Onit's Pro Forma Invoicing allows vendors submit invoices in a pre-finalization “Pro Forma” state so that, in tax-sensitive jurisdictions, the invoice can be reviewed and adjusted by the client before the vendor finalizes it against local government or tax specifications. The reviewer makes any needed line-item adjustments in Unity ELM, approves the invoice, and Unity ELM returns it to the vendor through Counsel Exchange for reconciliation and final submission.
Here's how to work with Pro Forma invoices in Counsel Exchange:
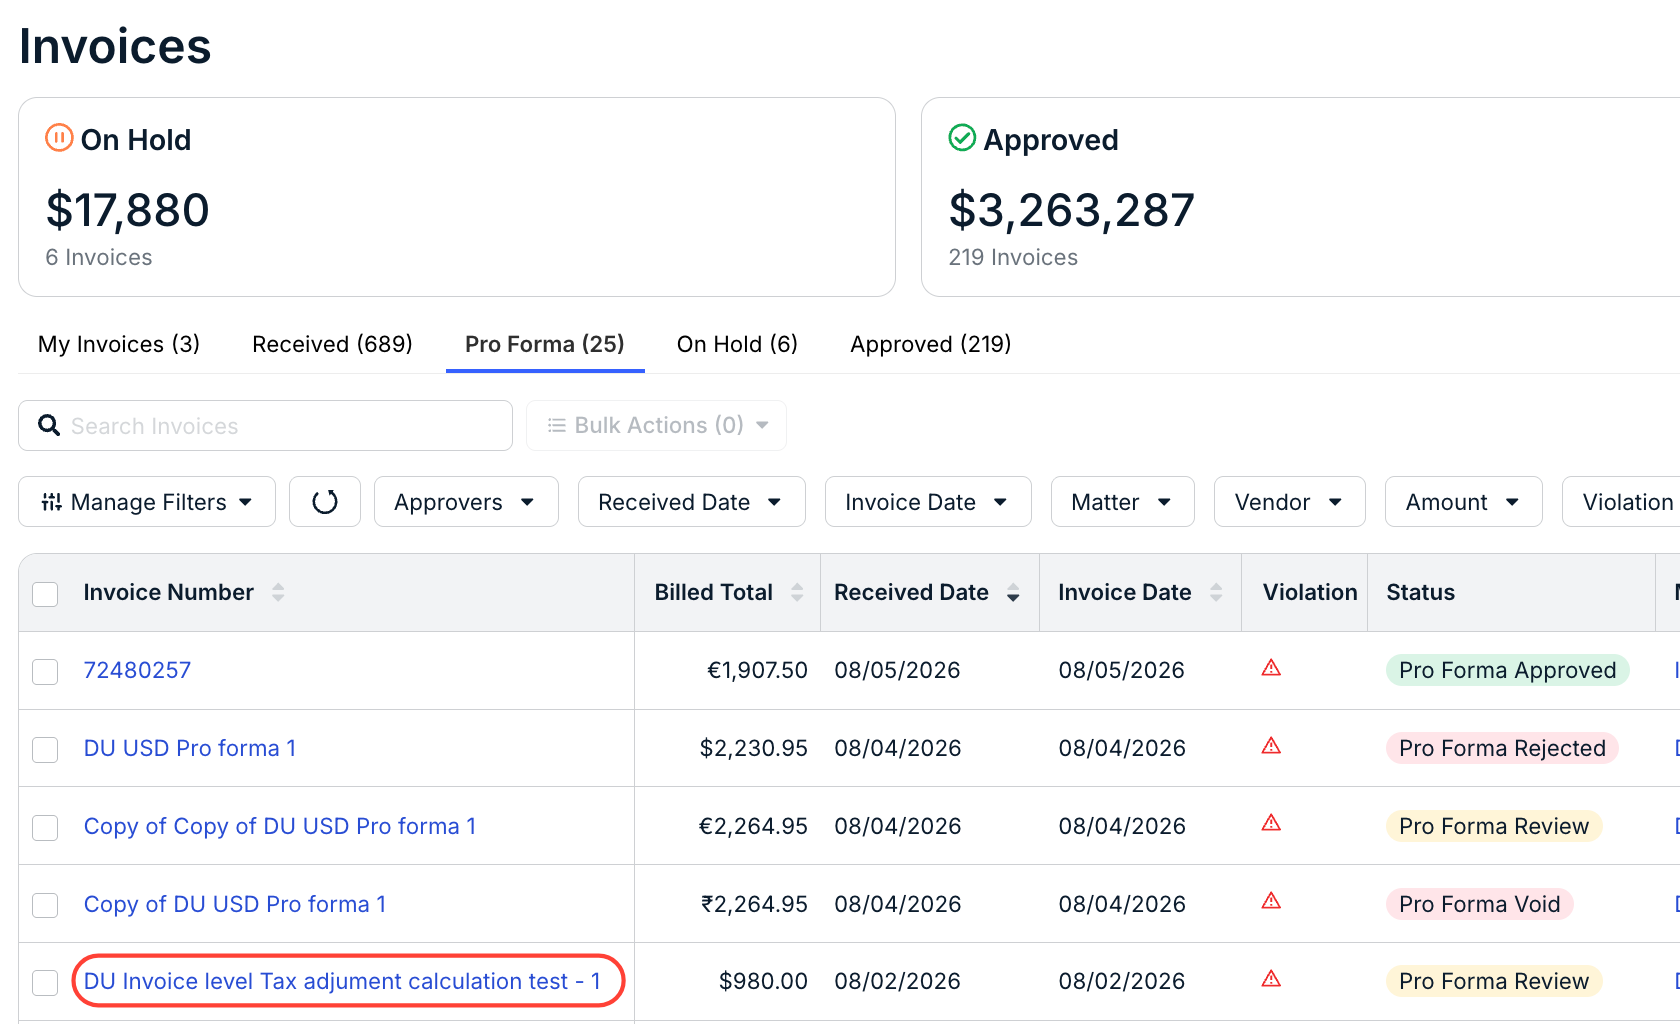
- Open the "Invoices" tab on the left-hand side menu in Unity and click on the "Pro Forma" tab.
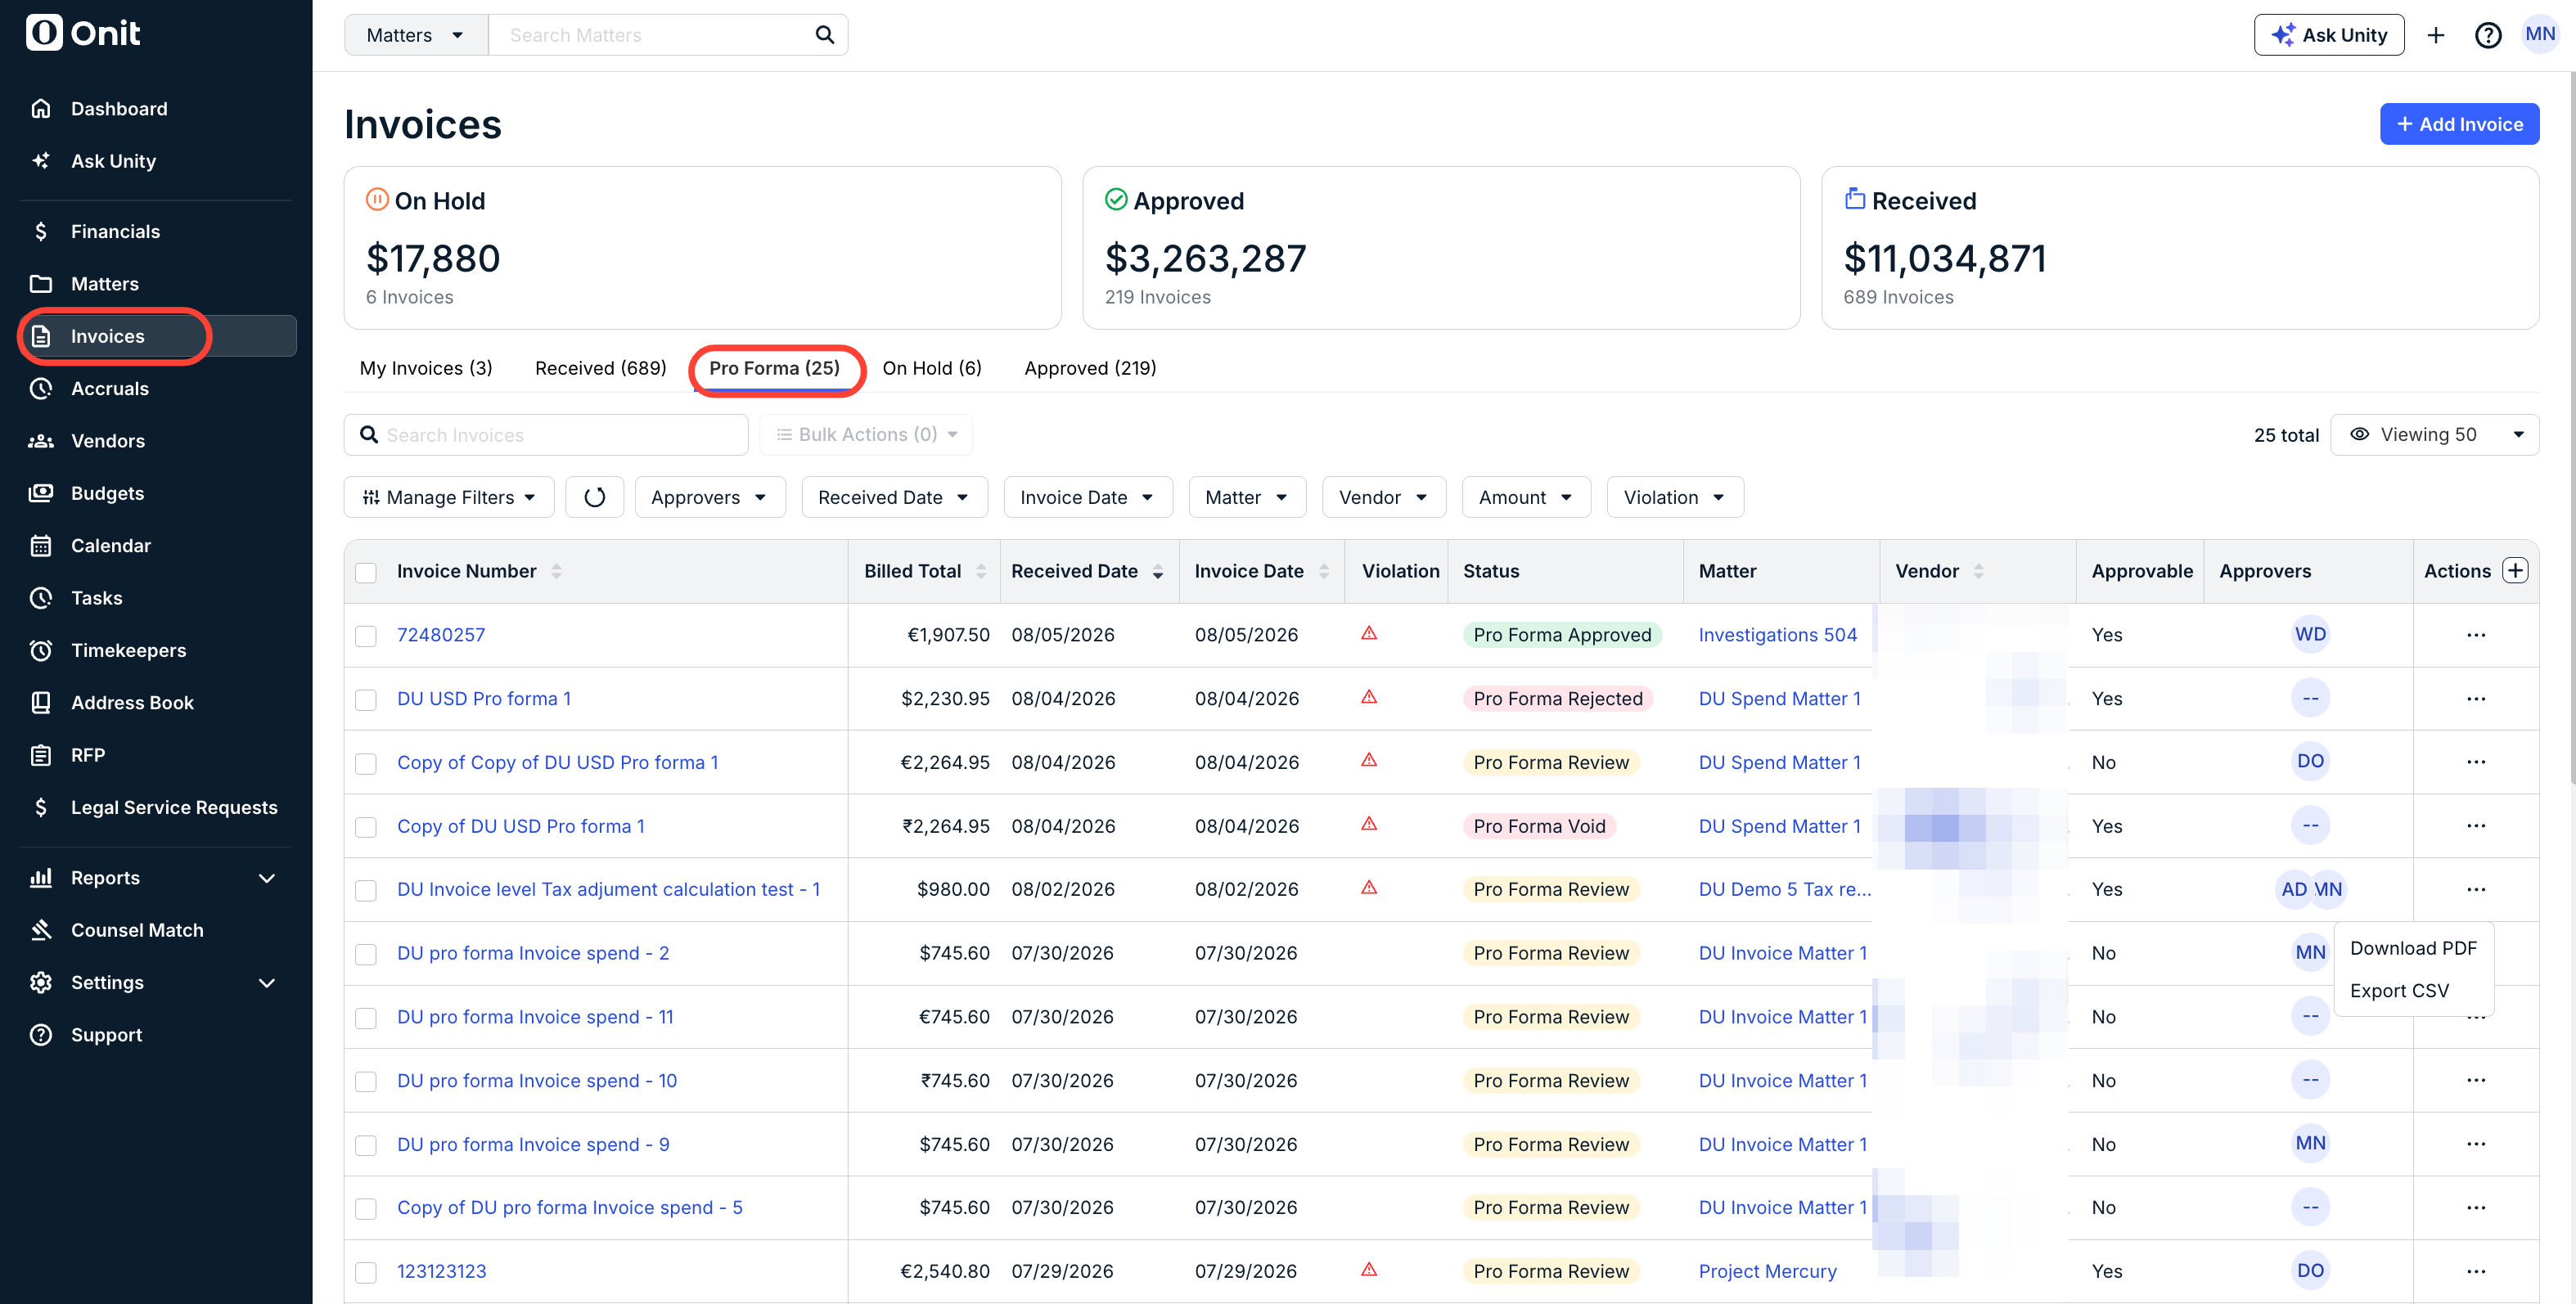
- On this page, you'll see key invoice information for Pro Forma invoices.
You'll see the Invoice Number, Billed Total, Received Date, Invoice Date, Violation status, Status, a Matter link, a Vendor link, whether it is Approvable or not, the Approvers, and any Actions (Download PDF, Export CSV). Use the Search Invoices to search through the different invoices; use the Manage Filters and the other drop-down menus to filter what you see on the screen. Use the Viewing drop-down menu to customize how many records you want to see.
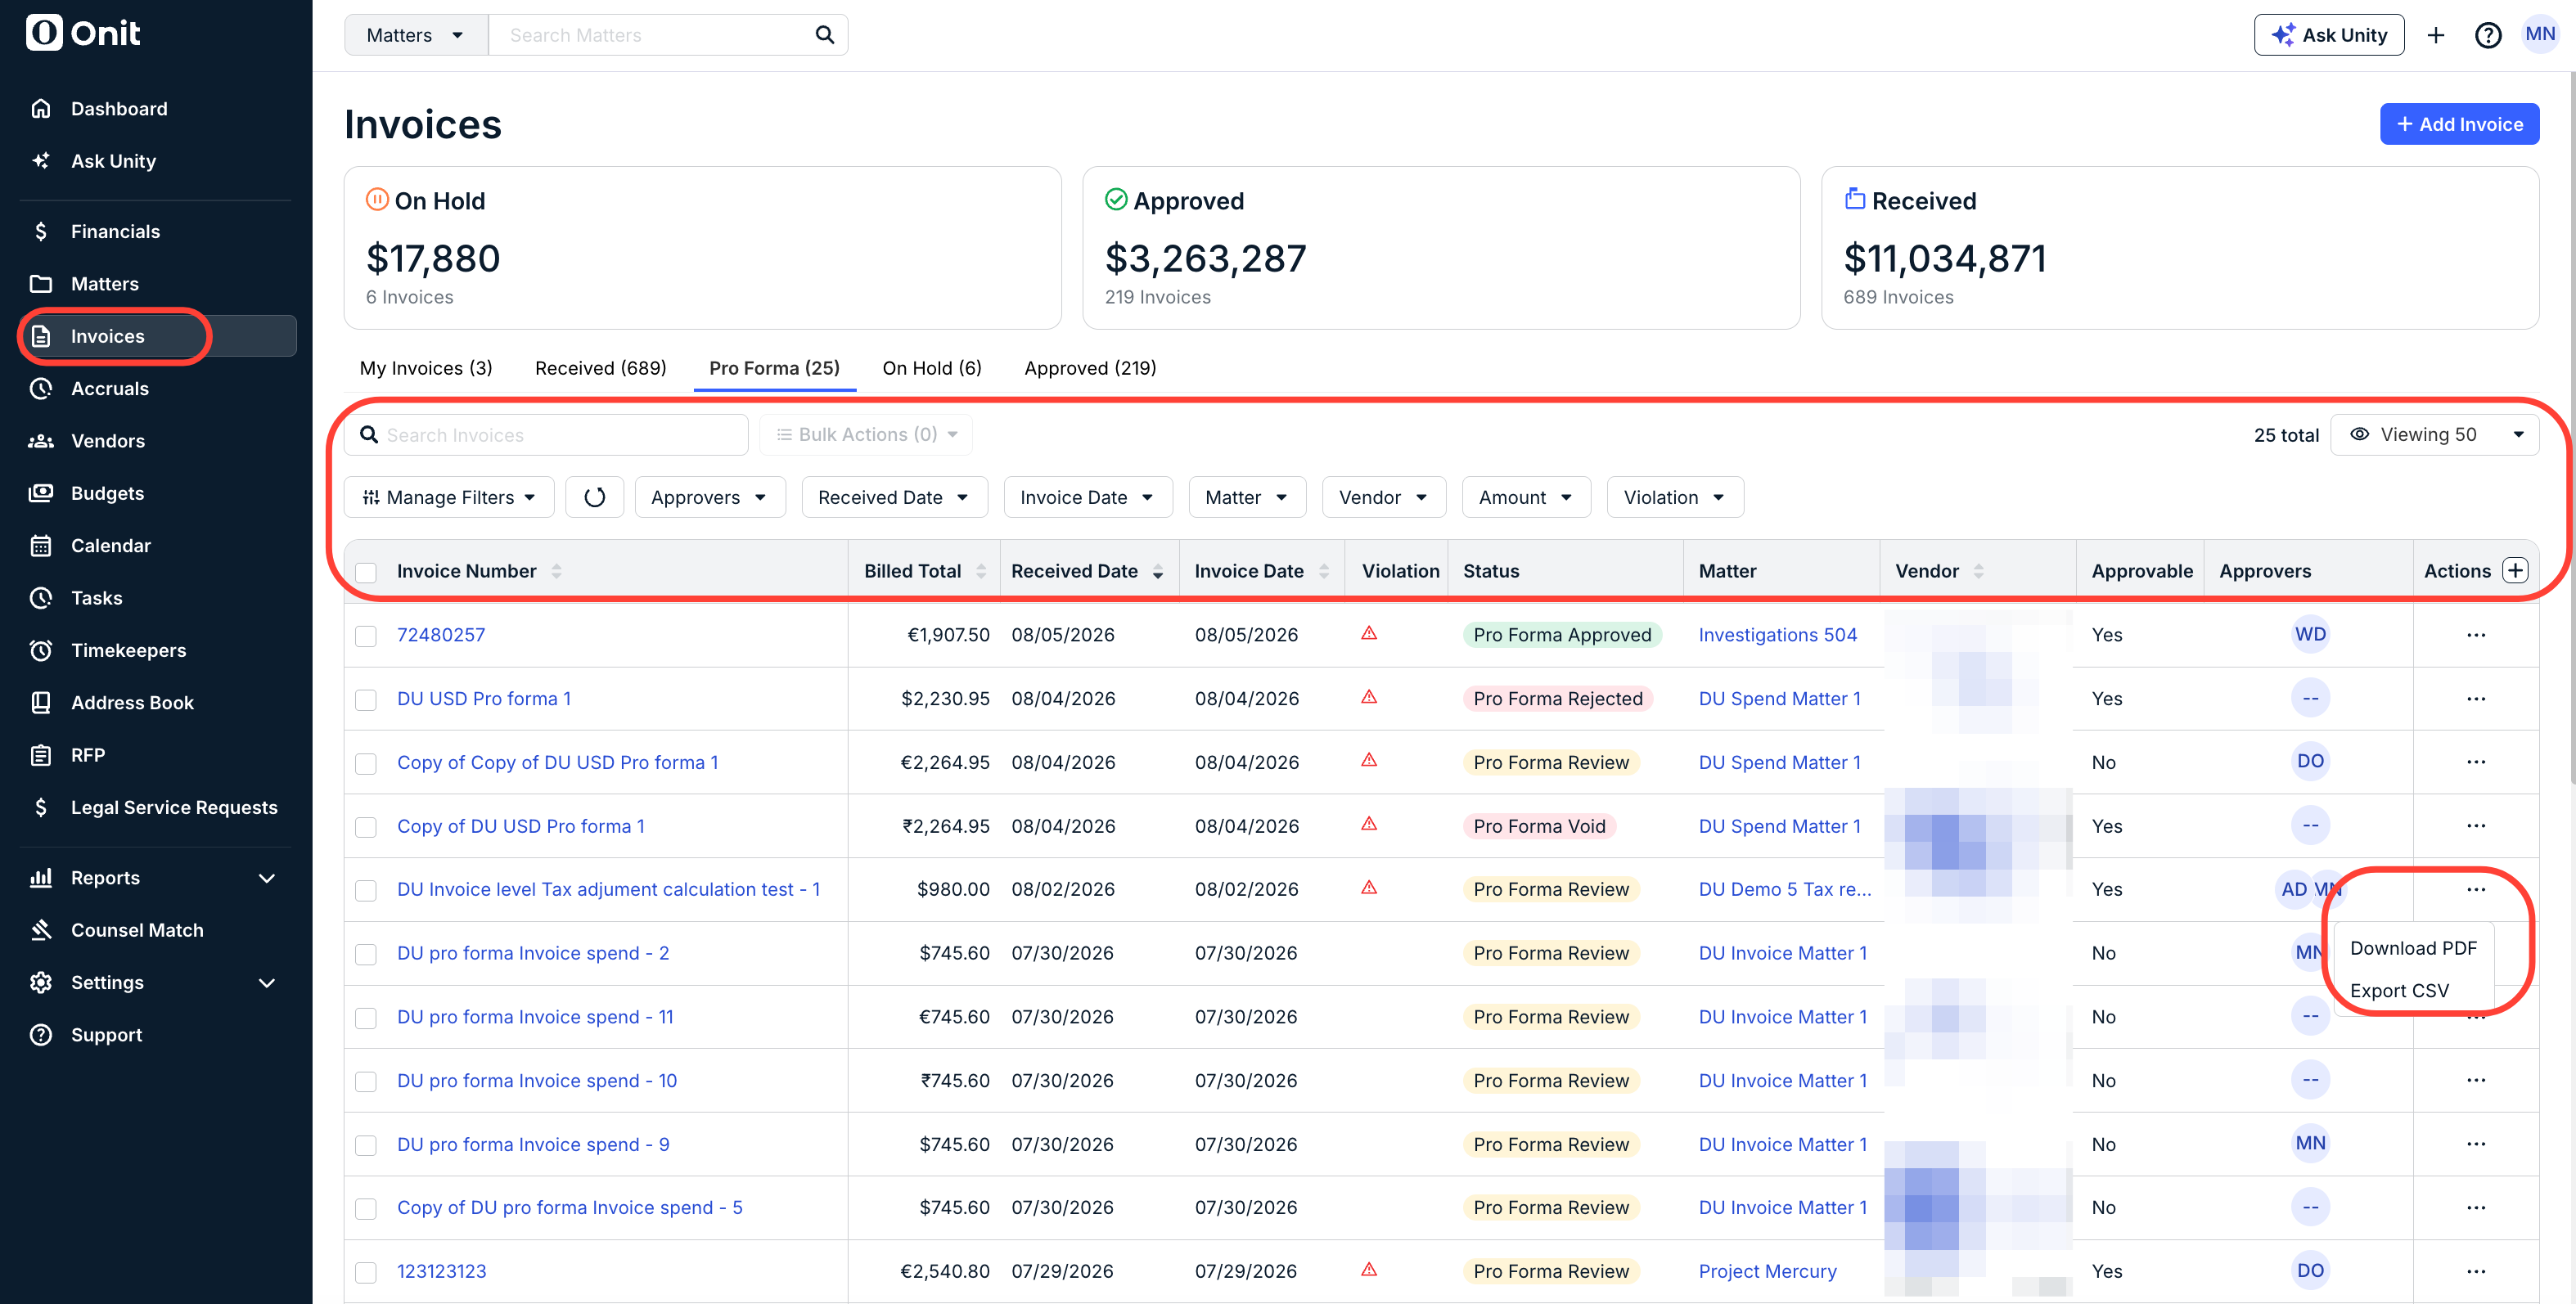
Use the Bulk Actions option and the check boxes on the side of the directory to bulk Download Attachments, Download CSV, or Download PDF.
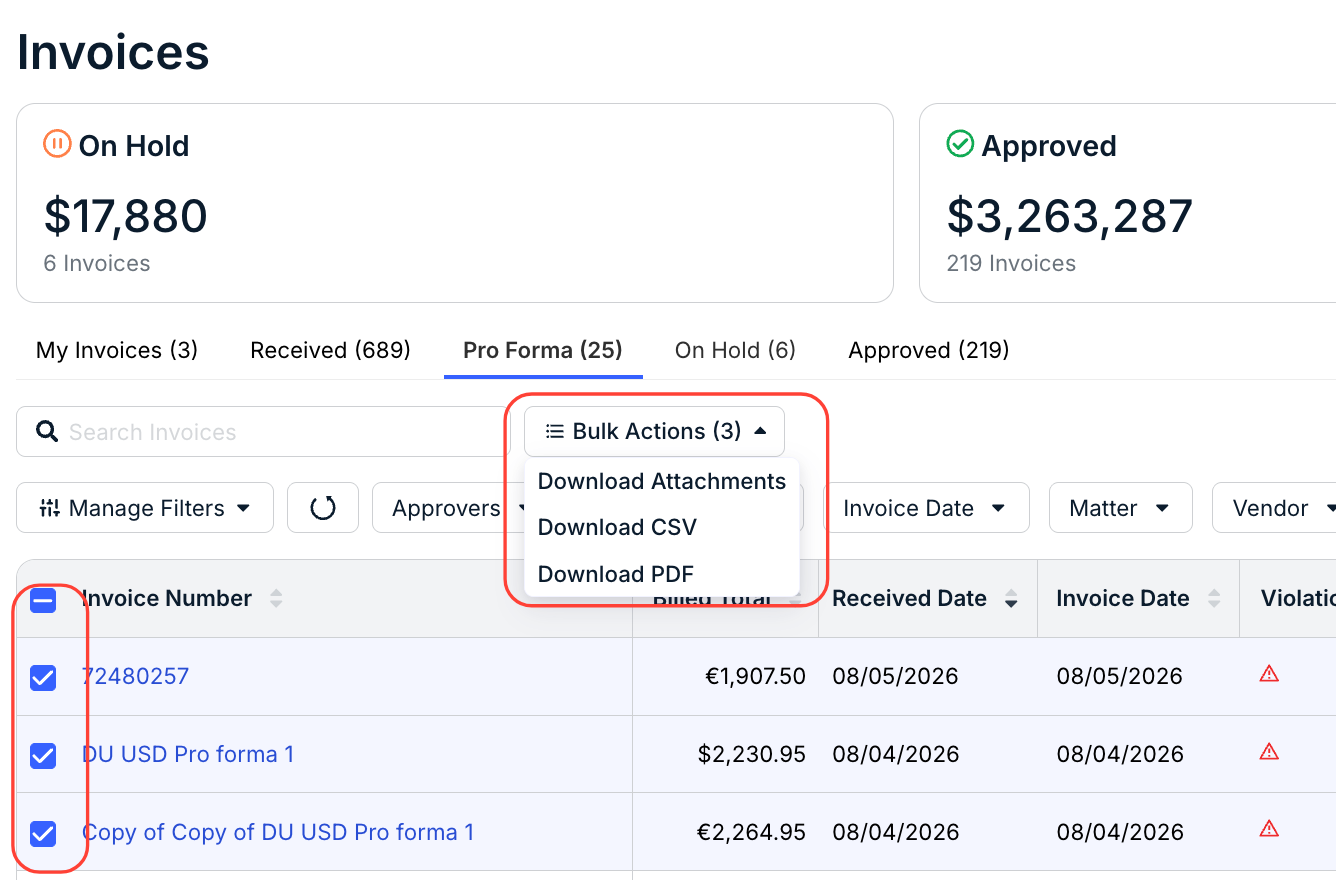
Note that you can click on My Invoices to quickly view the Pro Forma invoices you need to review.
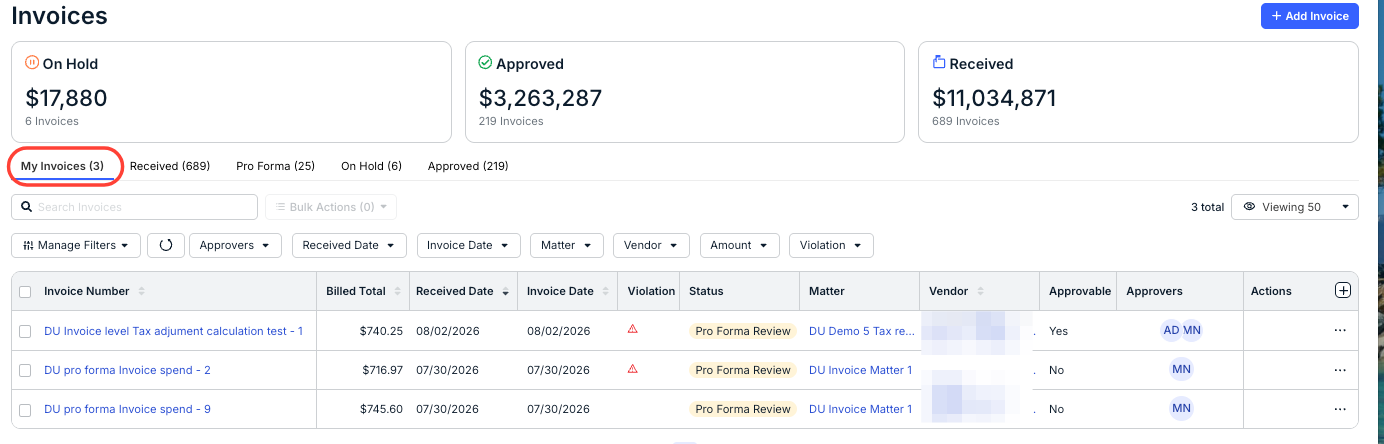
- Under the "Status" column, you'll see what status the invoice is in.
For Pro Forma invoices, these statuses are:
- Pro Forma Approved: Approved in your system and ready for payment.
- Pro Forma Rejected: Sent back to the vendor for adjustment.
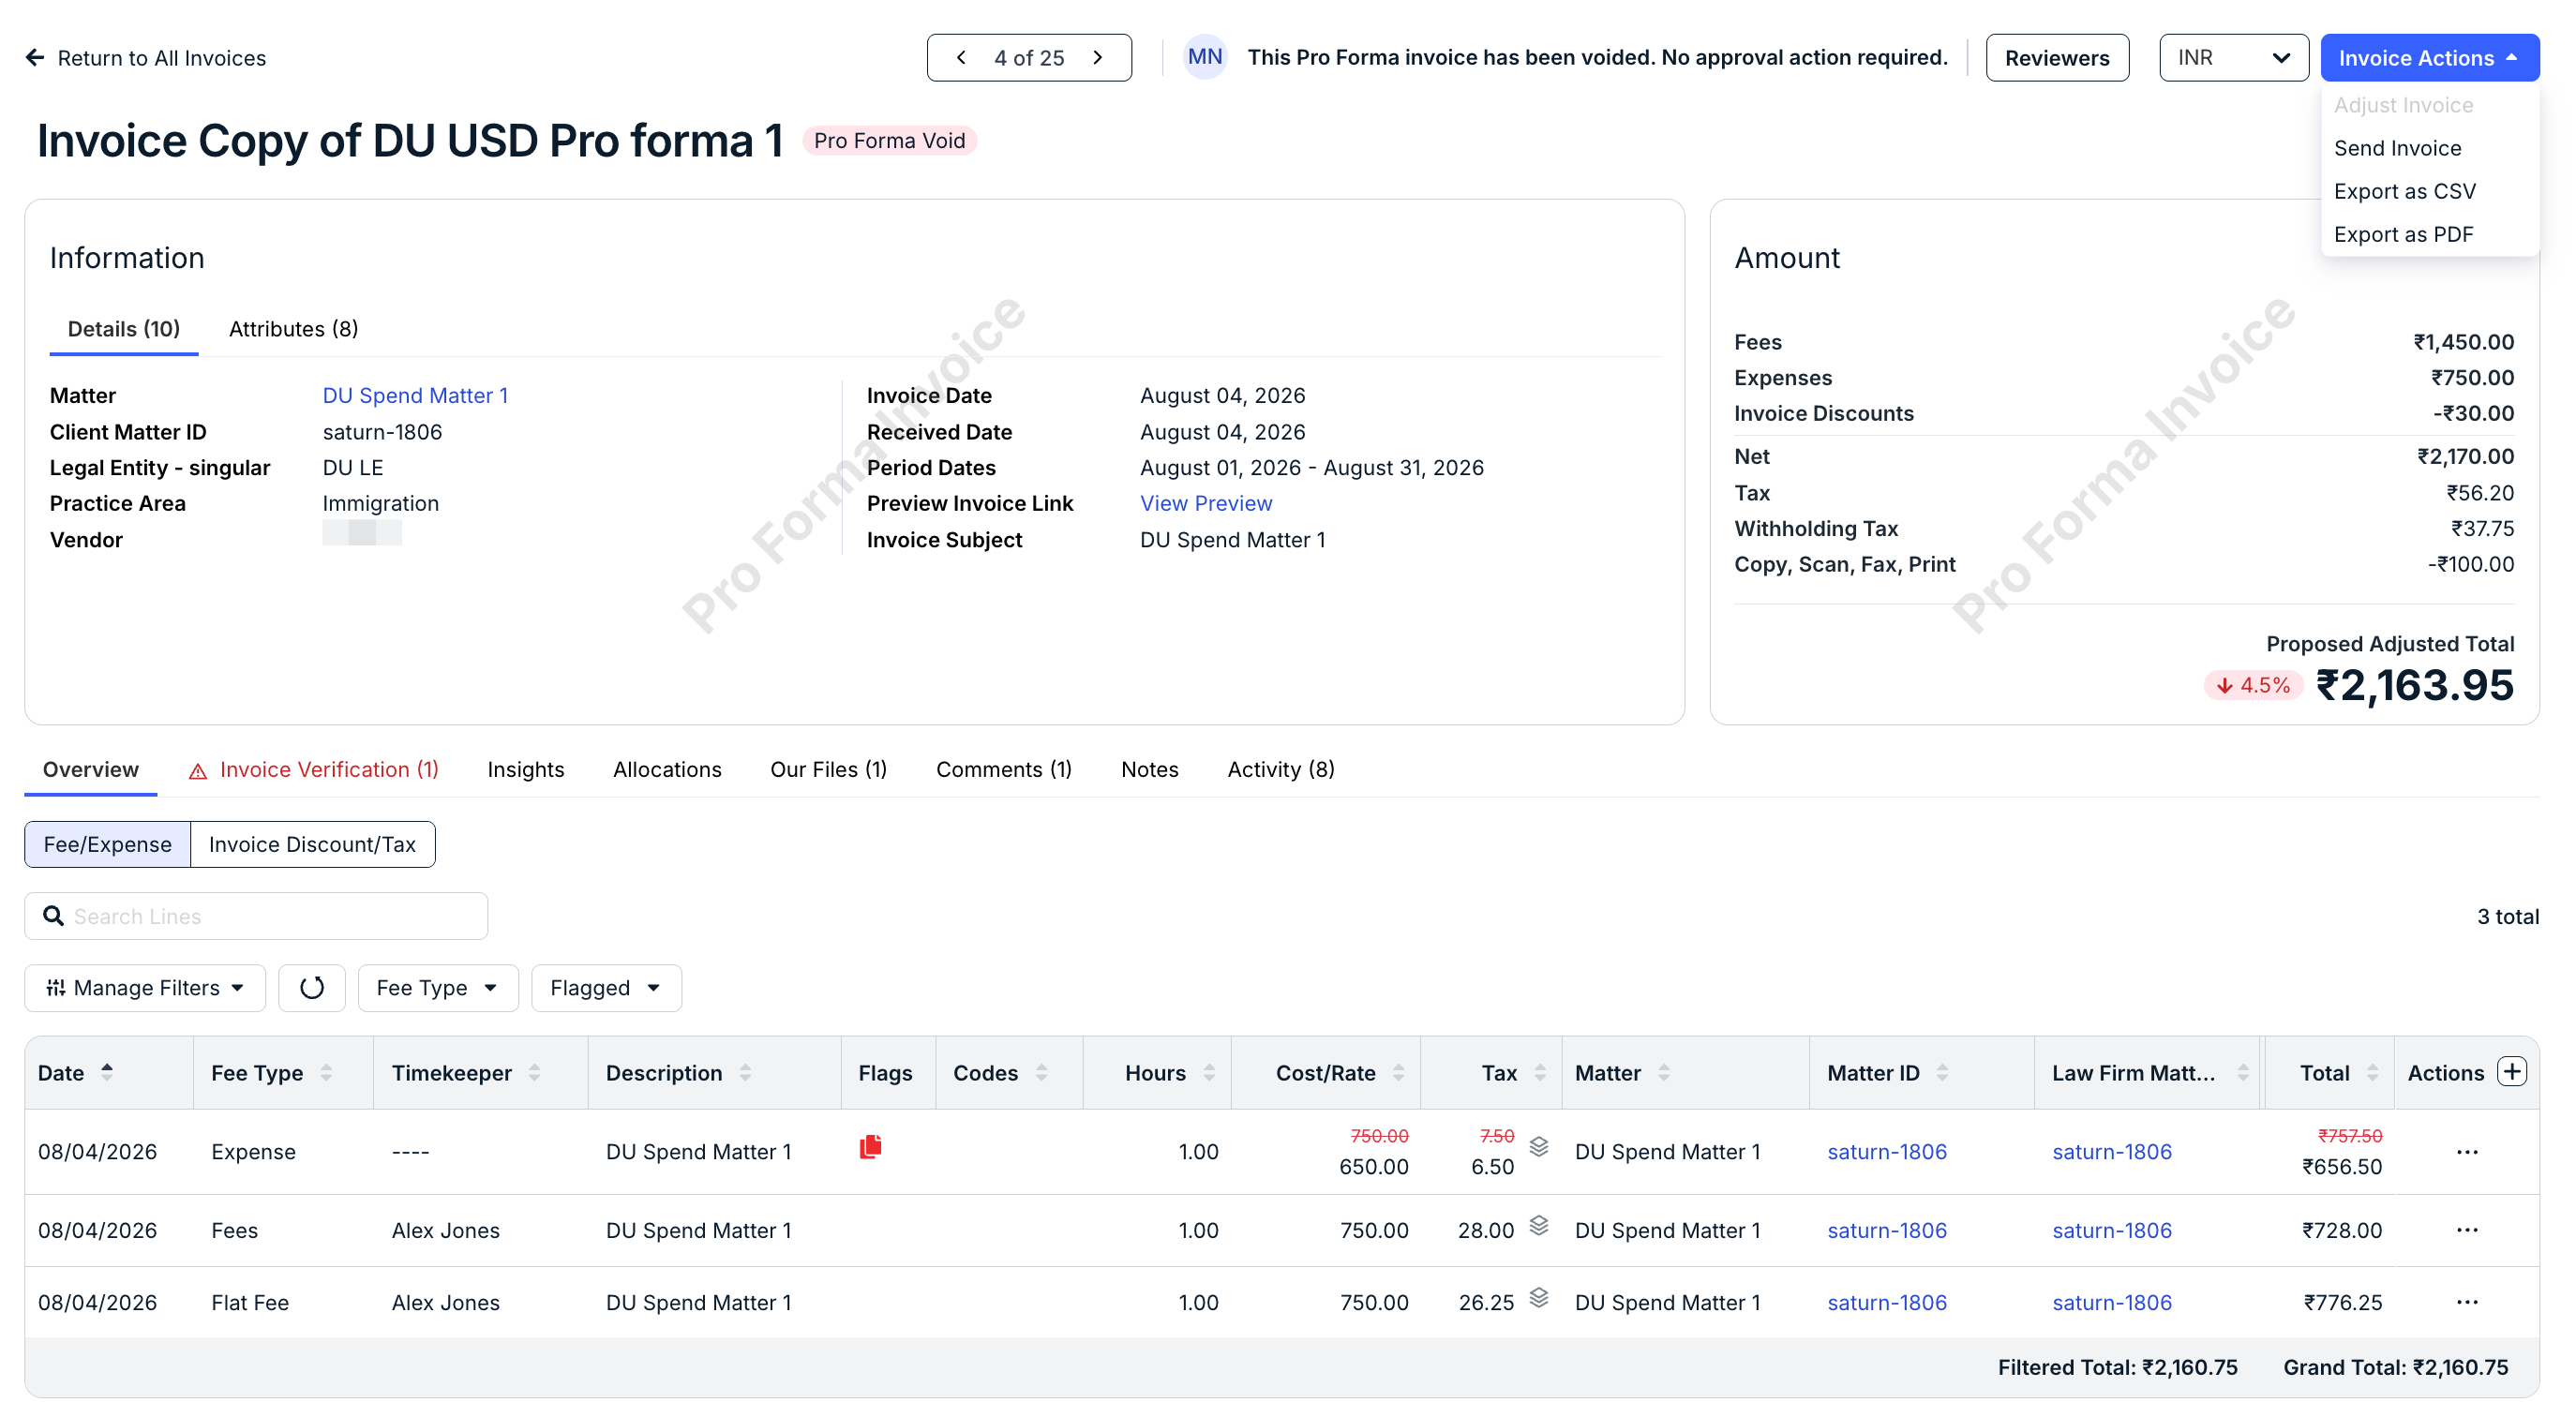
- Pro Forma Void: Voided by the vendor.
- Pro Forma Review: In Pro Forma review in your system.
- On this page, you'll see key invoice information for Pro Forma invoices.
- Open the Pro Forma invoice you want to review.
Click on the link under Invoice Number to open the invoice.
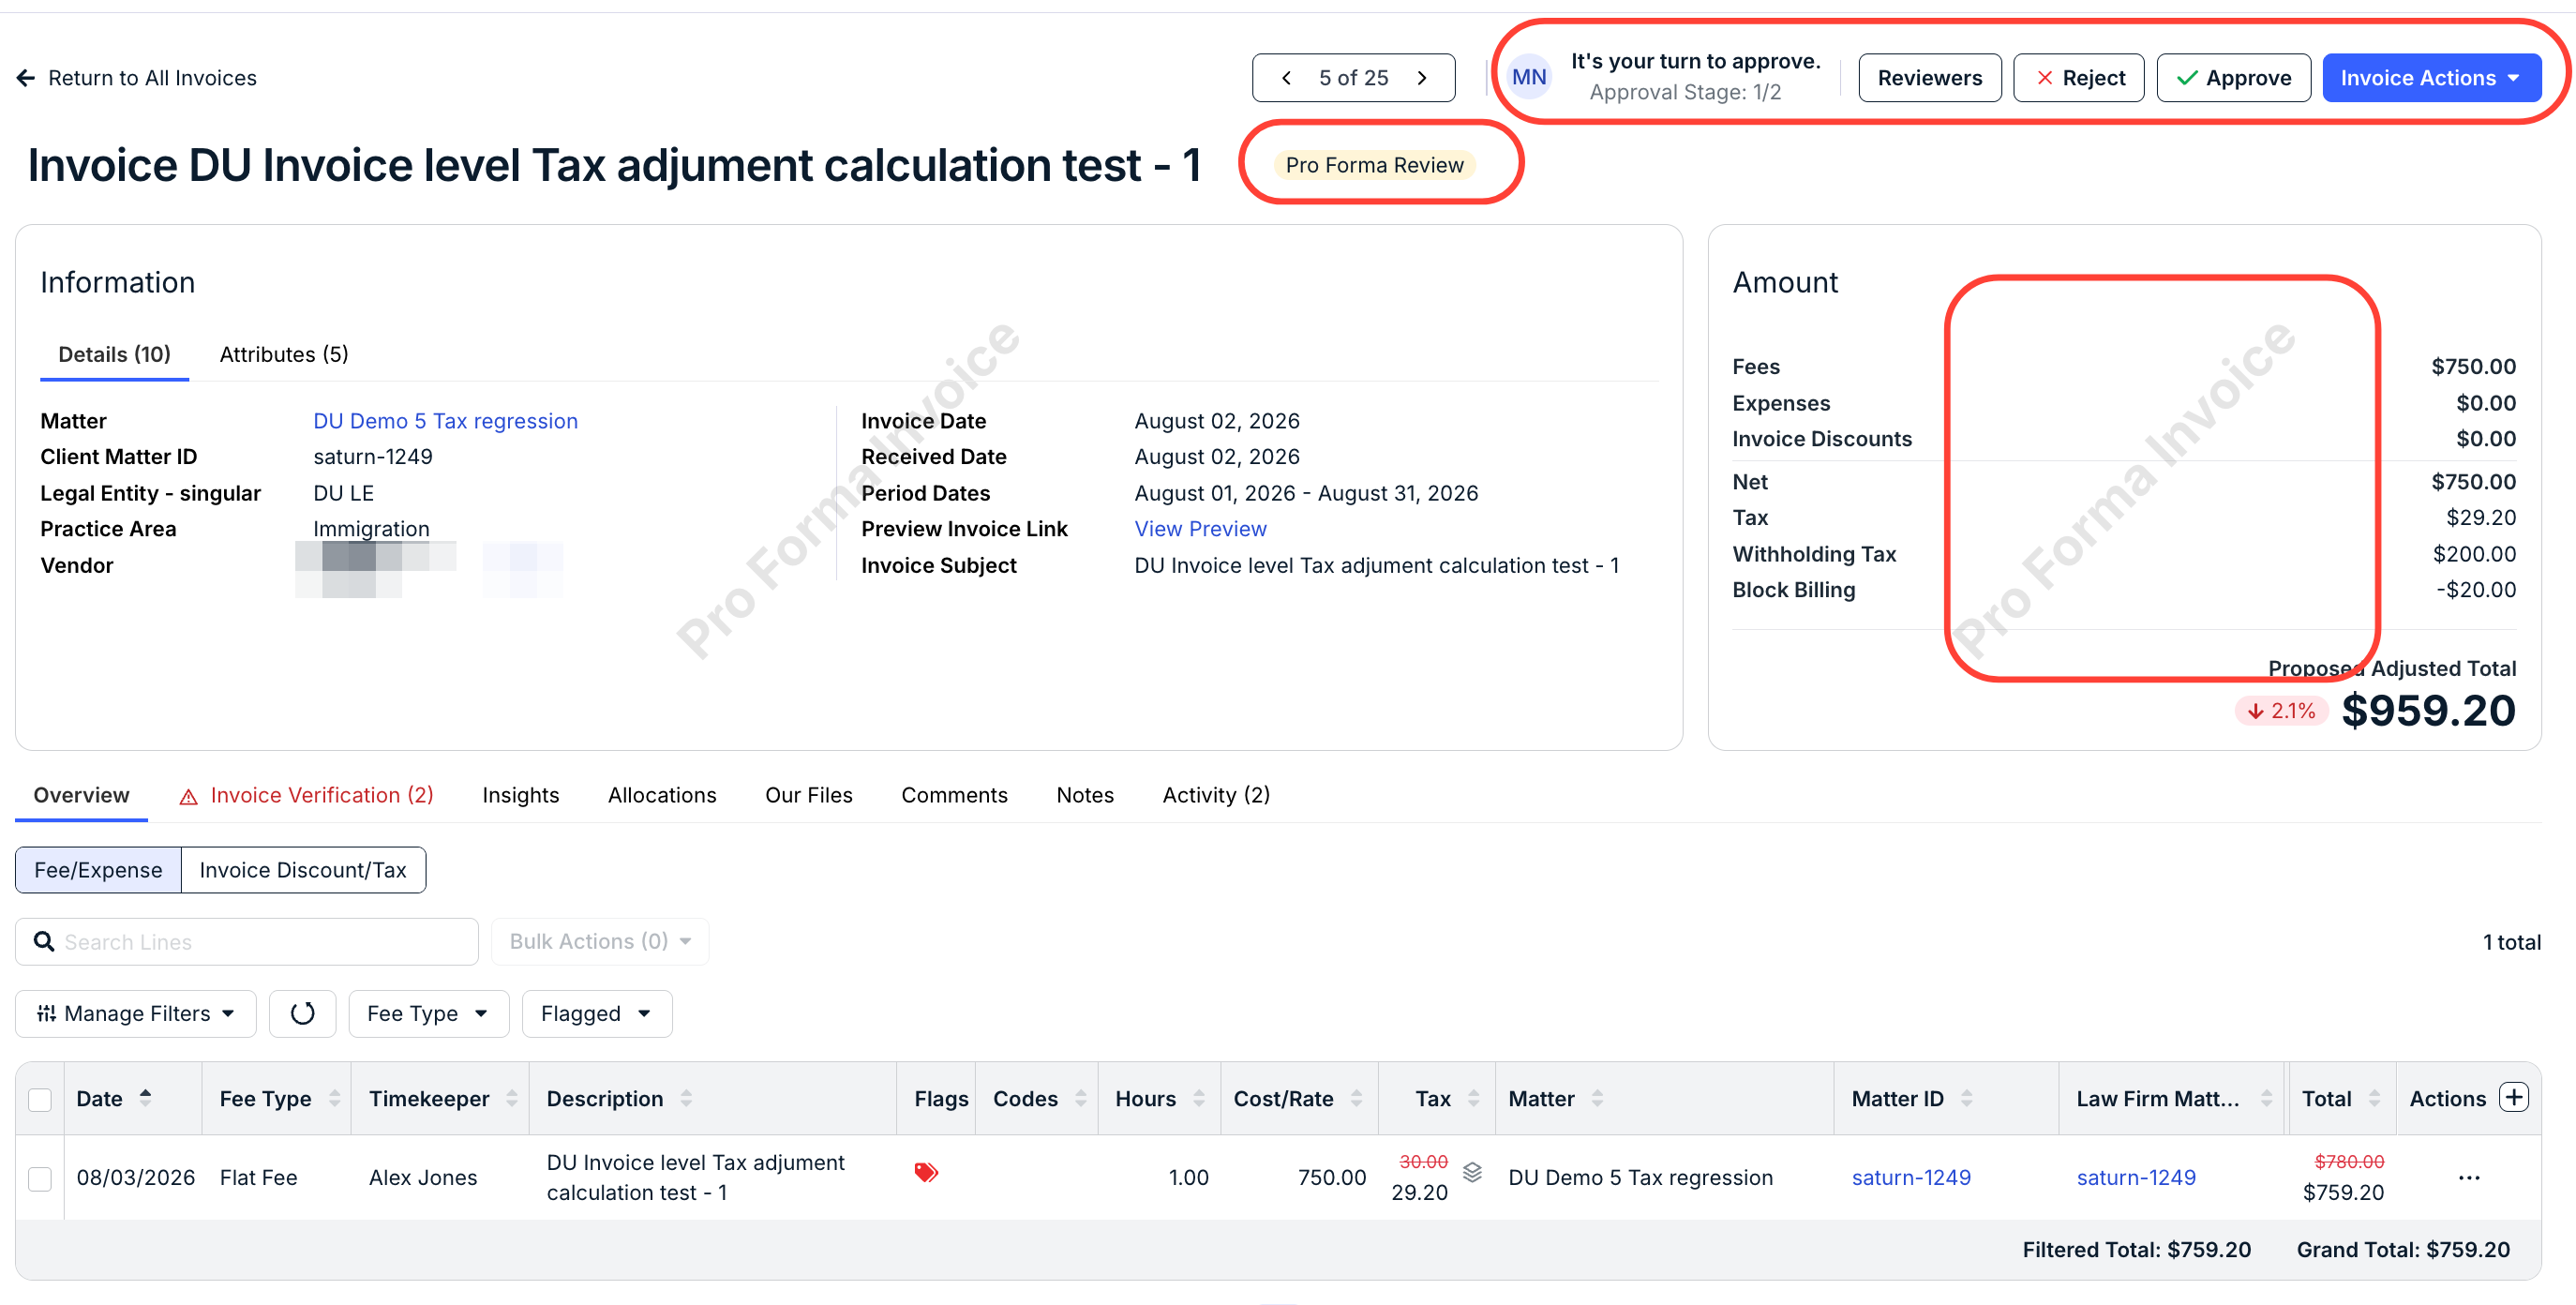
- You'll see the Pro Forma Review status badge at the top of the screen, next to the invoice title.
The approval bar at the top right shows where the invoice sits in the review cycle (for example, “It’s your turn to approve — Approval Stage: 1/2”) along with Reviewers, Reject, and Approve actions, and an Invoice Actions menu for adjusting, sending, or exporting the invoice.
Note that a diagonal "Pro Forma Invoice" is stamped across the main area of the invoice.
- If you are the designated reviewer, you can click Approve to move on to the next step or Reject to reject the invoice entirely.
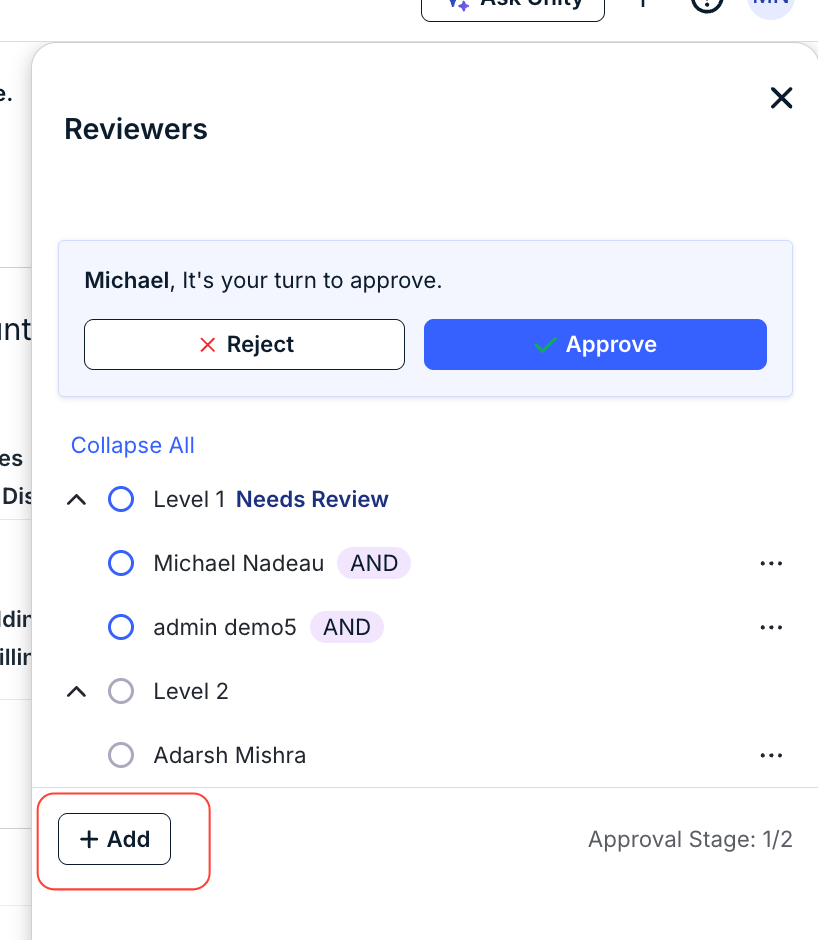
At the top of the screen, you'll see a summary of your role in the review process.

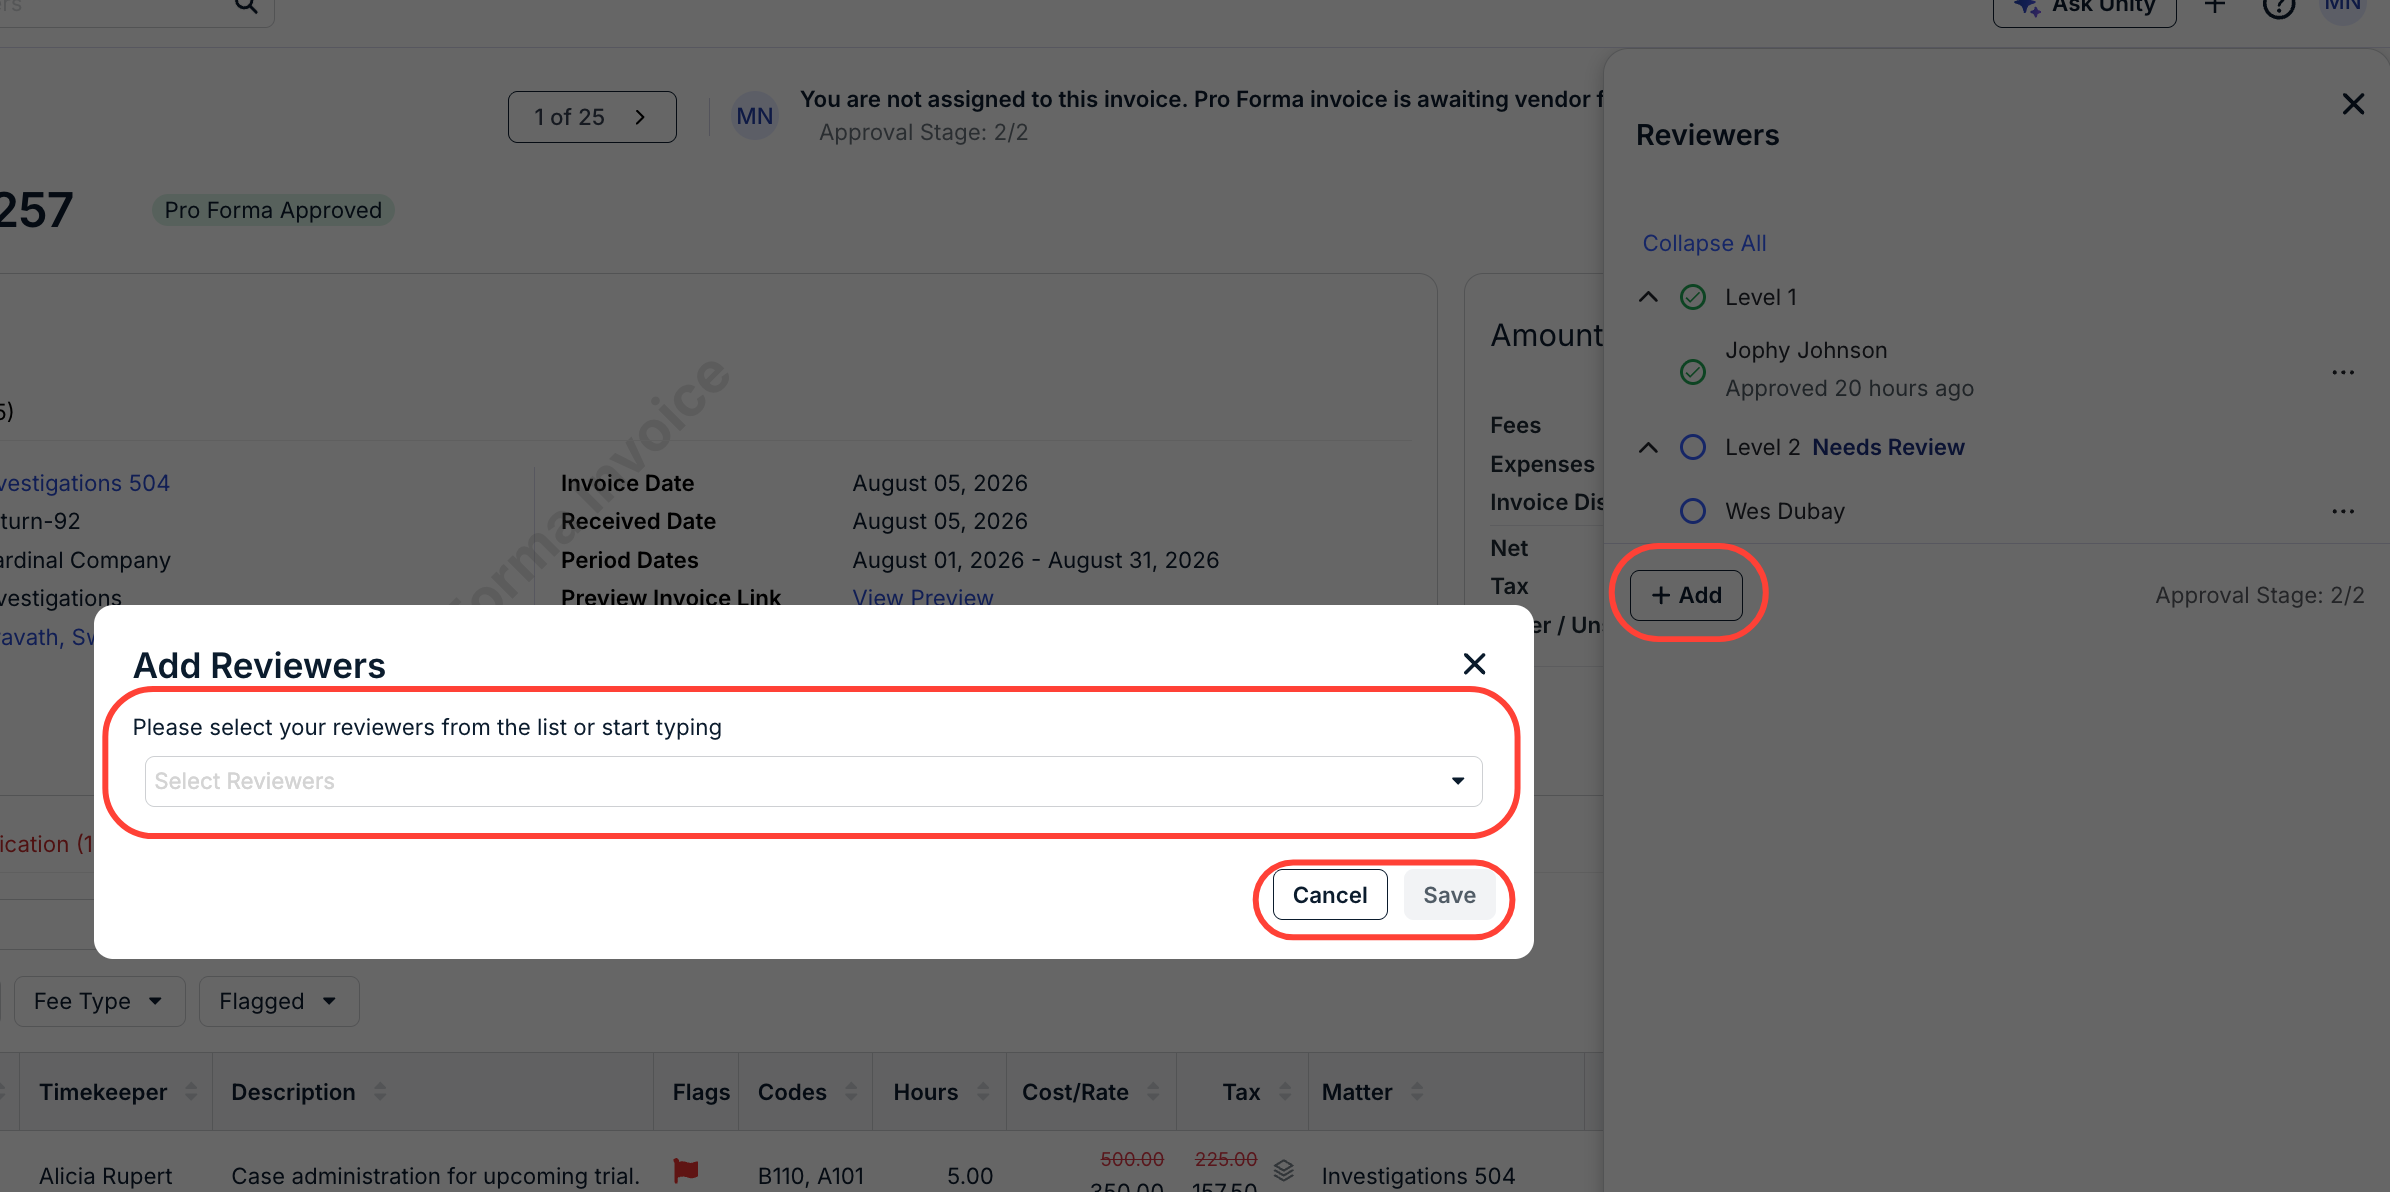
Click on Reviewers to see a full list of reviewers in the process; click Add to add another reviewer to the steps. You can also Reject or Approve from this screen.
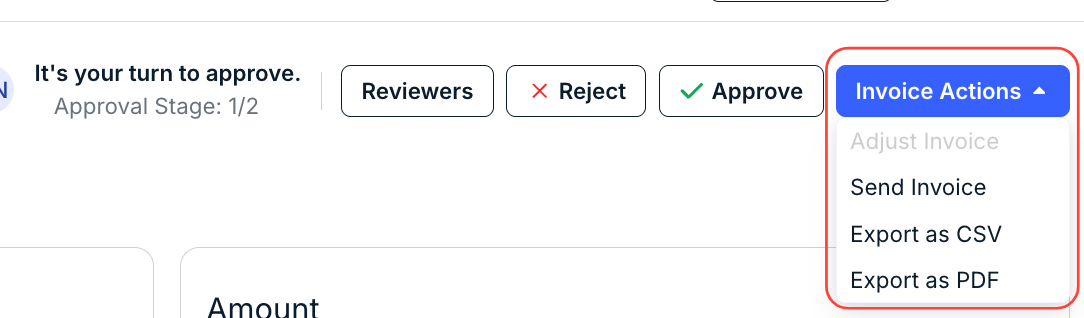
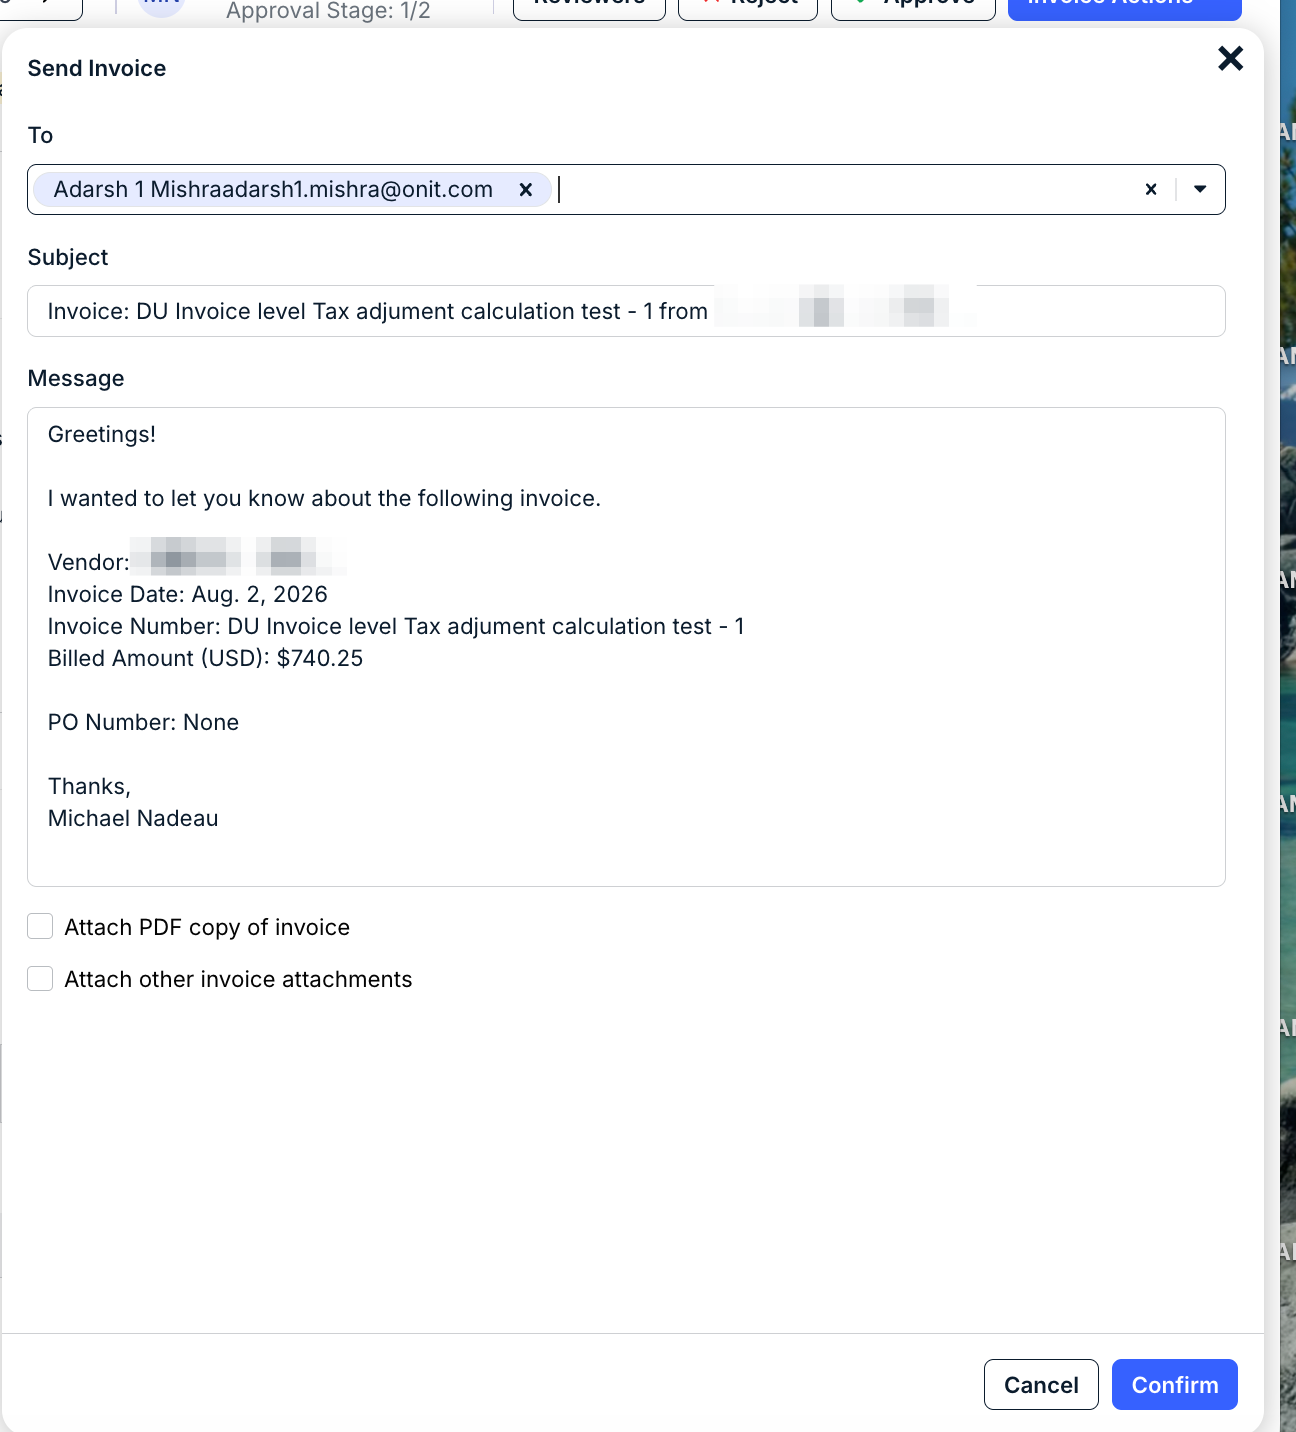
Under Invoice Actions you can Export as CSV, Export as PDF, or Send Invoice.
Clicking on Send Invoice allows you to send an email notification about the invoice to a contact. You can modify the Subject and Message, and you can also select to Attach PDF copy of invoice or Attach other invoice attachments. Click Confirm to send or Cancel to back out.
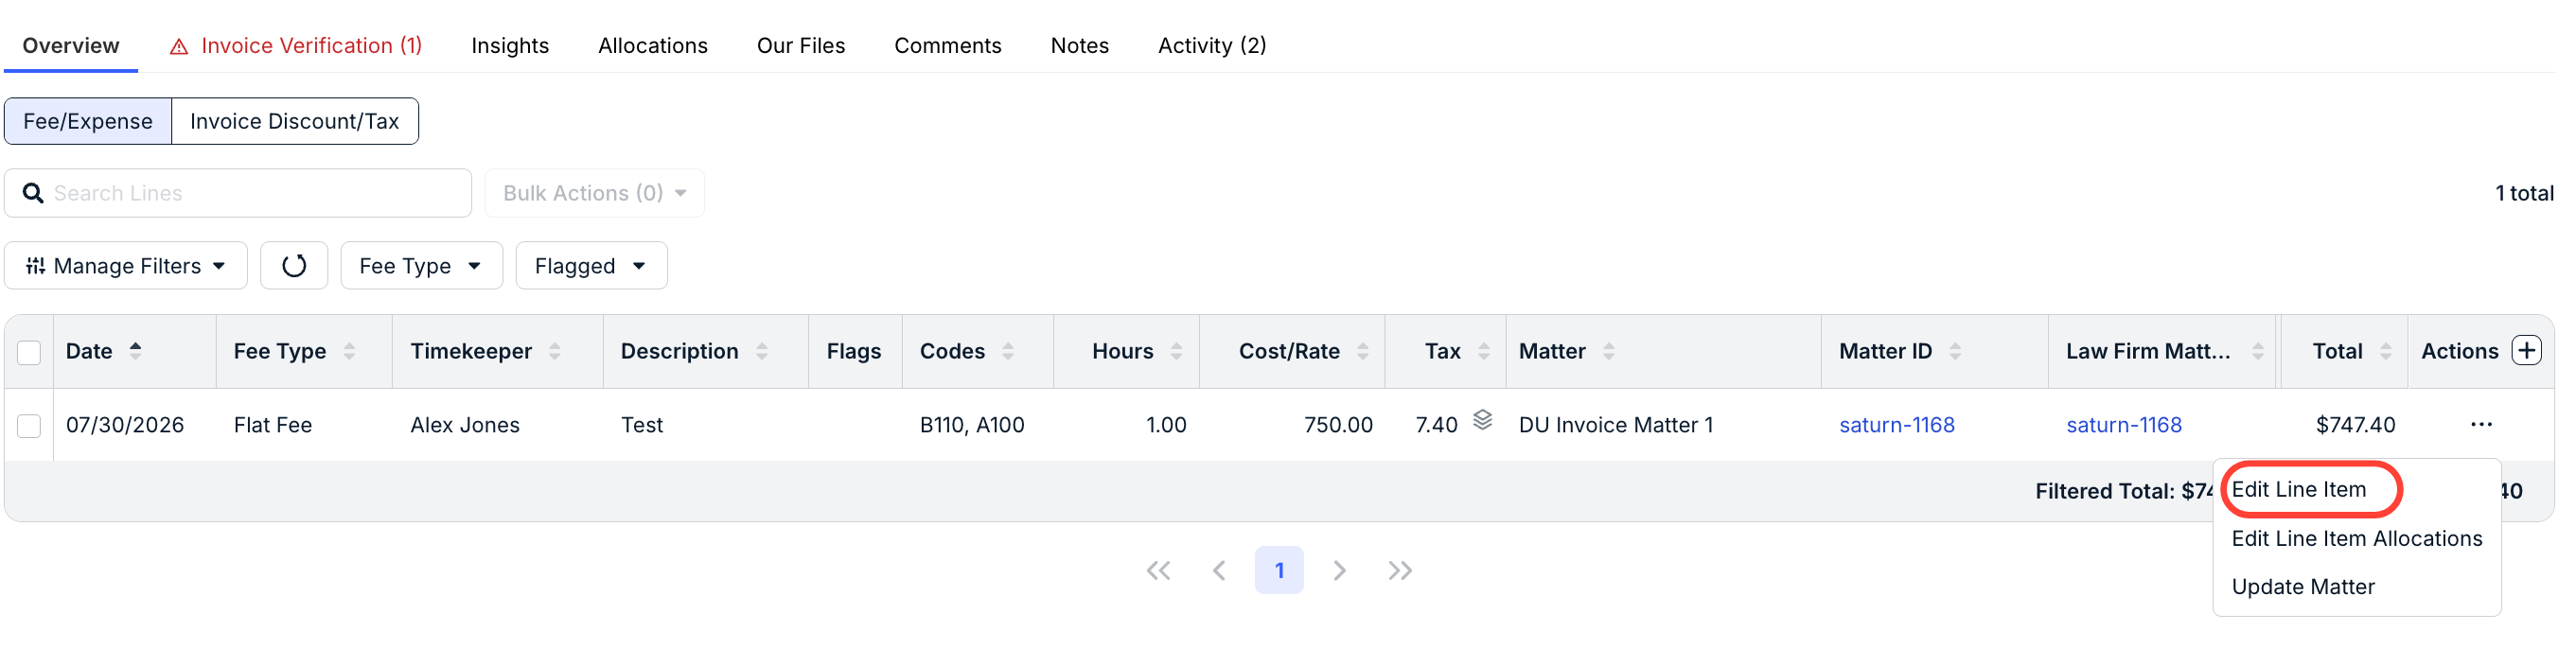
- Click on any line item or click "Edit Line Item" in the actions menu to make necessary adjustments before sending back to the vendor.
Check the box next to an individual line item to edit it on its own, or check the header-row checkbox to select every visible line item at once. Selecting one or more lines makes Adjust Line available from the Bulk Actions menu.
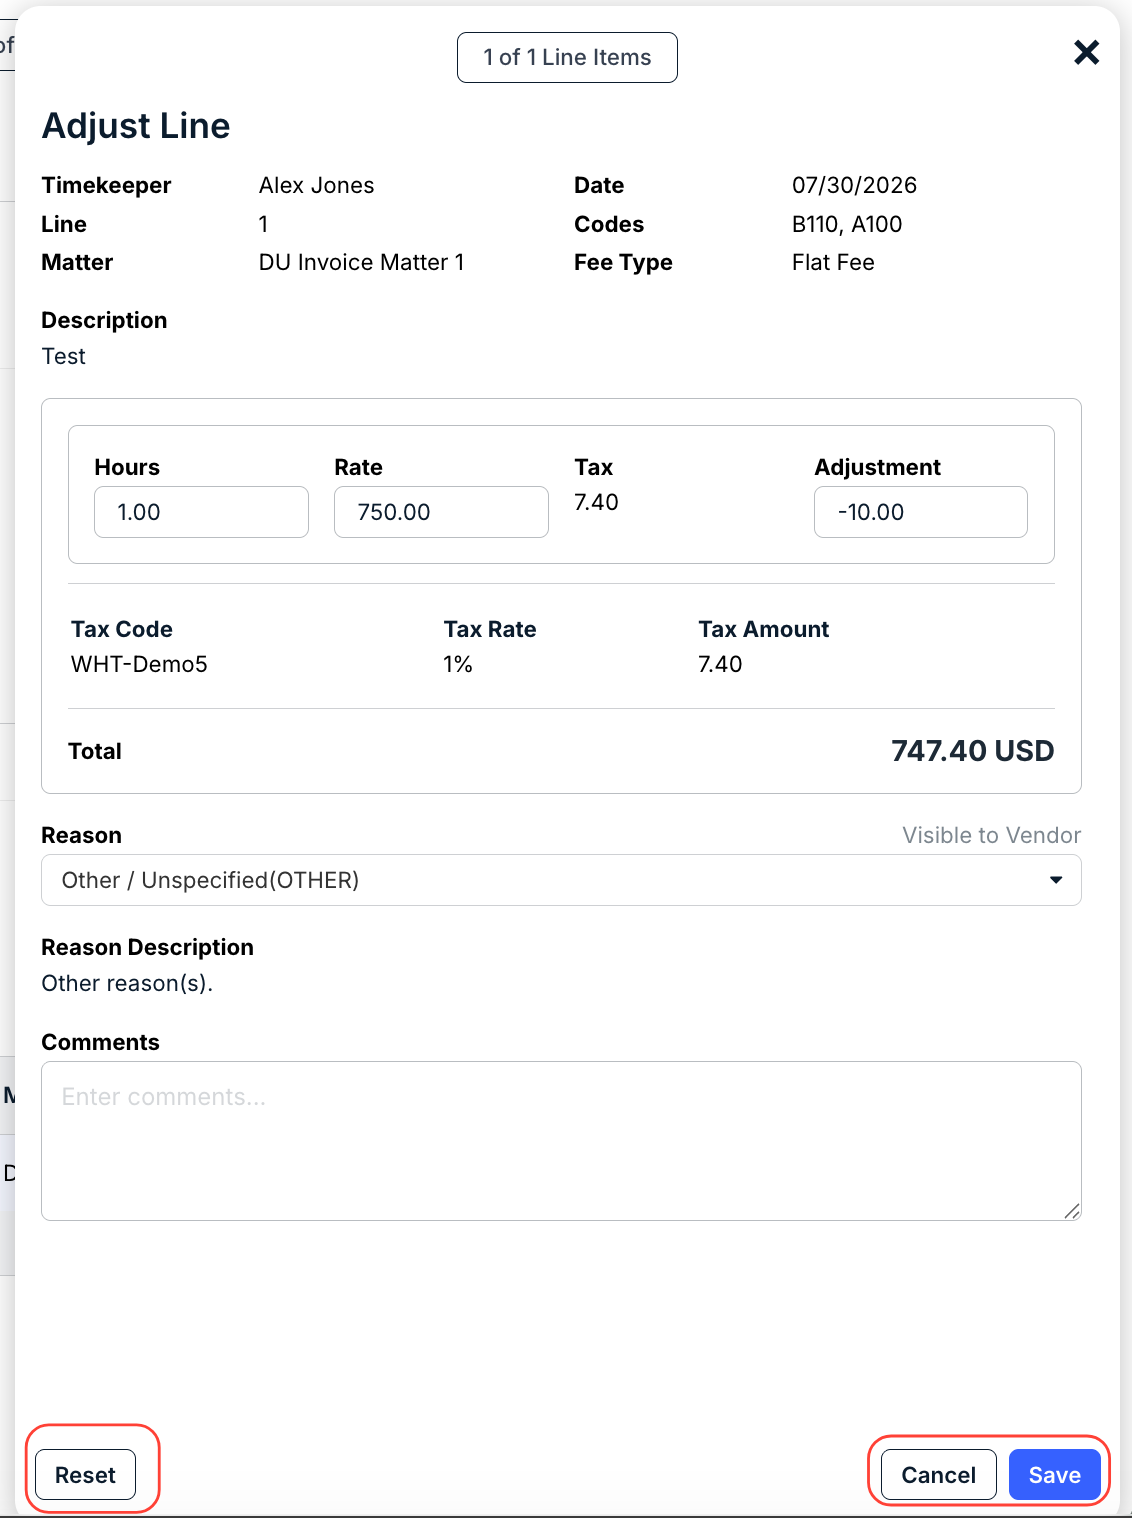
When you edit a line item, you'll open an Adjust Line panel on the right showing the line’s Description, any triggered Invoice Validation Rules, and the line’s Hours, Rate, and Tax. Enter your adjustment amount, and Unity ELM shows the affected Tax Code, Tax Rate, and recalculated Tax Amount for that line, plus the new line Total. Use the X of Y Line Items navigator at the top of the panel to move to the next selected line without closing it. Use the Reason drop-down menu to adjust the reason for adjustment.
You can also add any Comments needed for the vendor.
Click Save to save the adjustment, Cancel to back out, or Reset to remove your changes.
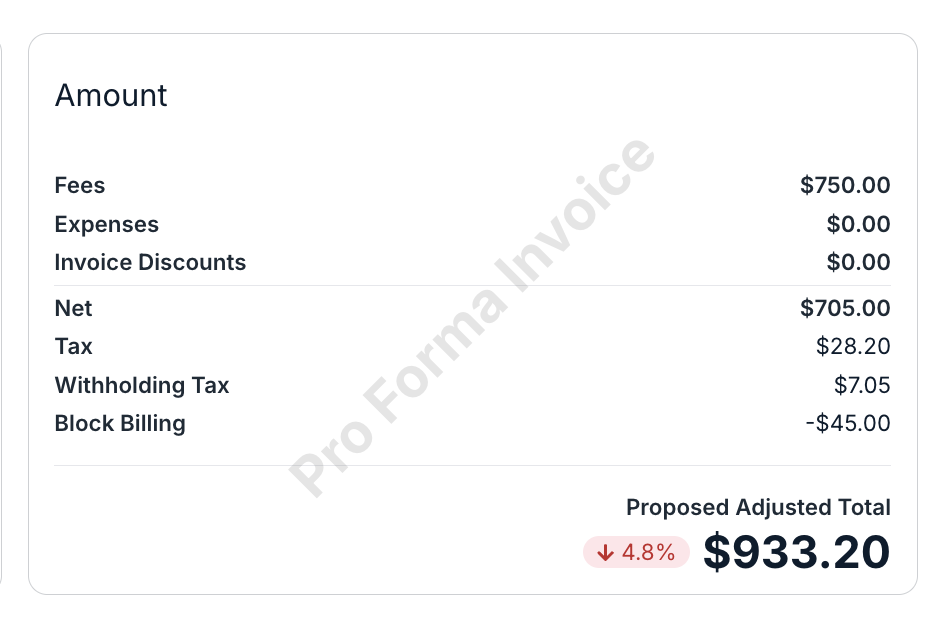
- Once all needed adjustments are applied, review the updated Proposed Adjusted Total in the Amount panel.
- Once you've finished your review, approve or reject the invoice.
Click Approve to send the invoice back to the vendor through Counsel Exchange for reconciliation. If the submission needs to go back to the vendor unreviewed — for example, if it was submitted in error — click Reject instead; rejected invoices show a Pro Forma Rejected status in the Invoices list.

- Once you approve, the invoice moves to the vendor in Counsel Exchange.
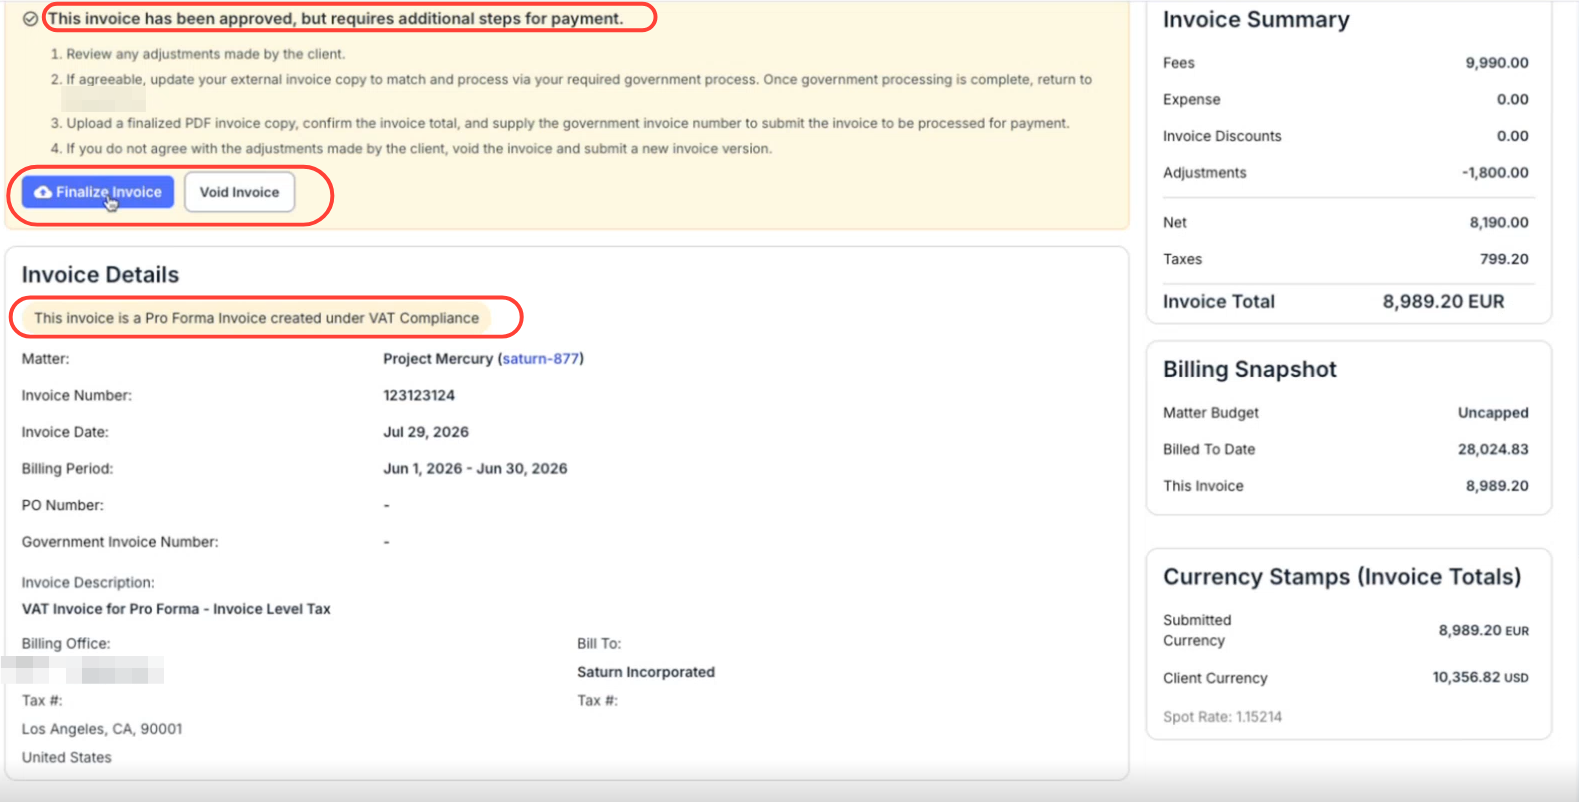
Vendors will see the invoice with a Pro Forma Approved status and a VAT tag. The vendor sees a banner confirming the invoice has been approved but requires additional steps for payment, along with an Invoice Summary that itemizes your Adjustments against the original Fees, Expenses, and Discounts, and a Currency Stamps panel showing the invoice total in both the submitted currency and the client’s currency.
From here, the vendor follows the steps Counsel Exchange lays out for them:
- Review the adjustments made by the client.
- If agreeable, update their external invoice copy to match and process it through their local government requirements. Once government processing is complete, they return to Counsel Exchange.
- Click Finalize Invoice to upload the finalized PDF invoice copy, confirm the invoice total, and supply the Government Invoice Number so the invoice can be submitted for payment.
- If the vendor does not agree with your adjustments, they click Void Invoice instead and submit a new invoice version. This starts the Pro Forma review over rather than proceeding to payment.
When the vendor finalizes, Counsel Exchange validates that the amount they entered matches your approved amount and that a Government Invoice Number is present. Once validated, the invoice appears in Unity ELM as Approved and proceeds to payment processing.
No action is needed from you during this stage unless a secondary approval step has been configured for your implementation, the vendor voids and resubmits, or the vendor’s submission fails validation. In any of those cases, the invoice will surface back in your queue for attention.
- If you are the designated reviewer, you can click Approve to move on to the next step or Reject to reject the invoice entirely.
- Note that you'll have different invoice options for Pro Forma invoices in different statuses.
- For Pro Forma Rejected status, you can view the reviewers and commit the standard invoice actions.
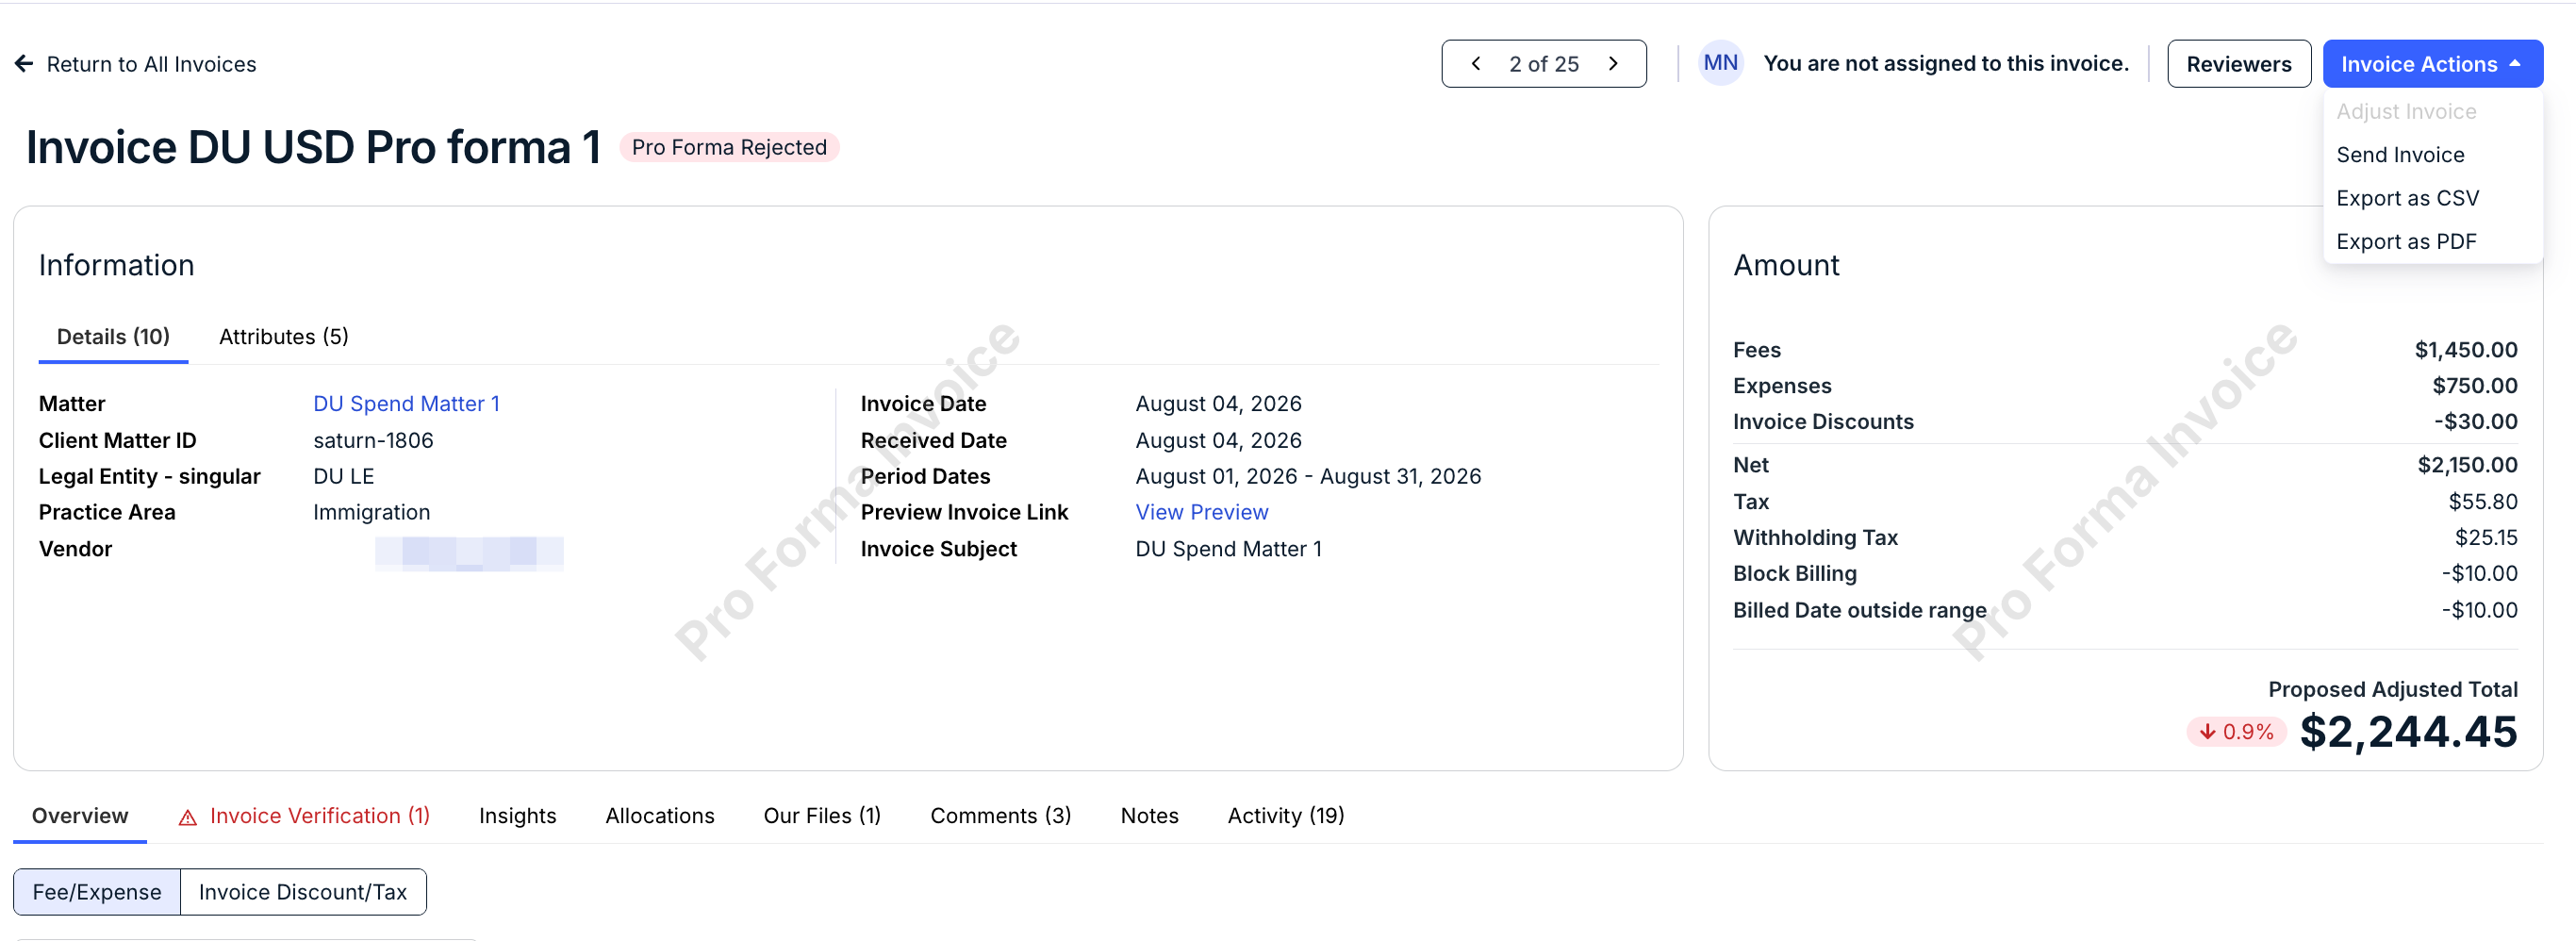
- For Pro Forma Approved, you can see the reviewers (and add reviewers if necessary), adjust the currency to view the adjusted totals, and commit the standard invoice actions.

After clicking on Reviewers, you can use the pop-up drop-down menu to add reviewers to the existing list. Click Save to save changes or Cancel to back out.
Use the currency drop-down to see the adjusted total in your selected currency.
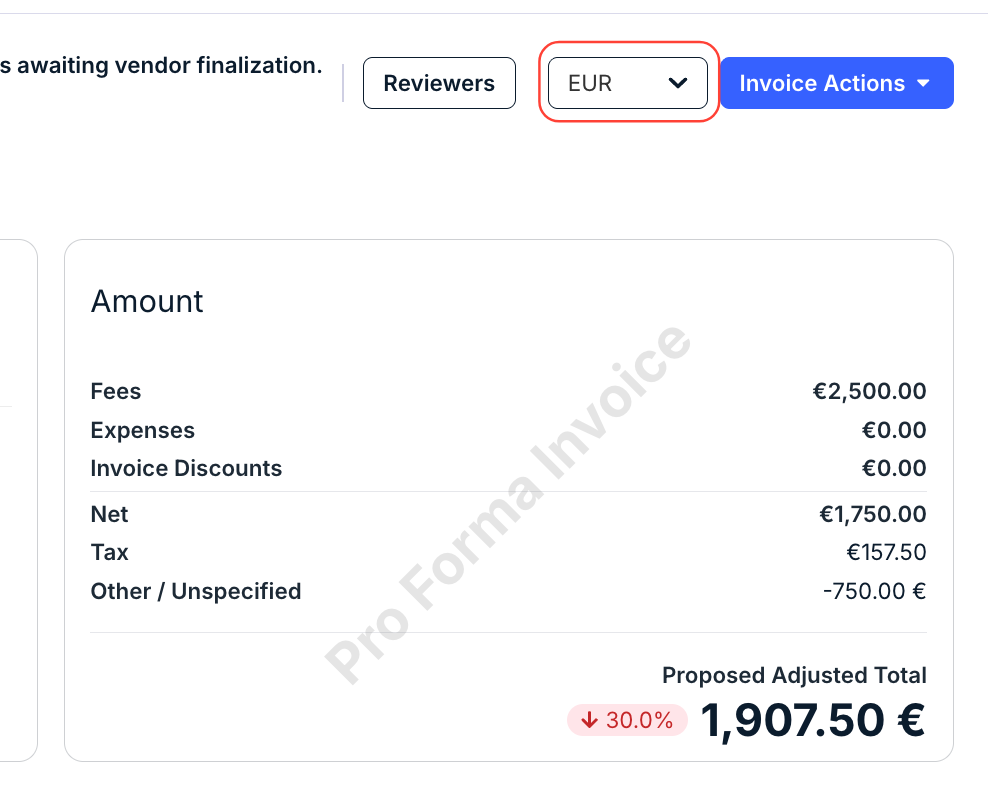
- For Pro Forma Void, you can see the reviewers, adjust the currency to view the adjusted totals, and commit the standard invoice actions.
- For Pro Forma Rejected status, you can view the reviewers and commit the standard invoice actions.