This article covers how to create tasks from scratch and how to create tasks from templates added by admins in your environment (if applicable).
Create New Tasks
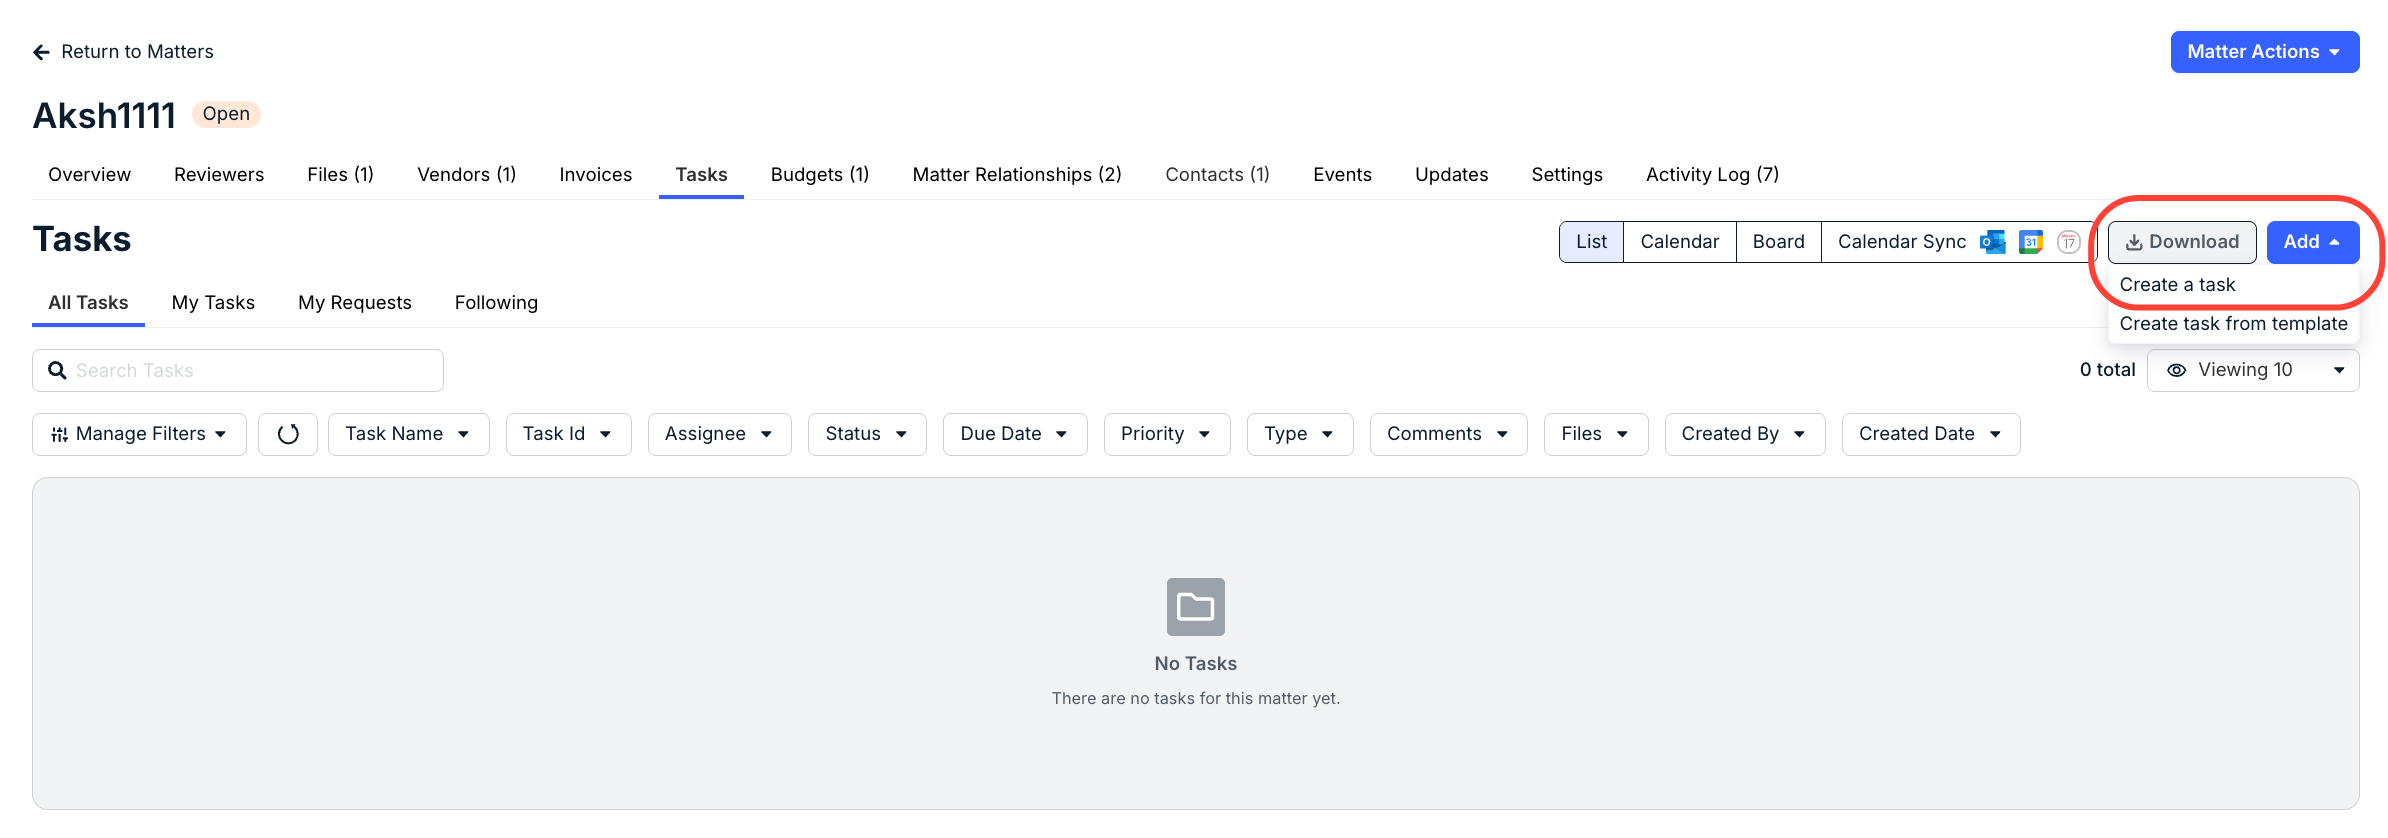
From the Tasks tab in a matter, click Add and select Create a task.
Fill in or select options for the fields described in the table below and then click Save Task.
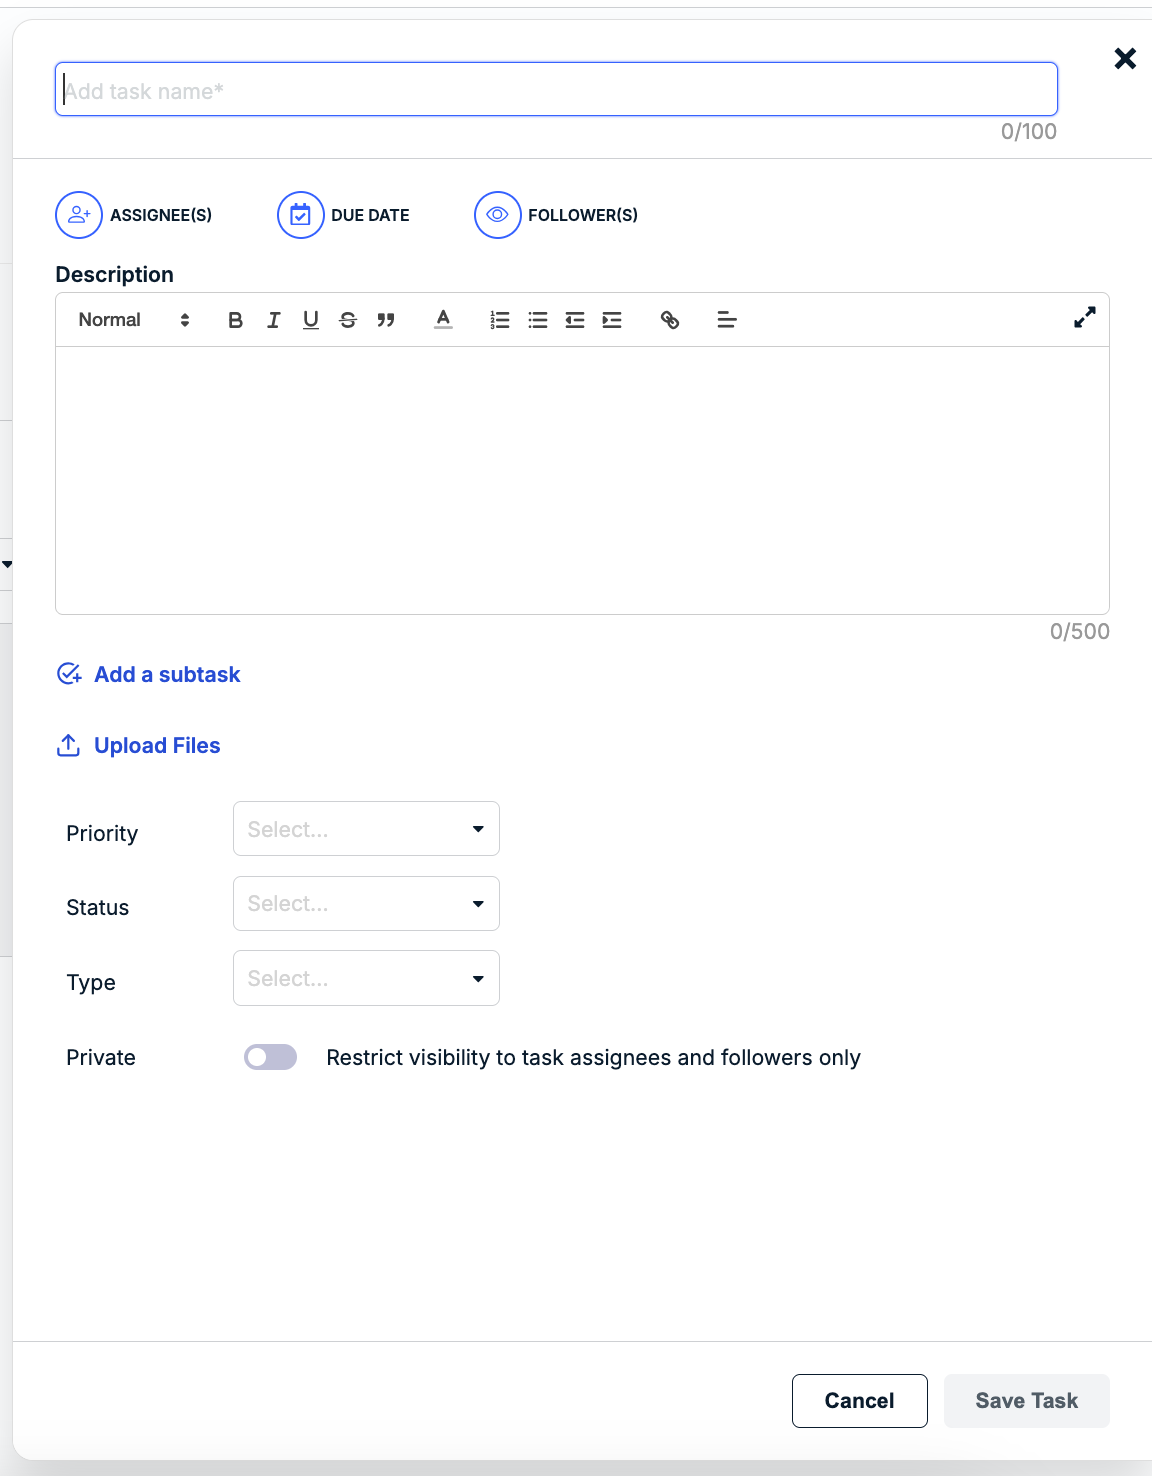
Add task name* (REQUIRED) | Enter a descriptive task name of up to 100 characters (including spaces). Task names within a matter do not have to be unique and can be identified by the system-generated ID assigned once the task is created. |
| Assignee(s) (OPTIONAL) | Click on the assignee icon to select one or more users and then click Apply. You can scroll through the list or use the search field to filter by name. Only users with permissions to edit the matter can be assigned. There is no limit to how many assignees can be added per task. |
| Due Date (OPTIONAL) | Click on the calendar icon to enter/select a specific due date or choose one of the predefined options on the left side (e.g., Today, In 1 week, In 4 weeks, etc.) and then click Apply. |
| Follower(s) (OPTIONAL) | Click on the follower icon to select one or more users who need to remain informed of progress on the task and then click Apply. You can scroll through the list or use the search field to filter by name. NOTE: You will automatically be added as a follower to any tasks you create. Users who have edit or view permissions on the matter can be assigned as followers. View-only users, however, cannot make changes to visible tasks. There is no limit to how many followers can be added per task. |
Description (OPTIONAL) | Use the text editor to enter a description and any additional notes or details (up to 500 characters including spaces). The editor allows for standard formatting, such as headings, lists, underlining, and indentation. |
| Add a subtask (OPTIONAL) | If applicable, you can enter one or more additional to-do items under a task by clicking + Add a subtask. You can choose the assignee(s) and due date (optional) by clicking on the user and/or calendar icons at the end of the row. To remove a subtask, click the x at the end of the row. Subtasks are stored as separate items nested under the primary task. You can also add other details to the subtasks, such as choosing a priority and adding a description, after you finish creating the primary task. |
| Upload Files (OPTIONAL) | Click Upload Files to drag-and-drop files or browse/select files that need to be linked to the task, and then click Upload. |
| Priority (OPTIONAL) | Select an option from the list. Which options are available depend on settings (e.g., Low, Medium, or High) and are managed by admins in your environment. |
| Status (OPTIONAL) | Select an option from the list. Which options are available depend on settings (e.g., Not Started, etc.) and are managed by admins in your environment. If you do not select a status for the new task, it will default to Not Started once created. The Not Started status may appear as a different term depending on settings managed by admins in your environment. |
| Type (OPTIONAL) | Select a category based on the nature of the task (e.g., Due Diligence, Negotiation, etc.). Which options are available depend on settings and are managed by admins in your environment. |
| Private (OPTIONAL) | If you do not want other users with access to the matter to see the task, click the toggle for Private one time to make it visible only to assignees and followers. By default, new tasks are not set to private. This setting can be turned on and off for individual tasks at any time. NOTE: Private tasks can still be viewed, opened, and modified by admins with access to the matter. |
Any other assignees or followers you added to the task(s) will be notified via email.
Once you create the task, it will appear under the All Tasks, My Requests, and Following sub-tabs. If you assigned yourself to the task, it will also appear under the My Tasks sub-tab. Tasks and subtasks in each matter are assigned a system-generated ID for reference, filtering, and reporting purposes.
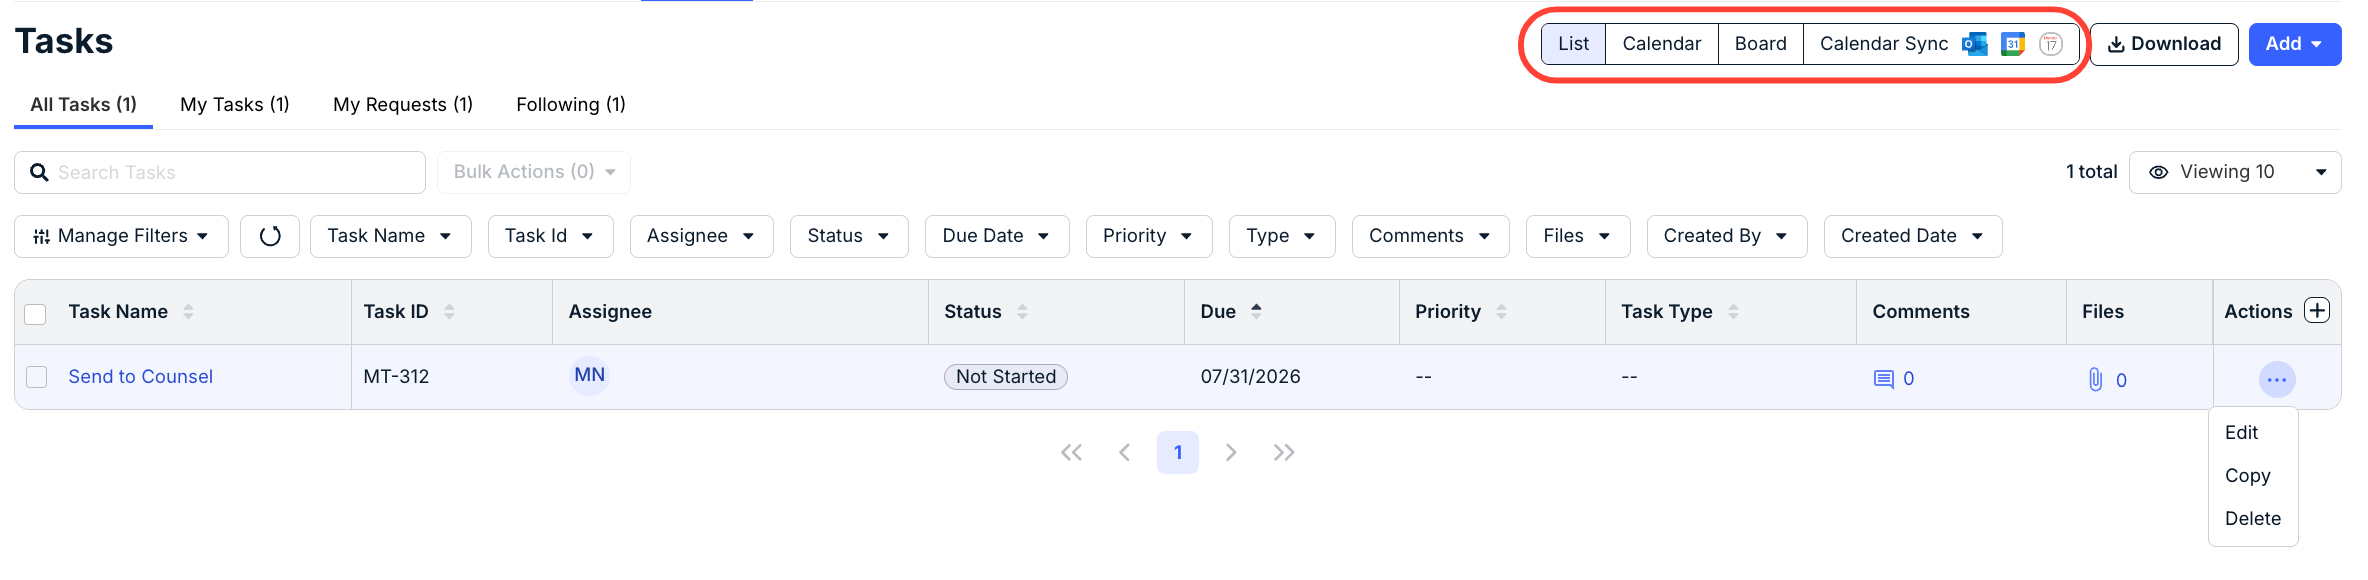
On the Task screen, you can see key task information, including Task Name, Task ID, Assignee, Status, Due date, Priority, Task Type, Comments, and Files. Under the Actions column, use the three-dot button to Edit, Copy, or Delete the task. Use the up/down arrows next to each column to sort by that column. Use the Search Tasks bar to search through the tasks. Use the Manage Filters and other drop-down menus to specify what tasks you want to see on the screen. You can use the Bulk Actions button and the check boxes to Edit or Delete the tasks. Click Download to download the tasks as an Excel file.
Note that you can use the top selector menu to choose whether you want to view the tasks in a List, Calendar, or Board view. Click the Calendar Sync button to synchronize with Apple Calendar, Google Calendar, Microsoft Outlook, and other calendar applications.
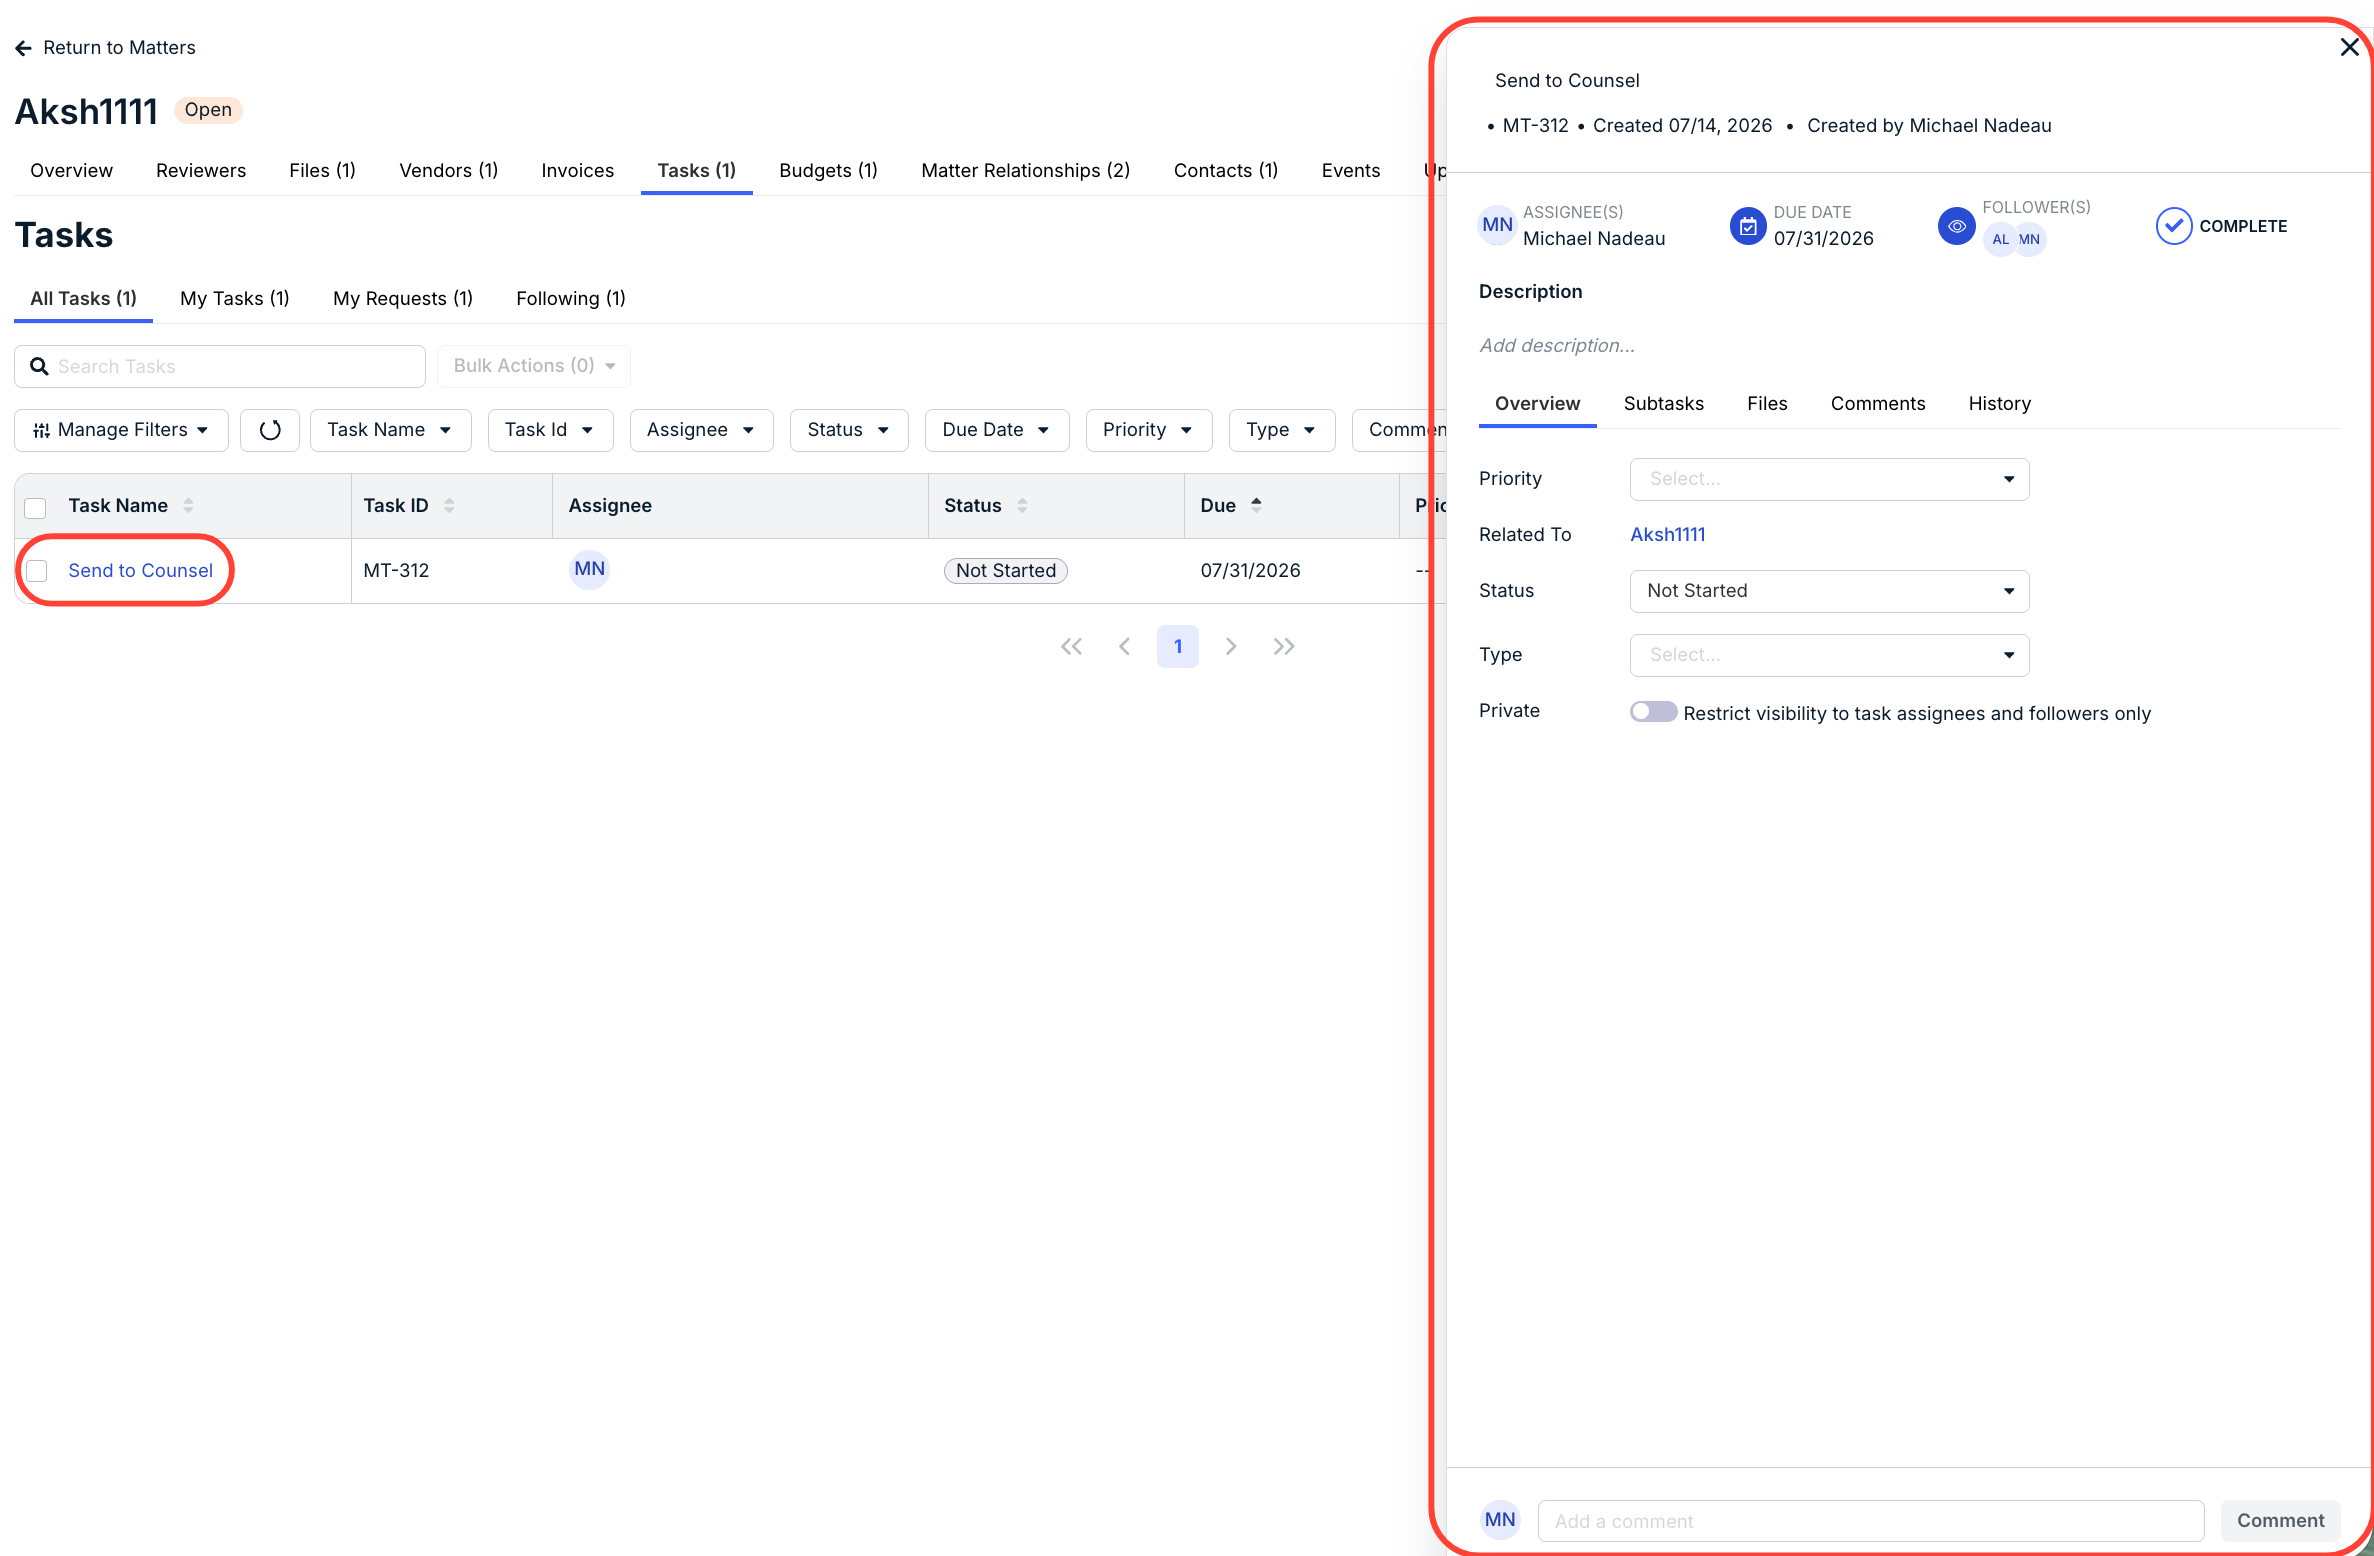
To view and edit the details of a task, including any subtasks, click on the hyperlinked name from the list. The task will open on the right-hand side of the screen.
Creating Tasks from a Template
To save time, you can use templates built by admins in your environment to create and customize standardized lists of repeated tasks. The instructions in this article only apply if there is at least one active template. If you do not see any active options, please contact your admin for assistance.
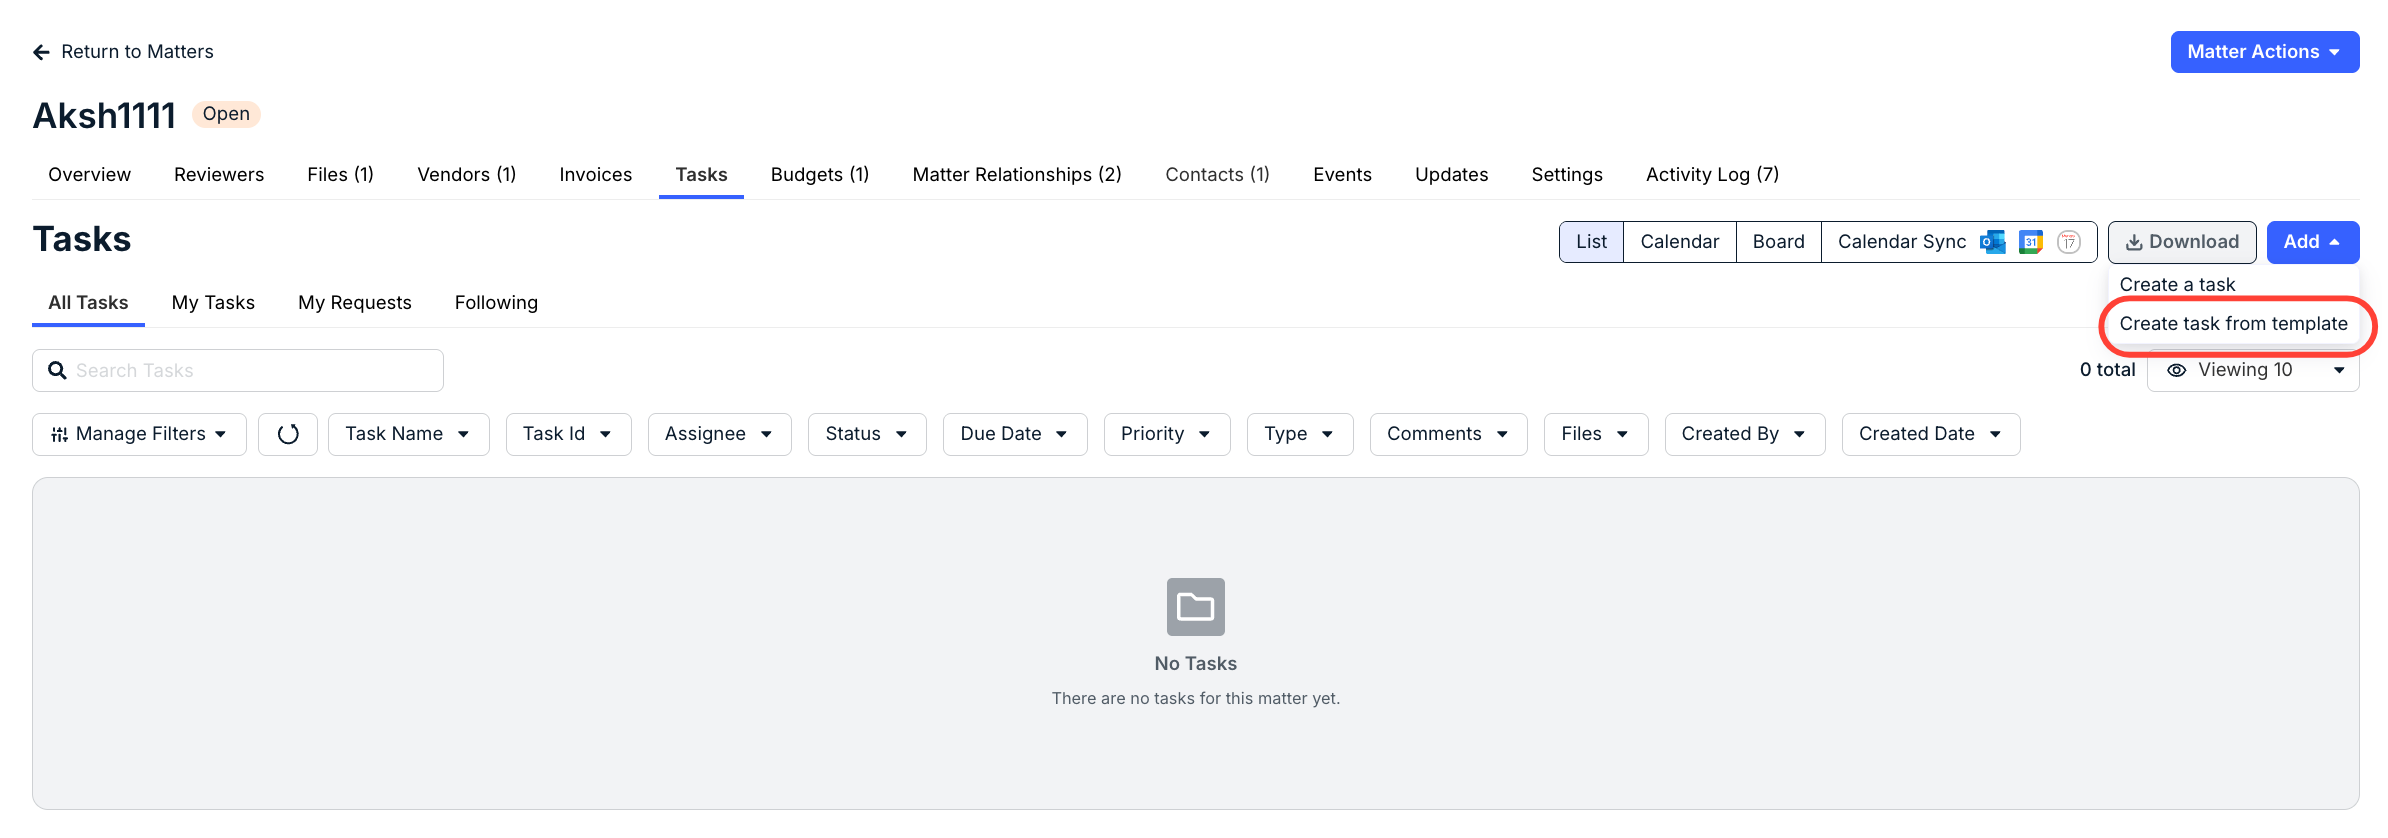
From the Tasks tab in a matter record, click Add and select Create task from template.
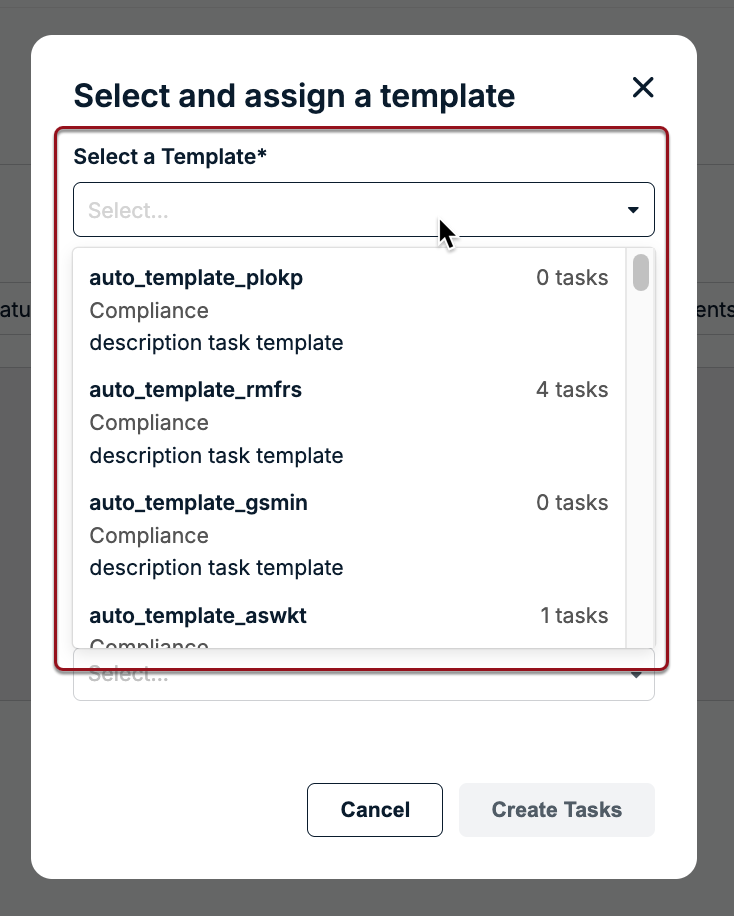
Select a template from the list. If any options are disabled, this means that the admin has not finished setting up tasks. Please contact an admin for assistance.
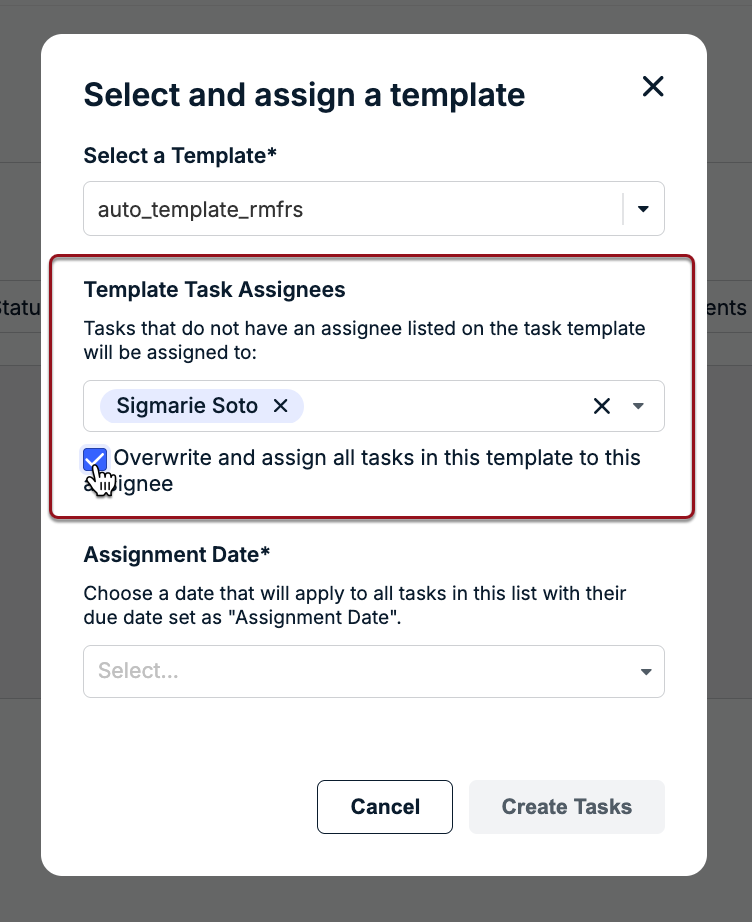
Choose one or more users from the Template Task Assignees dropdown for the tasks in the template that do not have a default assignee and then click Apply. Select the box for Overwrite and assign all tasks if you want to assign the selected user(s) to all tasks created from the template and remove any default assignees.
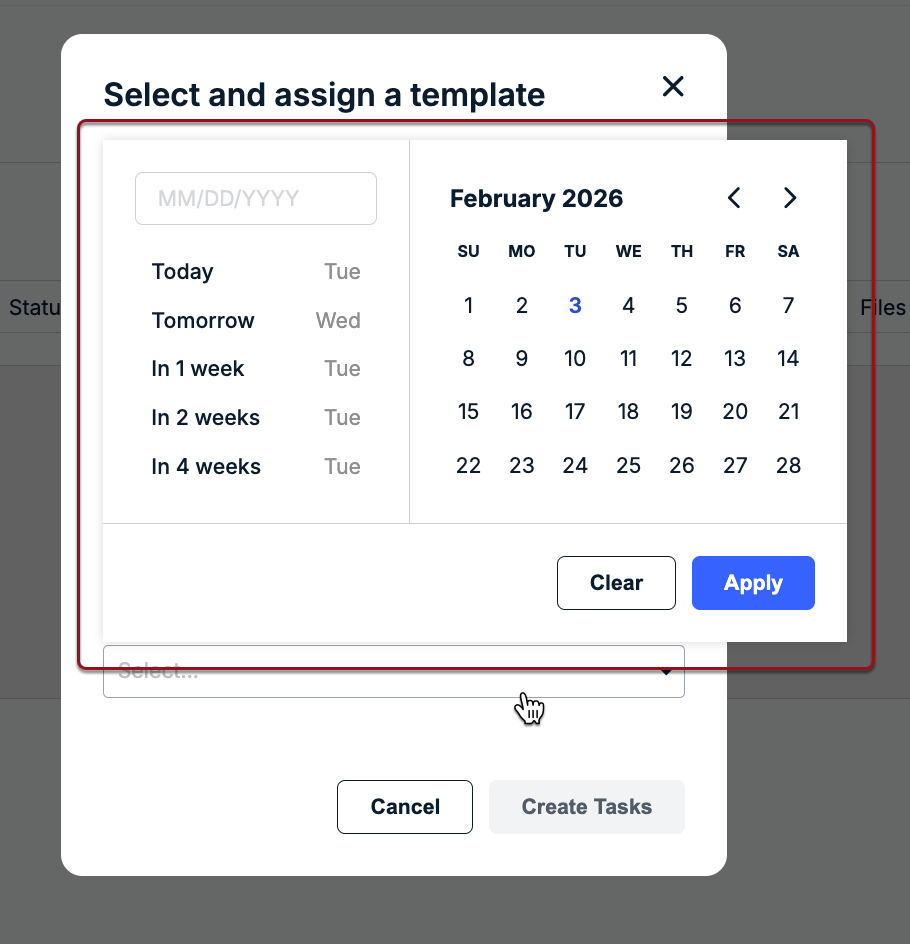
For the Assignment Date field, select the date that should be used to auto-populate any ranges specified in the template (e.g., X days after the Assignment Date). Click Apply.
Click Create Tasks in the bottom-right corner to continue. The Tasks tab will refresh to display the new tasks/subtasks associated with the template. From here, you can click on the task name to customize the general information (e.g., name, due date, assignees, priority, etc) and add other details (e.g., followers, files, subtasks, etc).