Introduction
Data as a Service (DaaS) provides Unity clients with easy access to receive their data from Unity's database. This enables clients to build their own data sources and develop their own reporting solution. DaaS uses the Open Data Protocol (OData), which provides a low-overhead, secure data gateway with a modernized, API-driven approach to enable broad integration across products such as Power BI, Tableau, and Excel. Clients can also use DaaS to access data and integrate it into their existing data lakes for enterprise-level reporting, all while maintaining the latest security protocols.
What to Expect from DaaS Provisioning
Provisioning of DaaS entails setting up the client as a tenant within the DaaS portal and creating an admin user for the client. Once DaaS is provisioned for the client, the admin user will receive the following information via email, which will allow clients to self-serve the setup for a successful DaaS connection and data retrieval into the client’s reporting environment:
- A welcome email with the link to connect to the DaaS portal and the next steps to connect to DaaS through BI tools.
- A data dictionary outlining the app/field relationship to enable clients to further create the joins based on their reporting needs.
- DaaS User Guide outlining different steps to cover various connection scenarios.
Before You Begin
Before you start accessing the OData endpoints, we recommend changing the password for the user/useradmin. Please follow the steps below to change the password:
Changing the Password
- To change the password, use your web browser to open the OData endpoint below.
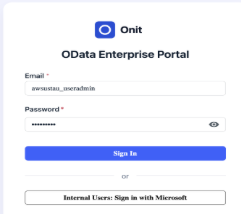
- Enter the username and password for your OData user/useradmin, shared through the OData Welcome Provision mail.
- Click on the Sign In button, and a change password screen will appear to set the new password.
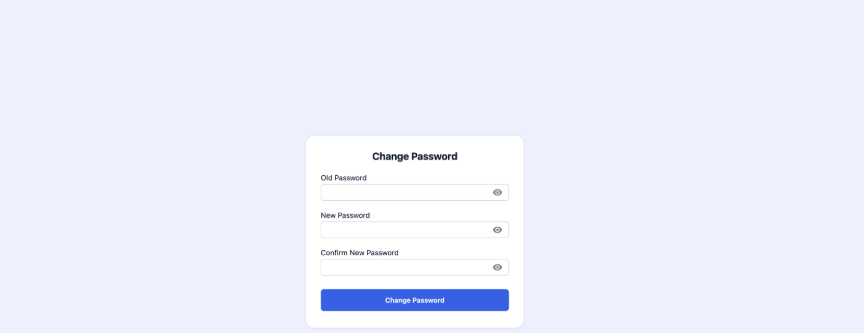
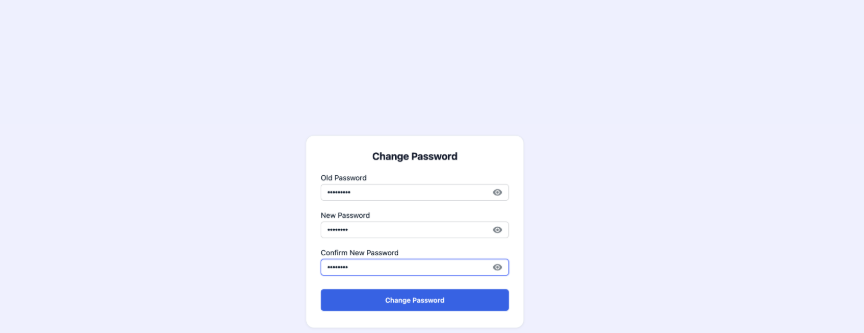
- Enter the Current Password and new password, confirm the new password, and click Save to change the password.
Create a New User for a Tenant
This section describes how to add a new user for a tenant. For this, we will use the useradmin credentials, as the useradmin will be responsible for adding new users.
- Log in to the OData endpoint below using the useradmin credentials.
https://{unity-elm-odata}.com/login. If the user admin is logging in for the first time, they need to reset their password. Refer to the Change the Password section of the document to change the password.
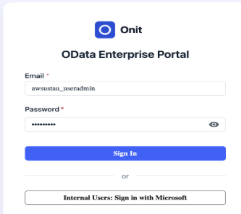
Once logged in, the Manage User page of the OData endpoint will open. This page lists this tenant's available users.
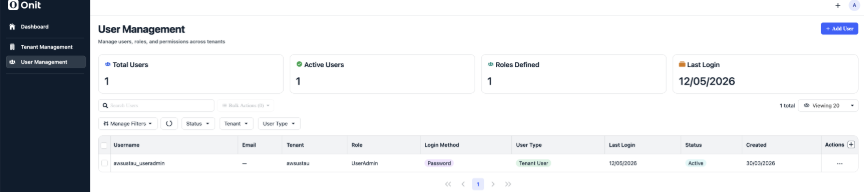
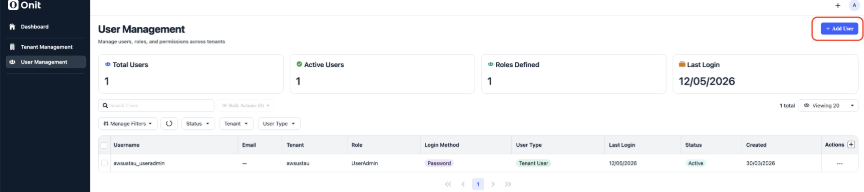
- Click on the + Add User button. This will open the Create User page.
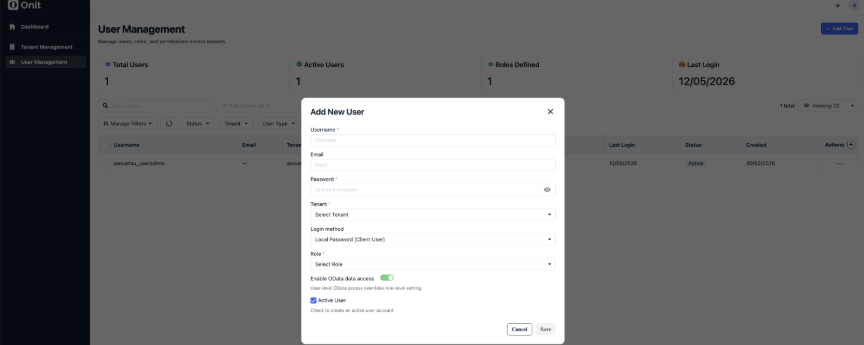
- In Create User page, enter your username in the User Name field and select the appropriate role from the Role dropdown.
There are two roles available in the Role dropdown:
BasicUser Role: Users with this role can access the data from the OData endpoint.
UserAdmin Role: Users with this role can create a user for a tenant.
Here, we will be creating a new user named {client_name_user} for {client_name} tenant, and the role for this user will be BasicUser Role.
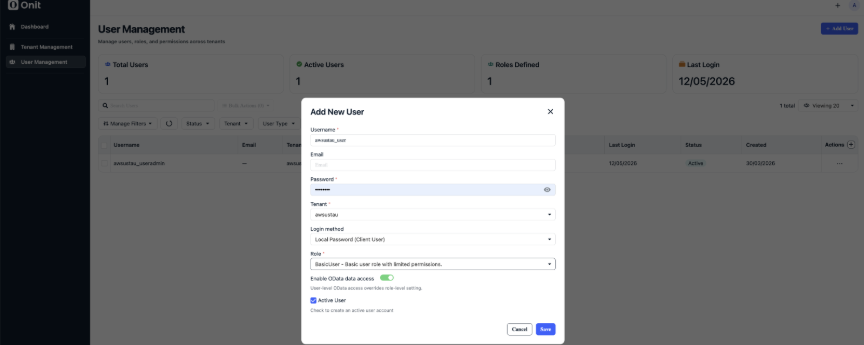
Enter the new user's password and click the Save button. After clicking the Save button, the user will be redirected to the Manage User page.
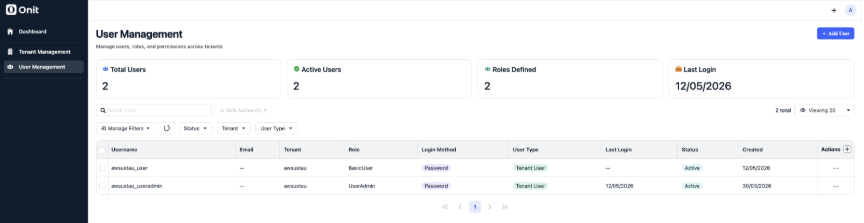
- The useradmin should now be able to see the newly created user added in the Manage User page.
The useradmin needs to share the credentials with the new user.
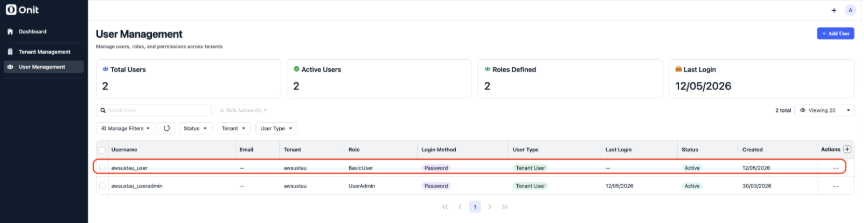
- The new user needs to log in to the OData endpoint and change the password.
The guide to changing the password for a user is provided in the Changing the Password section.
- Once the password is changed, the user can connect to the OData endpoints using any of the methods mentioned in the later sections of the document.
Configuring User Accounts for SAML Authentication
Once a SAML service has been registered, user accounts can be configured to use the service. As described in the following sections, user accounts can be configured through the Web UI.
To create a new user account, follow these steps.
- Navigate to the User Management view by clicking the User Management.
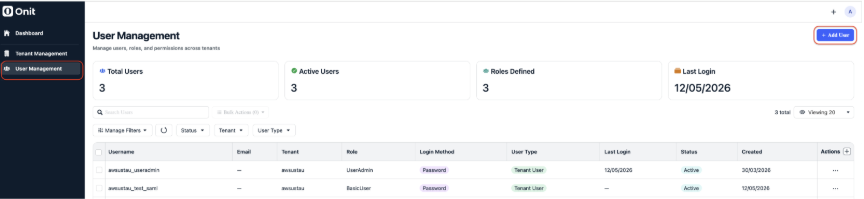
- Click + Add User.
- Select the tenant and user role, then enter the username and password.
- Select SAML service from the login method.
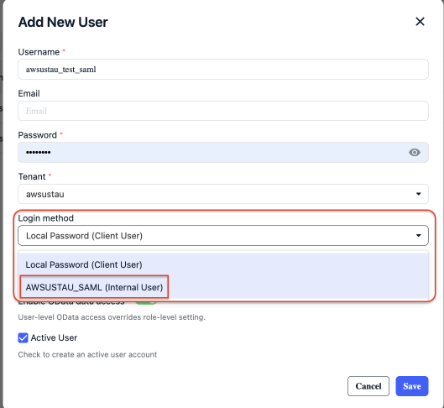
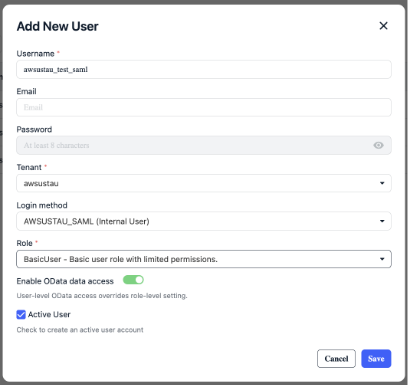
- Click Save.
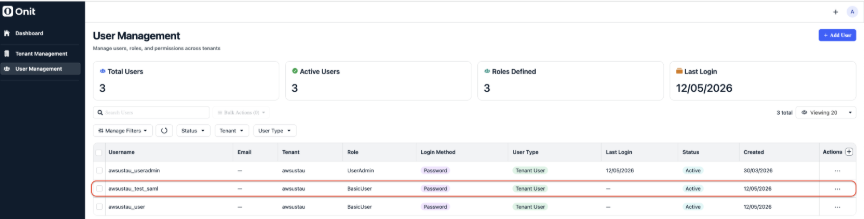
To modify a current user account, take the following steps:
- From the user list, click the three dots next to the user account you want to modify in the Actions column.
This will pop up three buttons: view, edit, and delete.
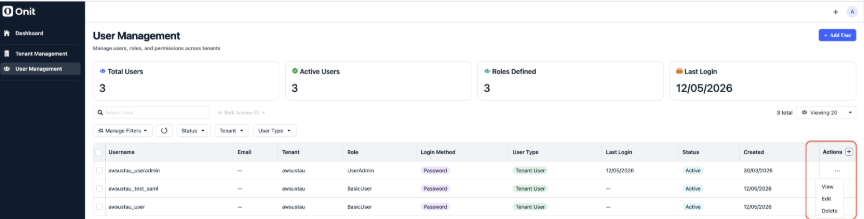
- Click on edit button to change user details.
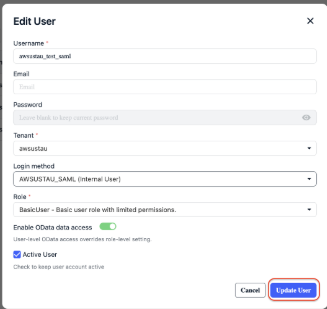
- After changing the details, click on the Update User button.
- Changes will be reflected.
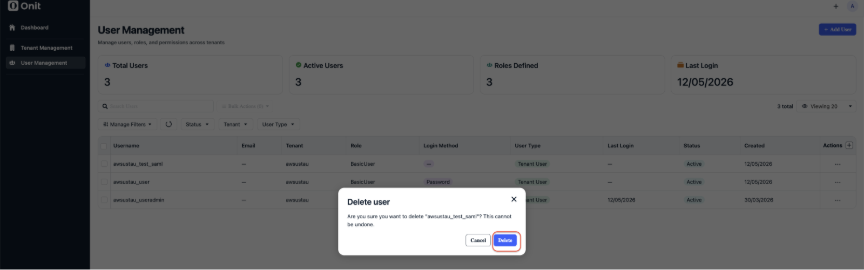
- To delete the user account, click on delete under actions. It will ask for confirmation.
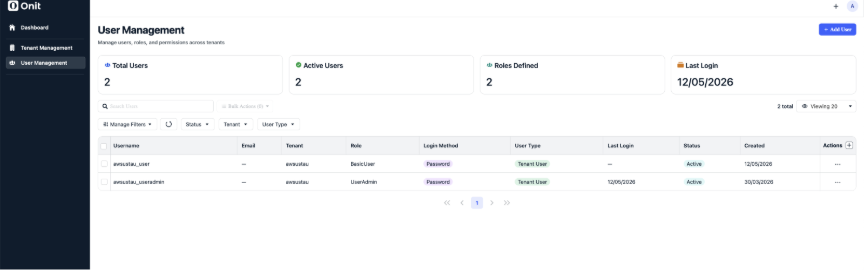
- Click on the delete button. User will be deleted; once deleted, it can't be undone.
To log in using SAML, you can just enter the URL of Unity Data as a Service instance followed by SSO and the authentication service name you created.
For example, https://{unity-elm-odata}.com/api/v1/auth/sso/{SAML_SERVICE_NAME}?return_to=https://{unity-elm-odata} .com/unity/odata/dashboard
- From the user list, click the three dots next to the user account you want to modify in the Actions column.
Connect Tableau to OData
Tableau & OAuth authentication for OData
As of now, Tableau does not have support for OAuth 2.0-based authentication for OData. Please refer to the OAuth Connections link for more details on other connectors supported by Tableau.
This section describes the steps for connecting Tableau to an OData data source. Tableau connects to OData V1, V2, and V4. Unity supports OData Version 4.
- Start Tableau and under Connect, select OData. For a complete list of data connections, select More under To a Server.
Then do the following:
- In Server, type one of the following:
- A service URL to access all feeds inside the service.
- A feed URL to access a specific data feed.
- From the Authentication dropdown, select the authentication mode for this connection.
If you select Username and Password, also type a username and password.
- Select Sign In.
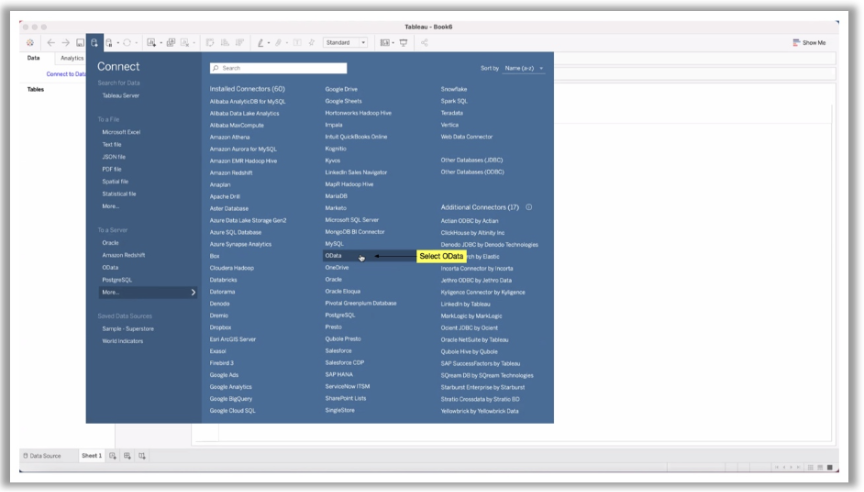
- In Server, type one of the following:
- Click on OData and enter the OData endpoint URL with username and password and click on Sign In.
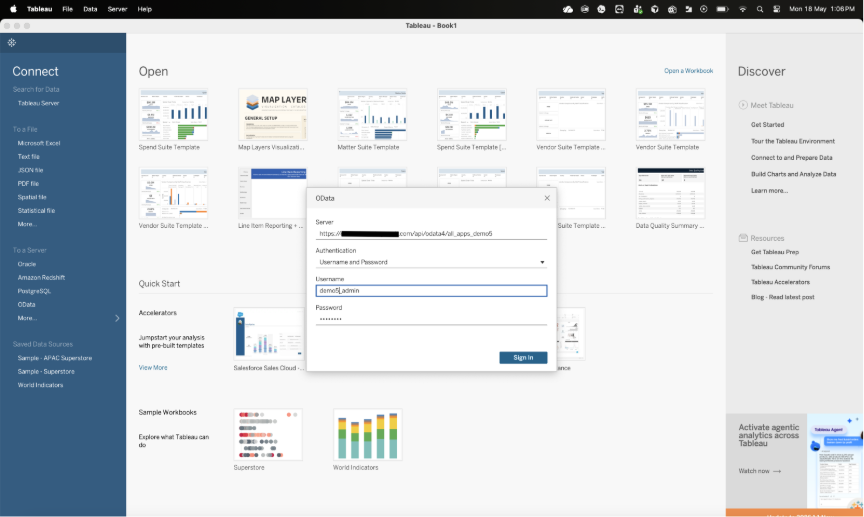
- Once the connection is successful, all the apps will be visible in the table panel of Tableau, drag and drop the tables to include them in the data source.

- You can include more than one entity into the data source and then specify the relationship between the entities using the joining fields.
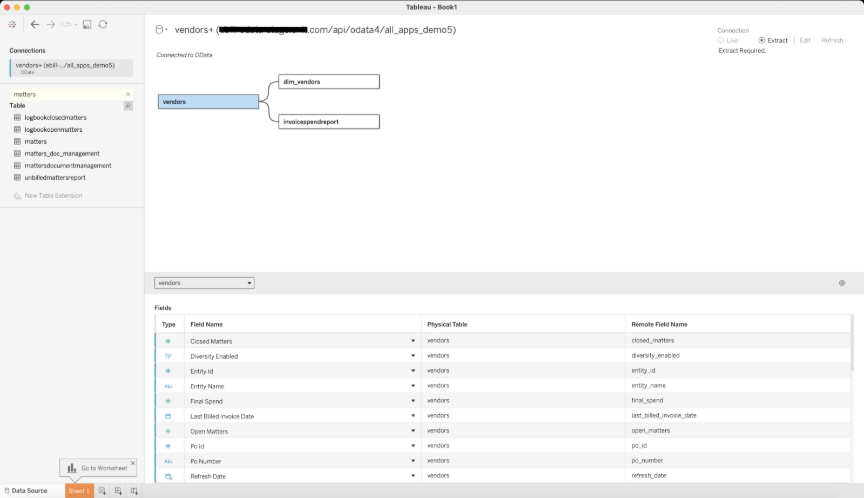
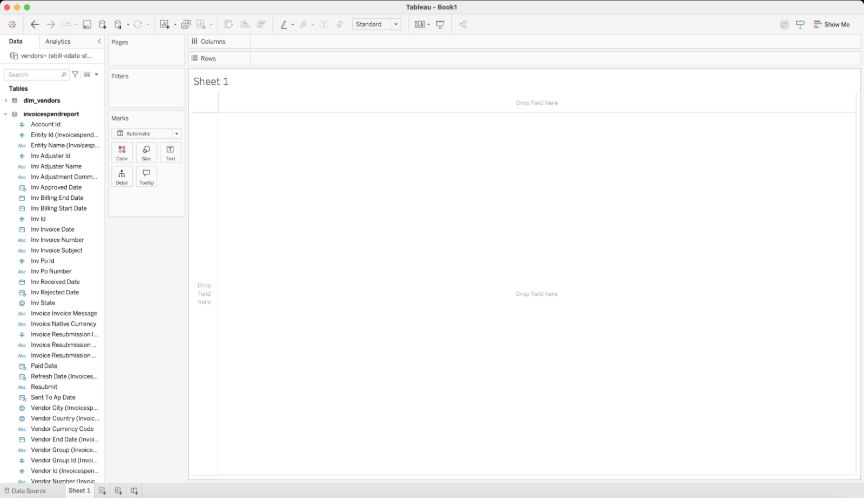
- Once the data source is designed, you can go to the worksheet to start building the Tableau dashboards/reports.
Connect Power BI to OData
Connect using OAuth 2.0-based authentication
This section describes the steps for connecting Power BI to an OData data source using OAuth 2.0-based authentication.
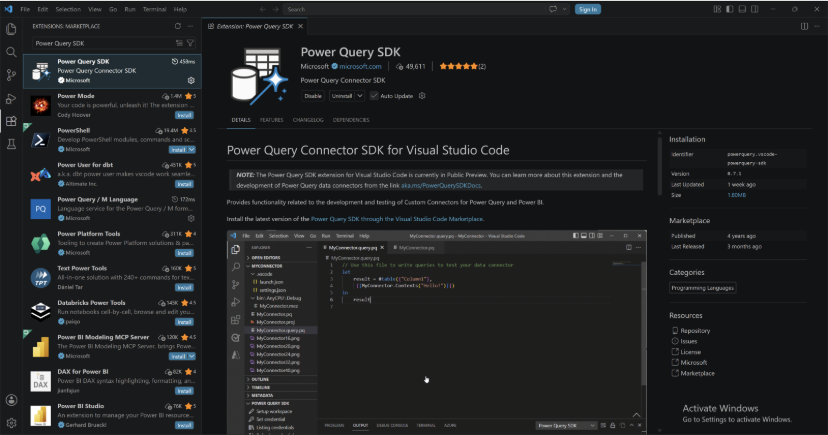
- Open Visual Studio and go to Extension (left sidebar).
Search for the Power Query SDK, and if it is not already installed, install it.
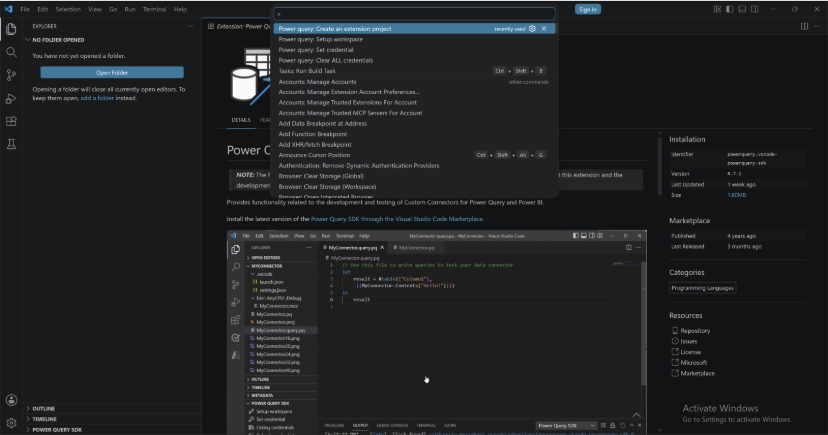
- Click on the Help > Show All Commands, or you can directly press “Ctrl + Shift + P” to get the same menu.
This will prompt the command we want to run.
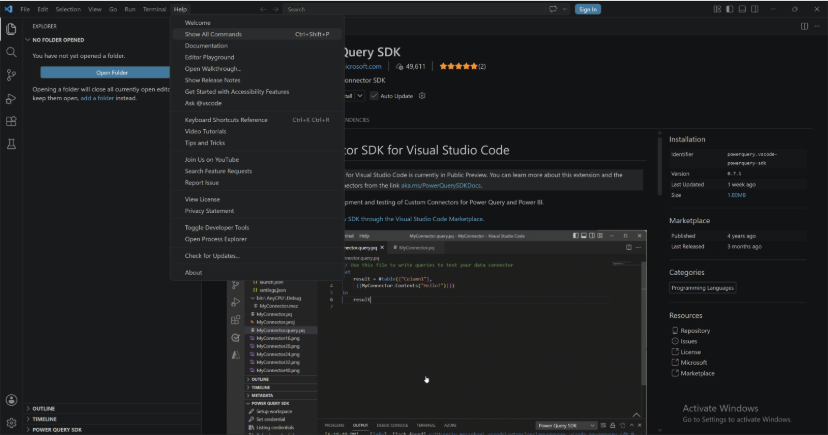
Select the “Power Query: Create an extension project” command from the listed commands.
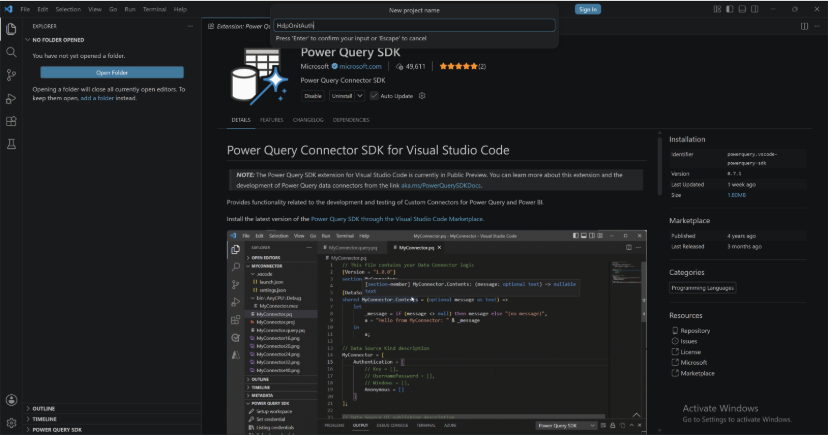
Once selected, this will ask for the Project Name. Enter the project name HDPOnitAuth. This will prompt for the location where this will be saved. You can choose any folder.
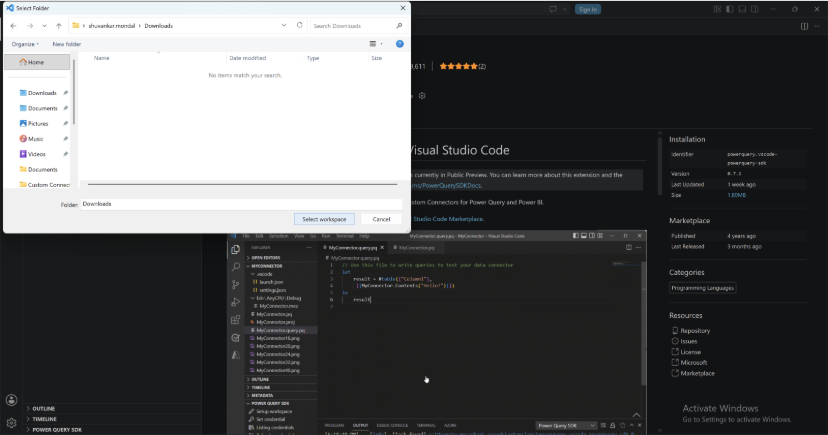
Once the folder is selected, a Project named HDPONITAUTH will be created.
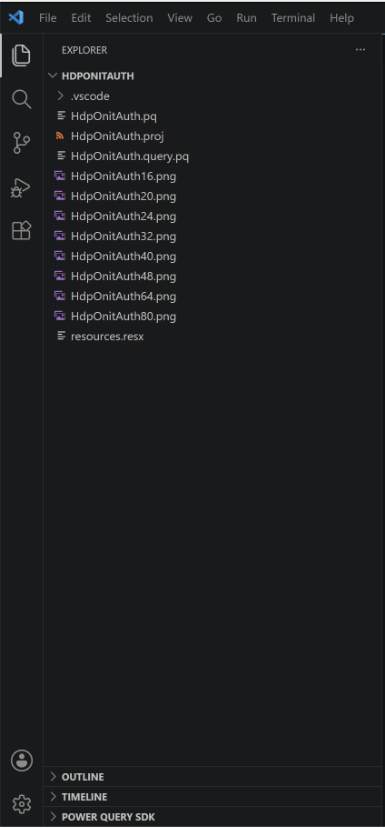
- In the Solution, open up the find HdpOnitAuth.pq file and change its content with the followings:
/* HDP Onit OData Connector - Unified OAuth2 & OIDC Template */[Version = "1.0.0"]
section HdpOnitAuth;
// ============================================================
// CONFIGURATION SECTION
// ============================================================
client_id = "{ CLIENT ID }";
client_secret = "{ CLIENT SECRET }";
// Update these based on the environment and Client Name
host = "{ OData URL }";
client_name = "{ CLIENT NAME }";
/* OIDC SUPPORT:
- For Standard OAuth2: Set auth_service_name = null;
- For OIDC: Set auth_service_name = "Your_Service_Name_From_HDP";
*/
auth_service_name = null;
// ============================================================
// INTERNAL LOGIC
// ============================================================
redirect_uri = "https://oauth.Power BI.com/views/oauthredirect.html";
[DataSource.Kind="HdpOnitAuth", Publish="HdpOnitAuth.Publish"]
shared HdpOnitAuth.Contents = () =>
let
full_url = host & "/api/odata4/all_apps_" & client_name,
// Define Headers based on whether OIDC is being used
request_headers = if (auth_service_name <> null) then
[#"x-datadirect-authService" = auth_service_name]
else
[],
Source = OData.Feed(full_url, null, [
Implementation="2.0",
Headers = request_headers
])
in
Source;
// ============================================================
// DATA SOURCE & OAUTH FLOW (Unchanged)
// ============================================================
HdpOnitAuth = [
Authentication = [
OAuth = [
StartLogin = StartLogin,
FinishLogin = FinishLogin,
Refresh = Refresh,
Logout = Logout
]
]
];
StartLogin = (resourceUrl, state, display) =>
let
AuthorizeUrl = host & "/oauth2/authorize?" & Uri.BuildQueryString([
client_id = client_id,
redirect_uri = redirect_uri,
state = state,
response_type = "code",
// Note: Added openid/profile/email for OIDC compatibility
scope = if (auth_service_name <> null) then "openid profile email api.access.odata" else "api.access.odata"
])
in
[
LoginUri = AuthorizeUrl,
CallbackUri = redirect_uri,
WindowHeight = 720, WindowWidth = 1024,
Context = host
];
FinishLogin = (context, callbackUri, state) =>
let
Parts = Uri.Parts(callbackUri)[Query],
Result = if Record.HasFields(Parts, {"error"}) then error Error.Record(Parts[error], Parts[error_description]?) else TokenMethod(context, "authorization_code", Parts[code])
in
Result;
Refresh = (resourceUrl, refresh_token) => TokenMethod(host, "refresh_token", refresh_token);
Logout = (token) => token;
TokenMethod = (baseHost, grantType, codeOrToken) =>
let
token_uri = baseHost & "/oauth2/token",
BaseQuery = [ client_id = client_id, client_secret = client_secret, grant_type = grantType, redirect_uri = redirect_uri ],
FullQuery = if grantType = "refresh_token" then Record.AddField(BaseQuery, "refresh_token", codeOrToken) else Record.AddField(BaseQuery, "code", codeOrToken),
Response = Web.Contents(token_uri, [
Content = Text.ToBinary(Uri.BuildQueryString(FullQuery)),
Headers = [#"Content-Type" = "application/x-www-form-urlencoded", #"Accept" = "application/json"],
ManualStatusHandling = {400, 401}
]),
Parsed = Json.Document(Response)
in
Parsed;
HdpOnitAuth.Publish = [
Beta = false,
Category = "Other",
ButtonText = { "HDP Onit Connector", "Connect to HDP OData" }
];
- Replace the following details in the pq file:
{ CLIENT ID } → client_id resulted from the OAuth2 call.
{ CLIENT SECRET } → client_secret resulted from the OAuth2 call.
{ OData URL } → OData URL for the environment. Remove the trailing slash if any.
{ CLIENT NAME } → Name of tenant/client.
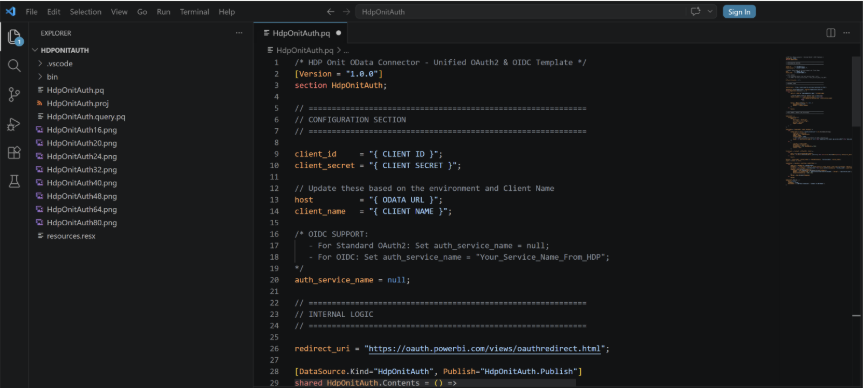
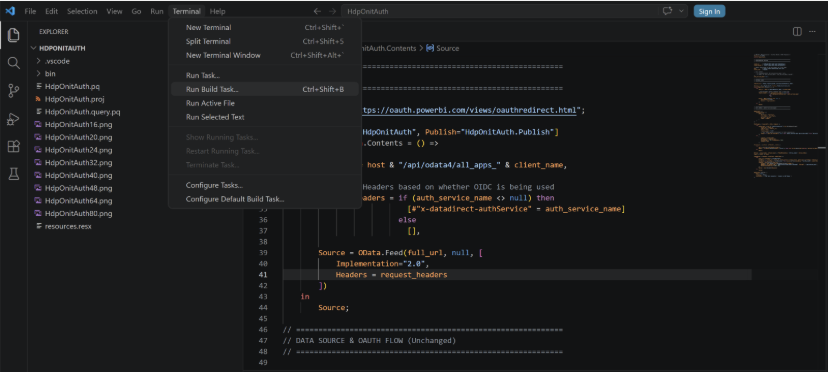
- Click on the Run Build Task by navigating to option Terminal > Run Build Task or alternatively press Ctrl + Shift + B.
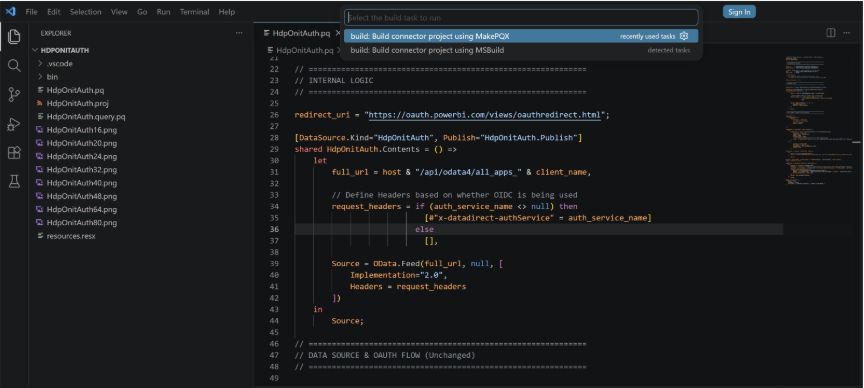
This will prompt for an action. Select “Build connector project Using MakePQX”. Selecting this will build the Power BI Custom Connector file, and the file extension will be .mez. This will be generated at the following path:
/bin/AnyCPU/Debug/HdpOnitAuth.mez

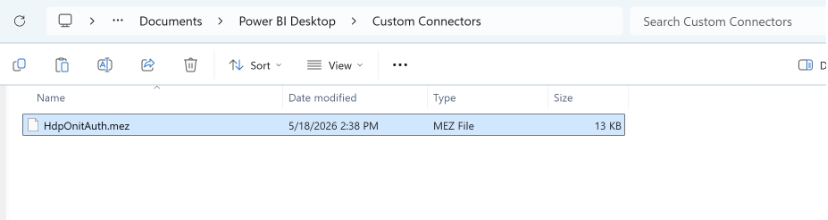
- On your PC, Go to Documents and under the folder named Power BI Desktop, create a folder named Custom Connectors, if not present already.
Copy the file HdpOnitAuth.mez from the path <Project Folder>/bin/AnyCPU/Debug into the Document/Power BI Desktop/Custom Connector path.
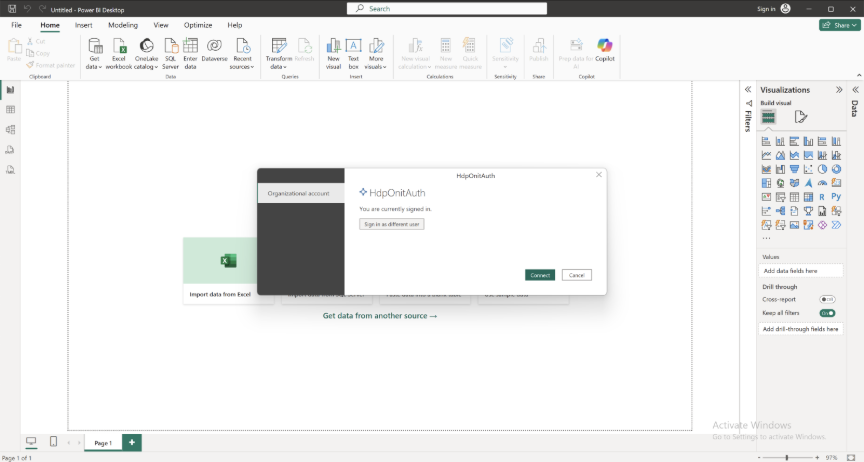
- Start Power BI Desktop. Under Get Data, select Other tab and choose HDP Onit Connector (Custom) from the list.
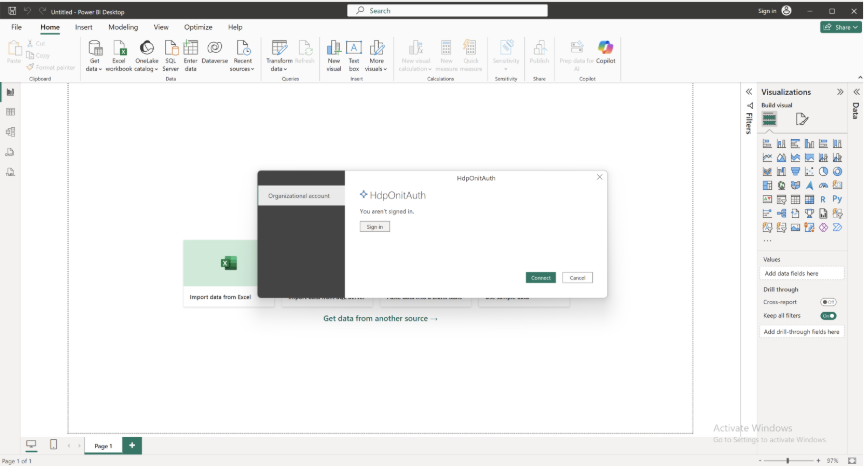
Click Connect and then Sign In.
This will bring a prompt that will ask for credentials to authorize and authenticate the OData flow. Make sure to provide the same credential that was used for generating the client_id and client_secret in the OAuth2 call, and then click on Continue button.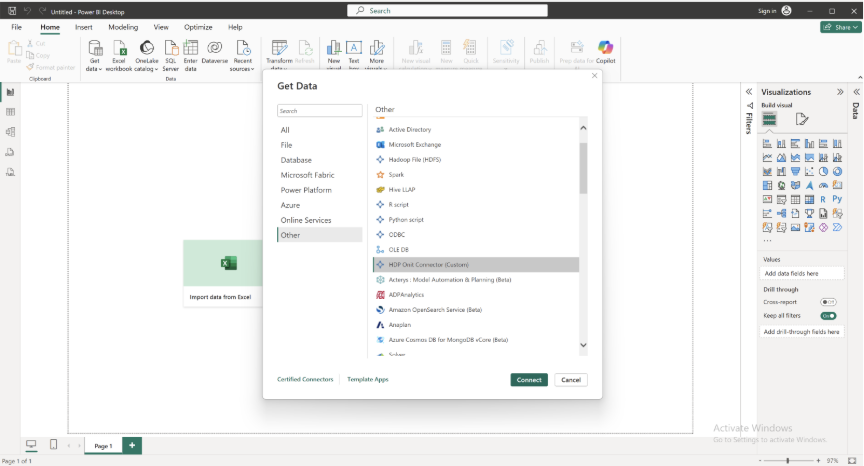
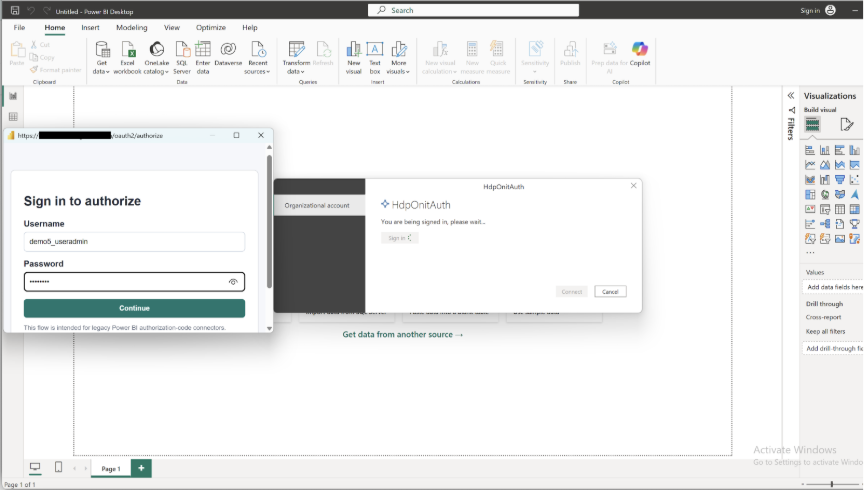
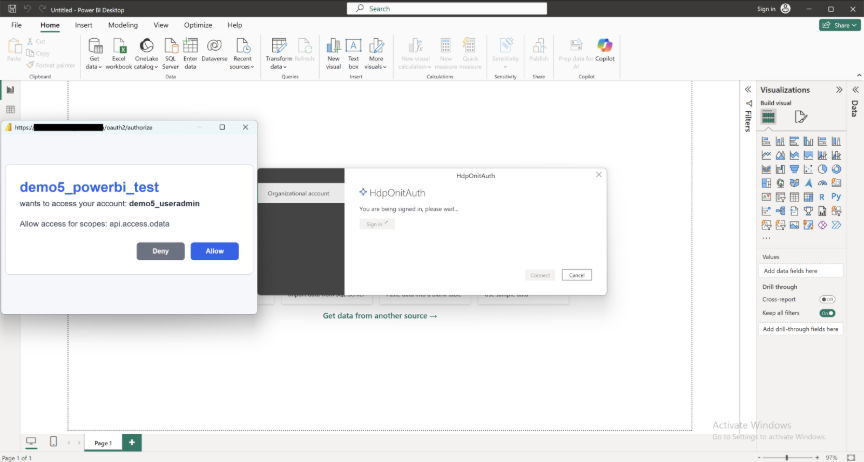
- If the username and password combination is correct, you should see the authorization screen below.
Click on the Allow button, and then click on the Connect button.
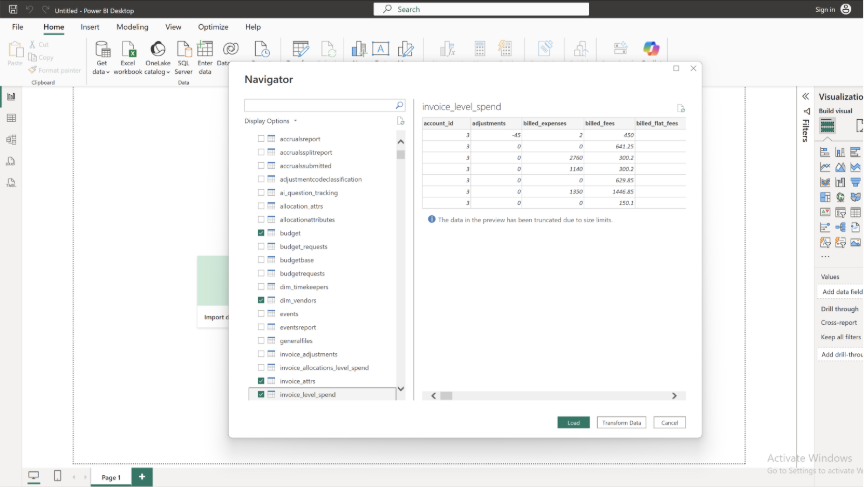
- This will show all the tables/entities listed.
Choose one or multiple entities and use them as per your needs.
Connect using basic authentication
This section describes the steps about how to connect Power BI to an OData data source.
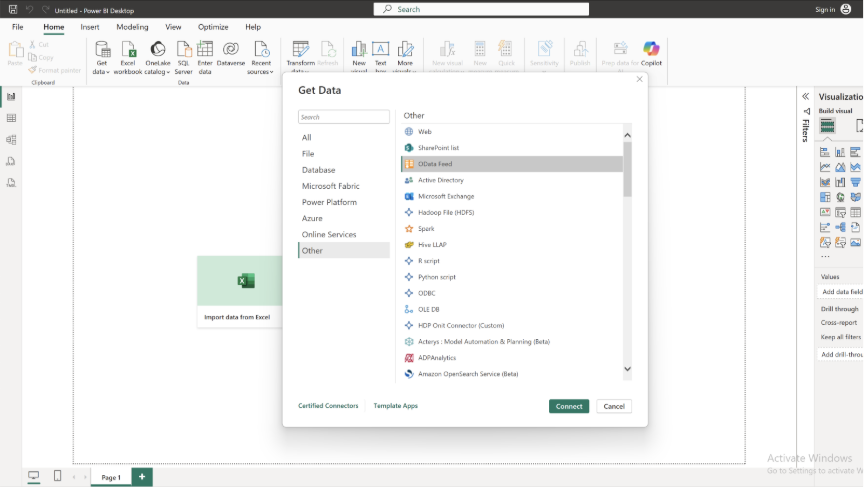
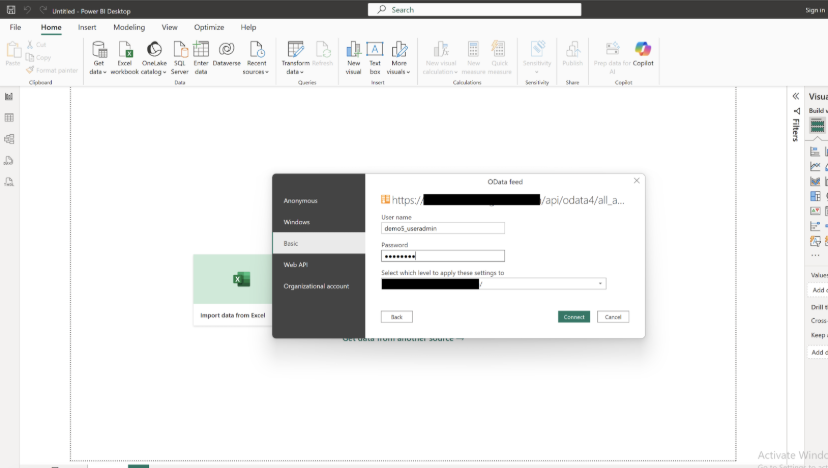
- Start Power BI Desktop and under Get Data, select OData feed.
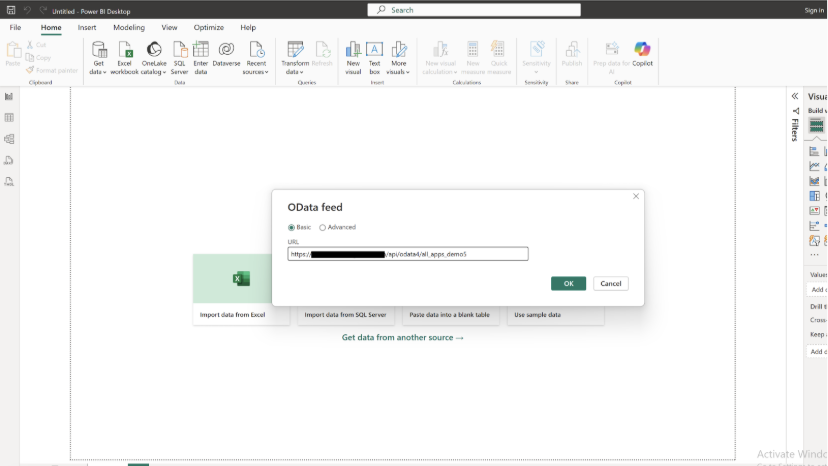
- In the OData Feed dialog, select the Basic option, enter OData Endpoint URL and Click OK.
- On the OData Feed dialog, enter the username and password and Click Connect.
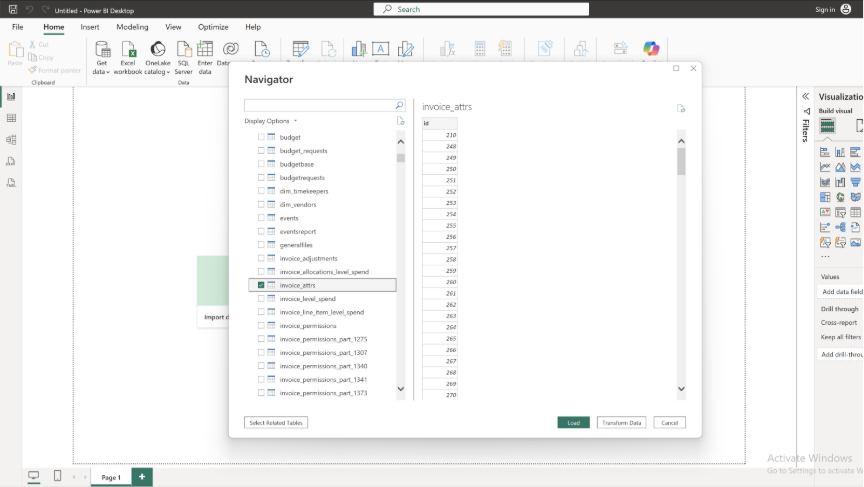
- Once the connection is successful, all the apps/entities will be visible in the navigator panel of Power BI.
Select the apps/entities that you want to include as part of the data source.
Limit unnecessary data at the source
Whether creating data sources for BI tools or accessing data via APIs, we strongly encourage selecting attributes and filtering rows to meet a specific business need for optimal performance. Consider filtering by phases, statuses, dates, or other attributes that meet your needs as efficiently as possible. For example, in ELM, you may never want to see voided invoices, so you can filter invoices, curr_state_name, and exclude the voided state. Rejected matters can also be excluded by filtering matters.curr_state_name and excluding the rejected state.
OData Endpoints
The following tables describe the resources and the corresponding URLs that can be used to fetch data via Odata api end point
OData Endpoints for the US Region
Resource | URL
| Description
|
Service endpoint
| https://{unity-elm-odata} .com/api/OData4/ | The root service endpoint for OData entities
|
Entity Collection
| https://{unity-elm-odata}.com /api/odata4/all_apps_{client_slug}/
| The collection of all the entities/apps
|
Entity
| https://{unity-elm-odata}.com /api/odata4/all_apps_{client_slug}/{entity_name} e.g. | A single entity from the entity collection
|
Entity Metadata
| https://{unity-elm-odata}.com /api/odata4/all_apps_{client_slug}/$metadata
| The collection of all the entities/app metadata
|
In addition to the metadata you can get from the endpoint, you can also request a data dictionary from support for your apps available in DaaS.
Use Postman to Access OData
Connect using OAuth 2.0-based authentication
This section describes the steps for connecting Postman to an OData data source using OAuth 2.0-based authentication.
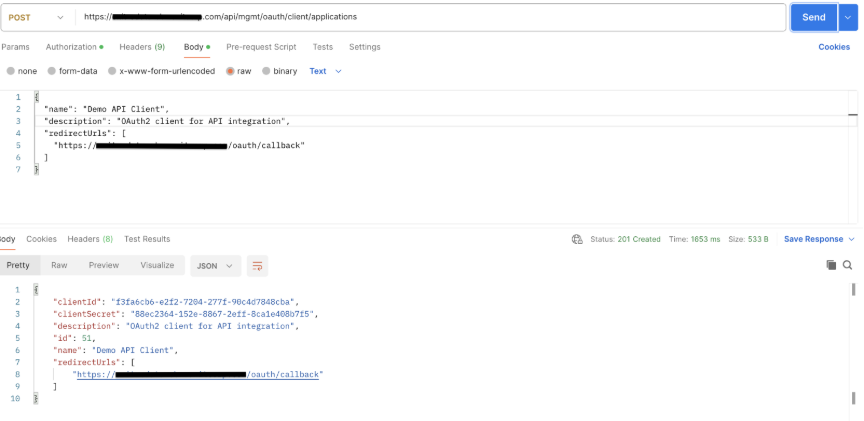
- Open Postman and send a POST REQUEST as shown below.
The Response from the Server will contain your Client Key and Client Secret and should look like the example below.
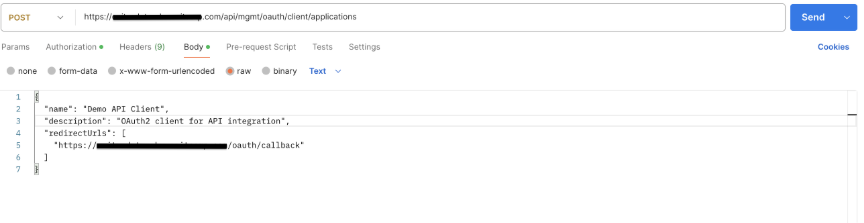
After clicking the Send button, you get ClientId and ClientSecret.
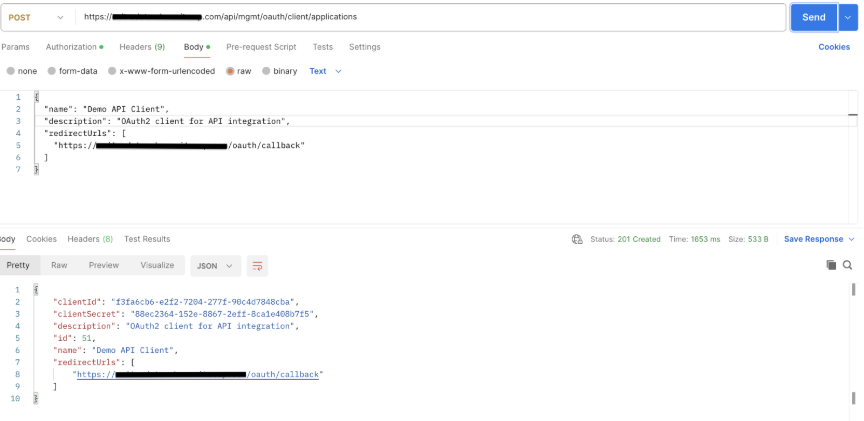
Body:
{
"name": "Demo API Client",
"description": "OAuth2 client for API integration",
"redirectUrls": [
"{redirect_url}"
]
}
Fetch OData Data using OAuth 2.0-based authentication
This section describes the steps for fetching OData data using OAuth 2.0-based authentication.
- Open Postman and send a POST REQUEST as shown below using the User provided in the welcome email.
The Response from the Server will contain your Client Key and Client Secret and should look like the example below.
- Open Postman and send a POST REQUEST as shown below using User provided in the welcome email.
The Response from the Server will contain your Access Token and Refresh Token.
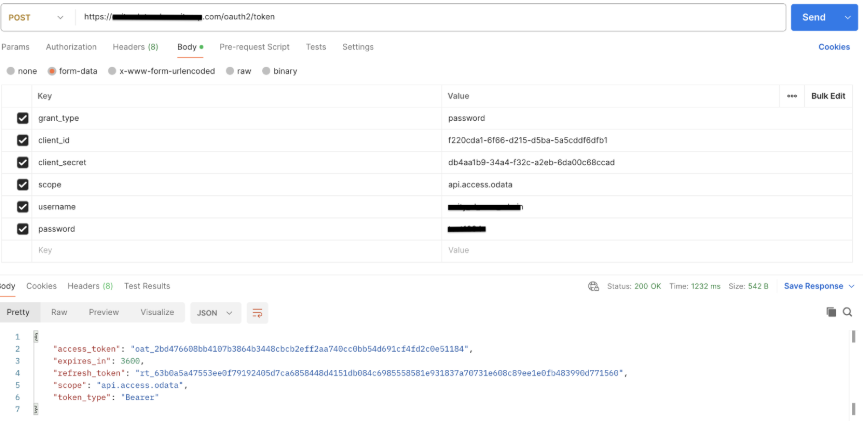
grant_type:password
client_id:f220cda1-6f66-d215-d5ba-5a5cddf6dfb1
client_secret:db4aa1b9-34a4-f32c-a2eb-6da00c68ccad
scope:api.access.odata
username:xxxxxxxxx
password:xxxxxxxx
- Open Postman and send a GET REQUEST as shown below using Access Token generated in the second step to fetch data using postman.
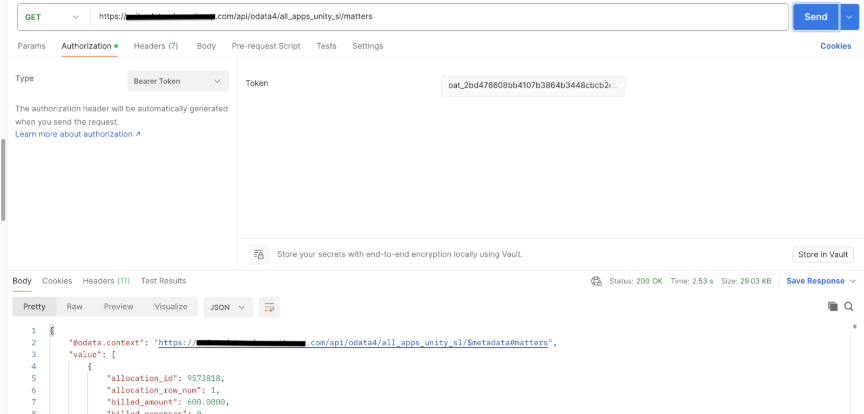
Connect using basic authentication
This section describes the steps about how to connect Postman to an OData data source.
Get the list of entities/apps
Start Postman and add a new request. Then do the following:
- In the Request URL, type the endpoint below:
https://{unity-elm-odata} .com/api/odata4/all_apps_{client_slug}
- On the Authorization tab, select type as Basic Auth and enter the username and password that was provided to you.
- Press Send button.
- It should return the list of apps/entities that are available as part of the OData API
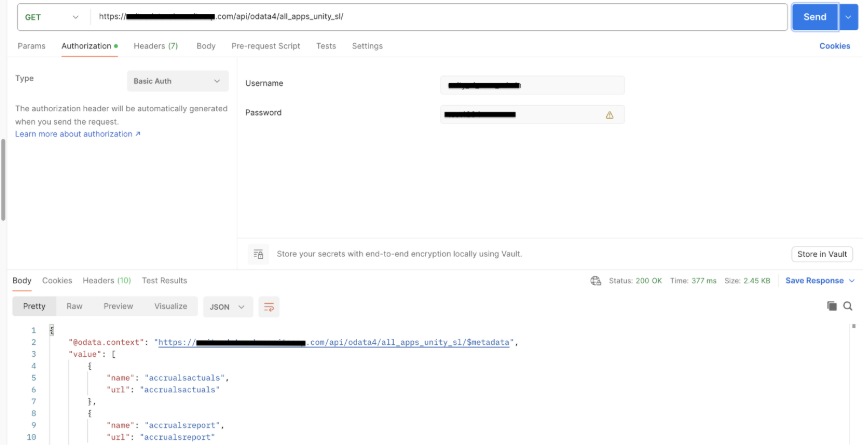
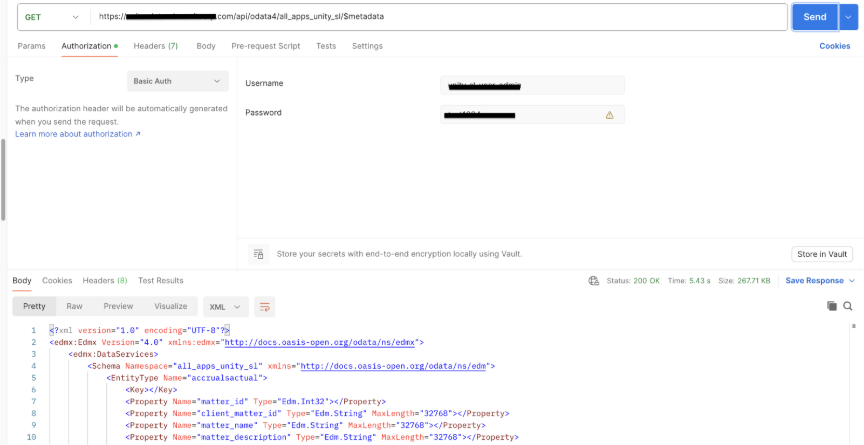
Get the list of entity/app metadata
Start Postman and add a new request. Then do the following:
In the Request URL, type the endpoint below: https://{unity-elm-odata} .com/api/odata4/all_apps_{client_slug}/#metadata
NOTE: Replace the {client_slug} with the name of your client_slugOn the Authorization tab, select type as Basic Auth and enter the username and password that were provided to you.
Press the Send button.
It should return the list of apps/entities metadata that are available as part of the OData API.
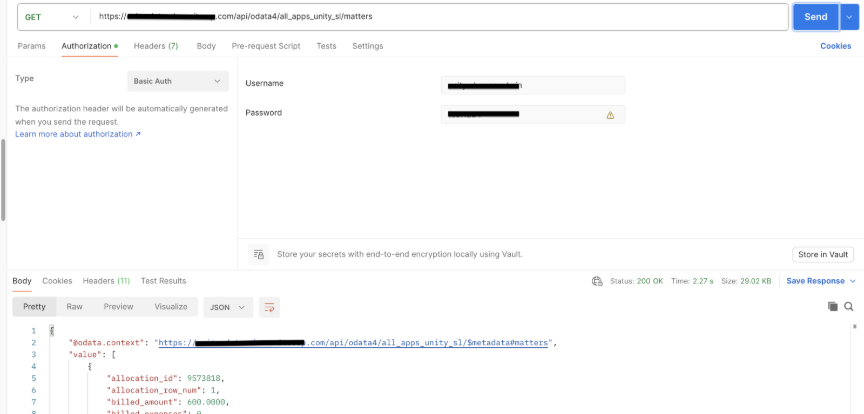
Get the data for an entity/app
Start Postman and add a new request. Then do the following:
In the Request URL, type the below endpoint: https://{unity-elm-odata} .com/api/odata4/all_apps_{client_slug}/{entity_name}
Note: Replace the {client_slug} with the name of your client_slug. Replace {entity_name} with the name of the entity that was returned as part of the list of entities.On the Authorization tab, select type as Basic Auth and enter the username and password that were provided to you.
Press the Send button.
It should return the list of apps/entities metadata that are available as part of the OData API
Generate code to connect to OData API
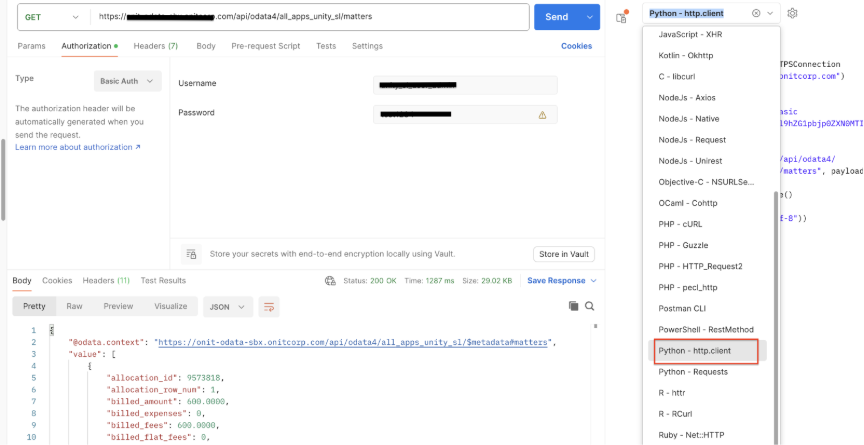
Start Postman and add a new request. Then do the following:
- In the Request URL, type the below endpoint https://{unity-elm-odata} .com/api/odata4/all_apps_{client_slug}/{entity_name}
Note: Replace the {client_slug} with the name of your client_slug. Replace {entity_name} with the name of the entity that was returned as part of the list of entities. - On the Authorization tab, select type as Basic Auth and enter the username and password that were provided to you.
- Press the Send button.
- Click on the Code icon to generate the code in the language of your choice.
Use Python to Access OData
Below are several Python code snippets for connecting to the OData API using basic authentication, pulling incremental data, and updating a target database.
Connect using basic authentication:
import http.client
import http.client
conn = http.client.HTTPSConnection("{unity-elm-odata} .com")
payload = ''
headers = {
'Authorization': 'Basic dW5pdHlfc2xfdXNlcl9hZG1pbjp0ZXN0MTIzNA=='
}
conn.request("GET", "/api/odata4/all_apps_unity_sl/matters", payload, headers)
res = conn.getresponse()
data = res.read()
print(data.decode("utf-8"))
Supported features from OData specification
The following are the high-level features that are enabled for the OData service, per the OData specification.
Available query options
$filter
$count
$orderby
$skip
$top
$select
Built-in operators for $filter
Equals (eq)
Not equals (ne)
Greater than (gt)Data as a Service
Greater than or equal (ge)
Less than (lt)
Less than or equal (le)
And
Or
Not
For more information, see OData operators.
OData Query Examples
Here are few examples of the various query features that can be used as part of OData. Please refer to OData specification for more details about querying and filtering data using OData specification.
Get the count of rows for a given entity: https://{unity-elm-odata} .com/api/odata4/all_apps_awsustau/matters/$count
2.Get top 5 rows: https://{unity-elm-odata} .com/api/odata4/all_apps_awsustau/matters?$top=5
3.Skip first 5 rows and get top 5 rows: https://{unity-elm-odata} .com/api/odata4/all_apps_awsustau/matters?$skip=5&$top=5
4.Order by field name in descending order: https://{unity-elm-odata} .com/api/odata4/all_apps_awsustau/matters?$orderby=created_at desc
5.Filter data using the filter expression: https://{unity-elm-odata} .com/api/odata4/all_apps_awsustau/matters?$filter=area_of_law eq 'Commercial'
6.Select specific fields from a given entity: https://{unity-elm-odata} .com/api/odata4/all_apps_awsustau/matters?$select=id,status,atom_numberData as a Service
DaaS Troubleshooting
This section describes how to troubleshoot Unity Data as a Service and potential connectivity issues
Communication error while connecting with Tableau or Power BI
When a user tries to log in to https://{unity-elm-odata} .com/api/odata4/all_apps_awsustau/ even with the correct credentials, Tableau or Power BI can still sometimes face communication issues with OData.
Ensure there are no leading or trailing spaces, which can sometimes happen while using copy/paste.
Timeout Session
An idle browser window (20+ minutes) will lose connectivity, and subsequent use of the UI will result in a session timeout (Error 408). Close and re-open the browser to start a new session to resolve this issue.
Additional entities or fields
Any additional tables or fields required from Unity ELM can be exposed via DaaS on request.