Unity's Enhanced Invoice Rejection & Adjustment flows help customers simplify their review process while making information clearer and more visible to vendors. This article covers invoice settings that admins can manage for rejections, adjustments, and other system-level invoice requirements. This menu is separated into the following sections:
- Adjustment Reasons: Allows admins to edit the descriptions for the list of built-in adjustment reasons reviewers can choose from when adjusting an invoice's total or line items.
- Rejection Reasons: Allows admins to create, edit, and/or delete the rejection reasons reviewers can choose from when rejecting an invoice.
- Preferences: Controls mandatory fields/notifications for invoice adjustments and rejections and allows admins to enable or disable other settings (e.g., preventing special characters in invoice numbers).
- Invoice Validation Rule Categories: Allows admins to manage the types/labels that can be used to categorize Invoice Validation Rules.
- Outside Counsel Guideline Files: Upload and assign system-level billing guidelines for Onit's Spend Agent review integration.
To access these sections in Unity, go to Settings > Invoice Settings.
Adjustment Reasons
Admins can customize the descriptions tied to adjustment reasons to help reviewers determine which option to select when adjusting the invoice total or individual line items. In addition, this reduces back-and-forth communication between vendors and reviewers by making the information more visible and helpful for law firms in the vendor portal.
The Adjustment Reasons tab displays the following columns:
- Adjustment Code (read-only): Abbreviation that appears in parentheses next to the adjustment reason. By default, the table is sorted by code in alphabetical order.
- Reason (read-only): Name/label that appears in the dropdown list shown to reviewers.
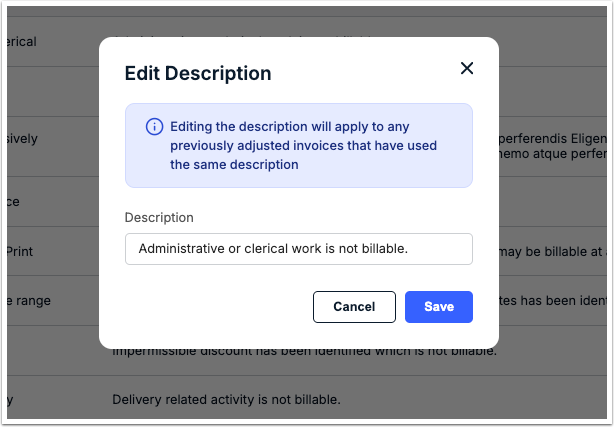
- Description (editable): Long description that appears if the reason is selected.
- Actions: Click ... (more) and select Edit to modify the text shown on invoices in Unity and the Vendor Portal.
If editing the description, the updated text applies to all historical invoices on which the adjustment reason was used. Click Save.
Rejection Reasons
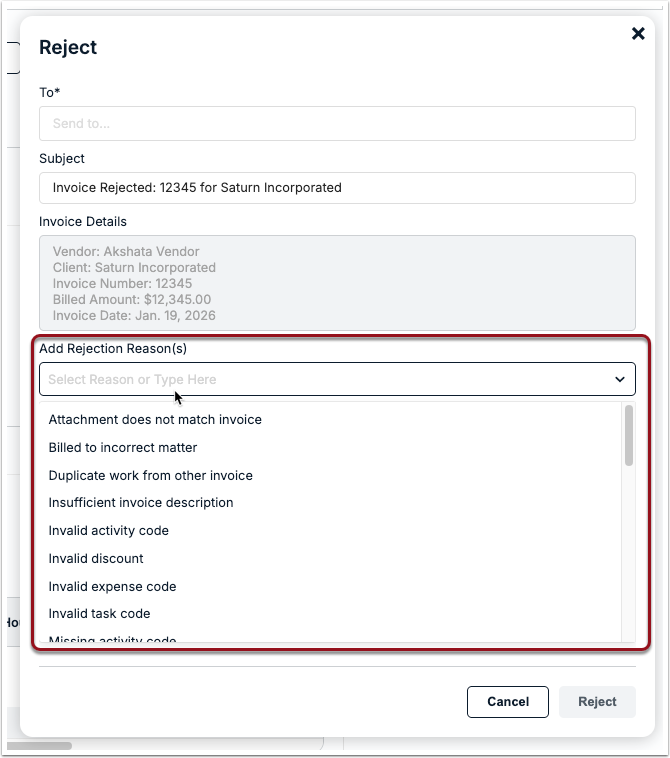
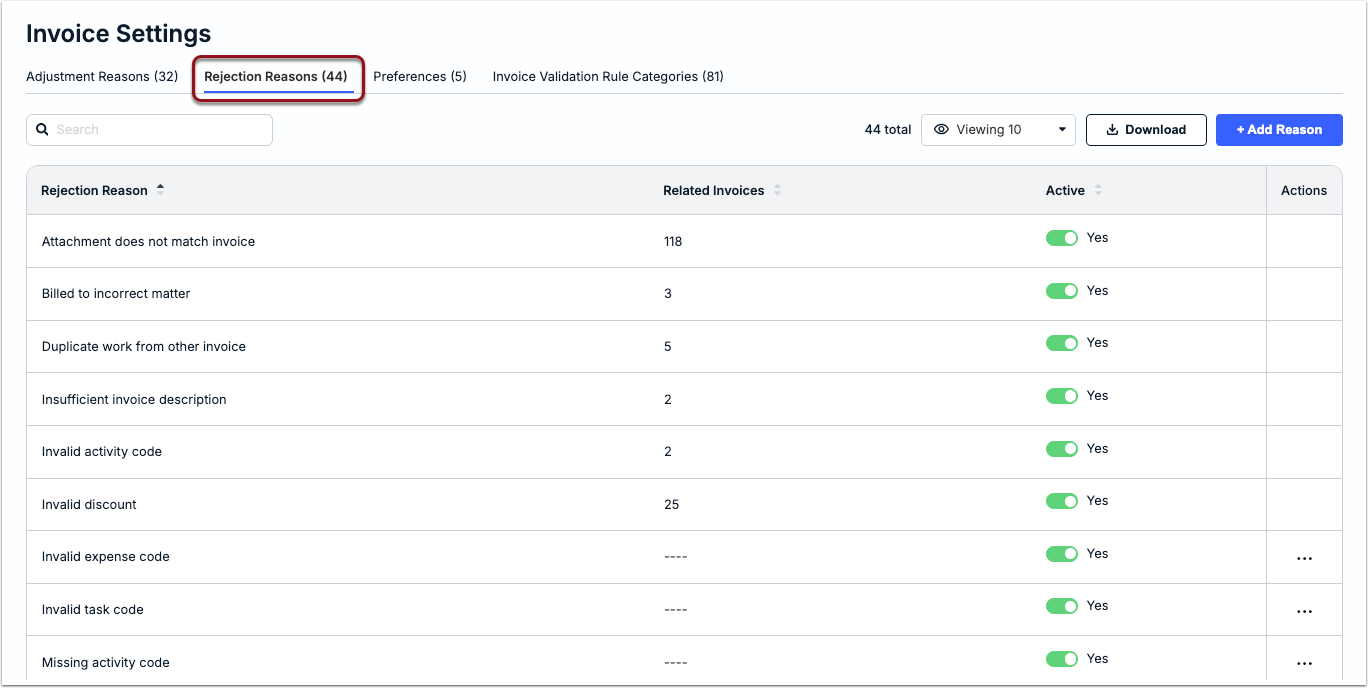
To simplify the invoice review process, customers can use and customize our built-in rejection reasons and/or create their own based on vendor billing needs and standard processes. Active rejection reasons appear to reviewers as a list of options on invoices, as shown below.
To view existing rejection reasons, make changes, or add your own, switch to the Rejection Reasons tab from Settings > Invoice Settings. To see the list of built-in rejection reasons available to all customers, click here.
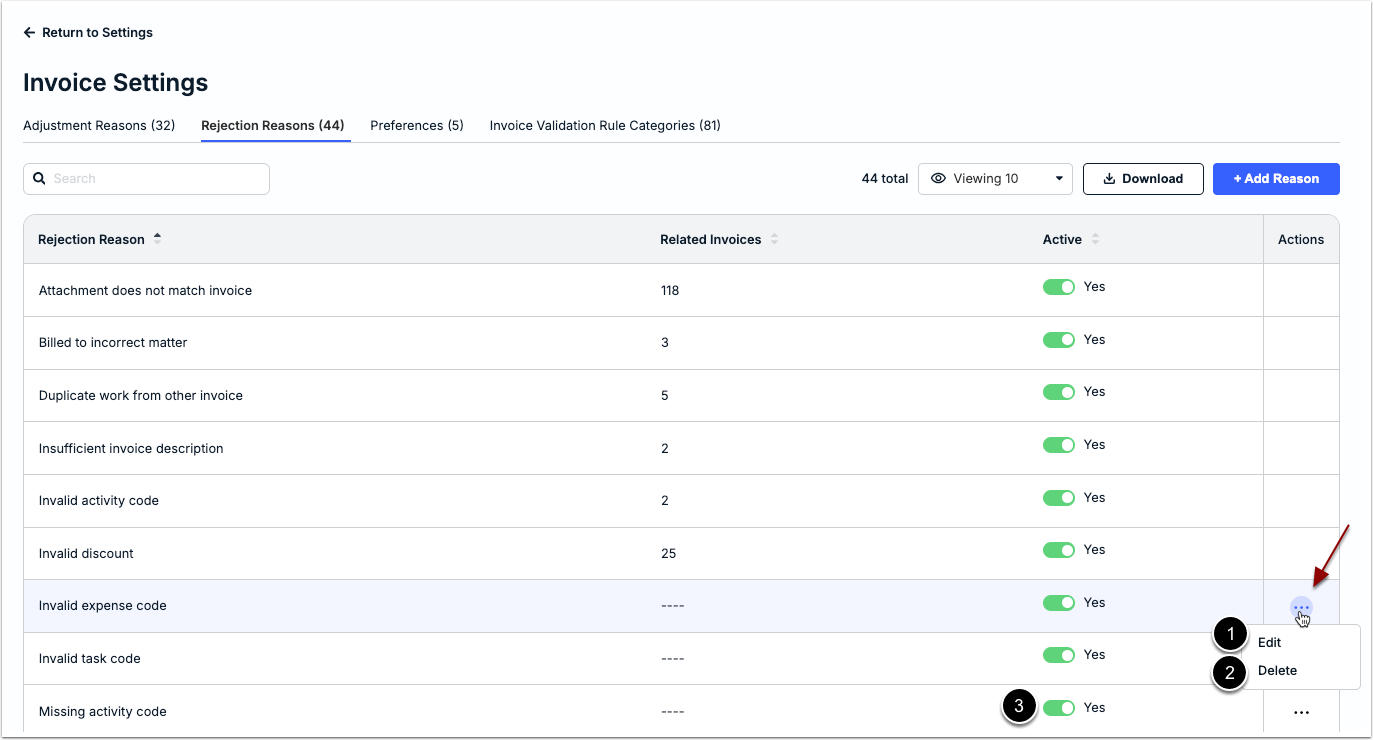
Managing Invoice Rejection Reasons
You can do the following from this view:
- Click ... (more) under Actions and select Edit. Update the text and click Save.
- Click ... (more) under Actions and select Delete. Click Yes when prompted to confirm.
- Click the toggle under Active once to deactivate the reason so that it is no longer visible to reviewers.
Creating Custom Invoice Rejection Reasons
If the built-in rejection reasons do not address all of your vendor billing scenarios, you can create custom reasons that will appear in the list of options shown to invoice reviewers when rejecting an invoice.
Before Continuing
Review the following notes and considerations before moving forward:
- New rejection reasons are set to active by default, which means they will immediately appear in the list of options.
- All rejection reason names must be unique; duplicate names return an error message.
- A maximum of 250 characters are allowed for each invoice rejection reason name.
- Confirm that a similar or overlapping rejection reason does not already exist to avoid confusion.
- Check whether editing an existing rejection reason addresses your need; the option to edit is only available if the reason has not yet been applied to one or more invoices.
- Make sure rejection reasons are clear and appropriate since any applied reasons will be visible to the vendor in the Vendor Portal and via email notification (if applicable).
- If a rejection reason has already been used on one or more invoices but needs to be renamed, consider setting it to inactive and then creating a new rejection reason to replace it per the instructions below.
To add a custom rejection reason:
1. Click + Add Reason from the Rejection Reasons tab under Settings > Invoice Settings.
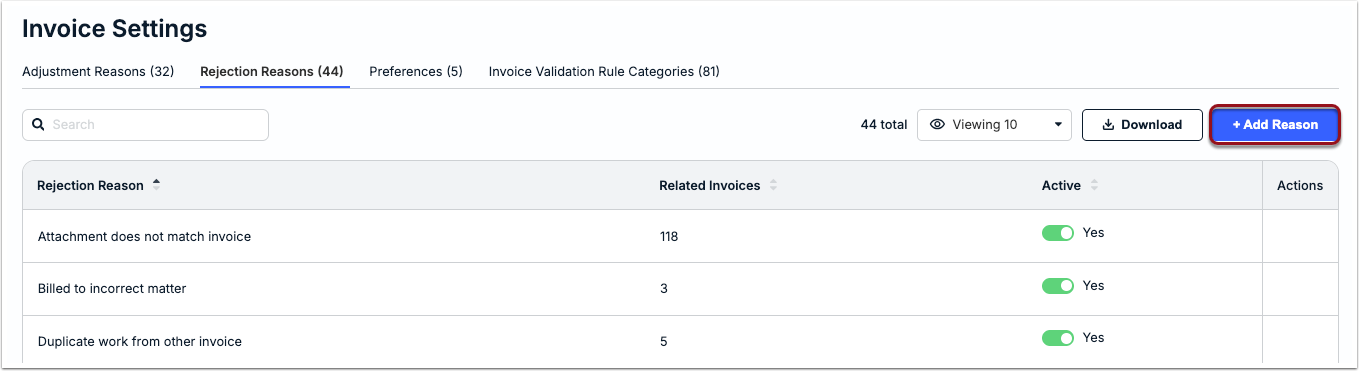
2. Enter the name of the rejection reason in the text field and click Save.

Built-In Invoice Rejection Reasons
The following standard rejection reasons are available to all customers:
- Attachment does not match invoice
- Billed to incorrect matter
- Duplicate work from another invoice
- Insufficient invoice description
- Invalid activity code
- Invalid discount
- Invalid expense code
- Invalid task code
- Missing activity code
- Missing discount
- Missing expense code
- Missing task code
- Unapproved timekeeper rate
- Unauthorized work
- Wrong matter
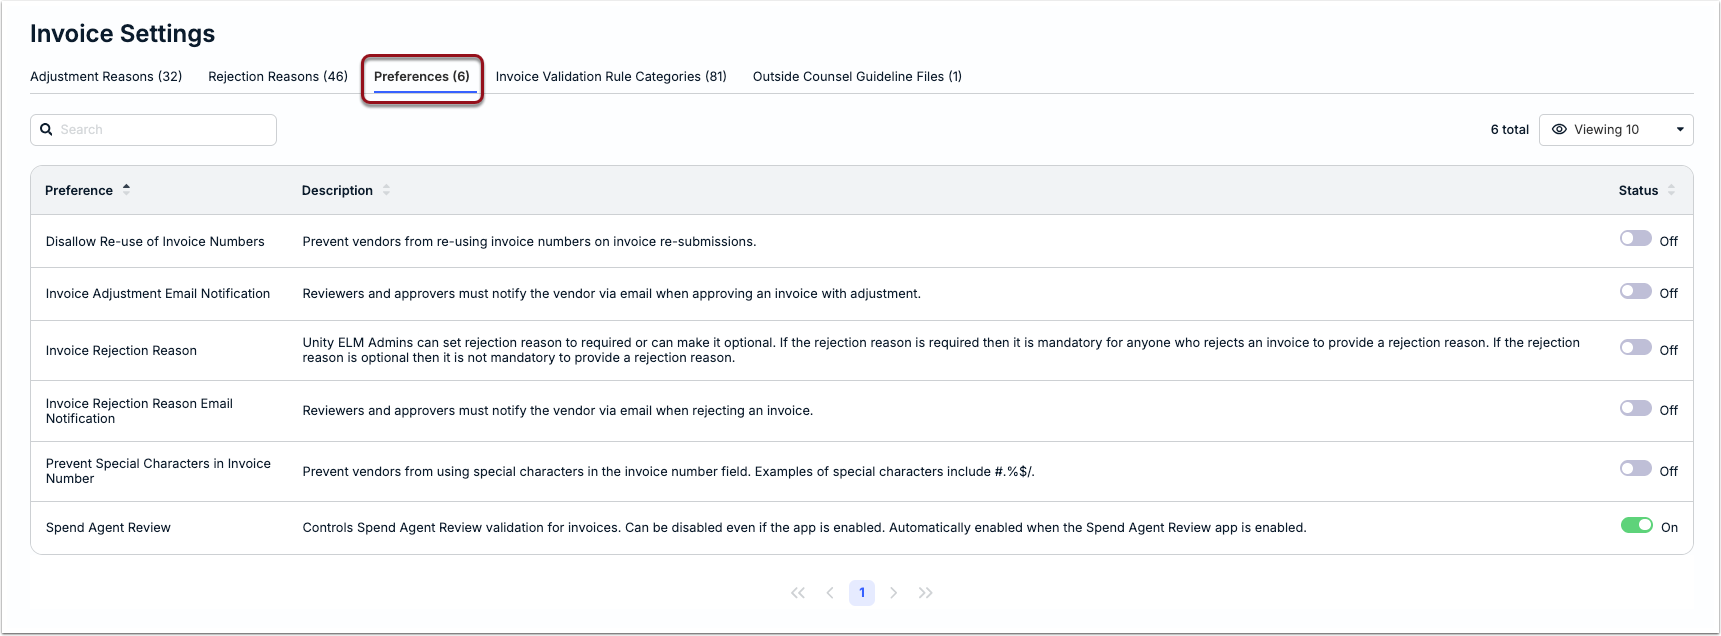
Preferences
Use the Preferences tab under Invoice Settings to enable or disable the following:
- Disallow Re-use of Invoice Numbers: Control whether vendors can use the same invoice number when resubmitting a previously rejected invoice. This is set to OFF by default, meaning that vendors can reuse rejected invoice numbers for resubmissions.
- Invoice Adjustment Email Notification: Set the Notify via Email box as mandatory for all reviewers when approving an invoice with adjustments. This is set to OFF by default; enabling this means reviewers cannot de-select the notification option.
- Invoice Rejection Reason: Set the rejection reason field as required for all reviewers when rejecting invoices (i.e., reviewers must select at least one reason to move forward). This is set to OFF by default (i.e., selecting a reason is optional).
- Invoice Rejection Reason Email Notification: Set the Notify via Email box as mandatory for all reviewers when rejecting invoices. This is set to OFF by default; enabling this means reviewers cannot de-select the notification option.
- Prevent Special Characters in Invoice Number: Control whether vendors can enter special characters in the Invoice Number field in the Vendor Portal. This is set to OFF by default, meaning vendors can enter special characters (e.g., !, #, &, etc.).
- Spend Agent Review: Control whether incoming invoices go through Onit's AI-based validation tool. If set to ON, this can still be disabled for individual vendors as needed without impacting system-level settings. For more Spend Agent information, click here.
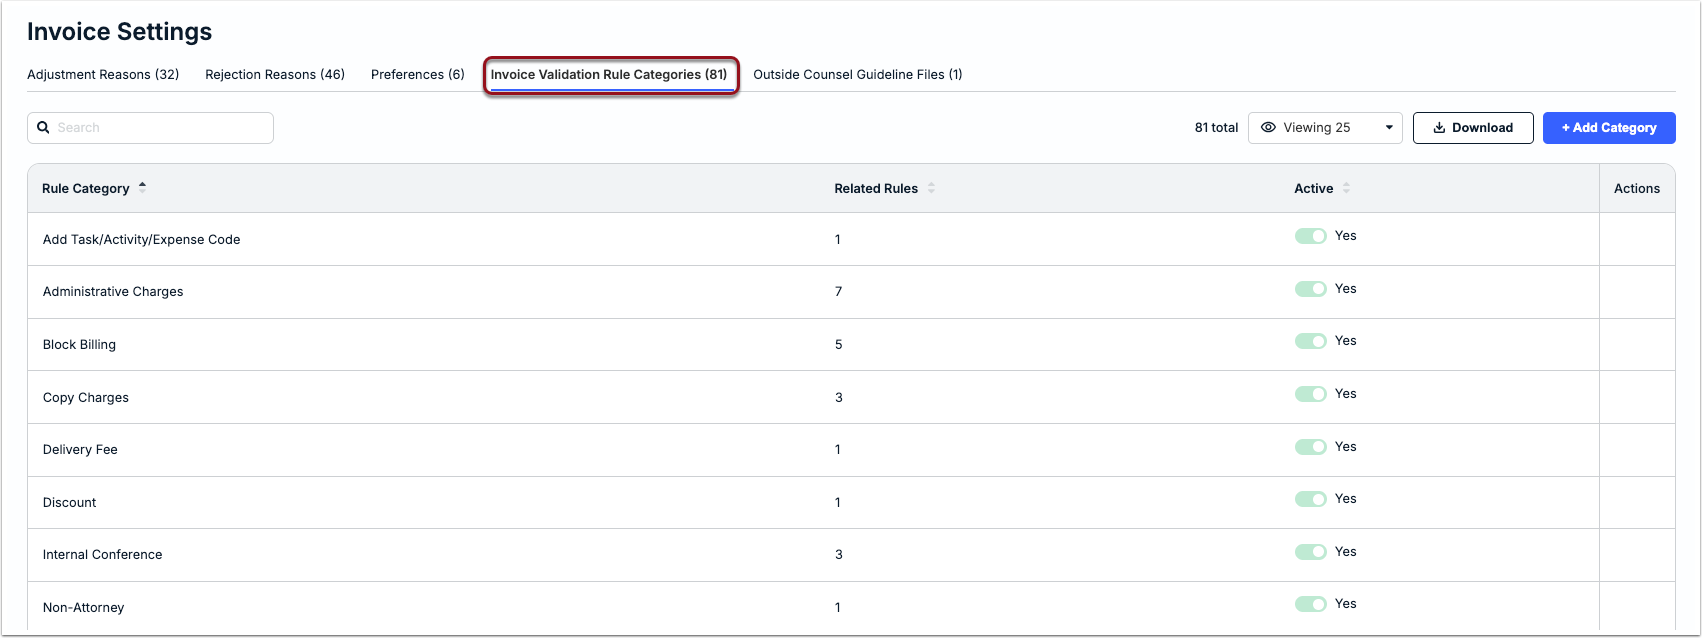
Invoice Validation Rule Categories
Customers can use and/or expand our list of built-in categories to organize and report on Invoice Validation Rules in line with billing needs and scenarios. If you are looking for more information about this feature, click here.
To view existing rule categories, make changes, or add your own, switch to the Invoice Validation Rules tab from Settings > Invoice Settings.
Managing Existing Rule Categories
You can do the following from this view:
- Click ... (more) under Actions and select Edit. Update the text and click Save. A category can only be edited if the Related Rules column displays --.
- Click ... (more) under Actions and select Delete. Click Yes when prompted to confirm. The option to delete a category is only available if the category has no related rules and is deactivated (i.e., Active = No).
- Click the toggle under Active once to deactivate the reason so that it is no longer visible to admins. Click Yes when prompted to confirm. A category can only be deactivated if the Related Rules column displays --.

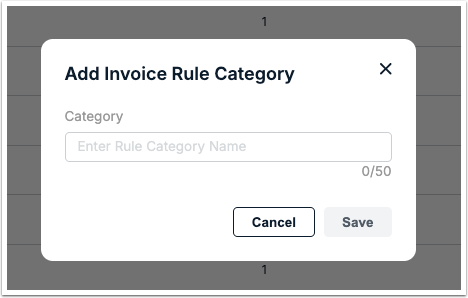
Creating Custom Invoice Validation Rule Categories
If the built-in rule categories do not address all of your vendor billing scenarios, you can create custom rule categories that will appear in the list of options shown to admins when creating or editing an Invoice Validation Rule.
Before Continuing
Review the following notes and considerations before moving forward:
- Up to 50 characters are allowed (including spaces).
- Each category name must be unique; duplicates will result in an error message.
- Category names cannot be blank; at least one letter or character is required to save the category.
- New rules are set to active by default and will be displayed as an option in the Rule Editor when creating or updating rules; to hide it, click the toggle under Active one time
- Once a rule category is active, it cannot be edited or deleted unless you deactivate it.
- Once a rule category is applied to at least one rule, it cannot be deactivated or deleted unless you change the category for its associated rules.
- Rule categories built into Unity cannot be edited or deleted, but they can be deactivated as long as there are no related rules.
1. Click + Add Category from the Invoice Validation Rule Categories tab.
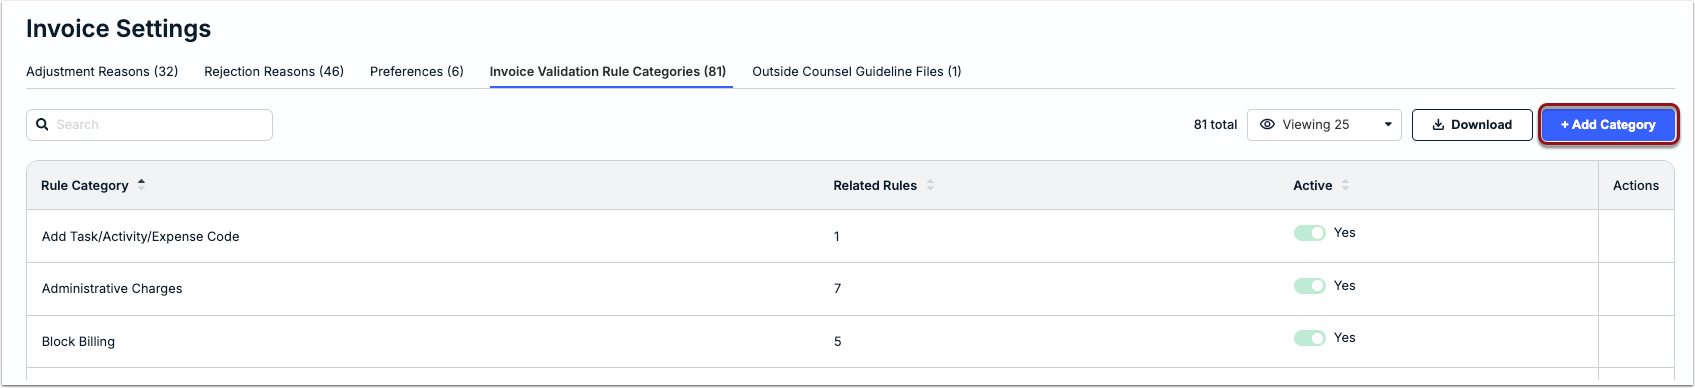
2. Enter the category name and then click Save.
Built-In Rule Categories
Below is the list of built-in rule categories available to all customers. All built-in categories are active by default but can be deactivated if there are no related rules per the details in the section above.
- Add Task/Activity/Expense Code
- Administrative Charges
- Block Billing
- Copy Charges
- Delivery Fee
- Discount
- Internal Conference
- Non-Attorney
- Overhead Cost
- Postage Fee
- Research
- Travel
- Unauthorized Expenses
- Vague Description
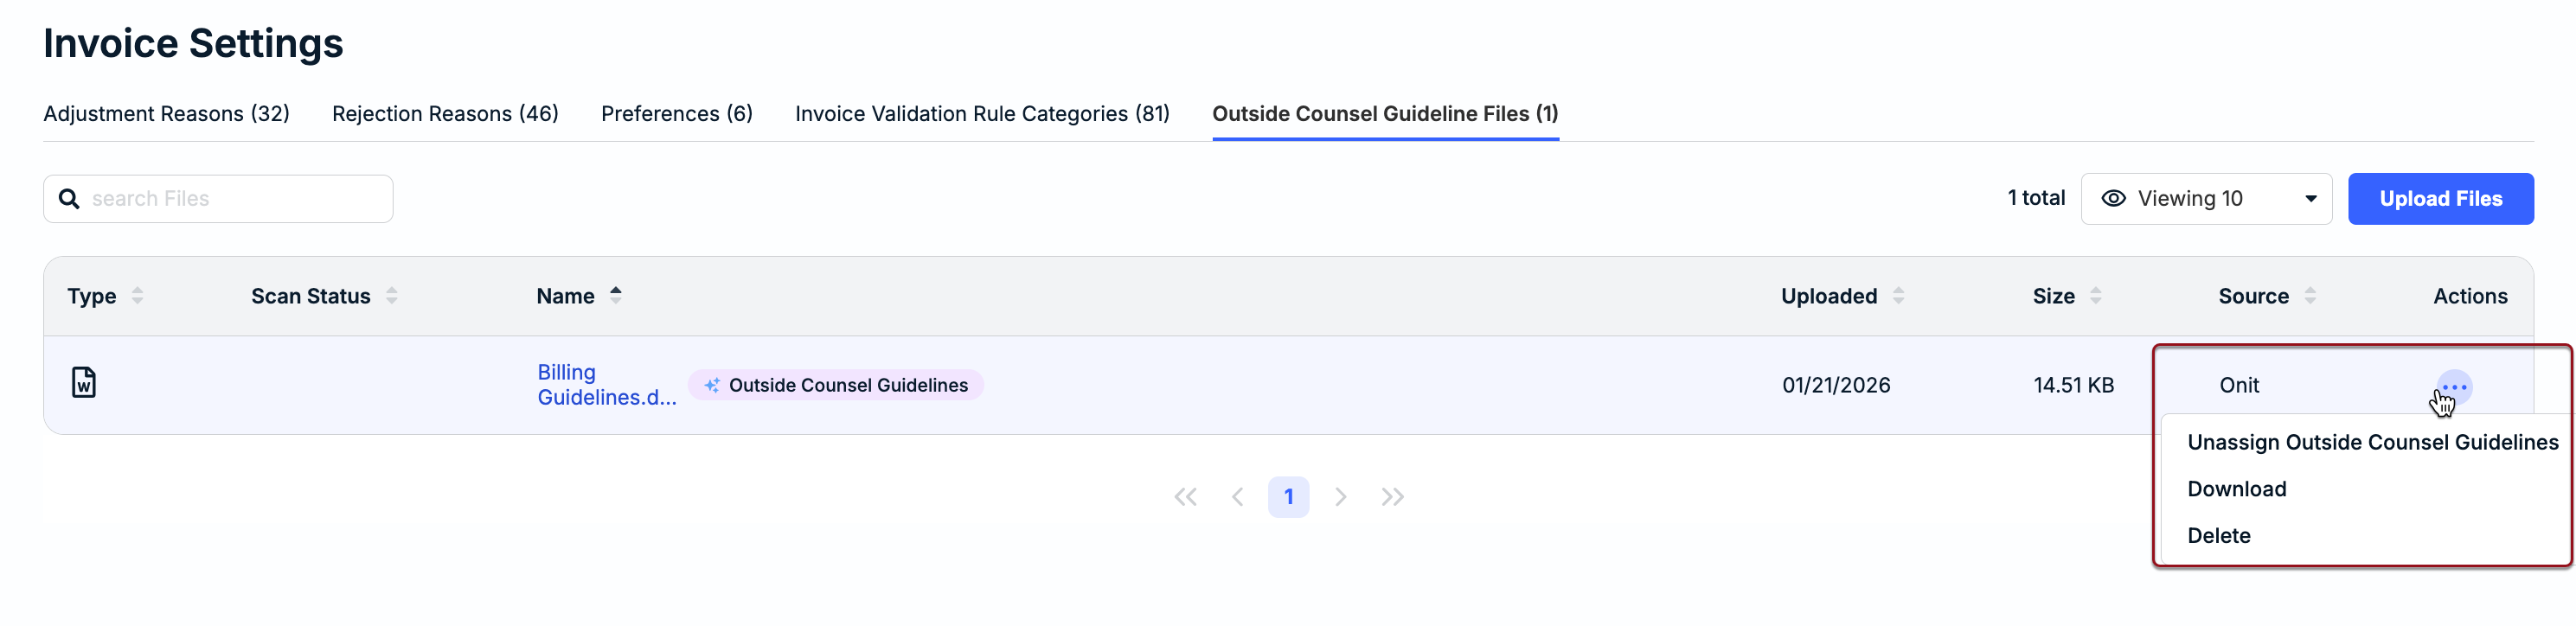
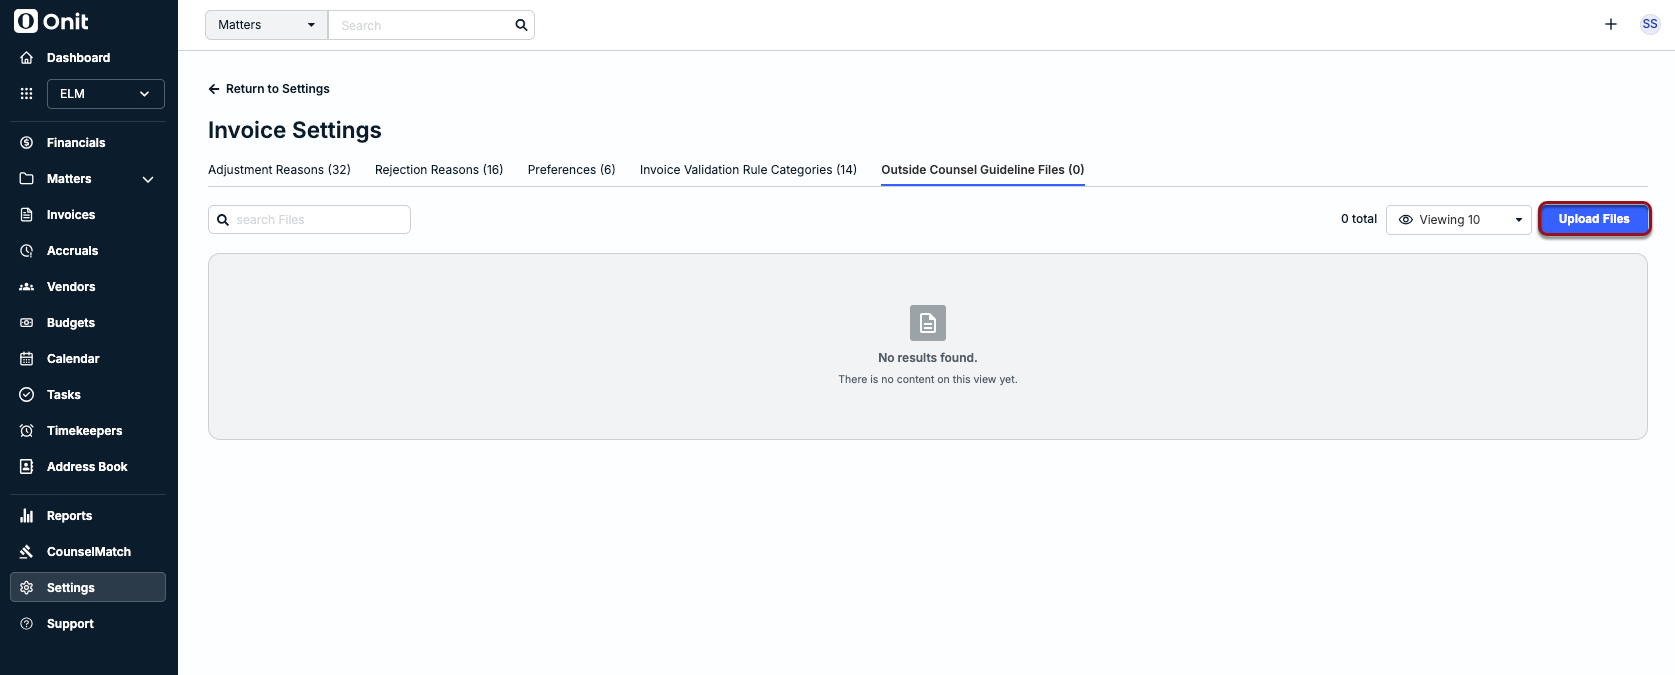
Outside Counsel Guideline Files
The Outside Counsel Guideline Files tab under Invoice Settings is used to upload and/or manage the file that is tagged as the review guidelines for Onit's Spend Agent Integration (if enabled) at the system level. For more information about using Spend Agent, click here.
From the Outside Counsel Guideline Files tab, you can do any of the following:
- Upload a new file and assign it as the system-level billing guideline for Spend Agent review.
- Download any files uploaded as billing guidelines for Spend Agent review.
- Tag billing guidelines file uploaded from a specific vendor record as the system-level default for Spend Agent review.
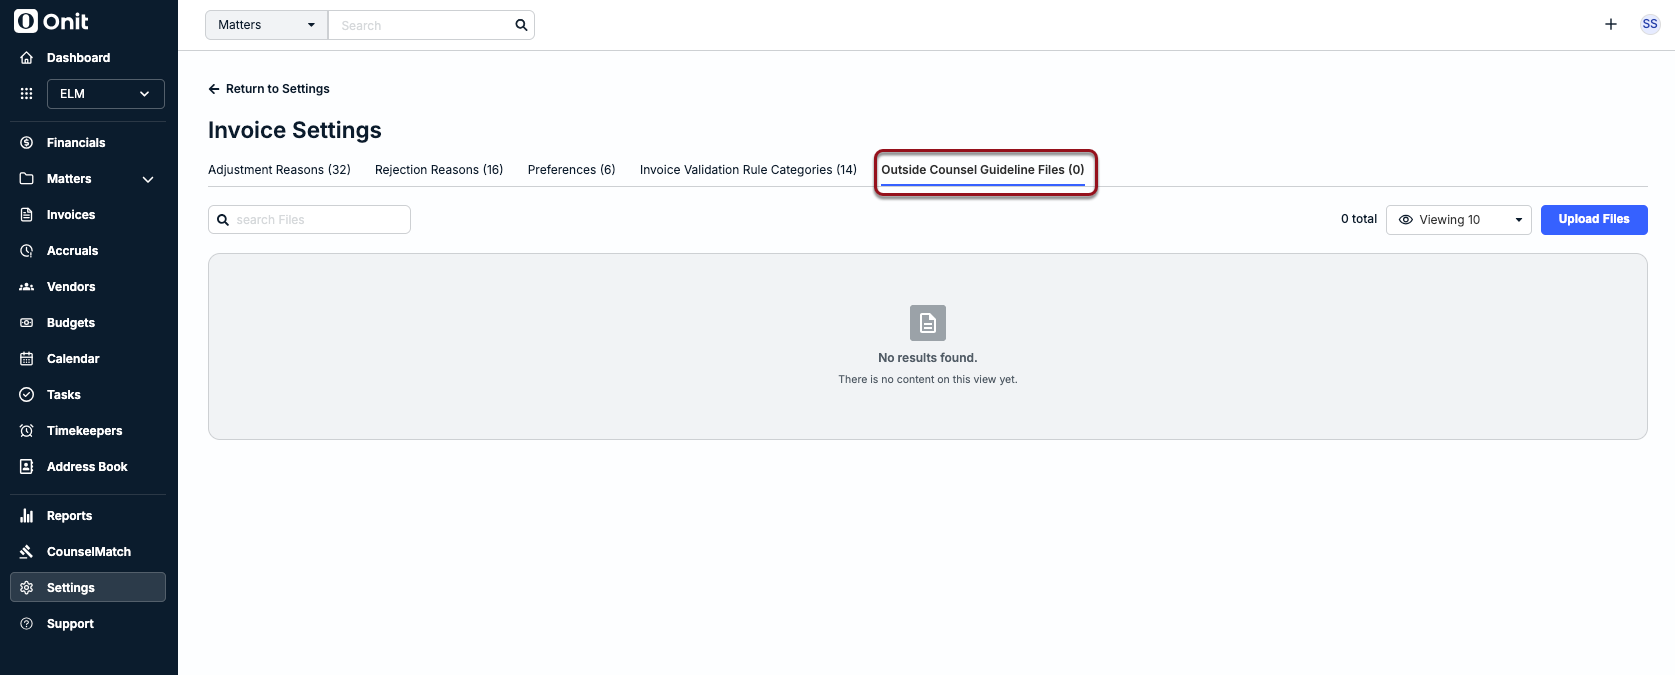
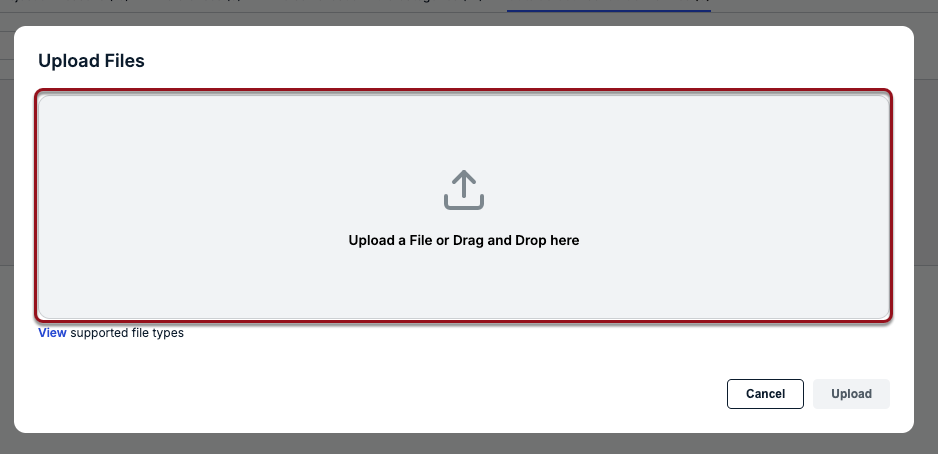
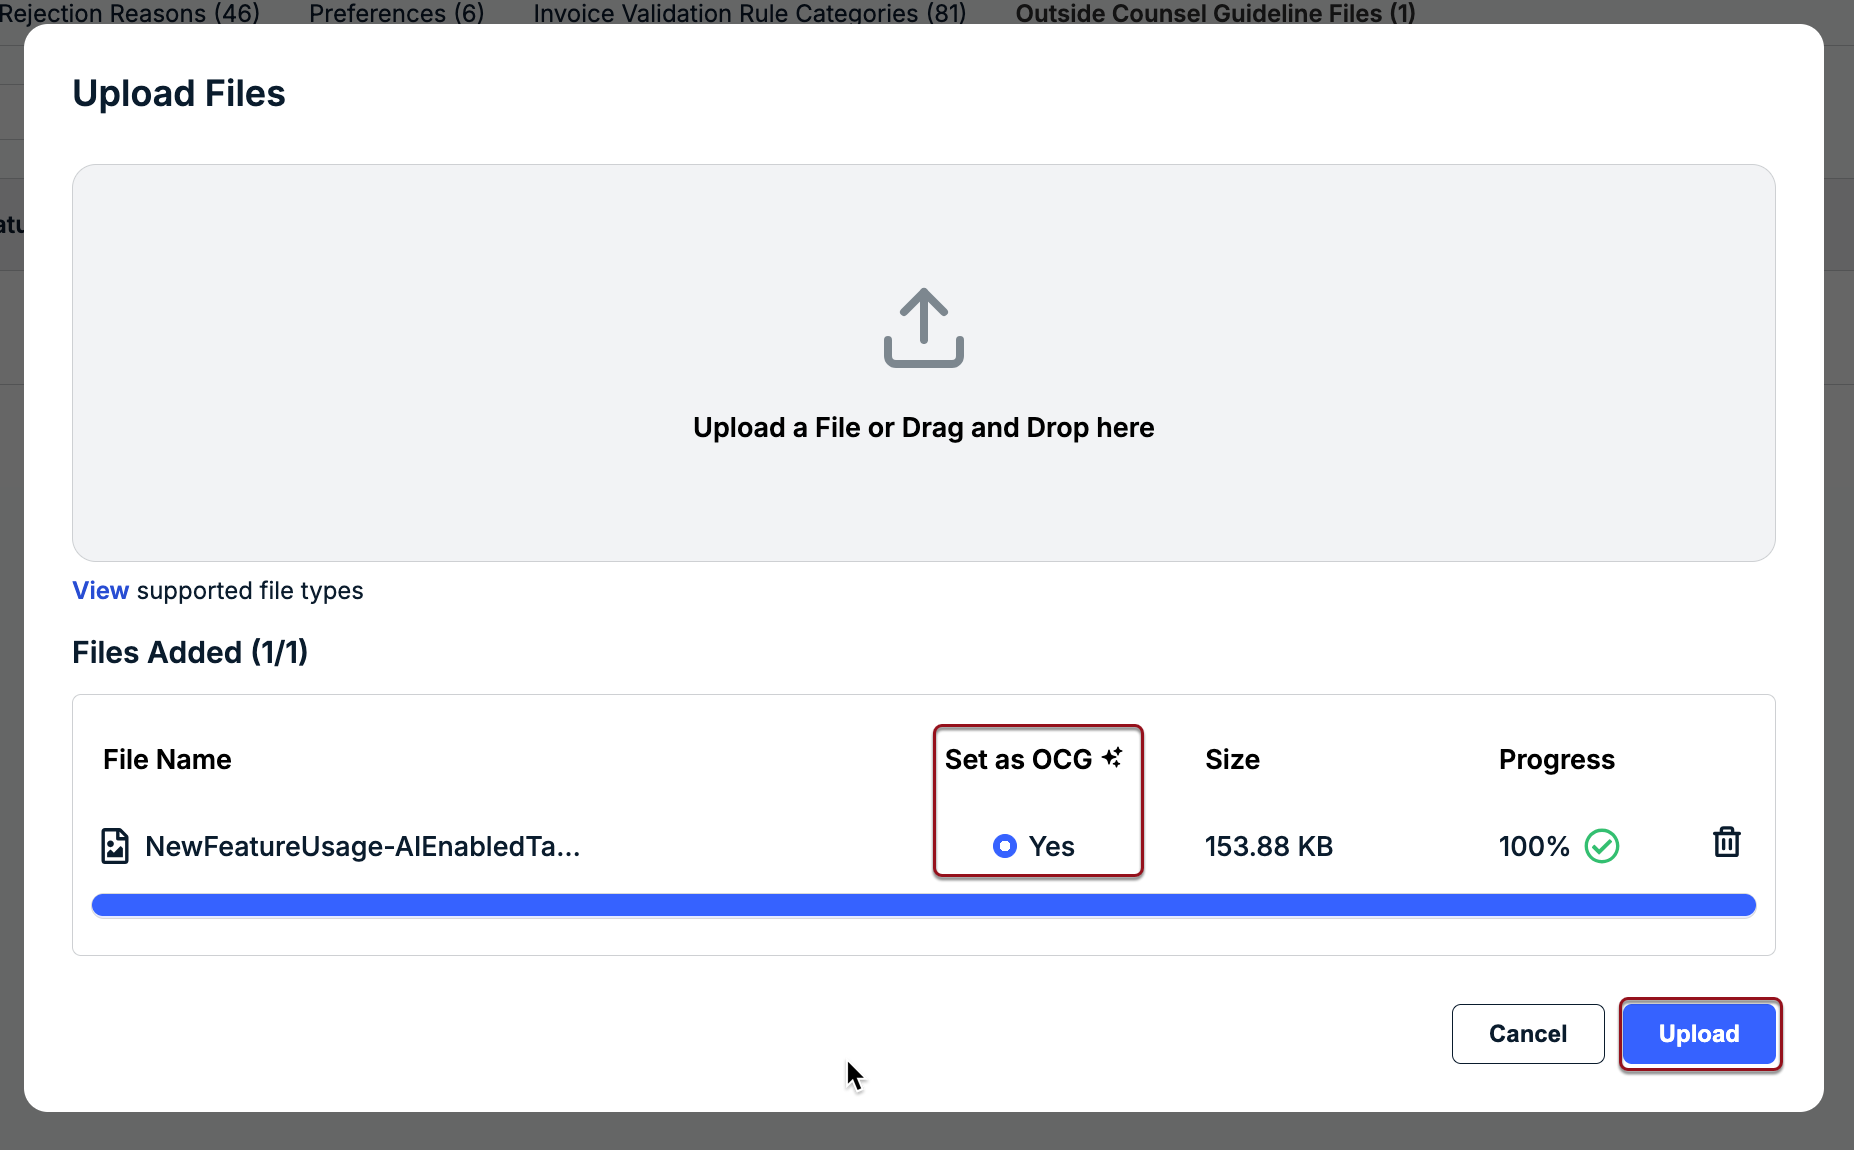
To upload a new file and assign it as a billing guideline:
1. Click Upload Files.
2. Click within the upload section or drag and drop the file into the window.
3. Select Yes under Set as OCG and then click Upload.
Actions for Outside Counsel Guideline Files
Use the ... (more) option under the Actions column to do one of the following for an uploaded file:
- Assign/Unassign
- Download
- Delete