The Editor guides users through loading, filtering, and selecting matters for bulk updates directly from the Unity UI. We recommend using the Editor if the same value change applies to fields across multiple matters. For example, assigning the same vendors to 30 matters.
With a few quick steps, you can choose which columns of information and filters you want to see for matters so that you can easily find and select records based on relevant criteria, such as status, matter group, open date, matter template, or even custom attributes.
This article provides instructions for how to use and navigate the Editor. To get started, go to Settings > Bulk Actions.
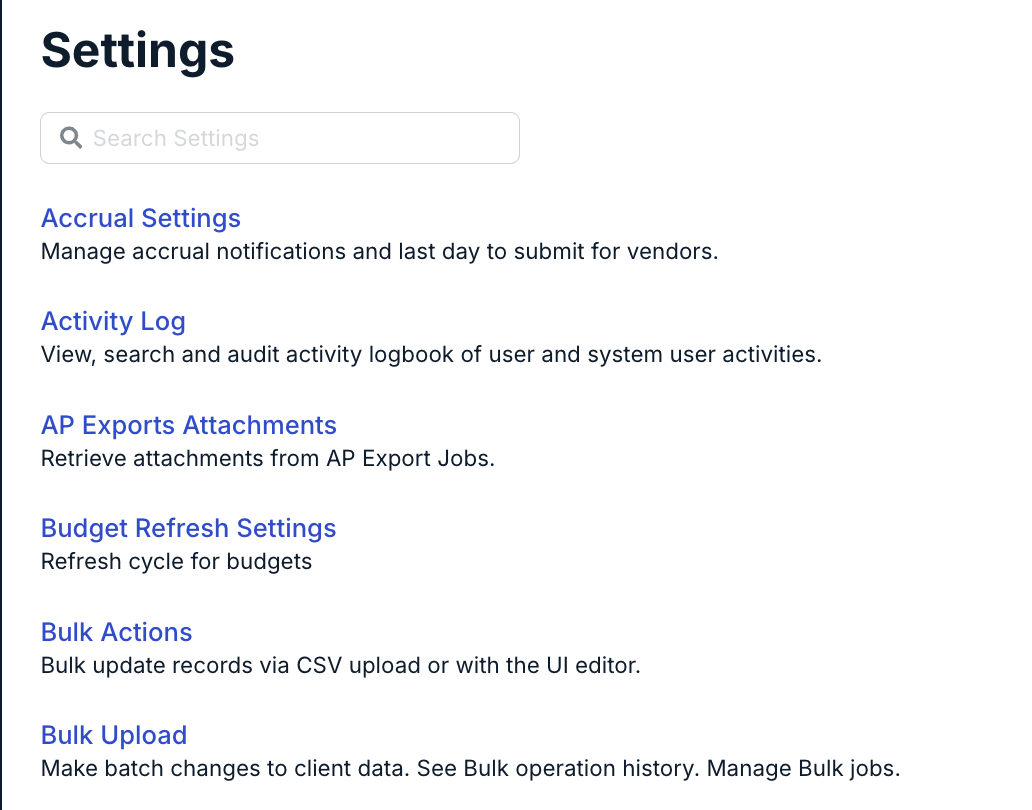
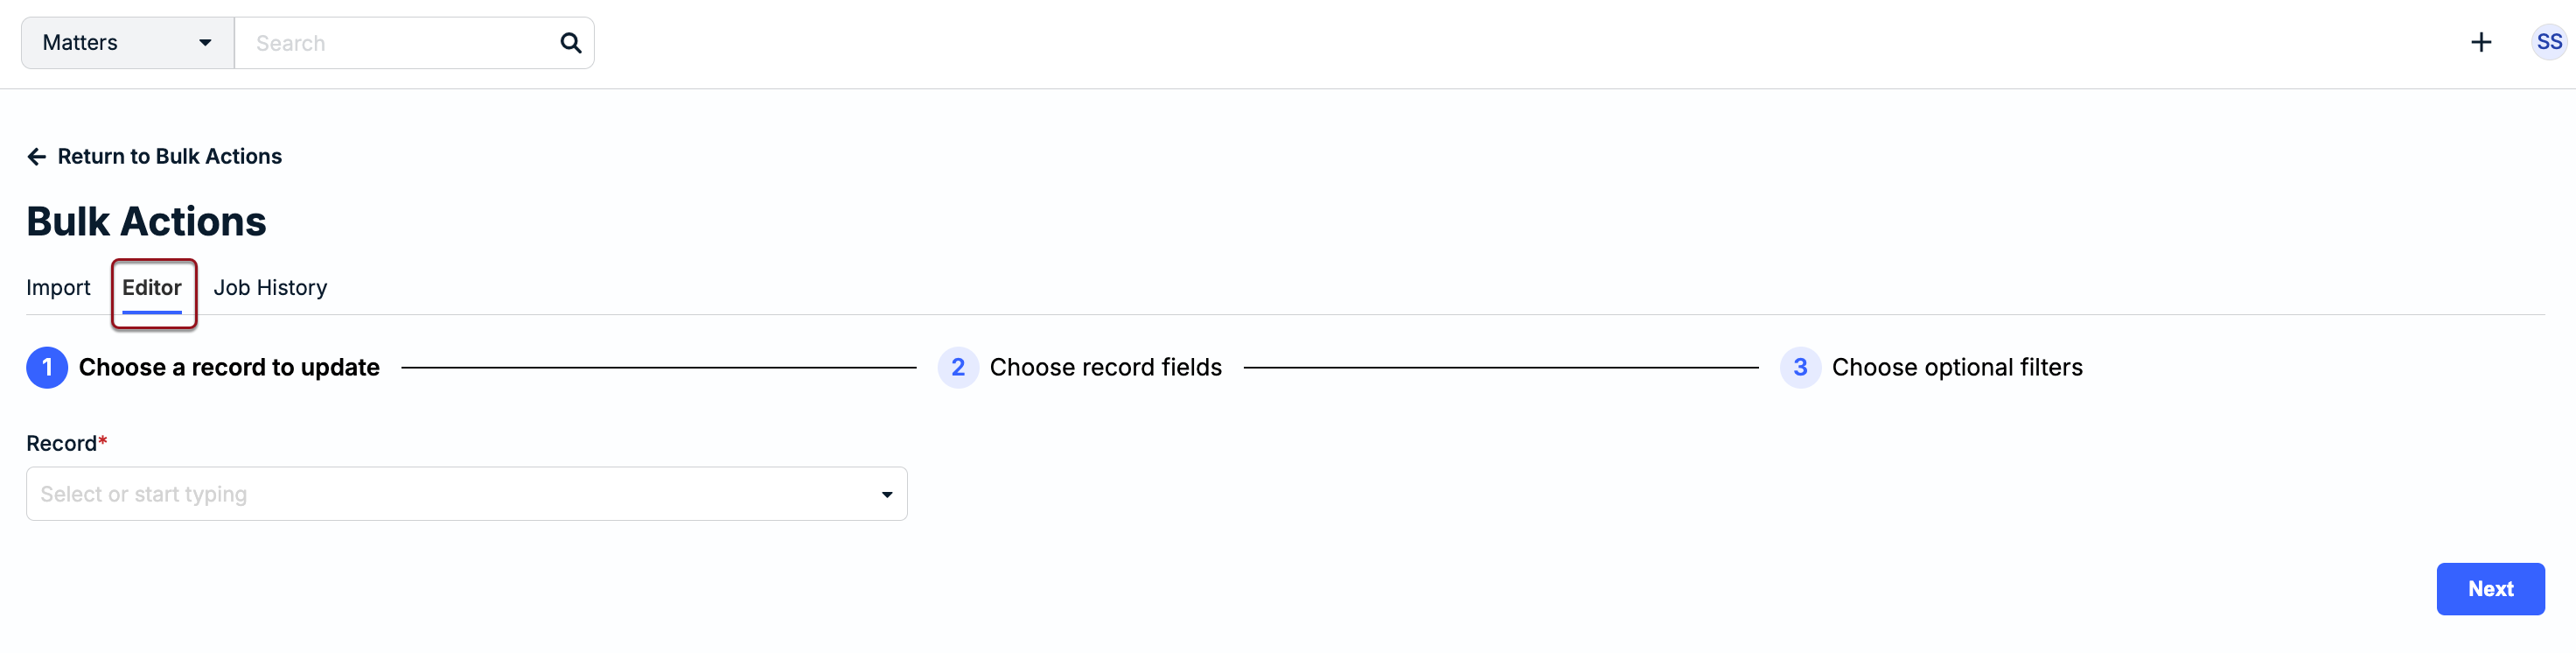
The Bulk Actions screen will appear. Click on Editor on the top tab.
How to Use the Editor
Select a bulk action type from the Record dropdown and click Next.
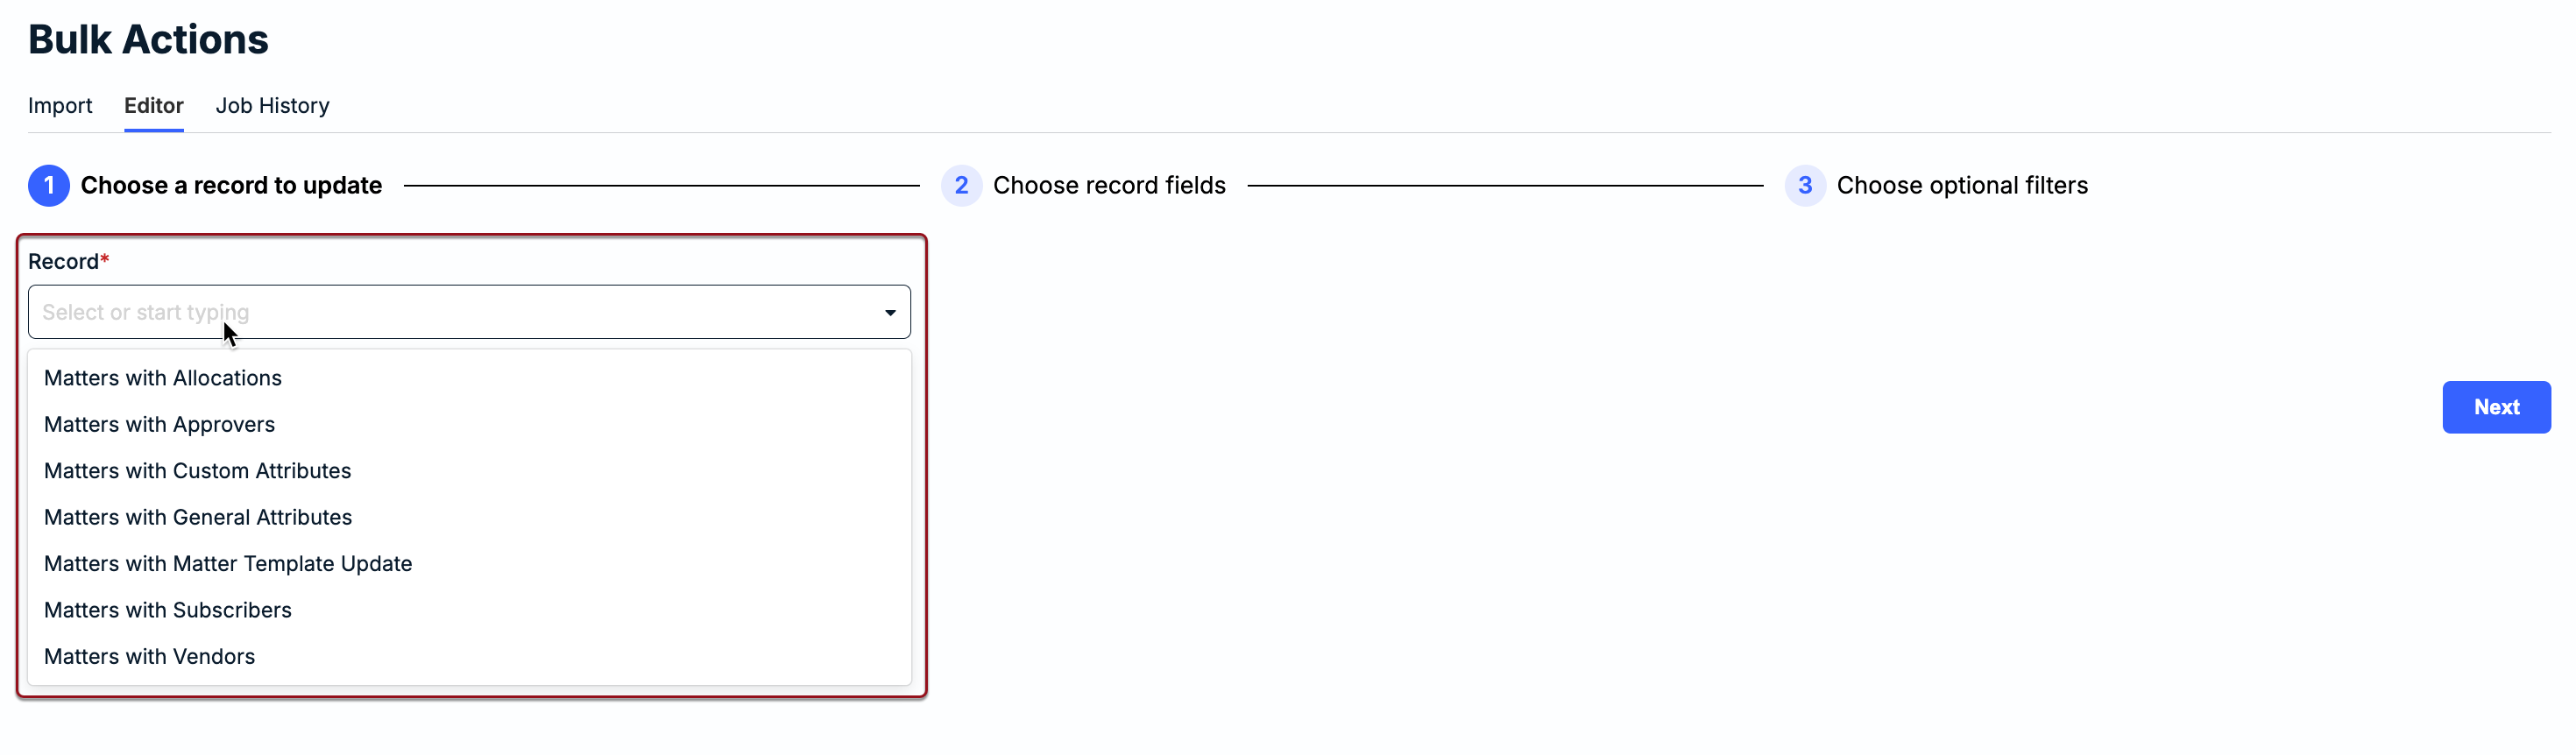
The Record dropdown list shows all supported bulk action types (e.g., Matters with General Attributes, Matters with Vendors, etc.). For example, if updating only standard fields, such as Matter Status and Matter Description, choose Matters with General Attributes. For more information on which option to choose, refer to the Bulk Actions Overview article.
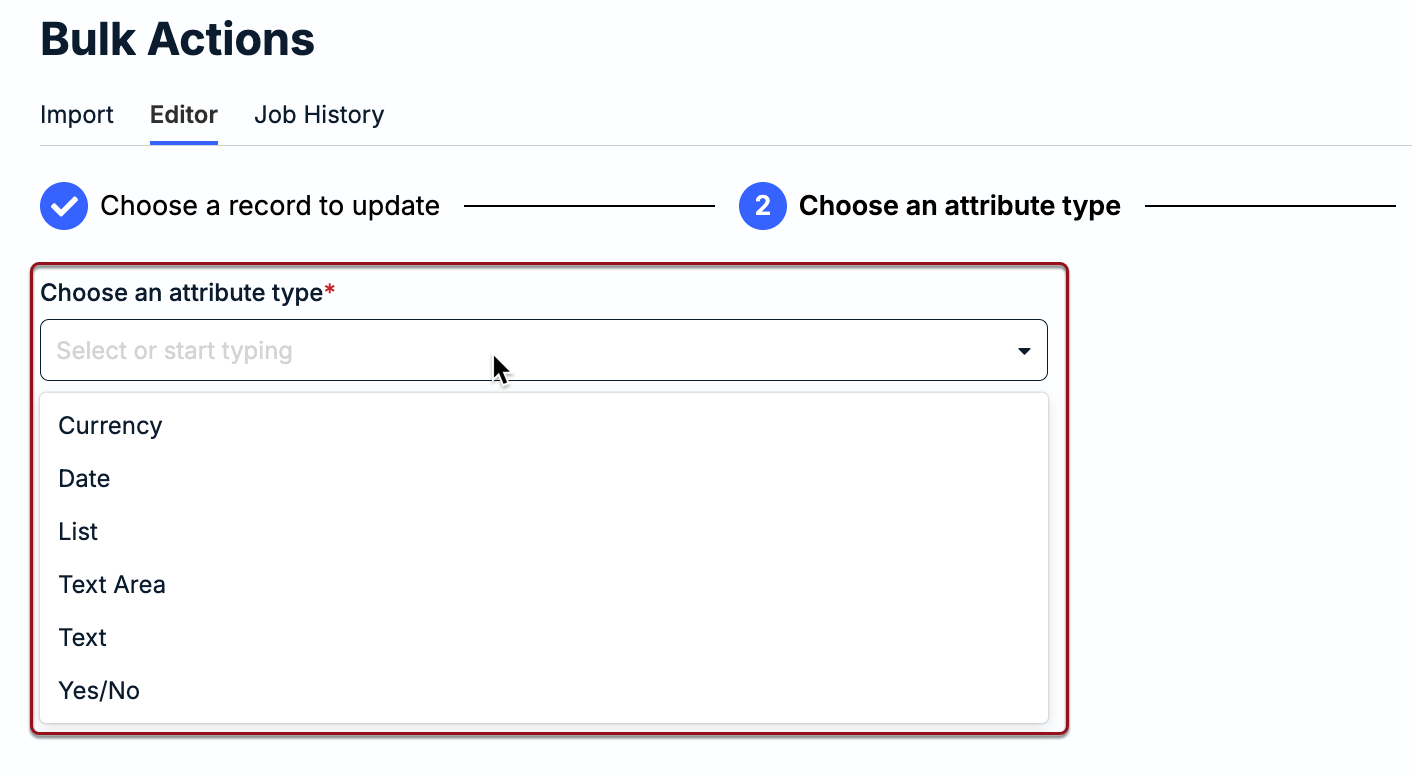
1a. If selecting Matters with Custom Attributes, you are required to choose an attribute type and click Next to move on to the next step (e.g., Currency, List, Yes/No, Text, etc.).
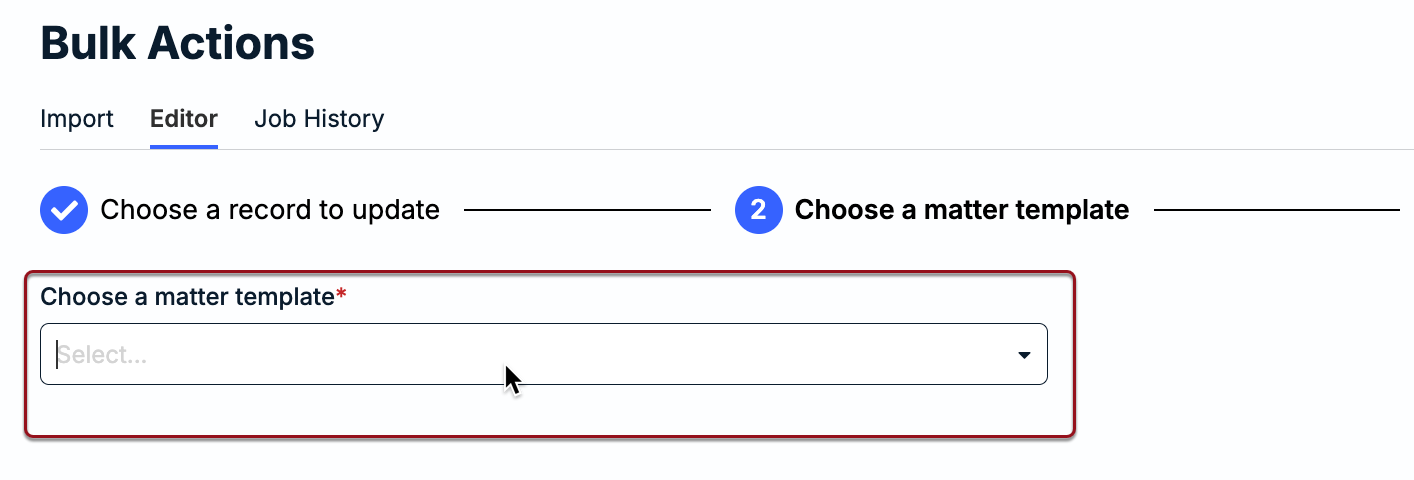
1b. If selecting Matter with Matter Template Updates, you are required to choose a matter template and click Next to move on to next step. Only modified templates with impacted matters are listed in this dropdown.
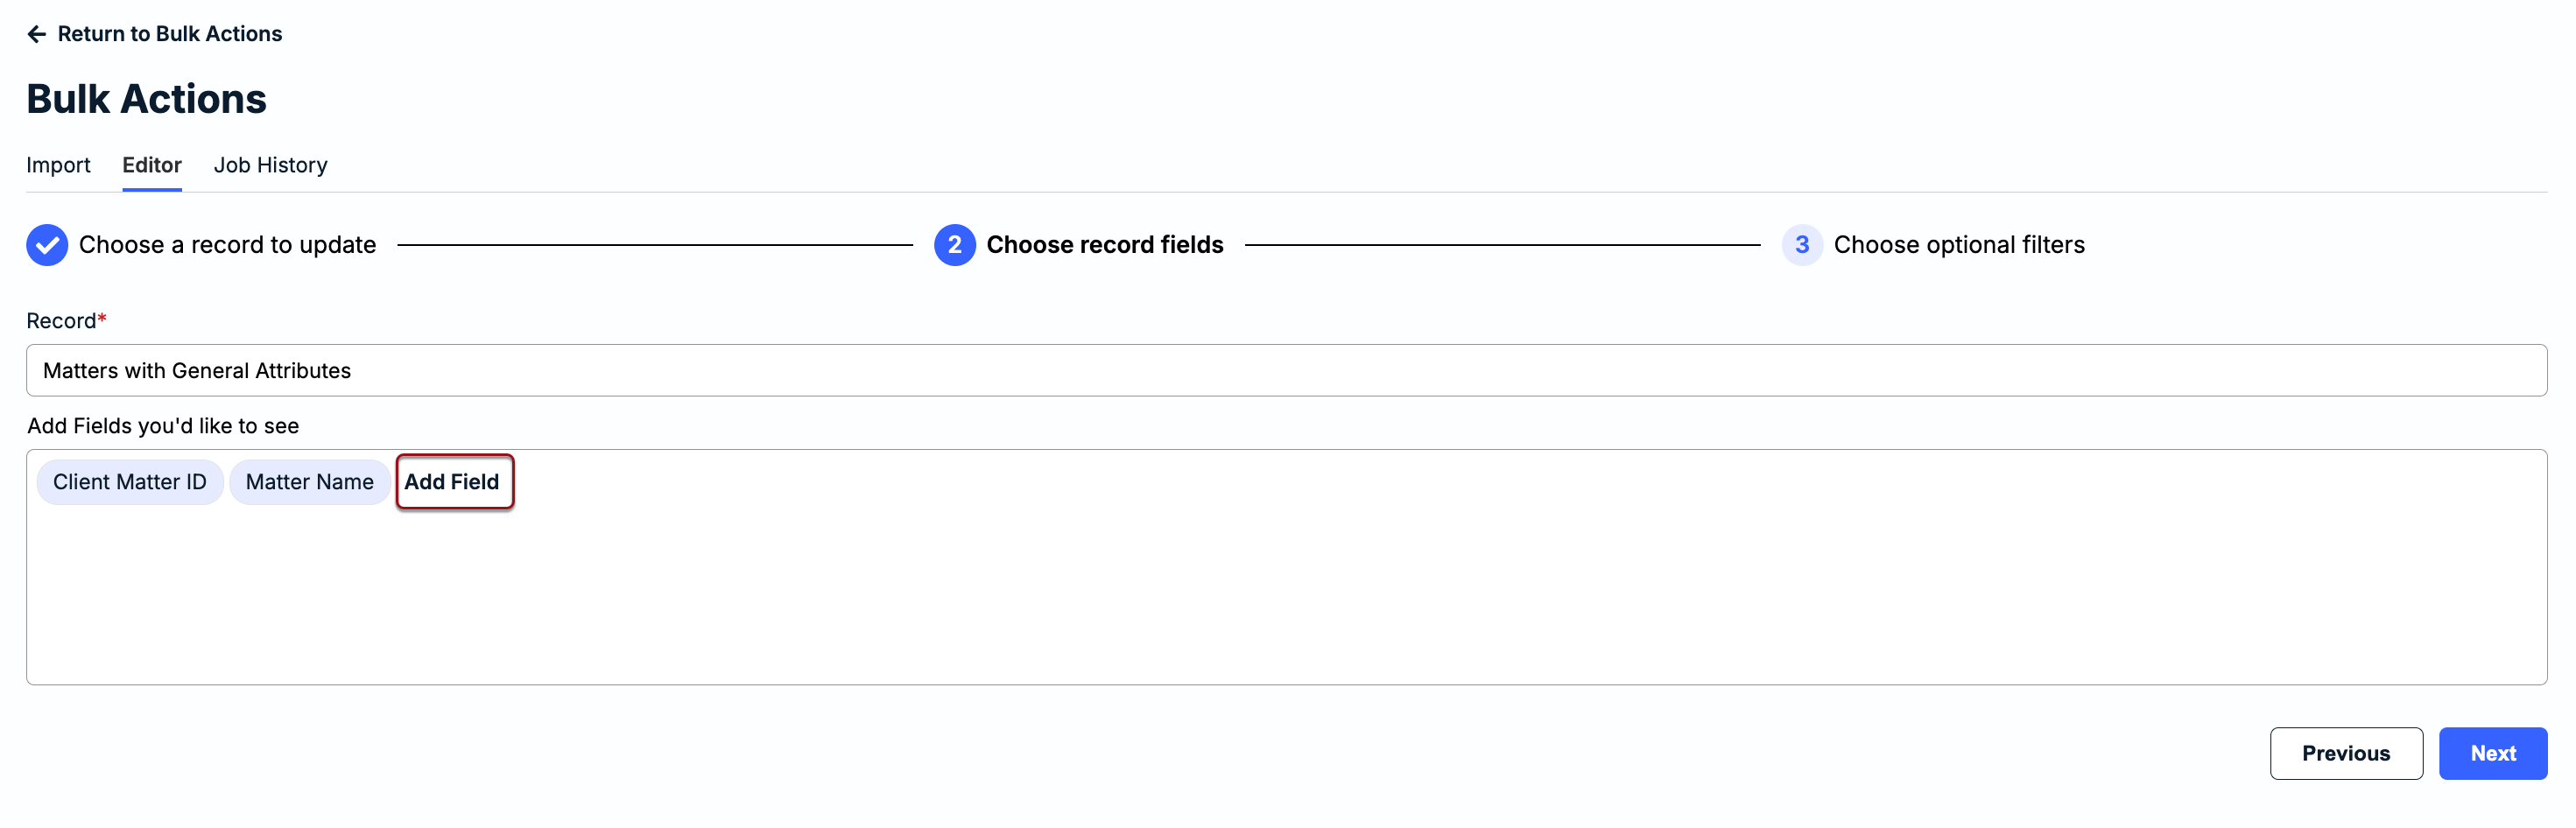
Click Add Field to choose which columns you want to see for matters displayed on the results page and then click Next.
At a minimum, Client Matter ID and Matter Name are shown as default fields for all bulk action types and cannot be removed. Additional default fields appear for certain bulk action types, such as Subscribers for Matters with Subscribers and Vendors for Matters with Vendors.
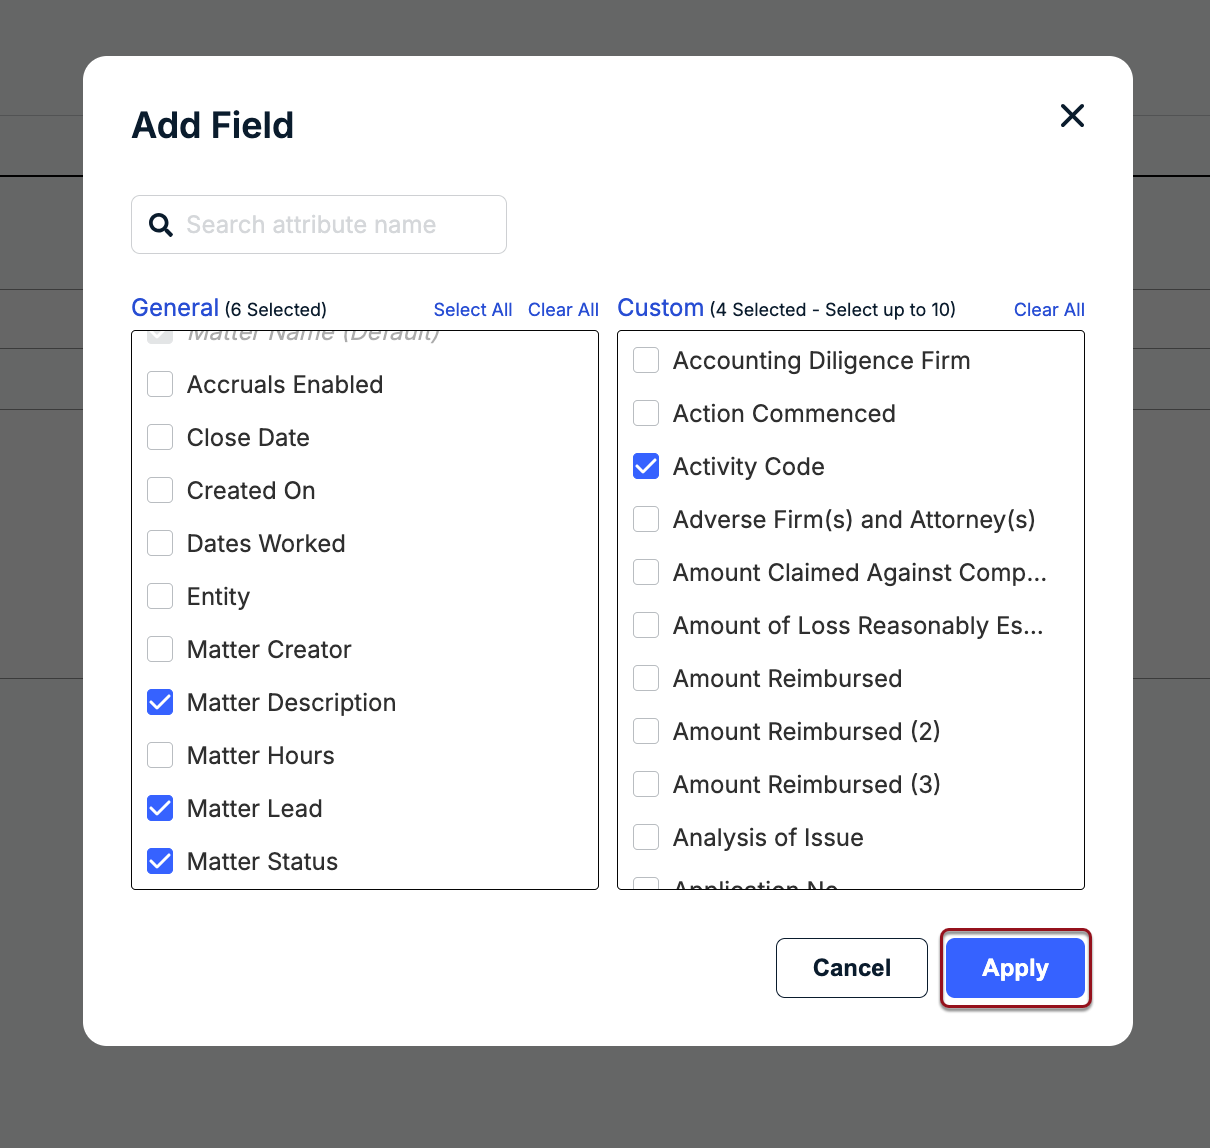
Click Add Field to select additional columns of information you would like to see for matters on the results page. You can choose from general attributes on the left (e.g., Matter Status, Matter Creator, etc.) and up to 10 custom attributes from the right. Click Apply.
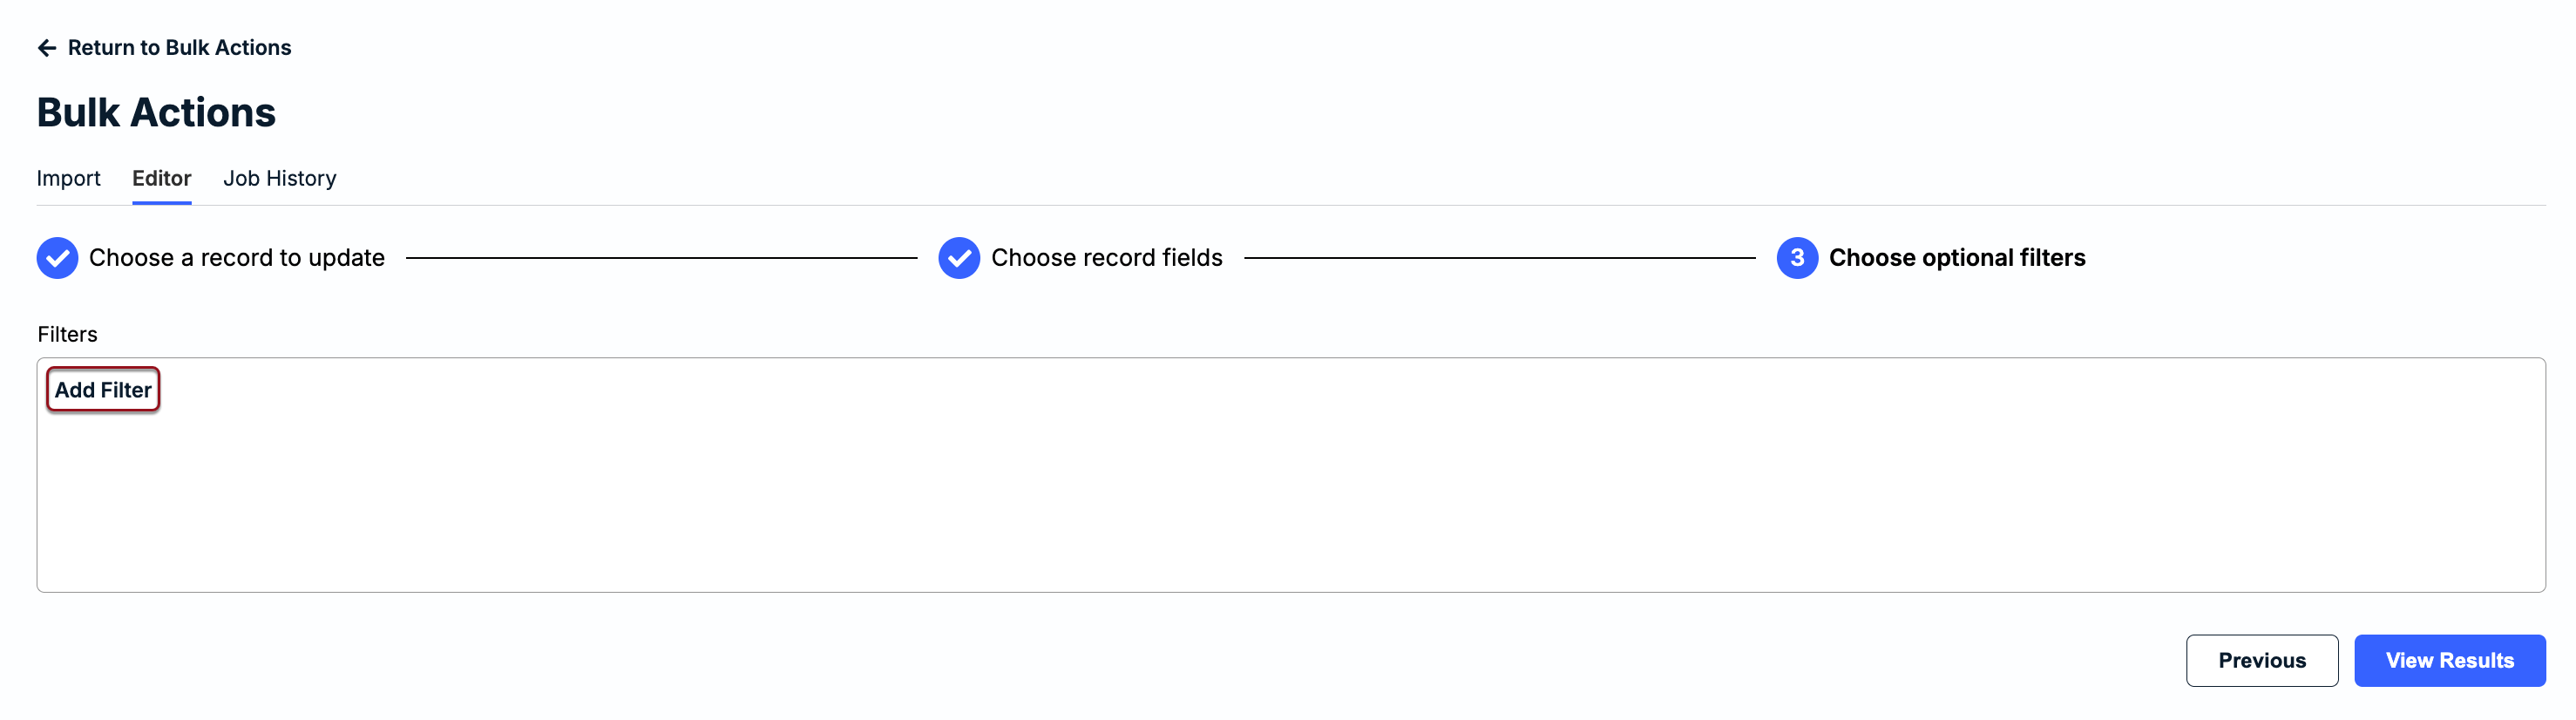
Click Add Filter to choose which filters to narrow the matters displayed on the results page and then click View Results.
Defining filters will help you quickly find matters you are looking for by applying specific criteria, such as status, assigned vendors, or matter groups, on the next page. If no filters are selected, you will only be able to sort the list of matters by the columns selected in Step 2.
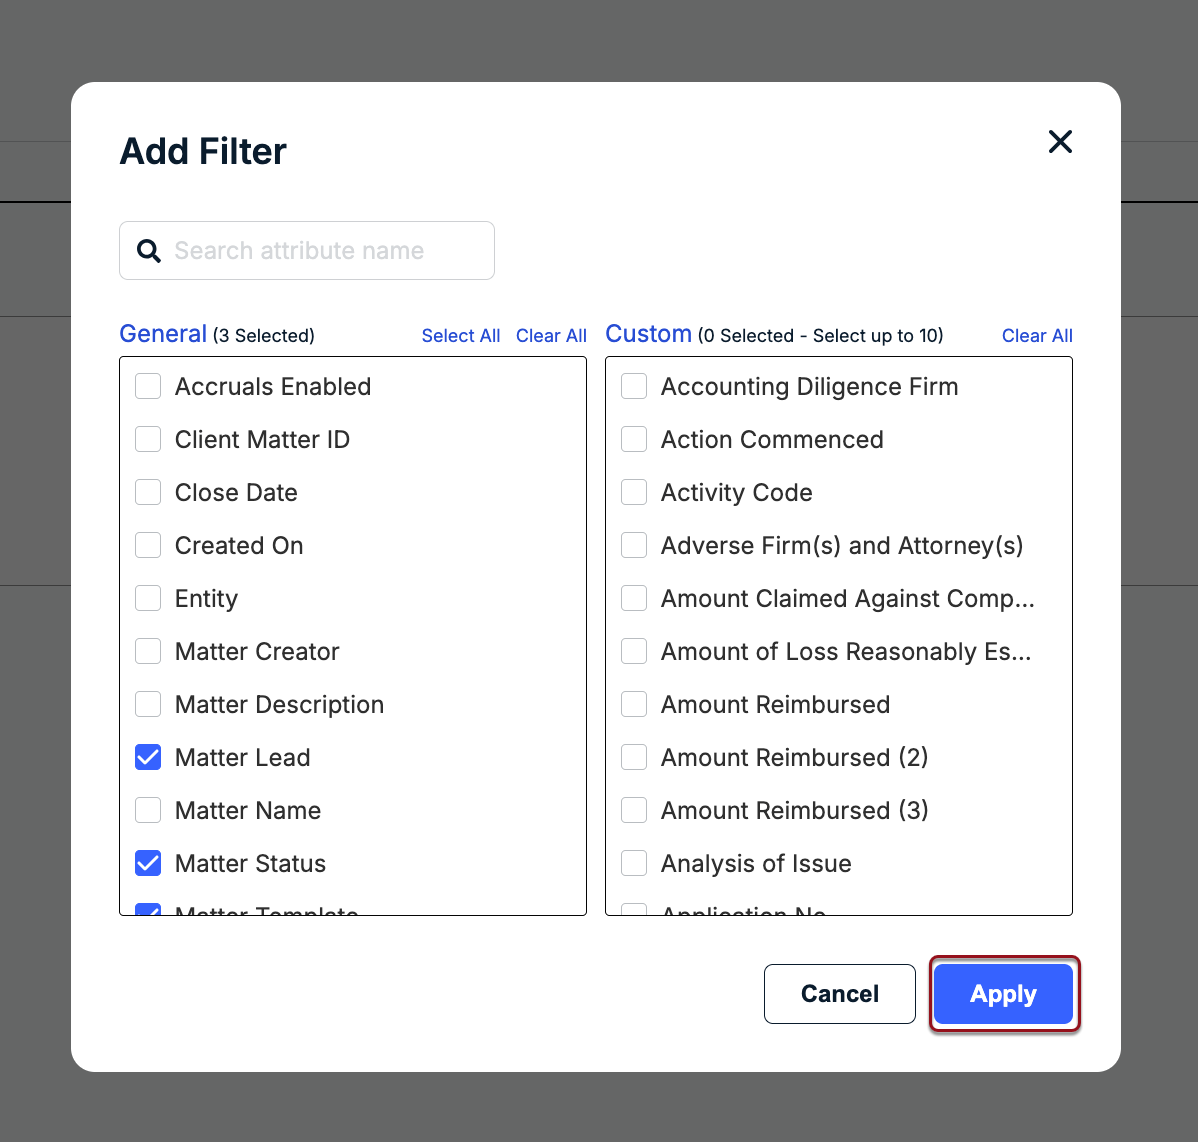
Click Add Filter to select which fields you want to see as filter options. You can choose from general attributes (left) and up to 10 custom attributes (right). Click Apply.
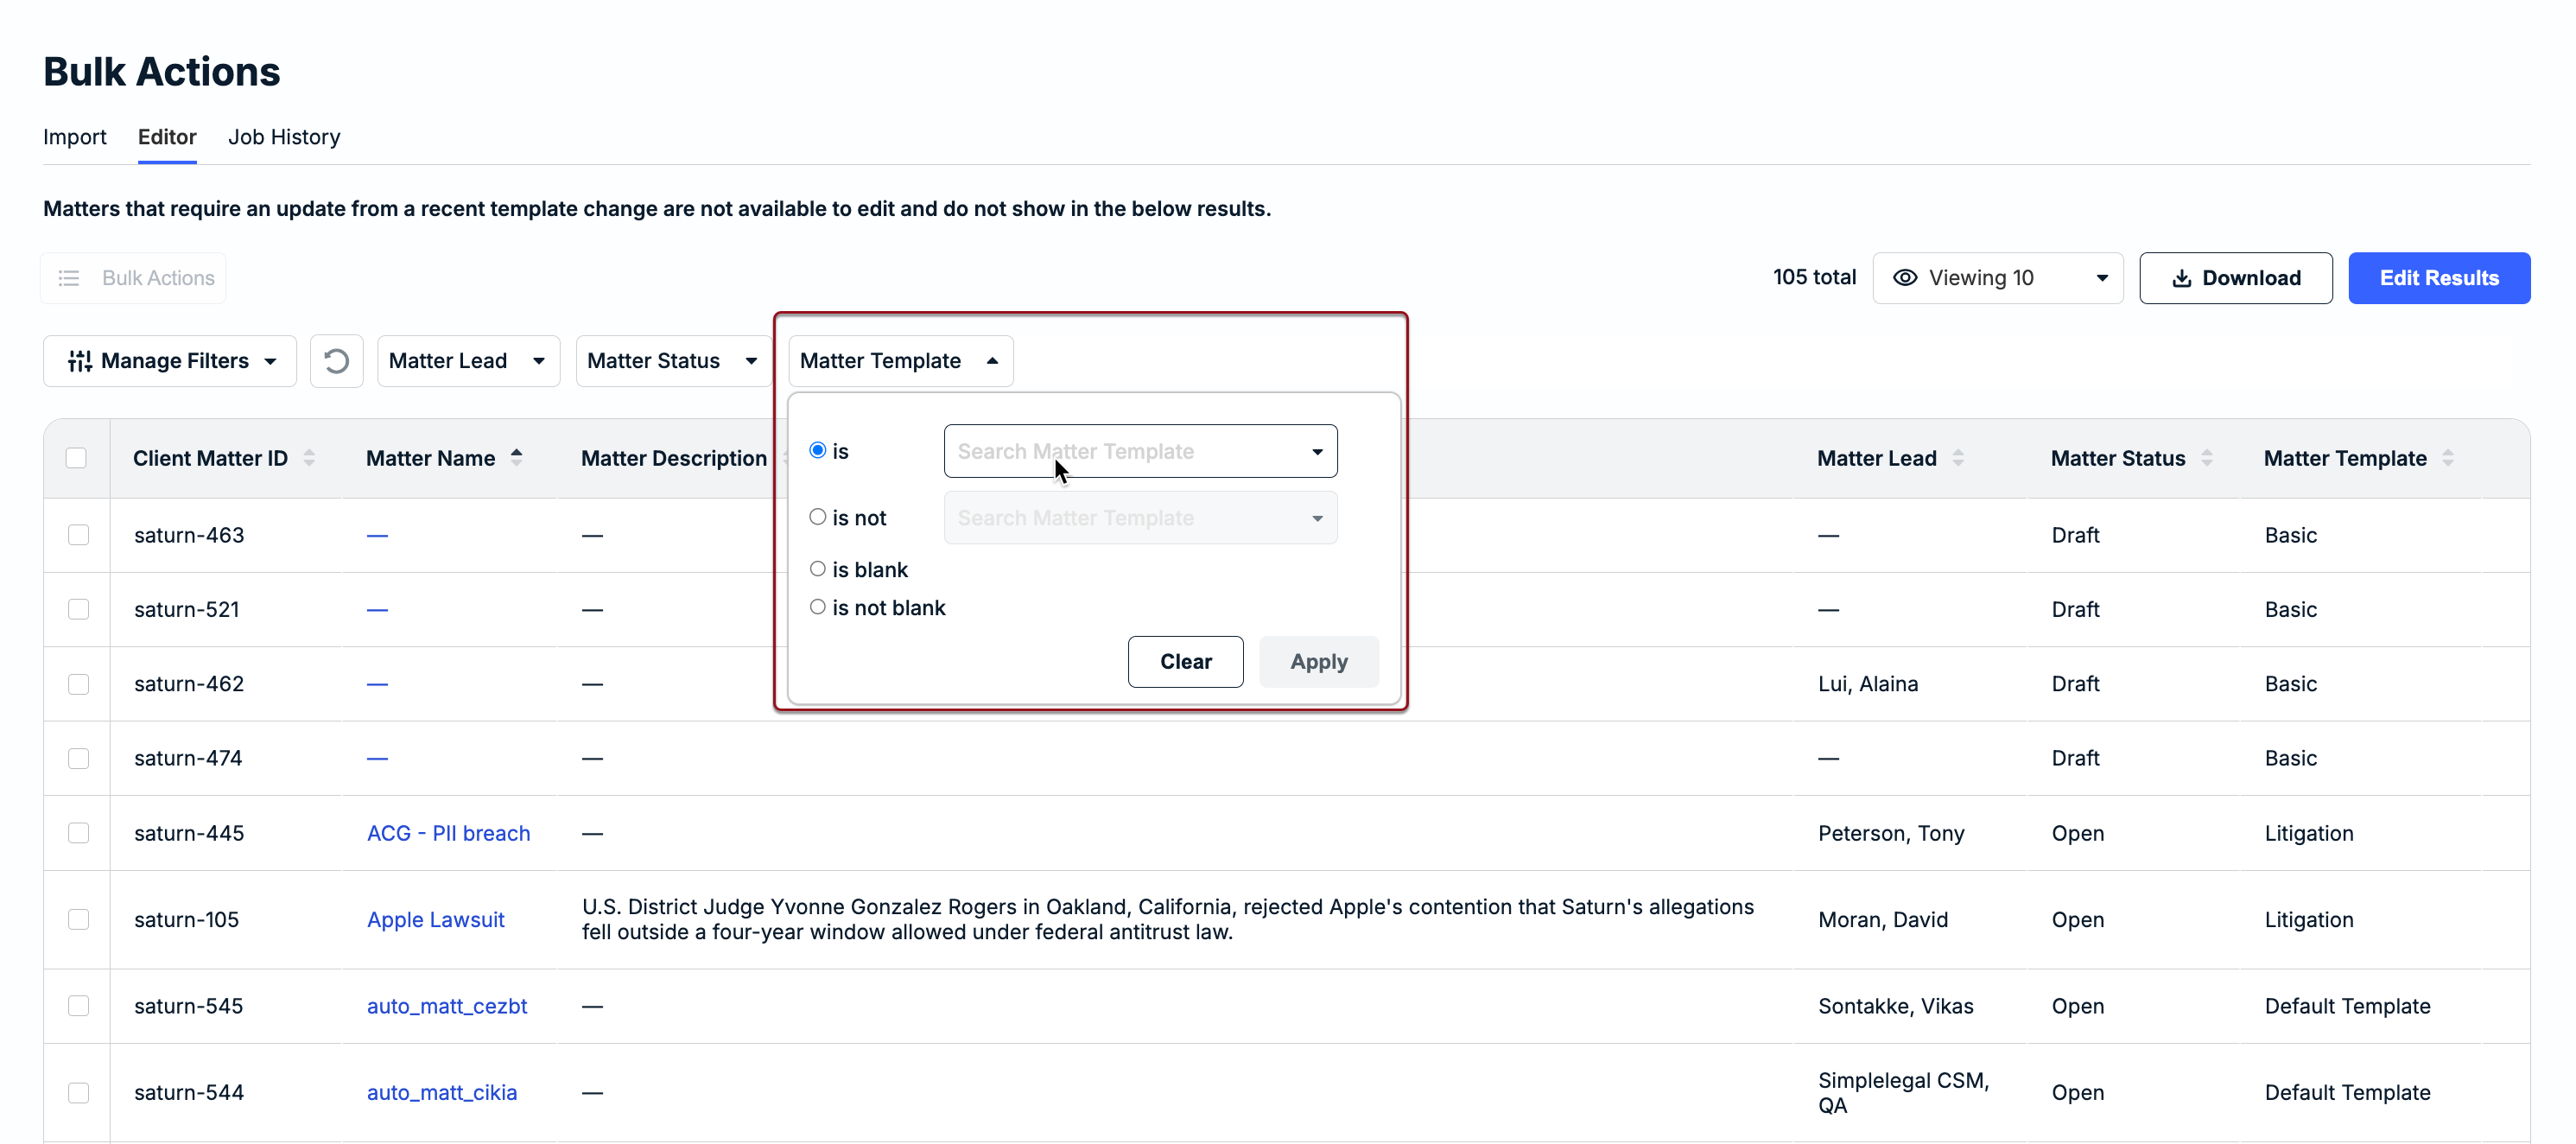
Use the filters at the top of the results page to narrow the list of matters.
Click on a filter at the top of the page, select one or more options, and then click Apply.
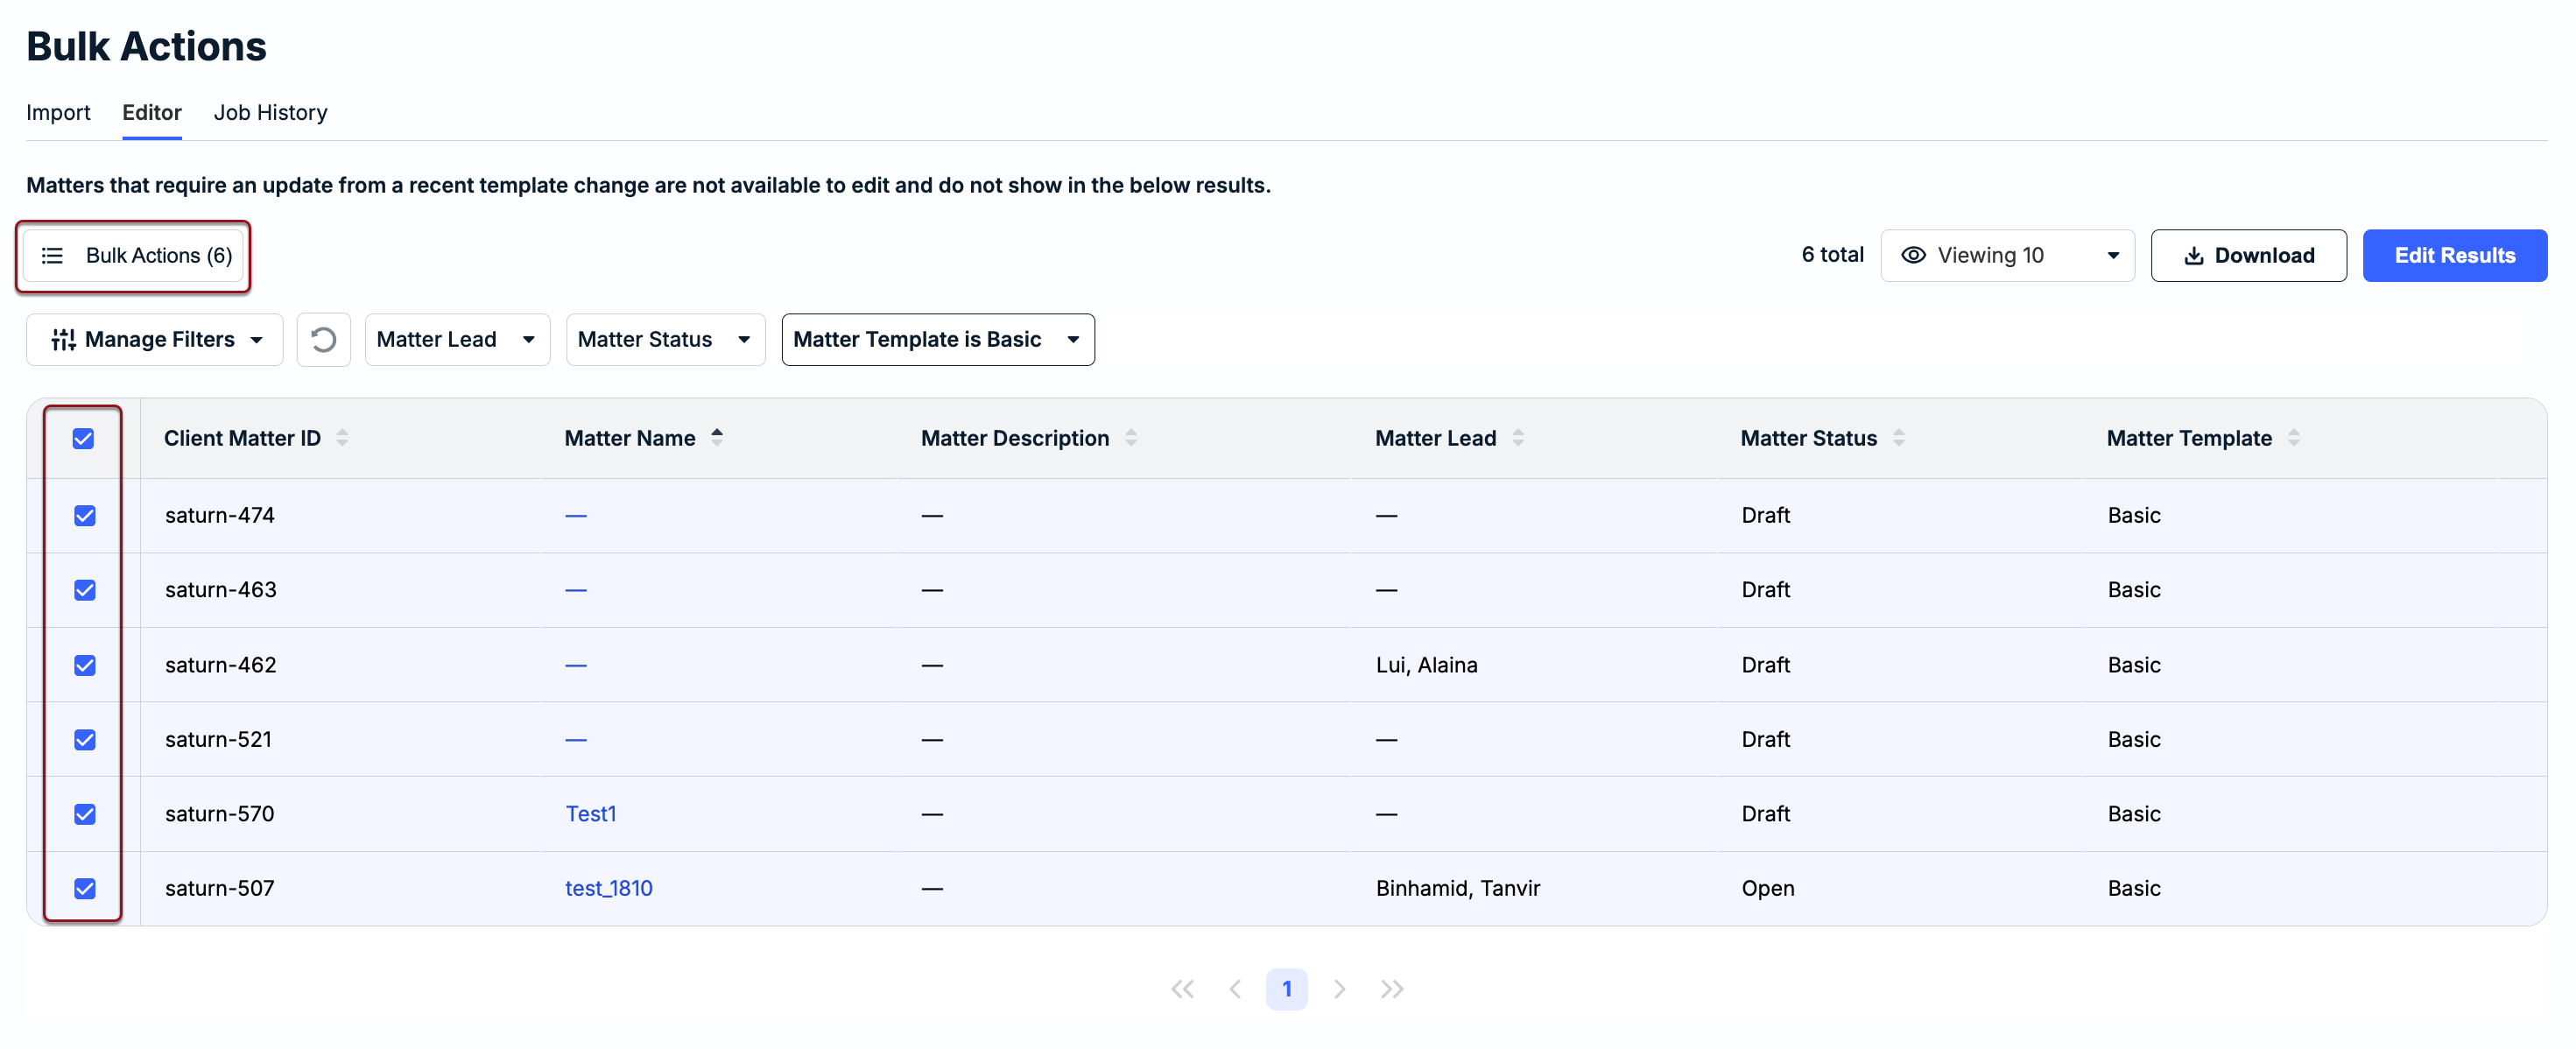
Select boxes for multiple matters or select all matters and click the Bulk Action(s) button.
Select boxes for individual matters on the left side of the table or choose all matters by selecting the box in the top-left corner the table, and then click Bulk Action(s).
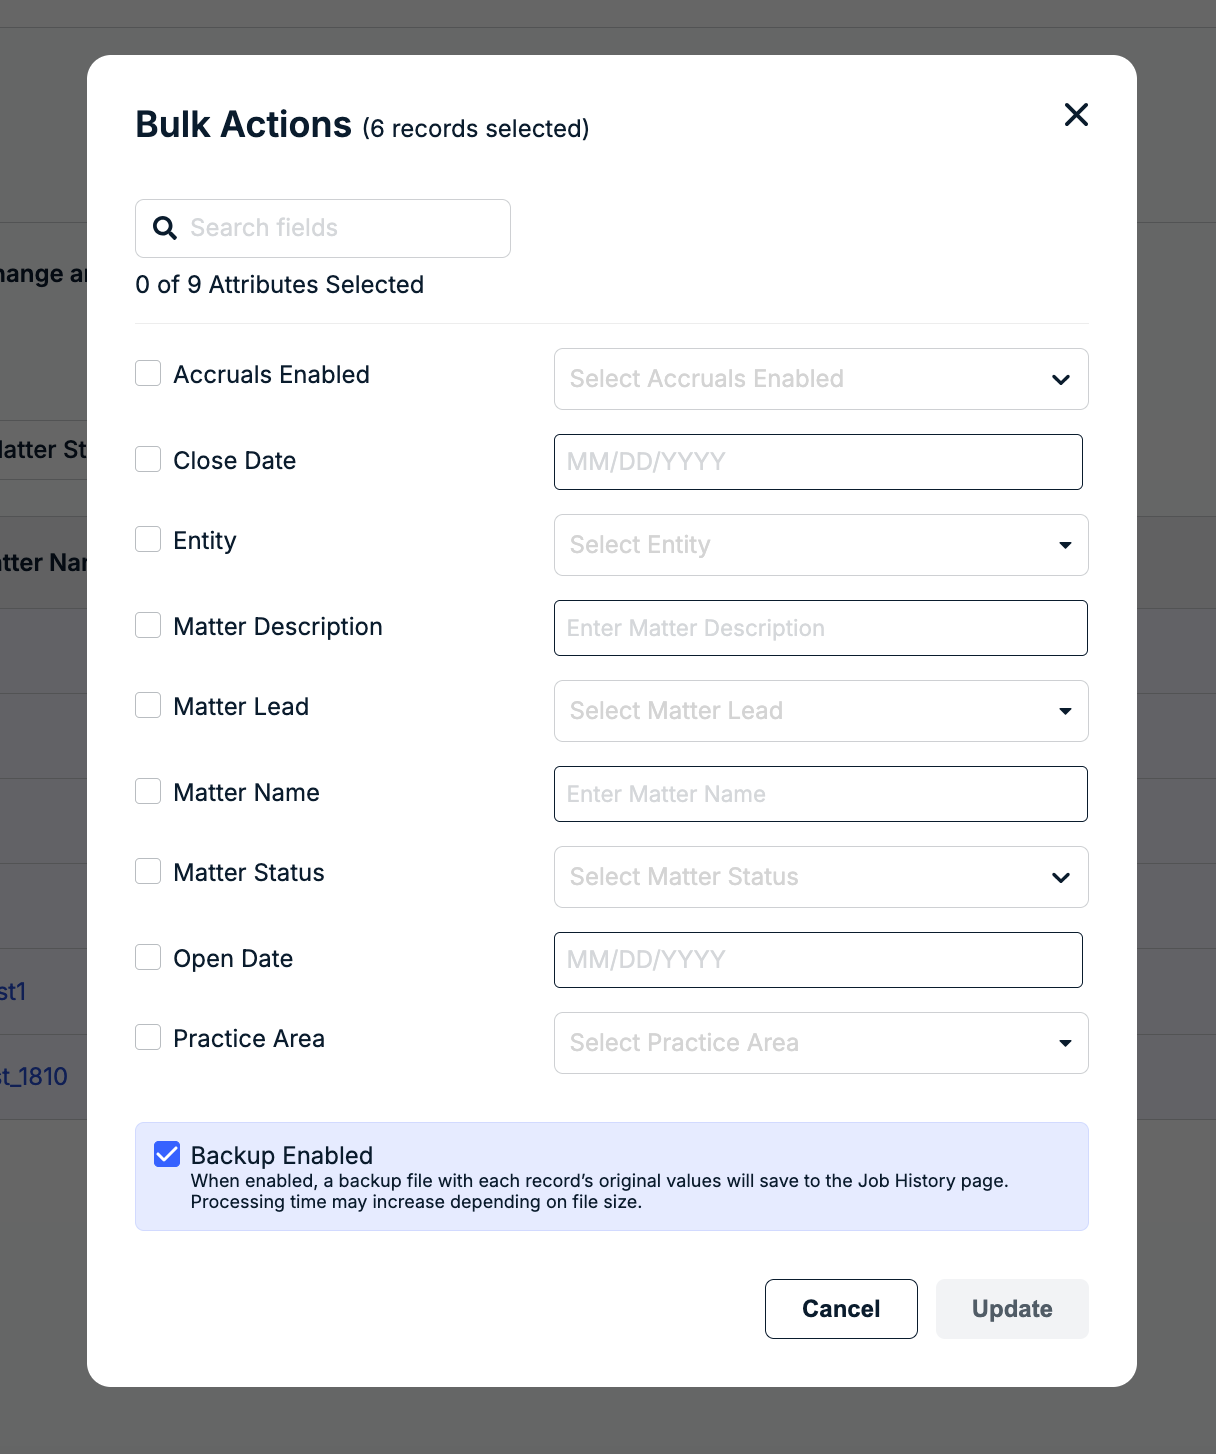
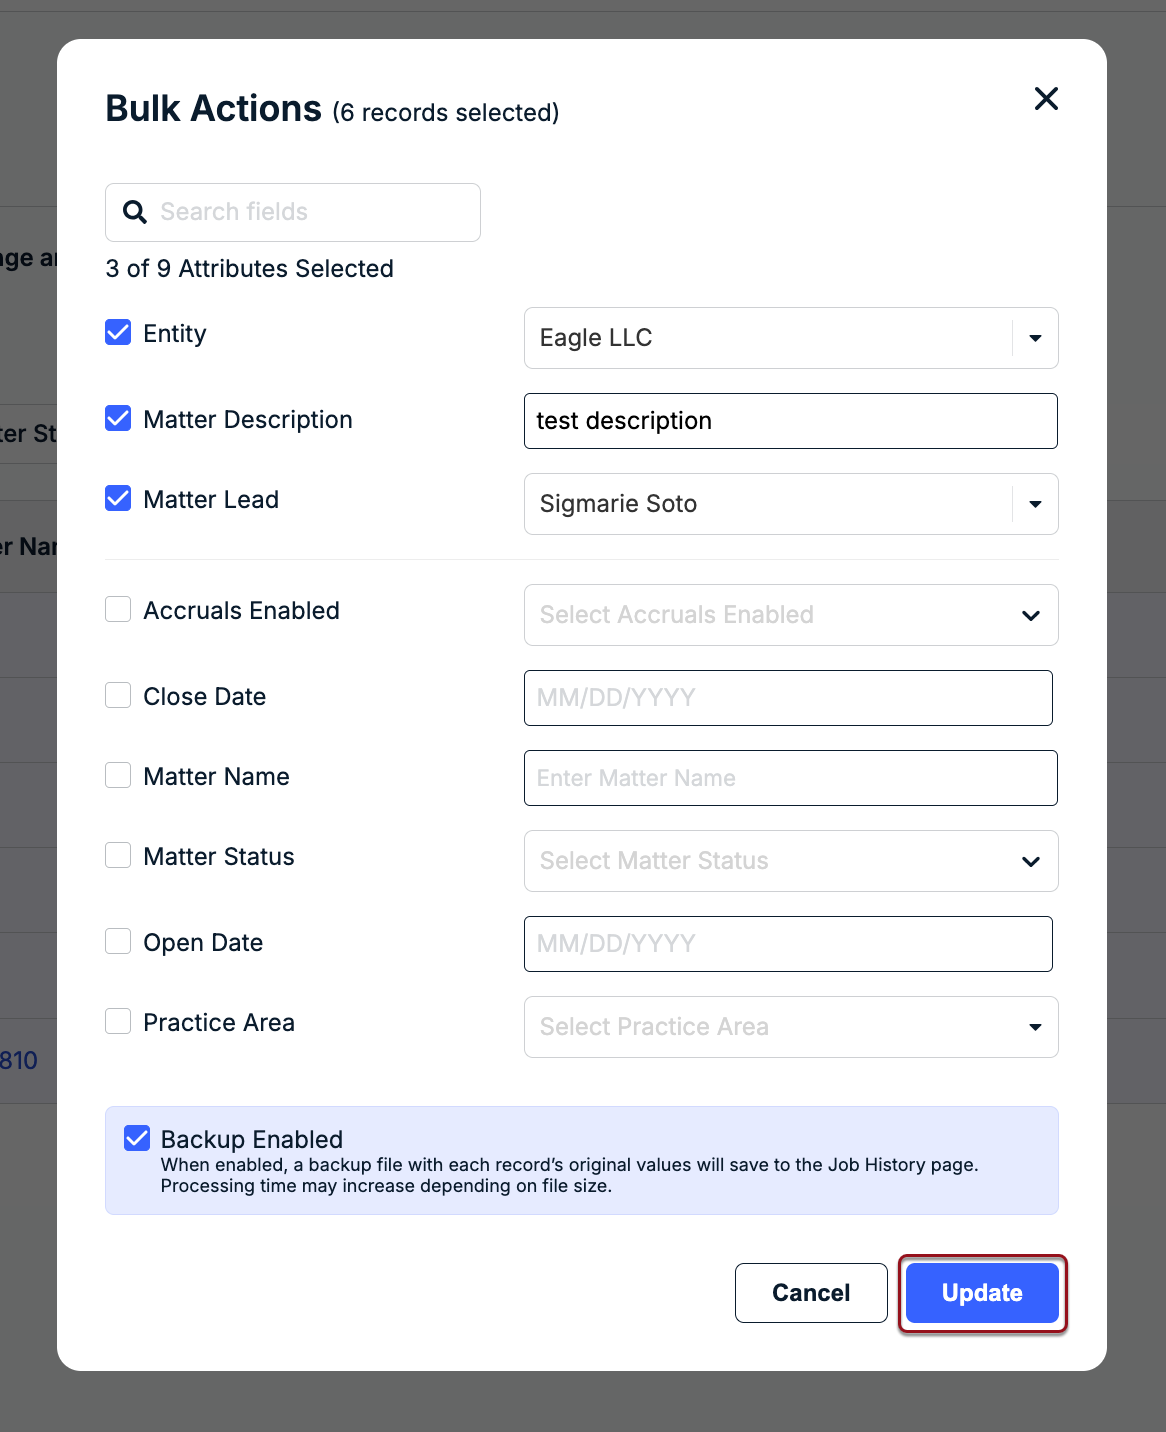
Make changes to relevant fields in the update modal.
Select which field(s) you want to bulk update and then select relevant values or enter information as needed. Please keep the following in mind:
- The modal in the example screenshot below is for Matters with General Attributes. Click on a bulk action type below for more information on the update modal and supported fields:
- The changes apply to all selected matters; make sure the edits are relevant to all selected matters before continuing to avoid overwriting data or getting processing errors.
- Entering NONE (not case-sensitive) for a text field or selecting None for a dropdown field in the modal will erase the value from all selected matters.
- Only the Matters with Matter Template Updates option allows for bulk updates to both open and closed matters. To bulk update closed matters, you must first re-open them manually or use the Matters with General Attributes option to change the status from closed to open.
- When updating Matters with Custom Attributes, updating fields that are marked as read-only from the editor will result in processing errors. Please confirm that the fields you are updating in bulk are not set to read-only in the associated matter template(s).
- The Backup Enabled option at the bottom of the window is selected by default; unless de-selected, a backup file with original values will be added to the Job History page. We recommend keeping the backup option enabled when using the Editor.
- If you select an attribute/field but do not choose or add a value, the Update button will remain disabled until you fill it in. Review fields in red to move forward.
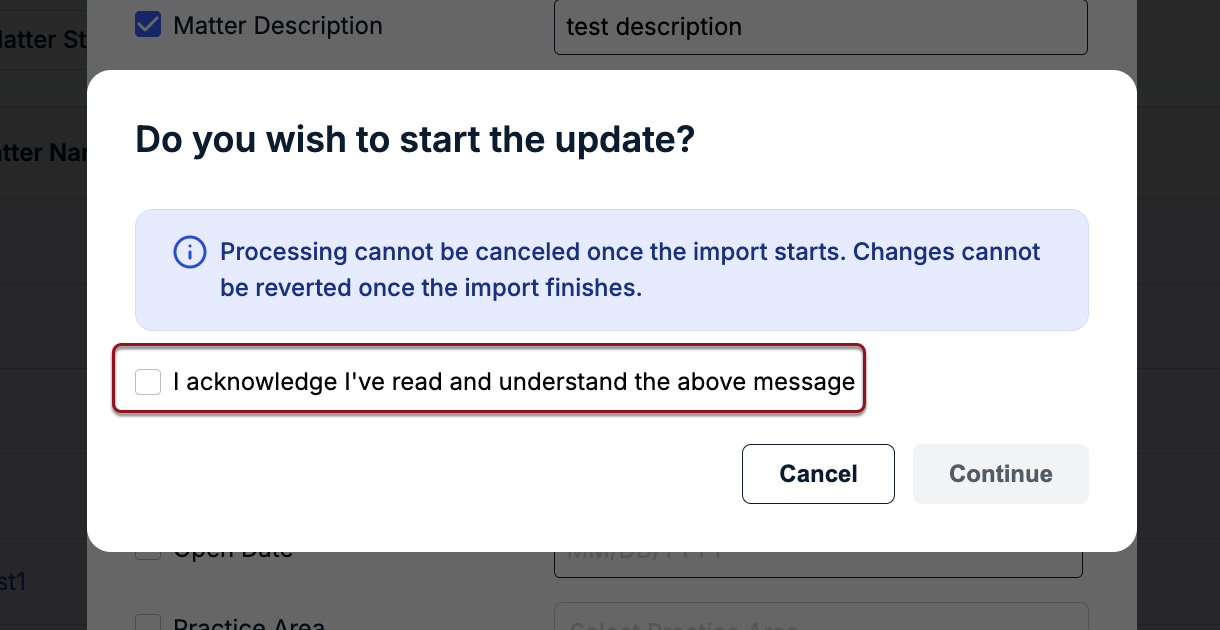
Click Update and confirm you want to continue.
You must click the I acknowledge I've read and understand the above message box and then click Continue in the bottom-right corner of the confirmation window to submit the bulk action job.
A progress bar appears confirming the bulk action job is processing. Clicking Close in the bottom-right corner redirects you to the Job History page to see the status.
Update Modal and Supported Fields
Matters with Allocations
Matters with Allocations is used to bulk update values for one or more allocatable fields across multiple matters. Supported fields depend on which fields are set to "allocatable" in your Unity environment.
Select Matters with Allocations as the record type and load/filter/select matters for update.
REMINDER: Use the Editor if changing one or more fields across multiple matters to reflect the same value(s). For example, changing the status of 50 matters from "open" to "closed." If different values are required across multiple matters, consider the import option.
Choose which allocated fields to update by using the boxes to the left of the field name. In the example image below, only the two default allocated fields built into Unity are shown. How many fields are displayed, however, depend on whether any custom attribute lists are set as "allocatable" in your environment.
| Field Name | Description/Notes |
| Cost Code | Code that represents the organization to which legal costs may be charged; generally for accounting purposes. Code codes are unique to each customer environment and are set up under Administration > Cost Codes. The field name and list of values may differ depending on custom labels in your environment. This may, for example, appear as Charge Number or Cost Center. |
| Legal Entity | List of values used to associate matters with a company or organization with rights/obligations, such as taking on debt or paying out invoices. Legal entities are unique to each customer environment and are set up under Administration > Legal Entities. The field name and list of values may differ depending on custom labels in your environment. This may, for example, appear as Company Code or Company. |
Matters with Approvers
Matters with Approvers is used to assign, remove, and/or replace invoice reviewers across multiple matters. This means the same invoice reviewer changes will be applied to all matters selected via the Editor.
An invoice reviewer is a Unity user or User Team who needs to review/approve incoming invoices on a matter. Some invoice reviewers may have additional access or permissions to a matter that may be removed due to a bulk action. Please confirm before submitting the changes.
Select Matters with Approvers as the record type and load/filter/select matters for update.
REMINDER: Use the Editor if changing one or more fields across multiple matters to reflect the same value(s). For example, changing the status of 50 matters from "open" to "closed." If different values are required across multiple matters, consider the import option.
Choose one or more actions (i.e., add, remove, and/or replace) for invoice reviewers by using the checkboxes on the left. For example, you can choose Add matter approver to assign three additional reviewers and choose Remove matter approver to delete two other approvers for all selected matters.
See below for more information on each action.
If matters have more than one level of invoice reviewers, only the add action in the modal allows users to indicate whether new invoice reviewers should be assigned to the first or last level.
| Bulk Action | Description/Notes |
| Add matter approver | Assign one or more individual users and/or User Teams to selected matters. This does not replace existing assigned reviewers, but it may shift them to a different level or add a new level depending on options selected for the below: All of OR Any of: Each reviewer level can only be set to All of OR Any of. If the option selected does not match a level's current setting in a matter, a new level will be added and remaining levels will be shifted. Please review the invoice reviewer section for additional details before moving forward. Choose approver: Select one or more individual users and/or User Teams that should be added as invoice reviewers or start typing to filter the list. This will not replace reviewers currently assigned to the matters. Level: Select whether to add the reviewer(s) to the First level OR Last level of the matter. To avoid adding another level or shifting reviewers into other levels, confirm whether the first/last levels are set to All of or Any of. If you need to assign reviewers to specific levels in matters instead of the first or last levels only, consider using the CSV import option. Make sure to review formatting requirements and other considerations before moving forward. |
| Remove matter approver | Remove one or more invoice reviewers from all selected matters. This does not impact other assigned reviewers or the number/setting of invoice reviewer levels. Choose approver: Select one or more individual users and/or User Teams that should be removed as invoice reviewers or start typing to filter the list. This will not impact other assigned reviewers. |
| Replace matter approver | Change one invoice reviewer with another invoice reviewer for all selected matters (only one can be replaced per bulk action job). This does not impact other assigned reviewers. Replace from: Choose the individual user or User Team name from the list or start typing to filter the options. Replace to: Choose the individual user or User Team name from the list or start typing to filter the options. |
Matters with Custom Attributes
Matters with Custom Attributes is used to change the values for one or more matter fields across multiple matters. Which fields are displayed in the modal depends on the attribute type selected for Step 1 in the Editor. To minimize errors, only one attribute type can be updated per bulk action job. For example, you can use one bulk action job to update multiple list-type custom attributes across selected matters.
Select Matters with Custom Attributes as the record type and load/filter/select matters for update.
When filtering and selecting matters from the results page of the Editor, custom attribute columns may display the following values for some matters:
REMINDER: Use the Editor if changing one or more fields across multiple matters to reflect the same value(s). For example, changing the status of 50 matters from "open" to "closed." If different values are required across multiple matters, consider the import option.
Use the boxes to the left of the custom attribute name to select one or more fields and make the necessary updates. The example in the screenshot below is for text-based custom attributes. Custom attributes in your environment are specific to your company; the same fields do not appear for all users.
NOTE: Updating a field that is marked as read-only in the matter template will cause an error when the bulk action is submitted. Please check the job error file for additional information.
Custom Attribute Types
| Type | Description |
| Currency | Comprised of two fields:
|
| Date | Date picker option. |
| List | List of values. Only one value can be selected per field. |
| Text Area | Text field for longer inputs, such as notes or additional comments. Accepts letters, digits, and other symbols. Entering none as the value for a text field from the Bulk Editor modal will erase the current values across all selected matters. |
| Text | Text field typically for shorter inputs, such as descriptions or titles. Accepts letters, digits, and other symbols. Entering none as the value for a text field from the Bulk Editor modal will erase the current values across all selected matters. |
| Yes/No | Options for Yes OR No only. |
Matters with General Attributes
Matters with General Attributes is for bulk updates to general attributes, such as Matter Status, Legal Entity, Matter Lead, Matter Name, and Matter Description.
Select Matters with General Attributes as the record type and load/filter/select matters for update.
REMINDER: Use the Editor if changing one or more fields across multiple matters to reflect the same value(s). For example, changing the status of 50 matters from "open" to "closed." If different values are required across multiple matters, consider the import option.
Select boxes for one or more general attributes from the update modal shown below. There are 9 general attribute options for bulk update. See the list below for more information on input types and other requirements for supported fields.
| Field Name | Description/Notes |
| Accruals Enabled | List of values to enable or disable vendor accrual requests at the matter level as follows: Inherit from Practice Area (or Matter Group): Follow system default. No: Turn accrual requests off for selected matters. Yes: Turn accrual requests on for selected matters. |
| Close Date | Date picker to set the same "Closed On" date for all selected matters. |
| Legal Entity | List of values to associate all selected matters with the same Legal Entity. This field may have a different name, such as Company or Company Code, depending on custom label settings in your environment. |
| Matter Description | Text field to add the same description to all selected matters. Entering none as the value for the text field from the Bulk Editor modal will erase the current descriptions saved across all selected matters. |
| Matter Lead | List of values to assign the same Matter Lead to all selected matters. NOTE: A Matter Lead can be assigned or updated on all selected matters but they cannot be removed using the Bulk Editor. |
| Matter Name | Text field to give all selected matters the same name. Entering none as the value for the text field from the Bulk Editor modal will erase the current names saved across all selected matters. |
| Matter Status | List of values to update all selected matters to the same status (i.e., draft to open, open to closed, or closed to open). |
| Open Date | Date picker to set the same "Opened On" date for all selected matters. |
| Matter Group | List of values to categorize all selected matters under the same matter group. This field may have a different name, such as Practice Area, depending on custom label settings in your environment. |
NOTE: Changes you apply via the Editor will overwrite any existing values saved in the selected matter records. Confirm that the changes you chose in the update modal apply to all selected matters. Once a bulk action job is submitted/processed, it cannot be reverted or undone.
Matters with Matter Template Updates
Matters with Matter Template Updates is used to edit values for fields in matters that were impacted by a matter template update.
This option allows for bulk updates to both open and closed matters. If you submit changes to closed matters, they will temporarily be re-opened for processing only and then automatically reverted to closed upon completion. No additional action is required to close the matters.
NOTE: The above only applies to Matters with Matter Template Updates. If other types of bulk changes are required for closed matters, they must first be re-opened manually or by using the Matters Only option.
Select Matters with Matter Template Updates as the record type and load/filter/select matters for update.
If the template list is blank, this means there are no impacted matters that require changes.
REMINDER: Use the Editor if changing one or more fields across multiple matters to reflect the same value(s). For example, changing the status of 50 matters from "open" to "closed." If different values are required across multiple matters, consider the import option.
Choose one or more options by using the boxes to the left of the field name. Fields that are required in the template are marked with asterisks (*) in the update modal. The modal shows only fields that were modified/added in the template and require update. If you need to update other attributes, use the Matters with General Attributes or Matters with Custom Attributes options.
NOTE: The bulk update will fail if the matter template you selected is archived by the time you submit the update. Please download the error file for additional details.
Matters with Subscribers
Matters with Subscribers is used to assign, remove, and/or replace subscribers across matters. This means the same subscriber change will be applied to all matters selected via the Editor.
A subscriber is a Unity user or user team who needs view-only access to incoming invoices on a matter. Some subscribers may have additional access or permissions to a matter that may be removed due to a bulk action.
Select Matters with Subscribers as the record type and load/filter/select matters for update.
REMINDER: Use the Editor if changing one or more fields across multiple matters to reflect the same value(s). For example, changing the status of 50 matters from "open" to "closed." If different values are required across multiple matters, consider the import option.
Choose one or more actions (i.e., add, remove, and/or replace) for subscribers by using the checkboxes on the left. For example, you can choose Add matter subscriber to assign three subscribers and choose Remove matter subscriber to delete two other subscribers for all selected matters. See below for more information on available actions.
| Bulk Action | Description/Notes |
| Add matter subscriber | Assign one or more additional individual users and/or User Teams to all selected matters. This does not replace existing assigned subscribers. Select a subscriber: Select one or more individual users and/or User Teams or start typing to filter the list. |
| Remove matter subscriber | Remove one or more individual users and/or User Teams from all selected matters. This does not impact other assigned subscribers. Select a subscriber: Select one or more individual users and/or User Teams or start typing to filter the list. |
| Replace matter subscriber | Change one subscriber with another subscriber for all selected matters (only one can be replaced per bulk action job). This does not impact other assigned subscribers. Replace from: Choose the individual or User Team from the list or start typing to filter the options. Replace to: Choose the individual or User Team from the list or start typing to filter the options. |
Matters with Vendors
Matters with Vendors is used to add, remove, or replace assigned vendors across matters. This means that the same vendor change will be applied to all matters selected via the Editor.
NOTE: Inactive vendors can be removed or replaced, but they cannot be assigned.
Select Matters with Vendors as the record type and load/filter/select matters for update.
Choose one or more bulk actions (i.e., assign, remove, replace) for vendors on all selected matters. See the list below for more information on each bulk action.
| Bulk Action | Description/Notes |
| Assign Vendor | Add one or more vendors to all selected matters. This does not replace or remove any other assigned vendors. Select a vendor: Select one or more active vendor names from the dropdown list. |
| Remove Vendor | Remove one or more assigned vendors from all selected matters. This does not impact other assigned vendors. Select a vendor: Select one or more active or inactive vendor names from the dropdown list. |
| Replace a Vendor | Change one vendor with another vendor for all selected matters (only one can be replaced per bulk action job). This does not impact any other assigned vendors. Replace from: Select one active or inactive vendor name from the dropdown list. Replace to: Select one active vendor name from the dropdown list. |
REMINDER: The same vendor change will apply across all selected matters. For example, you can assign the same vendor across multiple matters as part of one bulk edit job. If you need to make different vendor changes across a larger number of matters, consider the CSV import option. Please make sure to review formatting requirements and other considerations before using the import option.