Matters in Unity e-Billing are records that can be created to capture/track standard information (e.g., name, dates, contacts, matter group, etc.) and facilitate invoicing projects, cases, and other matters managed by your legal department.
Here, we'll take you through the basics of navigating the Matters page.
The Matters List Page
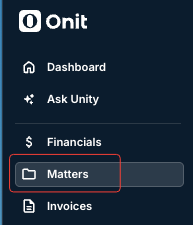
To see the matters list page, navigate to Matters on the left-side navigation bar.
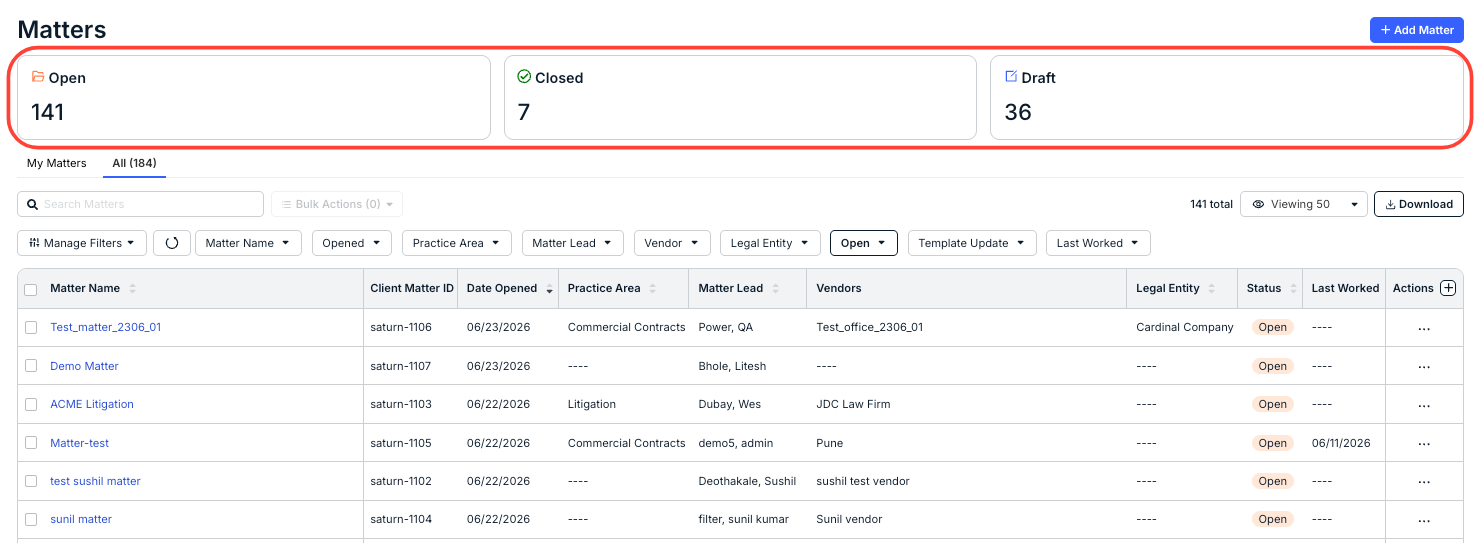
At the top of the Matters screen, you'll see cards displaying the number of Open and Closed Matters and matters in Draft.
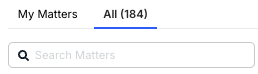
Matters Tabs
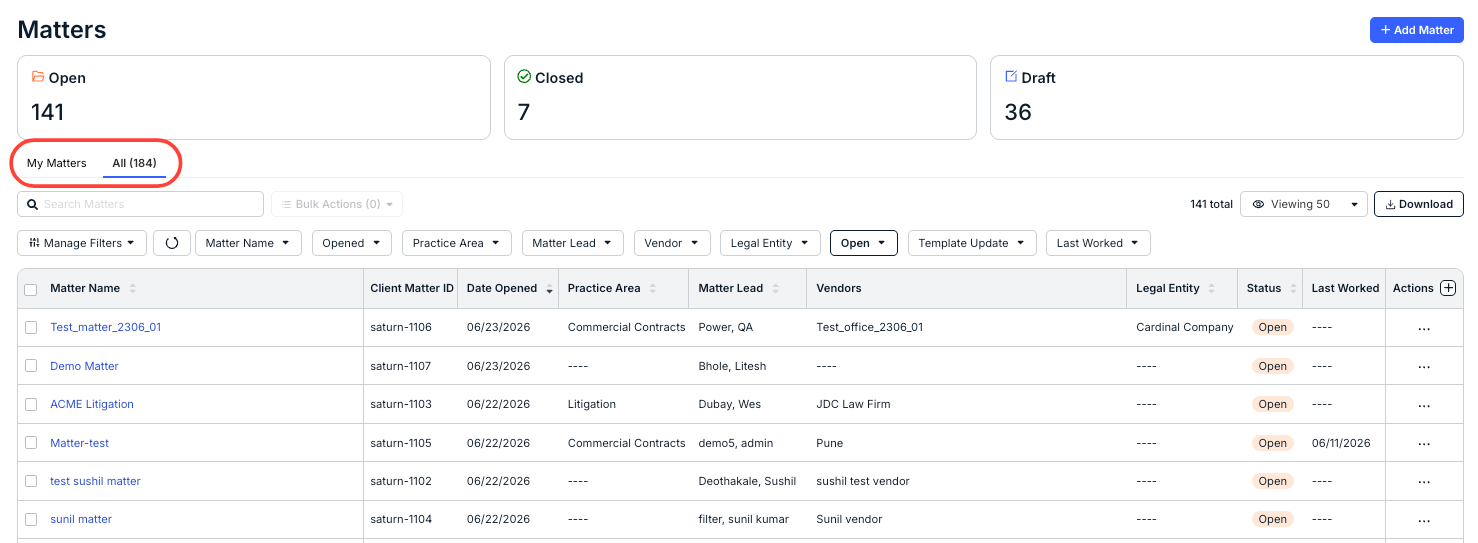
Use the tabs to switch between All Matters and My Matters. My Matters are the matters that need completion.
Searching Matters
Use the Search Matters bar to find specific matters in the directory.
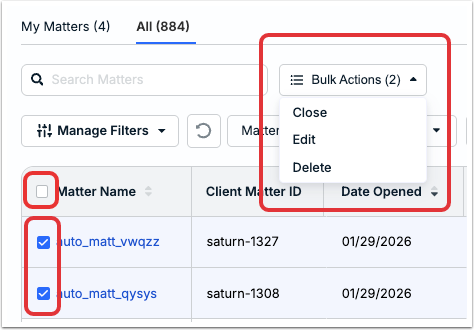
Bulk Actions (Close, Edit, Delete)
When at least one row on the main matter list is selected (through the check box), the Bulk Actions button will appear as an option (it will be grayed out if not).
Bulk action options include:
- Close the matters
- Edit the matters
- Delete the matters
Click the top box to select all matters.
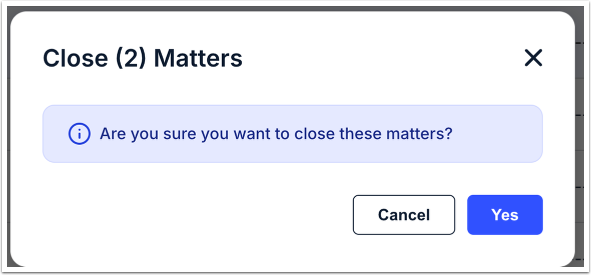
When you click Close matters, this screen will appear. Click Yes to close the matters or Cancel to back out.
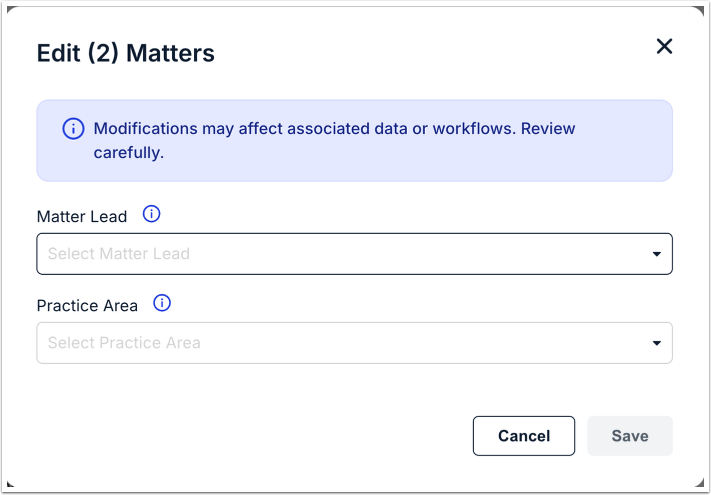
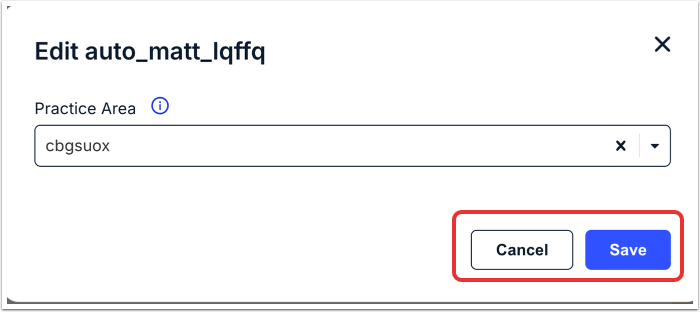
When you click Edit matters, this screen will appear. You can adjust the Matter Lead and the Practice Area; choose them from the drop-down menus. Click Save to save the changes or Cancel to back out.
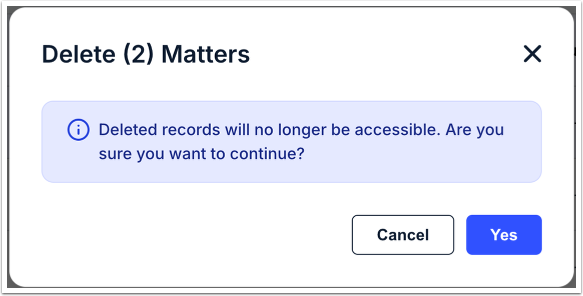
When you click Delete matters, this screen will appear. Click Yes to delete the matters or Cancel to back out.
Navigating the Main Matter List
The matter list is (by default) sorted by Date Opened (most recent first).
The following columns of information are shown for each matter:
| Matter Name | Click on the hyperlinked name to open the matter record. |
| Client Matter ID | The client matter identification number. |
| Date Opened | Date the matter was published or re-opened. |
| Practice Area | The practice area (litigation, privacy and data, etc.) |
Matter Lead | Name of the assigned Matter Lead, if applicable. |
Vendors | Click on the hyperlinked name to open the vendor record |
Legal Entity | Click on the hyperlinked name to open the Legal Entity record. |
Status | Whether a matter is in open (default), draft, or closed status. |
| Last Worked | When the matter was last edited. |
| Template Update | If the template has been edited. |

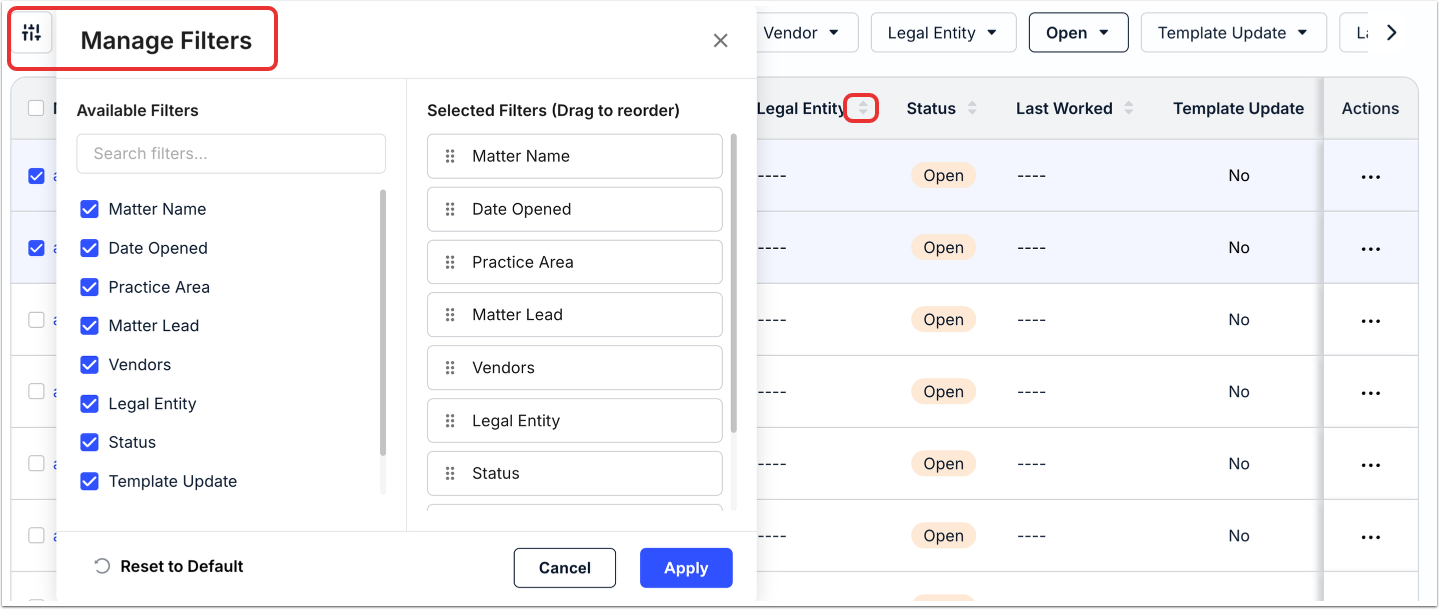
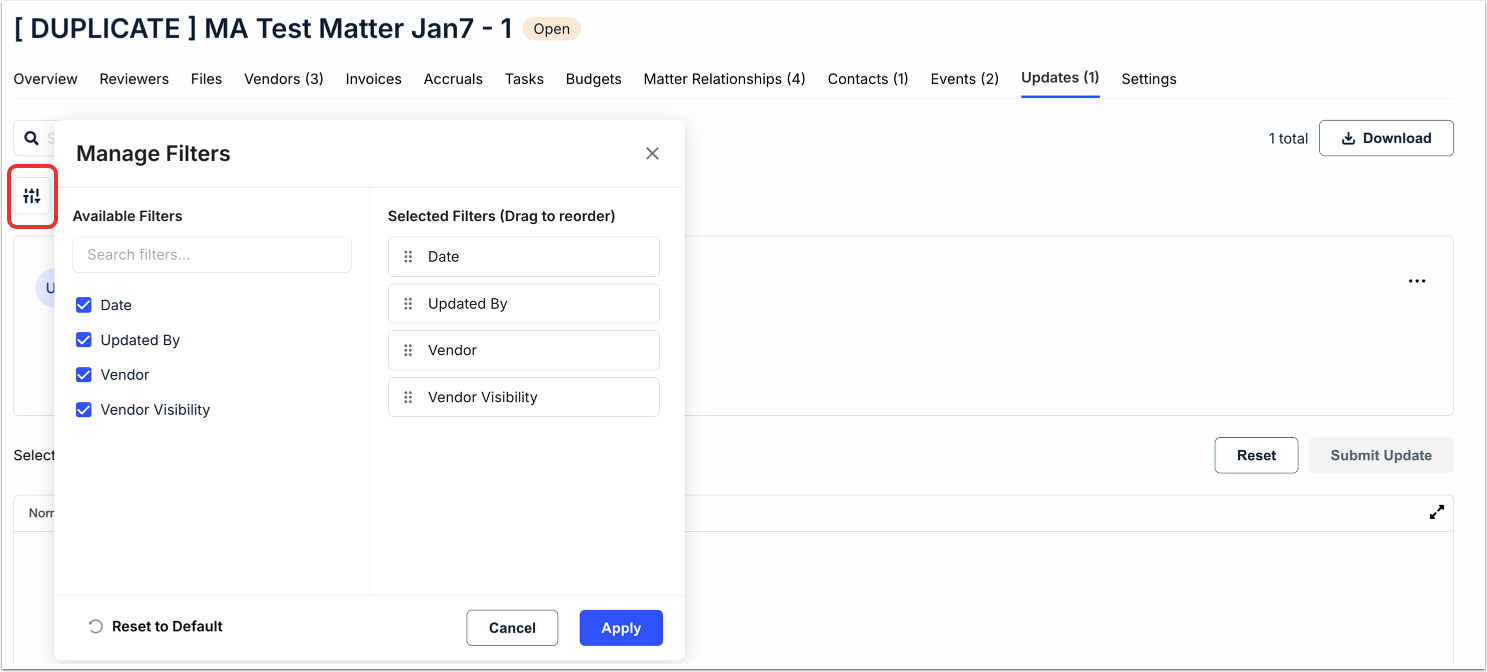
Use the up/down arrows next to each column to sort by that detail. Click on Manage Filters to apply available filters or reorder selected filters; you can also Reset to Default. Click Apply to adjust or Cancel to back out.
You can also use the top buttons to search within those columns; click Apply to search, Cancel to back out, or Clear to clear the text you submit.

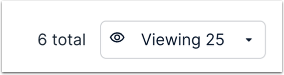
Use this drop-down menu to choose how many records you want to display on the screen.
You can also click on Download to download selected record information.

Click on the three dots menu to the right of each record to:
- Edit the Matter Lead
- Edit the Practice Area
- Delete the matter

Clicking on Edit Matter Lead will allow you to select the matter lead from a drop-down menu. Click Save to edit your changes or Cancel to back out.

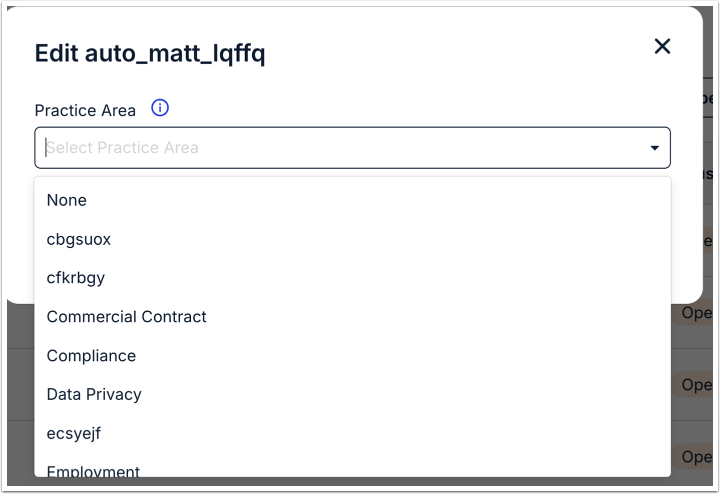
Clicking on Edit Practice Area will allow you to select the practice area from a drop-down menu. Click Save to edit your changes or Cancel to back out.
Click the plus button next to Actions to customize the table columns. Adjust and click Apply to save or Cancel to back out.

Matters Details Page & Tabs
Clicking into an individual matter will bring up the Matter Details page. This page is divided into several different tabs:
- Overview
- Reviewers
- Files
- Vendors
- Invoices
- Accruals
- Tasks
- Budgets
- Matter Relationships
- Contacts
- Events
- Updates
- Settings
- Activity Log
Numbers next to each tab will show you the amount of action items you have in each.
In this section, we’ll go through all of those different tabs.

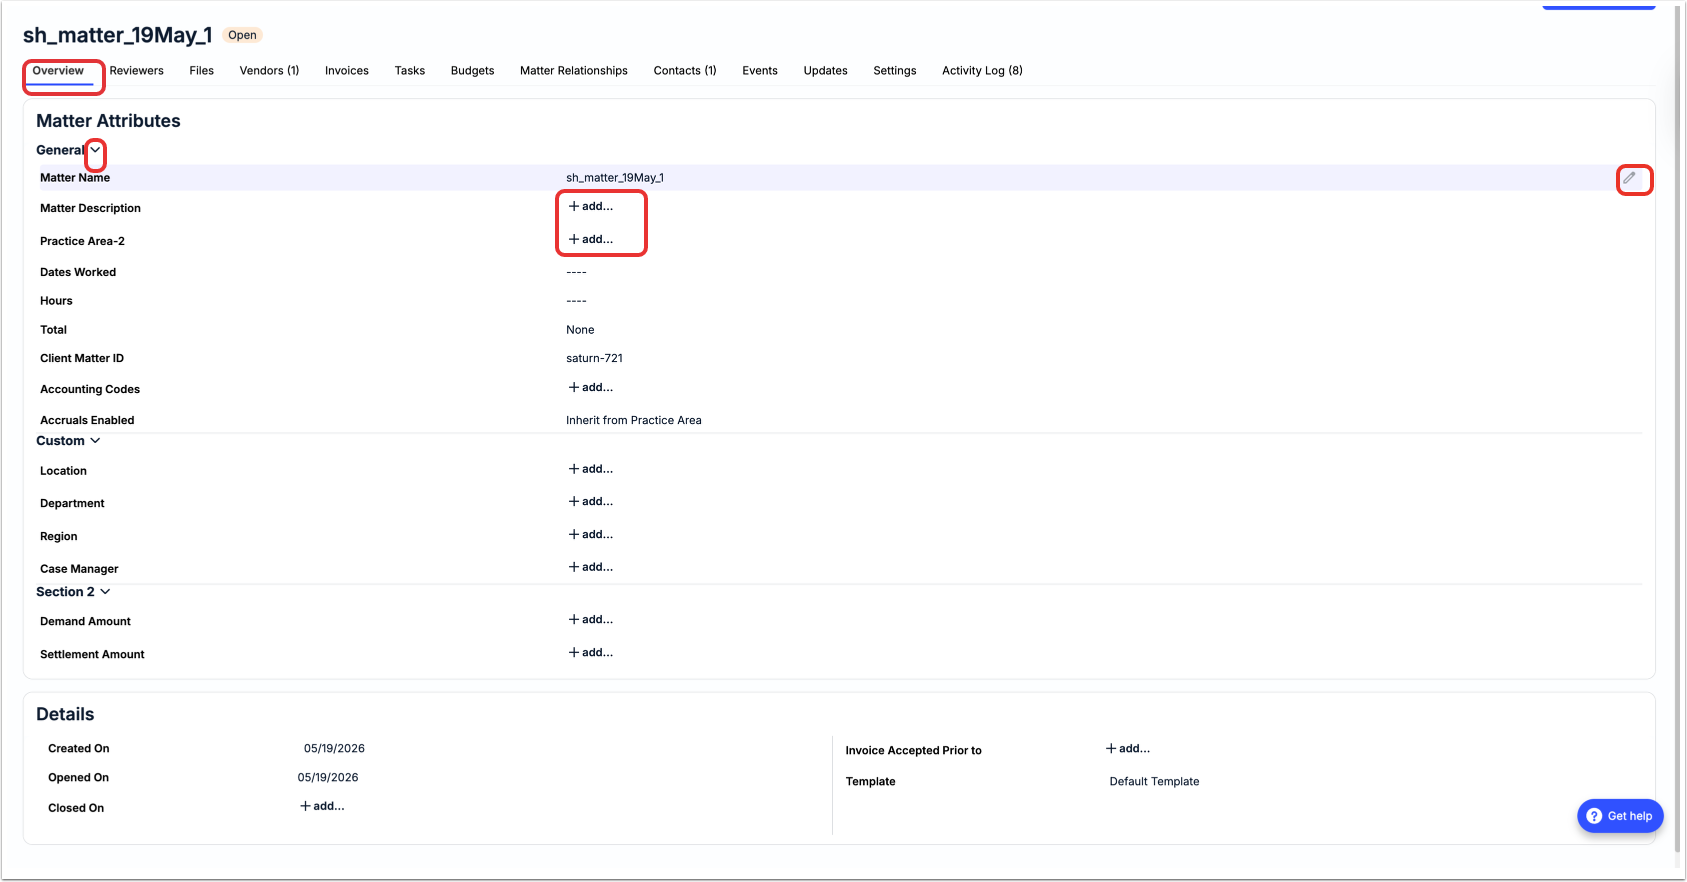
Overview
The Overview tab delivers key information about the matter, including:
- Matter Attributes (Matter Name, Matter Description, Practice Area, Dates Worked, Hours, Client Matter ID, Legal Entity, Accruals Enabled). Click on the Edit (pencil) button or the +add button to edit or add in information to the attributes. Click on the up/down arrow next to General to show or hide the details.
- Custom Attributes. Click on the Edit (pencil) button or the +add button to edit or add in information to the attributes. Click on the up/down arrow next to Custom to show or hide the details.
- Details. Click on the Edit (pencil) button or the +add button to edit or add in information to the attributes.
Reviewers
Use the Reviewers tab to view and edit matter / invoice reviewers and followers. Use the top menu to toggle between Reviewers and Followers.
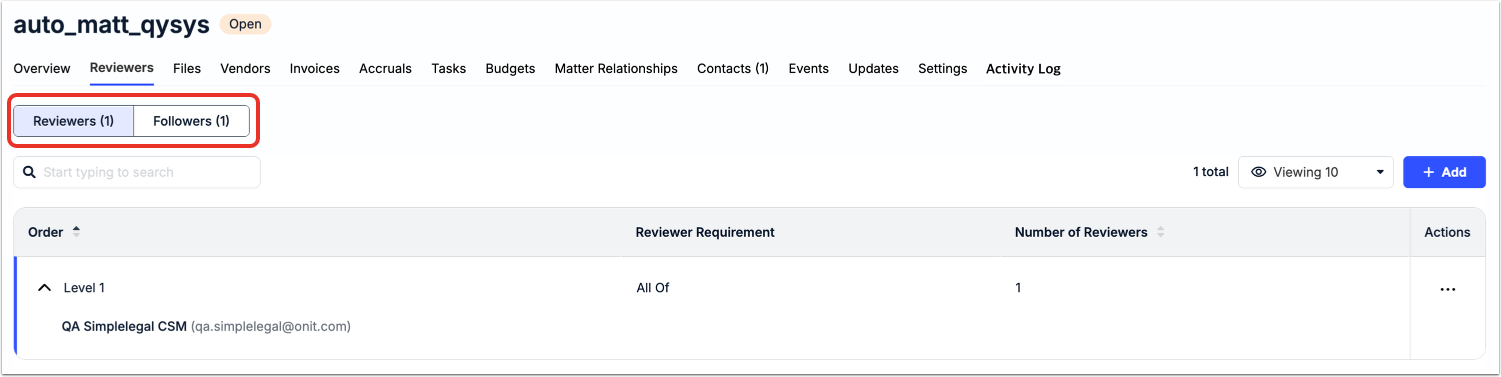
In the Reviewers tab, you can see the Order of the reviewers, the Reviewer Requirement, and the Number of Reviewers. Use the search bar to search through reviewers. Click on the up/down arrow on each column to sort by that column. Use the drop-down menu to customize exactly what you want to see on the screen.

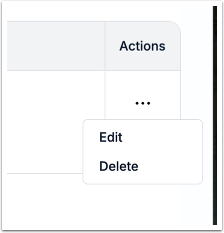
Click the three-dot Actions menu to Edit or Delete the reviewer.
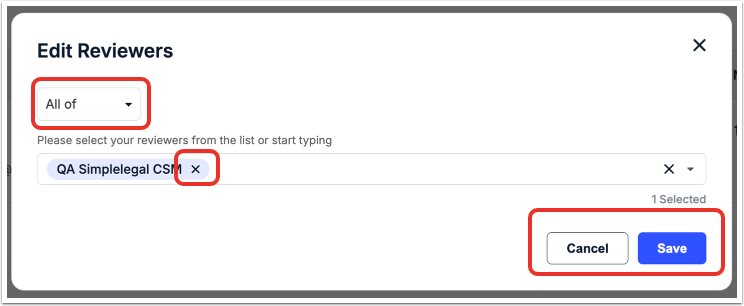
You can Edit the reviewers to select All of / Any of from the drop down menu; type in the name of the reviewers or select from the drop-down menu to add or remove reviewers. Click the X to remove your selection. Click Save to save your changes or Cancel to back out.
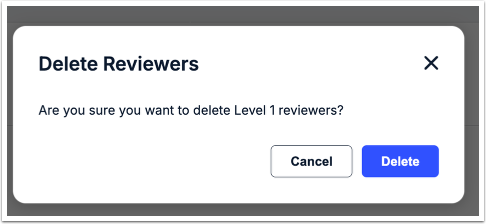
Clicking on Delete will allow you to delete reviewer rows. Click on Delete to remove or Cancel to back out.
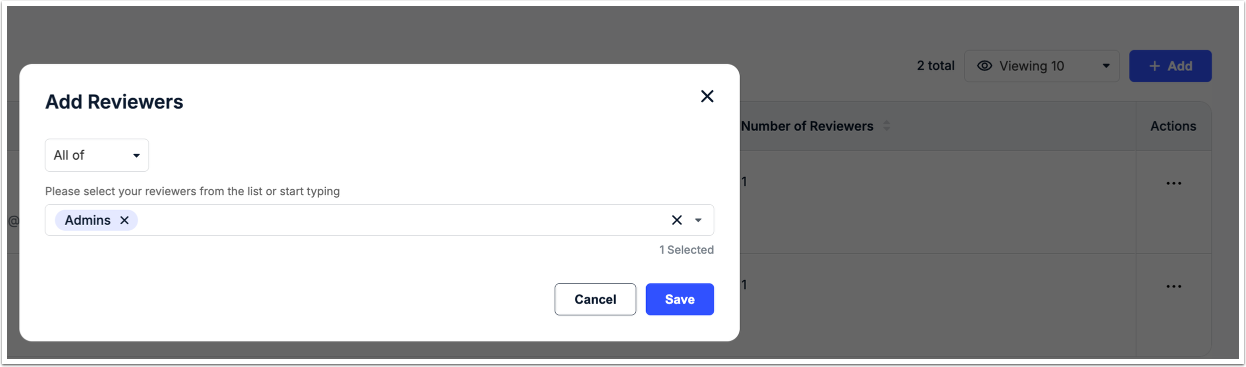
Clicking in Add will allow you to add a reviewer. Select All of / Any of from the drop-down menu and type in the name of the reviewers or select from the drop-down menu to add or remove reviewers. Click the X to remove your selection. Click Save to save your changes or Cancel to back out.
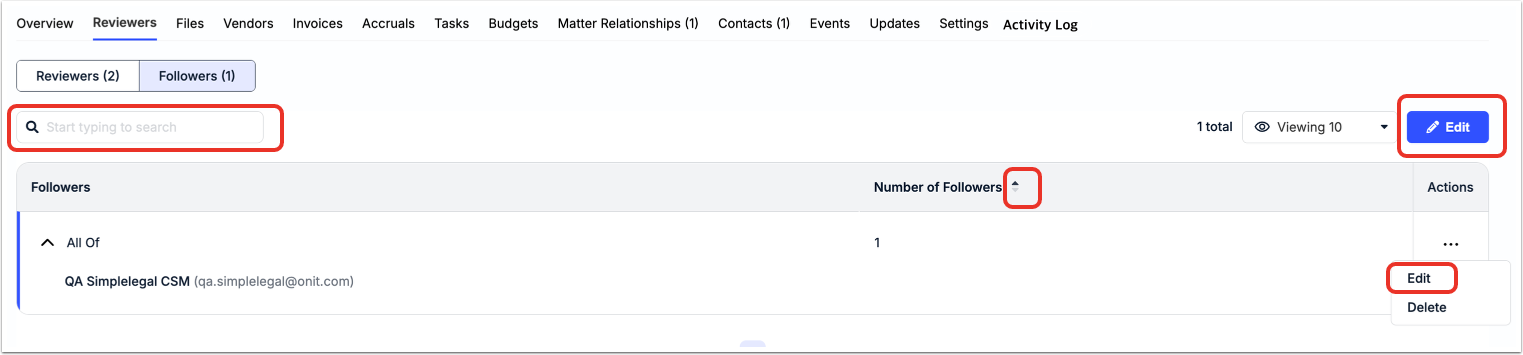
Under Followers you can see the Followers and Number of Followers. Use the search bar to search through followers. Click on the up/down arrow on each column to sort by that column. Use the drop-down menu to customize exactly what you want to see on the screen.
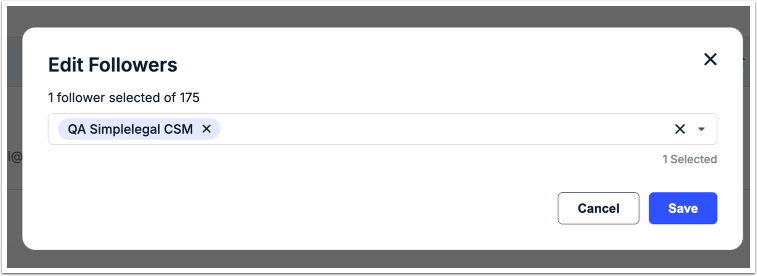
Use the three-dot menu to either Edit or Delete the follower. The Edit button will also allow you to edit the followers.
After editing the followers, you can type in the name of the followers or select from the drop-down menu to add or remove reviewers. Click the X to remove your selection. Click Save to save your changes or Cancel to back out.
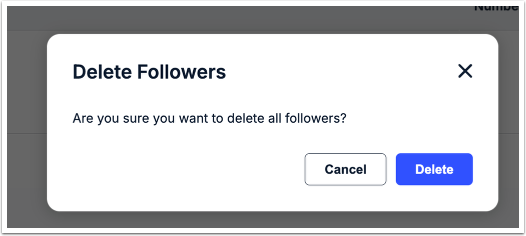
Clicking on Delete will allow you to remove the follower. Click Delete to remove or Cancel to back out.
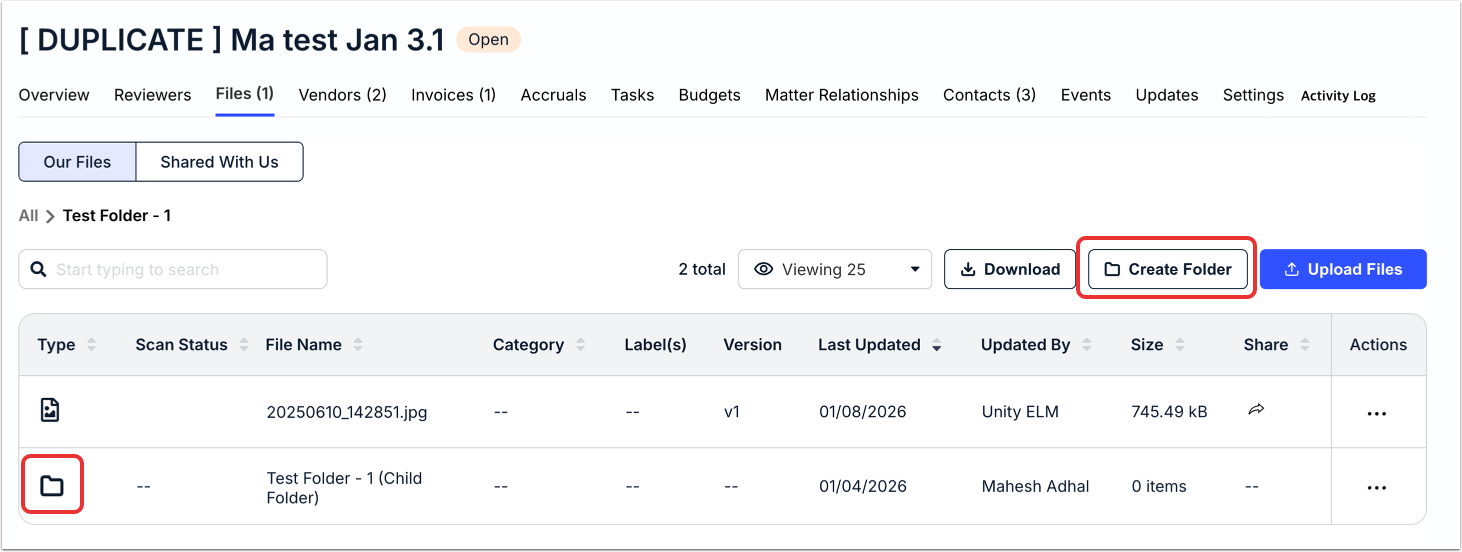
Files
Use the Files tab to view, add, and edit files. You can toggle between Our Files and files Shared With Us.
You can see the File Type, the Scan Status, the File Name, the Category, Label(s), Version, Last Updated date, Updated By, Size. Use the up/down arrows next to each column to sort by that detail. Use the Search bar to search through the files. You can use the search bar to search for specific updates; additionally, you can use the drop-down menu to customize how many updates you'd like to see on screen.
Click on Download to download all the documents.
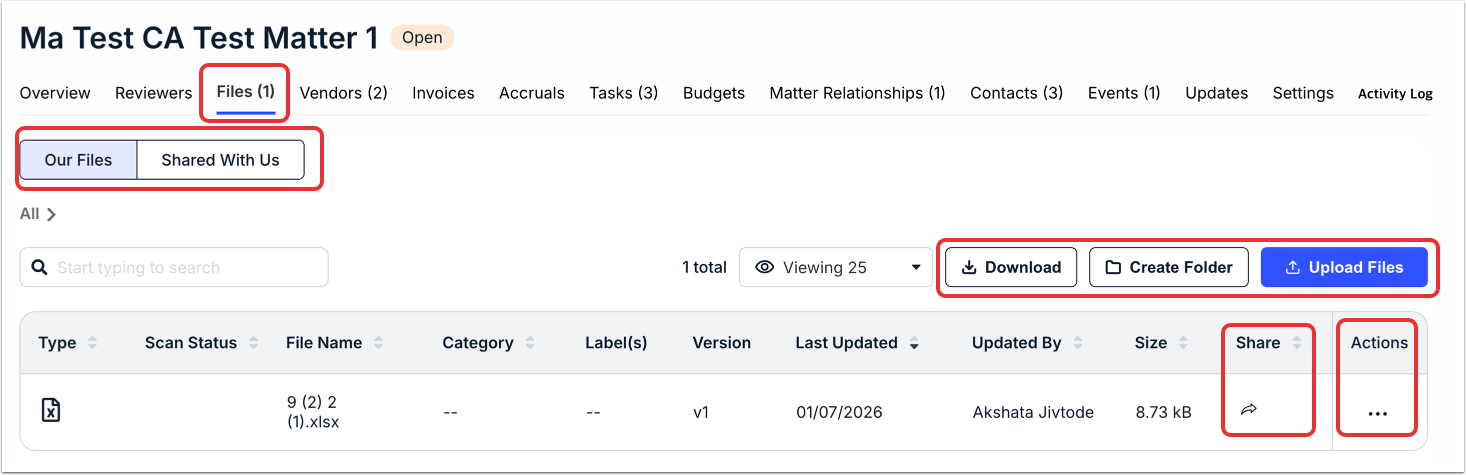
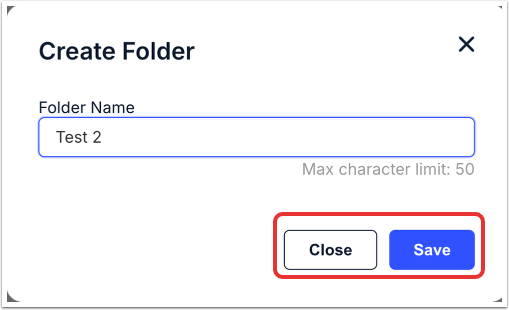
Click on Create Folder to add a new folder to the structure. Give the folder a name and click Save to add the folder or Close to back out.
You can click on the folder icon within the main Files screen to view what's in the folder.

Within a folder, you can do perform the same actions you can on the main Files screen - renaming files, moving files, etc. You can also click on the Create Folder to create sub-folders.
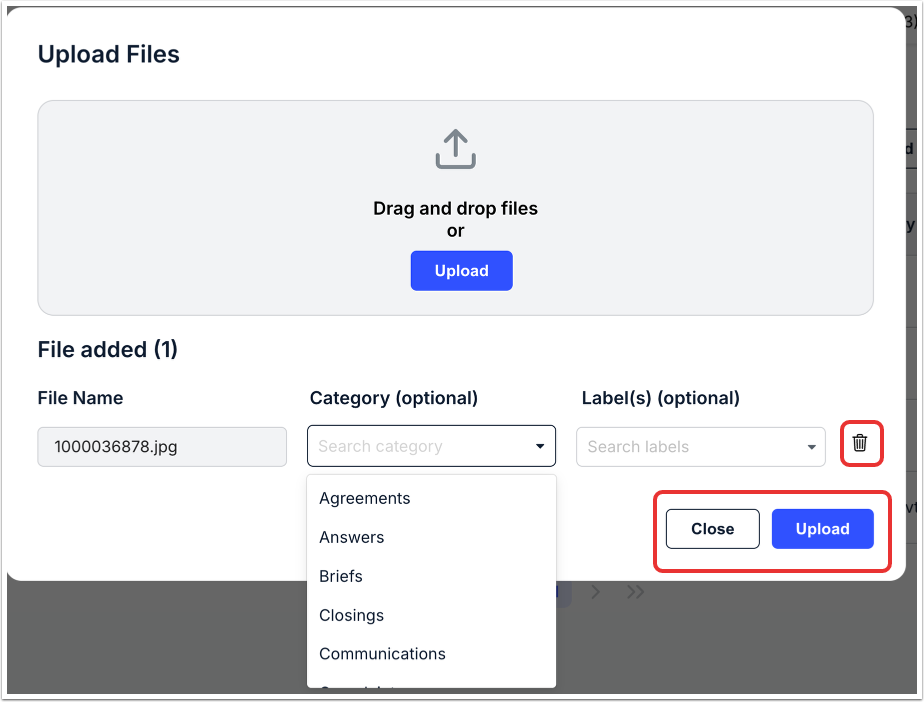
Click on Upload Files to upload a new file to the matter. After selecting (or dragging-and-dropping) the file, you can choose a Category and/or Label for the file. Click Upload to upload the file or Close to back out. You can also click the Delete (trashcan) option to remove the file.
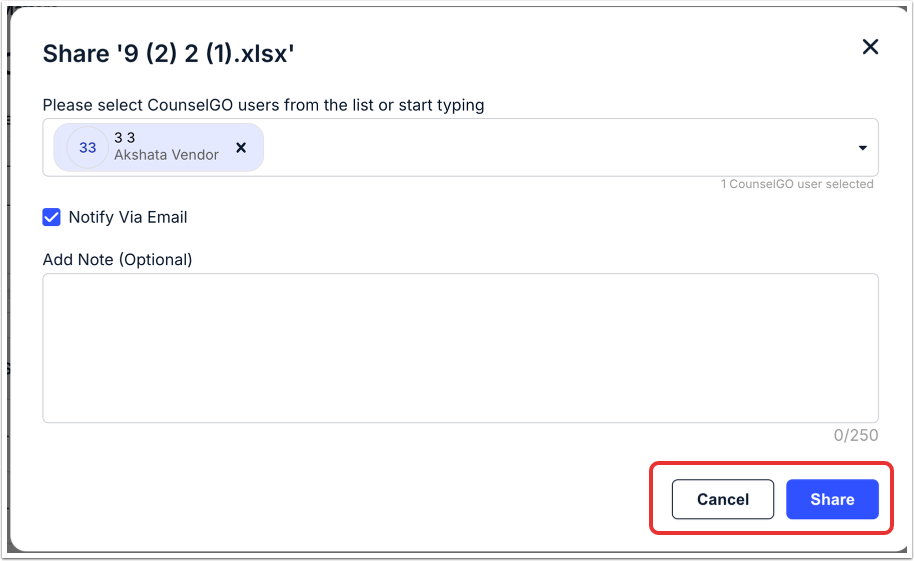
Clicking on Share will allow you to select recipients to share a specific file with. Select the users from the drop-down menu or type their names in the selection field; click the X to remove users. You also have the option to Notify Via Email and add in a note.
Hit Share to share or Cancel to back out.
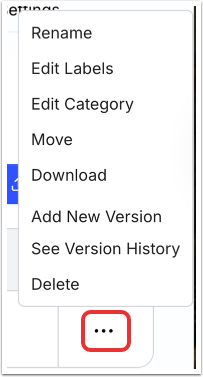
Click on the three-dot menu under Actions on a file to Rename, Edit Labels, Edit Category, Move, Download, Add a New Version, See Version History, or Delete.
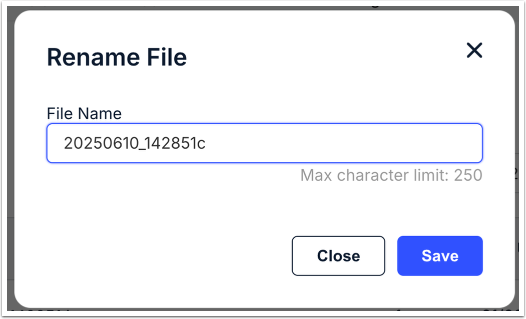
Click on Rename to rename the file. You can adjust the file name and click Save to save the change or Close to back out.
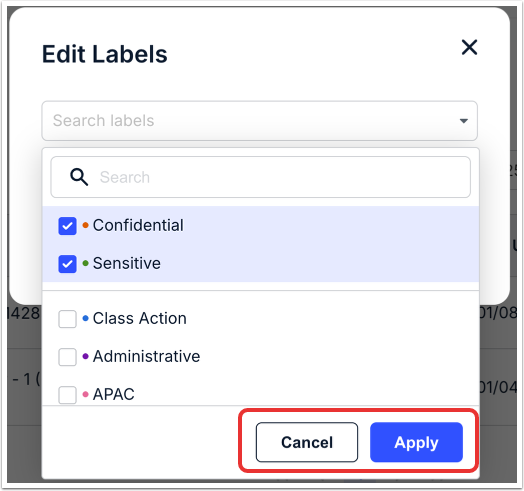
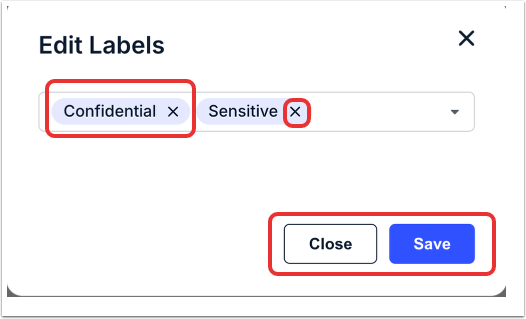
Click on Edit Labels to choose a new label from the drop-down menu; click Apply to make the change or Cancel to back out. Click Save to save the change or Close to back out. You can click on the black X to remove the label.
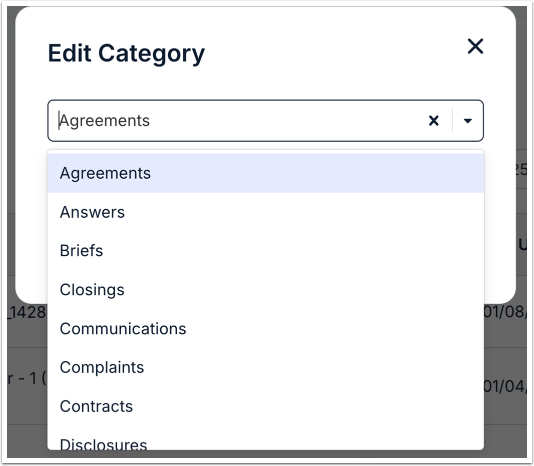
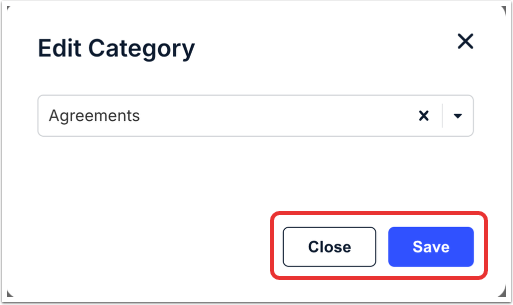
Click on Edit Category to edit the file category. Select the category from the drop-down menu. You can click X to remove the selection. Click Save to save the change or Close to back out.
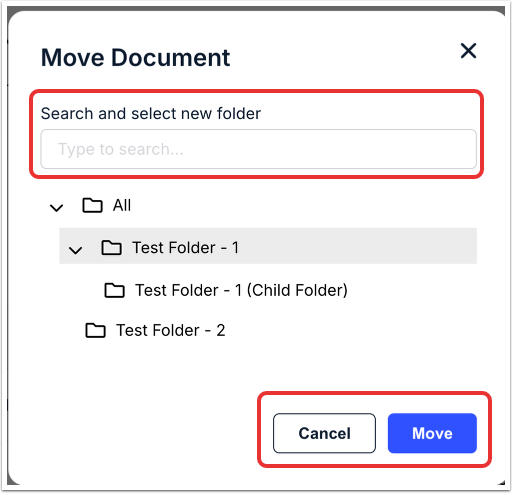
Click Move to move the file into a new location; you'll see the structure displayed on the screen. You can also Search for the location in the search bar.
Click Download to download the file to your desktop. You can also click Add New Version to bring in a new version of the file; you'll have to select the version from your desktop.
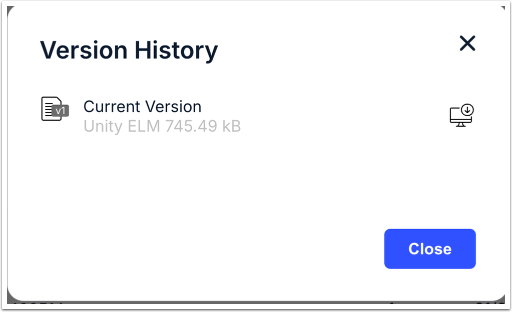
Clicking on See Version History will bring up the full version history of the file.
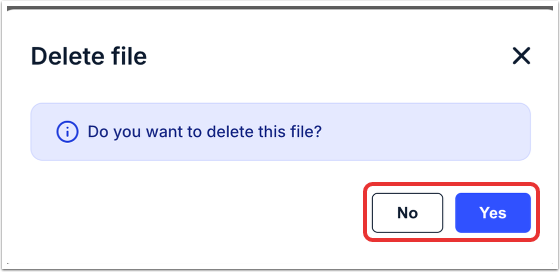
You can also click on Delete to remove the file. Click on Yes to delete or No to back out.
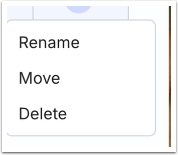
With a folder, actions include Rename, Move, or Delete. These actions work the same as they do with files.
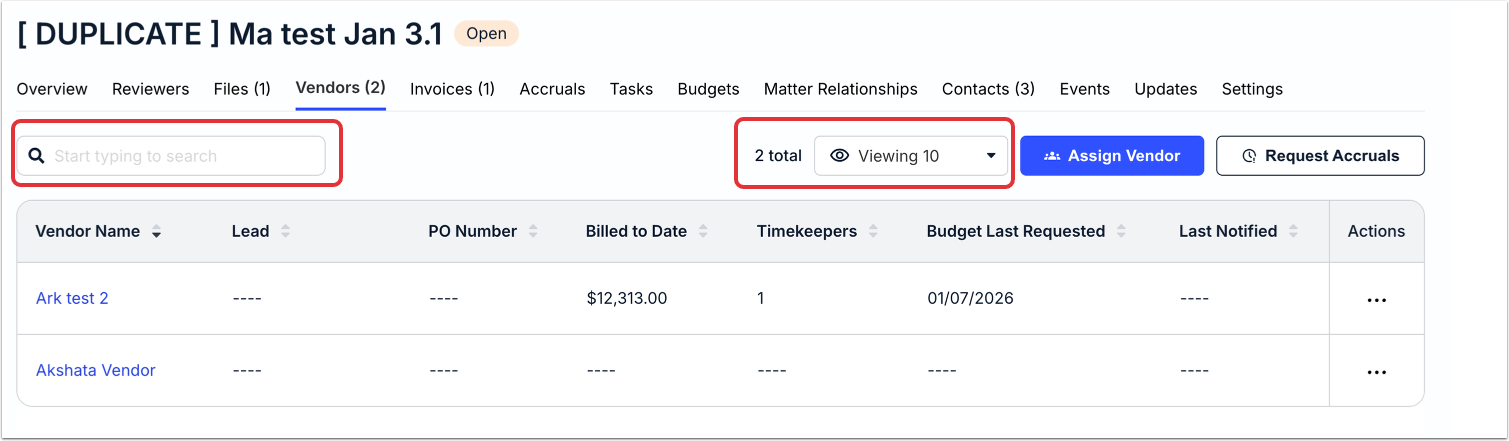
Vendors
Use the Vendors tab to view and assign vendors to a matter.
On the main Vendors screen you’ll see the:
| Vendor Name | The name of the vendor |
| Lead | The lead assignee to the vendor |
| PO Number | The PO number of the vendor |
| Billed to Date | The date the vendor was billed |
| Timekeepers | Any timekeepers for the vendor |
| Budget Last Requested | The date the budget was last requested |
| Last Notified | The date the vendor was last notified |
Use the up/down arrows next to each column to sort by that detail. You can use the search bar to search for specific files; additionally, you can use the drop-down menu to customize how many files you'd like to see on screen.
Click on each link under Vendor Name to go to that Vendor's page.
Assign Vendor
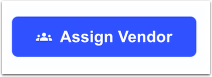
Click on the Assign Vendor button to assign a vendor to the matter.
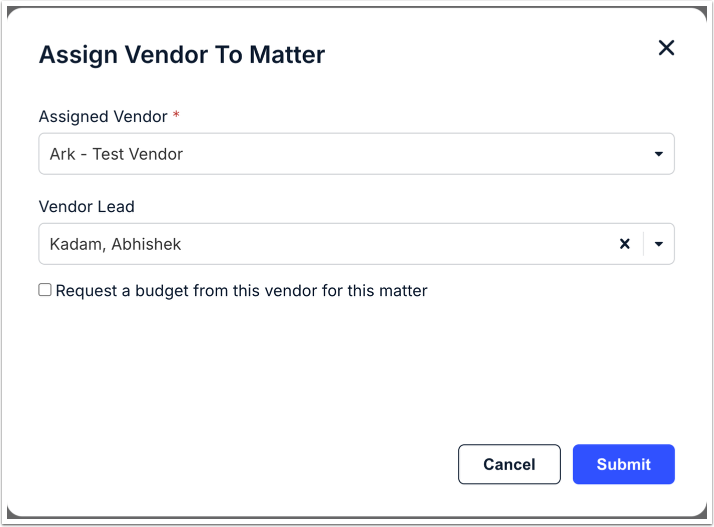
The Add to Vendor Assignment to Matters screen will appear; you'll have to select the Assigned Vendor (required) and Vendor Lead from the drop-down menus. Click on the check box to Request A Budget From This Vendor For This Matter. Click Save to submit the vendor or Cancel to back out.
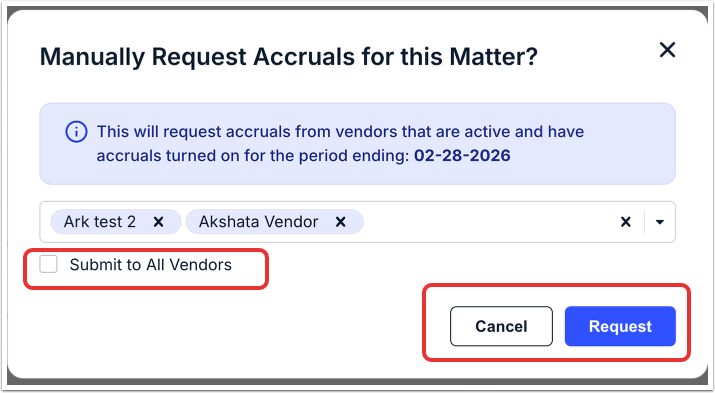
Requesting Accruals
Click on Request Accruals to manually request accruals for this matter. You'll have to select a vendor or vendors from the drop-down menu (click X to remove the selection) and use the check box if you want to Submit to All Vendors. Click Request to send the request or Cancel to back out.
Invoices
Use the Invoices page to view invoices associated with the matter. On the main invoices screen, you can see the:
- Invoice number
- Billed Total
- Invoice Status
- Received date
- Invoice Date
- Vendor (click the link to go to the vendor's page)
- Approvable (Yes/No)
- Approvers
- Native Adjusted Total
Use the up/down arrows next to each column to sort by that detail. You can use the search bar to search for specific files; additionally, you can use the drop-down menu to customize how many files you'd like to see on screen. Click on Download to download the invoice file.
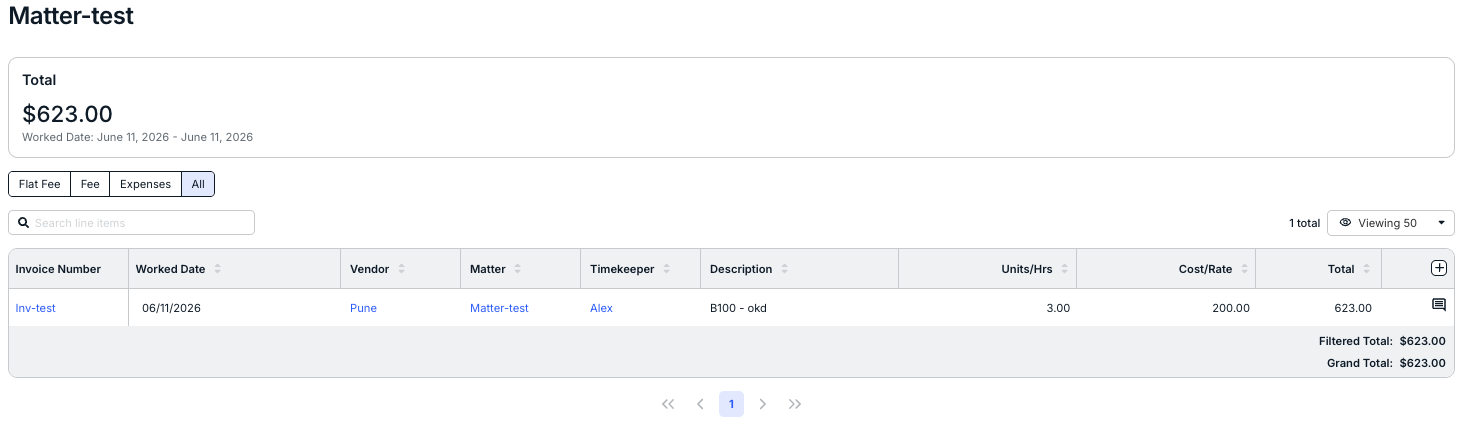
Click on View All Line Items to view the important line-item details under the Reports screen.

Within the line items reports screen, use the tabs at the top of the screen to switch between Flat Fee, Fee, Expenses, and All line items.
For more on working with invoices, view our Invoice Unity user guide.
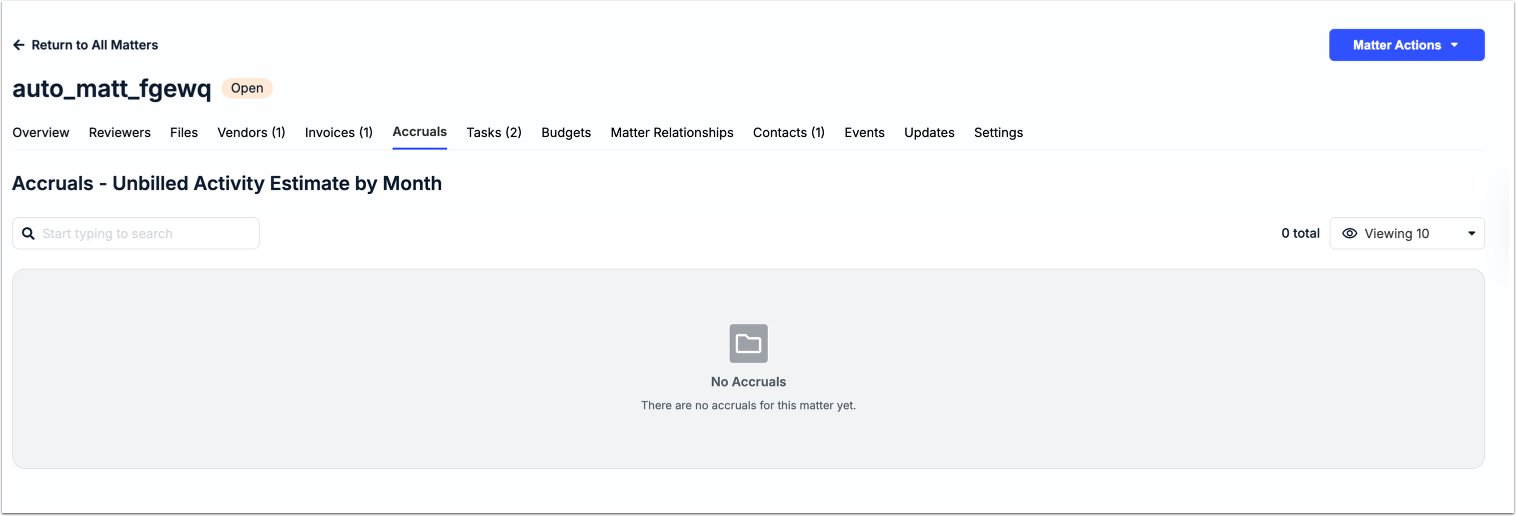
Accruals
Use this section to add, view, and edit matter accruals.
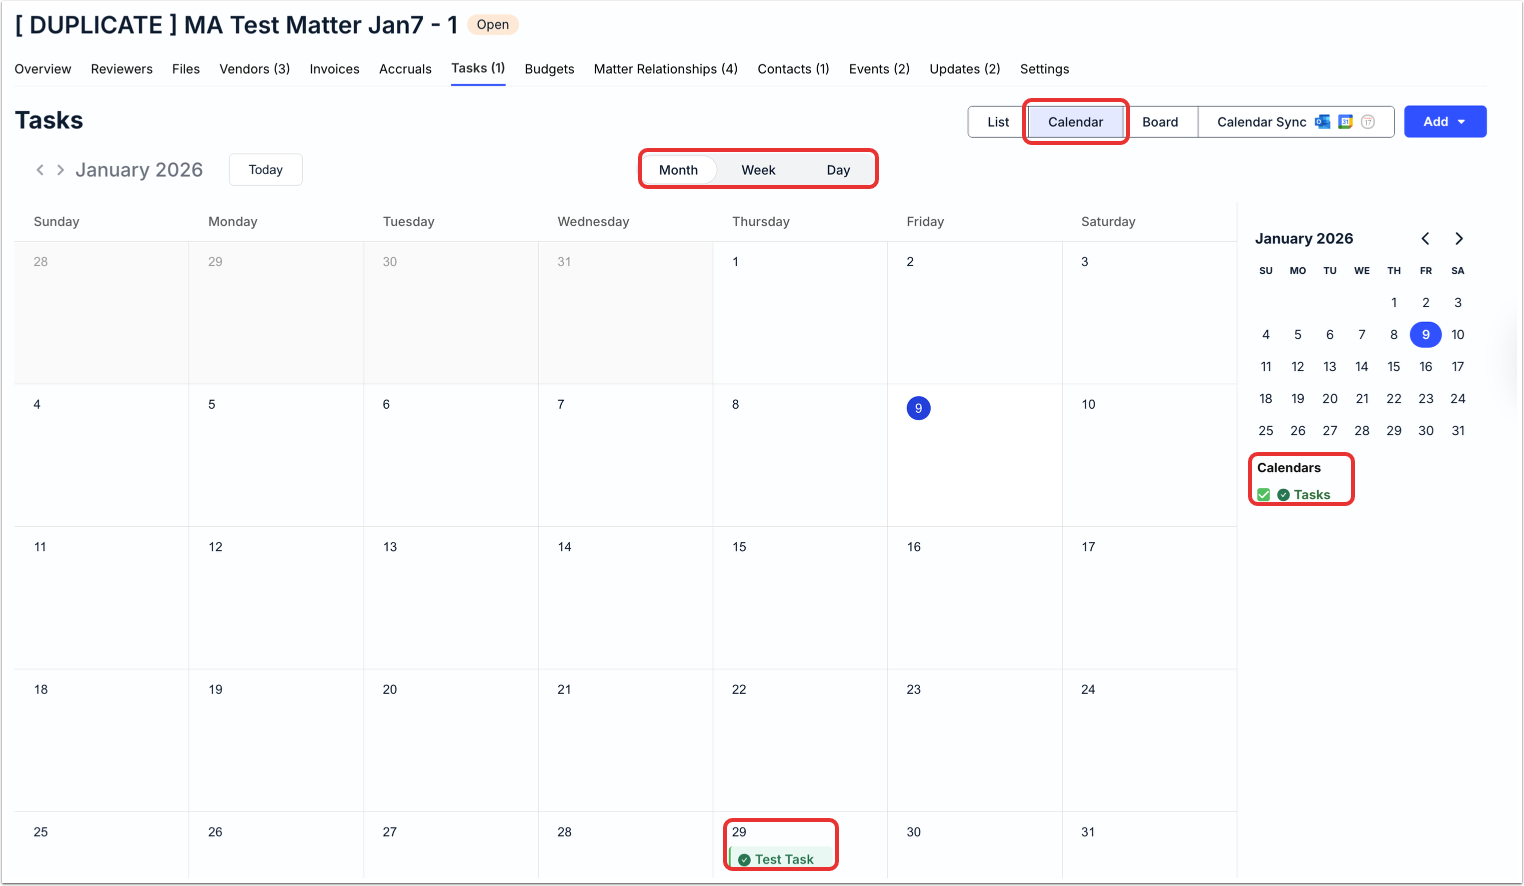
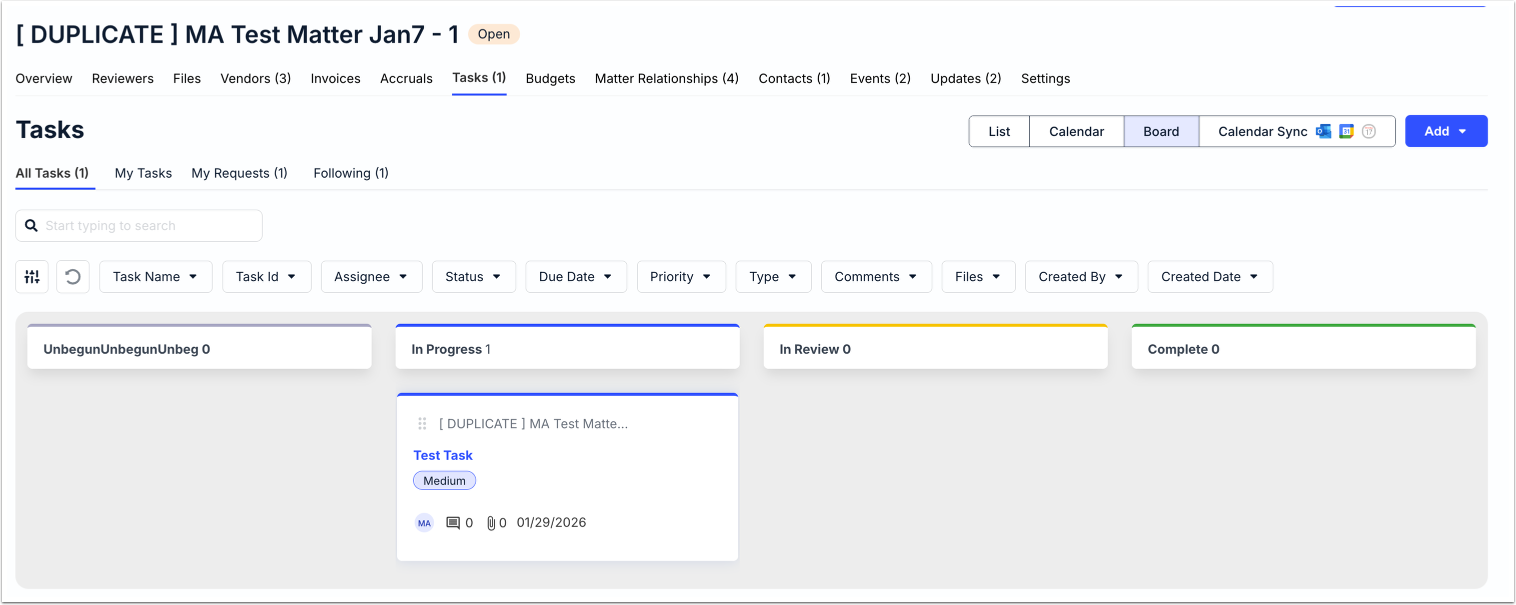
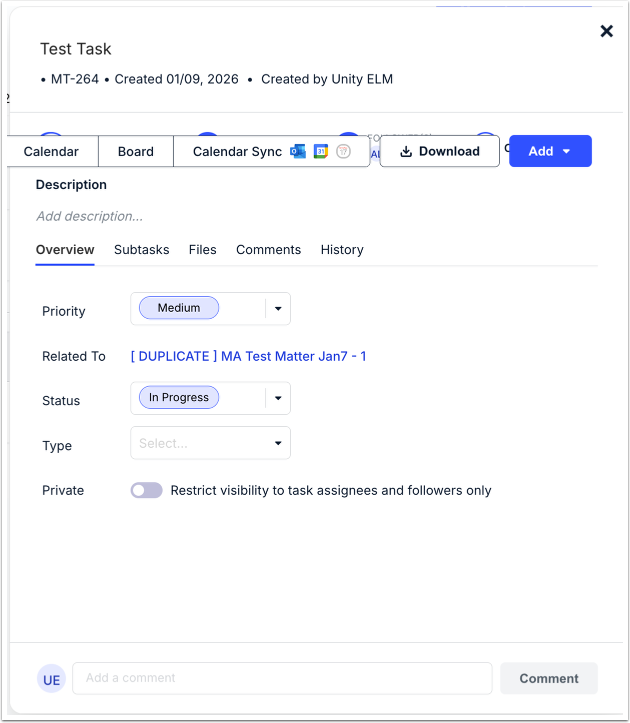
Tasks
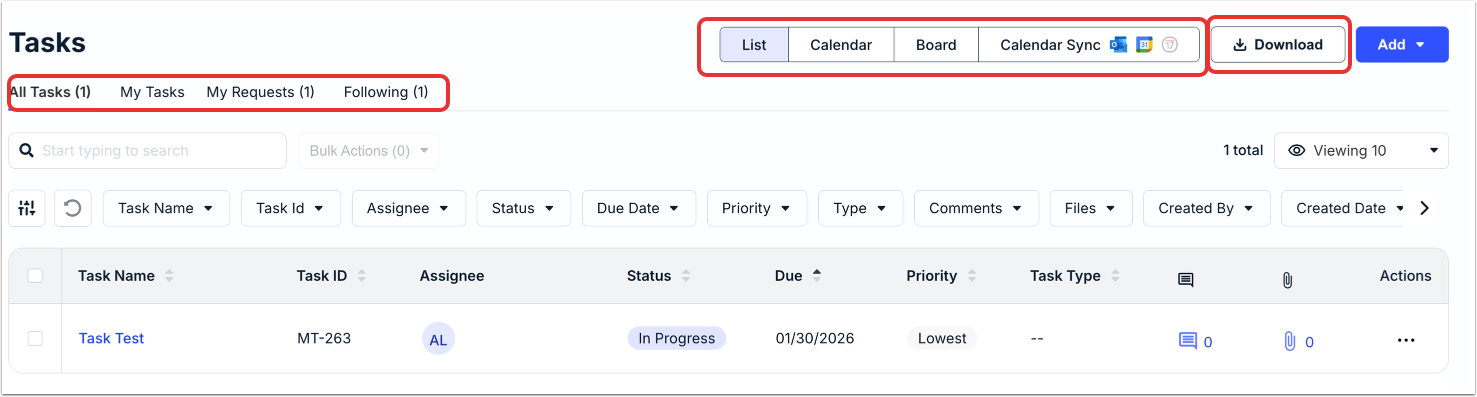
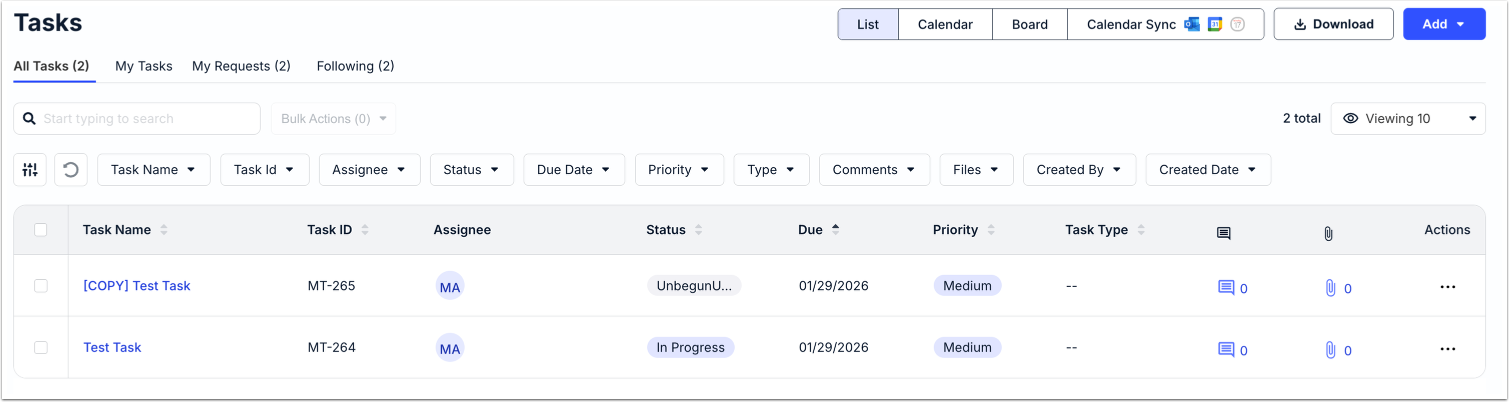
Use the Tasks tab to add, view, and edit tasks. You can switch between the List, Calendar, and Board view; click on Calendar Sync to synchronize with your calendar tools (Outlook, Google, etc.). You can also switch between All Tasks, My Tasks, My Requests, and Following.
On the Calendar view, you can see the upcoming tasks laid out in a calendar view. You can toggle between Month, Week, and Day, and choose to show or hide specific events on the calendar.
Click on Board to view a corkboard setup of tasks Not Started, In Progress, In Review, and Complete. Click into any task to view and edit.
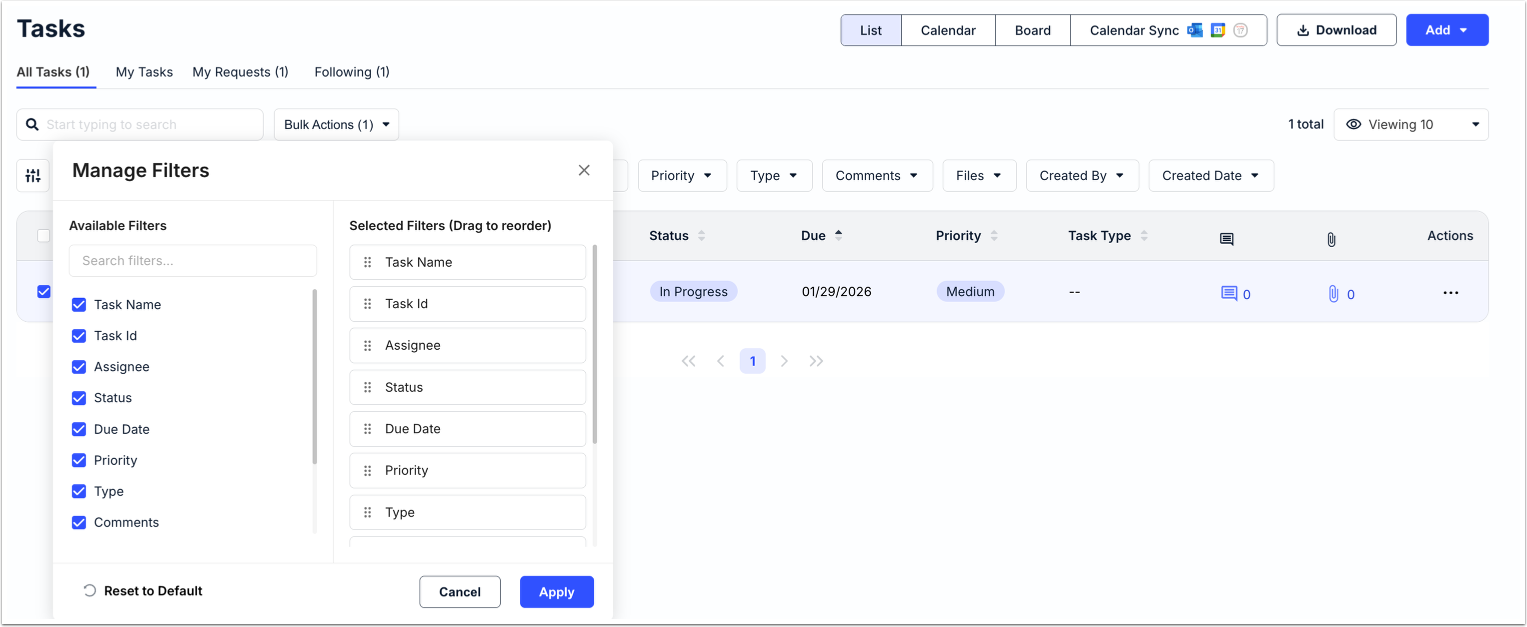
On the main screen, you'll see the Task Name, Task ID, Assignee, Status, Due date, Priority, Task Type, Notes, Attachments, and Actions. Use the up/down arrows next to each column to sort by that detail. You can use the search bar to search for specific files; additionally, you can use the drop-down menu to customize how many files you'd like to see on screen. Use the column drop-down menus and filters to choose what contacts you'd like to see on the screen. Click on Download to download the task.
Use the Bulk Actions option to bulk Edit or Delete the tasks.
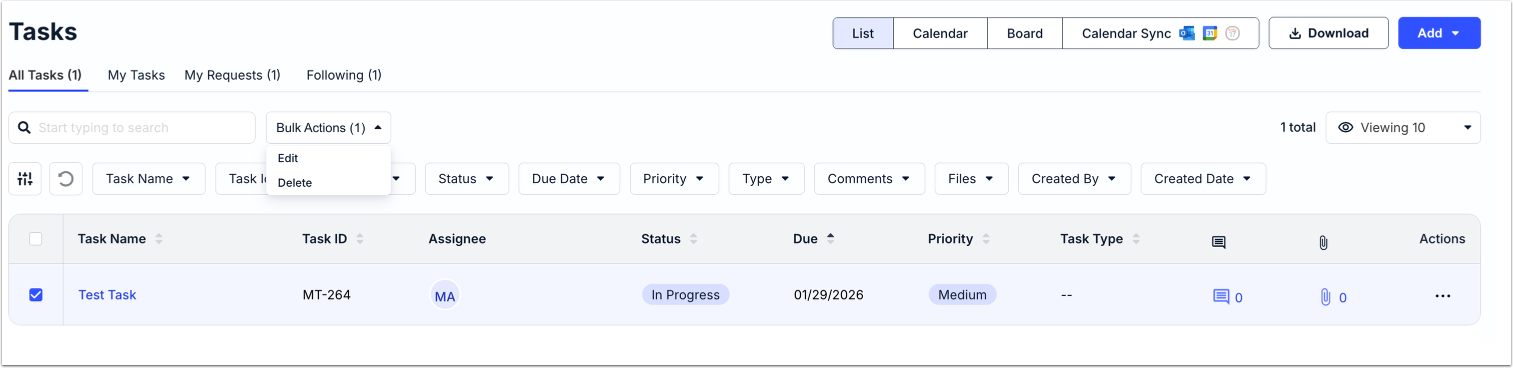
Use the three dots under the Actions menu to Edit, Copy, or Delete the task.

If you click on Edit, this screen will appear; edit the information and the task will automatically update. View the Adding a Task section for more details.
When you Copy a task, the copied task will appear in the main screen.
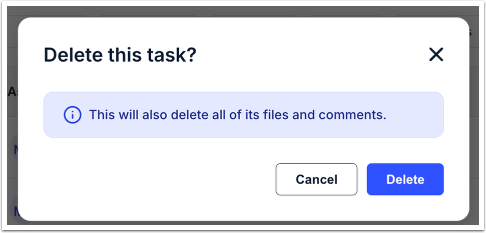
If you click Delete, you'll get this message. Click on Delete to delete the task or Cancel to back out.
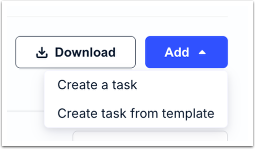
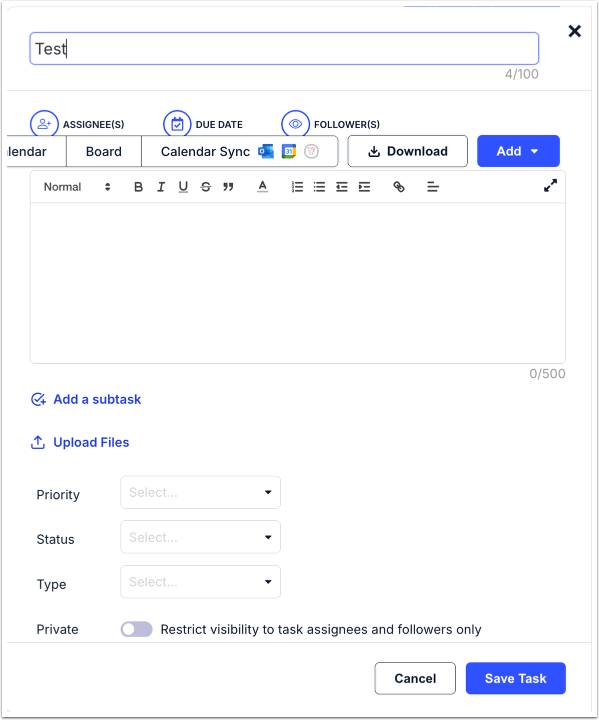
Adding a Task
Use the Add button to Create a task or Create a task from template.
If you Create a Task, you'll have to:
- Give the task a Name
- Pick out the Assignees, Due Date, and Followers
- Fill out the Description
- Add a Subtask and Upload Files (if necessary)
- Choose the Priority, Status, and Type from the drop-down menus
- Select if you want to keep the task Private (restrict visibility to task assignees and followers only)
Click Save Task to save the task or Cancel to back out.
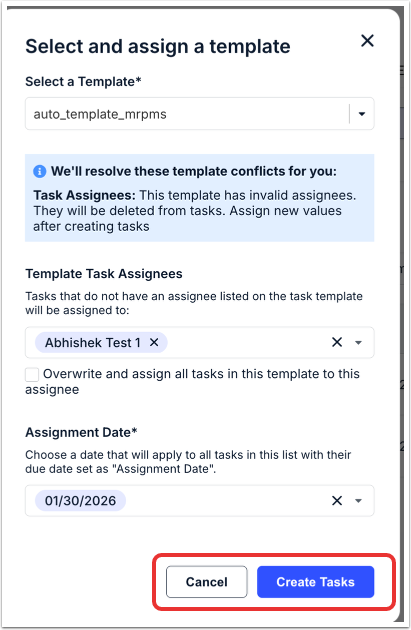
To Create a Task from Template, you'll have to Select and assign a template. You'll have to Select a Template, the Template Task Assignees (click the X to remove the selection), and the Assignment Date from the drop-down menus.
Click Create Tasks to create the tasks or Cancel to back out.
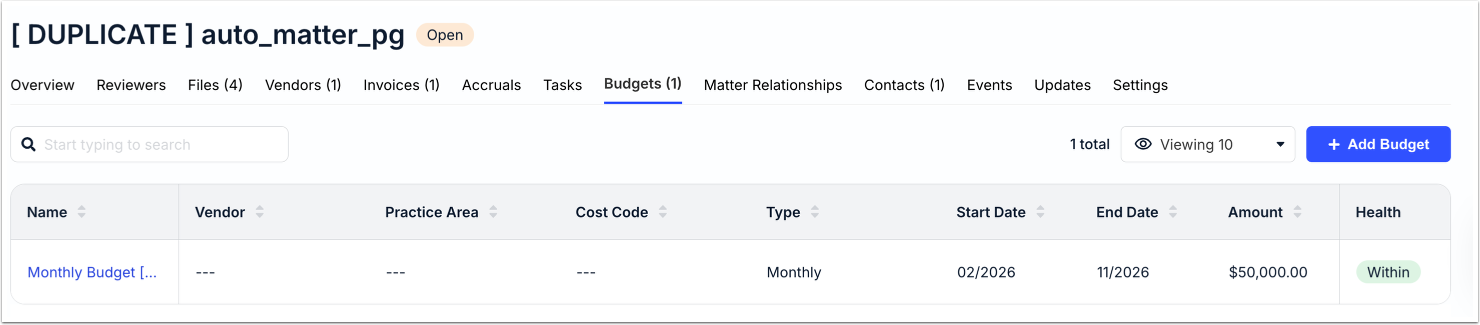
Budgets
Click on the Budgets tab to view the budgets associated with the matter. On the main screen, you'll see the Name (click on that link to go to the specific budget), Vendor, Practice Area, Cost Code, Type, Start Date, Amount, and Health. Use the up/down arrows next to each column to sort by that detail. You can use the search bar to search for specific files; additionally, you can use the drop-down menu to customize how many files you'd like to see on screen.
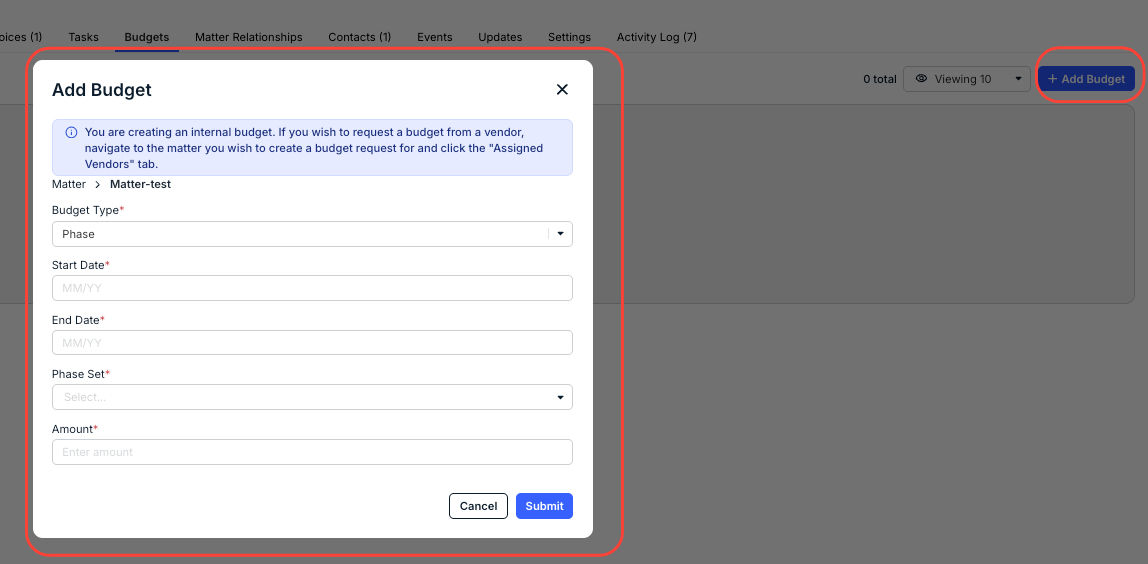
Click on Add Budget to add a new budget to the matter. Select the Budget Type from the drop-down menu and fill in the Start Date, End Date, Phase Set, and Amount. Starred fields are required.
Click Submit to send the budget in or Cancel to back out. You'll see the new budget appear on the main screen.
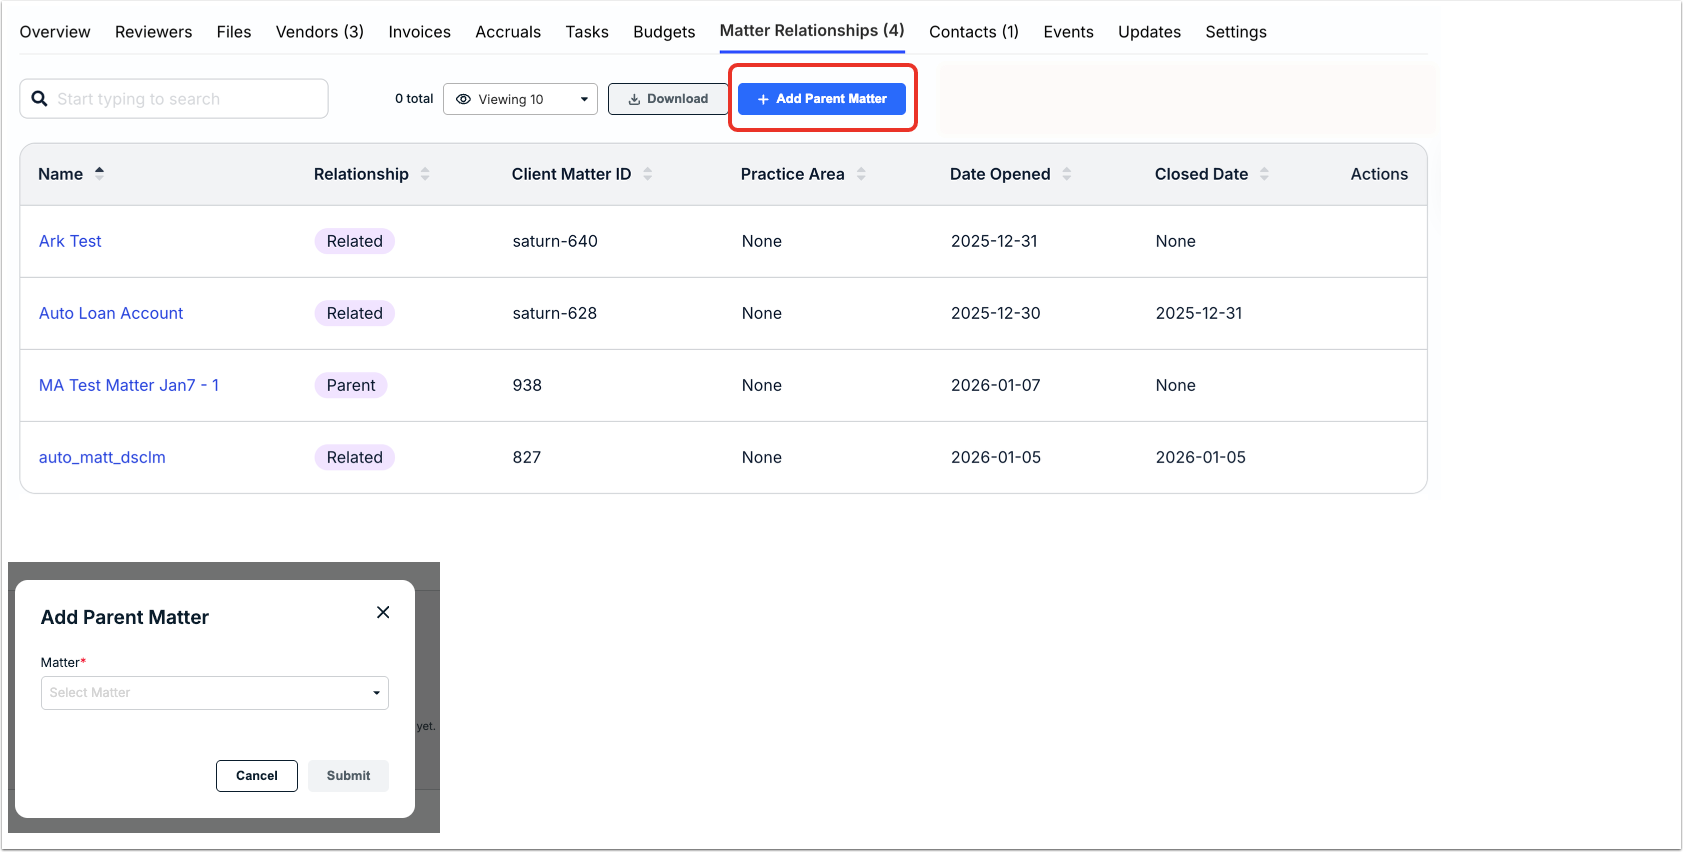
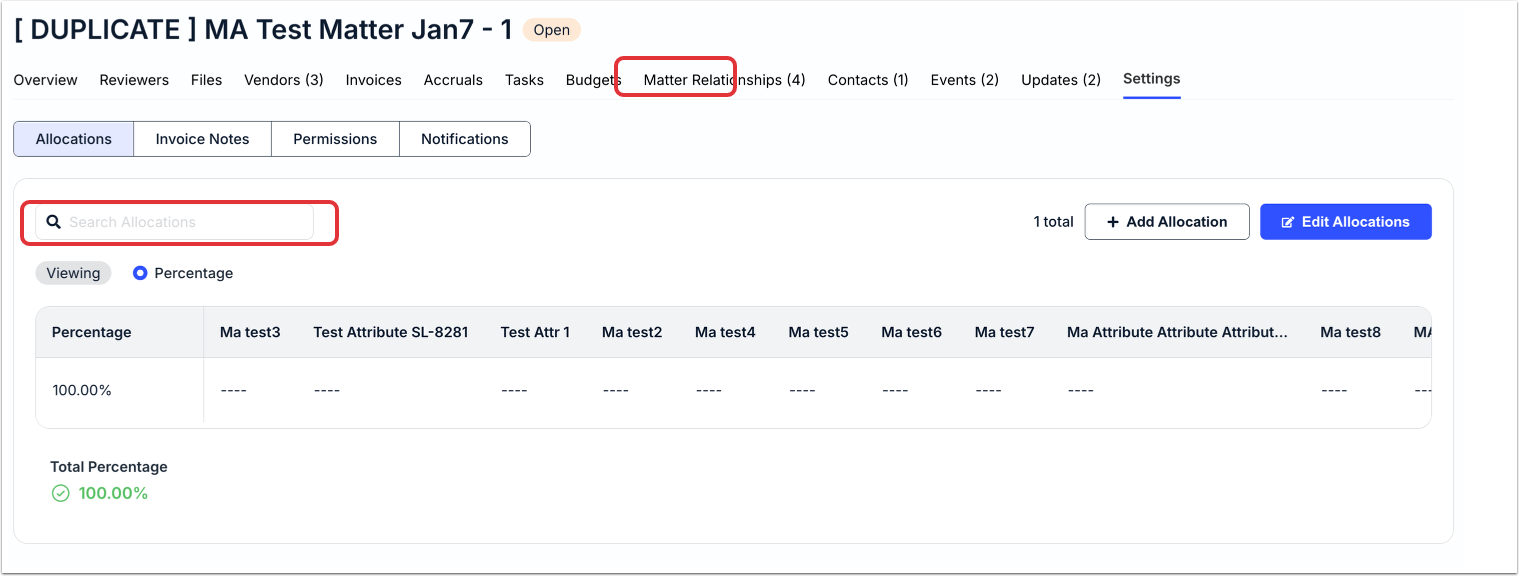
Matter Relationships
Under Matter Relationships, you can see the different matters with relationships to the current matter. On the main screen, you'll see the:
- Name of the relationship
- Type of relationship (related/parent)
- Client Matter ID
- Practice Area
- Date Opened
- Closed Date
Use the up/down arrows next to each column to sort by that detail. You can use the search bar to search for specific files; additionally, you can use the drop-down menu to customize how many files you'd like to see on screen. Click on Download to download the matter relationship information.
Click on Add Parent Matter to select a parent matter from the drop-down menu.
Contacts
Use the Contacts page to view, assign, and create new contacts associated with the matter.
On the main Contacts screen you’ll see the:
- First Name of the contact
- Last Name of the contact
- Roles of the contact
- Contact Email
- Contact Phone Number
- Contact Company
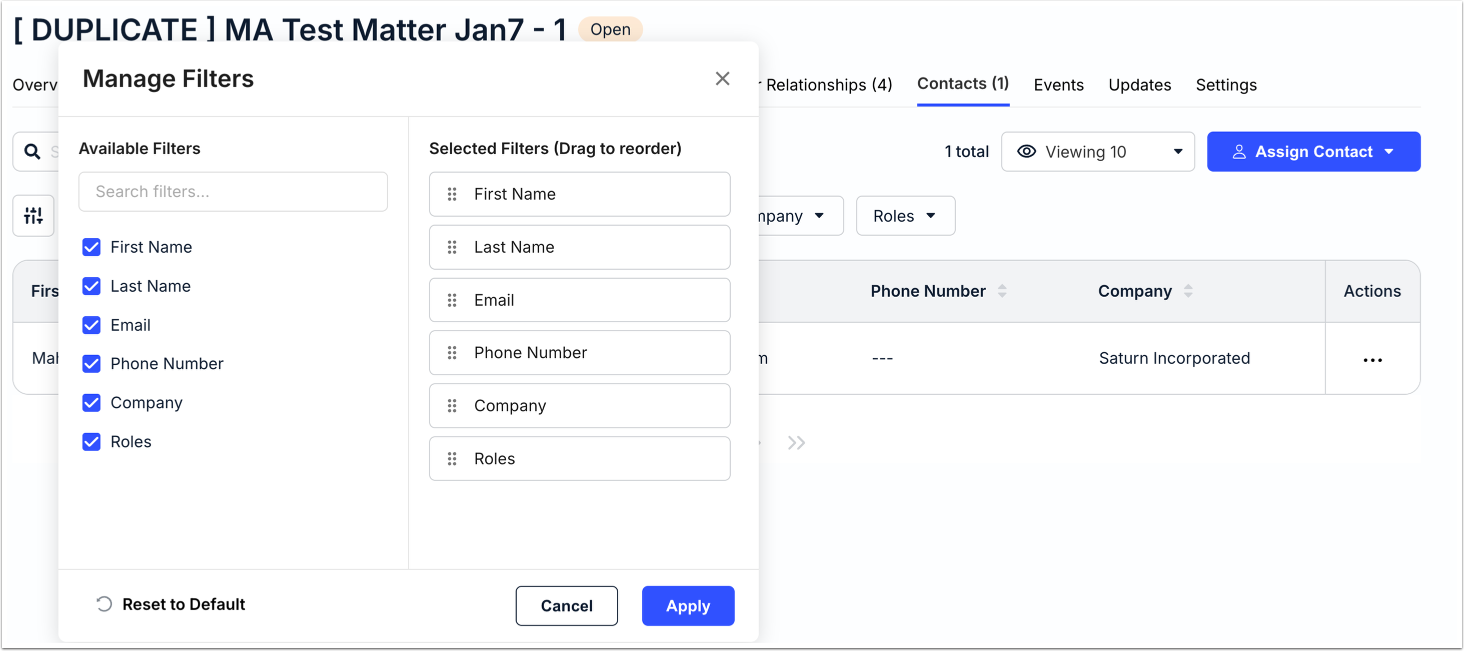
Use the up/down arrows next to each column to sort by that detail. You can use the search bar to search for specific files; additionally, you can use the drop-down menu to customize how many files you'd like to see on screen. Use the Manage Filters drop-down menu and column drop-down menus to choose what contacts you'd like to see on the screen. Click on the Download Data button to export the data as an .XLSX file.
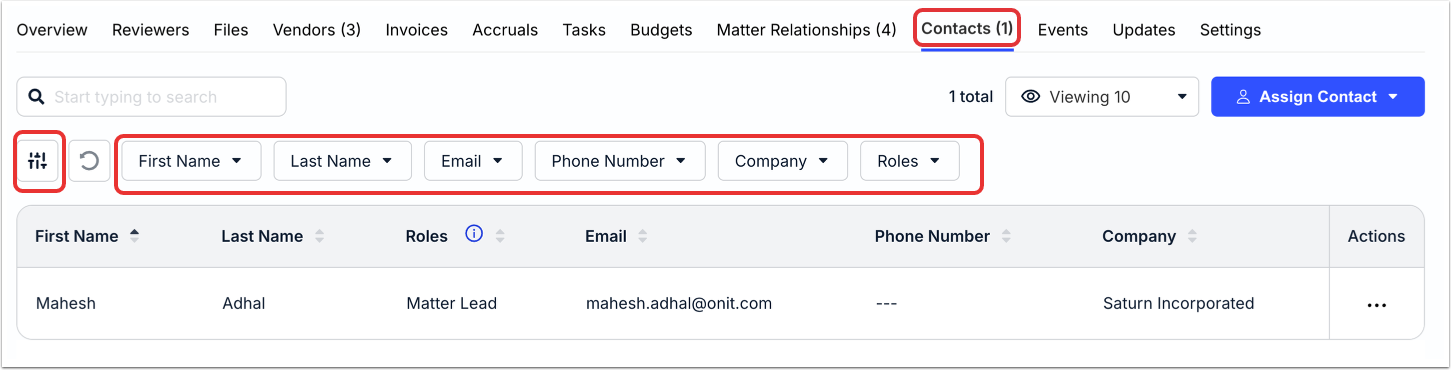
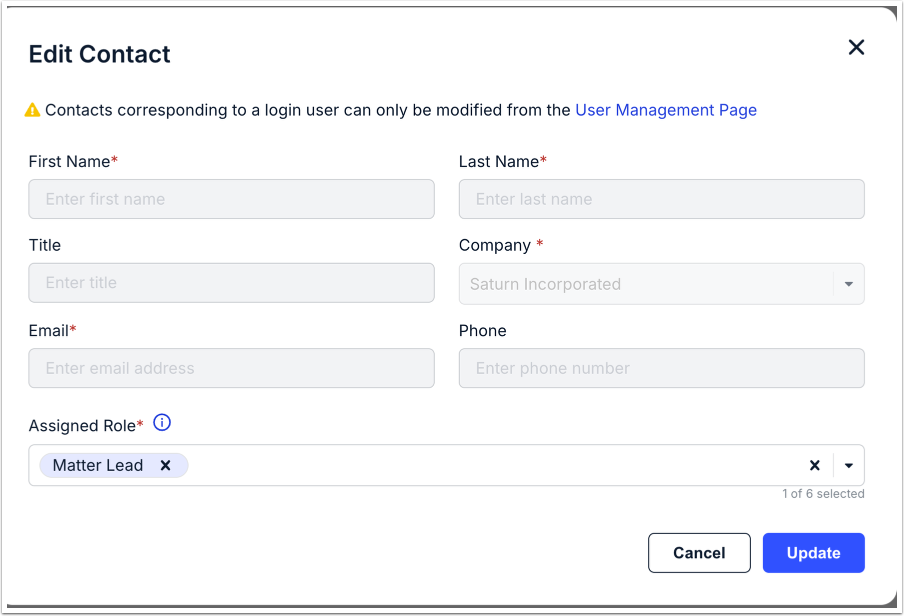
Click on the three dots under the Action menu to either Edit or Unassign the contact. Clicking on Edit Contact will allow you to edit the contact properties (more on that in the following section).
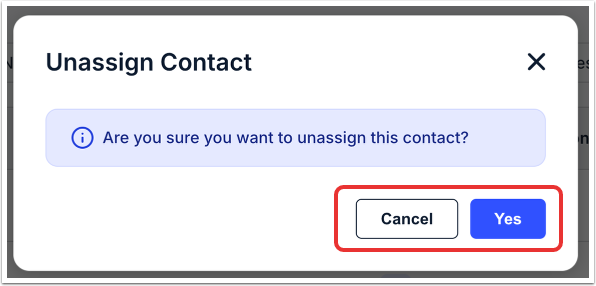
Clicking on Unassign Contact will remove the contact from the matter. Click on Yes to unassign the contact or Cancel to back out.
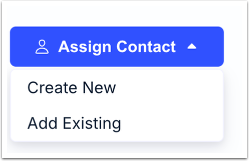
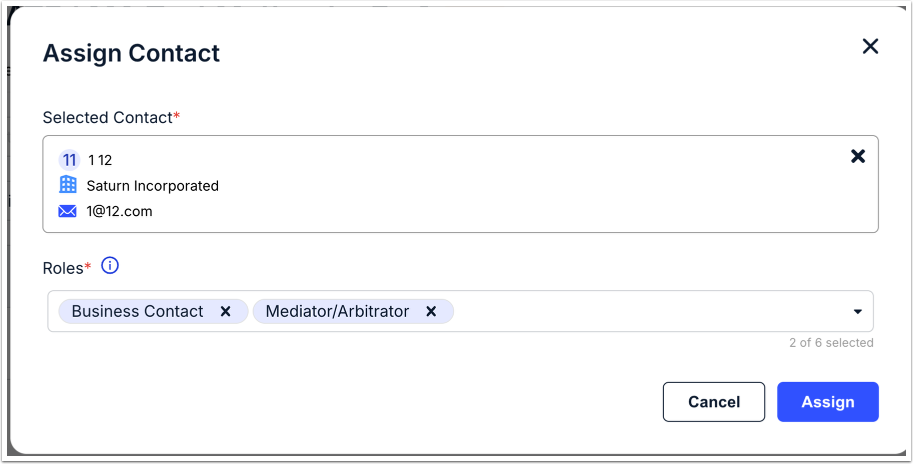
Assigning a Contact
Click on the Assign Contact button to assign a vendor to the matter. You can choose from Create New or Add Existing.
If you choose the Create New option, you'll have to fill in the First and Last Name (required), Title, Company (required), Email (required), Phone number, and at least one Assigned Role from the drop-down menu (you can add up to five). Click the X next to a selected role to remove that selection.
Note that if you select a Custom company, you'll have to fill in a Company Name.
Click Create to create the contact or Cancel to back out.

When you choose the Add Existing option, you'll choose the Selected Contact from the drop-down menu and up to six Roles. Click the X next to a selection to remove.
Click Assign to assign the contact or Cancel to back out.
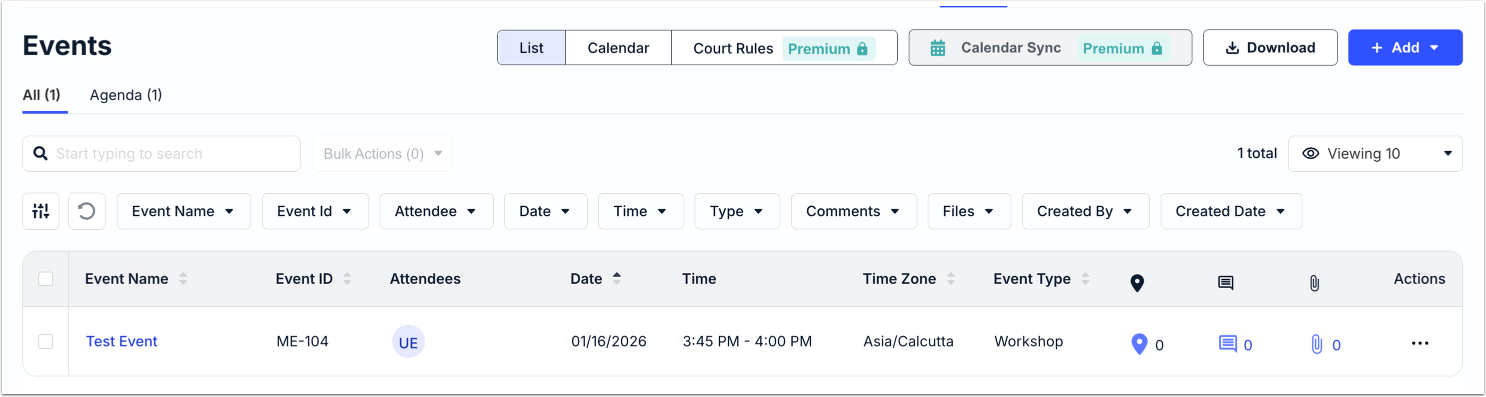
Events
Use the Events page to view and manage important upcoming events.
On the main screen, you can toggle between the List of upcoming events, a Calendar of upcoming events, and the Court Rules (Premium Version only). You also have the option for a Calendar Sync with an external calendar (Premium Version only).
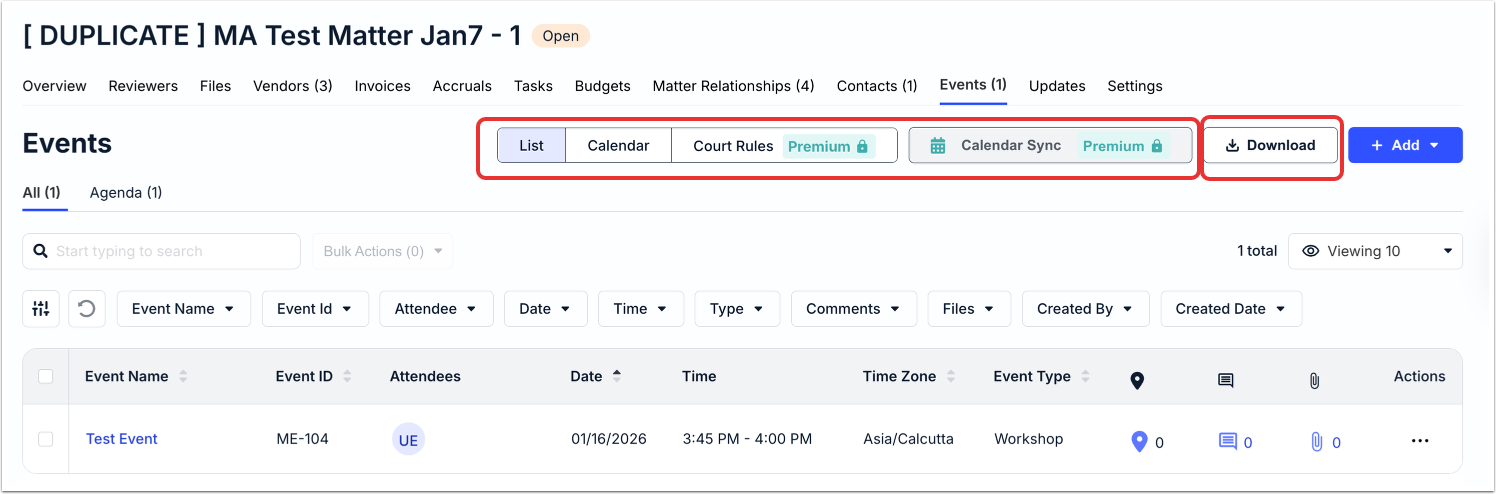
List View
The list view details all of the upcoming events in a standard list format. On the page, you'll see the:
- Event Name (click on the link to open a screen with more details for editing)
- Event ID
- Attendees
- Date
- Time
- Time Zone
- Event Type
- Location
- Notes
- Attachments
Use the up/down arrows next to each column to sort by that detail. You can use the search bar to search for specific files; additionally, you can use the drop-down menu to customize how many files you'd like to see on screen. Use the Manage Filters drop-down menu and column drop-down menus to choose what contacts you'd like to see on the screen. Click on the Download button to export the information as an .XLSX file.
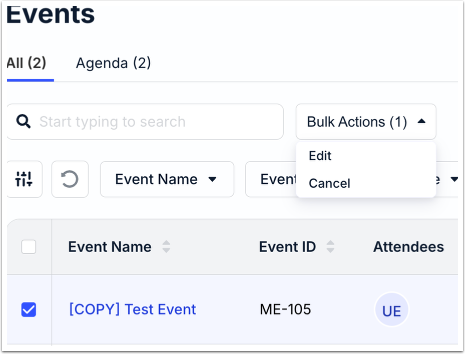
Note that you can toggle between All events and those on your Agenda (ones you have action items for); you'll see a number next to Agenda that details the number of action items.

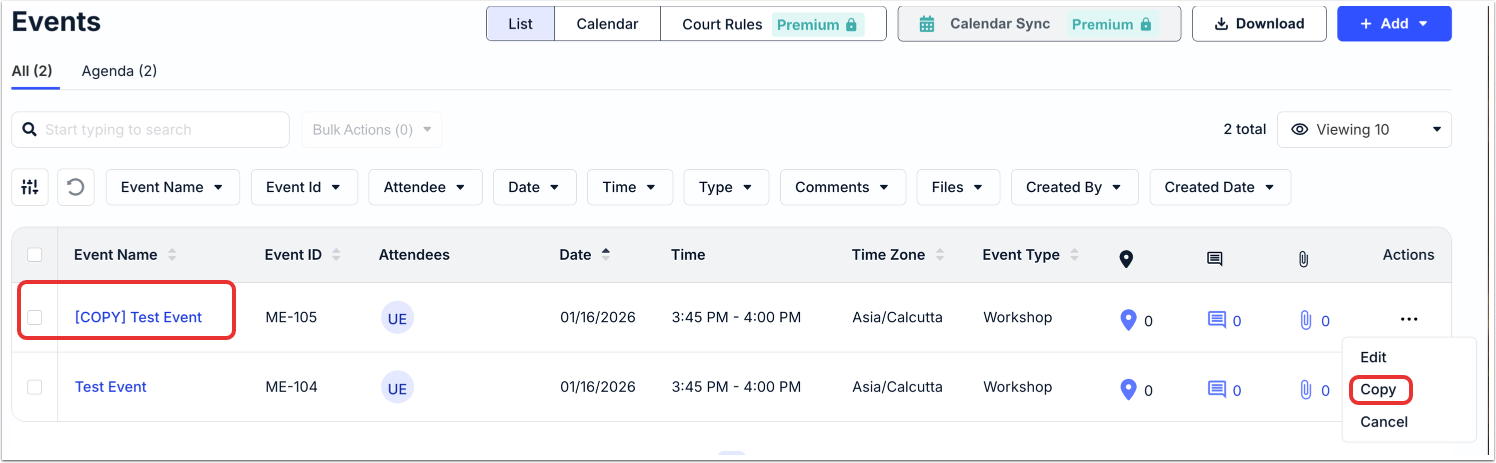
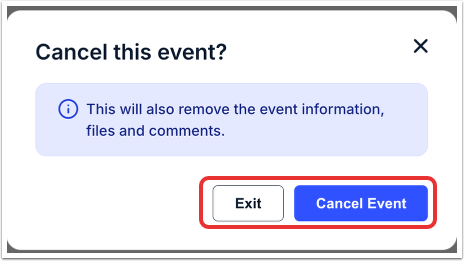
Click on the three dots under the Actions menu to Edit, Copy, or Cancel the event.
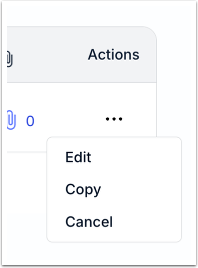
Clicking on Edit will bring up the event details for editing; you can see more on this in the Add Event section.
Clicking on Copy will duplicate the event within the list.
Clicking Cancel will remove the event from your calendar. Click on Cancel Event to remove the event or Exit to back out. Note that this will also remove the event information, files, and comments.
Use the Bulk Actions menu to Edit or Cancel events in bulk.
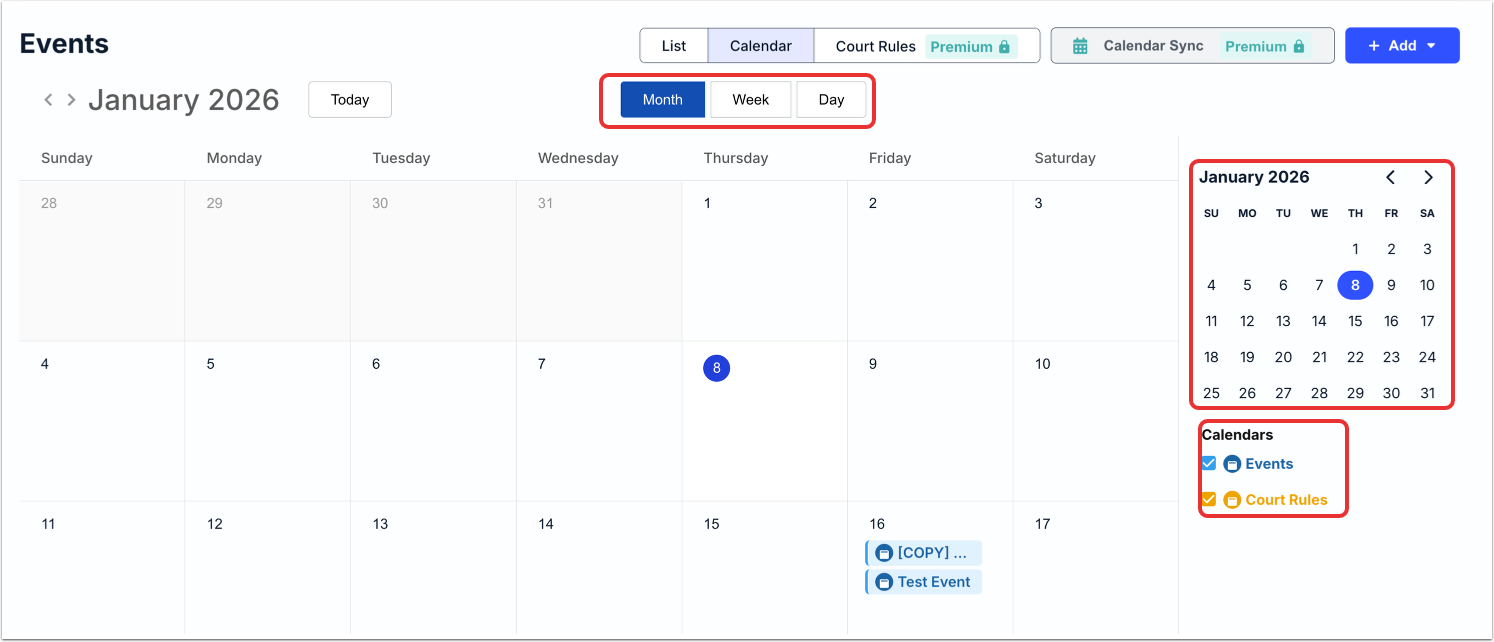
Calendar View
The Calendar View will show events set up in a calendar grid. Click on any event to open. Use the top tabs to toggle through Month, Week, and Day options; use the side calendar to move through months. A grid on the bottom right allows you to view/hide different event types.
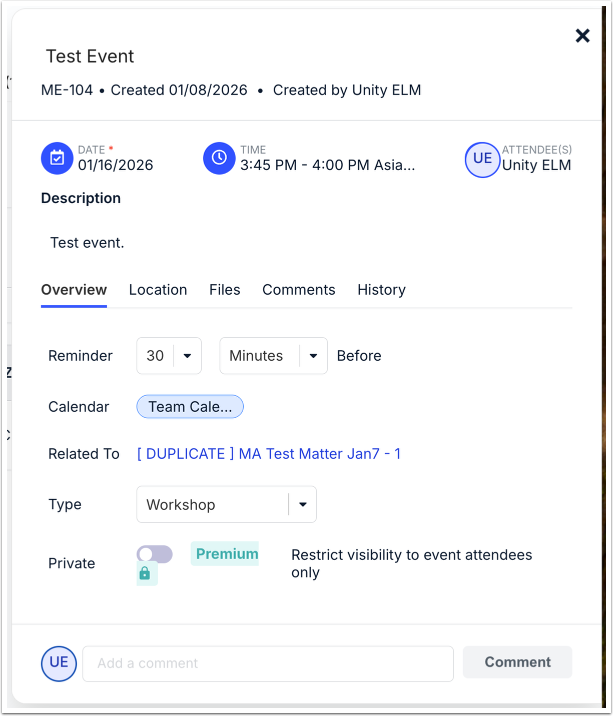
Add Event
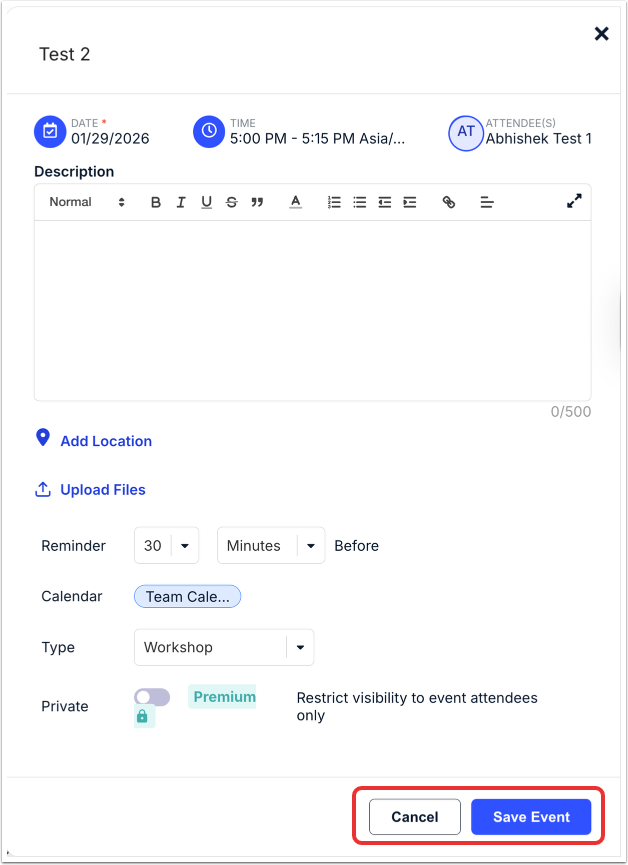
Click on the Add Event button to Create an Event or Add court rules (premium). When you Create an Event, you'll have to:
- Fill in the event Name
- Choose the Date, Time, and Attendees
- Fill in a Description
- Add Location (if necessary)
- Upload Files (if necessary)
- Set a Reminder using the drop-down menus (if necessary)
- Choose the Calendar to add the event to
- Select the Type of event from the drop-down menu
- Choose to make the event Private (premium option)
Click Save Event to create the event or Cancel to back out.
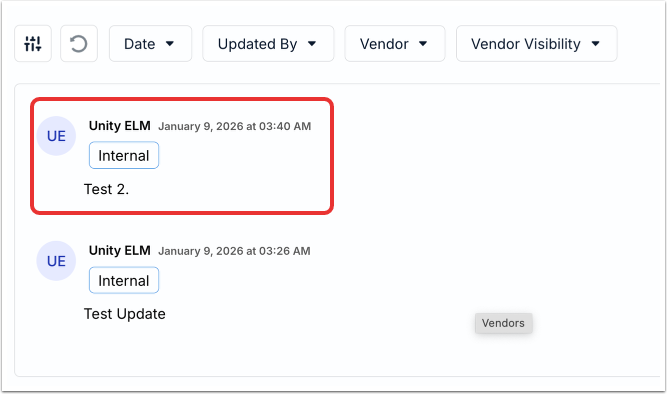
Updates
Use the Updates page to view and add important text updates about the matter. You can see the Date, the date the update was Updated By, and the actual Update text.
Use the up/down arrows next to each column to sort by that detail.
You can use the search bar to search for specific updates; additionally, you can use the drop-down menu to customize how many updates you'd like to see on screen. Use the column drop-down menus and filters to choose what contacts you'd like to see on the screen. Click on Download Data to download the update information as an .XLSX file.
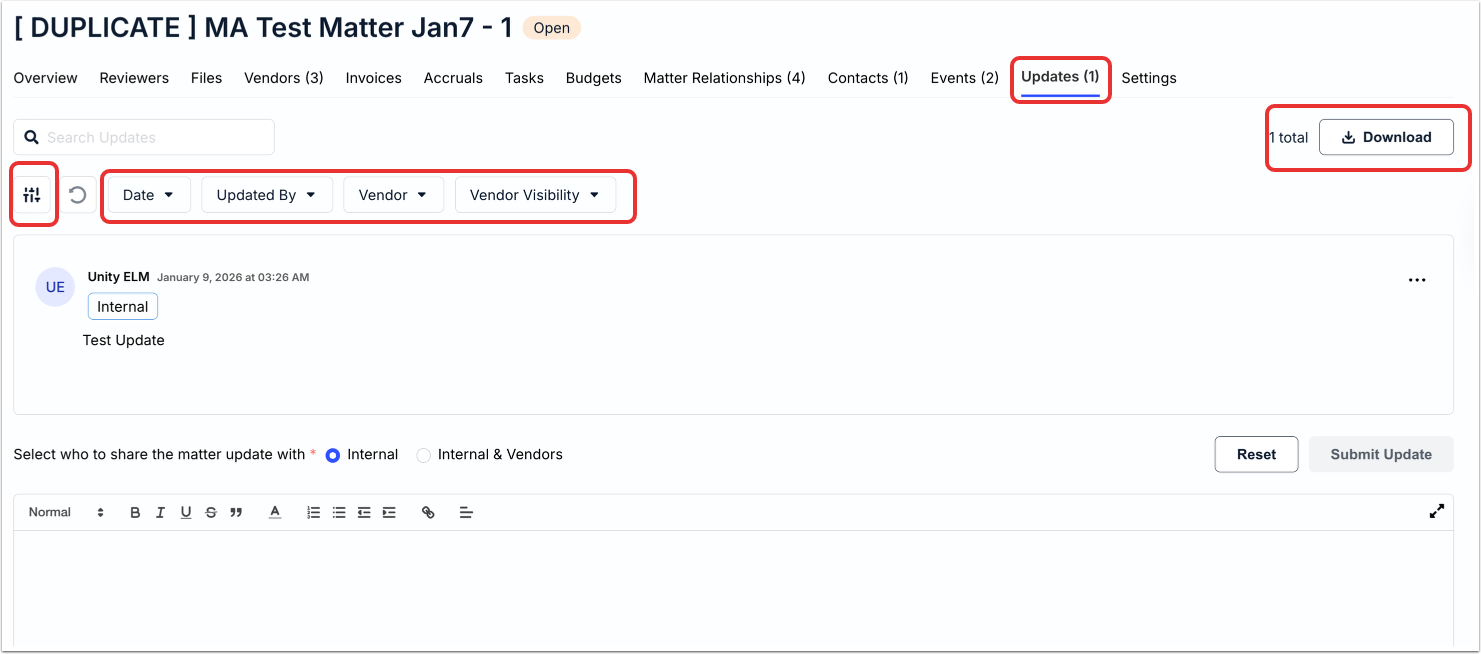
On the main Update page, you'll see all of the entered updates. Click the three dots on the right-hand side of the update to Edit or Delete the update.

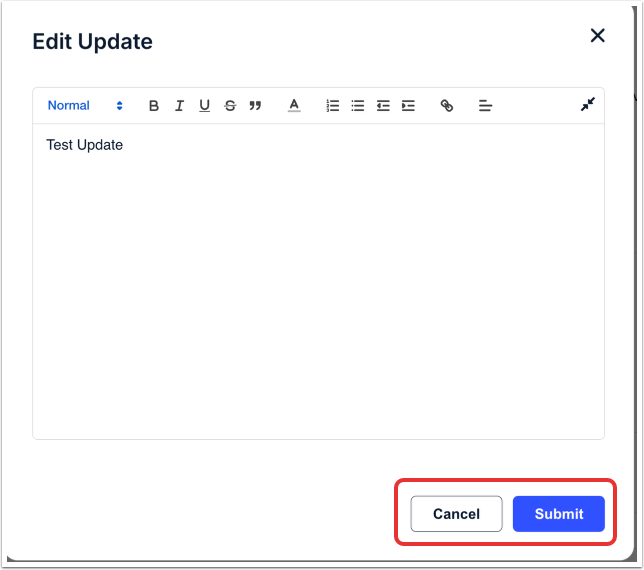
Clicking on Update will allow you to edit the text for the update; click Submit to update or Cancel to back out.
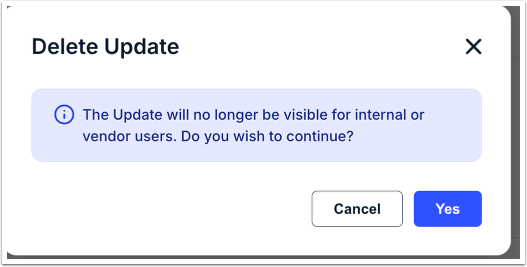
If you click Delete, you'll get the following message. Click on Yes to delete the update or Cancel to back out.
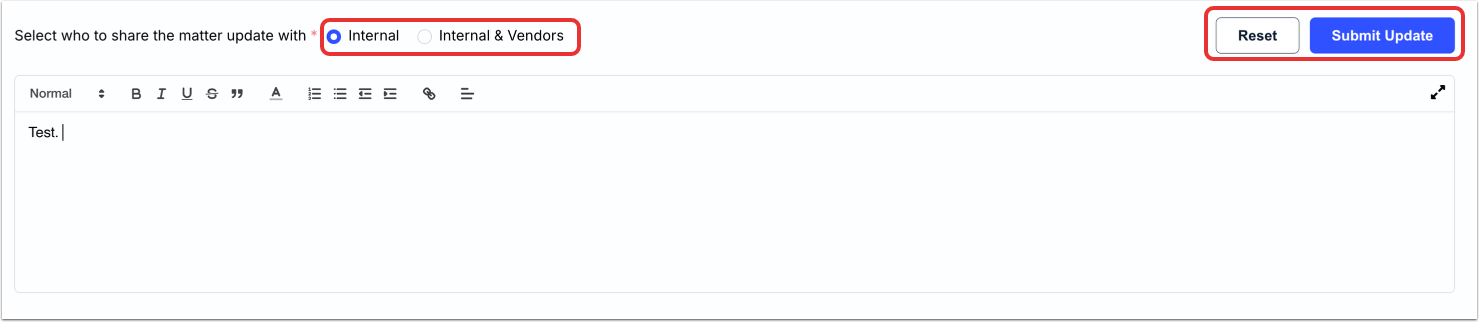
Submitting an Update
To submit an update, fill in the text on the field at the bottom of the screen and click Submit Update. You can also select who to share the matter update with - either Internal or Internal & Vendors. Click Submit Update to submit the update or Reset to clear the update.
The update will appear on the main screen.
Settings
Within Settings, you can adjust the Allocations, Invoice Notes, Permissions, and Notifications. We'll go through these four tabs here.
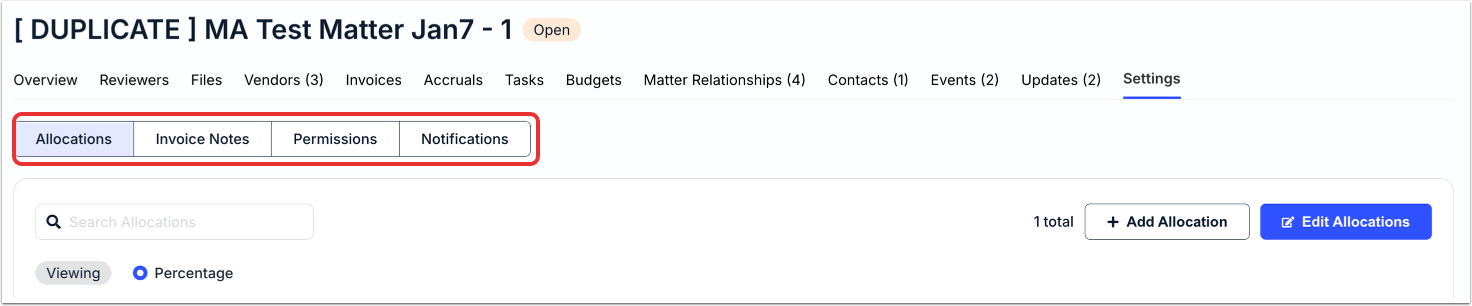
Allocations
Use the Allocations tab to view, add, and edit allocations. Click the up/down arrows next to each column to sort by that column. You can also use the Search bar to search for specific allocations.
Adding an Allocation
Click on Add Allocation to add an allocation to the matter. "Allocation" is the system of assigning portions of funds to different traits associated with a matter. Adding allocations to a matter provides a way to attribute funds to two or more areas from the same invoice.
With Unity, you can break up spend toward a matter and apply it to multiple areas (e.g., legal entities, cost codes, or allocated custom attributes) by percentage or amount.
Legal Entity and Cost Codes are the default terms used in Unity. They may appear differently in your environment depending on custom label settings.
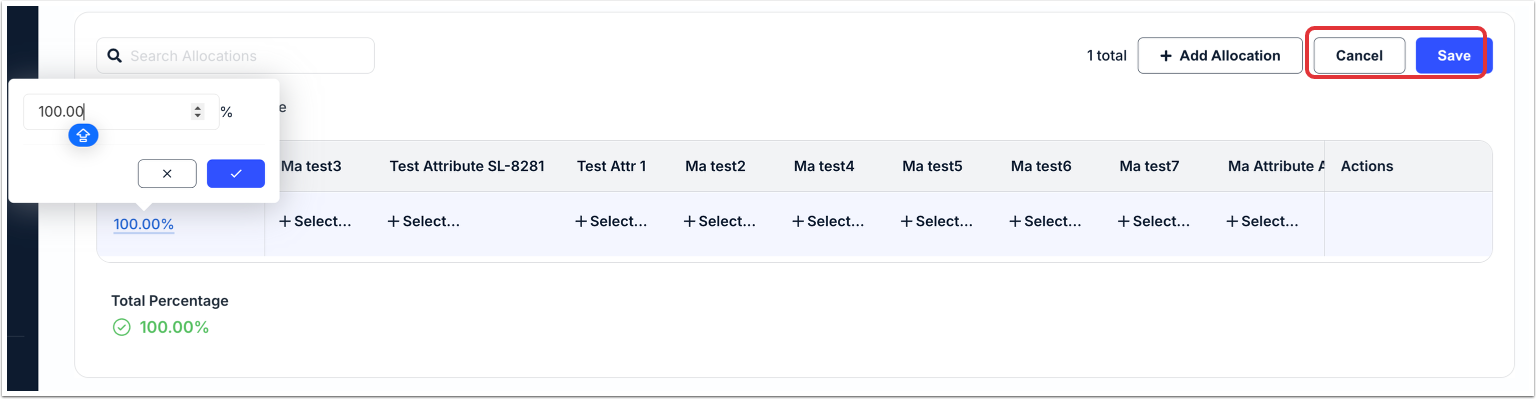
You'll have to fill in the Percentage and click the check mark to save or X to back out. Use the three-dot menu to Delete an allocation. Click Save to save the allocation or Cancel to back out. The total must equal 100.00 (i.e., 100% up to two decimal place precision).
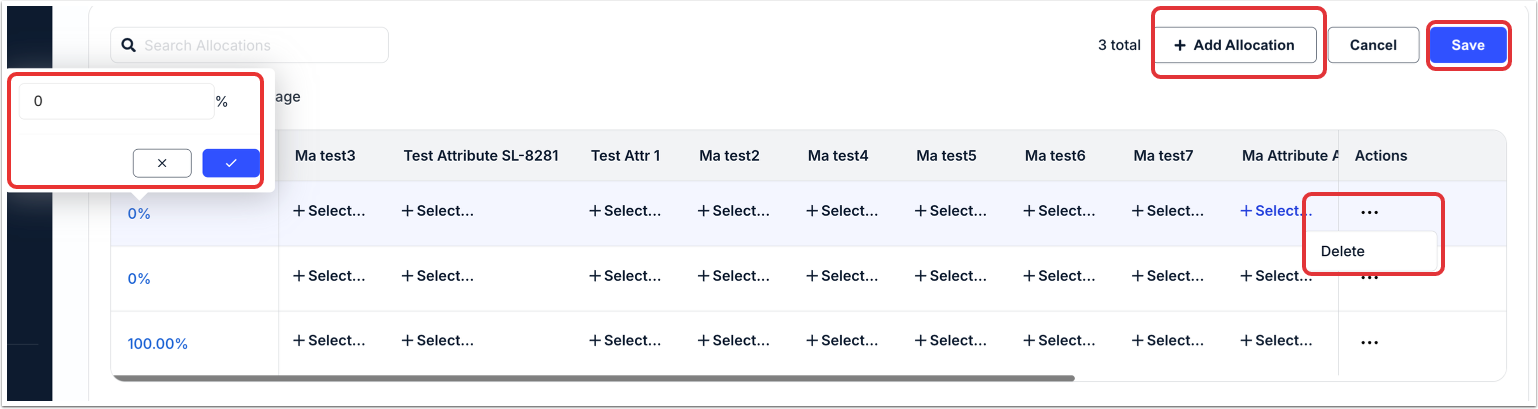
Editing an Allocation
Click on Edit Allocation to edit an existing allocation. Update the Percentage and click the check mark to save or X to back out. Click Save to save the allocation or Cancel to back out. The total must equal 100.00 (i.e., 100% up to two decimal place precision).
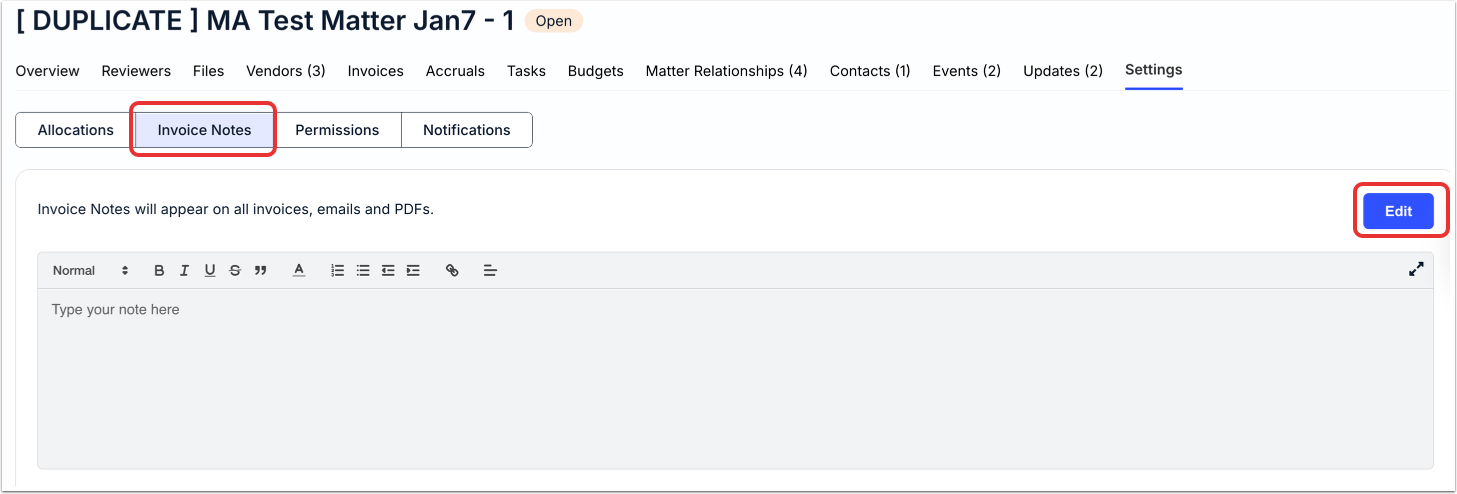
Invoice Note
Use the Invoice Note section to add a note to associated invoices.
Click on Edit to insert the note. Note that these appear on all invoices, emails, and PDFs.
Permissions
Use the Permissions tab to view and edit user permissions. The main screen will display all of the different user Names along with their Email; you can toggle their permissions to Read, Edit, have both, or have neither. Click the up/down arrows next to each column to sort by that column. You can use the search bar to search for specific users; additionally, you can use the drop-down menu to customize how many users you'd like to see on screen.
Click on Restore to Defaults to bring all permissions back to the default.
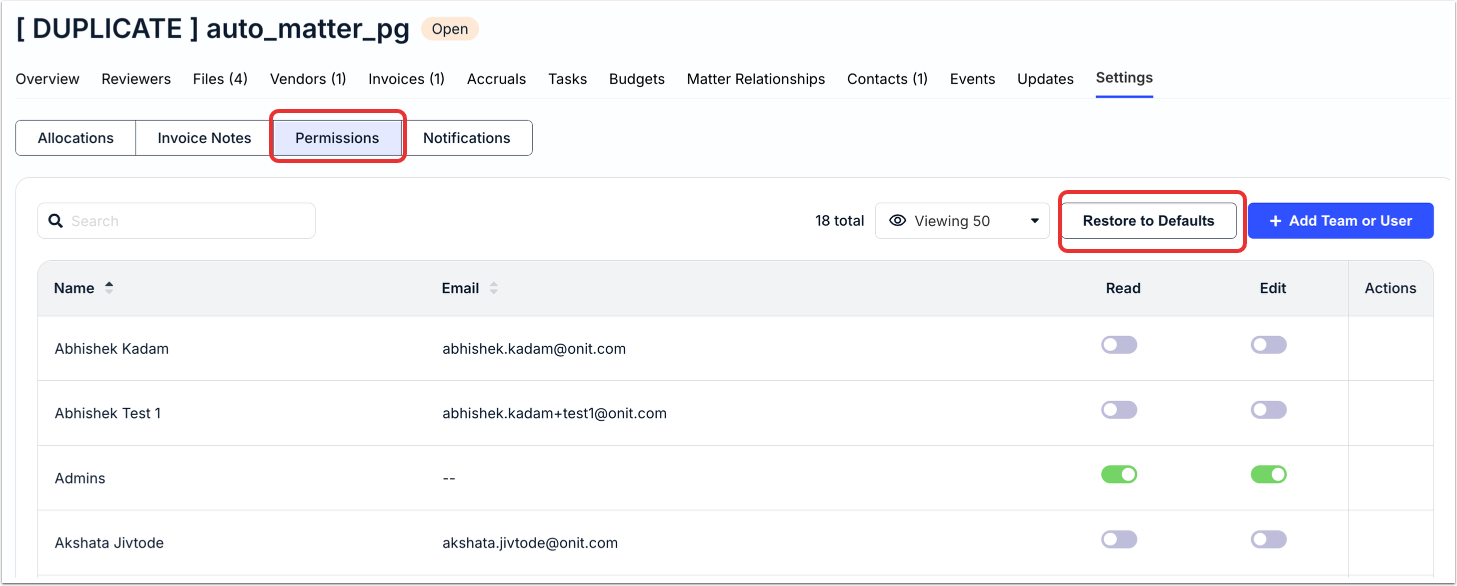
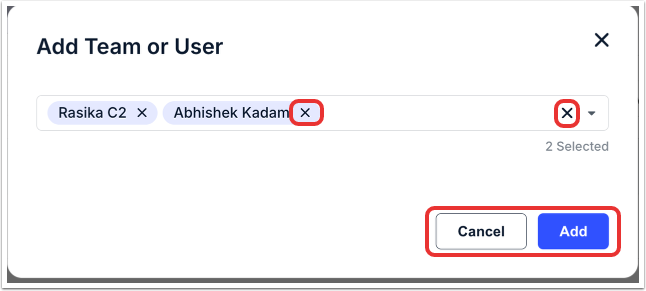
Click on Add Team or User to add teams or users to the list. Select teams or users from the drop-down menu and click on Add to add them to the list. Click the X to remove the selections. Click Cancel to back out.
You'll see the additions appear on the main screen.
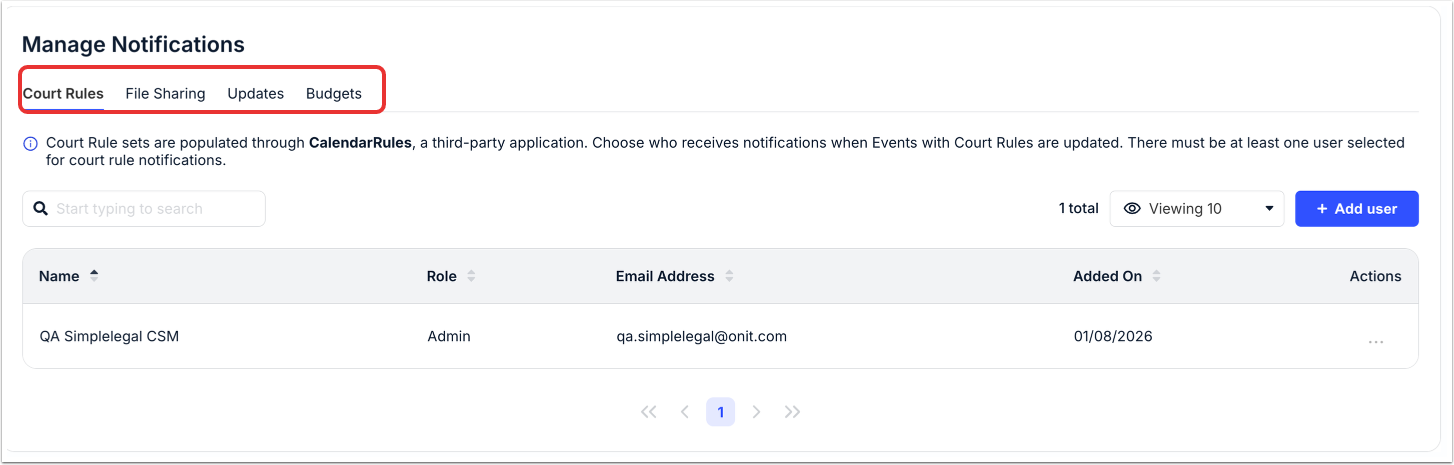
Notifications
Use the Notifications screen to manage the different notifications for the matter. You can toggle between Court Rules (populated through a third-party application), File Sharing, Updates, and Budgets. Each one will display the Name, Role, Email Address, and Added On information. Click the up/down arrows next to each column to sort by that column. You can use the search bar to search for specific users; additionally, you can use the drop-down menu to customize how many users you'd like to see on screen.
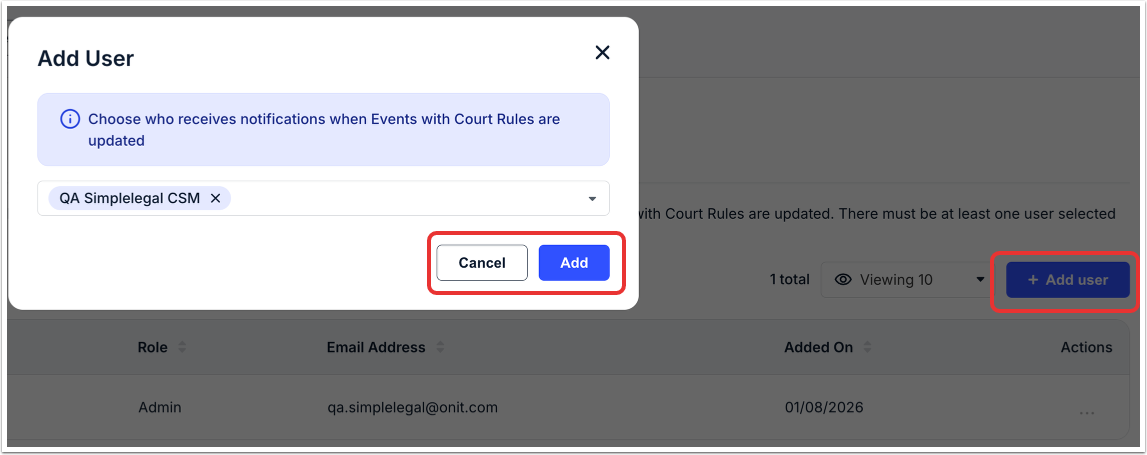
Click on Add User to give permissions for the user across the different categories. Type in the user name (or select from the drop-down menu) and click Add to add the user or Cancel to back out. Click X to remove the selection.
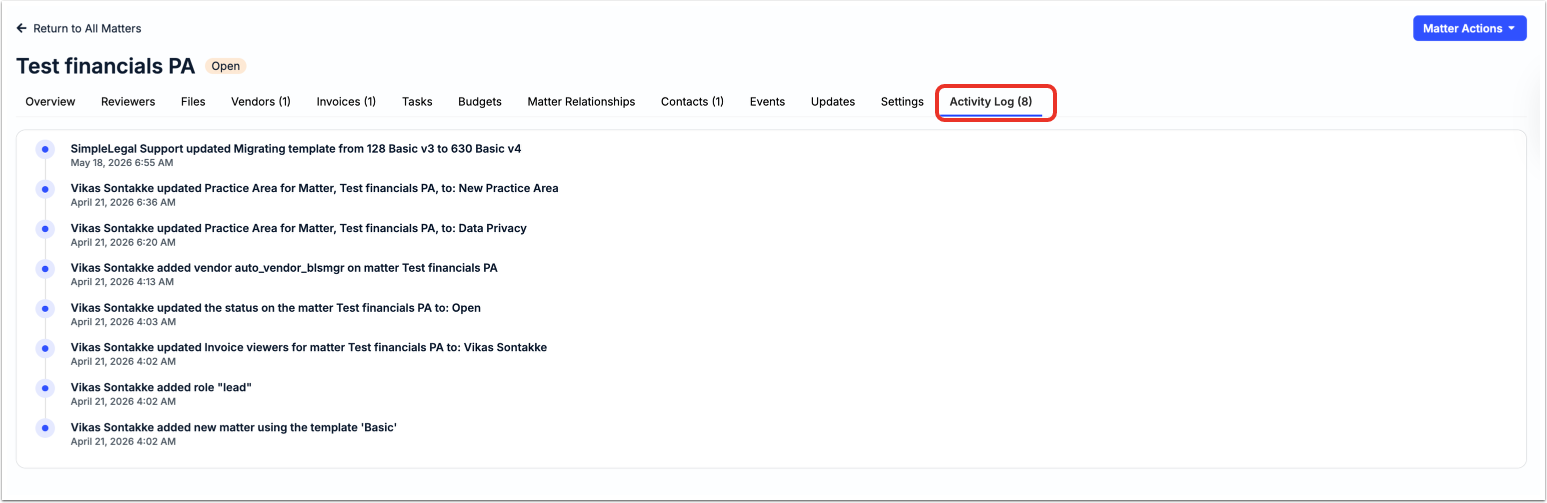
Activity Log
Click on Activity Log to see a chronological list of activities on the matter.