The Rule Management section in Unity allows admins to automate actions related to invoices, such as reviewer assignment, invoice rejection, line item adjustments, and flagging, based on specific criteria. Go to Settings > Rule Management to explore these options.
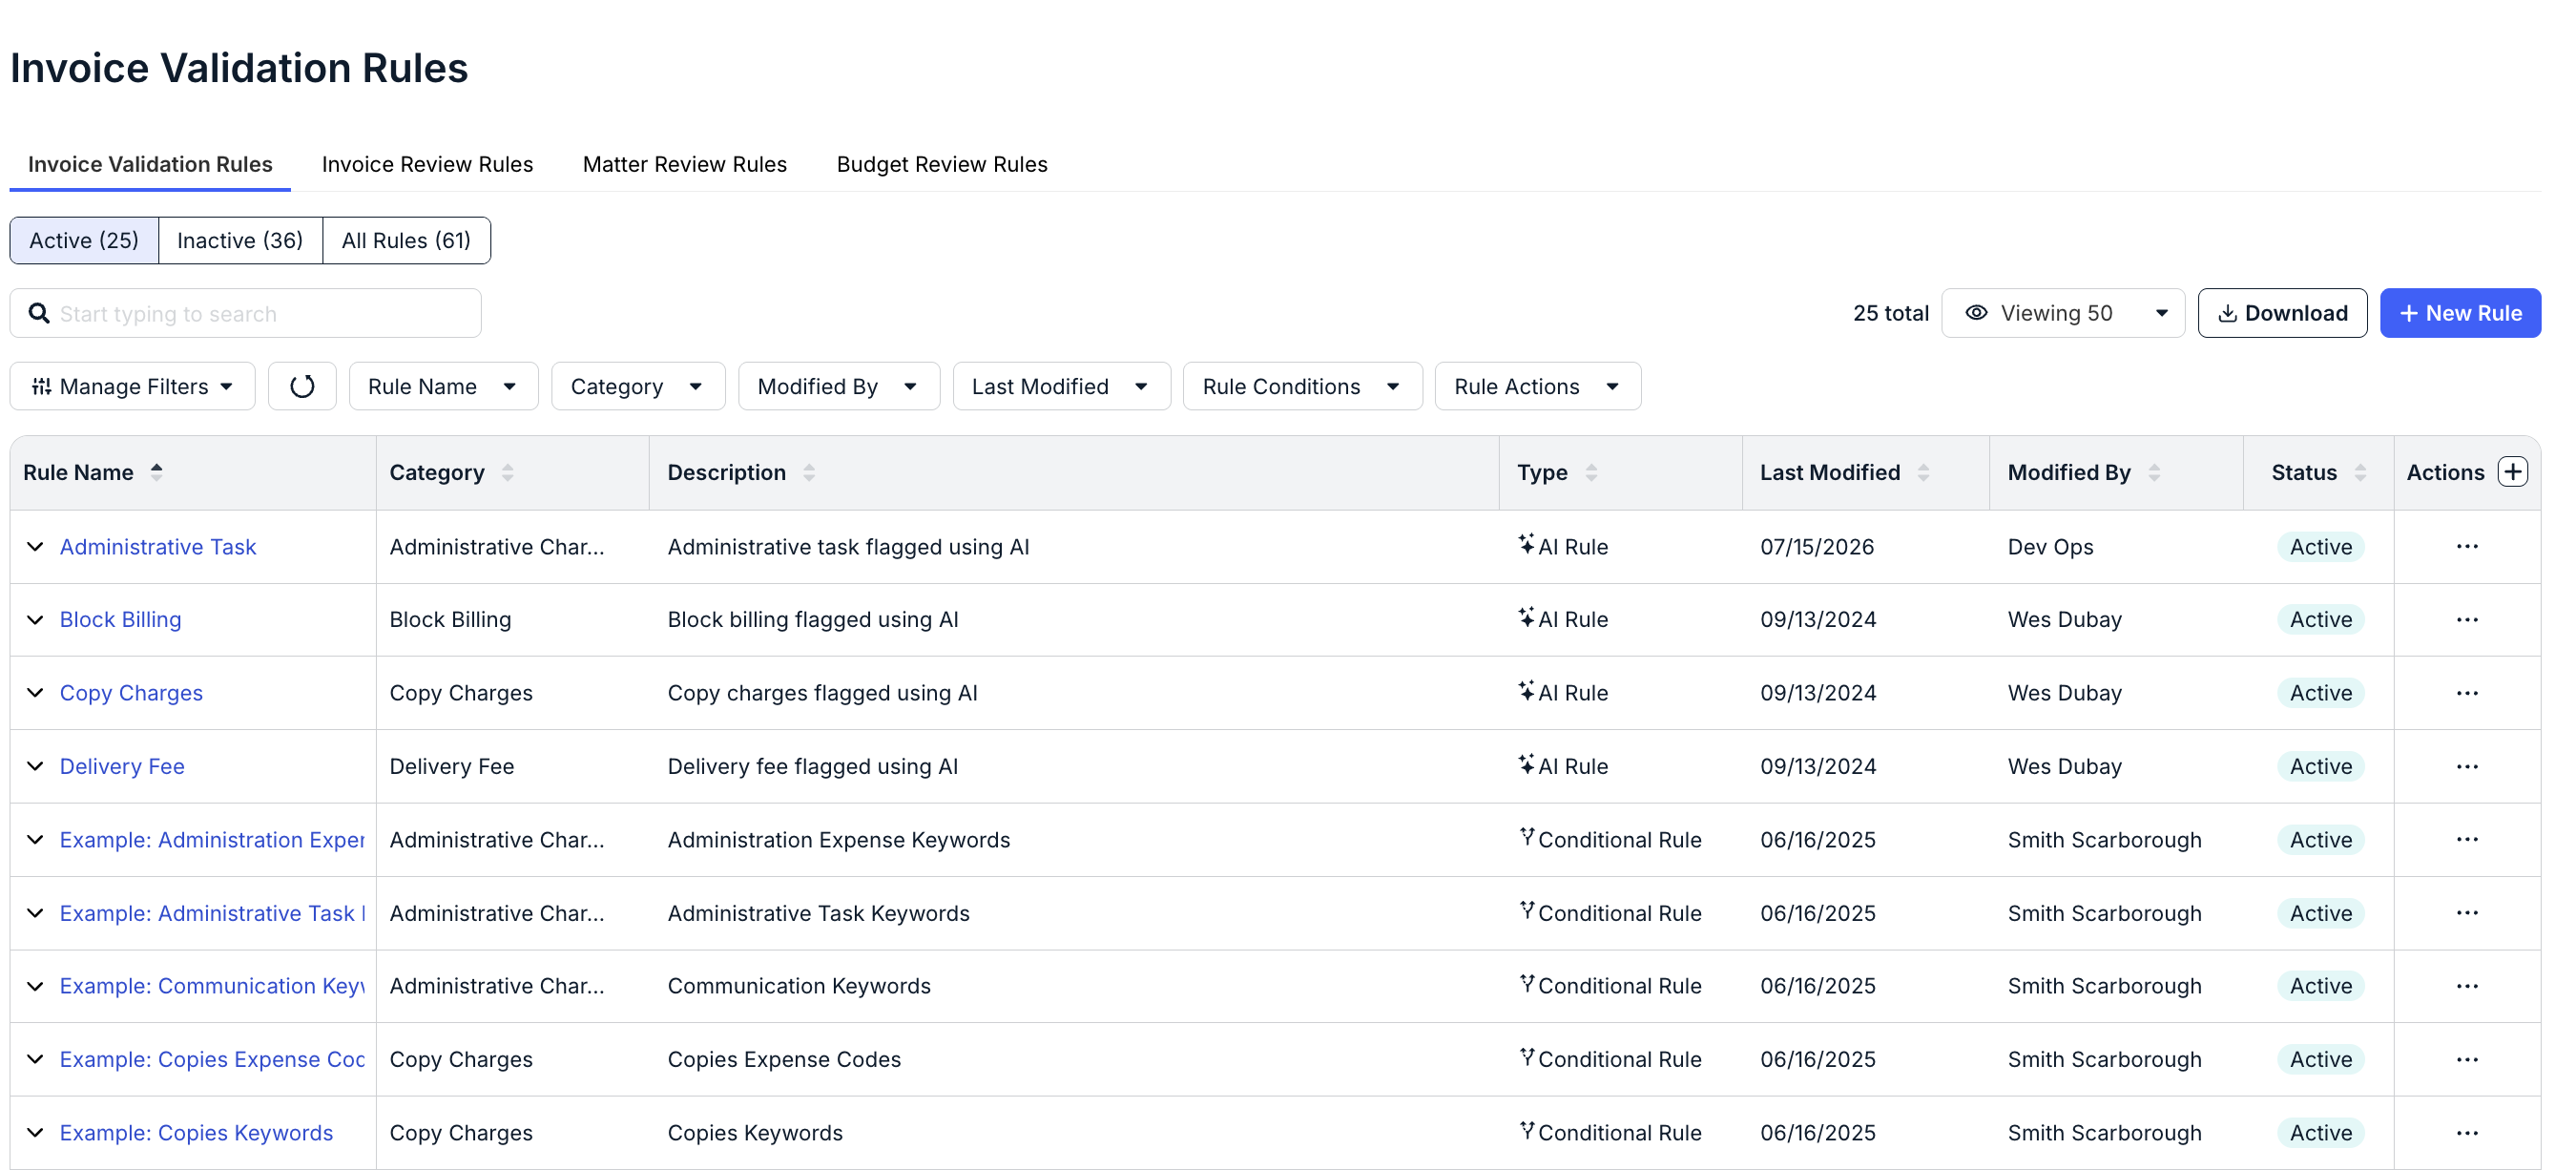
This article summarizes the functionality and capabilities for the following:
- Invoice Validation Rules
- Invoice Review Rules
- Matter Review Rules
- Budget Review Rules
- Timekeeper Rate Review Rules
- Matter Permission Rules
Invoice Validation Rules
Unity's Invoice Validation Rules streamline the invoice review process and give customers full control over how to enforce their billing guidelines. By configuring and managing rules that address unique needs, customers can automate corrective action and/or flagging for invoices that violate billing guidelines. This can simplify invoice validation, save significant time for reviewers, and allow for cost savings.
Rules can be set up to do any of the following depending on the specified criteria:
- Add task code
- Add expense code
- Add activity code
- Flag invoice
- Flag line item
- Adjust line item rate
- Adjust line item total
- Reject invoice
Examples of how customers can use rules include the following:
- Apply a one-time 10% discount when a law firm exceeds a specific threshold of annual spend.
- Set an expense code (if missing) based on a specific keyword in the line item description.
- Adjust line item total for copy/fax/scanning charges that exceed a maximum amount.
- Reject invoices with line item rates that exceed a maximum amount for specific vendors.
To help customers address common scenarios, Unity includes multiple built-in rules that can be used as-is or customized to fit your invoicing needs. These rules can be viewed by switching to the Inactive tab under Invoice Validation Rules (unless they have already been activated by an admin from your organization). These rule names are prefixed with Standard: for easy reference.
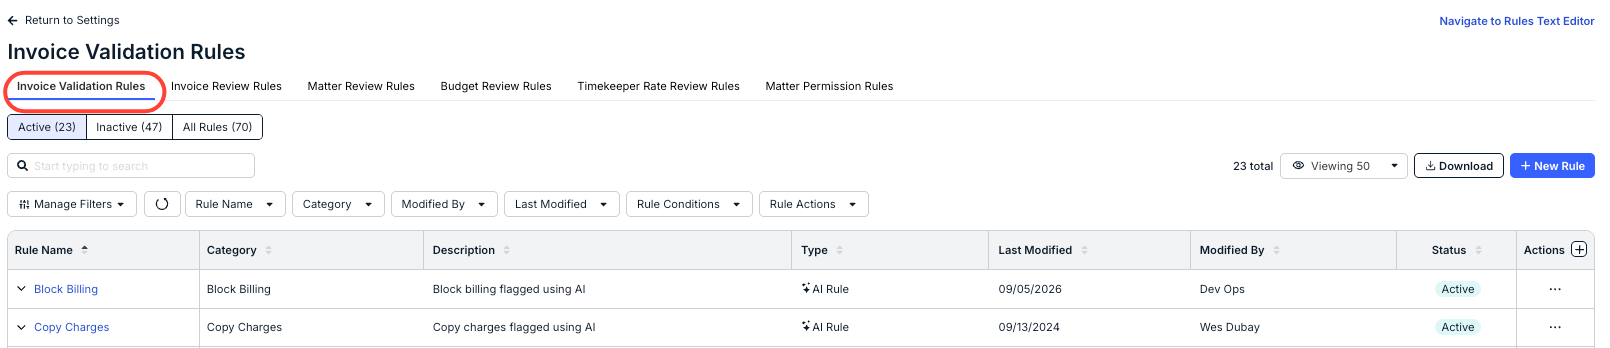
Admins can take various actions from the Invoice Validation Rules page, such as:
- Filtering the list of existing rules by various criteria, such as category and name.
- Expanding active or inactive rules from the list to see a read-only view of the conditions/actions.
- Downloading the list of rules for viewing, editing, or other updates.
- Creating new rules from scratch.
- Using the Actions column to open rules for editing or cloning existing rules instead of starting from scratch.
For detailed information on how to navigate the Invoice Validation Rules section, click here.
Invoice Review Rules
In addition to invoices being associated with specific matters, they can also be associated with a Practice Area, Legal Entity, and/or other relevant attributes in your environment. These attributes can be used to automatically assign reviewers via Invoice Review Rules.
There are four built-in review rules that enable admins to assign reviewers based on their familiarity or involvement with one or more of the following attributes or components:
- Legal Entity: Reviewers added under a Legal Entity record would automatically be assigned to incoming invoices for any matters associated with that specific Legal Entity in Unity (i.e., if the Legal Entity is assigned under matter attributes).
- Practice Area: Reviewers added under a Practice Area record would automatically be assigned to incoming invoices for any matters associated with that specific Practice Area (i.e., if the Practice Area is assigned under matter attributes).
- Vendor: Reviewers added to an individual vendor record will automatically be assigned to incoming invoices submitted by that vendor.
- Matter: Reviewers added to an individual matter record will automatically be assigned to incoming invoices submitted against that matter.
For details on how to assign reviewers from these record types (e.g., legal entity, vendor, etc.), click here.

Admins can do the following from the Invoice Review rules page:
- Filter the list of existing rules by various criteria, such as rule actions and ladder priority.
- Expanding active or inactive rules from the list to see a read-only view of the conditions/actions.
- Downloading the list of rules for viewing, editing, or other updates.
- Creating new rules from scratch.
- Using the Actions column to edit, clone, or delete a review rule.
For detailed information about how to manage and apply Invoice Review Rules, click here.
Matter Review Rules
Use the Matter Review Rules section to adjust the matter review process.
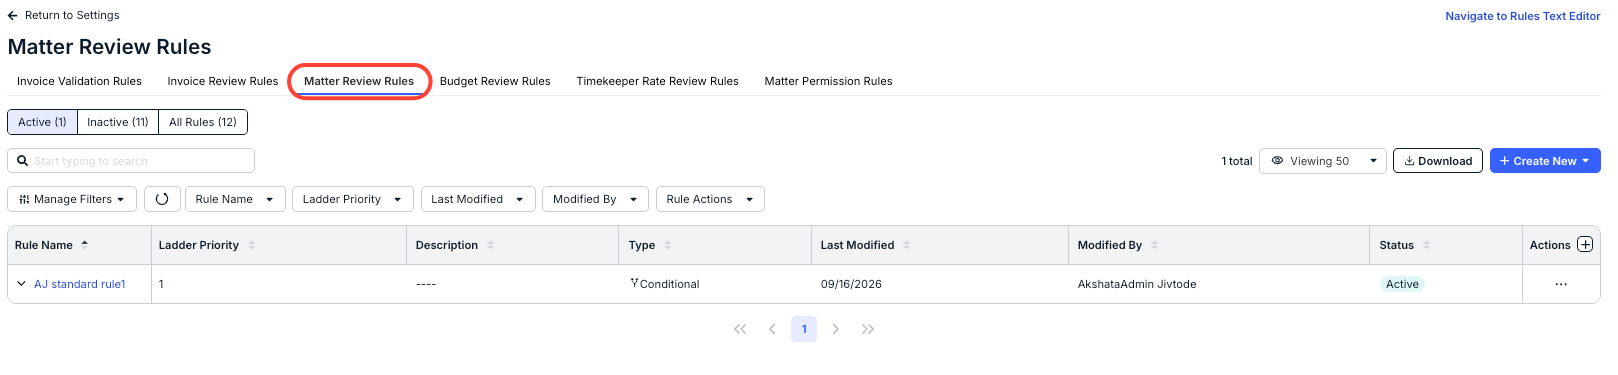
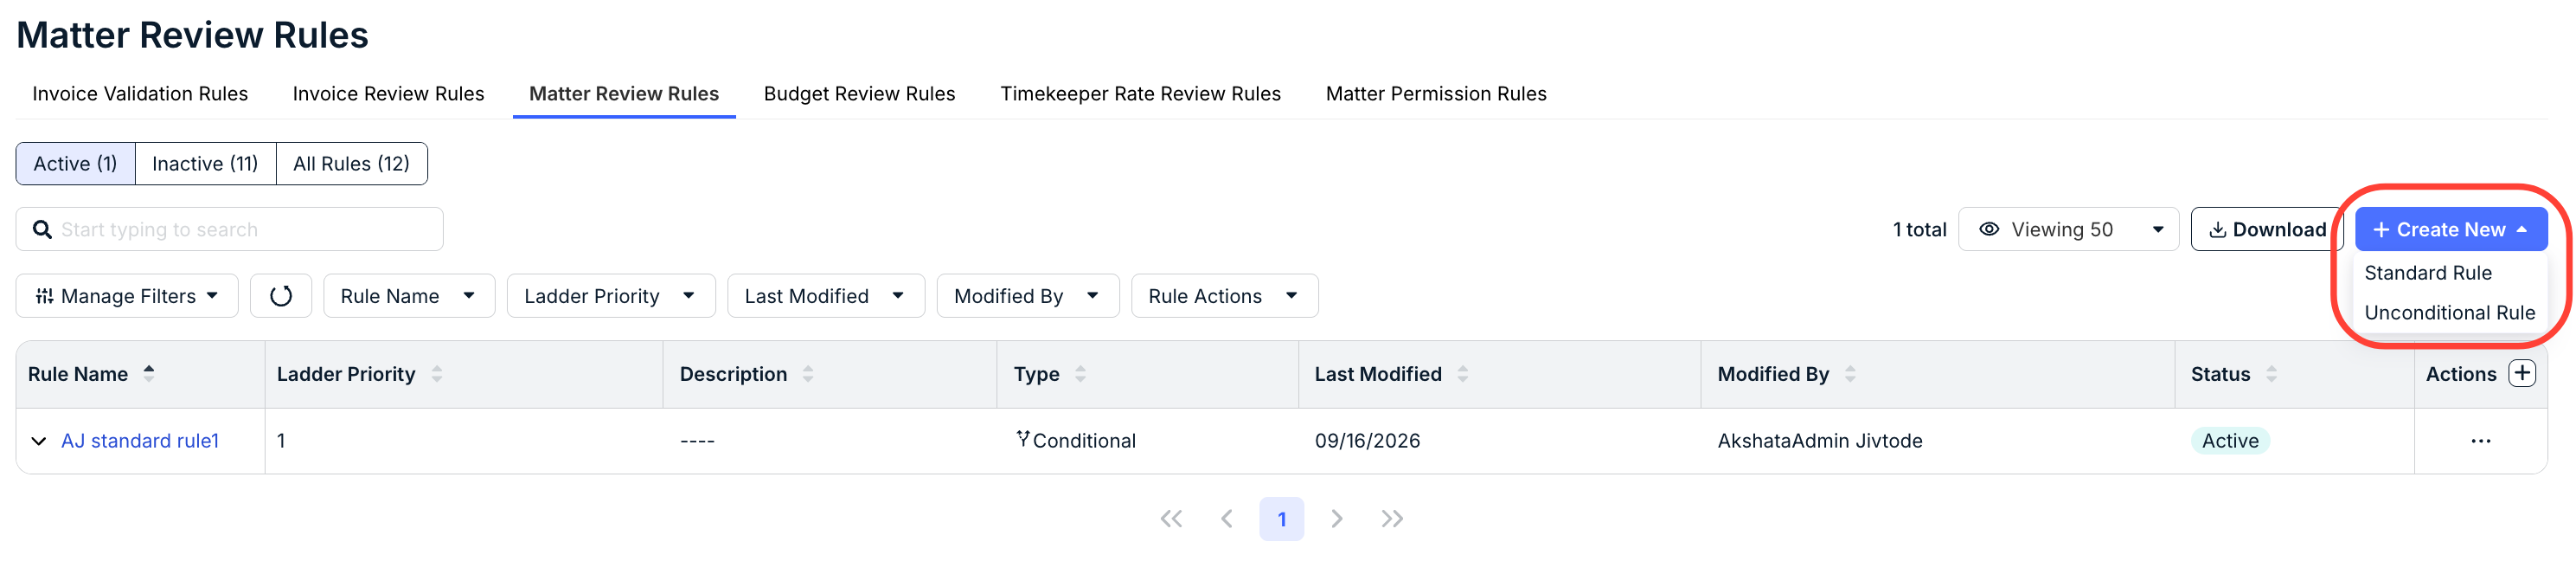
On the main directory, you'll see any existing matter review rules. Use the top tab to scroll between Active, Inactive, and All Rules. Use the search bar to search through all existing rules. Use the Manage Filters drop-down and other drop-down menus to customize what you want to see on the screen. Use the Viewing drop-down to select how many records you want to see on the screen. Click Download to download the rule information.
The main directory will show the existing Rule Name, Ladder Priority, Description, Type, Last Modified date, Modified By name, Status (Active/Inactive), and an Actions menu. Use the up/down arrows at the top of every category to sort by that category. Use the Actions menu to Edit, Clone, or Delete the rule. Use the arrow under Rule Name to toggle expanded information about the rule.
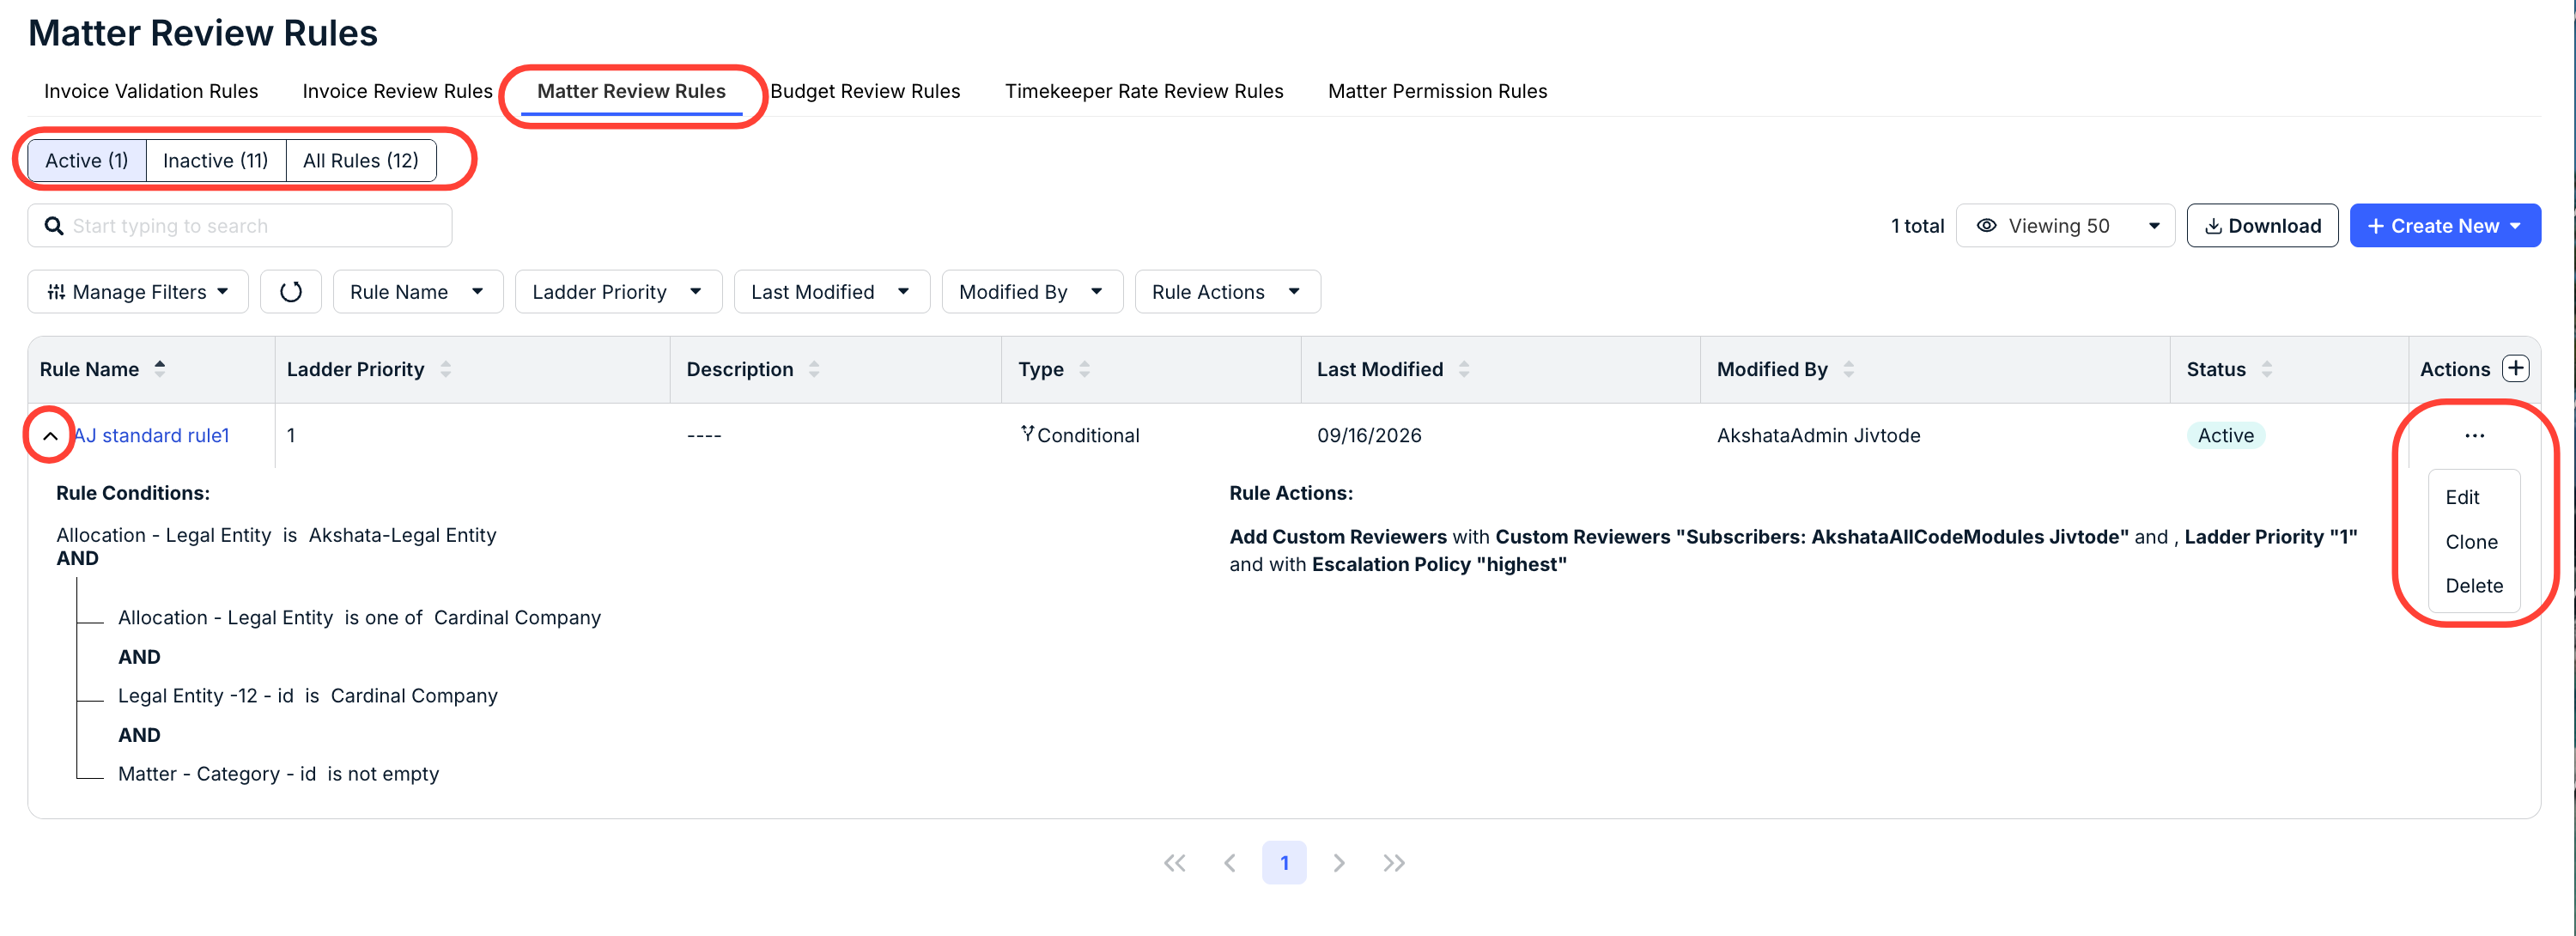
Click +Create New to set up a new Matter Review rule. You can create either a Standard Rule or an Unconditional Rule.
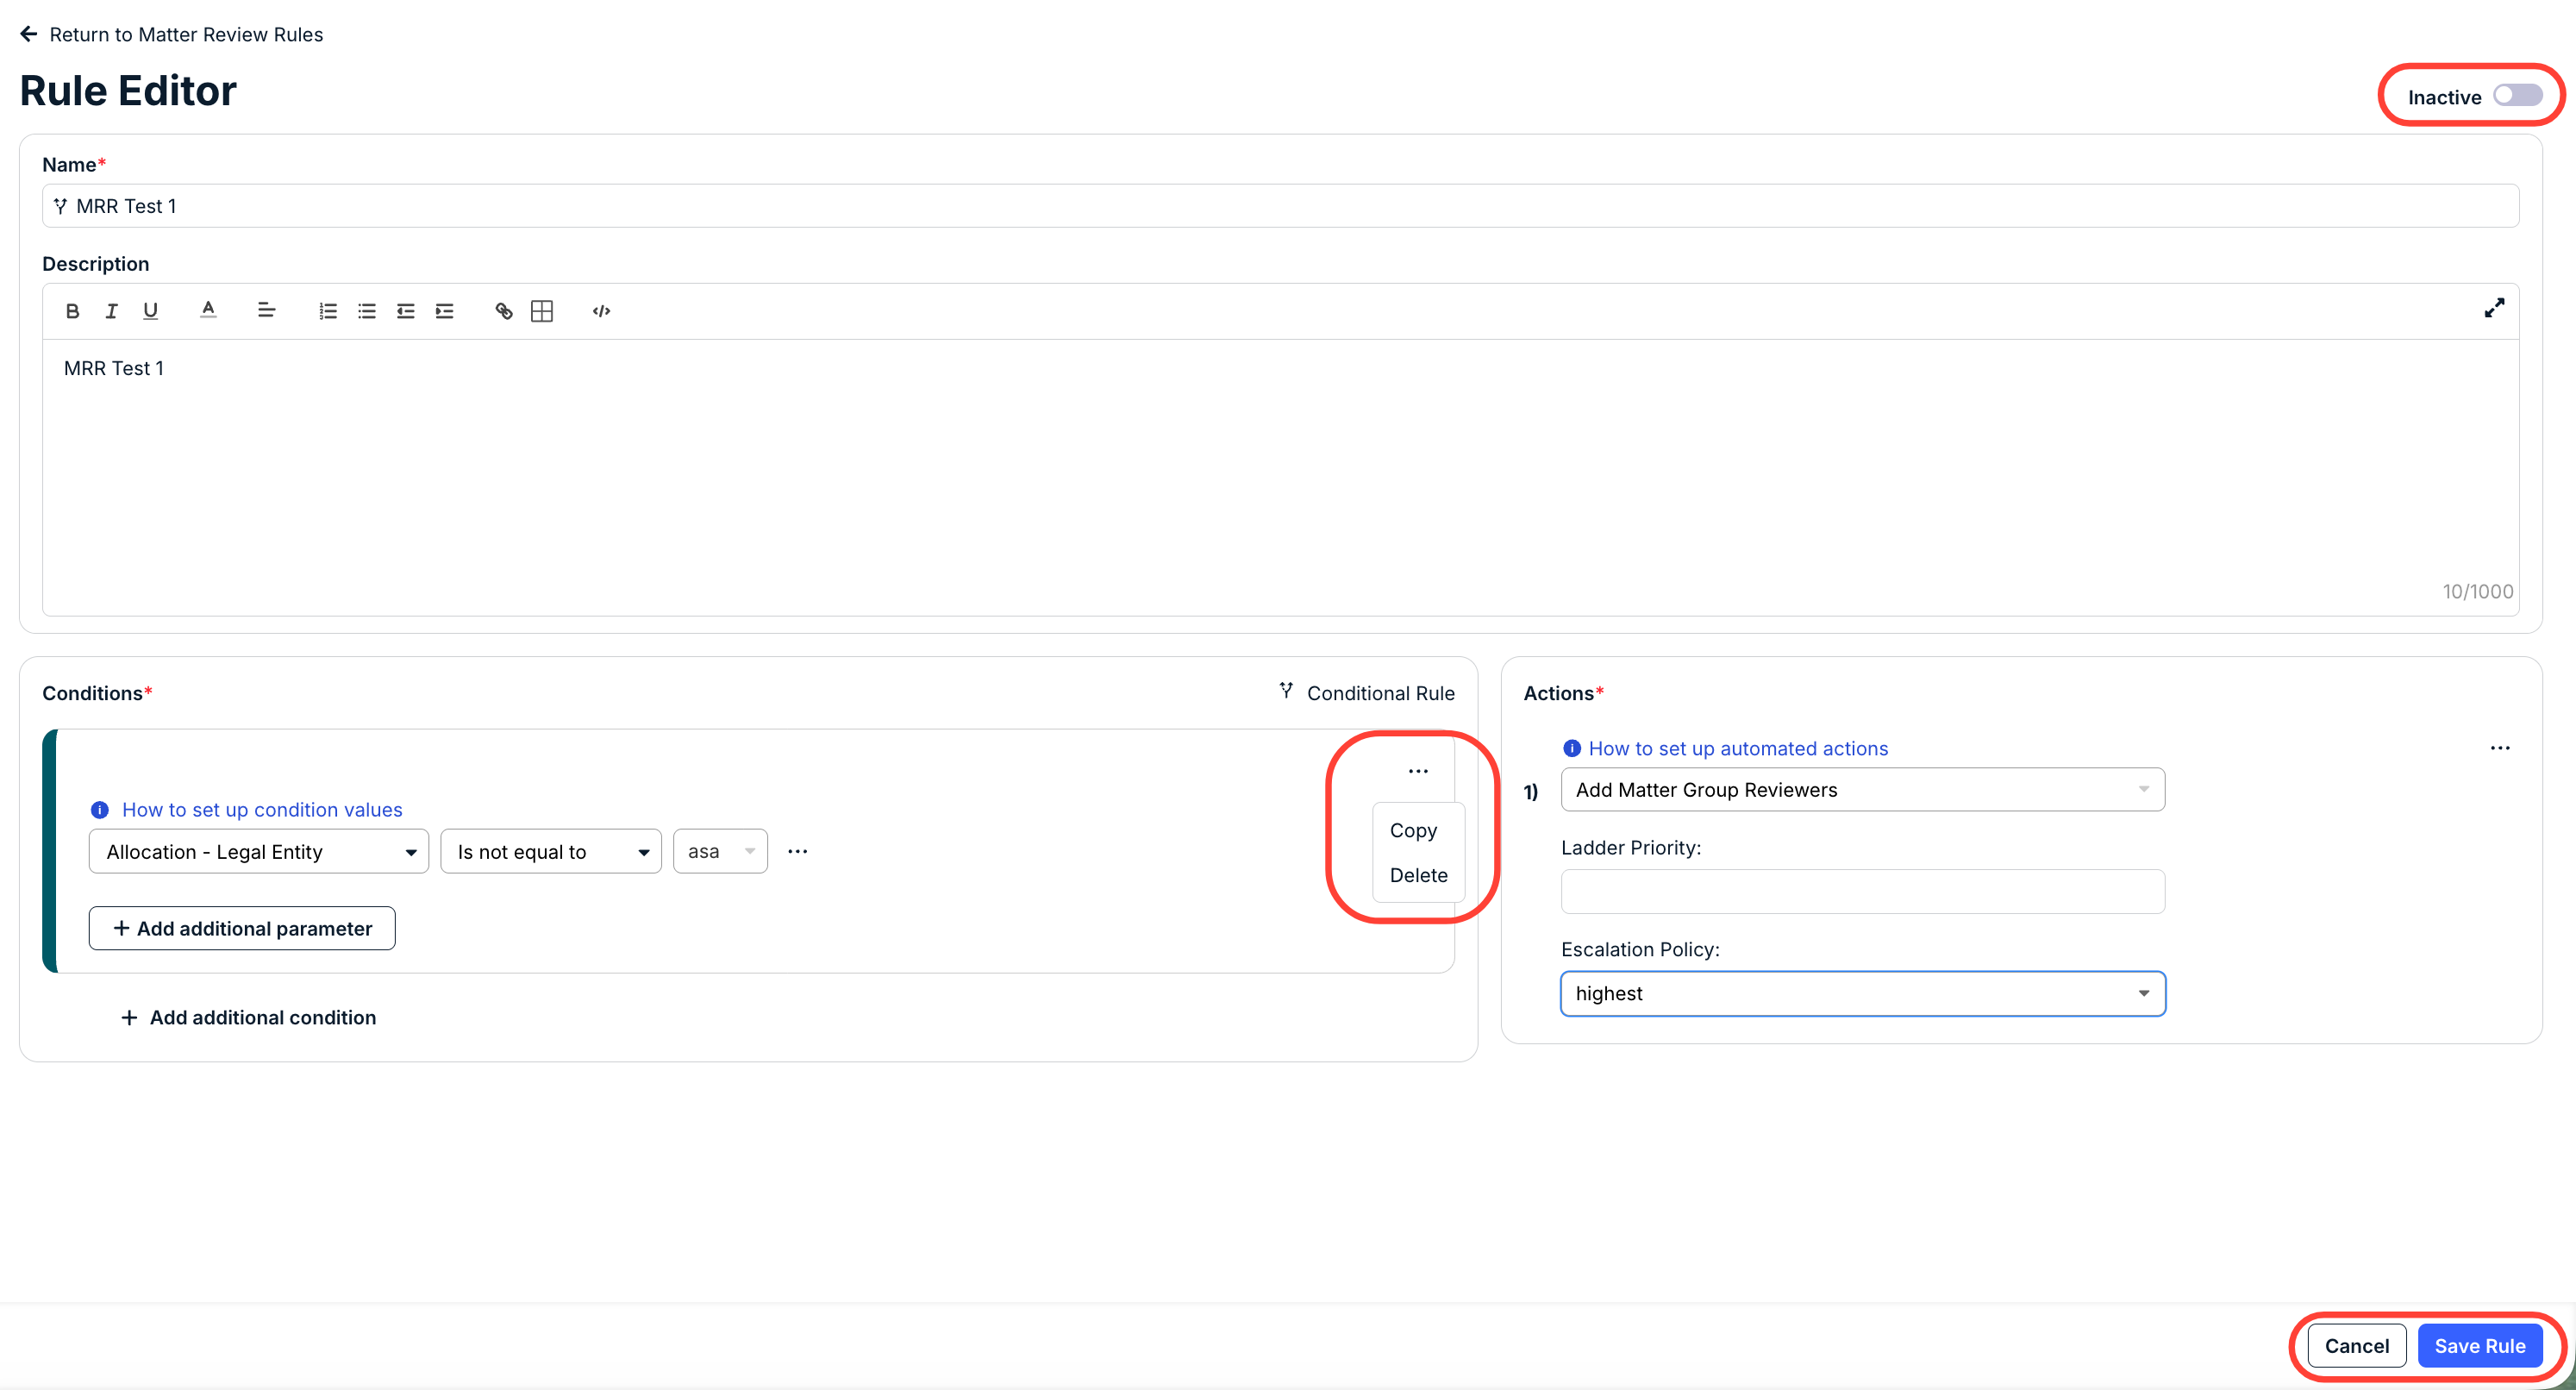
Clicking on Standard Rule will open the Rule Editor screen. Fill out the rule Name (required) and Description (if desired). Add your Conditions and Actions (learn more about them here) and click Save Rule to save the rule. Toggle the Active/Inactive button to make the rule active or inactive. You can also use the three-button menu on an Action or Condition to copy or delete either option. Use the +Add additional parameter and +Add additional condition to customize conditions. Click Save Rule to save the rule or Cancel to back out.
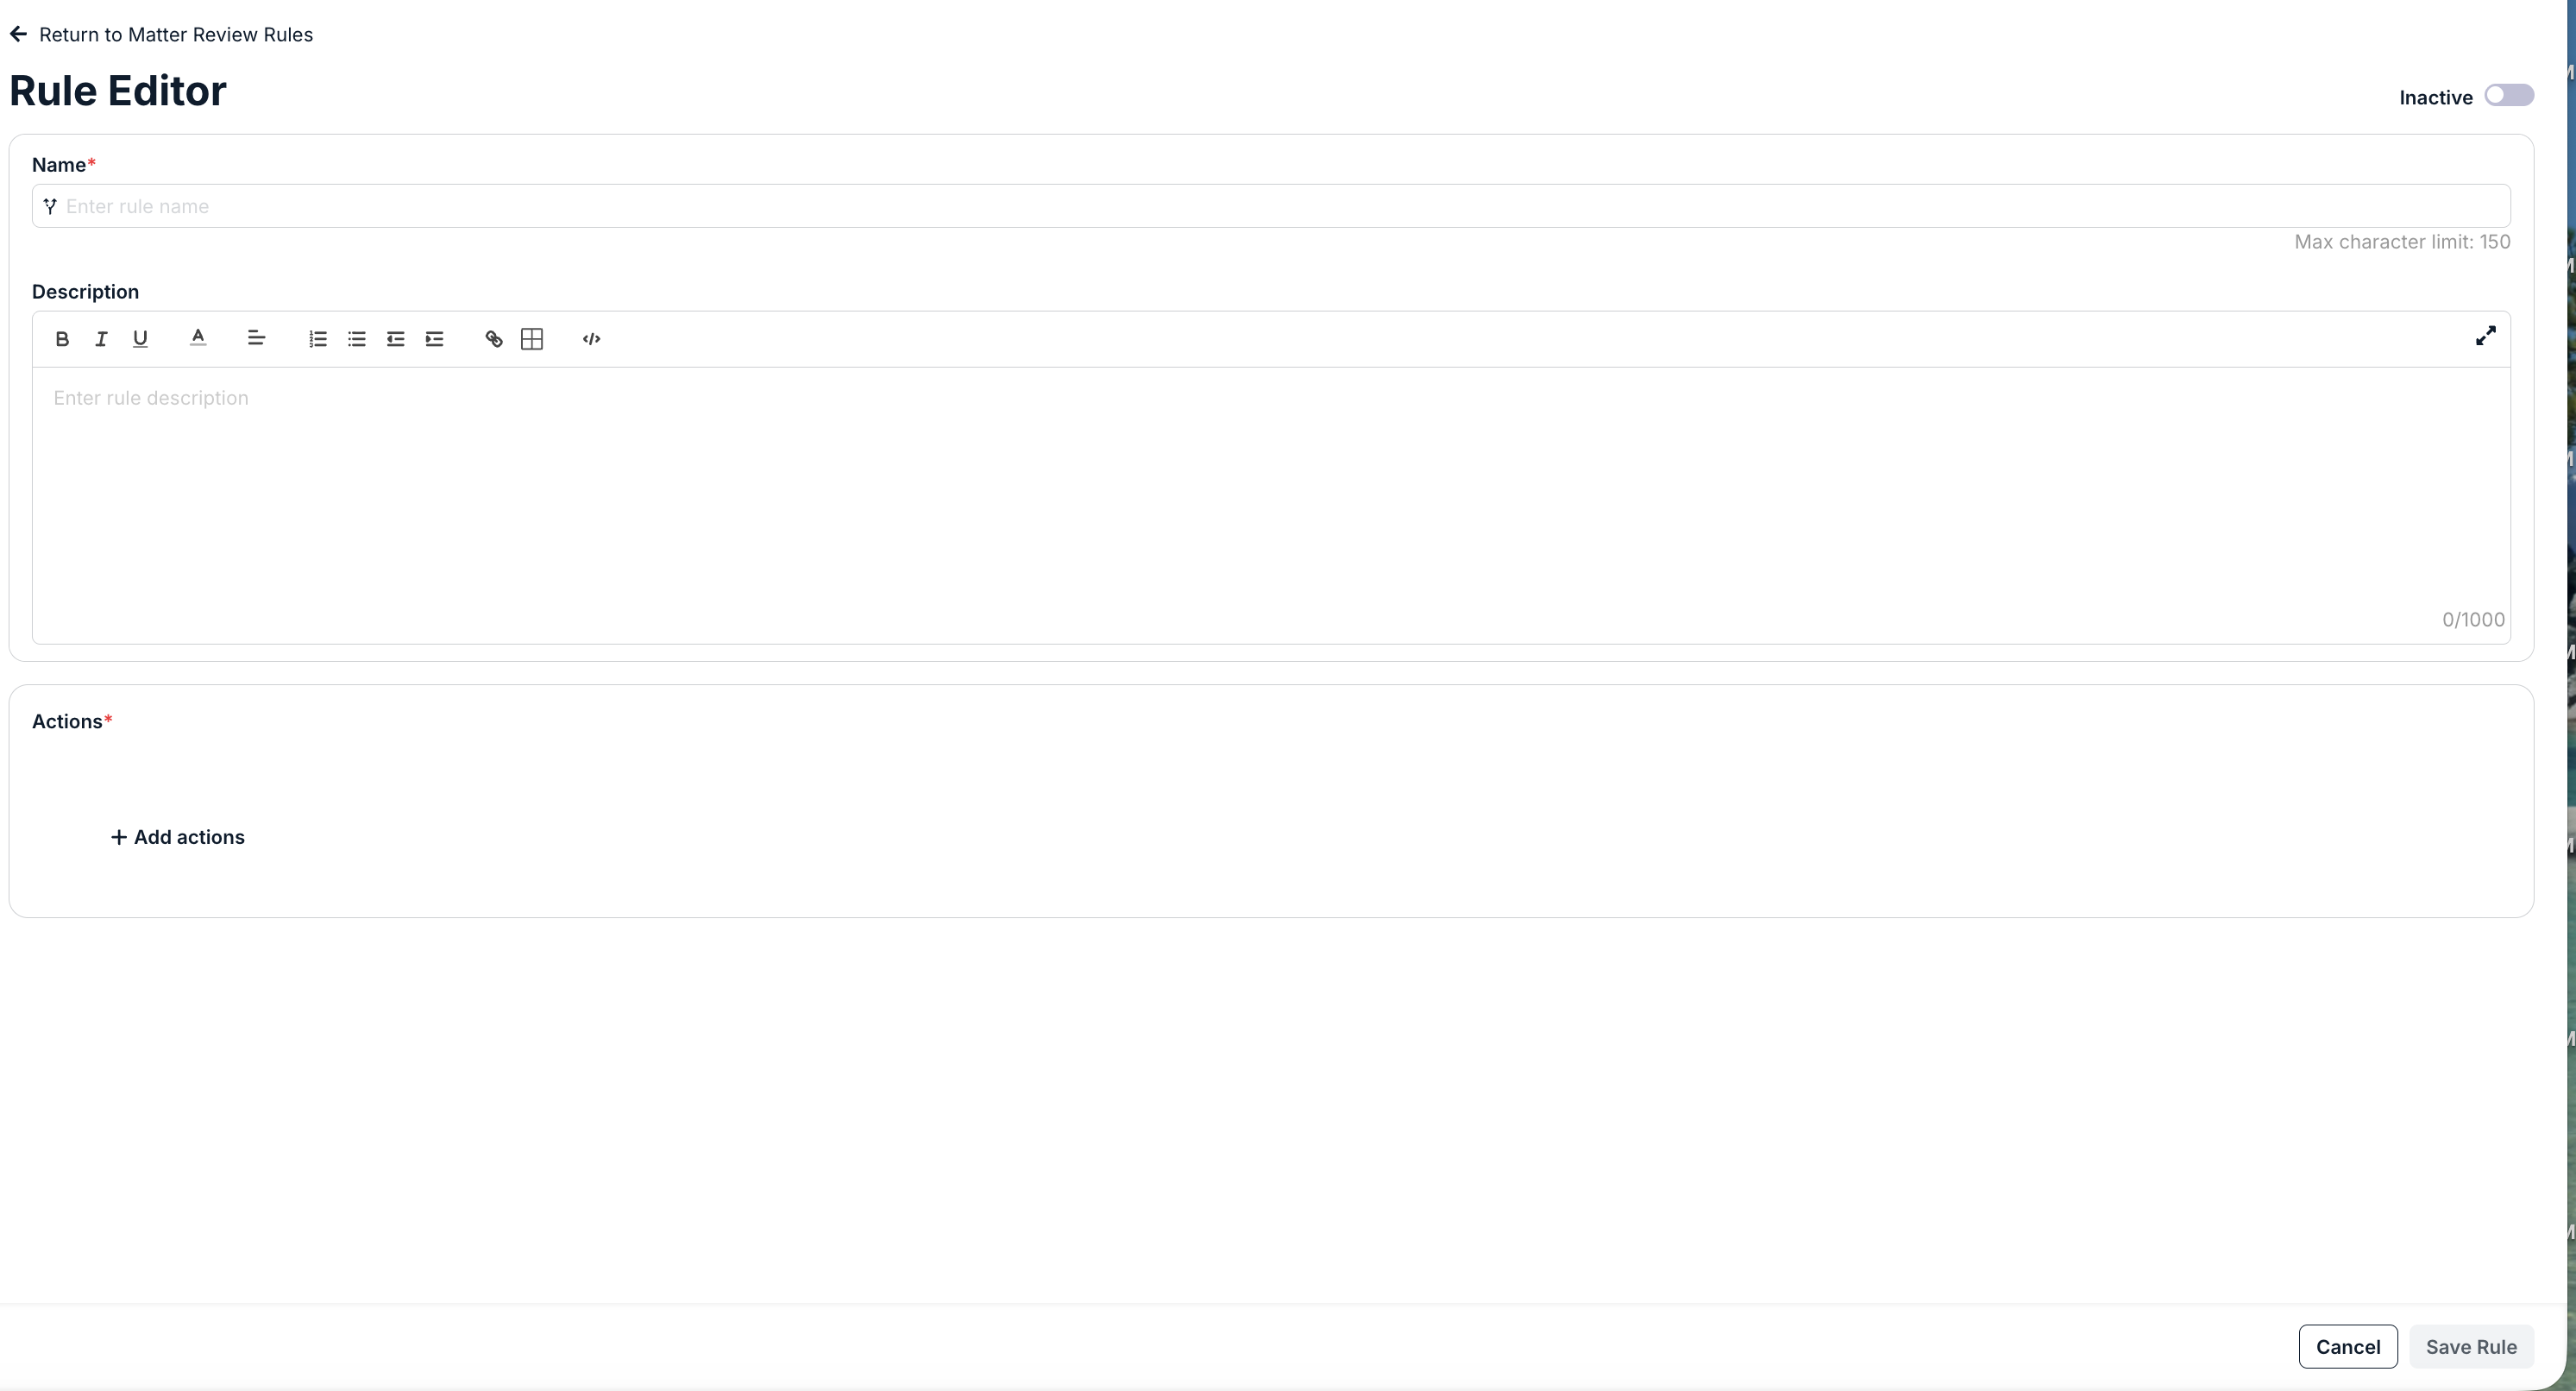
Clicking on Unconditional Rule will open a similar screen, just without the Conditions.
Budget Review Rules
Use the Budget Review Rules section to adjust the matter review process.
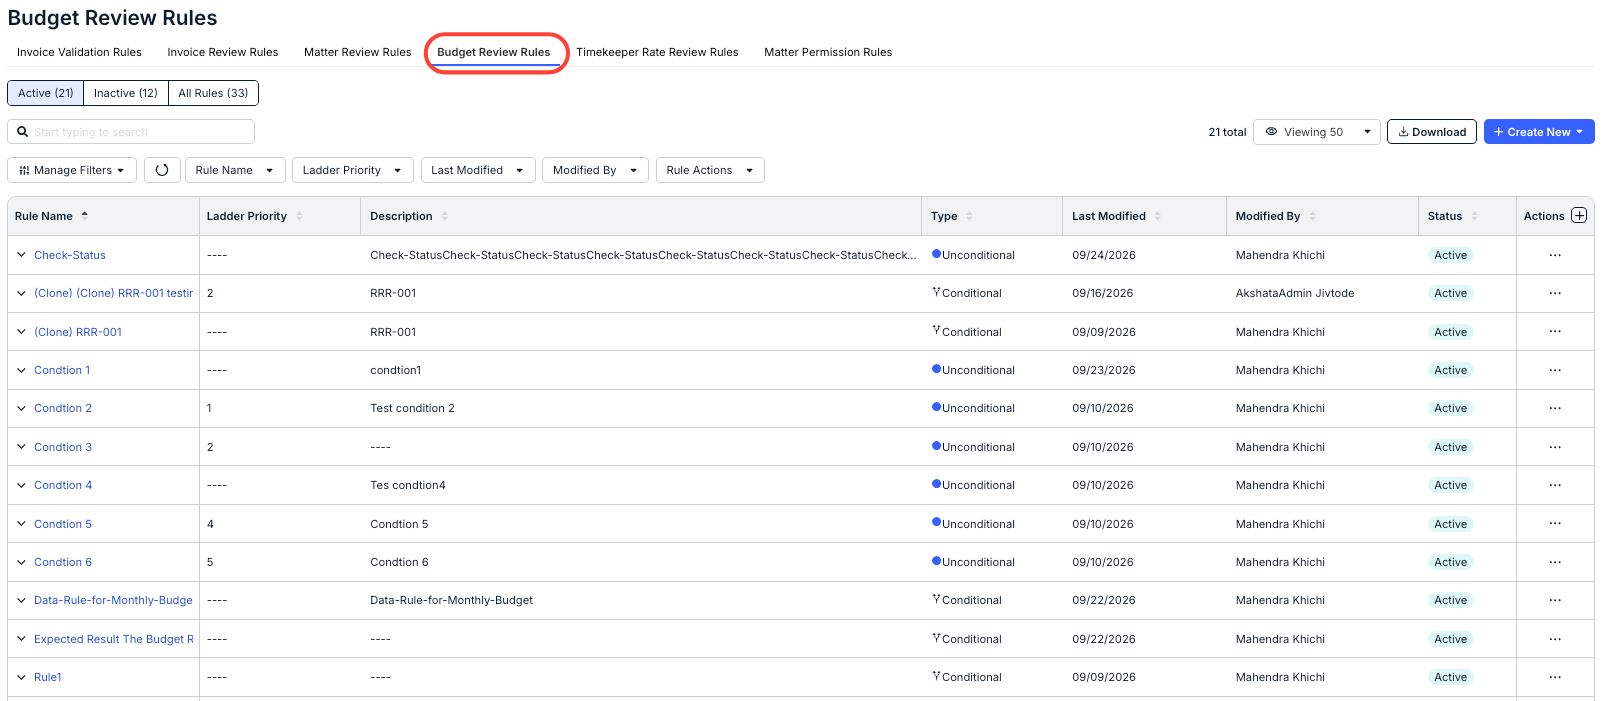
On the main directory, you'll see any existing budget review rules. Use the top tab to scroll between Active, Inactive, and All Rules. Use the search bar to search through all existing rules. Use the Manage Filters drop-down and other drop-down menus to customize what you want to see on the screen. Use the Viewing drop-down to select how many records you want to see on the screen. Click Download to download the rule information.
The main directory will show the existing Rule Name, Ladder Priority, Description, Type, Last Modified date, Modified By name, Status (Active/Inactive), and an Actions menu. Use the up/down arrows at the top of every category to sort by that category. Use the Actions menu to Edit, Clone, or Delete the rule. Use the arrow under Rule Name to toggle expanded information about the rule.
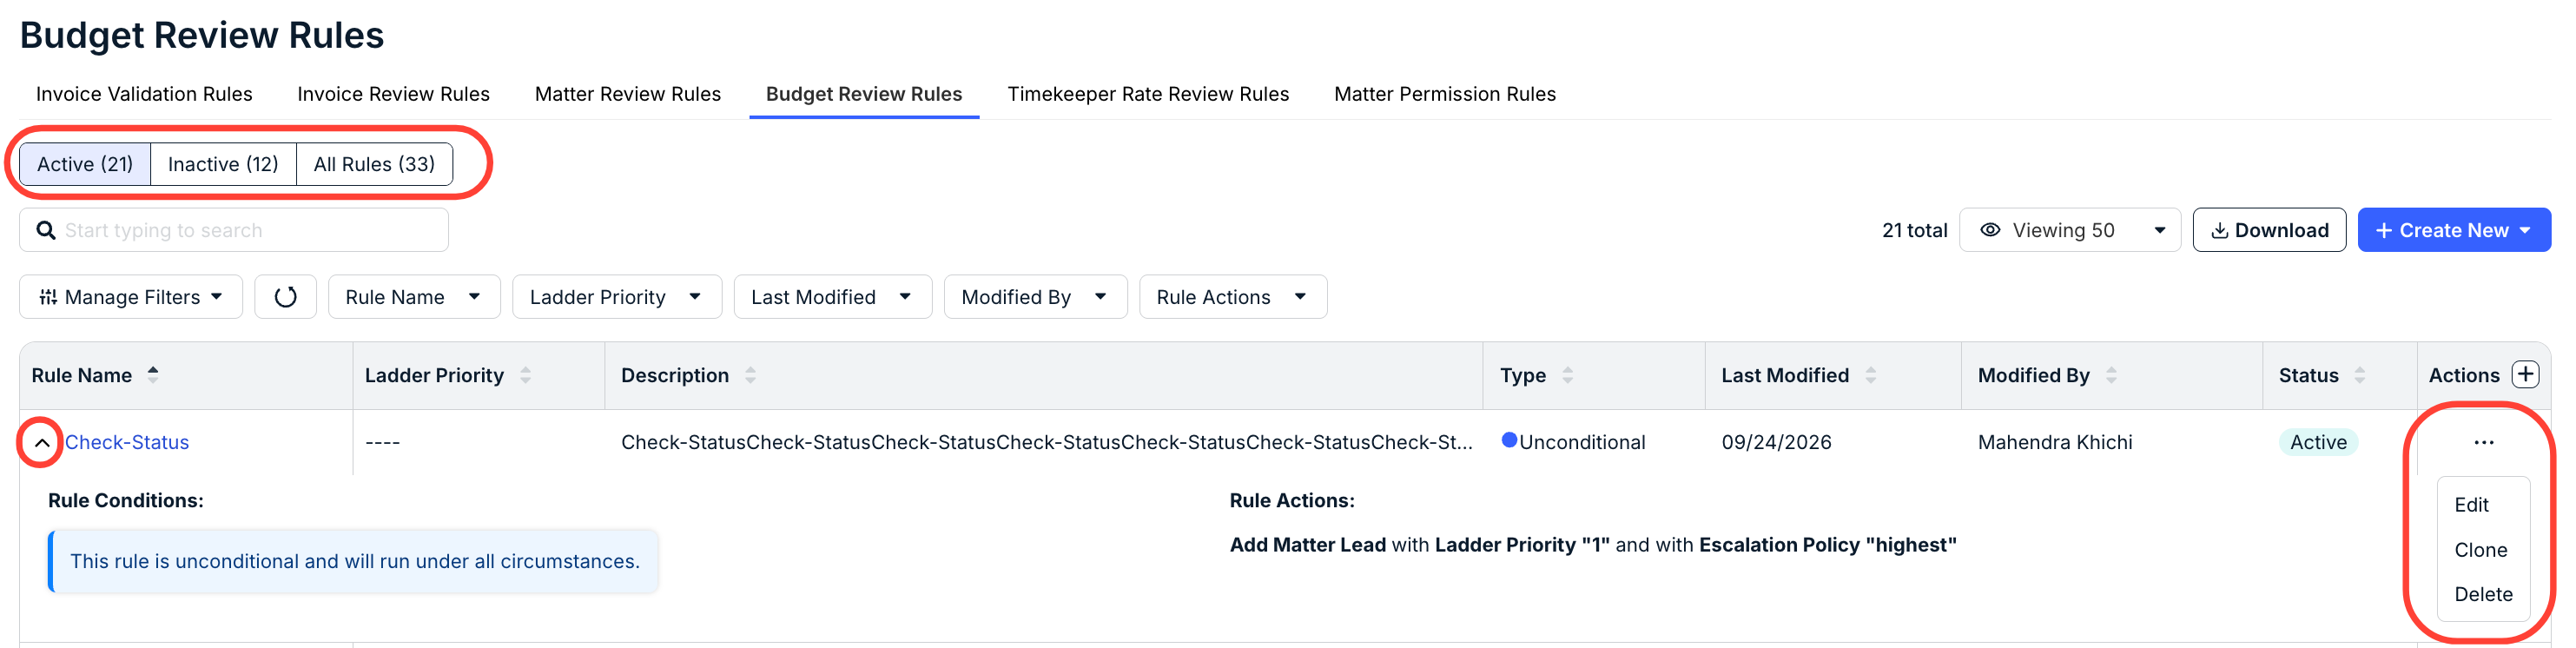
Click +Create New to set up a new Budget Review rule. You can create either a Standard Rule or an Unconditional Rule.

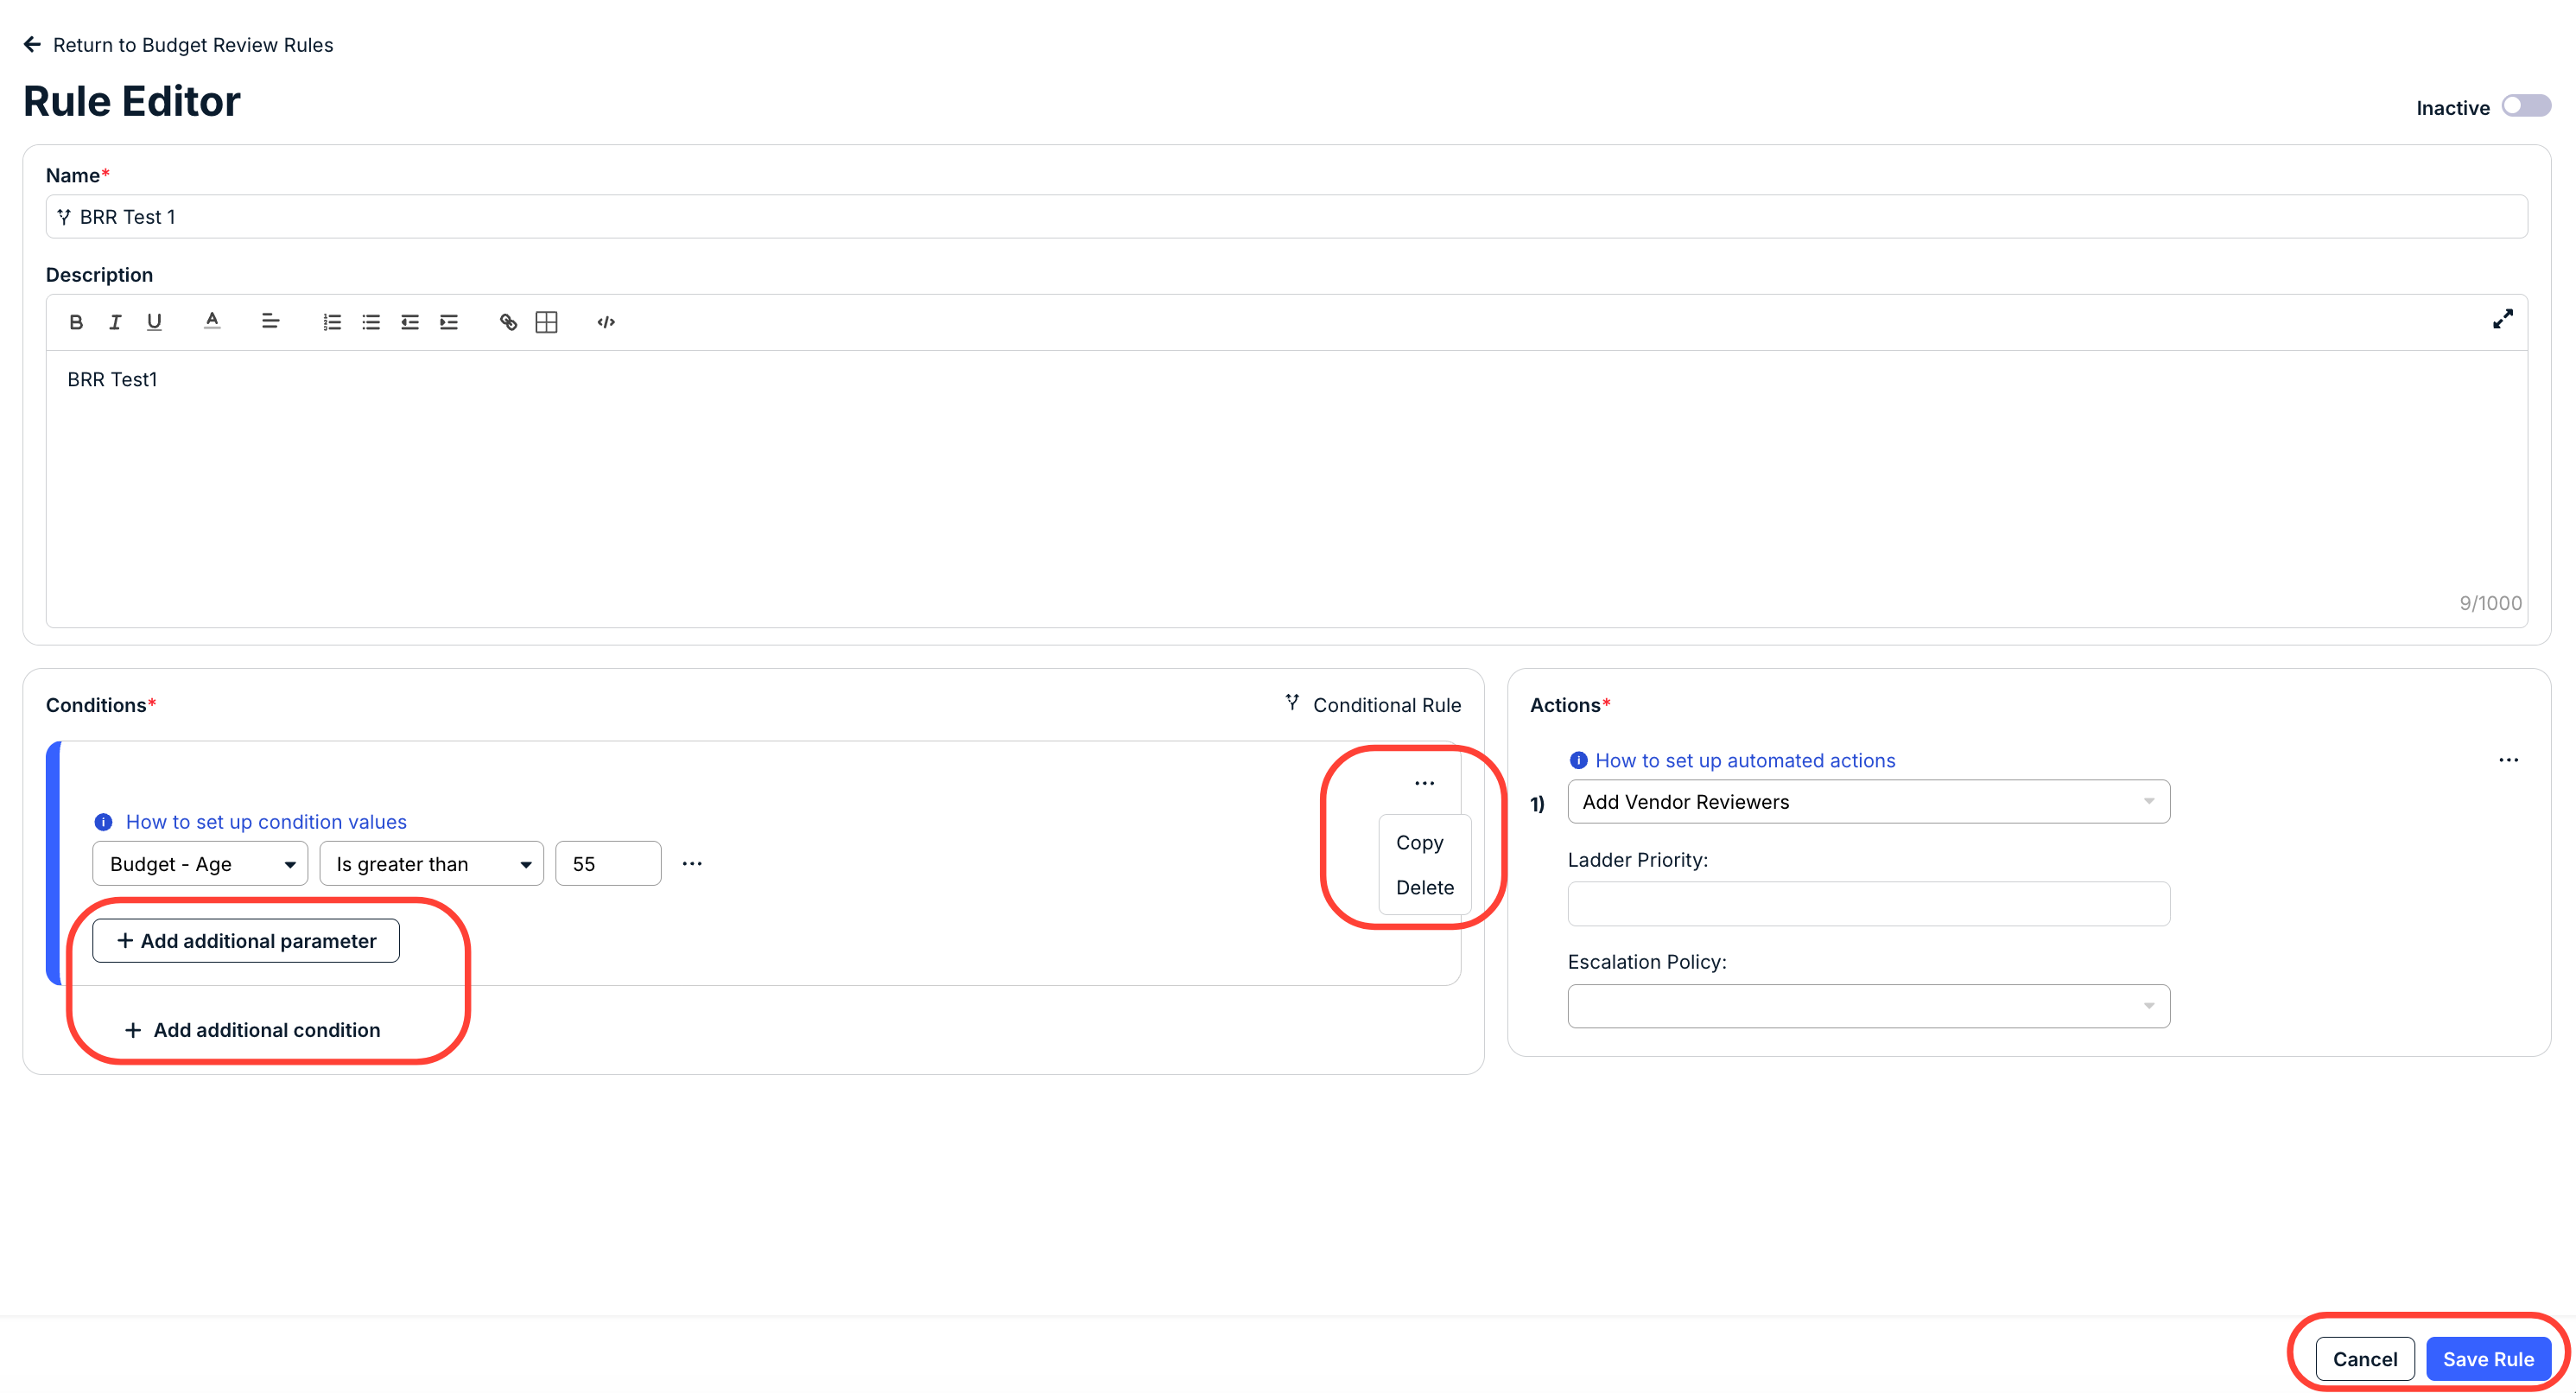
Clicking on Standard Rule will open the Rule Editor screen. Fill out the rule Name (required) and Description (if desired). Add your Conditions and Actions (learn more about them here) and click Save Rule to save the rule. Toggle the Active/Inactive button to make the rule active or inactive. You can also use the three-button menu on an Action or Condition to copy or delete either option. Use the +Add additional parameter and +Add additional condition to customize conditions. Click Save Rule to save the rule or Cancel to back out.
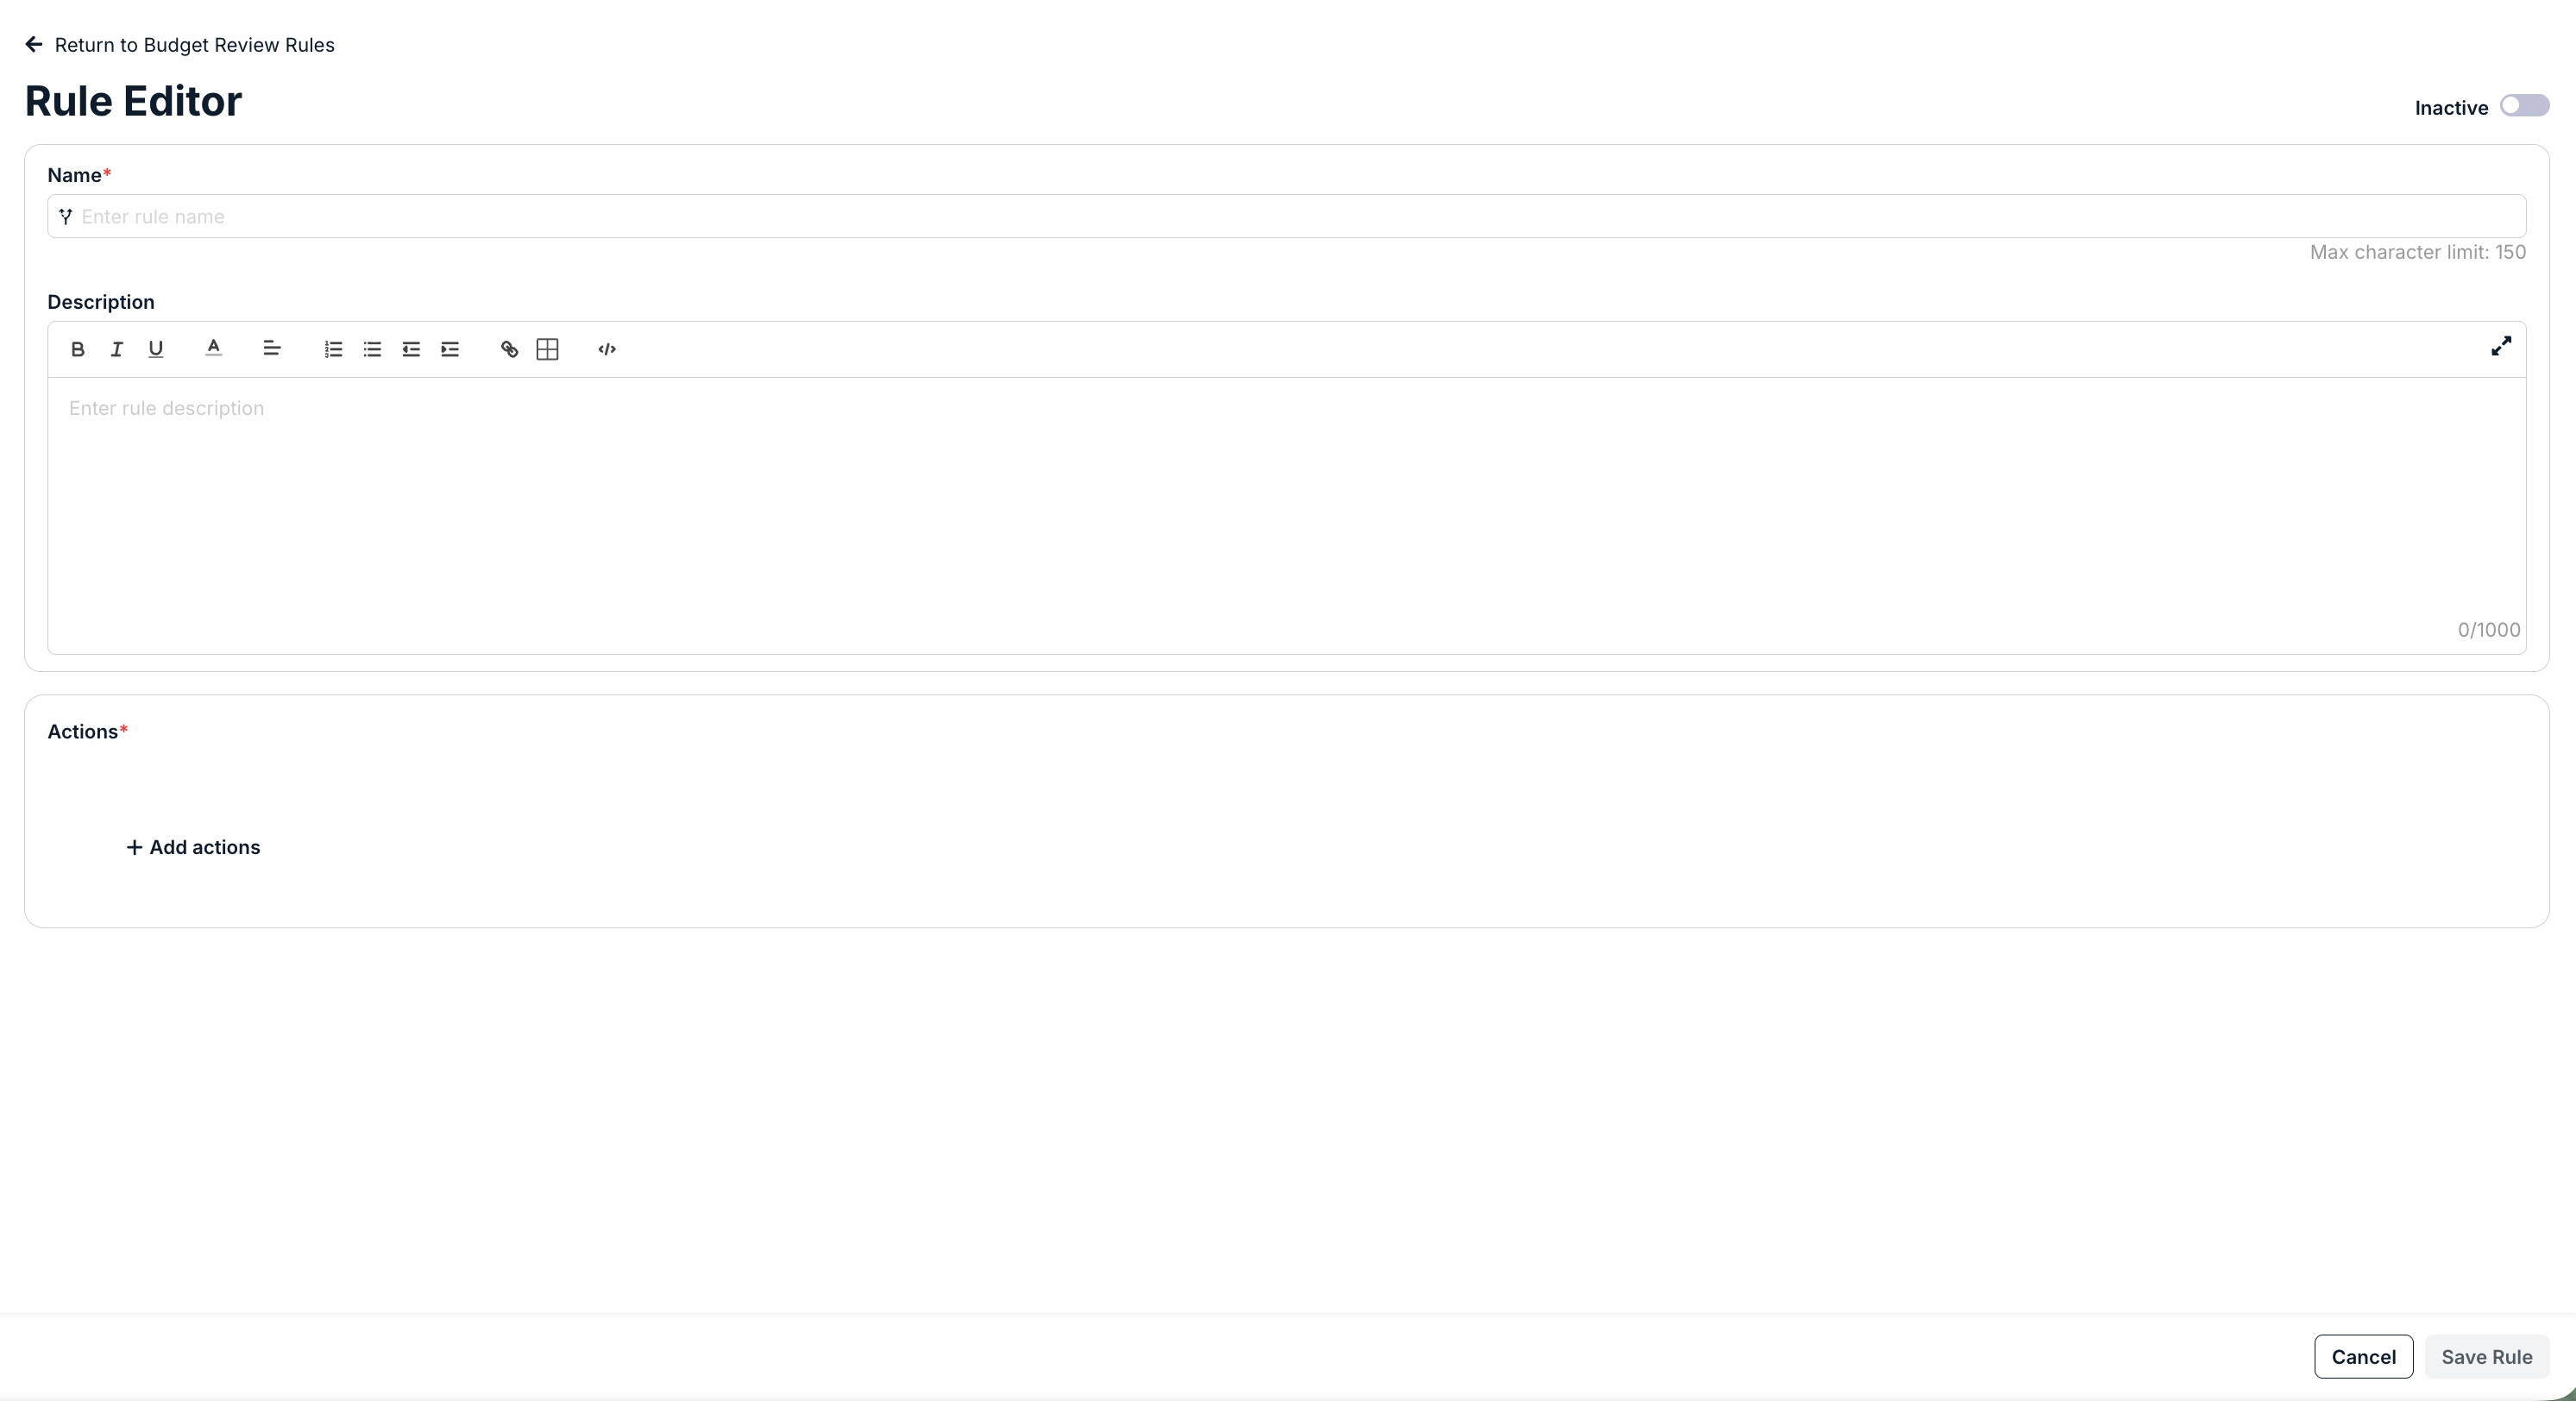
Clicking on Unconditional Rule will open a similar screen, just without the Conditions.
Timekeeper Rate Review Rules
Use the Timekeeper Rate Review Rules section to adjust the timekeeper rate review process.
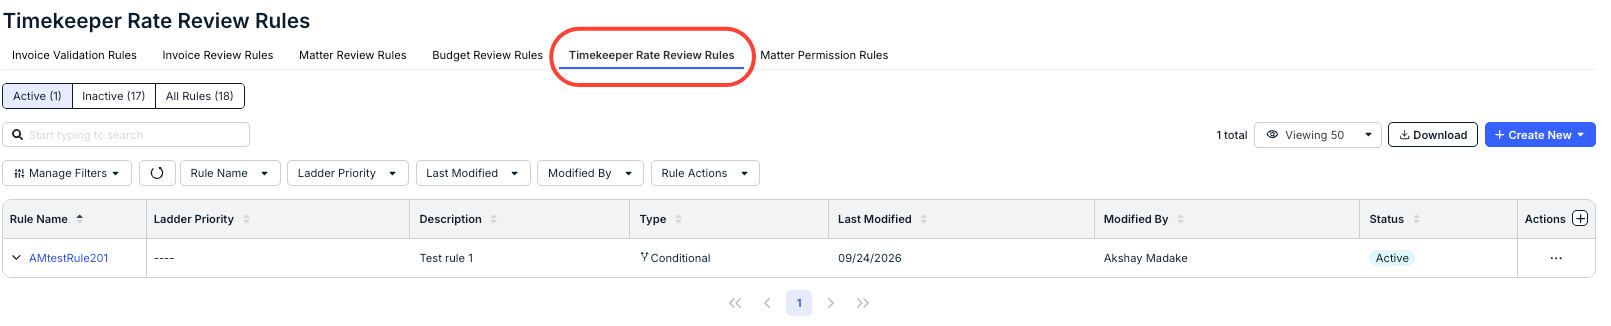
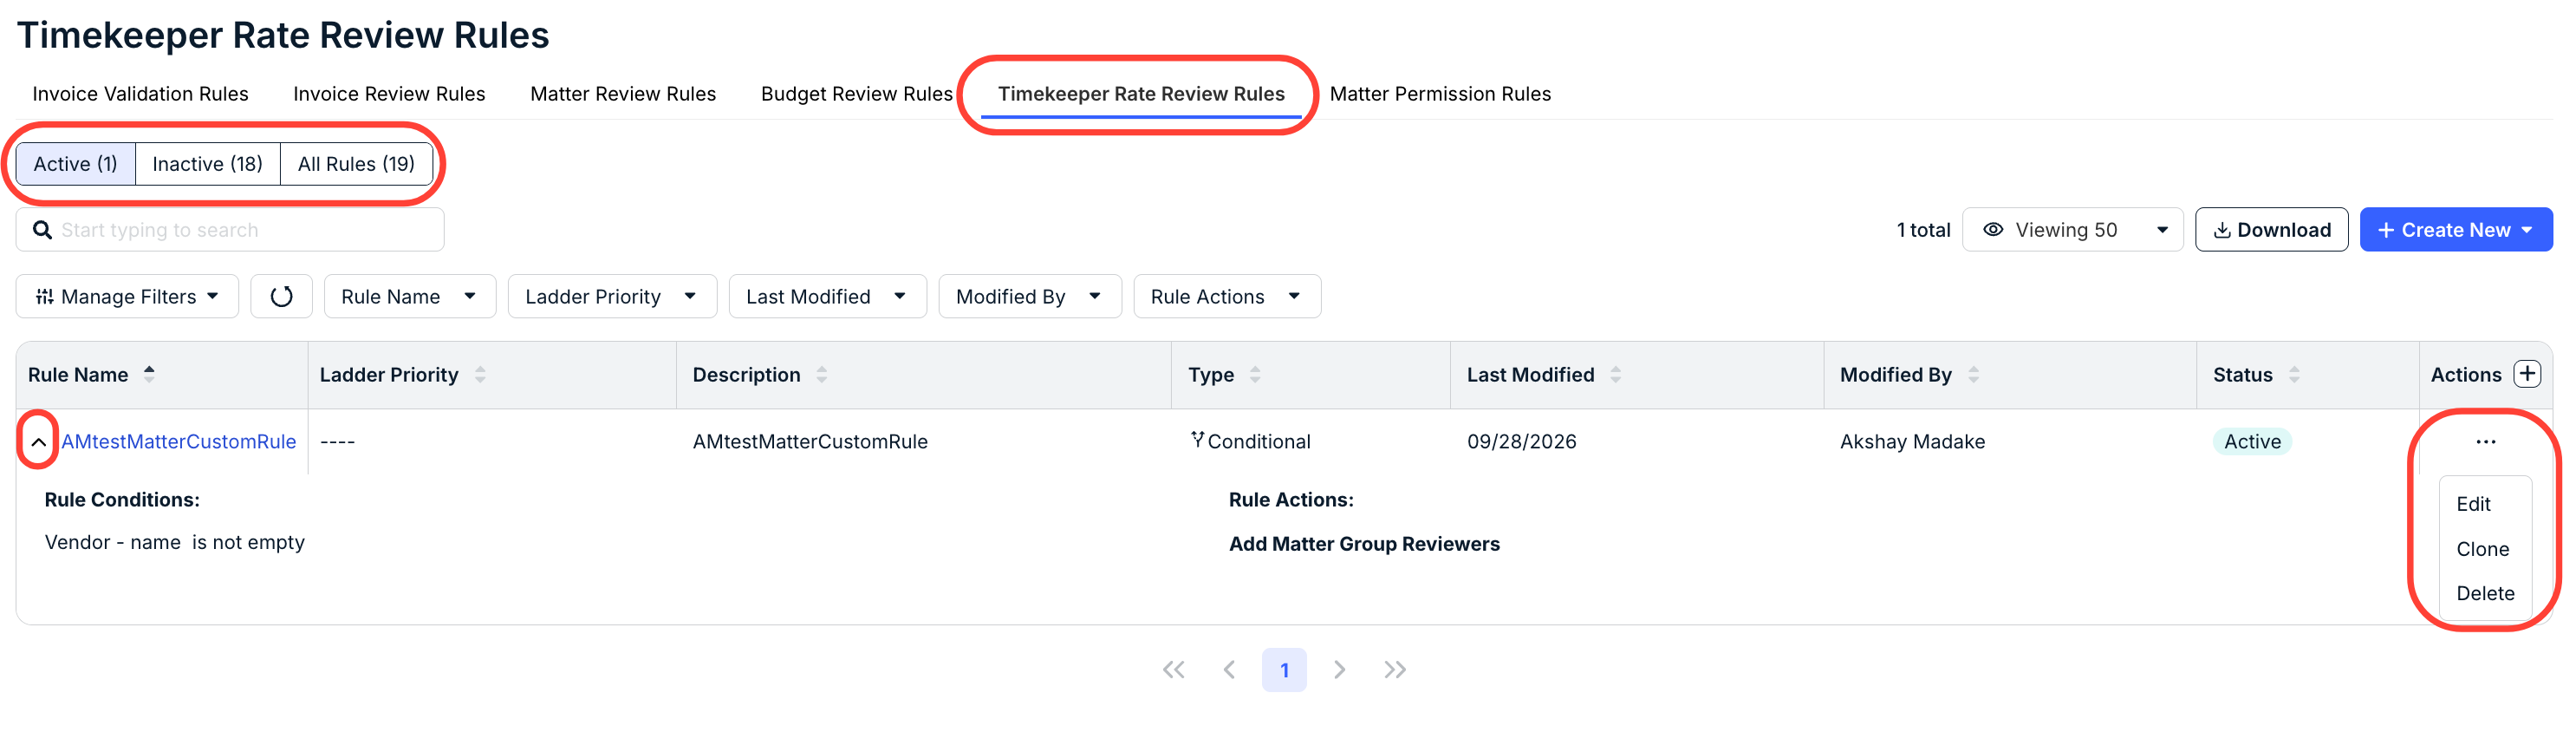
On the main directory, you'll see any existing timekeeper rate review rules. Use the top tab to scroll between Active, Inactive, and All Rules. Use the search bar to search through all existing rules. Use the Manage Filters drop-down and other drop-down menus to customize what you want to see on the screen. Use the Viewing drop-down to select how many records you want to see on the screen. Click Download to download the rule information.
The main directory will show the existing Rule Name, Ladder Priority, Description, Type, Last Modified date, Modified By name, Status (Active/Inactive), and an Actions menu. Use the up/down arrows at the top of every category to sort by that category. Use the Actions menu to Edit, Clone, or Delete the rule. Use the arrow under Rule Name to toggle expanded information about the rule.
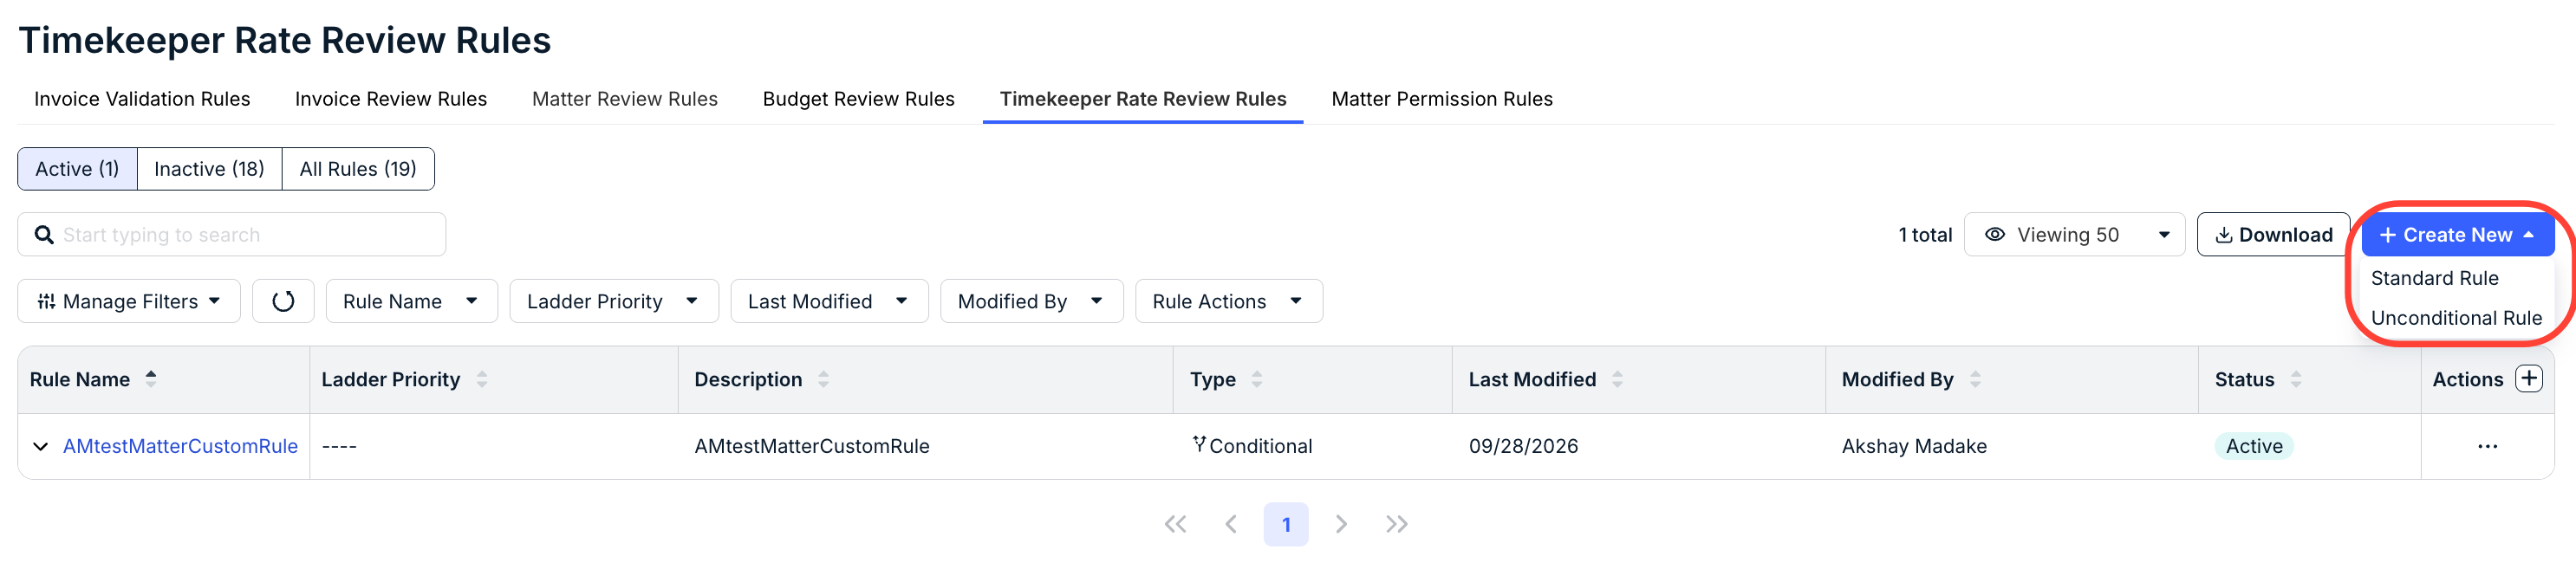
Click +Create New to set up a new Timekeeper Rate Review rule. You can create either a Standard Rule or an Unconditional Rule.
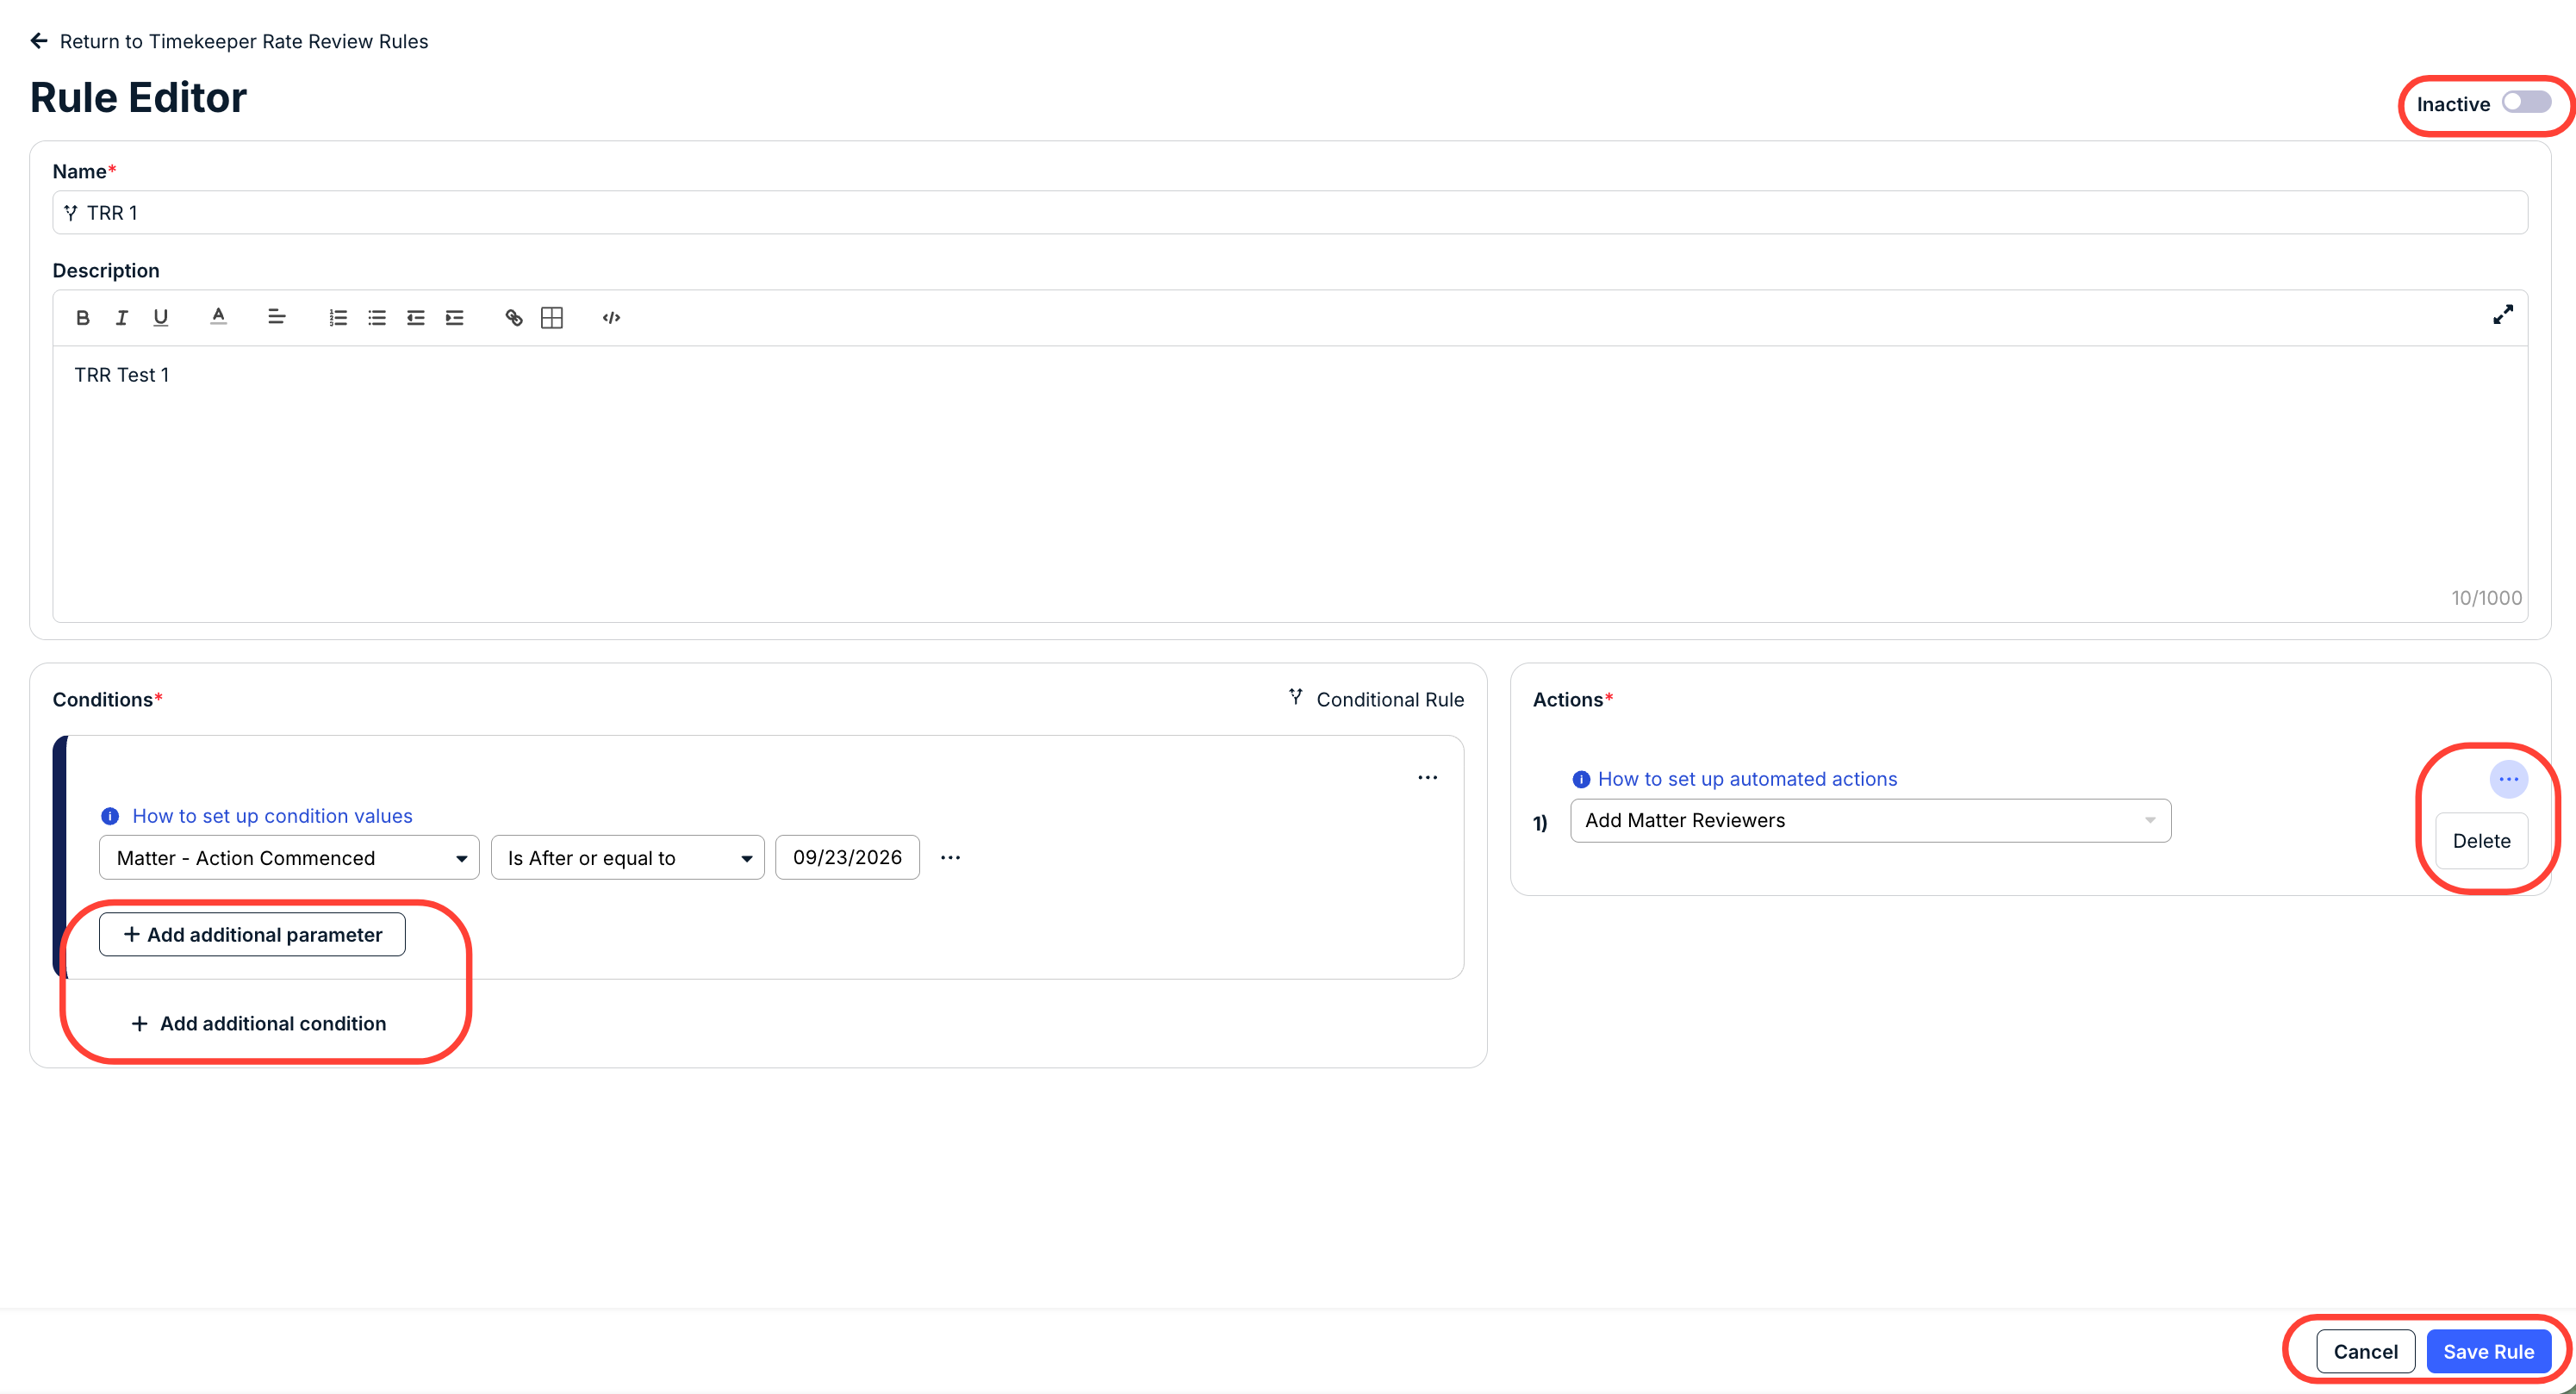
Clicking on Standard Rule will open the Rule Editor screen. Fill out the rule Name (required) and Description (if desired). Add your Conditions and Actions (learn more about them here) and click Save Rule to save the rule. Toggle the Active/Inactive button to make the rule active or inactive. You can also use the three-button menu on an Action or Condition to copy or delete either option. Use the +Add additional parameter and +Add additional condition to customize conditions; use the +Add additional action option to customize actions. Click Save Rule to save the rule or Cancel to back out.
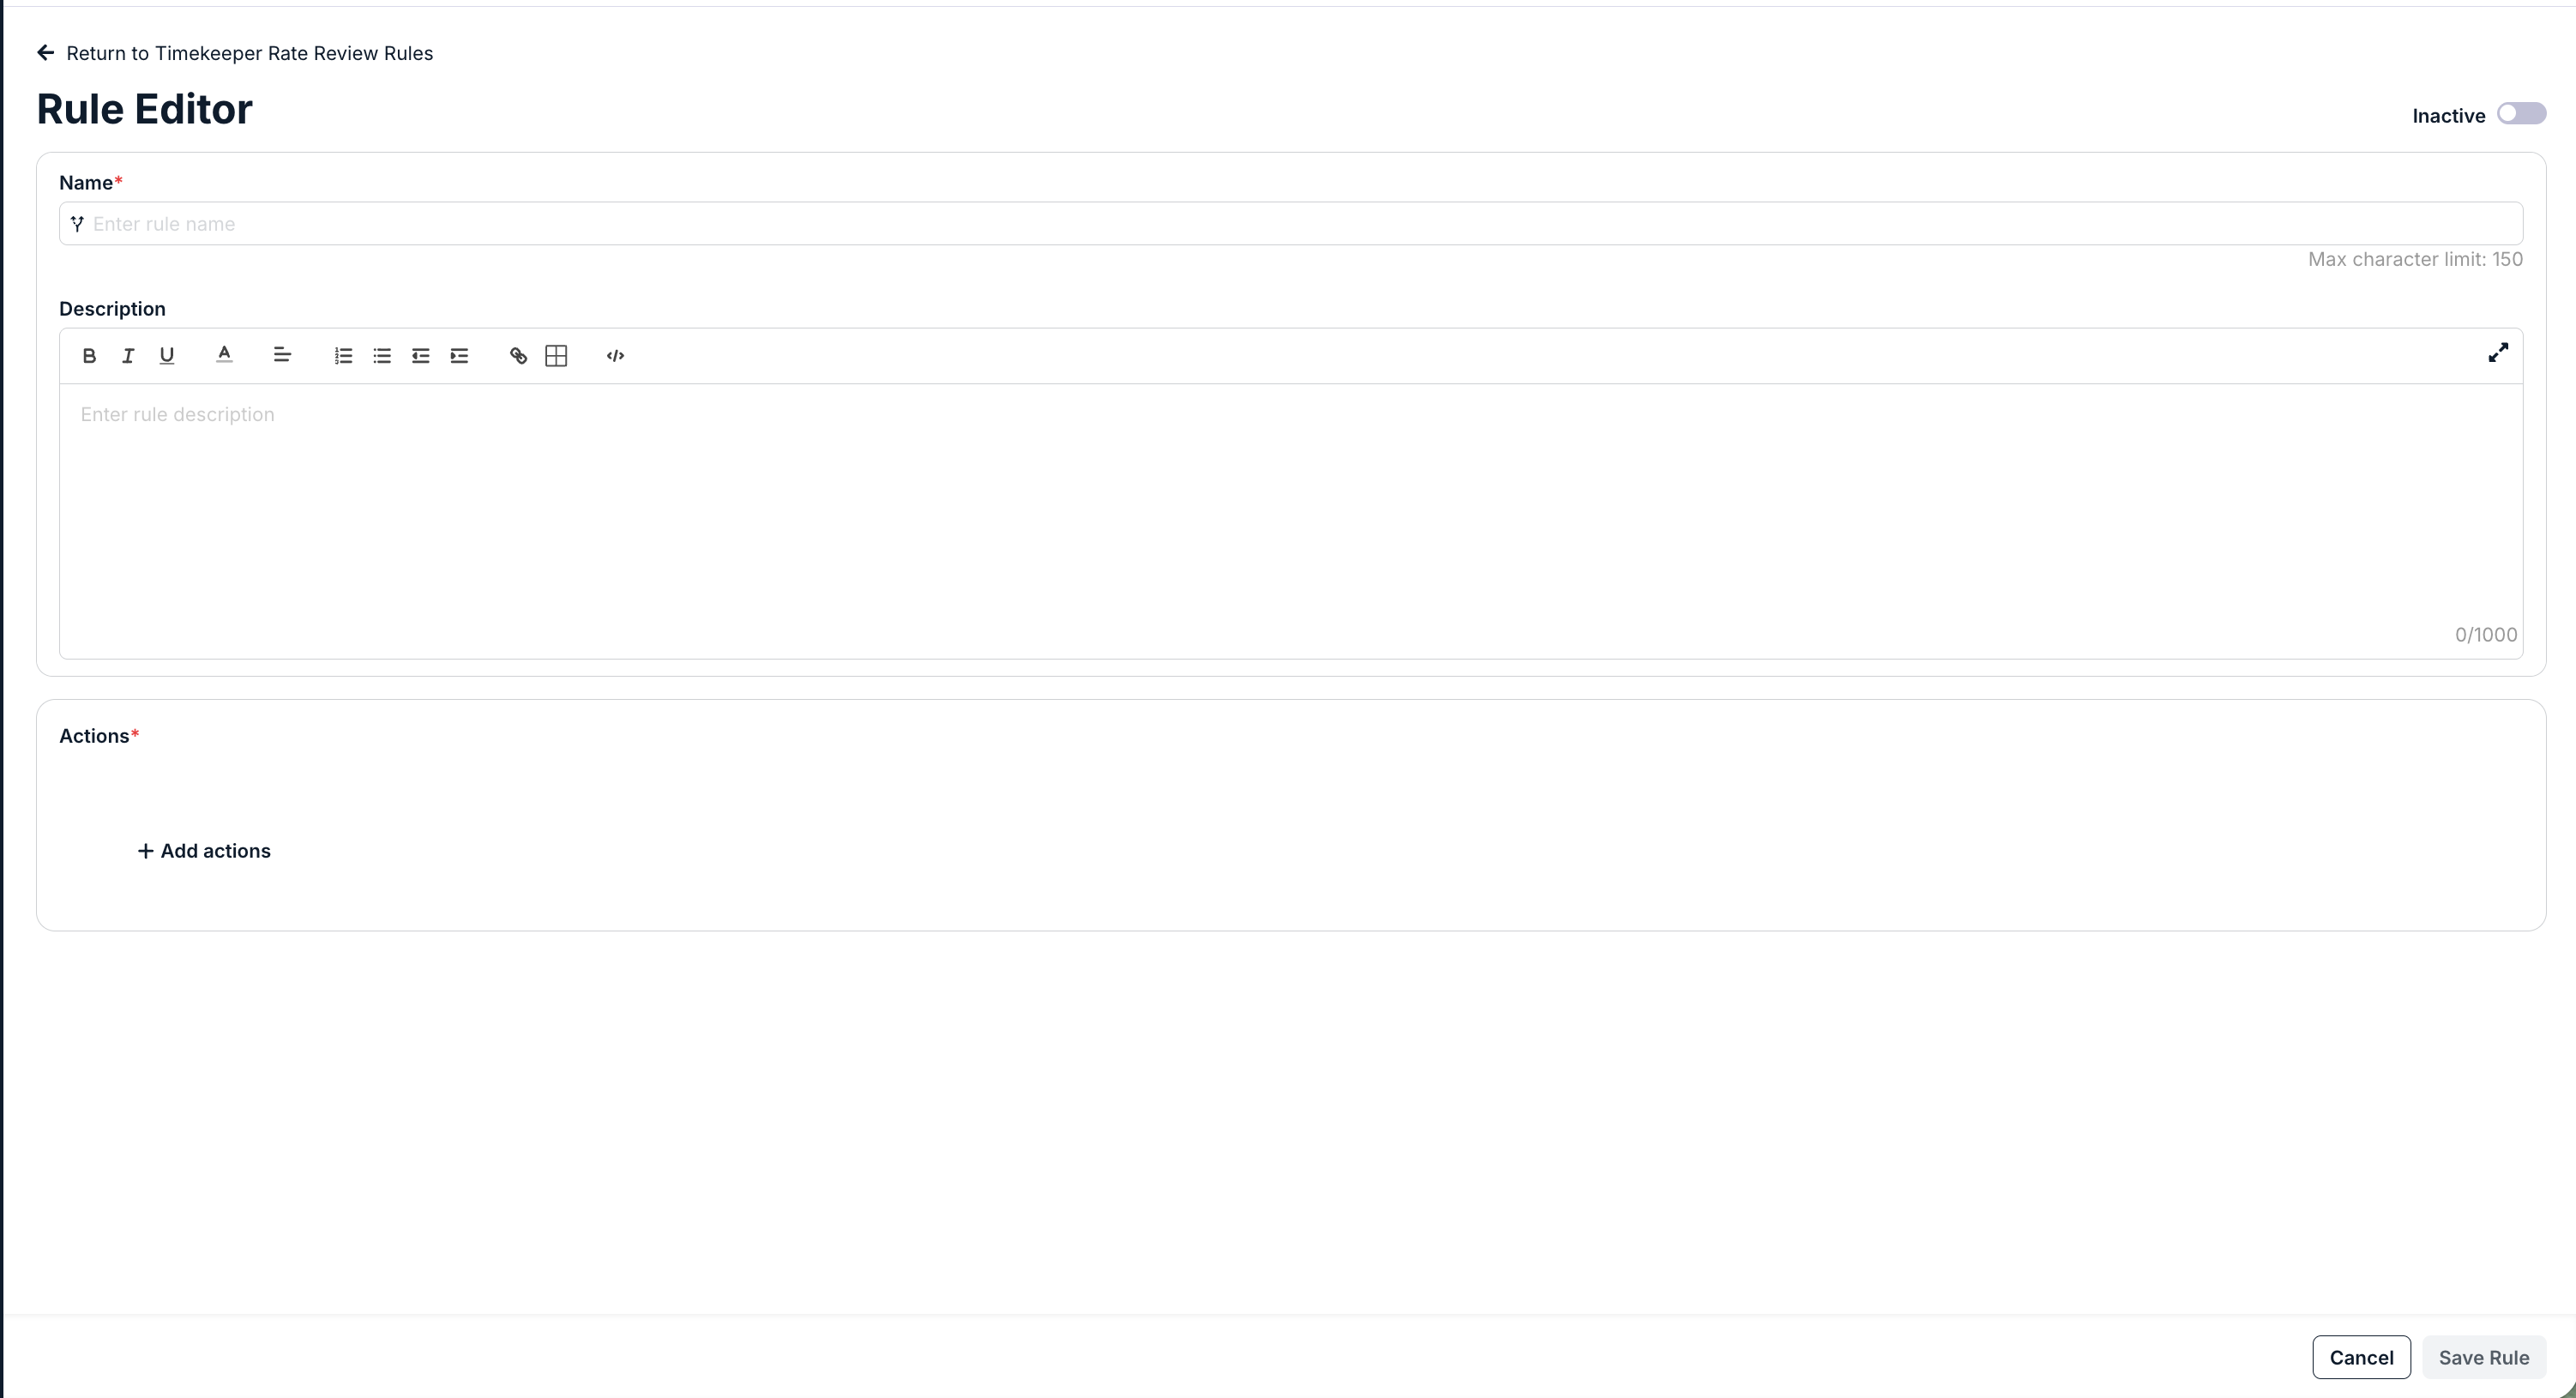
Clicking on Unconditional Rule will open a similar screen, just without the Conditions.
The new rule will appear in the main directory.
Matter Permission Rules
Use the Matter Permission Rules section to adjust the matter permission rules review process.

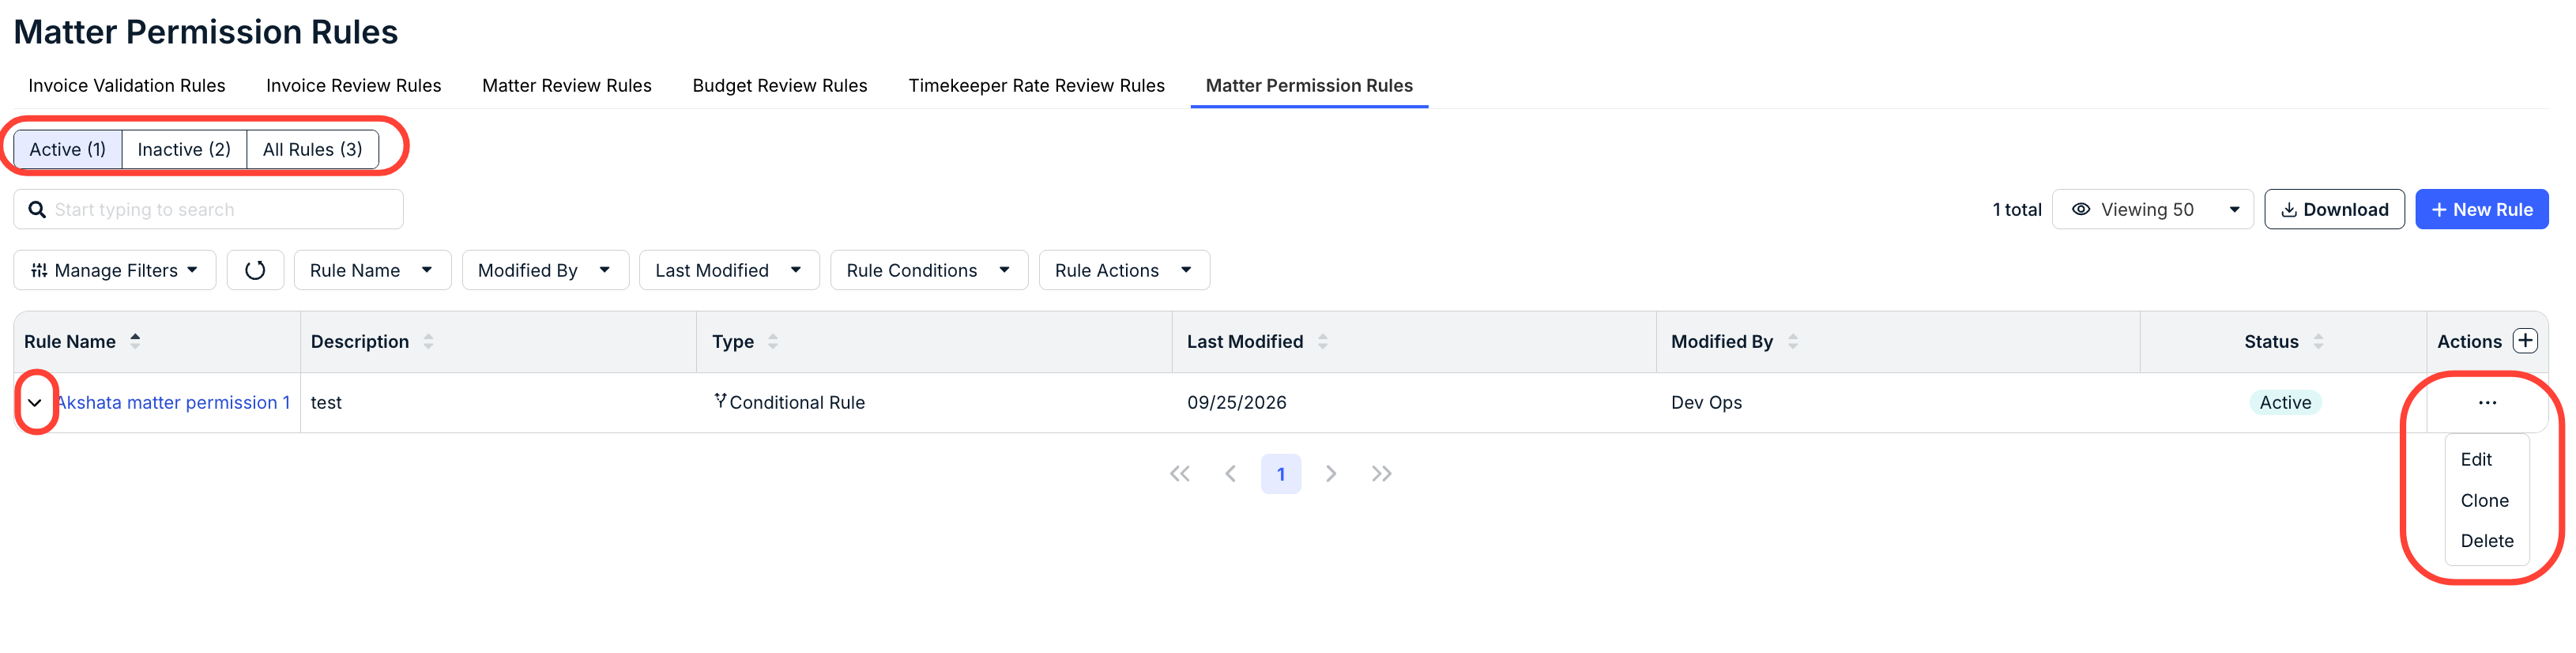
On the main directory, you'll see any existing matter permission rules. Use the top tab to scroll between Active, Inactive, and All Rules. Use the search bar to search through all existing rules. Use the Manage Filters drop-down and other drop-down menus to customize what you want to see on the screen. Use the Viewing drop-down to select how many records you want to see on the screen. Click Download to download the rule information.
The main directory will show the existing Rule Name, Description, Type, Last Modified date, Modified By name, Status (Active/Inactive), and an Actions menu. Use the up/down arrows at the top of every category to sort by that category. Use the Actions menu to Edit, Clone, or Delete the rule. Use the arrow under Rule Name to toggle expanded information about the rule.
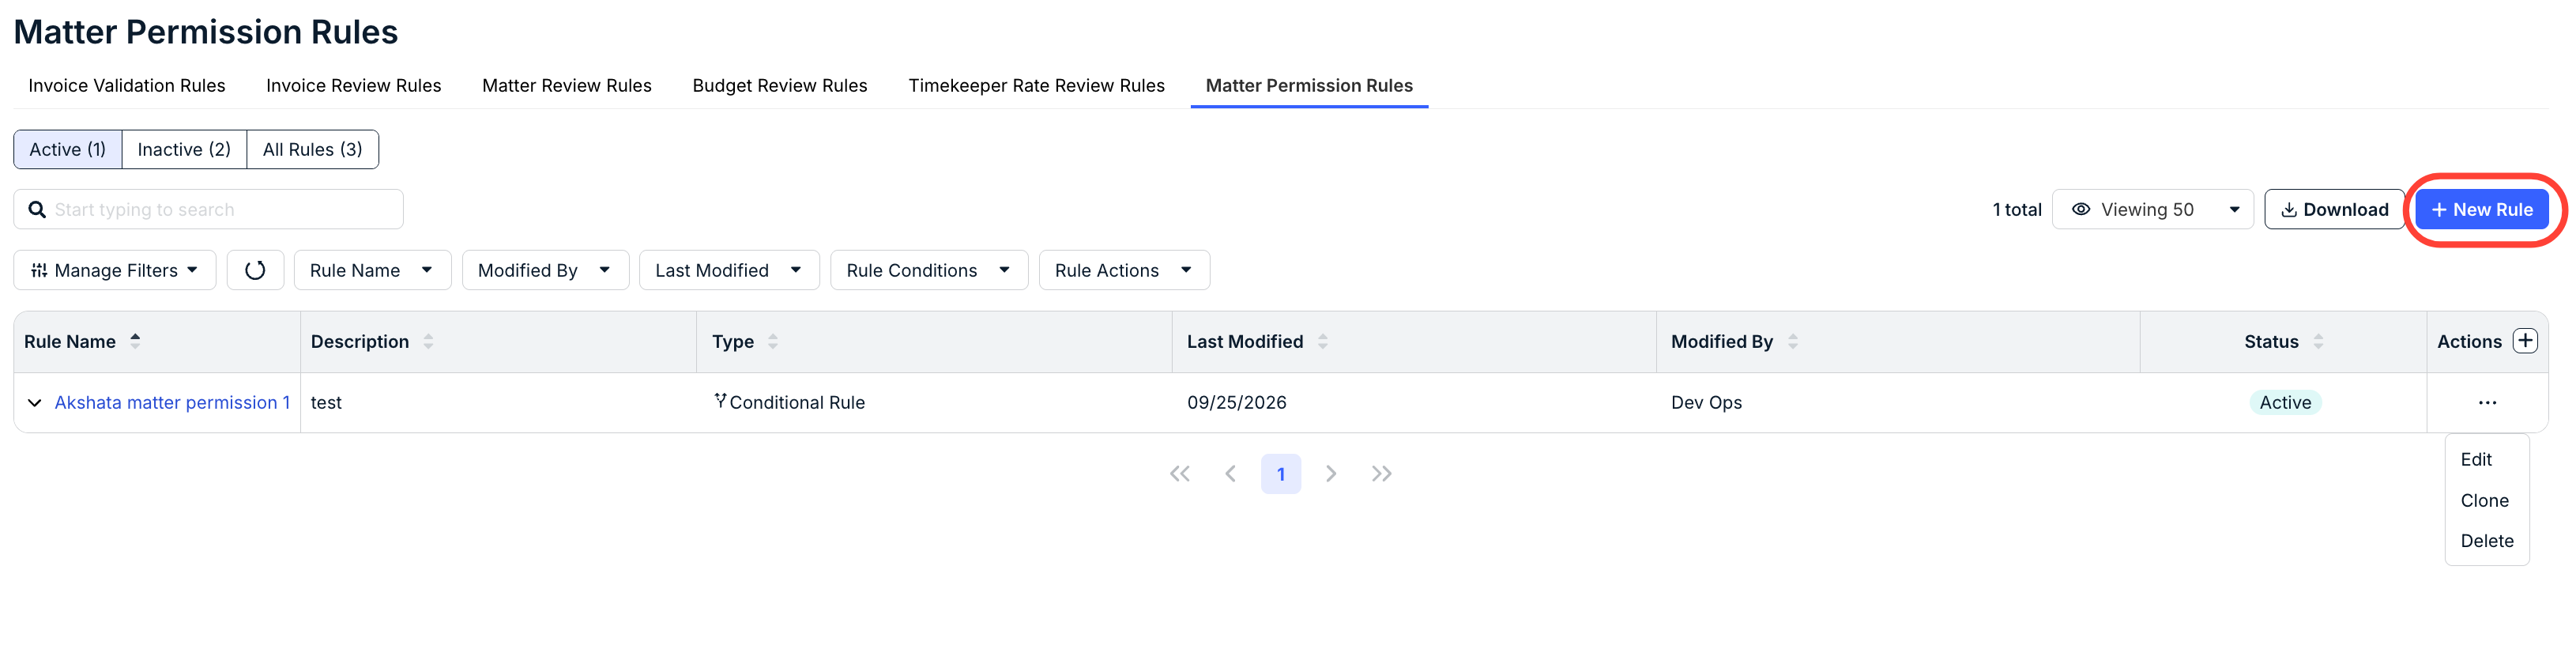
Click +New Rule to set up a new Matter Permission rule.
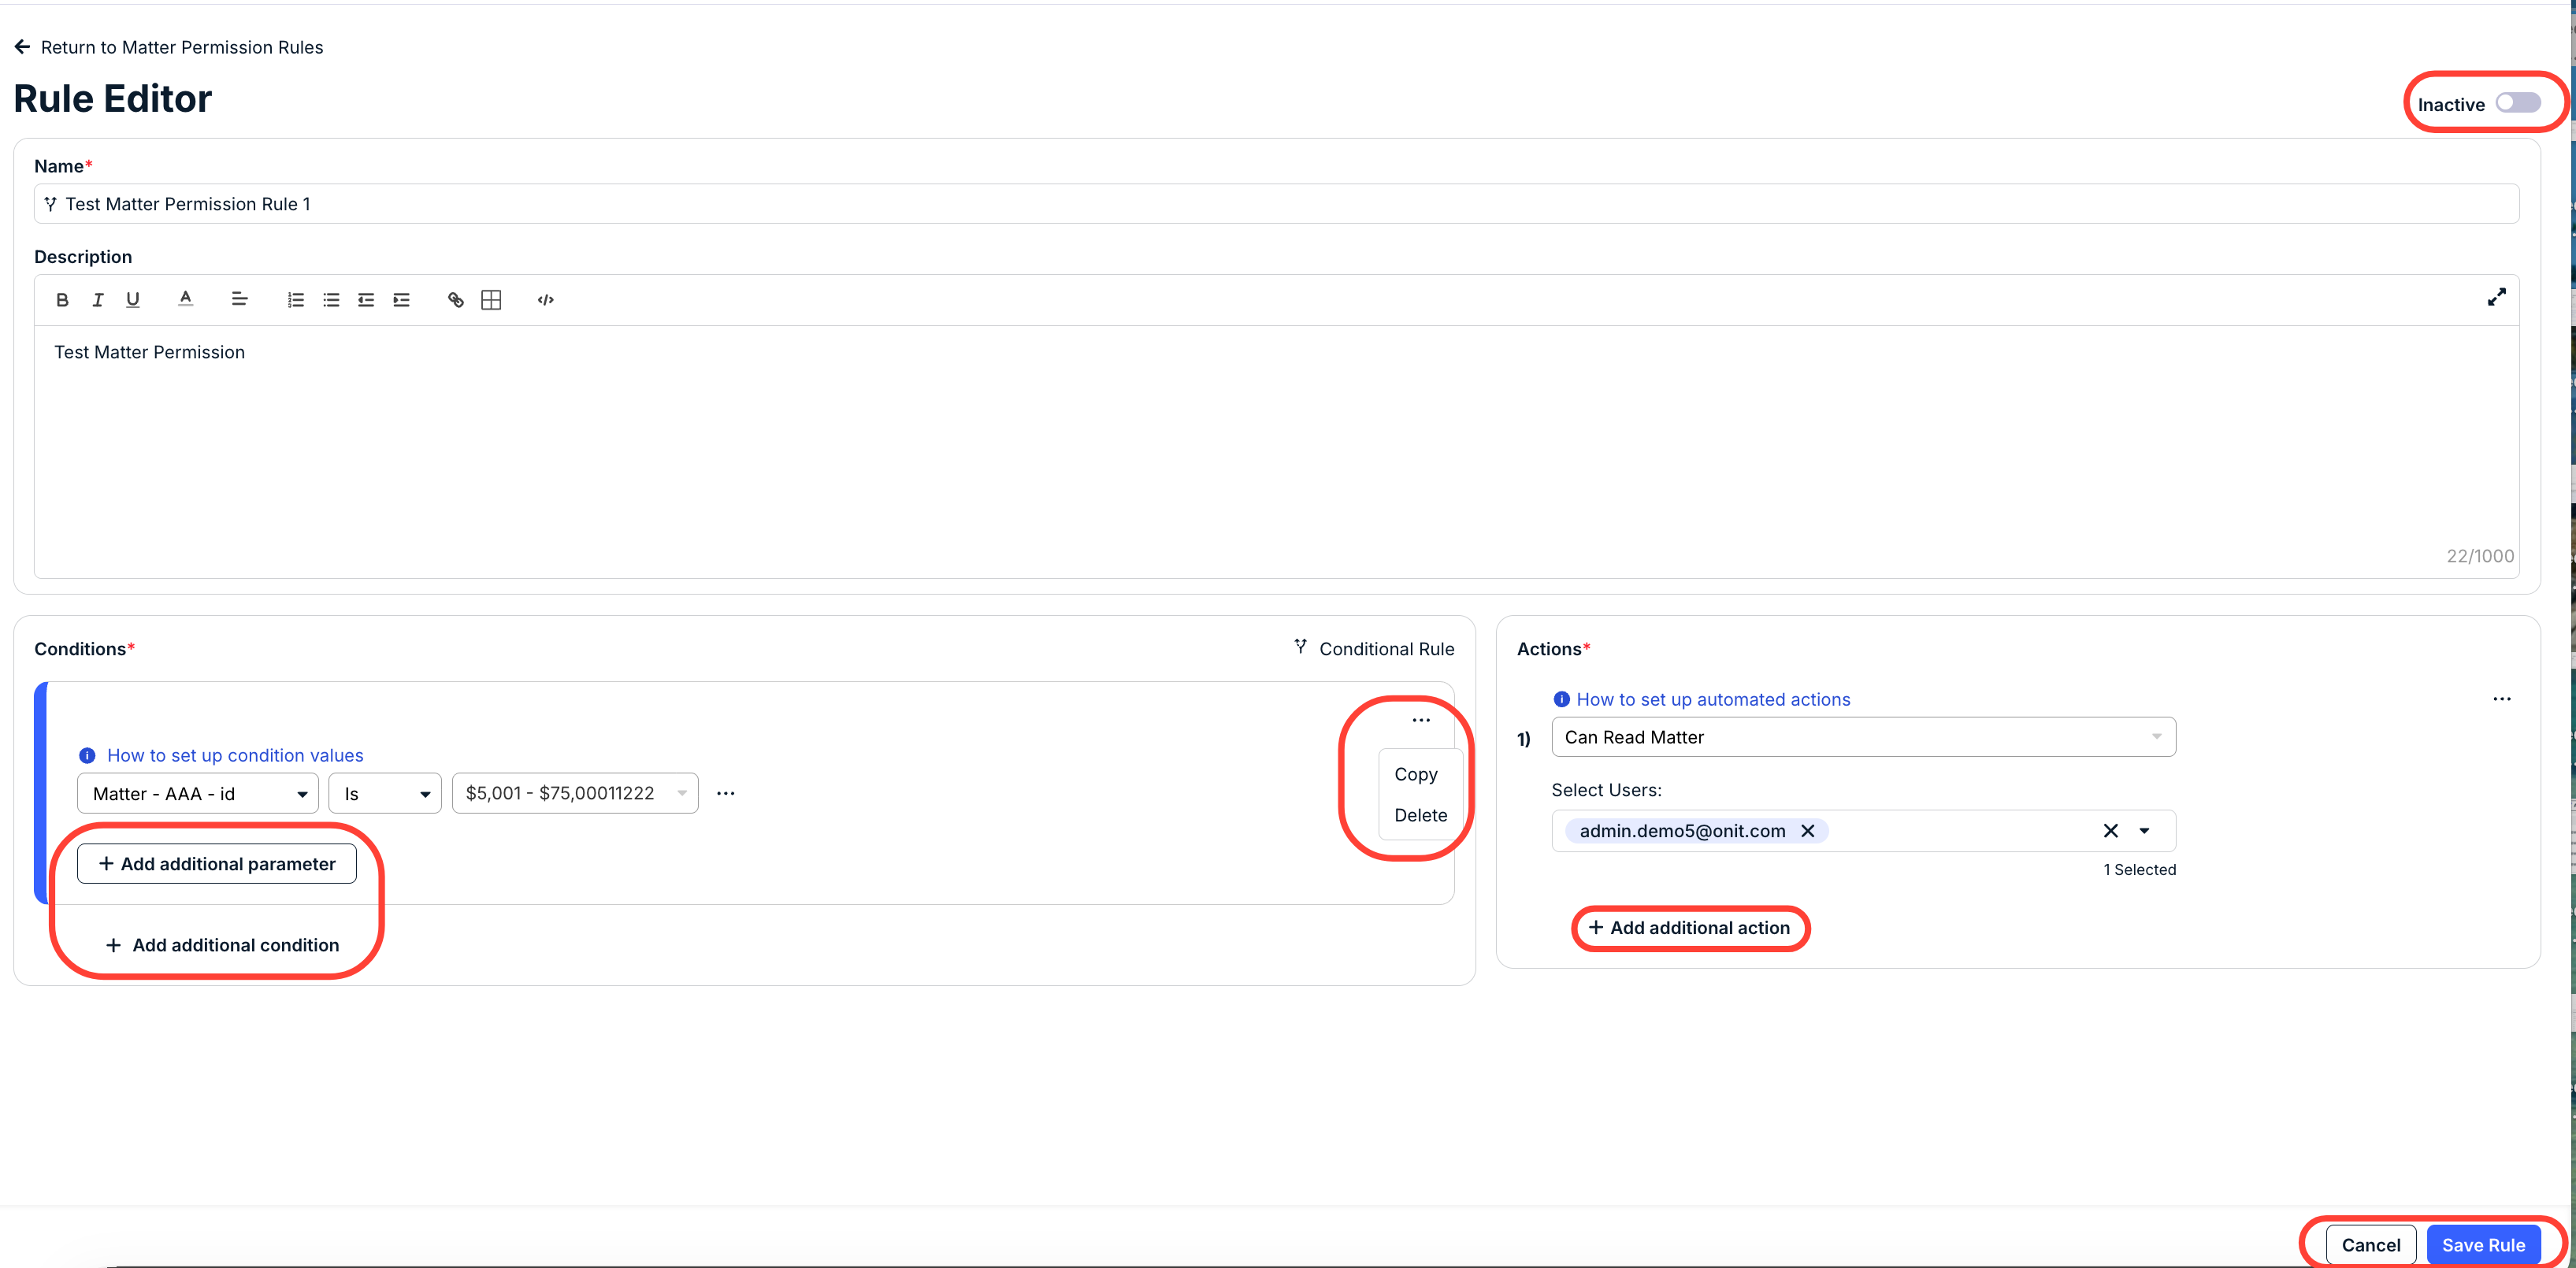
The Rule Editor screen will open. Fill out the rule Name (required) and Description (if desired). Add your Conditions and Actions (learn more about them here) and click Save Rule to save the rule. Toggle the Active/Inactive button to make the rule active or inactive. You can also use the three-button menu on an Action or Condition to copy or delete either option. Use the +Add additional parameter and +Add additional condition to customize conditions; use the +Add additional action option to customize actions. Click Save Rule to save the rule or Cancel to back out.
The new rule will appear in the main directory.