Unity ELM provides legal operations software to streamline the way corporate legal departments manage their matters, track and interpret spend, and collaborate with law firms and other vendors. By combining e-billing, matter management, accruals automation, and advanced reporting into a single, comprehensive solution, we centralize the functions and data necessary to make informed decisions and manage your entire legal department more efficiently.
NOTE: For the full user guide, click here.
Accessing and Maintaining Your Account
Activation and Password Setup
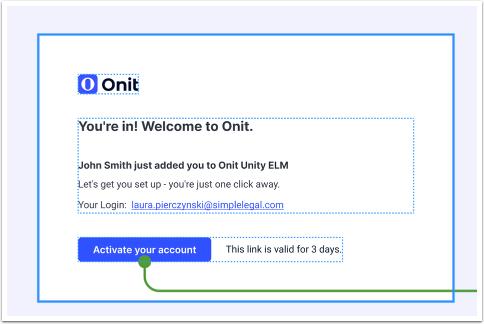
Once you're added to Unity ELM, you'll receive an email that looks like this in your inbox. It will detail your login name and include a link to activate your account. The link is valid for three days.
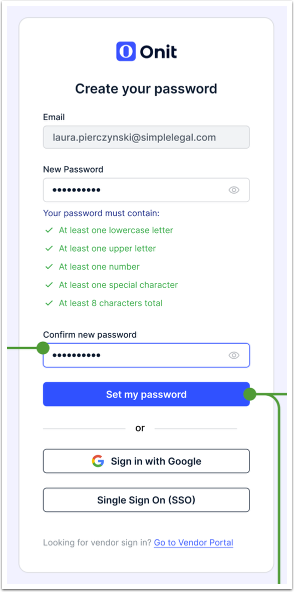
Once you click on the Activate your account link, you’ll be taken to the Create your password page. Your email will automatically be filled in; you’ll just have to create and confirm a new password.
The password must contain:
- At least one lowercase letter
- At least one uppercase letter
- At least one number
- At least one special character
- At least 8 characters in total
Once you fill in your password (note that you can click the eye symbol in each field to view what you’ve entered), you can click Set my password.
You'll receive an email confirming your new account password and containing a link to go to Unity eBilling.
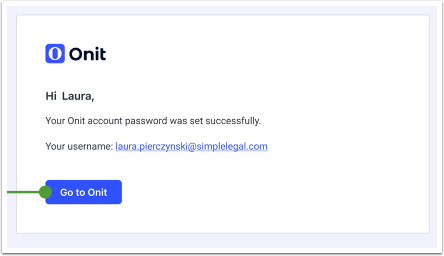
Click Go to Onit to access the login screen.
Forgot Password?
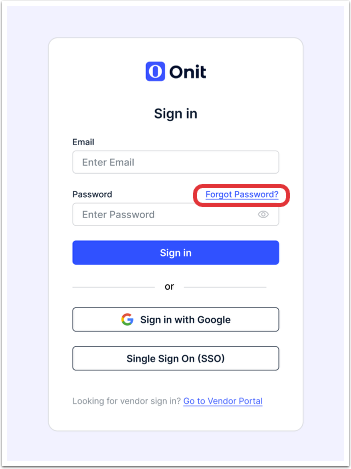
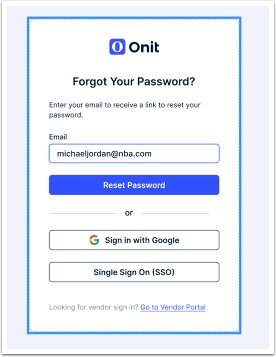
Forgot your password? To reset your Unity ELM password, click the Forgot Password link on the sign-on screen.
The Forgot Your Password? screen will appear. Fill in your email address and click Reset Password to receive a password reset link in your inbox.
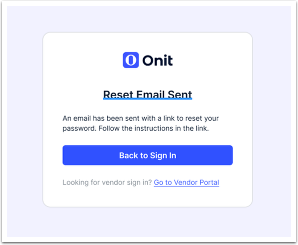
The email will contain a link to reset your password; this link expires 24 hours after it is generated for security reasons.
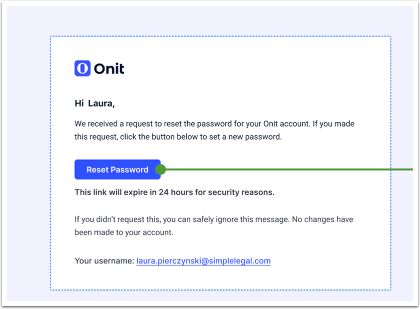
Once you click on Reset Password, you’ll be taken to the Create a new password screen. Fill in and confirm the new password. Note that you can click the eye symbol in each field to view what you’ve entered.
A reminder: The password must contain:
- At least one lowercase letter
- At least one uppercase letter
- At least one number
- At least one special character
- At least 8 characters in total
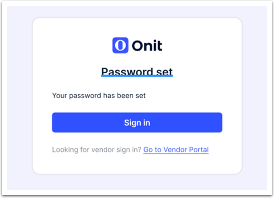
Click Save New Password to update the password.
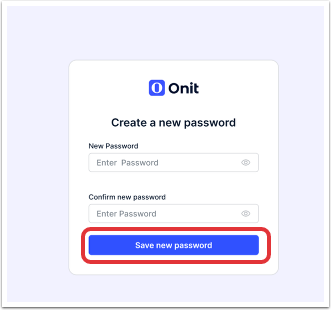
If successful, you'll receive a Password set notification on the screen along with an email confirmation.
Logging in to your Account
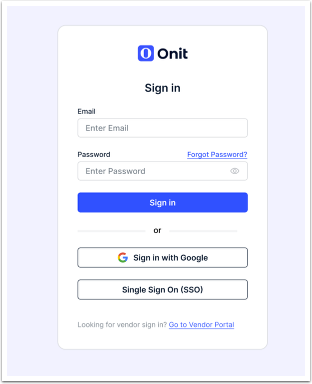
Once you navigate to the Unity eBilling platform, you'll be directed to the login page. Fill out your Email and Password to log in to the platform.
Note that you can click on the eye symbol in the password field to show what you've typed in.
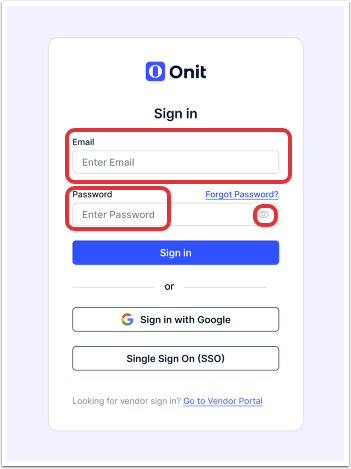
If the email and password are entered correctly, you'll go directly to the main screen.
Logging out of your Account
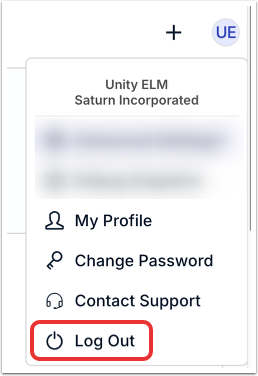
To log out of your account from within Unity eBilling, go to the User icon on the top right of the top navigation bar and click on Log Out.
From there, you'll go to the standard login page.
Changing Your Password
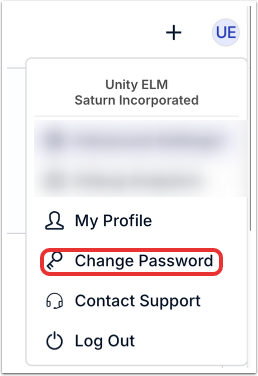
To change your password, go to the User icon on the top right of the navigation bar and click on Change Password.
The Change Password screen will appear. You’ll need to enter your old password and then fill in and confirm a new one. Note that you can click the eye symbol in each field to view what you’ve entered.
A reminder: The password must contain:
- At least one lowercase letter
- At least one uppercase letter
- At least one number
- At least one special character
- At least 8 characters in total
Click Save New Password to update the password or Cancel to back out.

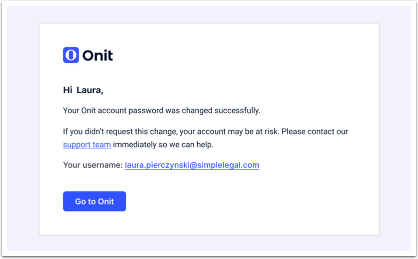
If the password change is successful, you'll receive an email confirmation of the change.
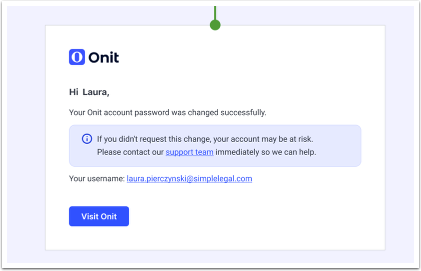
When you go back to Unity, you'll also see a top banner confirming the password change.

Session timeout
Unity users who are inactive for longer than 30 minutes are automatically logged out for security reasons.
This message will appear before the session timeout; click Stay Signed In to remain on the platform or Log Out to log out.

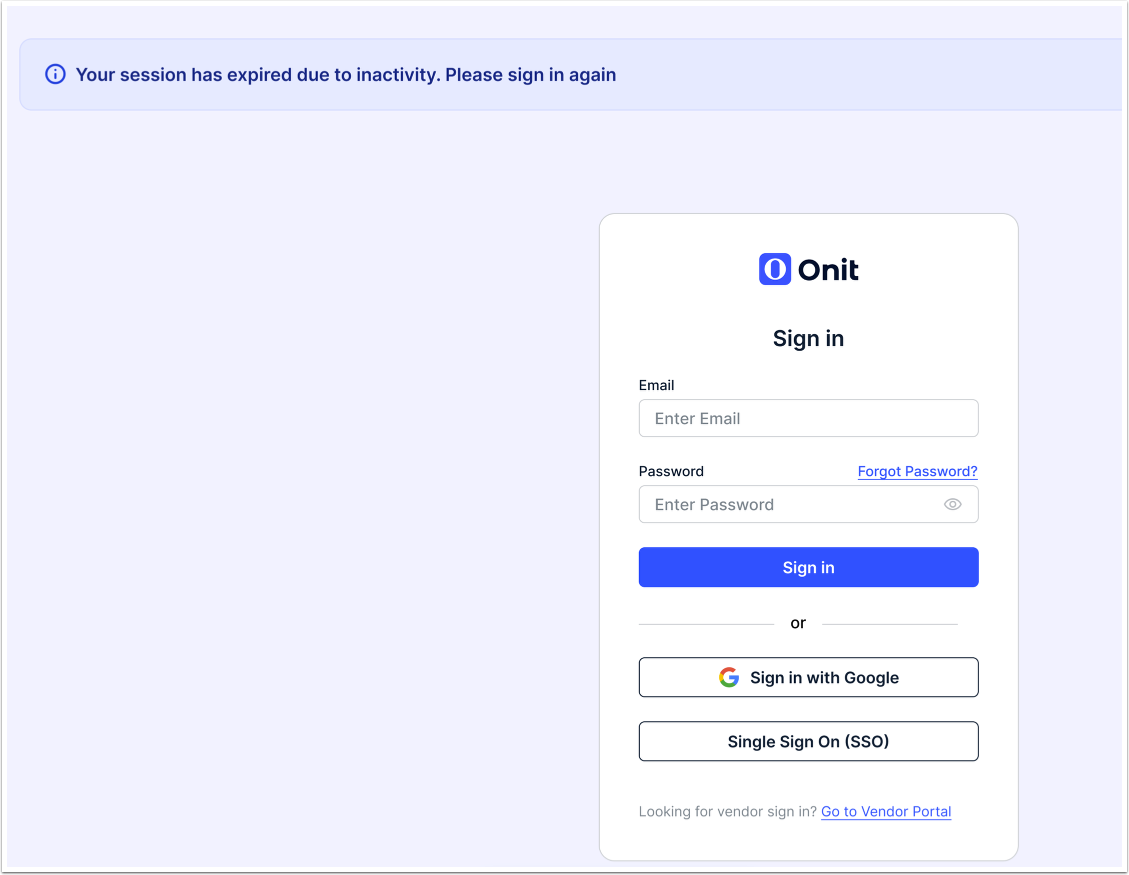
If the session expires, you'll see a banner message stating Your session has expired due to inactivity. Please sign in again. You will have to sign in again to access the platform.
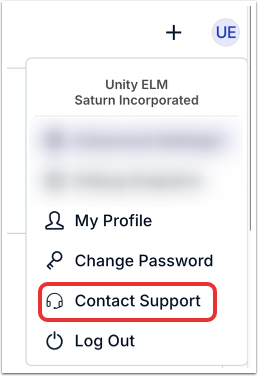
Contacting Onit Support
For Unity assistance, click on the Contact Support link within the user profile.
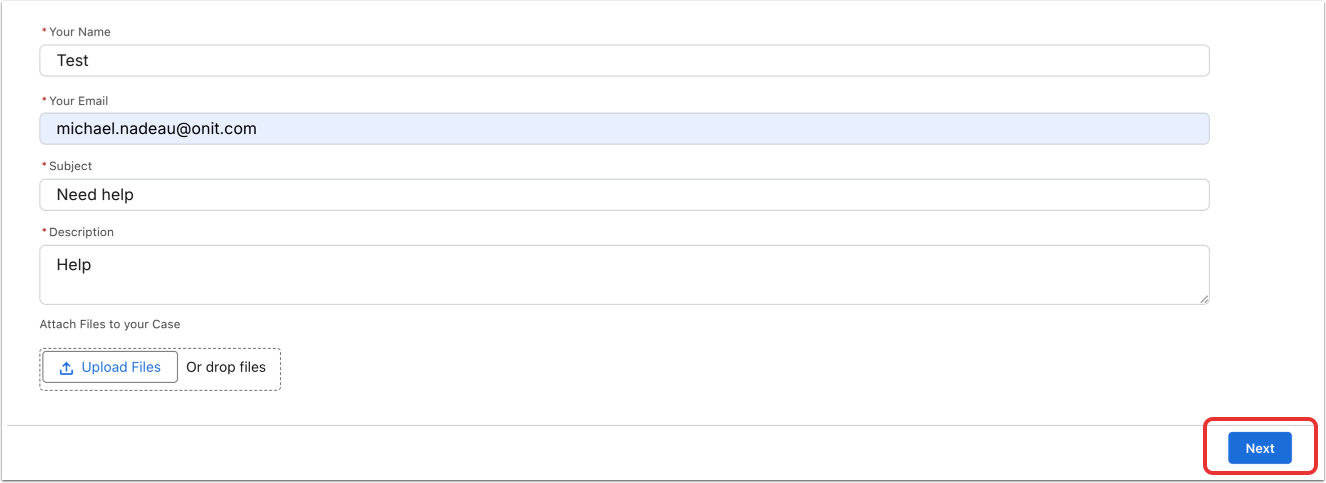
You'll go to the Support Form page; fill out the needed information (Your Name, Your Email, Subject, and Description of the issue) and Attach (or drop) Files to your Case if necessary.
Click Next to send the information to Onit support. The team will follow up ASAP.
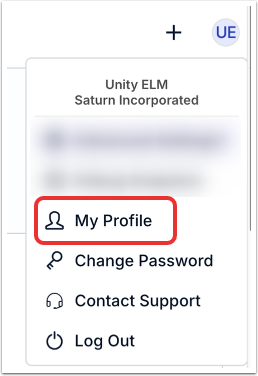
Managing Your User Profile
Click on My Profile to go to your User Profile.
The Profile page is divided into five tabs:
- Overview
- Pending Invoices
- Contact Affiliations
- Calendar Management
- Settings
We'll go through these tabs here.
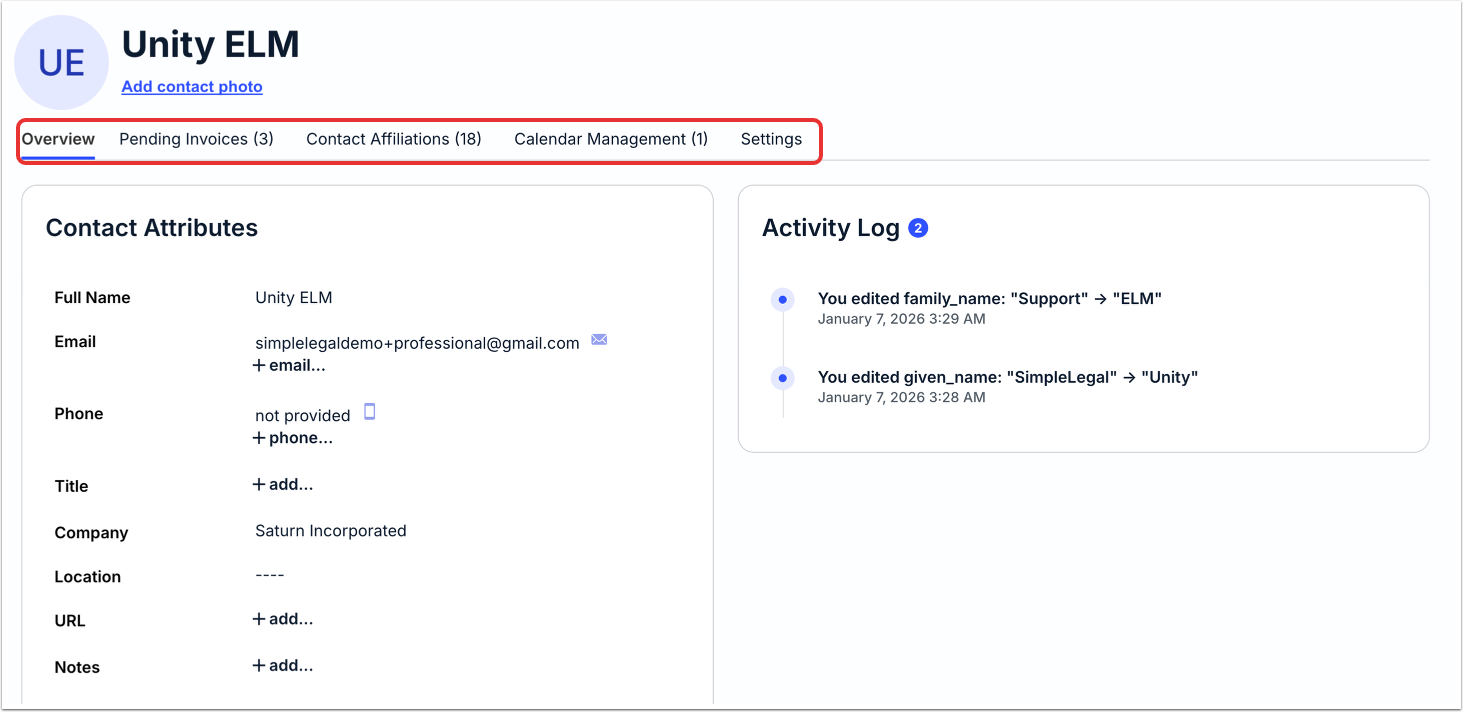
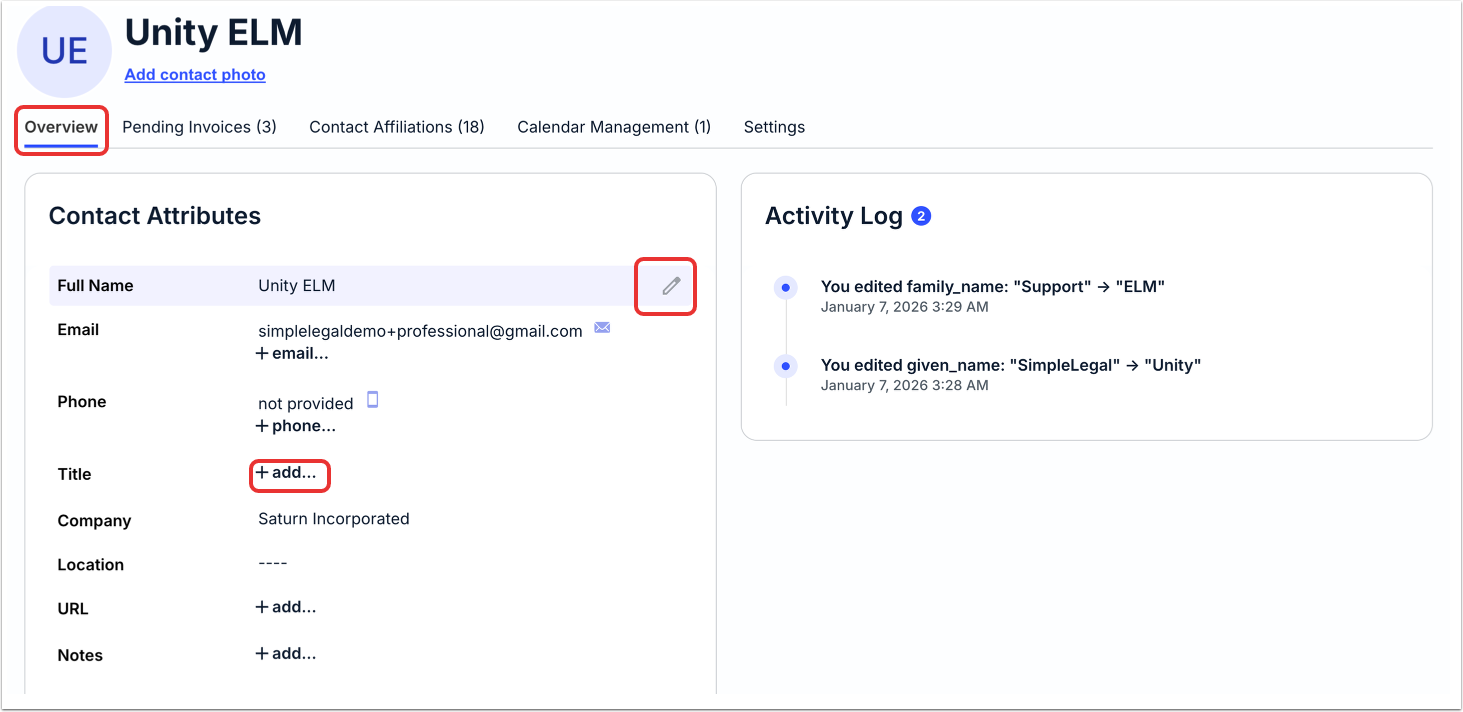
Overview
The Overview tab details key profile information, including;
- Name (click on Add contact photo to add a photo to your contact information)
- Contract Attributes, including Full Name, Email, Phone, Title, Company, Location, URL, and Notes. Click on +add to add more information or the edit (pencil) icon to edit the existing information.
- An Activity Log outlining recent activity. Click View all to see the full activity log.
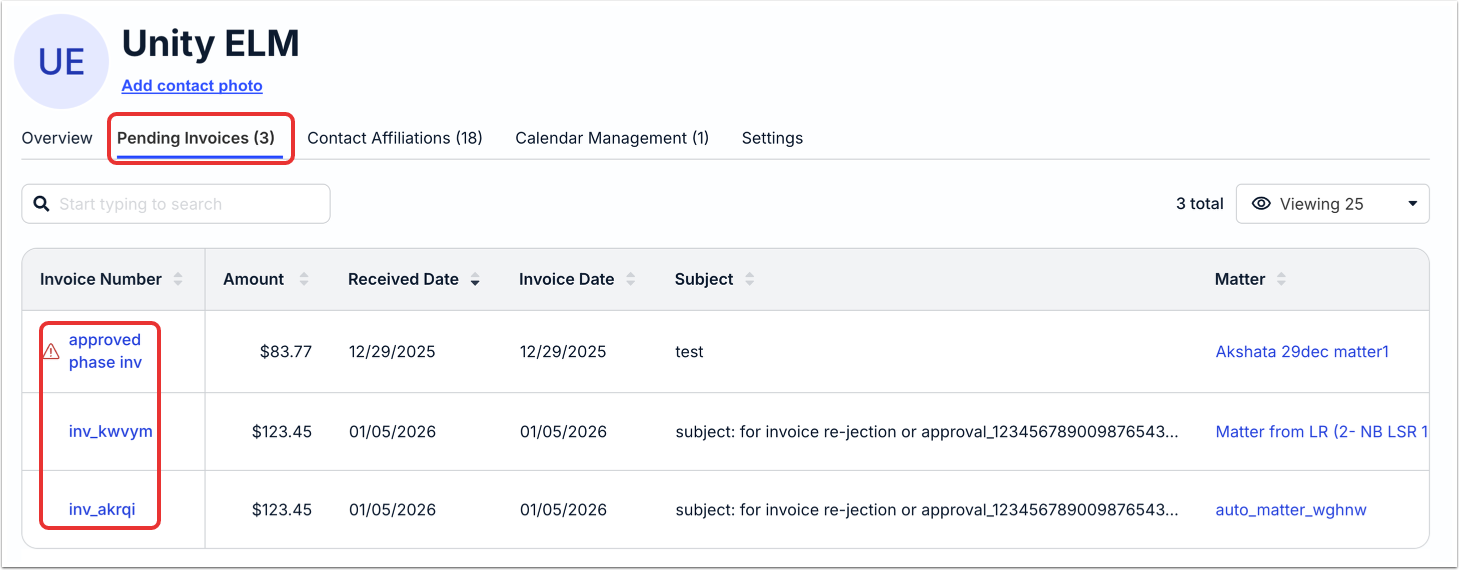
Pending Invoices
The Pending Invoices tab shows all pending invoices your profile. Use the search bar to search for different invoices; you can also use the drop-down menu to display the number of associated matters on the page.
The main page of the Pending Invoicestab will show the Invoice Number, Amount, Received Date, Subject, and Matter associated with the your profile. Use the up/down arrows next to each column to sort by that column. Click on the link in the Invoice Number section or the Matter section to go directly to that link.
Contact Affiliations
Associated matters are shown by default. Use the menu within Contact Affiliations to view which Matters, Vendors, Legal Entities, and Practice Areas the user is associated with (if applicable) along with any other important details. To open a corresponding record (e.g., matter, vendor, etc.), click on the hyperlinked name.

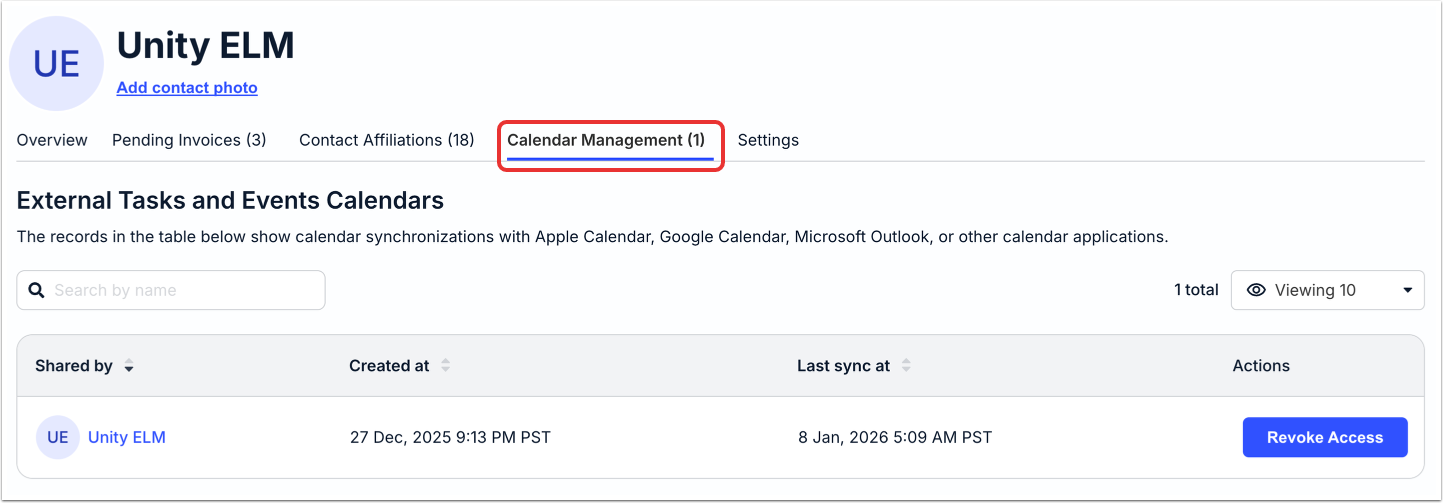
Calendar Management
Use the Calendar Management section to view calendar synchronizations with Apple Calendar, Google Calendar, Microsoft Outlook, or other calendar applications. Use the search bar to search for different tasks and events calendars; you can also use the drop-down menu to display the number of associated tasks and event calendars on the page. Use the up/down arrows next to each column to sort by that column.
The main screen will display a Shared by name, the Created at time, the Last sync at time, and the option to Revoke Access under Actions.
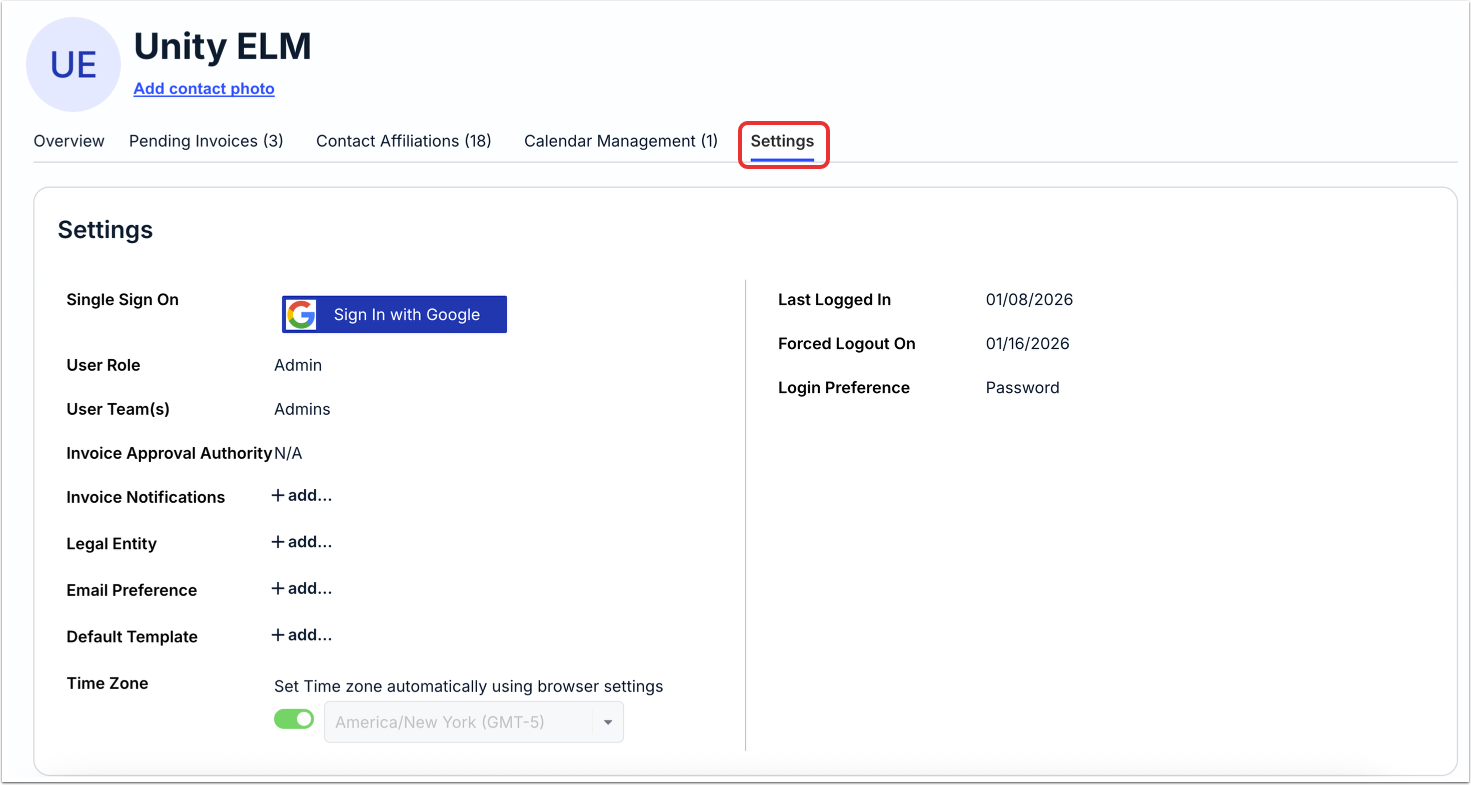
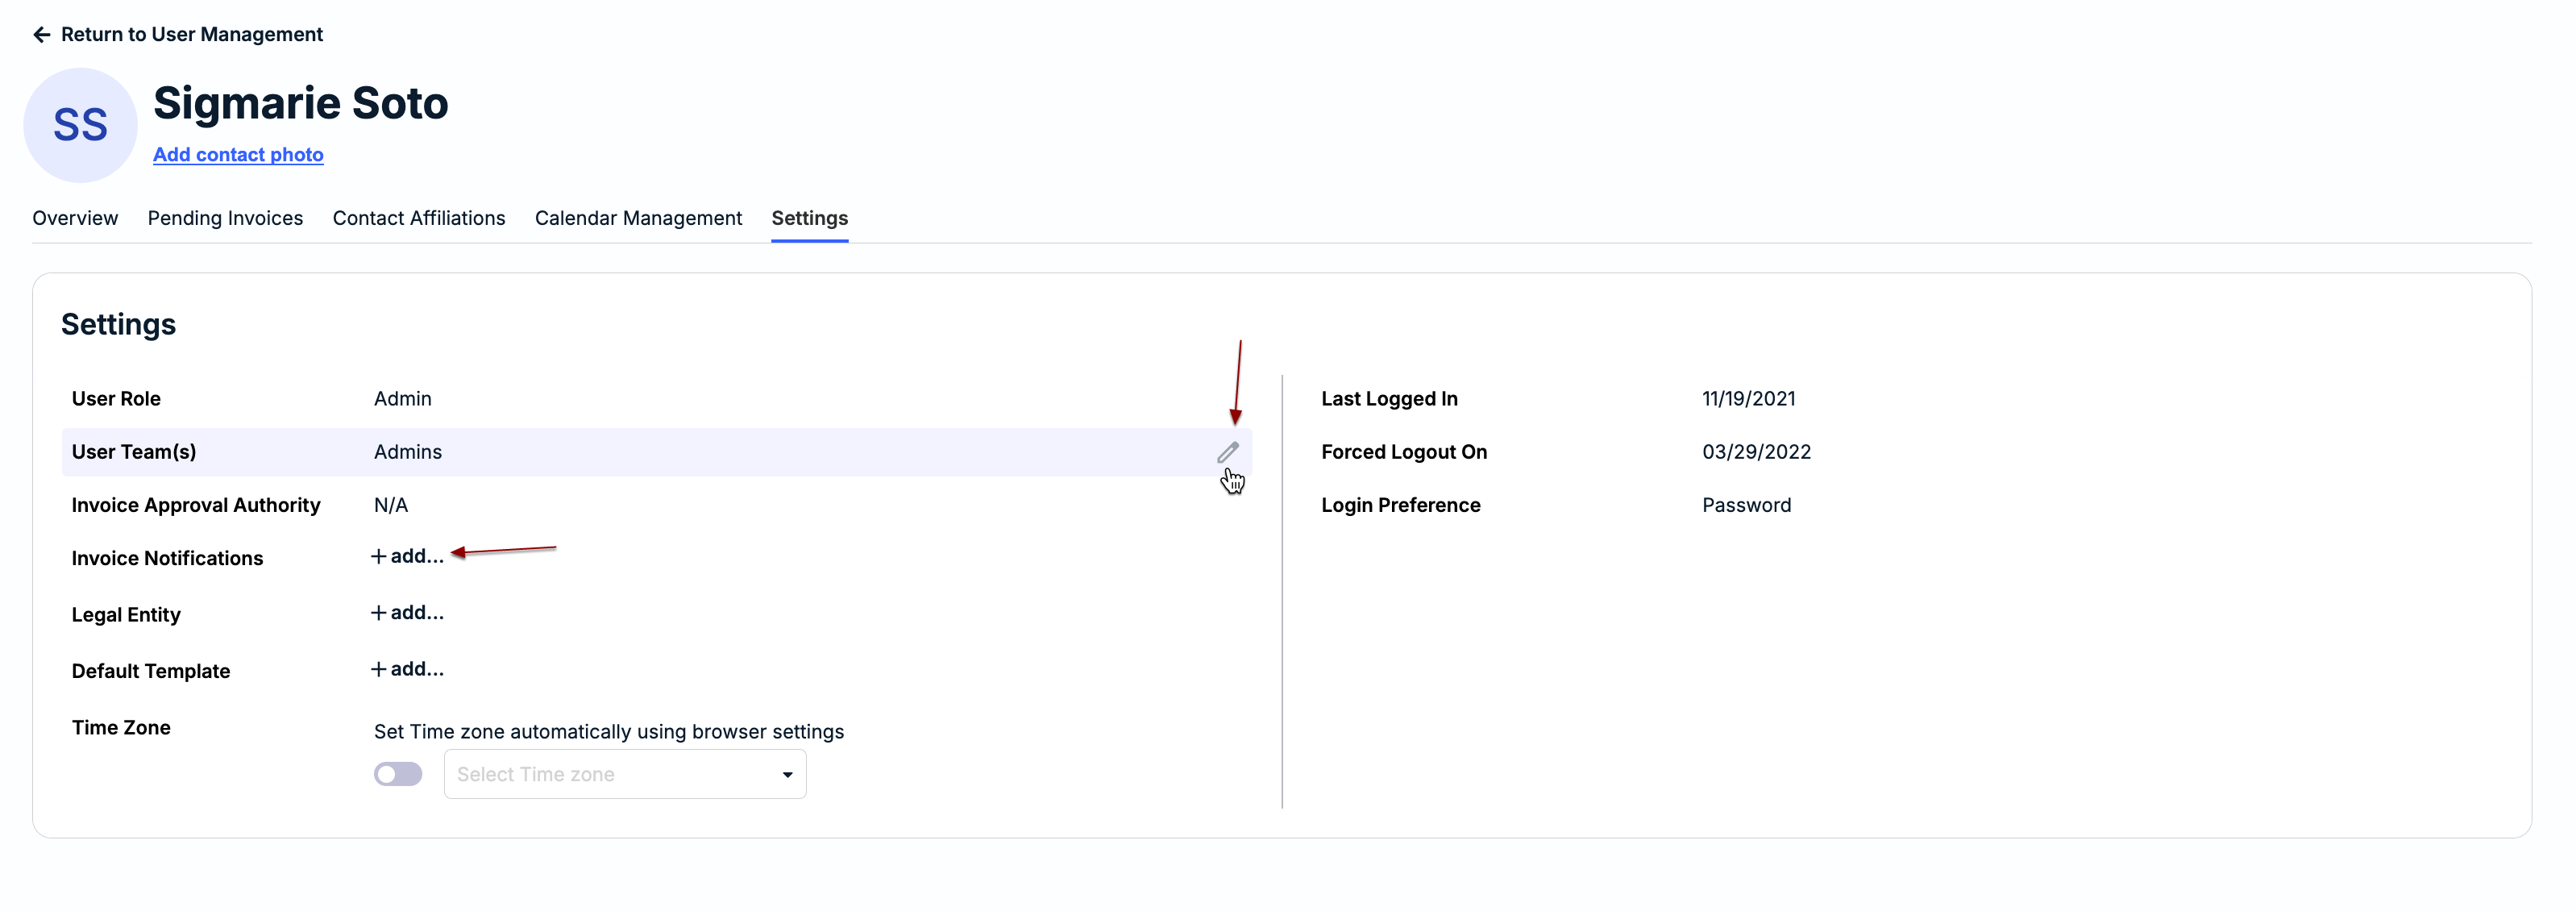
Settings
Under Settings, you'll be able to tweak some of the important contact settings. Click on the Edit (pencil) or +add buttons to edit or add:
- Single Sign On
- User Role
- User Team(s)
- Invoice Approval Authority
- Invoice Notifications
- Legal Entity
- Email Preference
- Default Template
- Time Zone (select from the drop-down menu or toggle to set automatically)
You can also see the Last Logged In, Forced Logout On, and Login Preference information.
Navigating Unity ELM
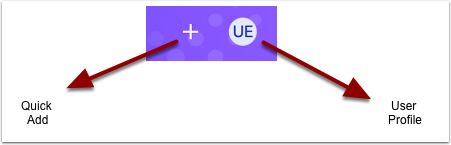
Top Navigation Bar
The Top Navigation Bar is a constant, easily accessible navigation bar at the top of Unity, allowing users to quickly access key sections and features.
Within the Top Navigation Bar, you can:
- Launch the Quick Add menu
- Open the User Profile Menu
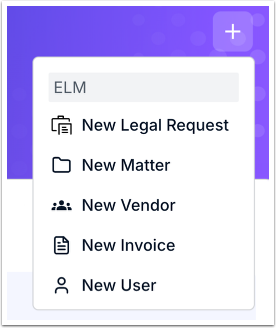
Quick Add Menu
Click on the Quick Add menu to open a drop-down menu that enables you to quickly:
- Create a New Legal Request
- Create a New Matter
- Create a New Vendor
- Create a New Invoice
- Create a New User
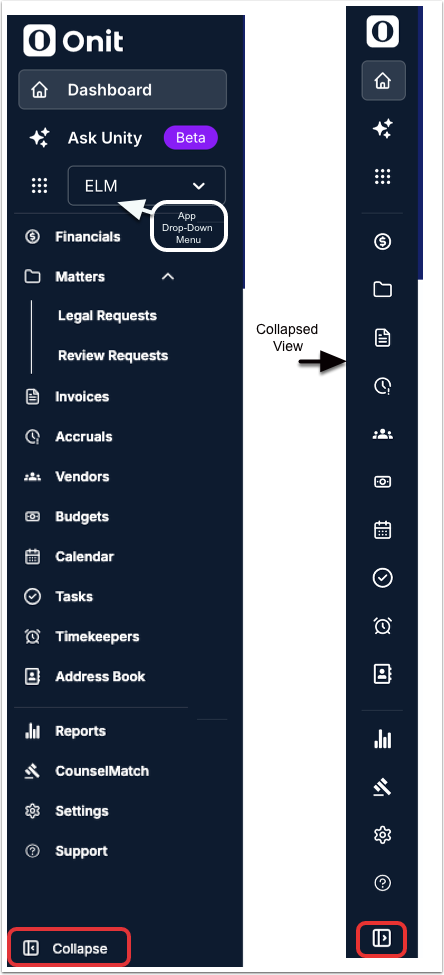
Left Side Navigation
The Left Side Navigation pane provides a quick way to access the essential parts of the platform.
Within the pane, you can:
- Go to the main Dashboard page. This displays high-level information needing your attention, such as pending invoices, timekeeper requests, and upcoming tasks or events.
- Access Ask Unity. Ask Unity is an AI-powered data exploration tool designed to revolutionize how legal operations teams interact with their legal data.
- Select which App you’d like to use, if applicable.
- Access the Financials page. This dashboard is a summary of legal spend for all matters and vendors, including Key Performance Indicators (KPIs) and Top 10 lists for core areas.
- Access the Matters page. This page contains a list of all open, draft, and closed matters, and the place to review and submit Legal Requests (if applicable). Users with relevant permissions can also create matters.
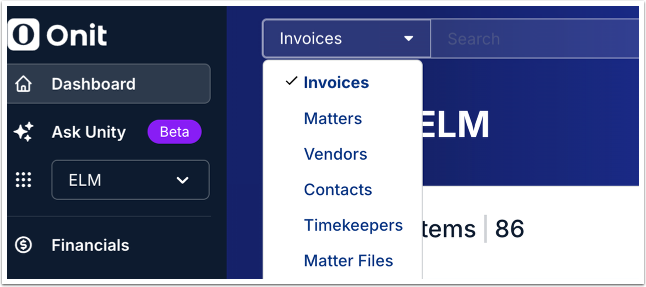
- Access the Invoices page. This page contains a list of all received and pending invoices, invoices on hold, not approvable invoices, and approved invoices awaiting payment. By default, you will see a list of invoices pending your review/action, if any.
- Access the Accruals page. Here, users can manage accrual requests and submissions from vendors.
- Access the Vendors page. This page contains a list of all active and inactive vendor firms that have been added to Unity ELM. Users with permissions can apply bulk edits, open and manage vendor records, and add new vendors.
- Access the Budgets page. Here, users can set, manage, and track internal budgets and external budgets (if applicable).
- Access the Calendar.This shows a consolidated view by month or week of upcoming tasks and events.
- Access the Tasks page. This shows a consolidated view of active tasks assigned across matters.
- Access the Timekeepers page. Here, users can approve or reject timekeeper rates, review timekeeper rate updates and profiles, and find and view approved timekeepers.
- Access the Address Book.The Address Book contains a directory of all essential contacts for your organization.
- Open the Reports function. Here, users can access various reports that provide further insights and metrics on spend, matter activity, vendor performance, and more. Users with relevant permissions can also build their own reports.
- Access CounselMatch
- Open the Settings screen. Here, users can manage various settings and configurations, including creating custom attributes to standardize data for your organizational needs
- Access the Support Center (Note that this will just lead back to the ScreenSteps page)
If you'd like to minimize the pane, click on Collapse for a condensed version. Click on the Expand button to restore to original size.
The Dashboard
Use the Dashboard to get a quick look at essential action items and other information within Unity eBilling.
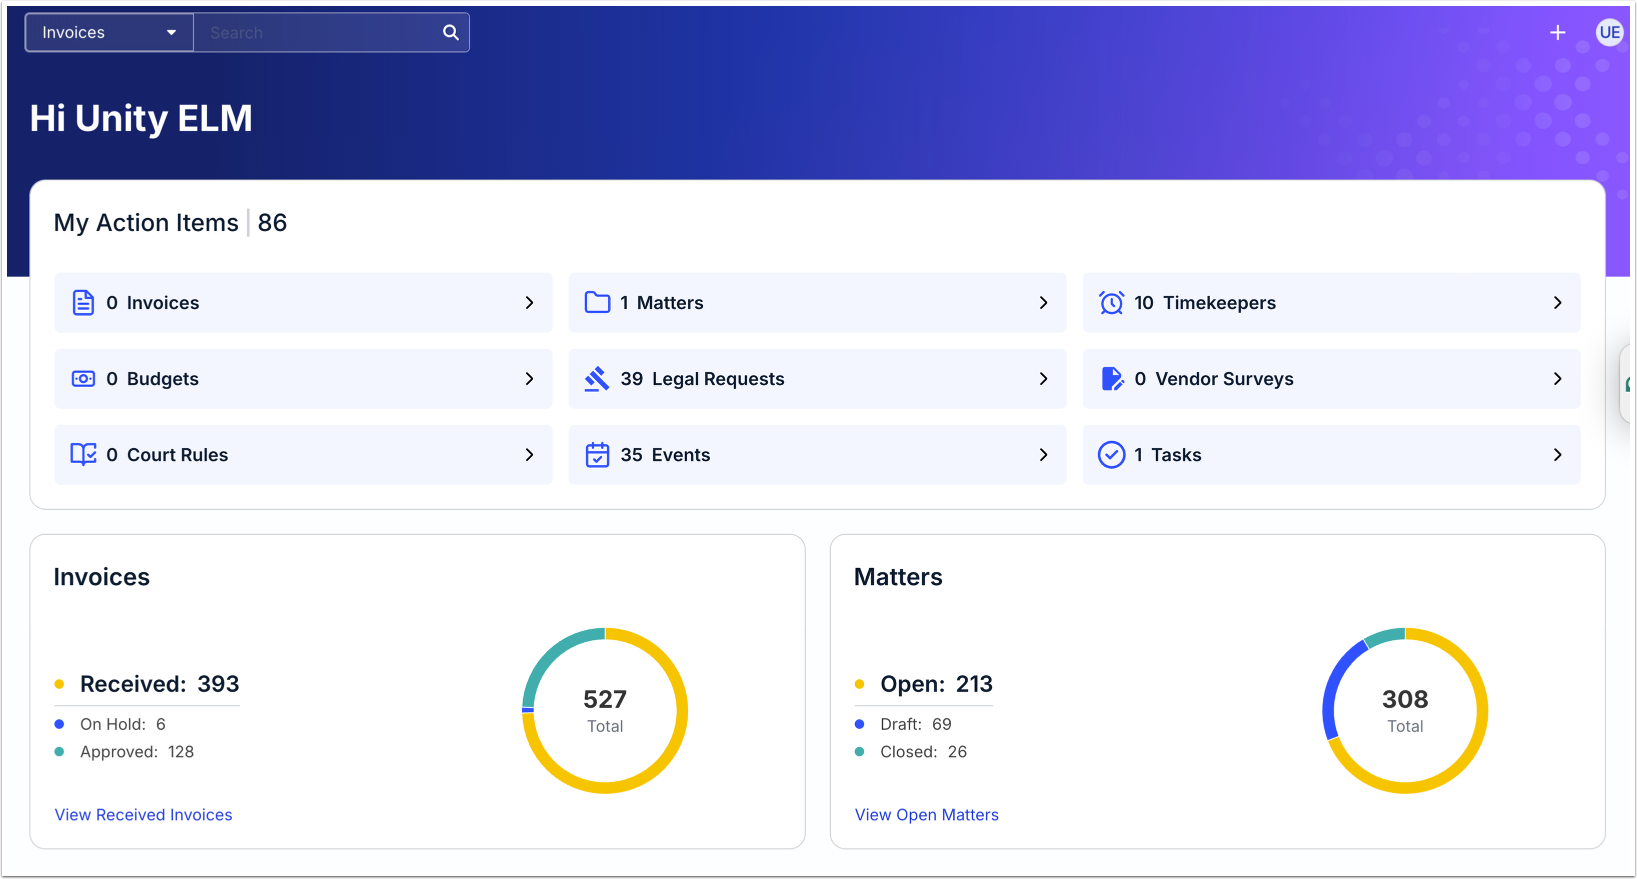
Click on the drop-down Search bar to search through a specific collection of documents.
The actual dashboard is comprised of two different areas: the My Items panel and the associated widgets.
My Action Items Panel
The My Action Items Panel displays an array of different cards linking to:
Next to each one of these action items, you'll see a number of how many action items you have in each category.
Each of these cards links to a corresponding page, allowing users to view more information.

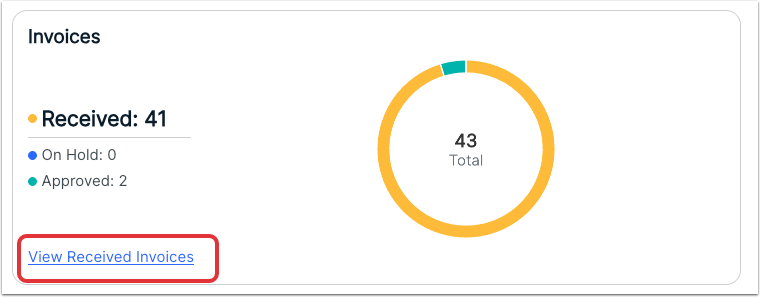
Invoices Widget
The Invoices Widget gives you a quick look at vital invoice statistics, including:
- Invoices Pending
- Invoices On Hold
- Invoices Approved
The widget also includes a chart with a sum total of all invoices, broken down by pending/on hold/approved. Hover over the colored sections to see more details.
Click on the View Received Invoices link to go directly to that section of the invoice list page.
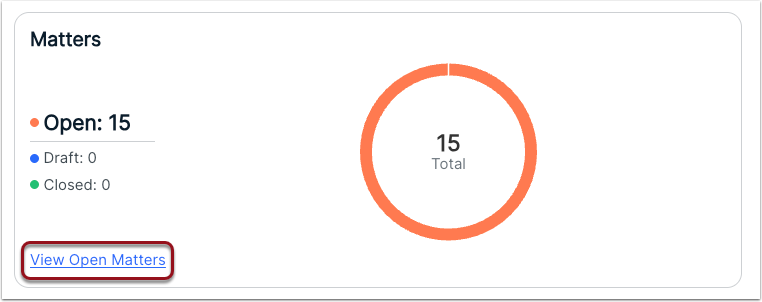
Matters Widget
The Matters Widget gives you a quick look vital matters statistics, including:
- Open matters
- Draft matters
- Closed matters
The widget also includes a chart with a sum total of all invoices, broken down by open/draft/closed. Hover over the colored sections to see more details.
Click on the View Open Matters link to go directly to that section of the matters page.
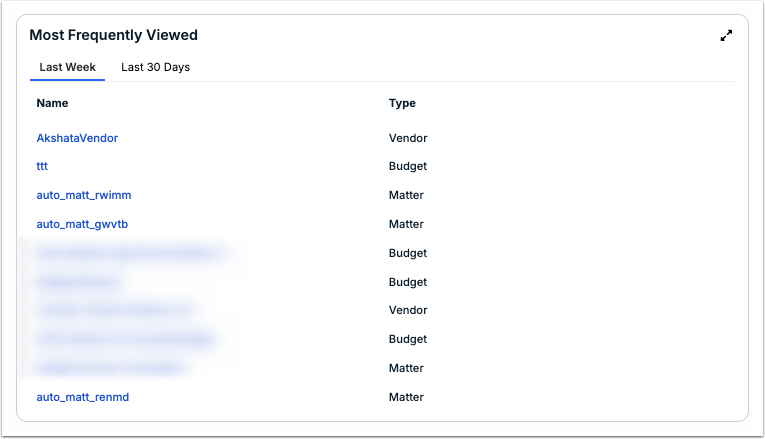
Most Frequently Viewed Widget
The Most Frequently Viewed widget allows you to quickly see your most visited pages over the Last Week and Last 30 Days. Click the link on the left-hand side to go directly to the vendor, budget, matter, etc.
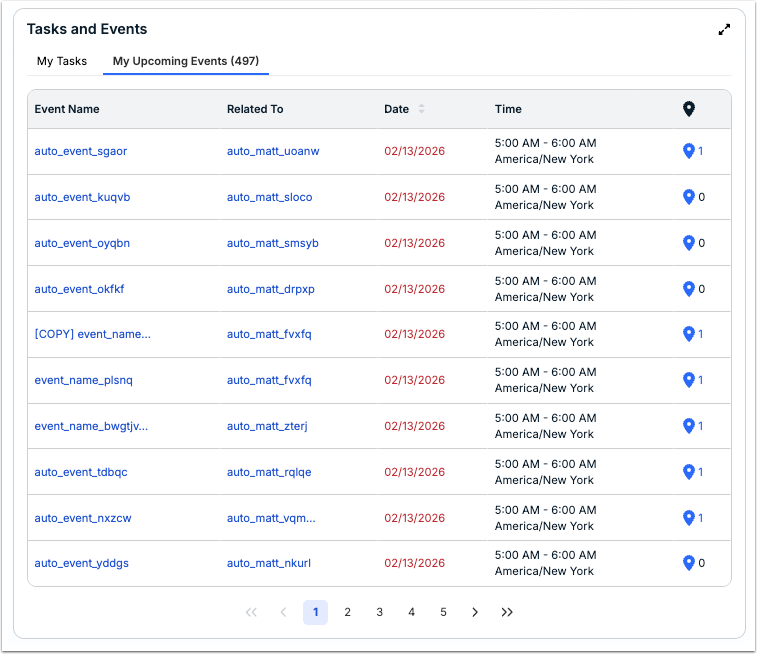
Tasks and Events Widget
The Tasks and Events widgets allows you to quickly access your Tasks and Upcoming Events. Click the links within the widget to go directly to the event or task.
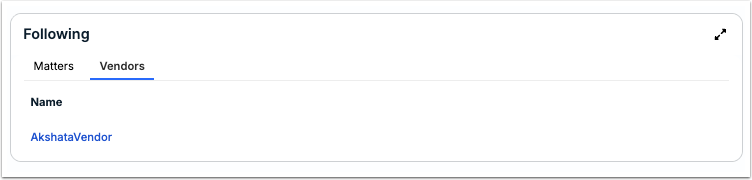
Following Widget
The Following widget will allow you to quickly access the Matters and Vendors you are following. Click the links within the widget to go directly to the matter or vendor.
Creating a New Matter
Adding a Matter
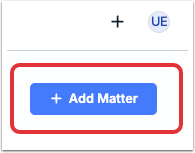
There are two ways to add a new matter to the system. The first is to go through the Quick Add (plus sign) menu on the top of the screen and click on New Matter.

The other option is to click on the Add Matter button on the Matters page.
From either option, the Add to Matters screen will appear. Select the Matters Template from the drop-down menu. You can click on the Show Descriptions box to display a description of the template. You can also use the Search bar to search for a specific template.
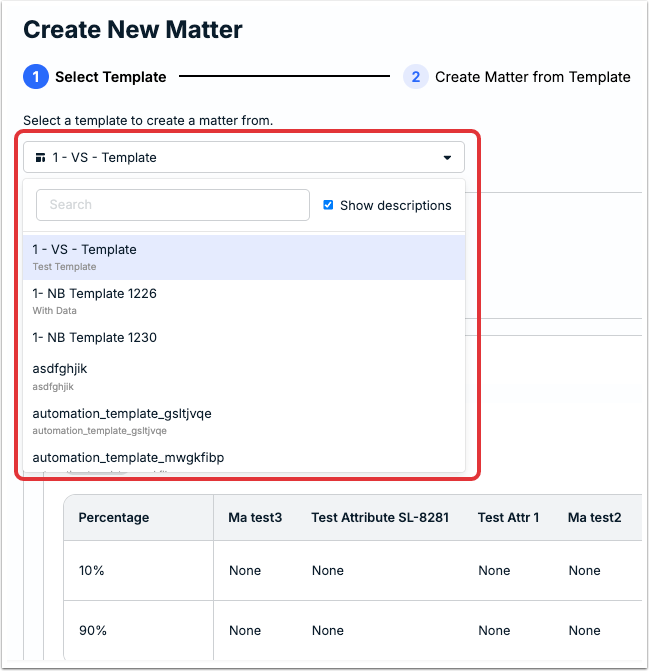
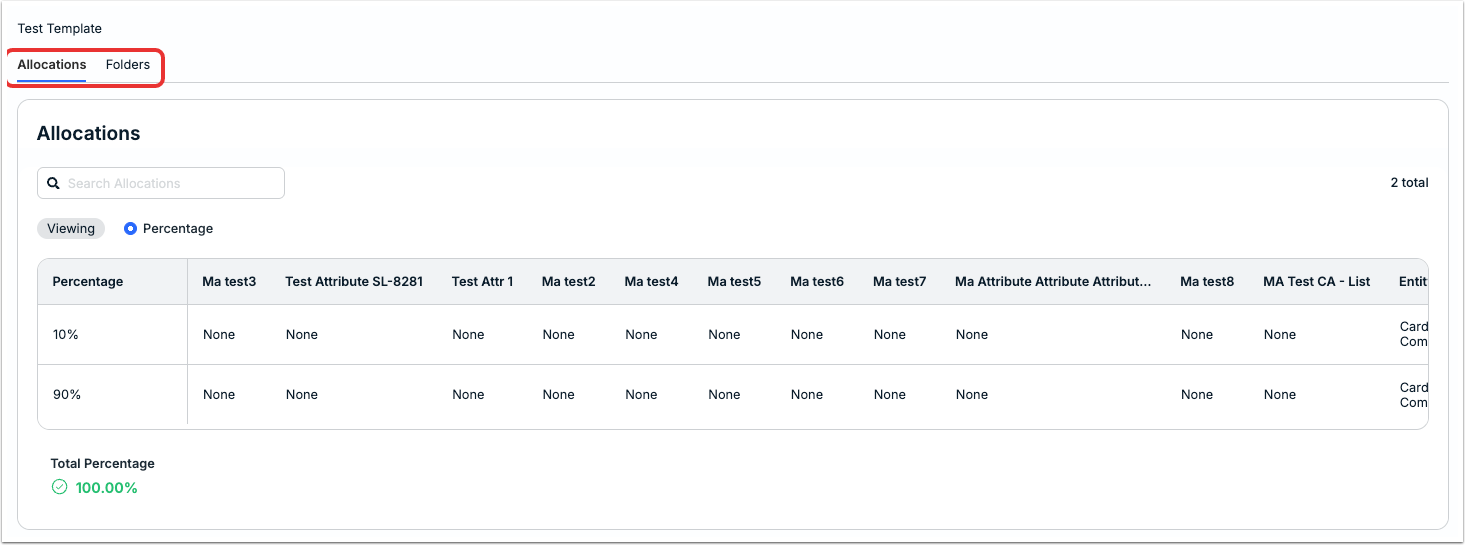
The main Create New Matter template screen will show Allocations and Folders in the tabs.
Click Next to move on the next step, the Create Matter from Template screen.
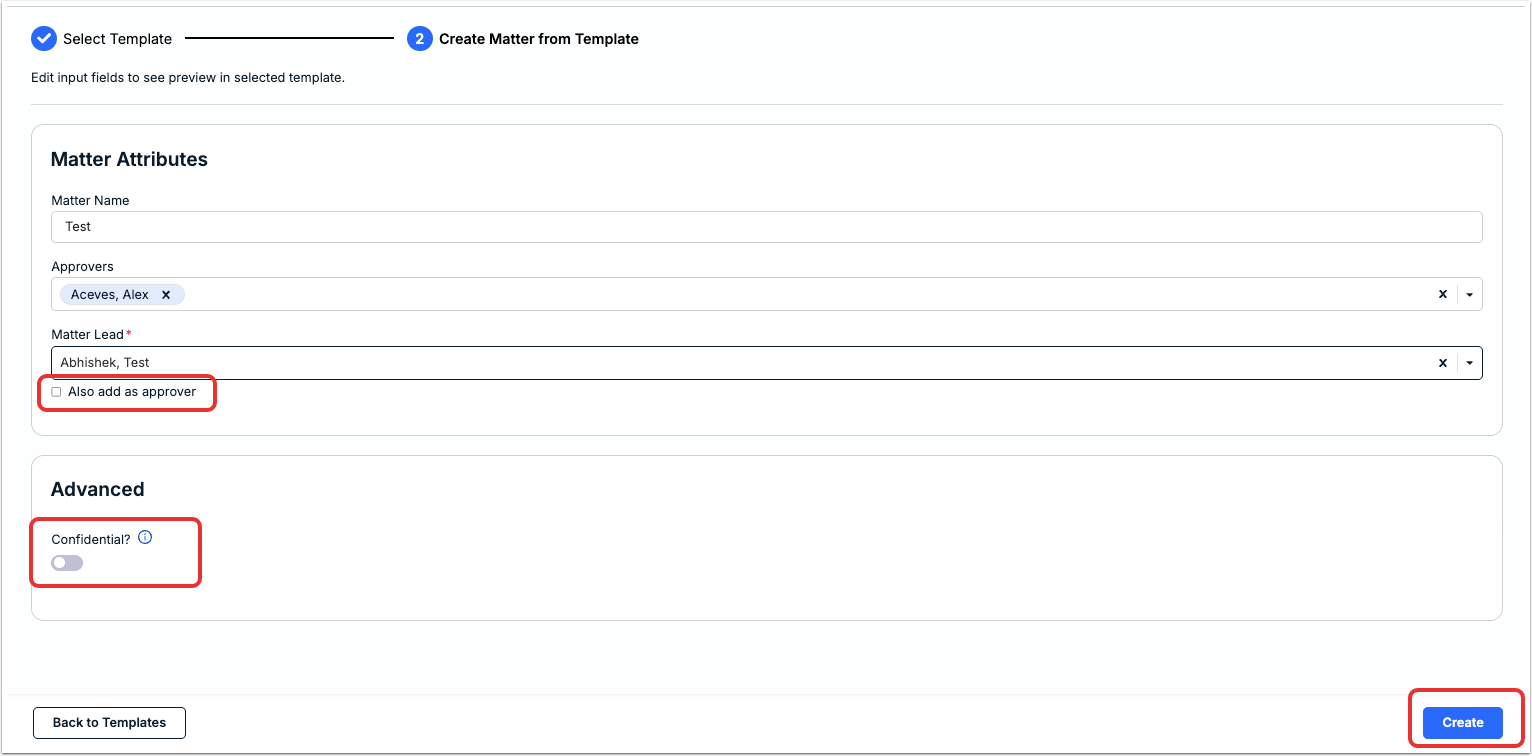
Fill out the different fields as necessary (these will change depending on the template).
Note that this is where you'll fill out the Approvers and Reviewers, along with the Matter Lead.
NOTE: A Matter Lead is required to publish a new matter. You can select the user in this step or assign them after the matter is created. Once a Matter Lead is assigned to a matter, they will receive an email notification with general information about the matter.
NOTE: If you entered a duplicate matter name, you will be prompted to confirm you want to use the same name as the existing matter. Click Yes to continue or No to edit the name.
Under the Advanced screen, you can mark the matter as Confidential. Confidential is defined as matters only visible to you and others explicitly added. For more information, go to the Creating a Confidential Matter section.
Click Create to create the matter. You'll see the matter appear on the main matter page.
IMPORTANT: If the Create button is disabled, this means that you still need to complete minimum required fields. Review the red banner at the top of the record to see what is missing.
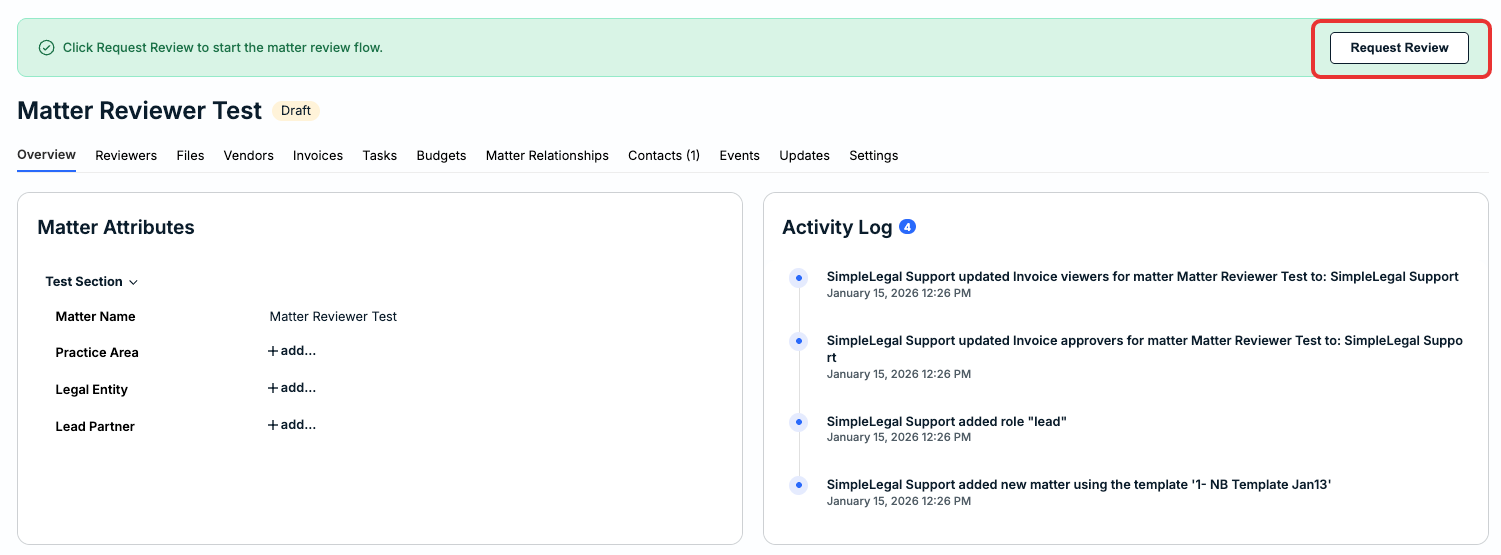
After you create the matter, you'll be taken to the Matter Overview page. Here, you can Request Review (if applicable) to start the Review process. The matter is saved in draft statusand an email notification is sent to the admin(s) designated as matter reviewers/approvers.
You will be notified via email if the reviewer requests any changes to the matter before moving forward with approving/publishing.
Head to the Matter Review Processsection to learn more.
Creating a Confidential Matter
Unity's Confidential Matters functionality enables your legal department to restrict access for your most sensitive matters. This means that users can only access a confidential matter and its associated invoices if they are explicitly granted permissions.
In this case, regardless of role, admins, power users, and other users would not see the matter in Unity or in reports unless the matter creator manually adds them under Settings > Permissions in the matter record.
Prerequisites & Other Considerations for Confidential Matters
- Advanced Permissions must be enabled to use Confidential Matters in Unity; access and visibility is controlled at the matter level and is not driven by system-level user roles.
- Budgets cannot be associated with confidential matters.
- Adhoc Reporting & Enhanced Reporting data does not include confidential matters regardless of permissions or access (i.e., does not appear to the matter creator).
- Confidential matters cannot be bulk updated using the Bulk Actions feature.
- Sharing matter updates with vendors is not available for confidential matters.
- Confidential matters cannot be cloned or marked as a "related" matter.
- Name given to a confidential matter is still visible to the assigned vendor(s) in Counsel Exchange and in their accrual submission forms.
- Matters must be set as "confidential" during matter creation in SimpleLegal; once created, it cannot be changed to a non-confidential matter or vice versa.
- When a confidential matter is created, only the user who created it has initial access. It is up to the matter creator to grant access to other users from the matter record.
- SimpleLegal Support does not see confidential matters unless the support agent is manually granted access to the matter.
- Invoice review ladders/levels are automatically adjusted if default invoice reviewers are not explicitly granted access to the confidential matter.
- Before moving forward with confidential matters, please make sure the following is completed:
- The feature is enabled in your environment.
- Advanced Permissions are enabled in your environment.
- There are at least two matter templates set up in your environment.
Assigning Contacts & Invoice Reviewers/Subscribers to a Confidential Matter
Users added as contacts, invoice reviewers, or subscribers to a confidential matter are granted the following permissions:
- Access to the matter record and any submitted invoices.
- Retrieval of the confidential matter in results using Unity's global search.
- Ability to see the confidential matter and its invoices in the assigned vendor's page.
- Ability to see the confidential matter on the vendor's accruals page.
- Ability to see the confidential matter on the associated matter group page (if applicable).
To add contacts to a confidential matter, go to the Contacts section. To add an invoice reviewer and/or subscriber to a confidential matter, go to the Reviewers section.
Invoices for Confidential Matters
Invoice line items for a confidential matter cannot be associated with a different matter. This is why we recommend single matter invoicing when the Confidential Matters feature is being used.
Once a vendor submits an invoice toward a confidential matter, the invoice subject and line item descriptions are redacted from Counsel Exchange.
Managing Permissions for a Confidential Matter
You can manage permissions for specific groups of users or individual users on a confidential matter by going to Settings > Permissions.
Approving and Rejecting an Invoice
Approving an Invoice
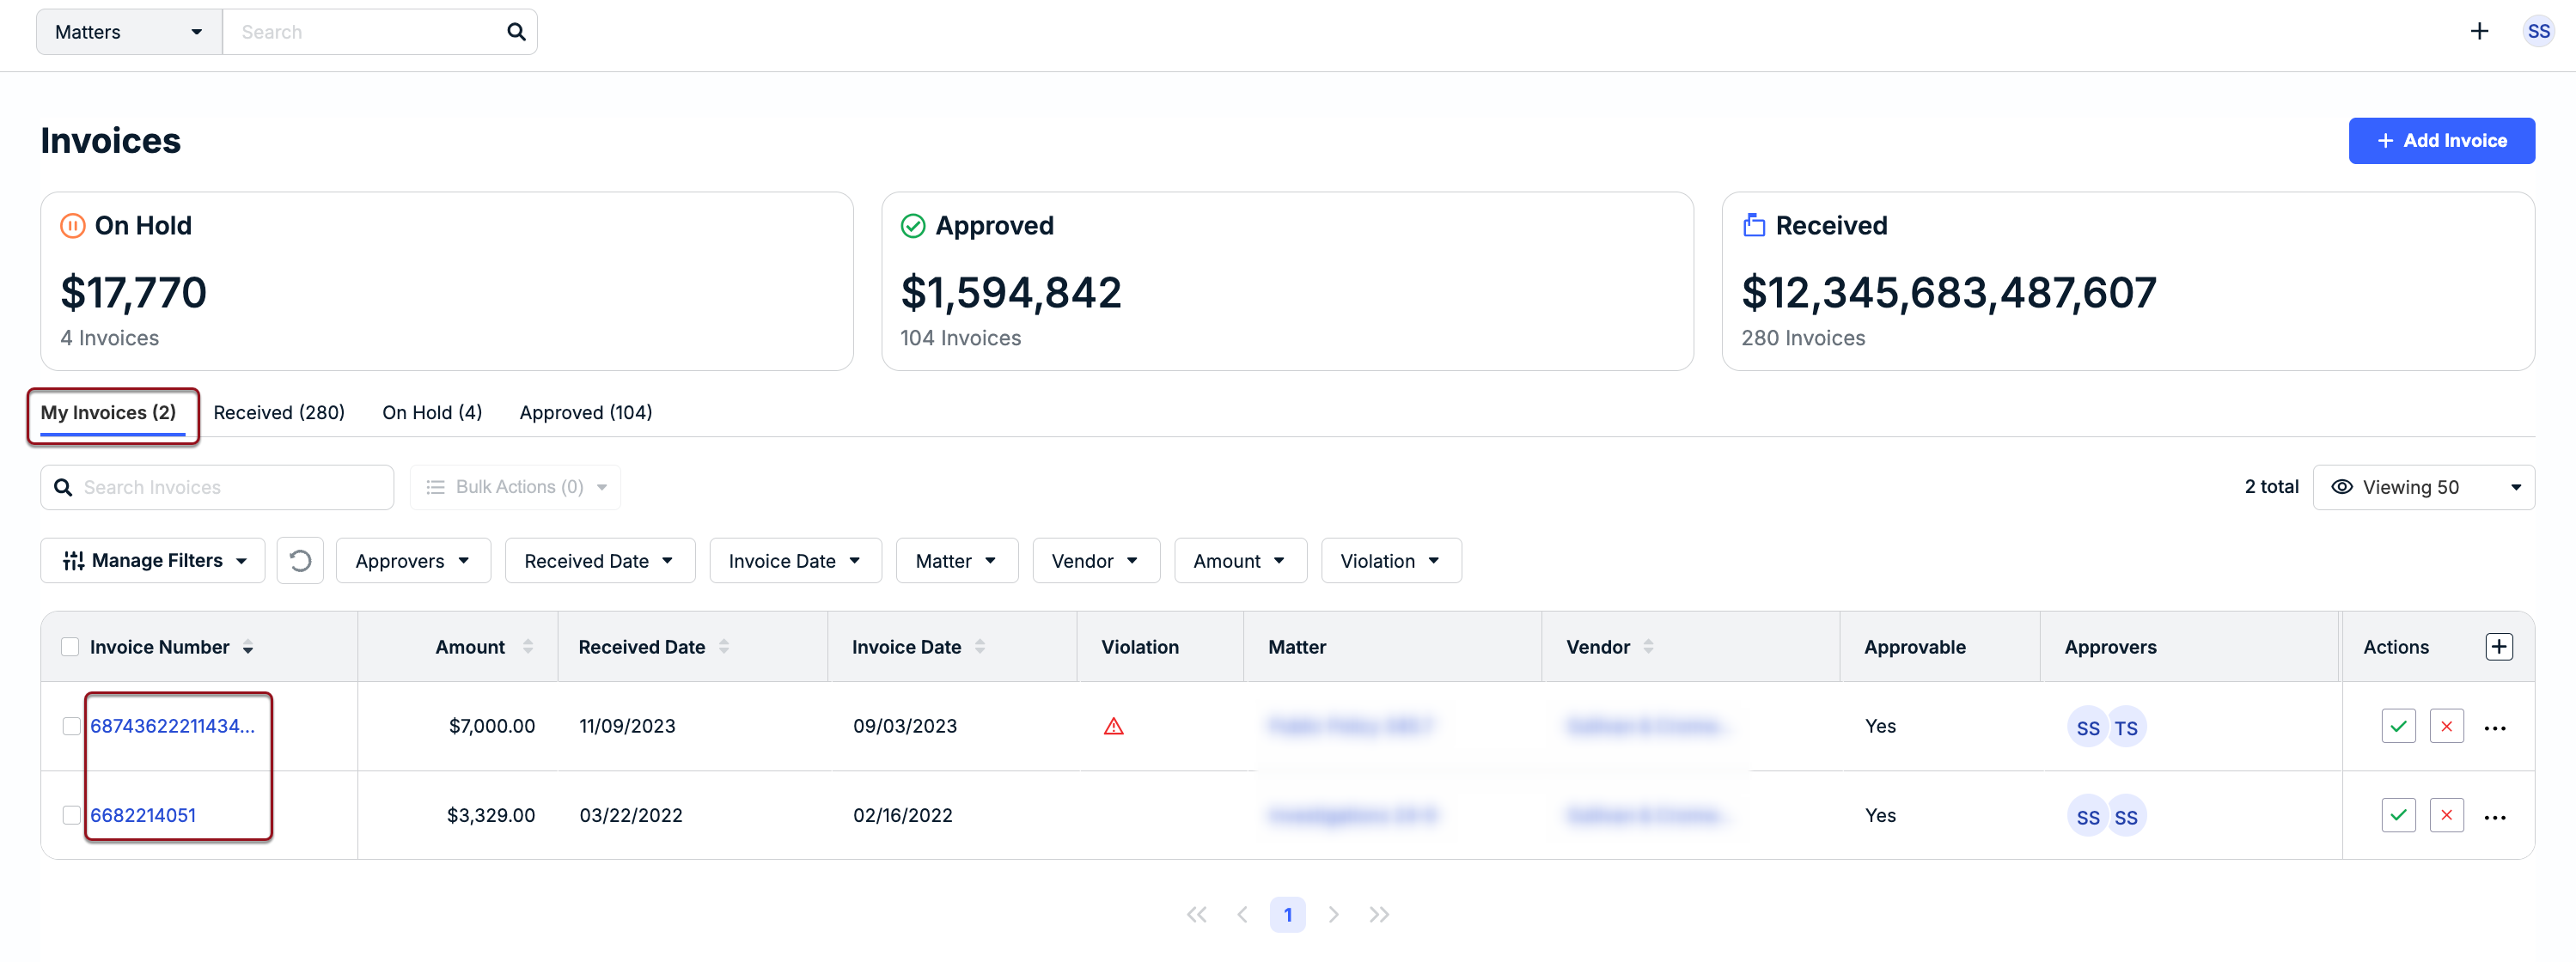
The option to approve an invoice only appears if you are assigned as a reviewer and it is your turn to review. To quickly check for invoices that are pending your review, click on Invoices from the My Items section of your dashboard.

To view the details of an invoice, click on the hyperlinked invoice number from the My Invoices tab.

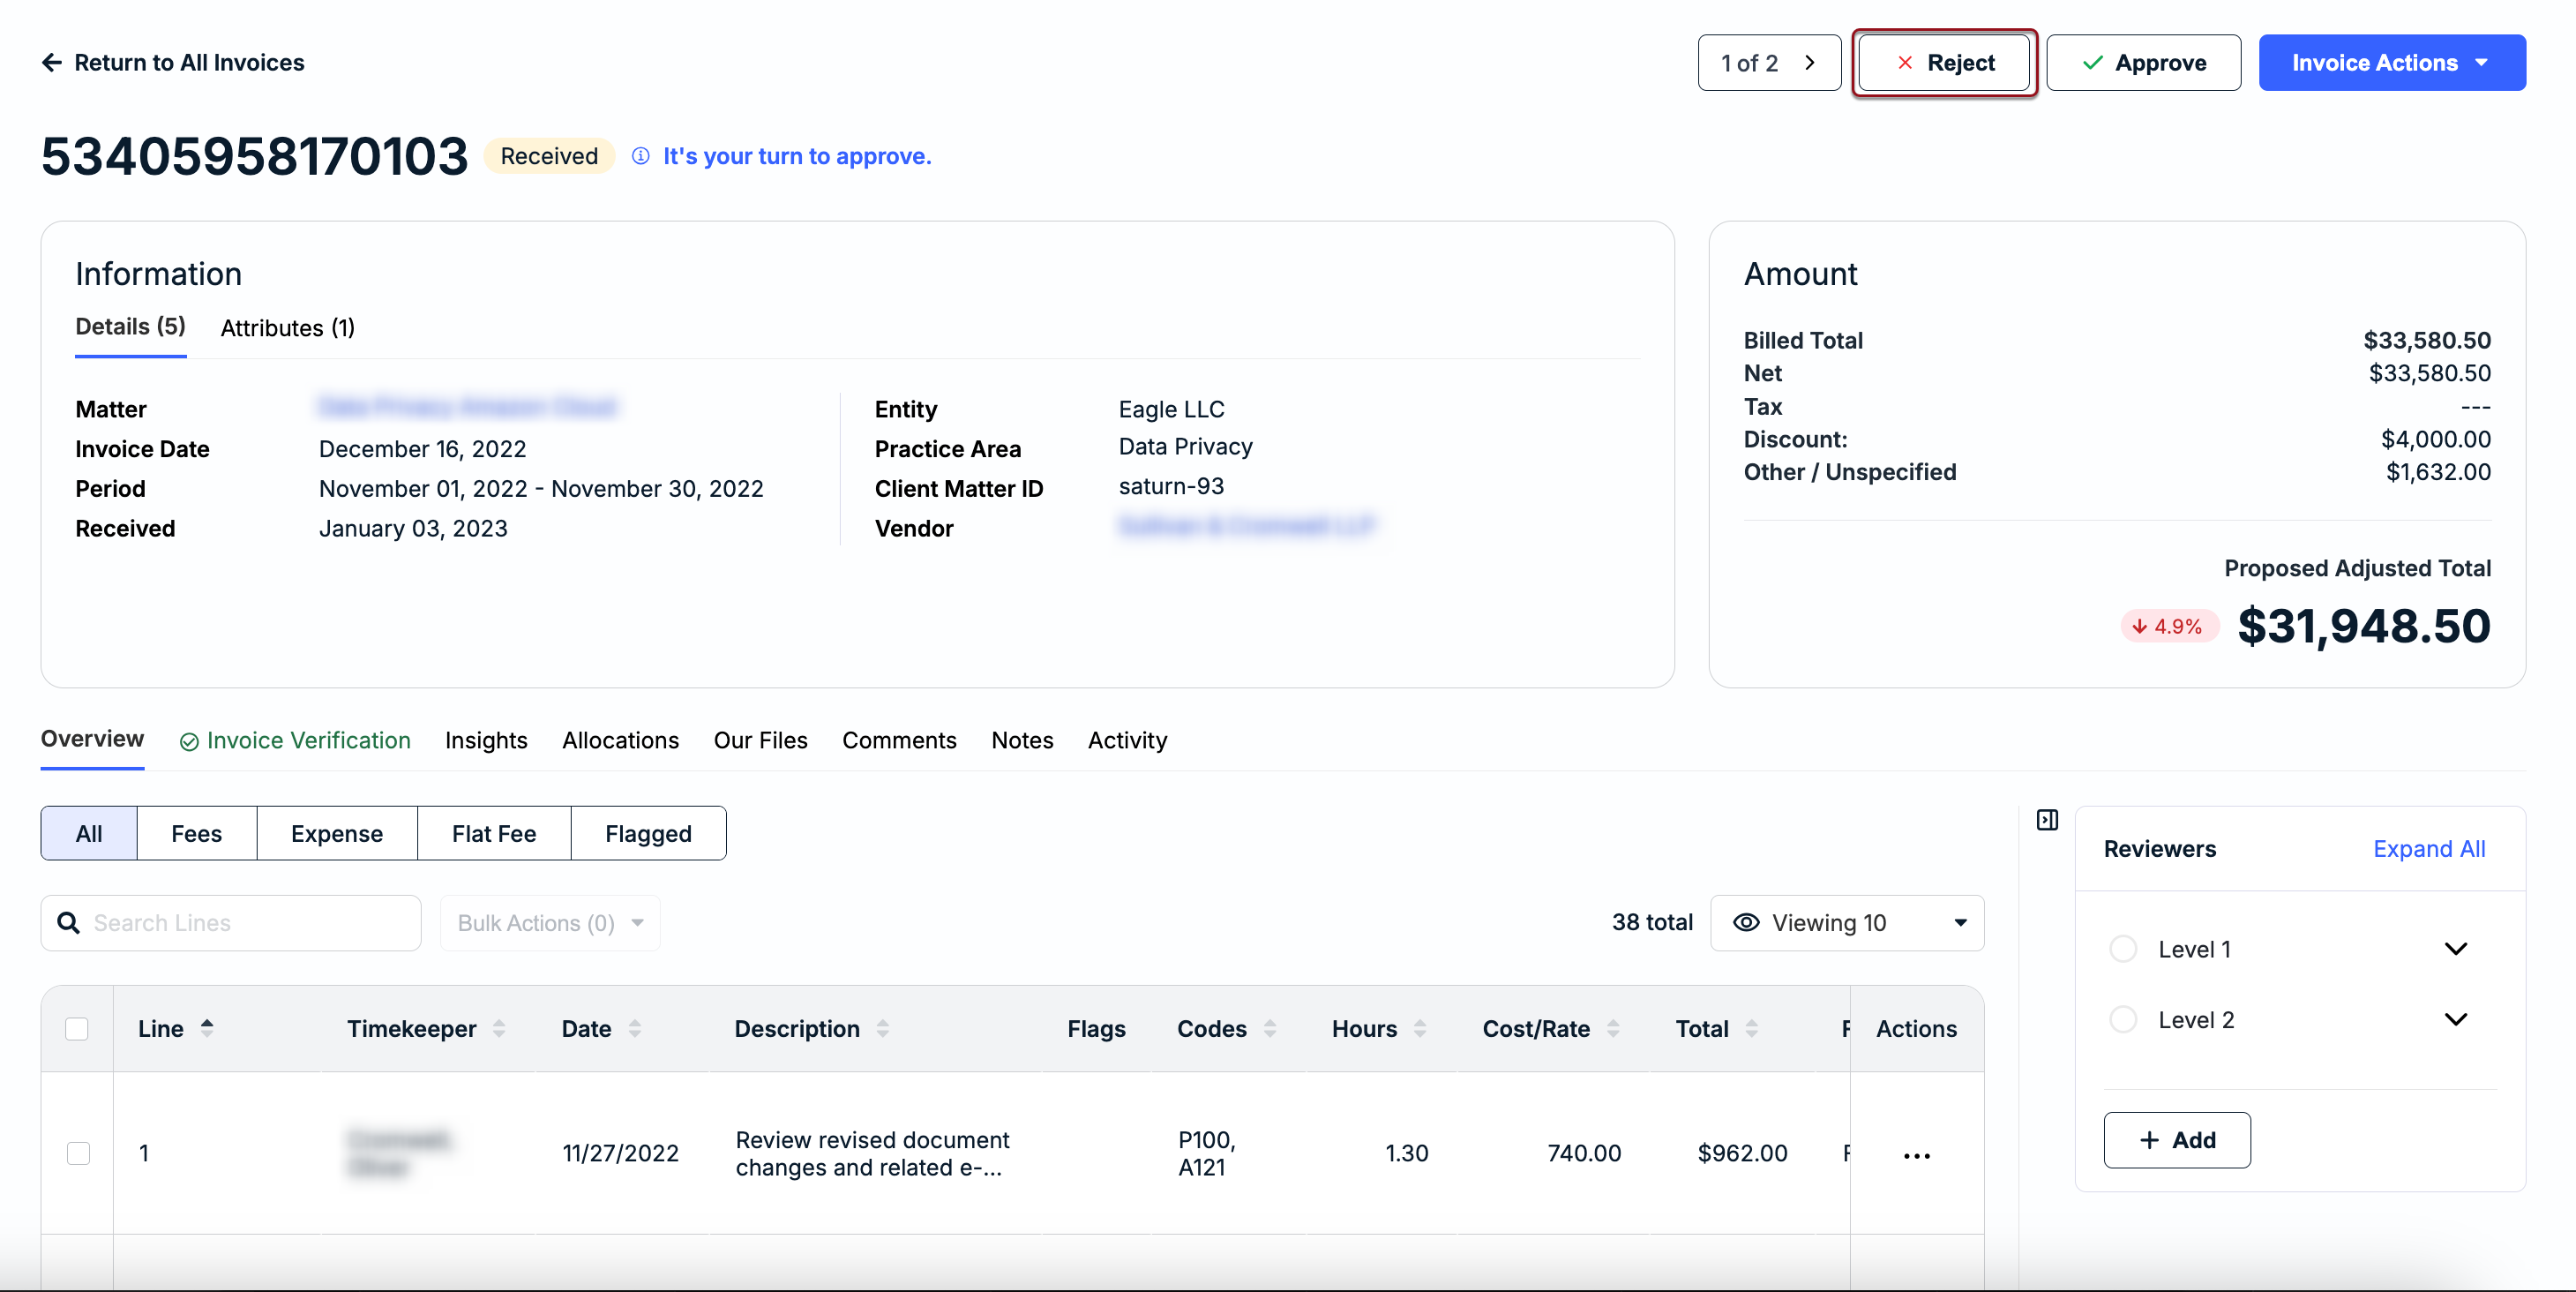
Review the invoice and verify it is ready for approval, including checking the Invoice Verification tab or other sections and making any required adjustments to line items or the total. Click the Approve button in the top-right corner of the invoice details page when ready.
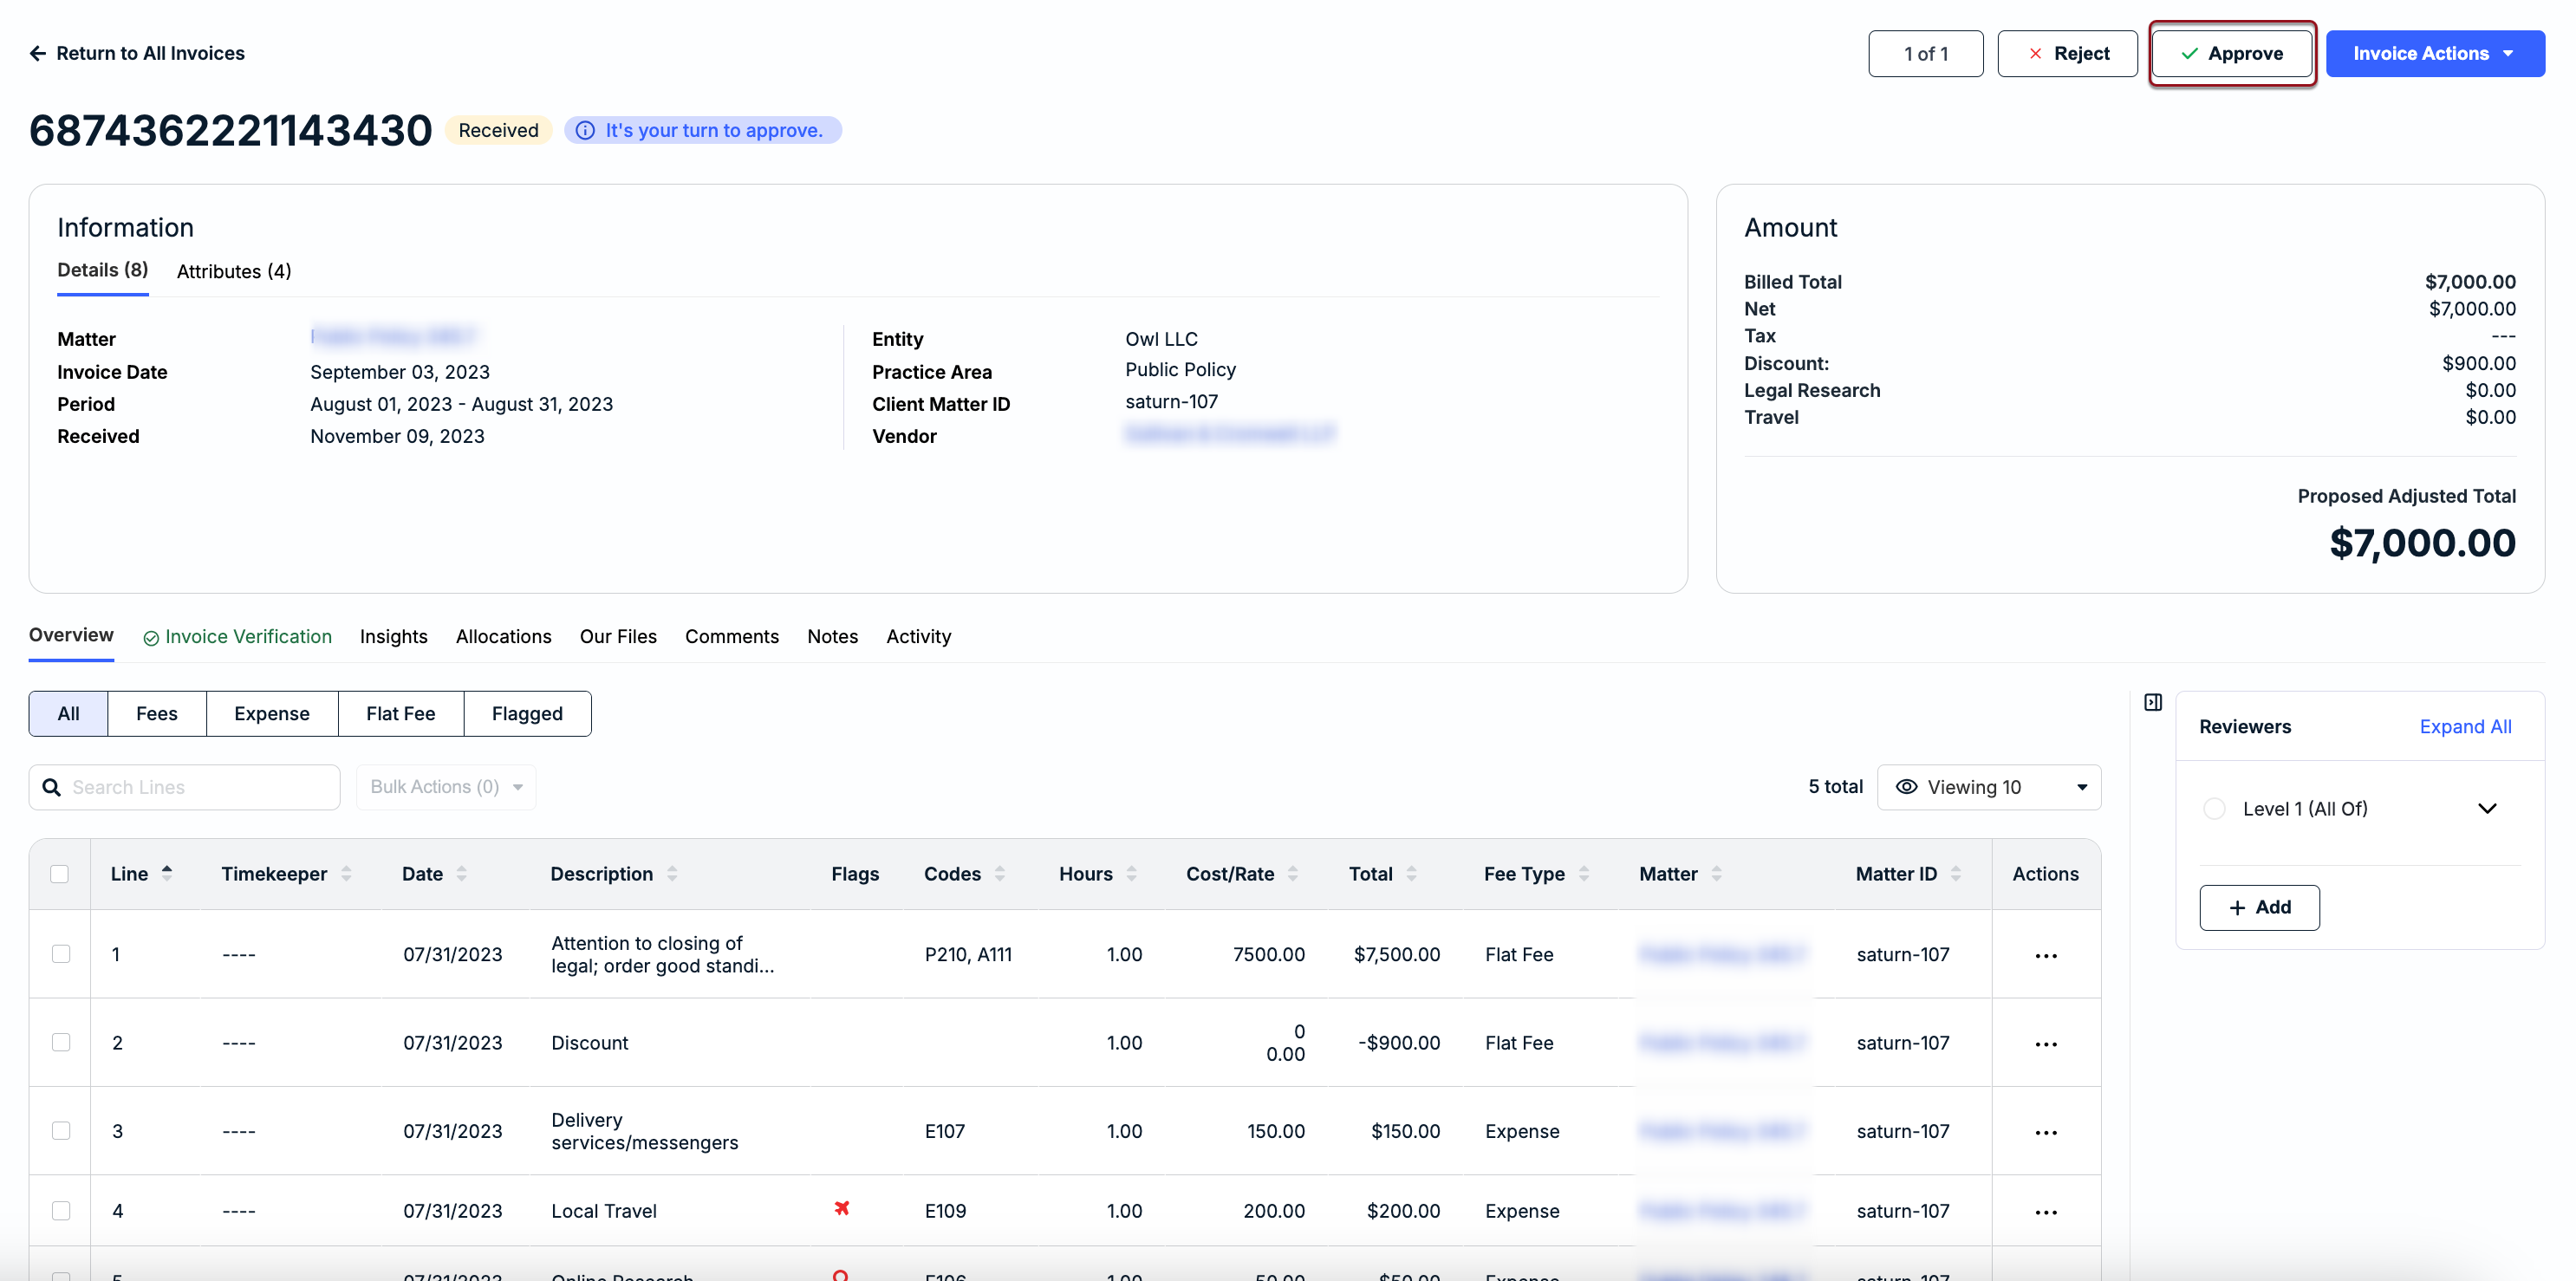
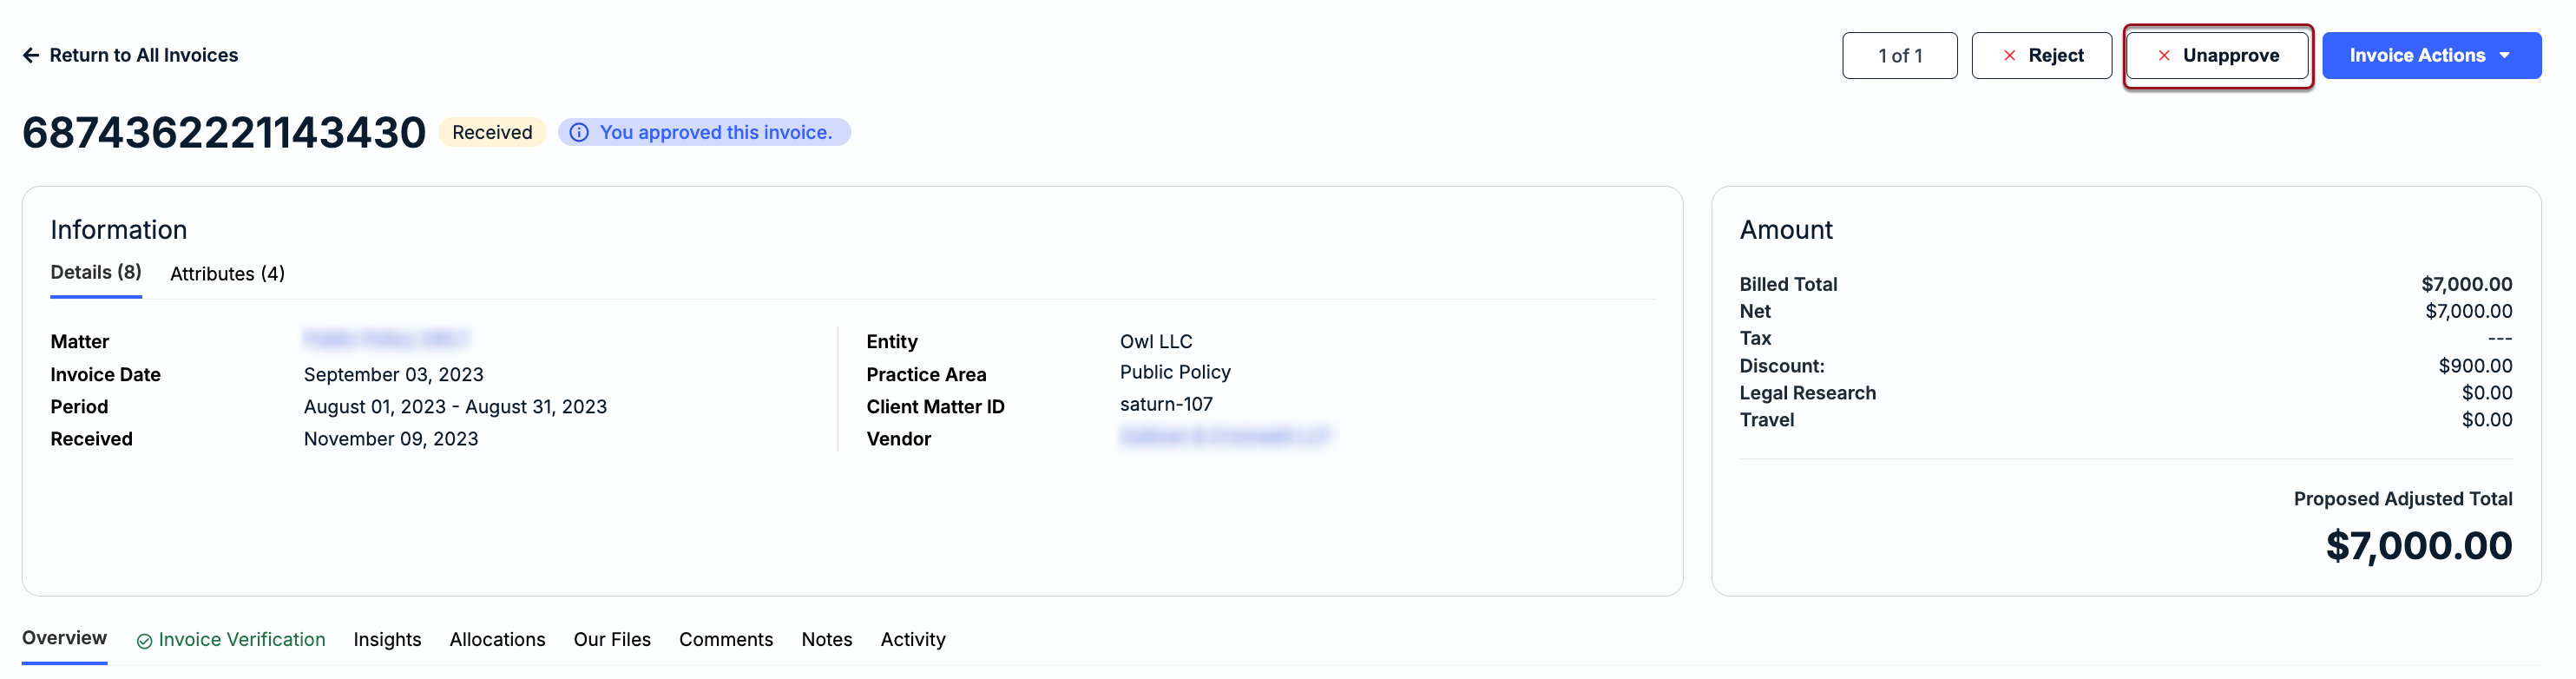
Approving an invoice will move the invoice to the next assigned reviewer's queue or end the review cycle if no other reviewers are assigned. If you need to revert the status of the invoice to Received for additional adjustments or further review, click the Unapprove button in the top-right corner of the invoice details page. Reverting the status to received will push the invoice back into the review queue for approval.
Rejecting an Invoice
The option to reject an invoice only appears if you are assigned as a reviewer and it is your turn to review. To quickly check for invoices that are pending your review, click on Invoices from the My Items section of your dashboard.
You can view the details of an invoice by clicking on the hyperlinked Invoice Number from the My Invoices tab. Make sure to view the invoice details, amounts, line items, and other information before moving forward. For more information on how to navigate the invoice details page, click here.
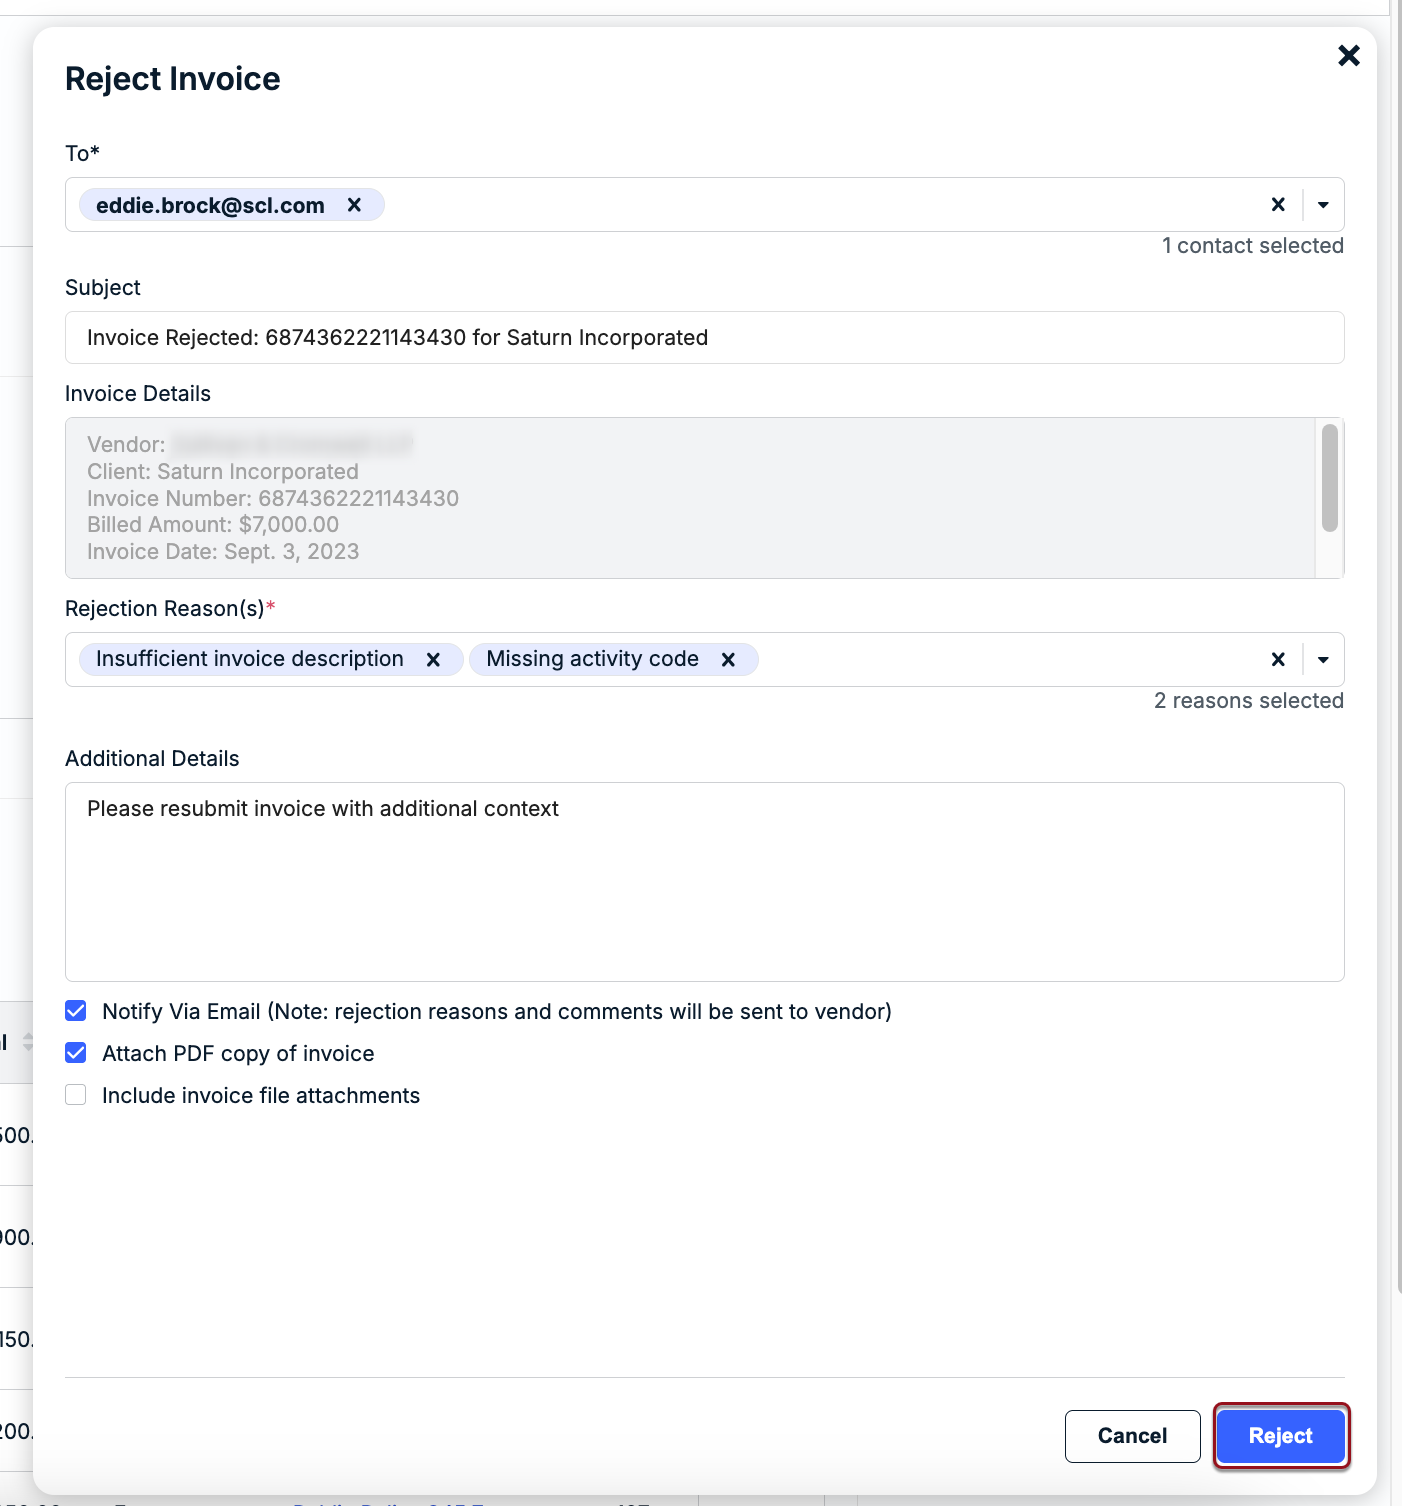
How to Reject an Invoice
Click the Reject button in the top-right corner of the invoice details page.
The modal shown in the image below appears when rejecting an individual invoice so that you can select the recipient(s), select one or more rejection reasons, attach files, and notify the vendor (if applicable). Any required/mandatory fields are marked with asterisks or disabled depending on settings in your environment. See the table below for more details.
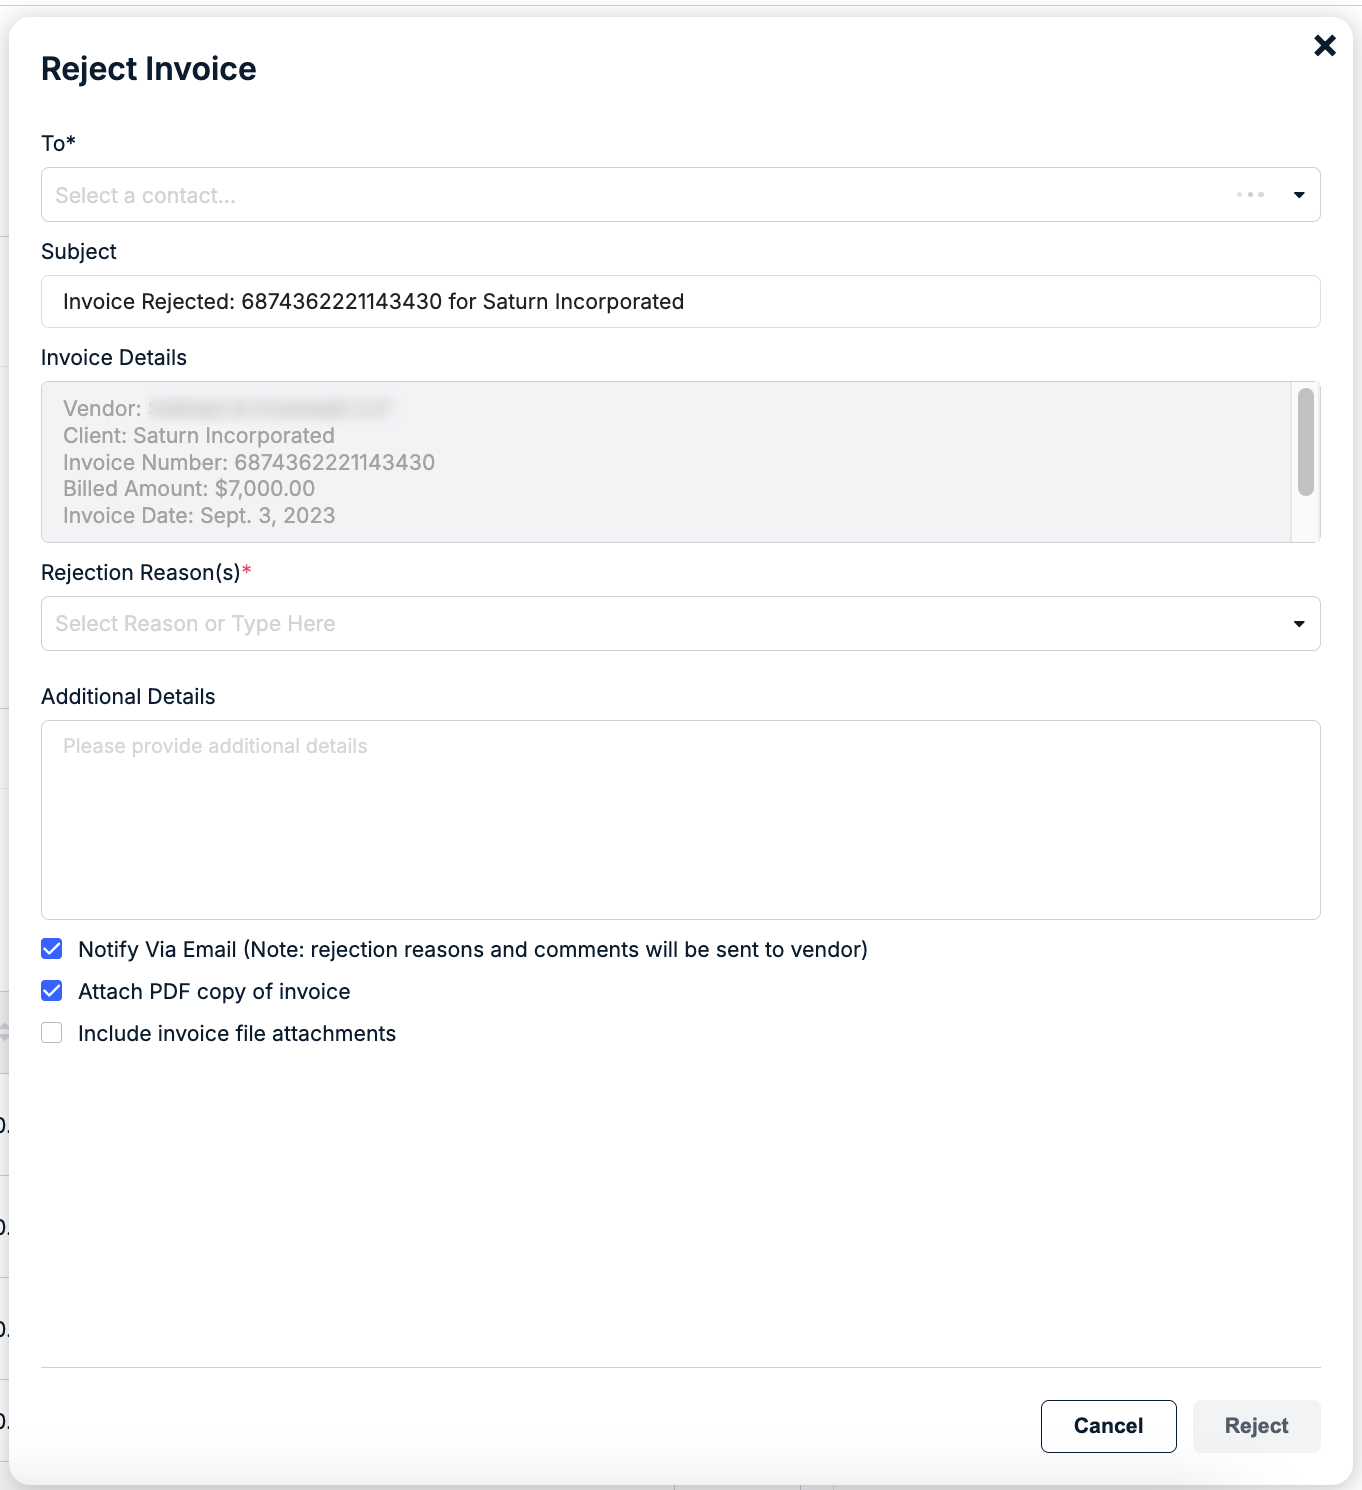
| To | Click within the To field to find/select relevant internal and external contacts, or type in an email address. |
| Subject | Auto-populates the invoice action (e.g., Invoice Rejected), invoice number, and your company's name. Click within the field to change or customize the text if needed. |
| Invoice Details | Auto-populates the following invoice information (and cannot be edited):
|
| Rejection Reason(s) | Find/select a rejection reason from the dropdown by scrolling through the list or typing in a keyword to filter the options. This is a pre-defined list of rejection reasons managed by admins in your environment. You can select one or more reasons to help the vendor quickly understand why the invoice was not approved (e.g., wrong matter, duplicate work, etc.). The selected rejection reason(s) will appear in the vendor email notification (if Notify via Email is selected) and under the invoice details page in Counsel Exchange. NOTE: A red asterisk (*) next to this field means you are required to select at least one option to move forward with invoice rejection. If a rejection reason needs to be edited or added, contact an admin for assistance. |
| Additional Details | You can enter any additional comments for the vendor in this field before submitting the rejection. This appears in the email notification (if selected) and under the invoice details page in Counsel Exchange. IMPORTANT: This section is a standard field but is optional. Please be mindful that the text is external-facing and will be visible to vendors. It is highly recommended to enter additional details in situations where you need to clarify why an invoice is being rejected or action is needed. |
| Notify via Email | The Notify via Email checkbox is selected by default. Leave this as-is to send the vendor an automated email notification with general invoice information and any additional comments once the rejection is submitted. You can de-select this option if you do not want to send the vendor an email notification. If the checkbox is disabled, however, this means that sending the notification is mandatory for all vendors when rejecting invoices in your environment. If notifying the vendor is optional, it is still highly recommended so that they know action is required. De-selecting this option will change the modal to only show the Rejection Reason(s) and Additional Details fields. Any information you enter or select will only appear to the vendor on the invoice page in Counsel Exchange. |
| Attach PDF Copy | This is selected by default to include an Onit PDF version of the invoice in the vendor email notification (if applicable). De-selecting this will exclude the PDF from the email notification. |
| Include Invoice File Attachments | Select this option if you uploaded additional files to the invoice and want to include them in the vendor email notification (if applicable). This is optional and the files do not appear in Counsel Exchange. |
Click Reject in the bottom-right corner when ready.
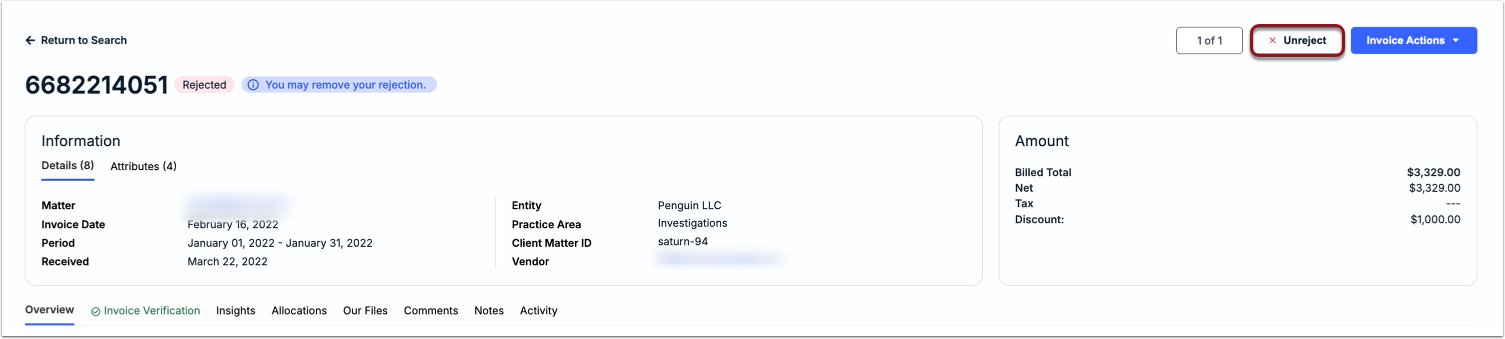
Rejecting an invoice will end the review cycle and it will not appear in the review queue of any other assigned reviewers. If you need to revert the status of the invoice to Received status and resume the review cycle, click Unreject at the top of the invoice details page.
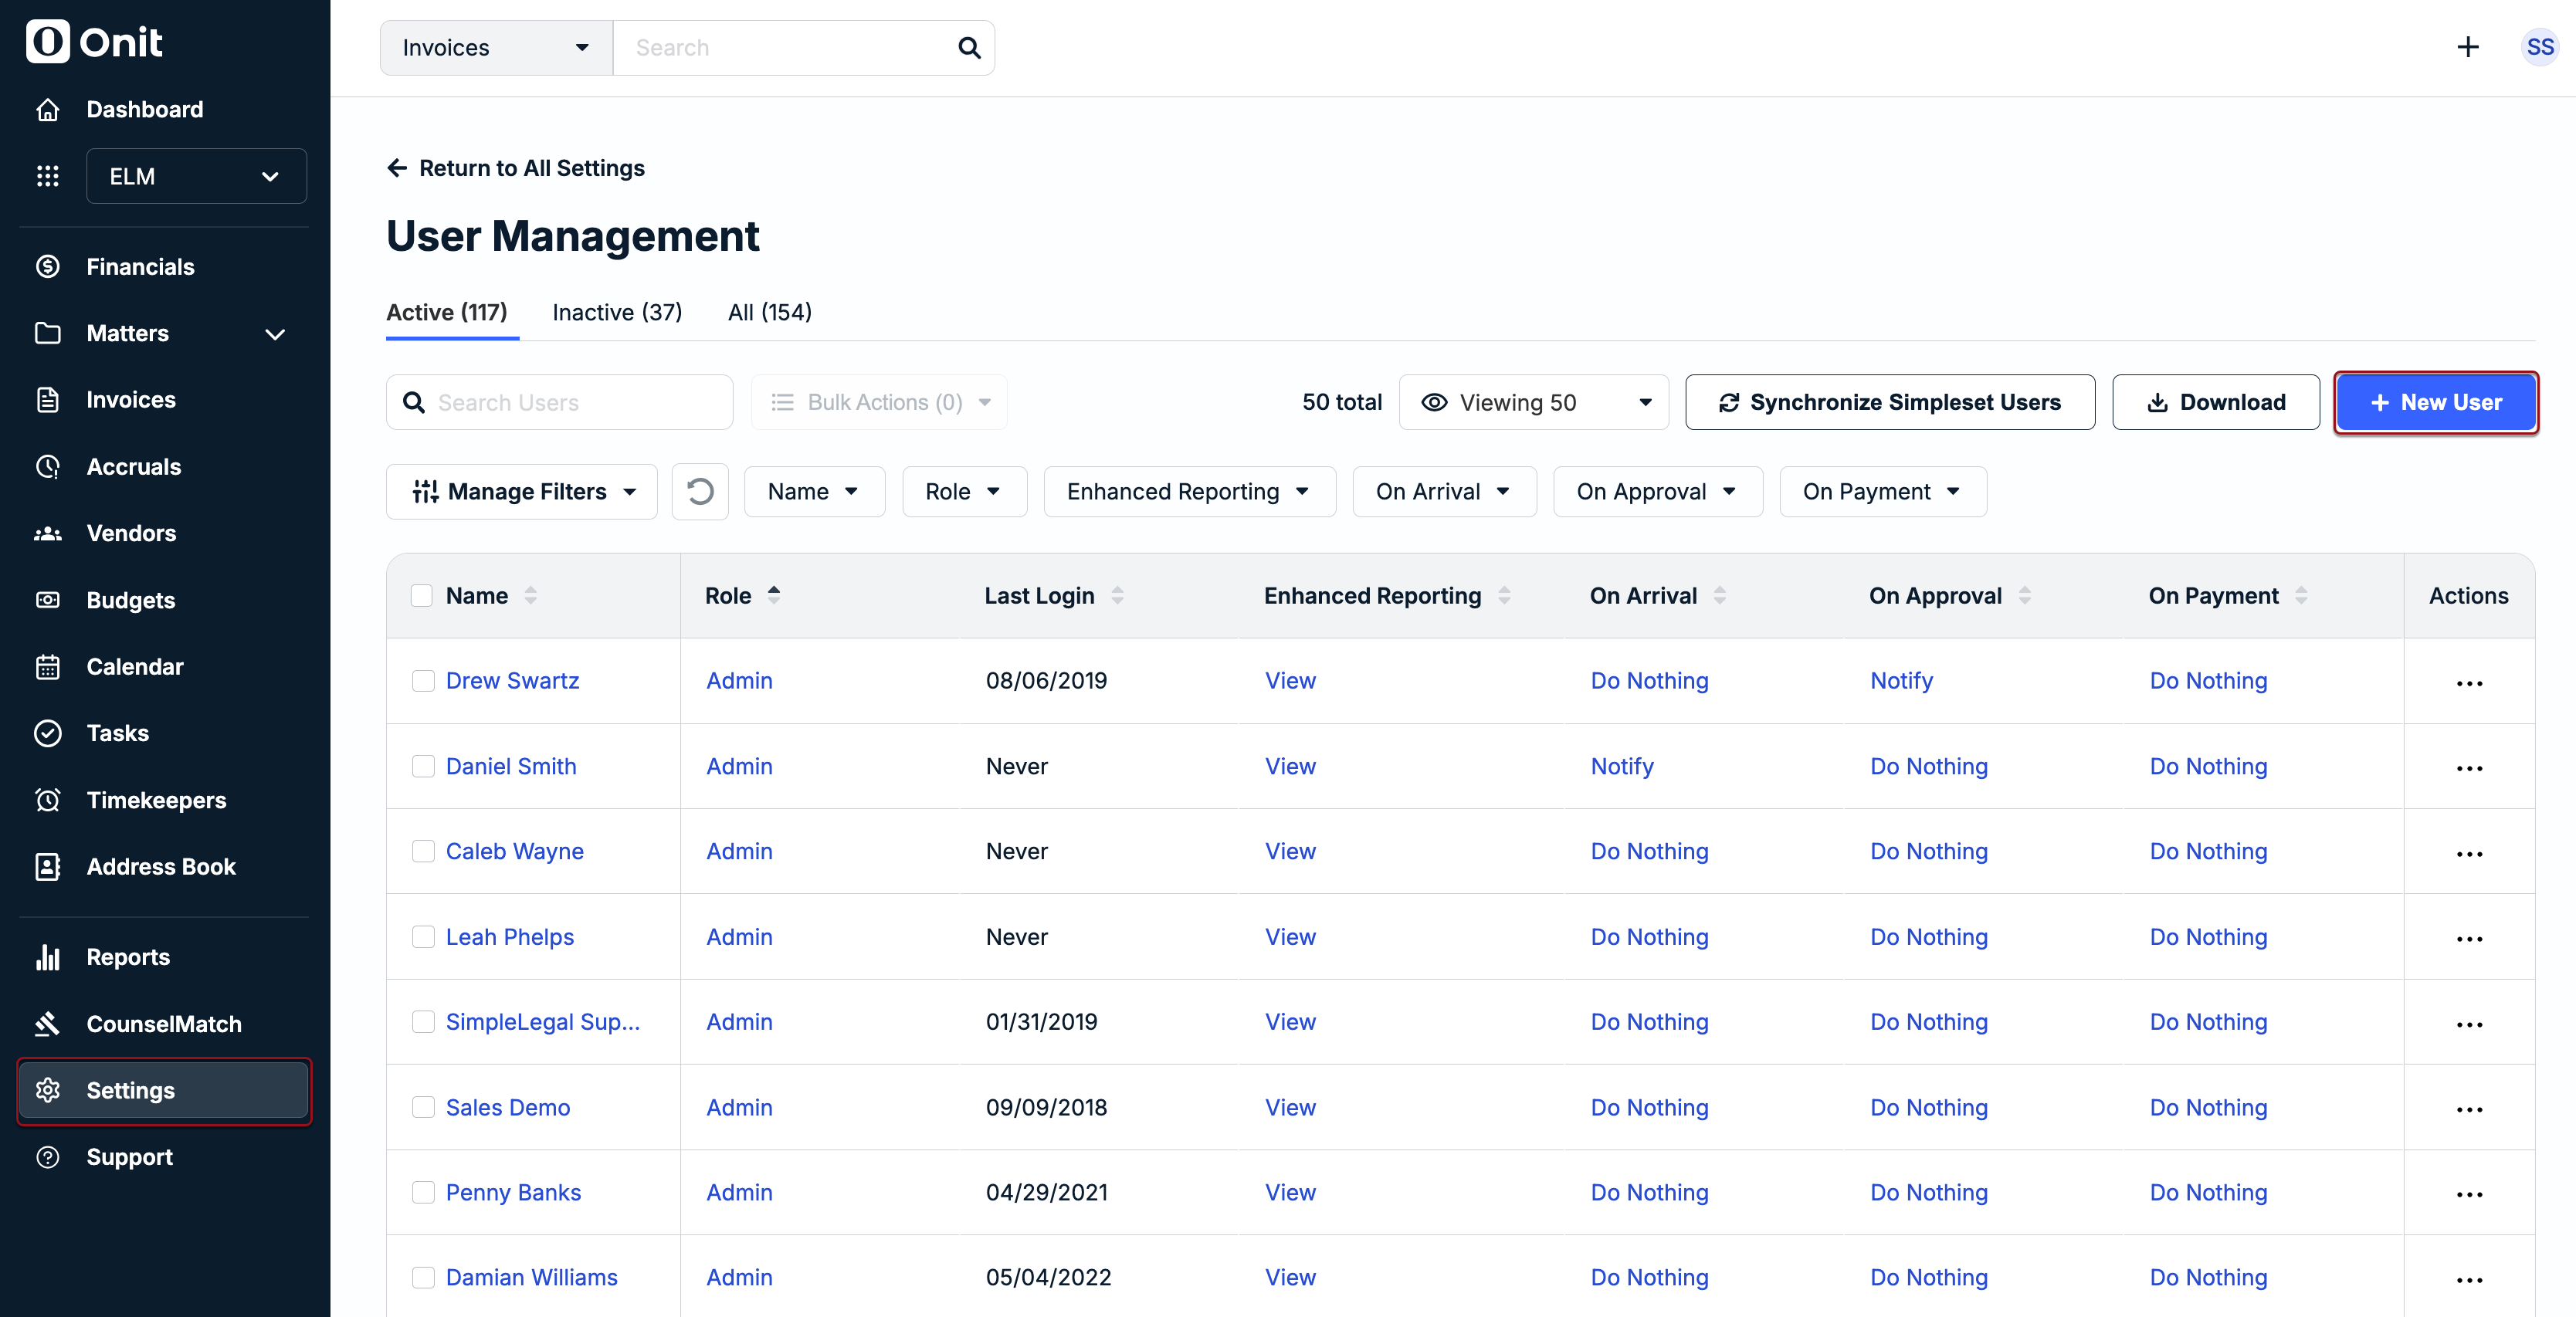
User Management
Users can be added, deactivated/reactivated, and updated by going to Settings > User Management. By default, active users are displayed. Use the tabs above the table to see only inactive users or all users.
This article covers the following topics:
- Adding a New User
- Resending Account Activation Links
- Editing a User
- Deactivating a User
- User Role Descriptions
- Invoice Notification Preferences
Adding a New User
New users can be added by admins. Before continuing, confirm the following:
- Which role the new user is being assigned.
- Which invoice notification preferences the new user needs.
- Whether the user will be logging in using a password or Single Sign-On (SSO).
To create a new user:
1. Go to Settings > User Management.
2. Click + New User in the top-right corner.
3. Fill in the first name, last name, and email address.
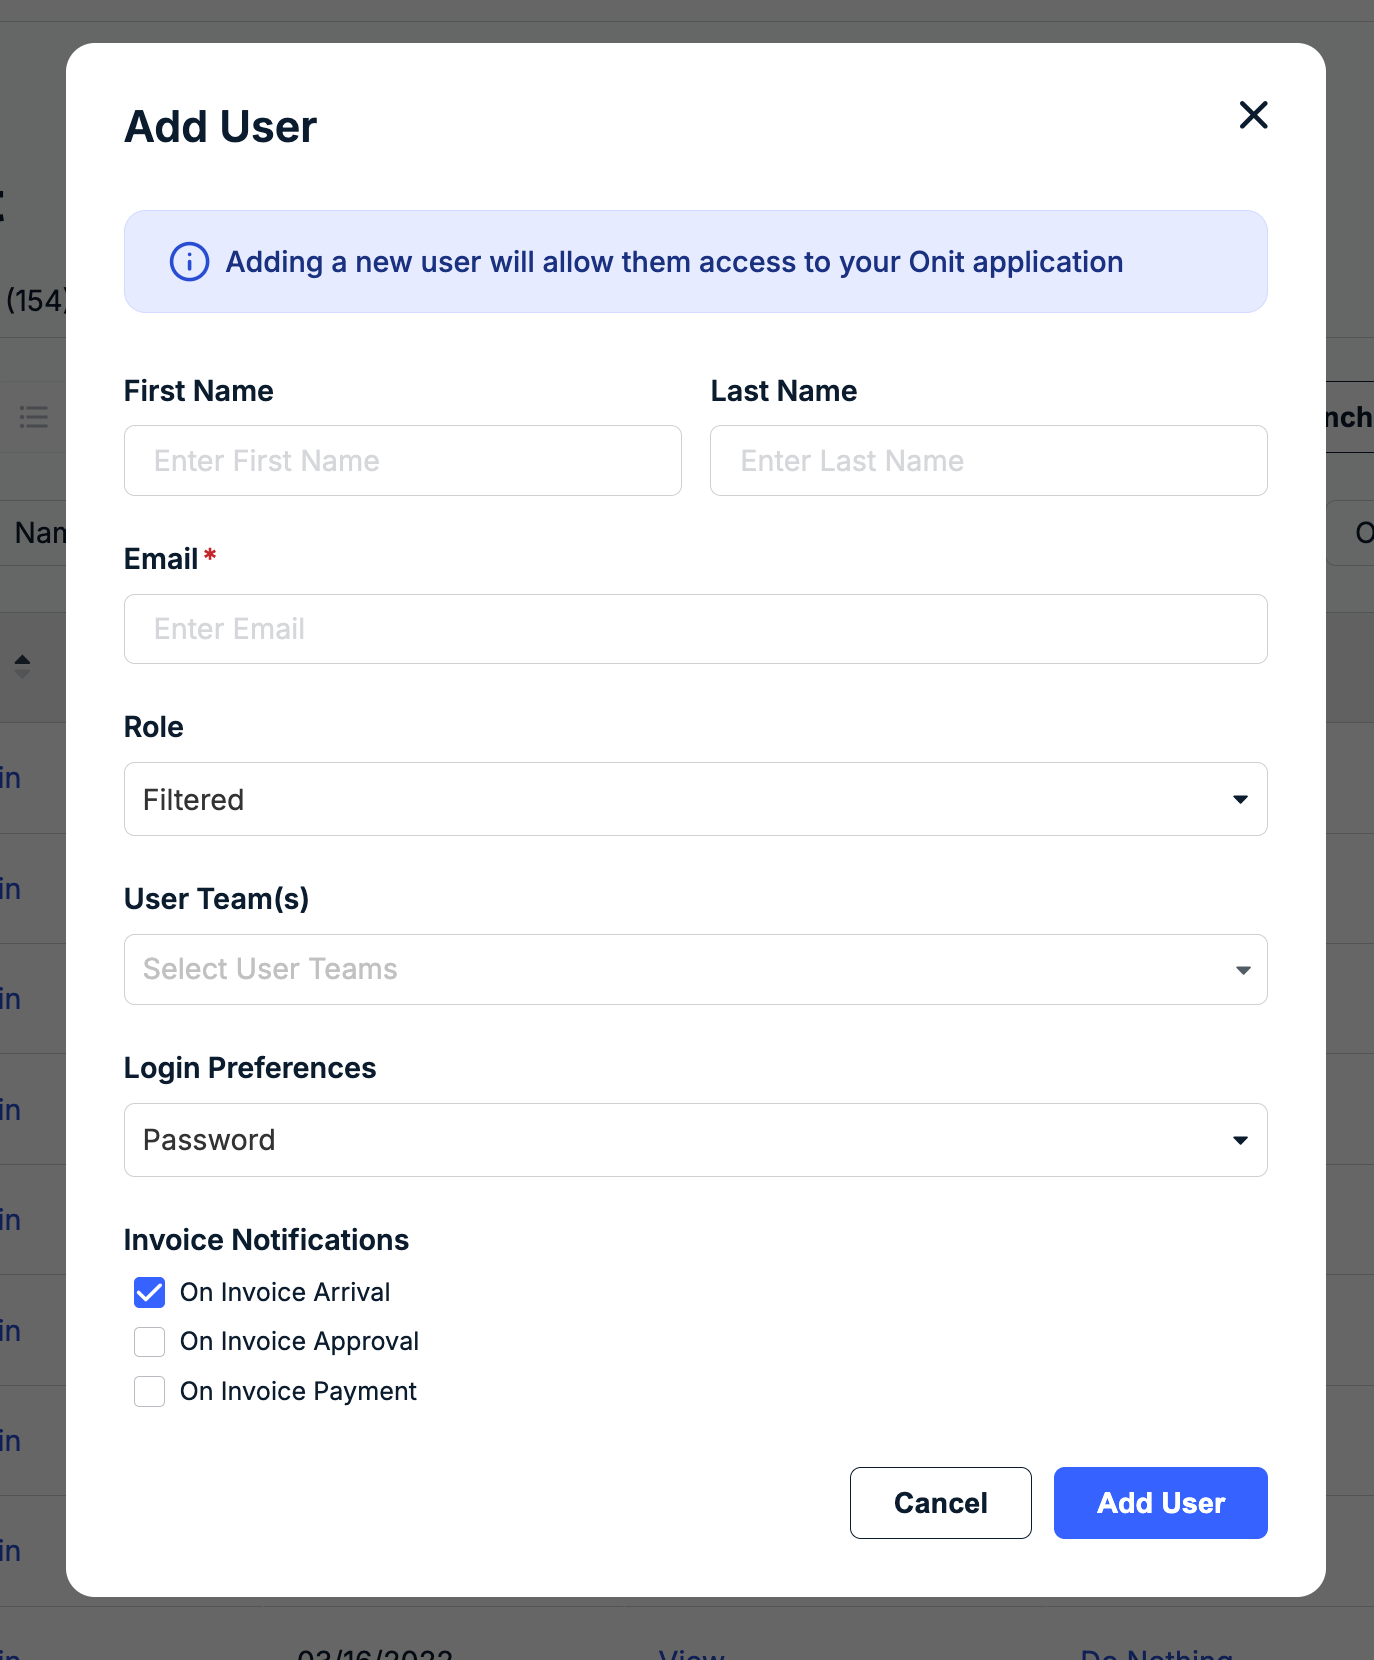
4. Select the role from the dropdown (e.g., Filtered, Email Only, or Email Only Filtered); click here for details on role permissions.
5. Select Password or SSO from the Login Preferences dropdown.
6. Update the invoice notification options; only On Invoice Arrival is selected by default.
7. Click Add User in the bottom-right corner to create the user and send the account activation email.
Resending Account Activation Links
Account activation links expire within three days of receipt. You can resend the email to individual users or multiple users at once from Settings > User Management.
For an individual user, click on the ... (more) option under the Actions column and select Resend Email Invite.
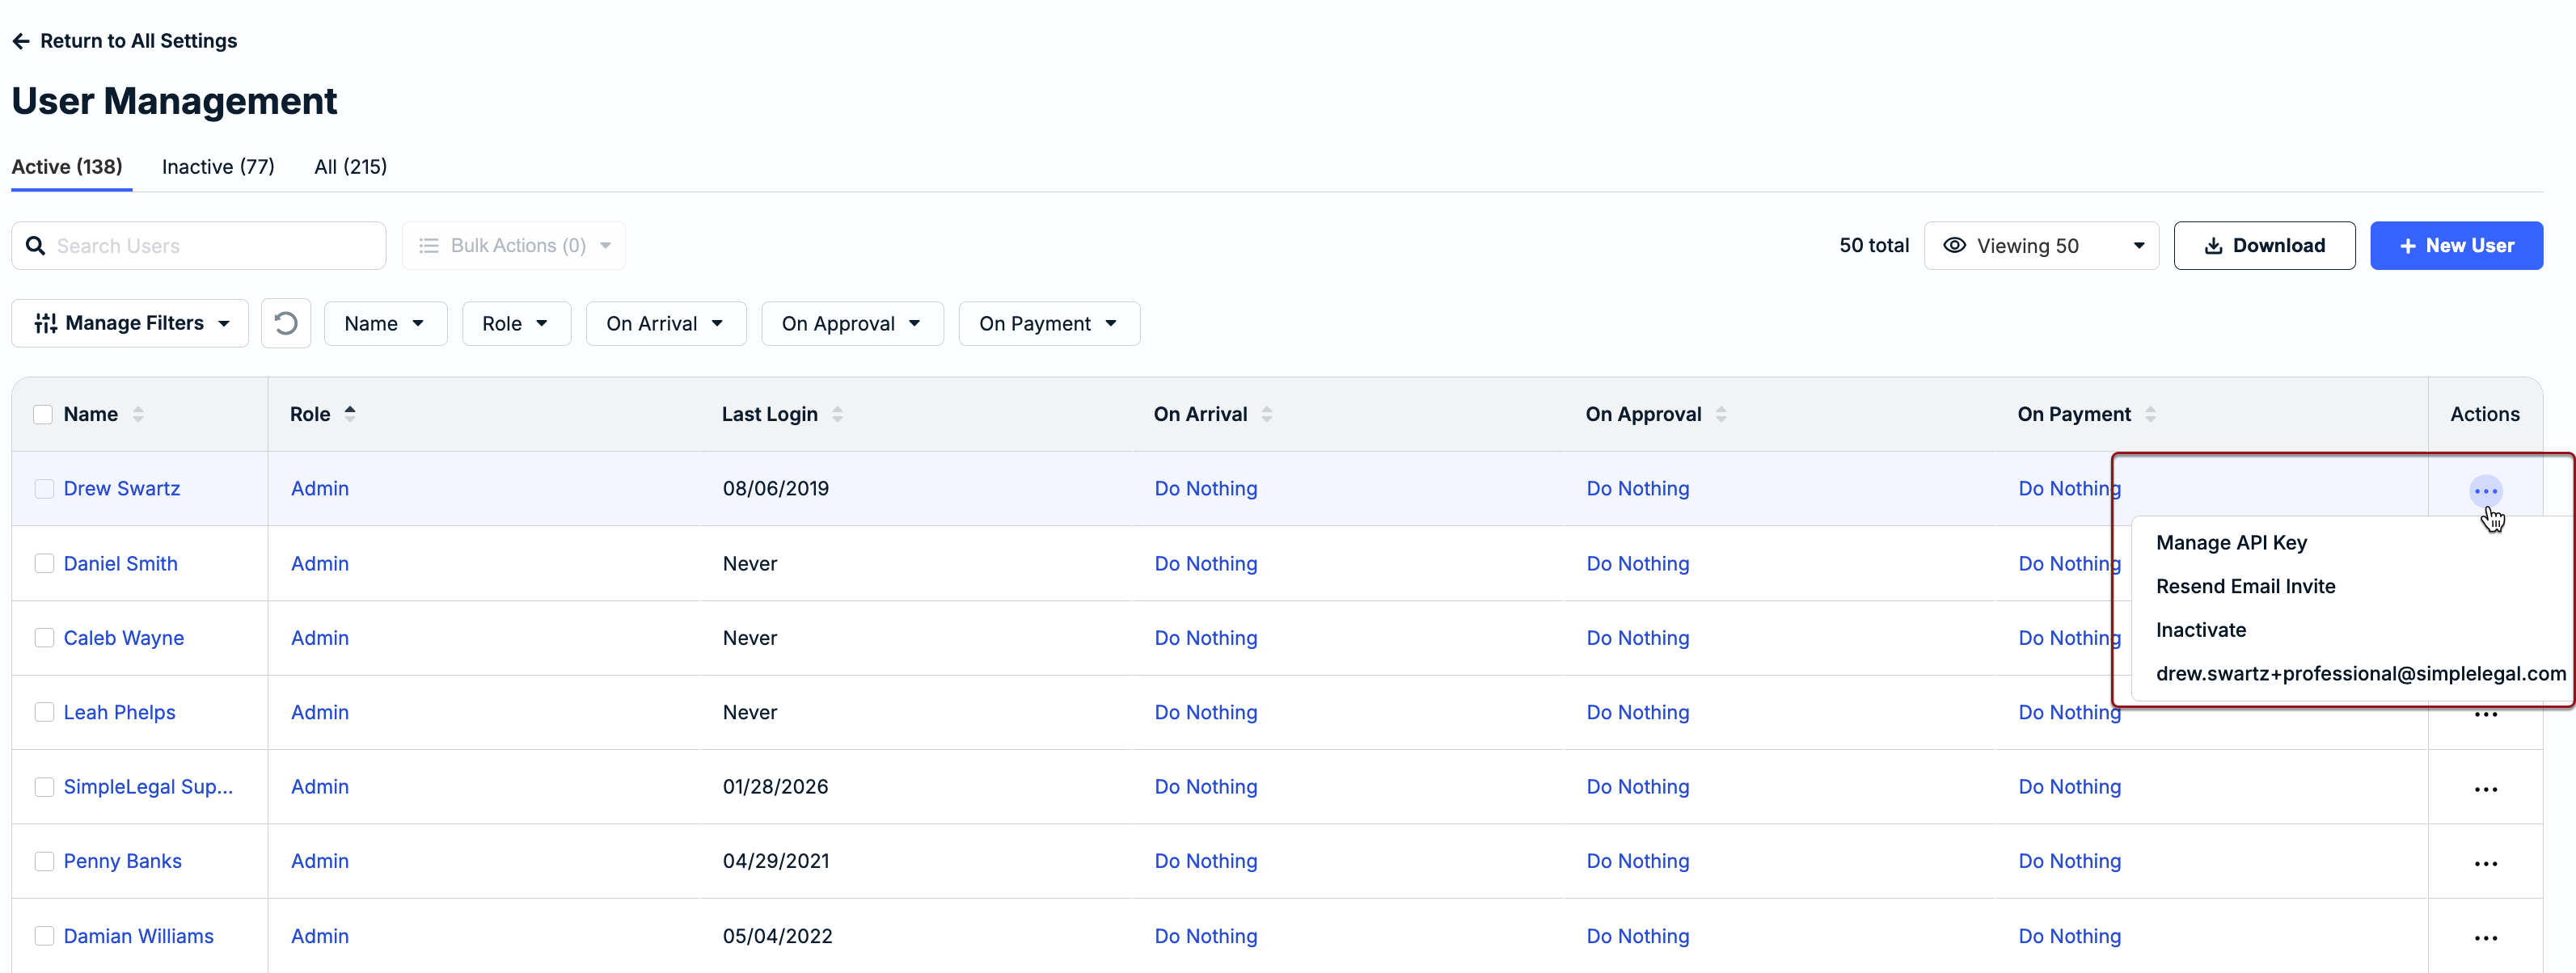
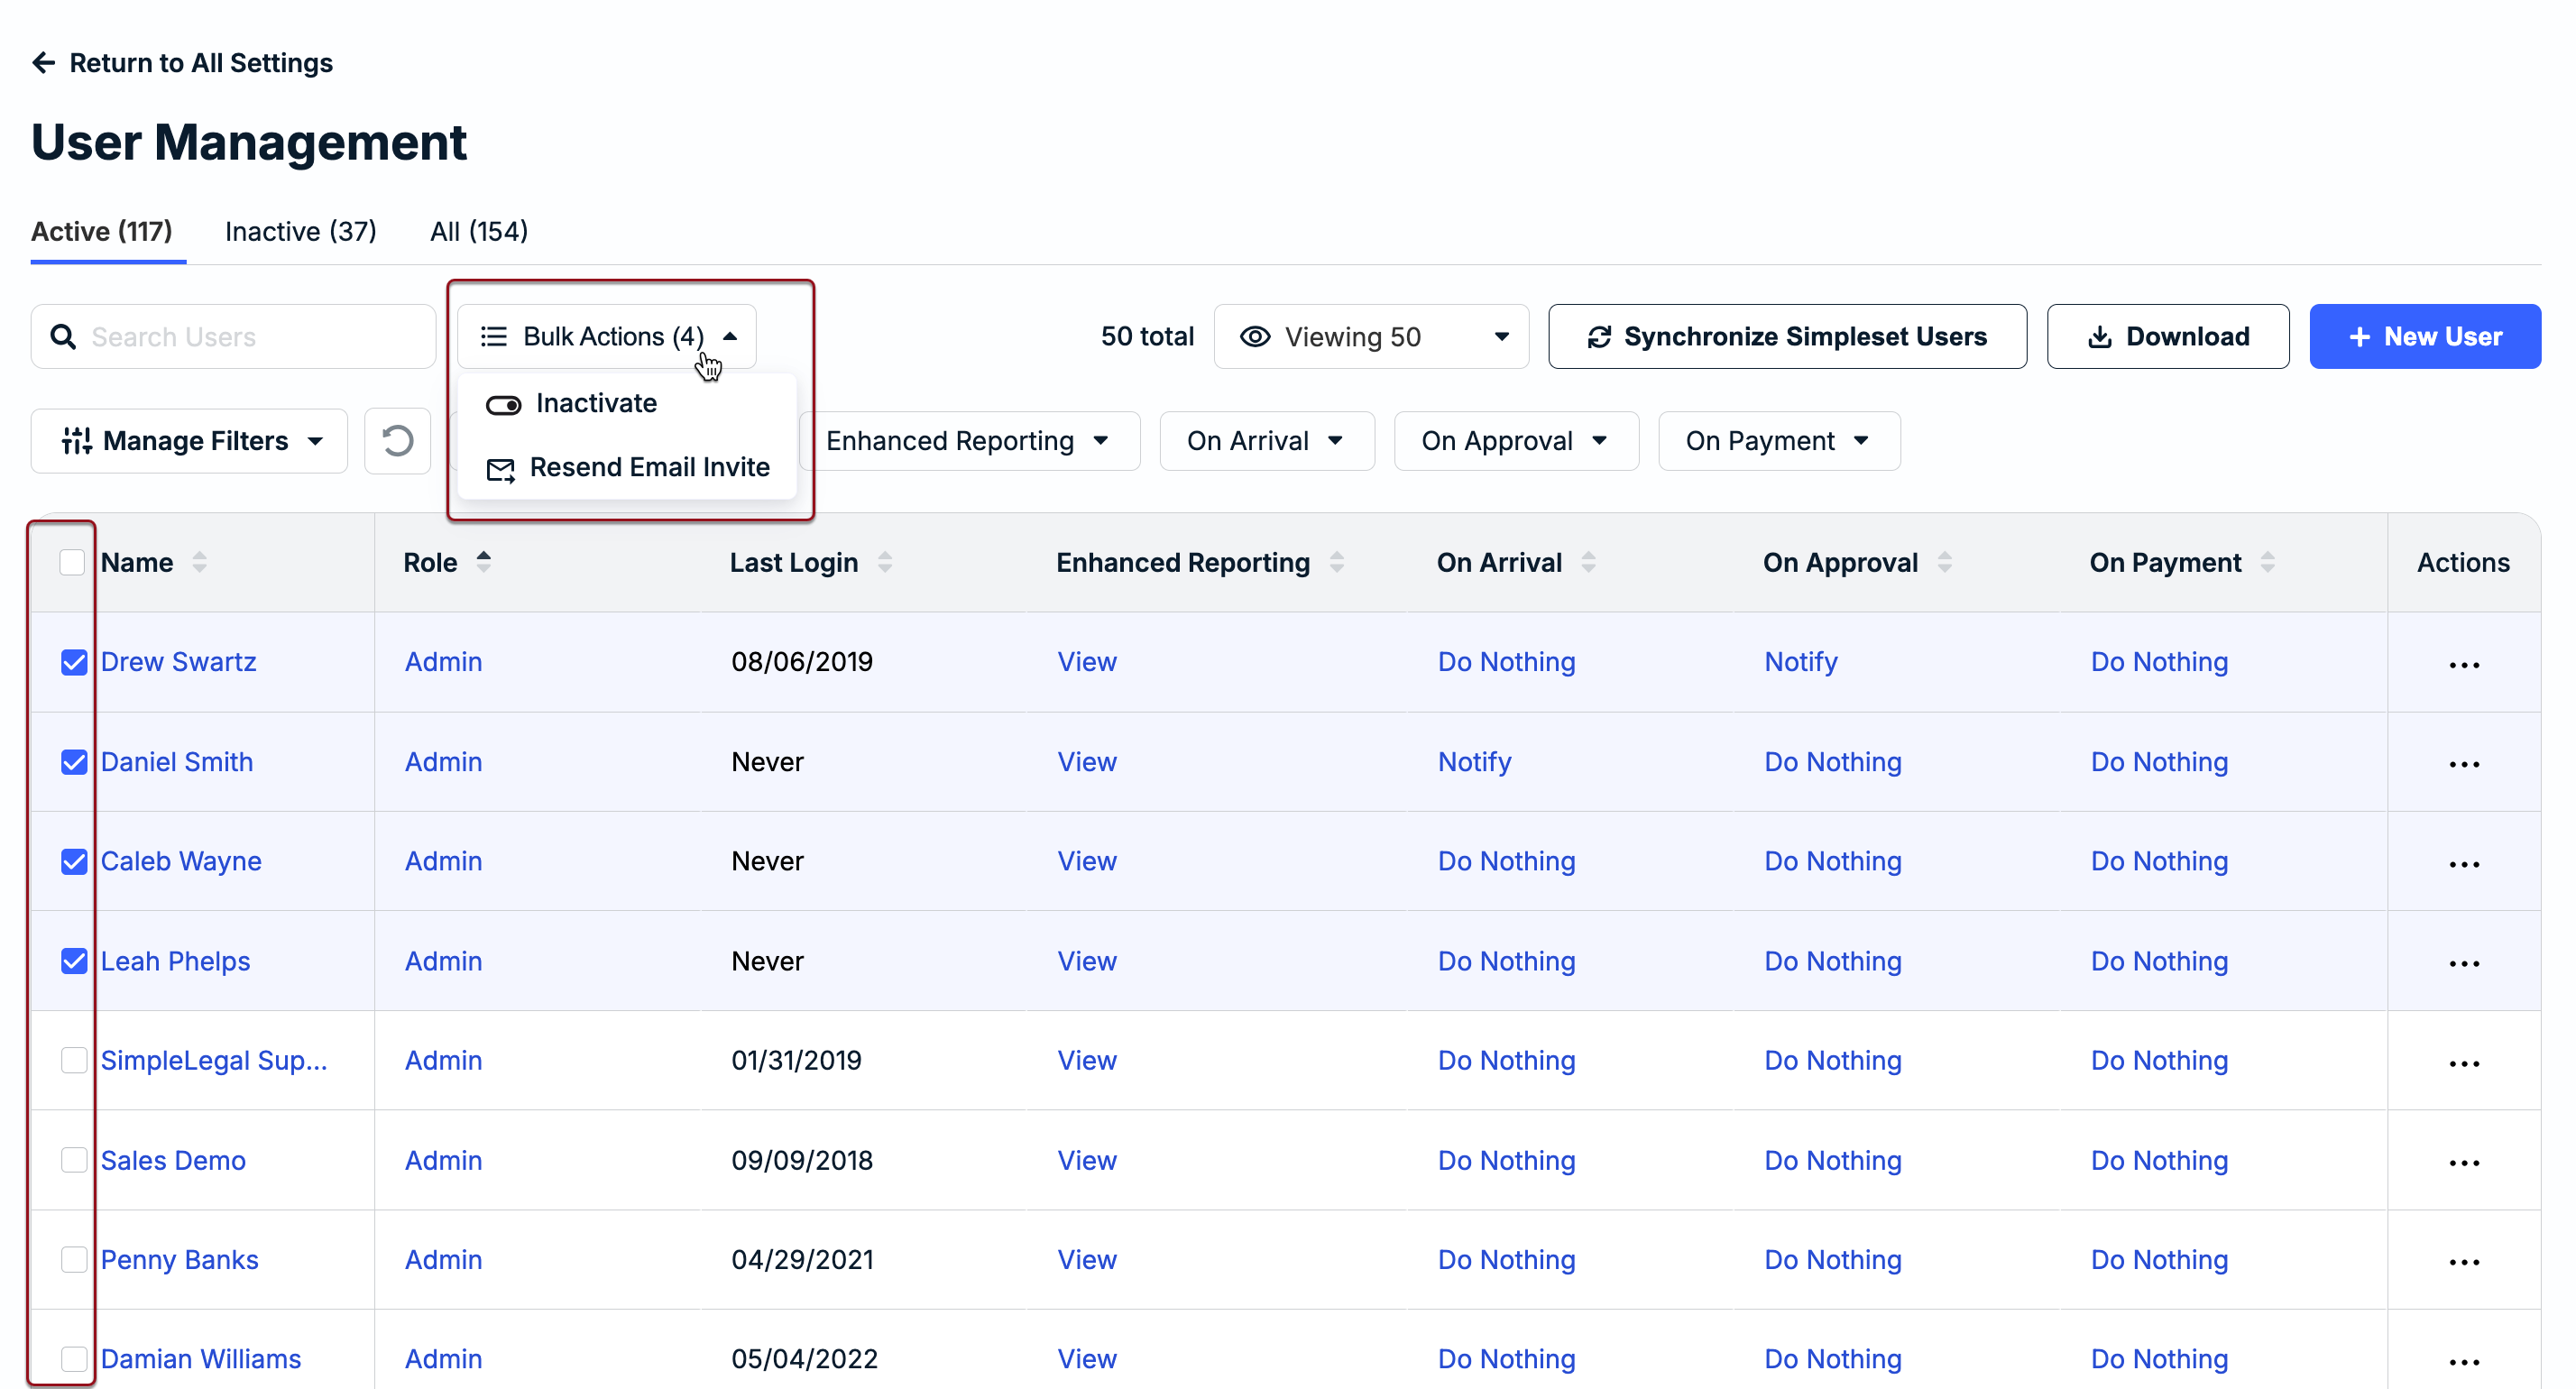
To resend to multiple users at once, select boxes for users from the left side of the table and select Bulk Actions > Resend Email Invite.
Editing a User
From Settings > User Management, click on the user's name to open their profile for editing. Each profile is separated into four tabs: Overview, Pending Invoices, Contact Affiliations, Calendar Management, and Settings.
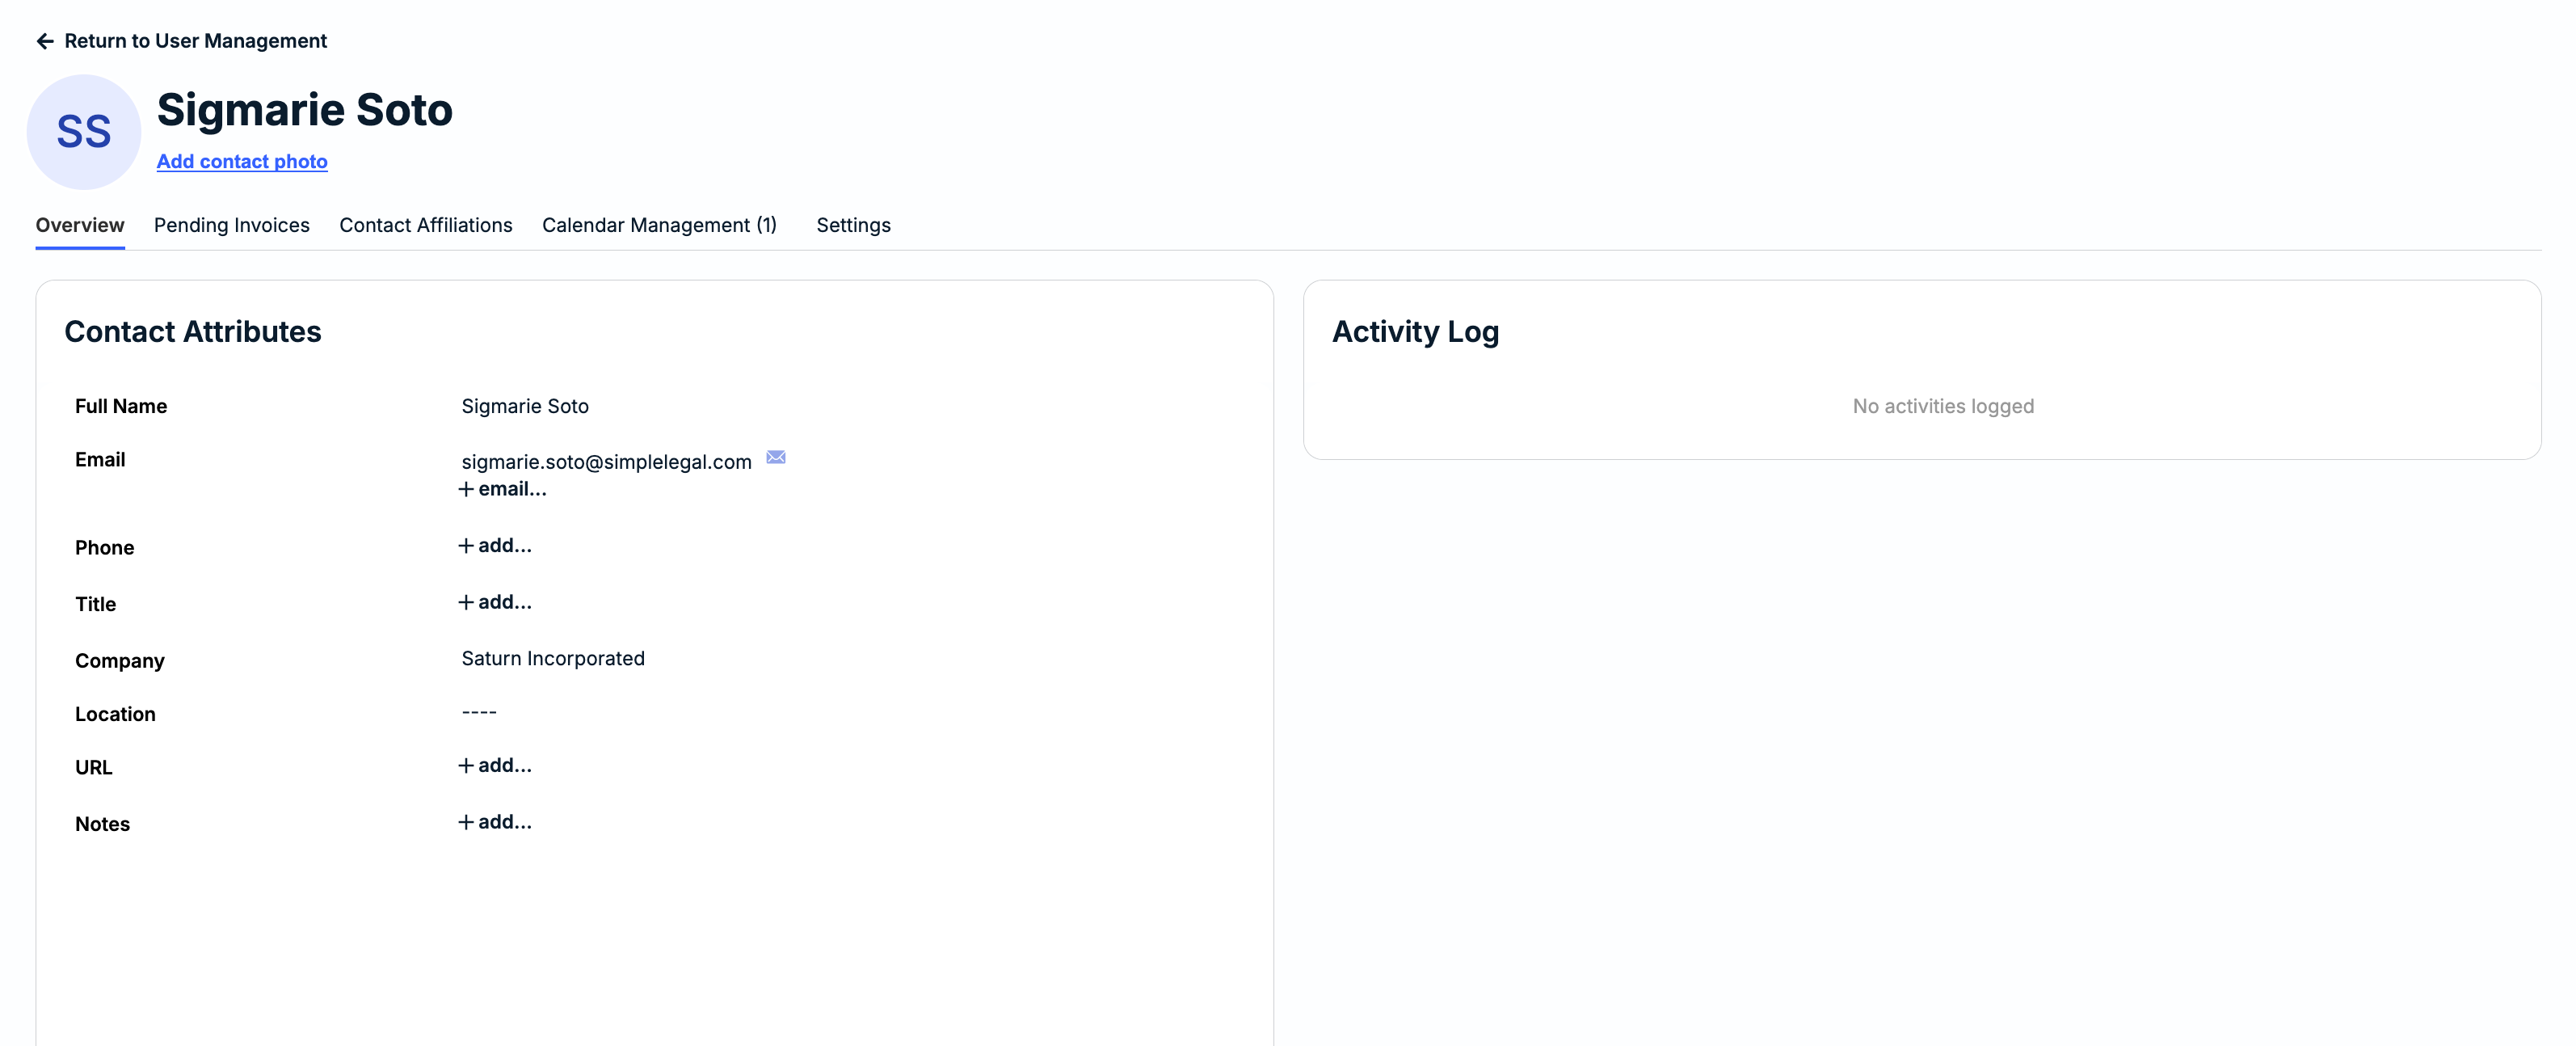
- Overview: View and edit general information, such as the user's name, email address, phone number, and title. The Activity Log displayed on the right side shows a preview of recent updates on the profile and recent actions taken by the user.
- Pending Invoices: Displays any invoices currently pending the user's review.
- Contact Affiliations: Displays records the user is assigned to or associated with (e.g., as Matter Lead, Vendor Manager, Follower, etc.).
- Calendar Management: Displays whether the user has an external calendar synced for events/tasks. This tab only appears if External Calendar Sync is enabled at the system level. To remove a user's external calendar, click Revoke Access and confirm when prompted.
- Settings: To update any of the fields, such as the role or invoice notifications, hover over the field and click on the edit icon or click + add... if blank. Click the checkmark to save your changes.
- User Role: Displays the user's current role (e.g., Filtered, Admin, etc.). For more information, click here.
- User Team(s): Shows any User Teams the user is currently assigned to.
- Invoice Approval Authority: If applicable, set the highest invoice amount the user is authorized to approve and select the escalation contact who will be prompted to approve if the threshold is reached. This can also be set and managed from the Escalation Management page.
- Invoice Notifications: Choose whether the user will receive notifications when associated invoices are recieved, approved, and/or paid).
- Email Preference: Choose whether the user will receive individual email notifications for each invoice. email notifications per vendor, or combined email notifications.
- Default Template: If applicable, select which default template should be populated when the user creates new matters.
- Time Zone: Only applies to events and matter updates. Turn the toggle on if the time zone should automatically be detected, or turn the toggle off to manually set a time zone for the user.
Deactivating a User
To move forward with disabling a user, click on the ... (more) option under the Actions column and select Inactivate.

Click Yes when prompted to confirm you want to remove the user's access.
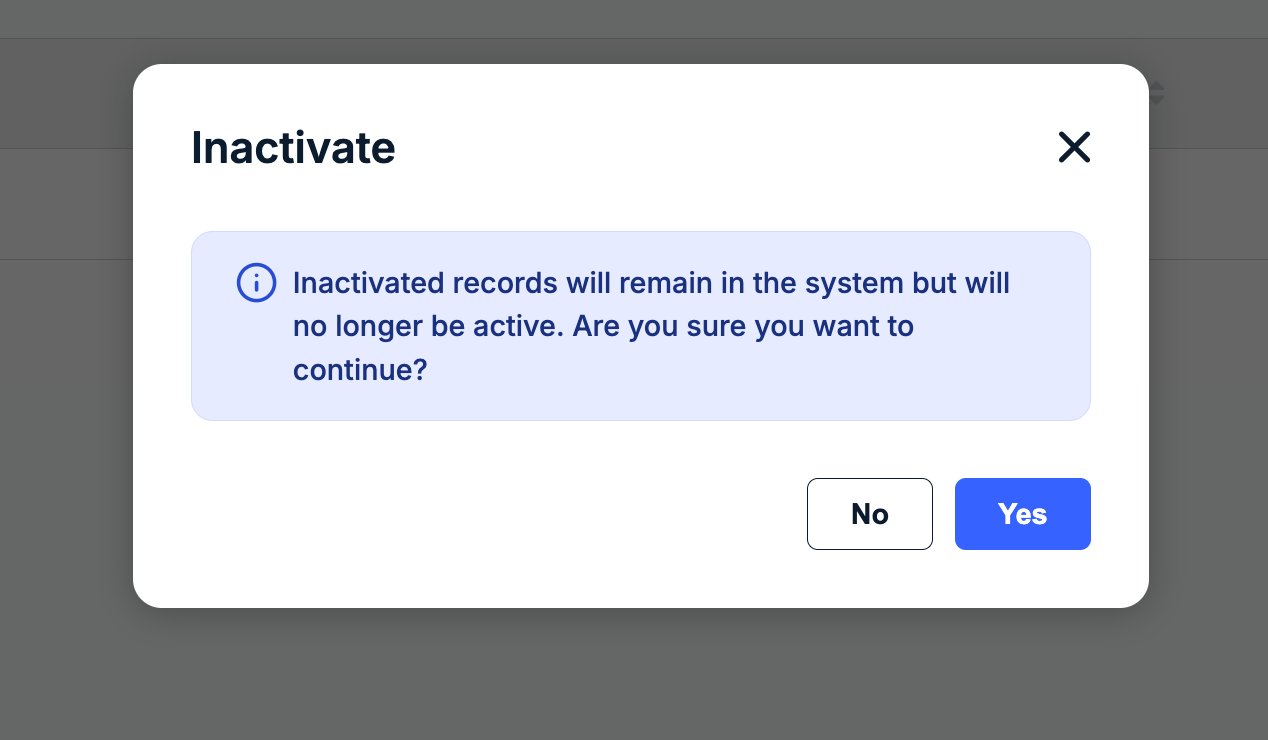
If you need to deactivate multiple users at once, select boxes for users on the left side of the table and then select Bulk Actions > Inactivate. Click Yes when prompted.
User Roles
Which role is assigned to a user drives permissions across Unity, including which types of records they can access and whether they have edit/view capabilities. The table below provides descriptions and additional notes/considerations for standard user roles that can be assigned.
| Role | Description |
|---|---|
| Admin | Onit recommends that you have 2-3 admins per account.
|
| Filtered | NOTE: This is the role most commonly assigned to non-admin users.
|
| Finance |
|
| Email Only | NOTE: This role is generally assigned to Accounts Payable (AP) team members.
|
| Email Only Filtered | NOTE: This role can be used to notify a certain list of users when there are multiple AP groups.
|
| Power User |
|
Invoice Notification Preferences
Our goal is to send you email notifications only when action is needed. You are notified via email automatically, for example, if it is your turn to review a submitted invoice. The invoice review notifications are distributed as follows during the review cycle:
- If an invoice is submitted that requires one specific user's approval, only that user is notified.
- If an invoice is submitted that requires approval from two users in a sequence (i.e., one user and then a second user), only the first user is notified.
- If the first user approves the invoice, the next user (or User Team) is notified.
- If an invoice is submitted that requires approval from any of the specified users in a level, all users are notified. Once the invoice is approved by any of the notified users, the invoice moves on to the next level (if applicable).
- If an invoice requires approval from a User Team, all users on that team are notified when it is their turn to review. Once the invoice is approved by anyone from that User Team, the invoice moves on to the next user in that level or to the next level (if applicable).
The following invoice notification options can be managed at the individual user level:
- On Arrival: Whether a user is notified when a new invoice is pending their review.
- On Approval: Whether a user is notified after an invoice has been approved by all required reviewers and is ready for payment.
- On Payment: Whether a user is notified after an invoice status is set to Paid.
These options can be set when creating a new user or when updating an existing user's notifications under Settings > User Management. Review the instructions above for information on how to edit a user.