Filters are a critical tool in building an Onit app. They enable you to filter for a subset of transactions or users that meet specific criteria. To limit their scope, filters can be assigned to certain Actions or Business Rules. For example, you can restrict which users receive notifications or which transactions are modified.
Note that Onit distinguishes between Raw Filters used to filter users and transactions. Therefore, in this tutorial, we'll refer to raw transaction and user filters separately.
Before We Start ...
This tutorial will assume you understand the following concepts:
Filter Overview
In Onit, Raw Transaction Filters and Raw User Filters are built using JSON, an open-standard format that stores and transmits data using human-readable text.
For example, the JSON below tells Onit to filter Records against specified criteria:
[{"operator":"like","value":"1000","property":"p_item_price","type":"combo"},
{"operator":"like","value":"Pending","property":"status","type":"string"}]
This text may look like gibberish to you, and that’s OK. While you don’t need to be an expert in Onit’s JSON filtering syntax to create Filters, you will need to be generally aware of what JSON is and where to use it. We’ll explain the critical concepts.
When working with Raw Transaction Filters, you can use a handy trick that will, in many cases, prevent you from having to write any JSON yourself. Instead, you’ll simply copy/paste the JSON from somewhere else. However, there are a few use cases (when working with Raw User Filters or performing certain “advanced” Record filtering operations) where you must write some basic JSON.
Once your JSON is ready, you’ll use it to create a new Filter in your App’s Advanced Designer. You can then assign this Filter to an Action or Business Rule. By doing so, you’re asking the Action/Business Rule to only run against Records/users that satisfy your Filter’s criteria.
Let’s get started by explaining how to build your JSON.
Don't Write JSON. Copy it!
In most cases, you don't need to write JSON when building a Raw Transaction Filter. Instead, you can use a quick trick to have JSON built for you, so all you have to do is copy and paste it into the new Filter you’re creating.
This trick revolves around an app's Dashboard.
You've probably seen your app's Dashboard. It's a grid where you can access all your app's transactions. You may also have noticed that each column in the grid is a Field or variable within your app.
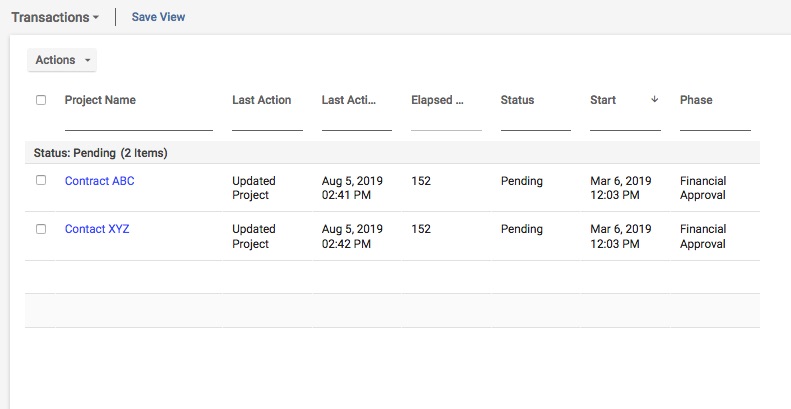
You can apply "filters" to each column on the Dashboard (similar to how you’d filter a column in Excel), so only transactions that meet some criteria are displayed.
Note that the filtering logic you apply to a Dashboard only affects the Dashboard -- it doesn’t affect any Actions or Business Rules. However, the filtering you are doing in a Dashboard automatically creates JSON behind the scenes, which we can use to create a new Raw Transaction Filter in the Advanced Designer.
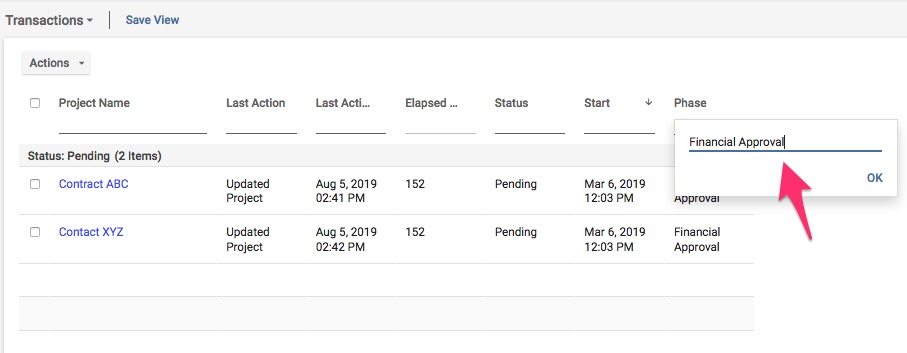
Let's walk through an example to learn how to filter a Dashboard's column. In this example, we'll say we need to filter for all the transactions currently in a Phase named Financial Approval.
1. Filter a Column
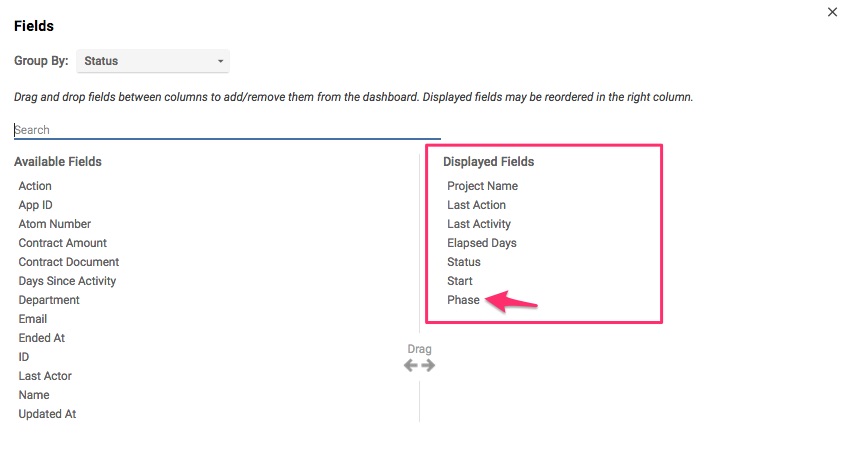
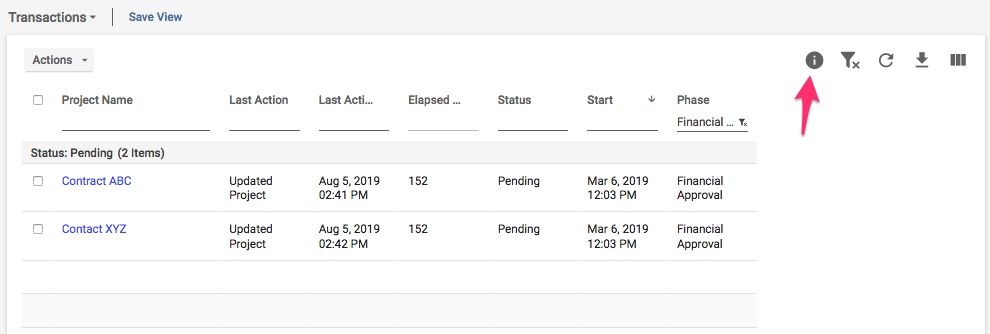
Ensure that the Phase column is visible. Then, click the three-column icon at the top right to open the column overlay.
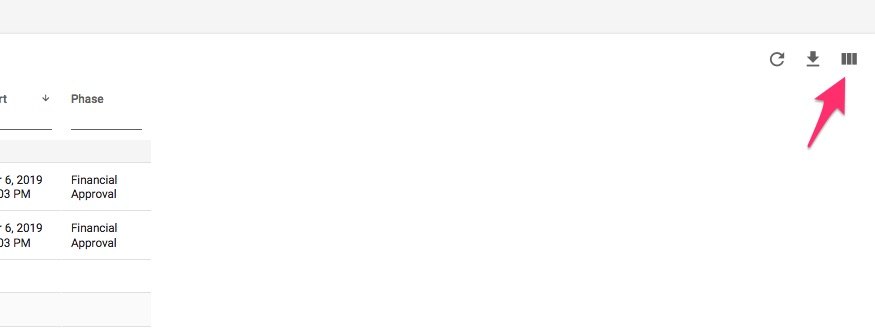
Ensure that the Phase column is visible.
Next, click the Phase column and type in the filtering value. For our example, we’ll type in Financial Approval.
2. Open the Filter Info Dialog
Great! We've filtered the transactions displayed on our Dashboard. As mentioned above, Onit generated JSON behind the scenes expressing this filtering logic, which we can easily access.
From the column's dropdown, select Filter Info.
3. Copy the JSON
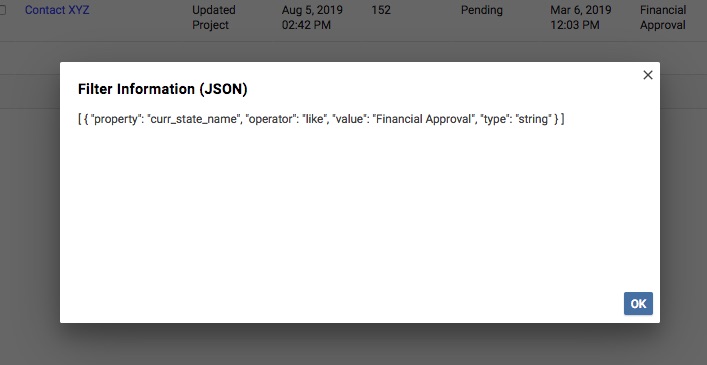
The pop-up contains the JSON you need to express this filtering logic in a Raw Transaction Filter for an Action/Business Rule. Copy this JSON to your clipboard and skip to our Using the Filter section below to see how to use it in a Raw Transaction Filter.
Can I always use the copy/paste JSON trick?
Unfortunately, no. The trick described above works when creating most Raw Transaction Filters. But you'll need to write the JSON yourself when you need JSON for a Raw User Filter or when building more “advanced” Raw Transaction Filters.
Along those lines, the list below covers the most commonly encountered situations where you need to write JSON. We've included a sample JSON for each situation below, which you can use as a starting point.
Situation #1: Raw User Filters
This situation only applies to Raw User Filters.
Define which users should be included by filtering for their email address:
[{"type":"string","value":"#([email protected]|[email protected])","field":"email"}]Situation #2: Checkbox and Combo Field Types
This situation only applies to Raw Transaction Filters.
If you build your JSON using the Dashboard trick explained above, you’ll need to adjust if the filter includes Checkbox, Combo, or Listcombo Fields.
For Checkbox Fields, substitute the word “boolean” for “checkbox”:
[{"operator":"==", "value":true,"property":"p_third_party","type":"boolean"}]For Combo and Listcombo Fields, substitute the word “string” for “combo”:
[{"operator":"like","value":"sales","property":"p_department","type":"string"}]Situation #3: Catch-All Filters
This situation applies to both Raw Transaction Filters and Raw User Filters.
Though it may sound odd, you’ll likely need to create an empty filter at some point. That is a Filter that includes all possible transactions or users and filters nothing out.
To write such a filter, use the following JSON:
[]Situation #4: Date and DateTime Filters
This situation only applies to Raw Transaction Filters.
If you build your JSON using the Dashboard trick explained above, the Date and DateTime Fields in the generated JSON need to be edited slightly before they can be used in a Filter. You’ll need to use a comparison operator and reformat the date using Liquid.
In the following example, Records are being filtered based on whether their expiration_date is less than six days from now:
[{"type":"date","comparison":"lt","value":"{{now|subtract_days:6|date:"%m/%d/%Y"}}","field":"p_expiration_date"}]Note that in the example above, the highlighted text is Liquid inserted into the JSON. When the Action/Business Rule runs, it will execute this Liquid, which will output a date.
Also, note the comparison operator is used in the example above in bold. Referring to the list of possible abbreviations below, the comparison operator used in the example (i.e., lt) means "Less Than." Plug in any of the following abbreviations to Date and DateTime filters:
- gt: Greater Than
- lt: Less Than
- eq: Equal To
- gte: Greater Than or equal to
- lte: Less than or equal to
Situation #5: Raw User Filters Driven by a List
This situation only applies to Raw User Filters.
Situation #1 hardcodes email addresses into the filter, so every change to the recipient group means editing the Filter in the Advanced Designer. If recipients change often, store them in a List and let the filter look them up instead.
What you need:
- A List with one row per recipient group. One column is the lookup key (for example,
name) and another holds the users (for example,users, as a multi-value field). A Generic Liquid Function named
Validate User Listwith one parameter,r_users. See Generic Liquid Function. Its Liquid Body is:{% assign users = r_users %} {% if users != blank and users != "" and users != null %} [{"type":"string","value":"#({{users | join: "|"}})","field":"email"}] {%else%} [{"type":"string","value":"\"DONTSEND\"","field":"email"}] {% endif %}
3. A Raw User Filter whose Filter JSON is:
{% assign users = "Weekly Report - All" | list_lookup: 'Email Distribution Slips', 'name', 'users' %}

{% execute_function validate_user_list %}
{% function 'Validate User List' %}
{% param r_users = users %}
{% endexecute_function %}
{{validate_user_list}}
How it works
list_lookuptakes the list name, the column to match, and the column to return. The text before the pipe ("Weekly Report - All") is matched against the second argument’s column, and the row’susersvalue is returned.- The function joins the users with
|and outputs the same JSON shape as Situation #1:#([email protected]|[email protected]). - If the lookup returns nothing, the function outputs a filter on the value
"DONTSEND". No user has that email, so the filter matches nobody and no email goes out.
Using Your Filter
Now that we know how to create the JSON, let’s cover where to insert it. This part is easy!
1. Browse to Filters
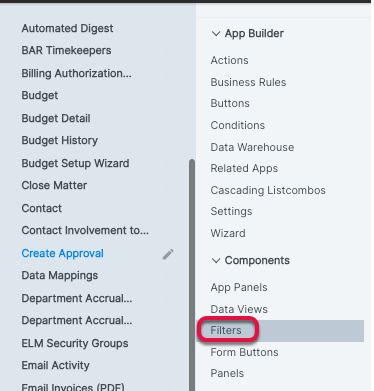
Browse to an App’s Advanced Designer page. In the left-hand pane, click the Filters node.
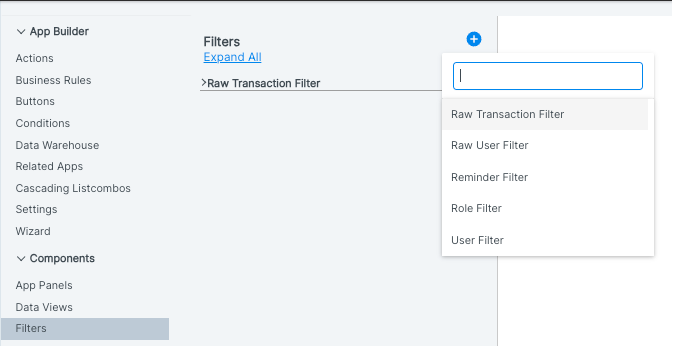
Select either Raw Transaction Filter or Raw User Filter from the Add dropdown.
2. Configure Your Filter
Provide your Filter with a Name. Since a single Filter may be used multiple times (by different Actions/Business Rules), be descriptive.
Enter your JSON into the Filter JSON property.
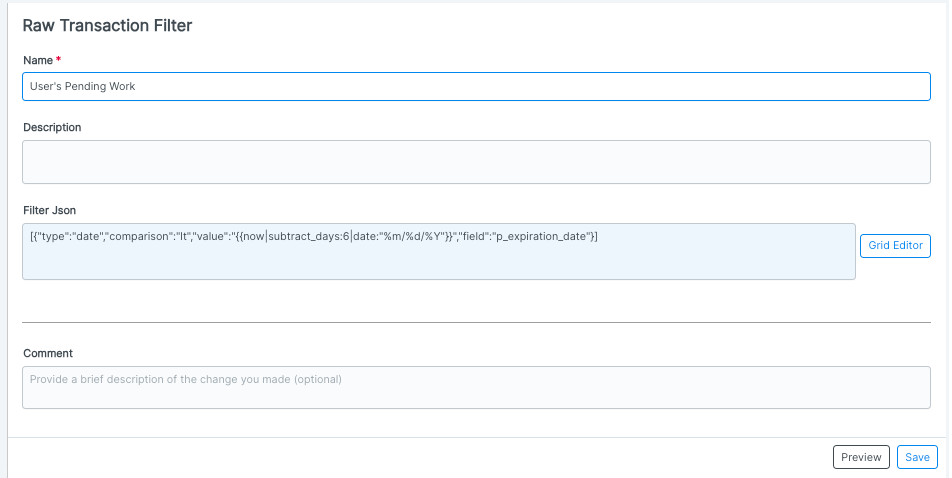
Select OK to save your new Filter.
3. Using Your Filter
Congrats! You now have a JSON-defined Filter ready to be applied to an Action/Business Rule.
Along those lines, note that only the following Actions accept Filters:
- Create Transaction from Transactions
- Multi Report
- Recalc Transactions
- Run Action on Related Transactions
- Send Report
- Upsert Other Transaction
In addition, one (and only one) Business Rule accepts a Filter: Daily Schedule. See our Scheduling Email-Based Reports tutorial for more info.
Other Filters in Onit
Other filters besides Raw User and Raw Transaction Filters are available to you in Onit.
Transaction Filter: This filter is functionally the same as the Raw Transaction Filter. Instead of writing JSON, the filter provides a dropdown list of Fields and Comparisons to build your filter.
- Name – Name of the Transaction filter.
- Description – A description of the filter.
- Field – The field to which the comparison will be based.
- Comparison – The comparison operator (e.g., Less than, Greater than, Equal, Not equal, etc.).
- Value – The value to compare to the current value of the selected field.
User Filter: This filter is functionally the same as the Raw User Filter. However, instead of writing JSON, it provides a dropdown list of Fields and Comparisons to build your filter.
- Name – Name of the User filter.
- Description – A description of the filter.
- Field – The field to which the comparison will be based. Either Email or Status.
- Comparison – The comparison operator (e.g., Less than, Greater than, Equal, Not equal, etc.)
- Value – The value to compare to the current value of the selected field.
Reminder Filter: The reminder filter should be used to create reminders for Records. The same functionality can be achieved with JSON in a Raw Transaction filter. However, this filter provides a dropdown configuration for the same task.
- Name – Name of the custom Reminder filter.
- Description – A description of the reminder filter.
- Days – Enter the number of days or select an Integer field from the App.
- Before/After – Select ‘Before’ to select transactions where today is a specified number of days before the field below. Select ‘After’ to select transactions where today is a set number of days after the field below.
- Field—Select a Date or DateTime field from the App that will be used to compare the above criteria and return the appropriate Records.