LawBase 12 Admin Help
Synaptec Software, Inc.
- Technical Support
- Getting Started
- Calendars
- Dashboards
- Debugging
- Design
- Favorites
- FlexBase Set-up
- HotDocs and LawBase
- Installation
- LawBase Hyperlinks
- LB2OutFor12
- LBExchange
- LBConcierge
- LBHDWord
- LBOutlook Connector
- LBShare
- LBSync
- Reports
- Searches
- Security
- SmartFolders
- System Information
- Disaster Recovery and Backup
- Test and Production Environments
- Users
- Utilities
- WorkFlow
LawBase 12 Administrator Help
© 2018 Synaptec Software, Inc. | Last Updated: June 1, 2018
Technical Support
At Synaptec Software, Inc, we work hard to provide you with intuitive products. Additionally, we try to provide superior online and print documentation to enable you to work independently in maximizing the features of LawBase for your office. However, should you find yourself with a technical question that you cannot answer with the provided information, please contact our Technical Support department.
Email Questions
Ask questions and receive detailed answers from the Technical Support Department by sending an email message to the address listed below. You will receive a reply either by email or by phone. [email protected]
Telephone
You can reach Synaptec Software Technical Support by phone Monday through Friday from 6:00 a.m. to 6:00 p.m. Mountain time. When you call, please be at your computer, and be prepared to provide the following information:
- LawBase version number
- Operating system
- Exact wording of any messages that may appear on your screen
- What you were doing when the problem occurred
- How you tried to solve the problem
- Synaptec Software Technical Support
phone: 303-320-4420 ext. 12 or 720.536.3212
Getting Started
For information about installing LawBase, see Installation
For information about configuring LBAdmin, see Suggested Setup Sequence
For help with LBDesign, see LBDesign
For go-to-know off-the-bat information, see Quick Tips.
Suggested Order of Set-up
The following is a suggested order for setting up LBAdmin.
1. Create FlexBases and Typelaws (typically these are created during screen design.
2. Add the users who need to access LawBase. For details go to: Users
3. Create user Default Screens
4. Create Groups for Calendars and Security.
5. Create Security Definitions.
6. Set FlexBase properties.
7. Set any needed cosmetics.
8. Set up FlexBase searches
9. Set up SmartFolders
10. Set up Quick Search and Quick Add.
Of course there is more you can do after this - develop reports, create WorkFlows, develop HotDocs.
Quick Tips
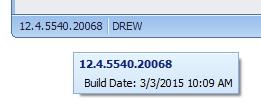
Finding your LawBase Build Number and Build Date and Other Tricks of the Status Bar
In LBAdmin, LBDesign, and the main LawBase program, you can very easily see the build number of your LawBase program files, and the name of the user you are logged in as, by looking in the bottom left corner of the main window:
If you hover your mouse over the build number, you should see the build date and time in the hover text:
![]()
You should expect the content of this information to change when you apply LawBase updates. For more about updating LawBase, see Updates.
Furthermore, when in the main LawBase program, if you right click over the displayed username, you can run the internal debug program. For more about debugging, see Debugging and Debugging Workflows.
LawBase and Email
LawBase assumes that Microsoft Outlook is your mail client. Users can drag and drop emails from Outlook into the Notes tab in a file, onto the Notes tab in a file, or onto a file result in a Smartfolder.
Similarly, emails created out of LawBase, using the email button on an email field, or created via workflow, should assume the user's Outlook properties as far as style and signature block are concerned.
If you have users who do not experience some or all of this functionality, be sure to check the registry settings on their machine. MAILTO should be Outlook.
Calendars
This section describes the administrative aspects of calendars. General documentation about calendars is in the User Help.
Calendar Security
Since all calendars belong to users or groups, read about Calendar Security in the User section.
Completing Calendar Items
From LawBase, users can complete pending items so they no longer show up in the calendar or the ticklers. The user-side mechanics of complete pending calendar items can be found in the in the User Help.This section describes how to configure Calendar Completion in LBAdmin and LBDesign.
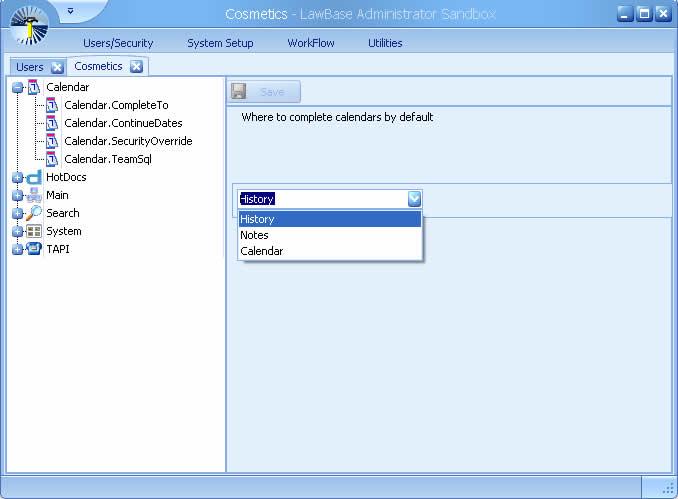
A. Set the Default Completion Target
1. From within LBAdmin go to System Setup > Cosmetics > Calendar > CompleteTo
2. Select where you want calendars to complete by default.
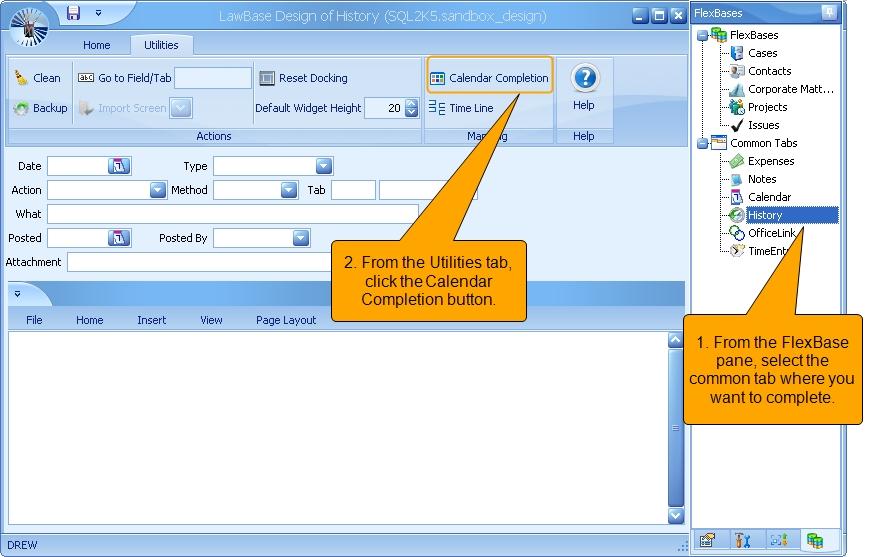
B. Map the Fields from the Calendar to the Target
1. Launch LBDesign and from the FlexBase panel select the common tab where you want calendar items
to complete. In the example below, we've selected History.
2. Click the Calendar Completion button to map from the Calendar to the Target
Completion button will not appear when you select Calendar as the target as there is no mapping to do.
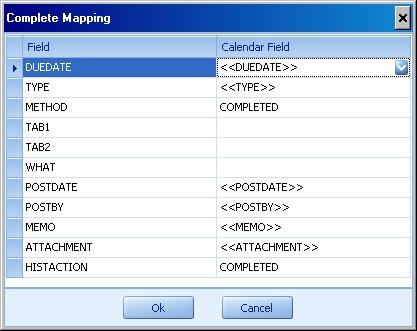
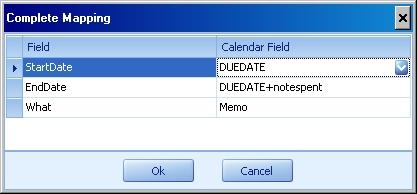
3. Use the Calendar Completion dialog to map fields from the Calendar to the target tab. When you first open it, you'll see blank fields. The fields on the right are the fields on the target tab (history).
Just fill in the calendar fields to match the target fields.
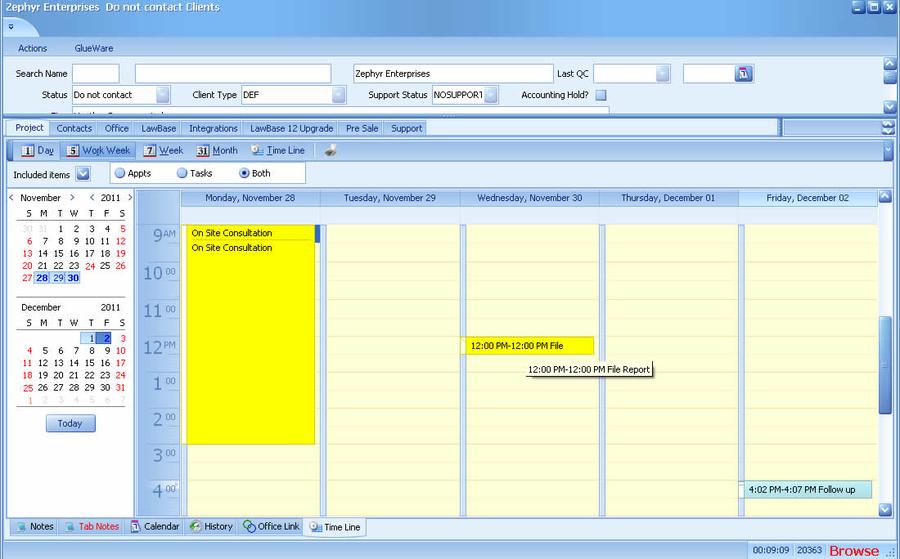
Time Line
The Time Line is a common tab which you may find along with your other common tabs. When it is enabled, it appears as the last common tab on the right. The Time Line acts as an aggregator, so you can open up any file and see what calendar items, notes, history and other common items were created for the selected time period. )
To add a common tab to the Time Line
1. Launch LBDesign
2. From the FlexBase Pane, select the common tab you would like to add.
3. Click the Time Line button on the Utilities tab.
4. In the mapping dialog that appears, set a destination for each field. The fields on the left belong to the time line, the fields on the right come from the common tab being mapped.
5. Use LBSync.exe to sync this change to your production database.
To exclude a common tab from the Time Line
1. Launch LBDesign
2. From the FlexBase Pane, select the common tab you would like to exclude.
3. Click the Time Line button on the Utilities tab.
4. In the mapping dialog that appears, clear the fields listed in the Calendar Field column and click OK.
5. Use LBSync.exe to sync this change to your production database.
To hide the Time Line from all users
To hide the Time line, repeat the steps above (To exclude a common tab from the Time Line) for all common tabs.

Time Line Security
If no common tabs are visible due to FlexBase security, the Time Line common tab will not appear.
Dashboards
The LawBase Dashboard is a quick way to view a high-level summary of what is happening in LawBase.
- Dashboards are made up of gauges such as charts and pivot grids.
- You can have up to eight separate gauges on any one dashboard.
- Open as many separate dashboards as you like.
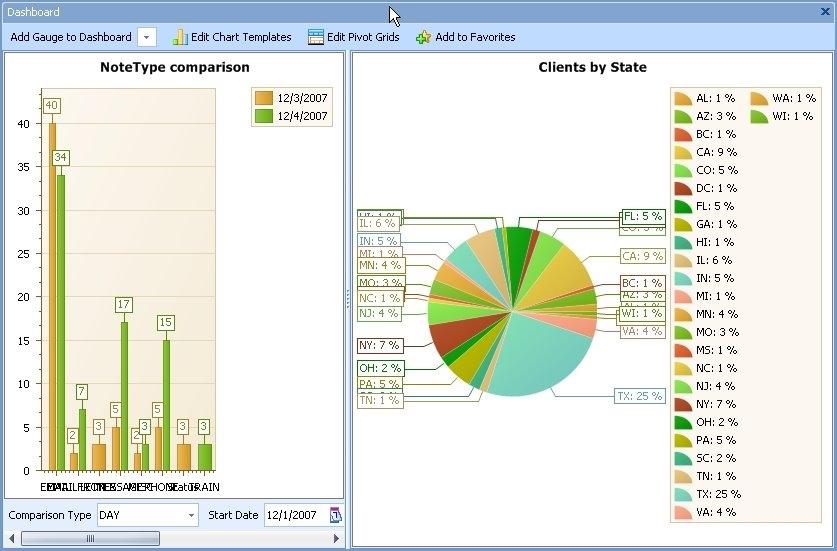
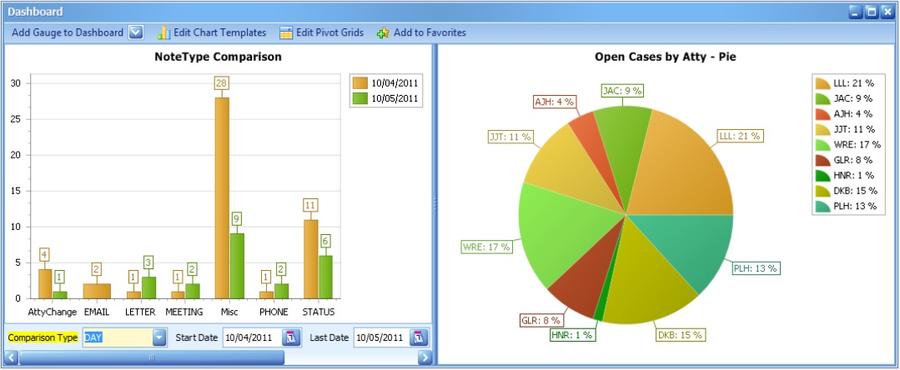
In the example below the dashboard is made up of a pie chart and a bar graph.
About Dashboards
A LawBase dashboard can contain charts and pivot grids.
- A chart is used to graphically display the results of an aggregate SQL Query.
- A pivot grid first display the SQL query results in grid format that can be used to create a chart.
Creating Dashboards with Existing Gauges
To create a dashboard:
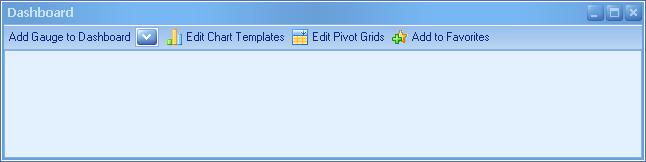
1. Click the dashboard button on the Home ribbon. The following screen displays.
2. Select the drop-down Add Gauge to Dashboard. You can then double-click on any gauge that has already been created. Some gauges may have parameters that you can modify to change the display of the grid. If these have been defined, you will see them on the bottom of the gauge.
In this example you may change the comparison type, start date, last date and minimum number of items that serves as a cutoff for displaying. This gauge is displaying the number of notes made of different types on two separate dates.
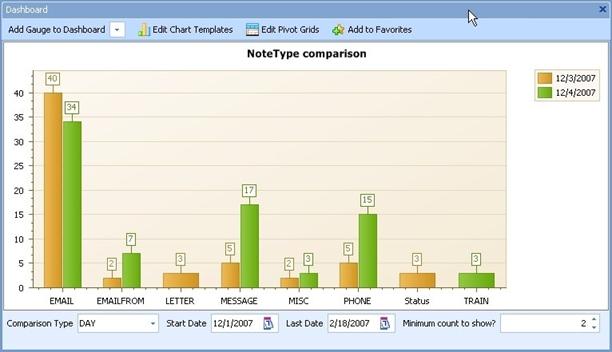
3. After selecting another gauge, the dashboard could look like:
4. To save this dashboard for future viewing, click the Add to Favorites button on the toolbar in the dashboards window. Name it and categorize as you like. What you save when you add a dashboard to favorites is a collection of gauges. If you choose not to save this dashboard, you can recreate it any time.
Charts
A variety of types of charts can be built and used on dashboards:
- Bar
- Gantt
- Line
- Pie
and a few more.
Creating Charts
Users with adequate permissions can create new gauges and edit existing ones. To create or edit, click Edit Chart Template from within the dashboard dialog.

The Design Charts Dialog appears.
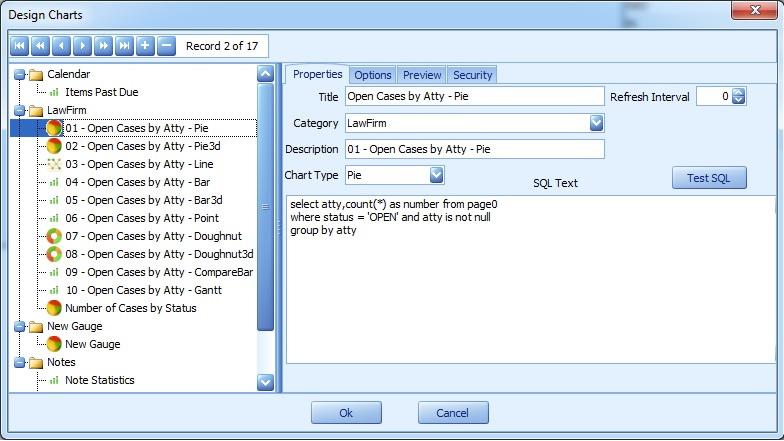
To create a new chart, click the plus sign in the navigation bar at the top. A blank chart will open up. Fill in the properties as described below.
Fill in the Properties tab
| Category | Use the Category to group various gauges in the display tree. This field is a non-validated picklist, so you can add categories freely. Defines the type of chart that will be displayed when add the gauge to the dashboard. |
| Chart Type | Examples are Pie, Line, Bar, Point and so on. Name This is the text that identifies the gauge in the Display Tree. Refresh The number of minutes to refresh the gauge automatically. Otherwise the dashboard will Interval be refreshed upon adding it to a dashboard or opening a saved Dashboard. The SQL query needed to generate the data for the chart. The Test SQL can be used to |
| Name | This is the text that identifies the gauge in the Display Tree. |
| Refresh Interval | The number of minutes to refresh the gauge automatically. Otherwise the dashboard will be refreshed upon adding it to a dashboard or opening a saved Dashboard. |
| SQL Text | The SQL query needed to generate the data for the chart. The Test SQL can be used toreview the results of the SQL Text |
| Title | This text is often the same as the Name but this text appears in the dashboard itself. |
The Options Tab
Options tab defines the detail properties of the Chart:
| Key Field | The field in the query that represents the item you're measuring. |
| Value Field | The field in the query that represents value or count of the measurement. Note: this option is not used on Gantt charts. |
| Scale Field | Optional. This field represents the item for those needing a third distinction. |
| Scale Type | The scale of the measurement. Options are: DateTime, Numerical and Qualitative. |
Pie Options
These options will only appear for Pie charts.
| Label Location | Choices are: Inside, Outside, Two Columns, Radical and Tangent. |
| Display Value as Percentage | Check this to display the value as a percentage of the total. Otherwise the actual data will appear. |
| Show Legend | Check to display the legend. |
| Explode by Default | Check to automatically explode the pie pieces. |
Pivot Grids
Pivot Grids can also be added to dashboards. Pivot Grids look like spreadsheets but may also include a chart view. Here's an example that looks at notes for a given time period and organizes them by user and by notetype.

Creating Pivot Grids
Users with adequate permissions can create new pivot grids and edit existing ones. To create or edit, click Edit Pivots Grids from within the dashboard dialog. The Design Charts Dialog appears. To create a new pivot grid, click the plus sign in the navigation bar at the top. A blank grid will open up. Fill in the fields and enter a SQL statement as needed.
For more assistance with a specific Pivot Grid, contact LawBase Support at [email protected] .
Examples of Queries
Ever dashboard or pivot grid needs a SQL query to function. Below are some sample of queries to help you get started.
Notes by User for a Time Period
This query says to select the noteby and compare it by day and count up all the different types of notes from a range of 2 weeks ago until today. It groups the results by the noteby which is the person who entered the note by day.
Using LBCompare
LBCompare(datefield,type) is a LawBase built in function that sets up the initial comparison. For the type variable you may use “day”,”week”,”month” or “year” depending upon which kind of comparison you’d like to do. If LBCompare exists in your sql query then an input will automatically be put on the gauge that allows the user to change this to any of the other options while looking at the chart.
This query finds the number of notes entered by type of note and compares them by day to start. It also has four questions in the query that are used to allow the user to change their value to modify the display of the chart immediately. As in Hot Docs Reports, you may use {ask} sections to define user input. Let’s break down this query to show what it’s doing:
This says that we want to select the notetype, compared by day, and count the number of each notetype from the notes table. Notetype and the total of each notetype by day will be the main information we display on the bar chart.
This says we want to find notes where the duedate on the note is between two questions that we will ask the user. In the above section we use to {ask} variables. The first one:
Says we wish to ask a date type of question. The input will say “Start Date” for it’s text and it will begin with the value of the current date (:CurDate) minus one week. The second {ask} section gets the upper end of the search and adds one day to the current date as its default.
This section says we want to group our notes by the notetype and compared by day.
Finally we put in a having clause to our SQL which says we’re only interested in notetypes that have 10 or more entries for our comparison.
Debugging
Built into LawBase is a debugging tool called Program Tracer. The Program Tracer shows step-by-step what is happening when you launch a workflow, edit a file, close a file and so on. This can be useful when troubleshooting. Why might you want to debug? A good example is when testing new WorkFlows to see the program steps as well as what the results for SQL selects, VARs and so on. Administrator level of security is not required to utilize Program Tracer.
Activating the Program Tracer
At the bottom left corner of the LawBase screen locate the logged-in user's name.
- Right-click once on the user name to activate debug level 1.
- Right-click again to activate debug level 2.
- Right-click a third time to turn off the program tracer.
When the tracer is running, you'll see something like this:

Options
To clear out the current trace messages, click the clear button. To pause the trace, check the Pause on Trace checkbox. You'll be prompted to click ok as each new line appears.
Design
LBDesign is a companion program to LawBase. Use LBDesign to modify the tabs in your LawBase. You can:
- Add, Modify and Hide Tabs
- Add, Edit and Delete Fields
What's New in this Version
If you have upgraded from LawBase 10.7, you might want to review the new features of LBDesign here: What's New in LBDesign
Configuring Design
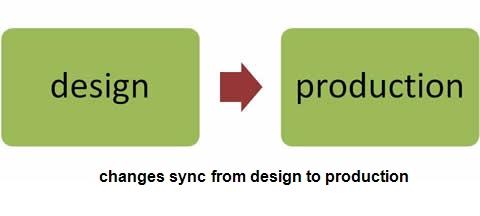
Typically, LawBase installations include two databases - one for production and one for design. In this scenario, you can make all of your changes to the design database, and when you are satisfied with them, sync them to the production database.
For this to function correctly:
- You need a database on your SQL server for each working environment
- You need to configure LBDBConfig; this is described on the following pages.
LBDBConfig
The LBDBConfig application (lbdbconfig.exe) is in your main LawBase directory. Double-click the file to launch the application. It does not require a login or a password.
Parts of the LBDBConfig Window
| Name | The name of the connection. For required connections, the name is hard-coded; you must have a Production and Design Connection. |
| Windows Authentication | Check this to authenticate to the SQL server using Window Authentication. Check this to authenticate to the SQL server using Window Authentication. |
| Server | When LBDBConfig launches, it reads from the SQL servers broadcasting on your network, so you should be able to choose the server where your LawBase database is housed. If you can't find the server in the drop-down, type in the name. |
| Port | By default this is 1433 but you can modify this as needed. |
| Database Name | Once you've chosen the server, you should be able to choose the database from a list. If you can't find the server in the drop-down, type in the name. |
| SQL User | Type in the name of the SQL server user who has rights to the LawBase database. |
| SQL Password | Type in the password for the SQL server user you filled in above. The password is not exposed -- the characters are obscured with asterisks. |
| Test Connection | Click this button to test connectivity. It checks that the server name and database name are correct and that the login and password work. |
| Send Backup to Synaptec | On occasion, you may need to provide Synaptec with a backup of your database, typically for troubleshooting. This is a quick way to send a backup to Synaptec. When you click this button, it creates a backup file in a temp space on your system, compresses the backup and then sends the backup to our secure ftp server. You may find that this button does not work; this is usually due to security and firewall settings on your end. |
| Save | Click save to save the settings from above to the lawbase.config file. This file is referenced every time you launch any of the executables provided with LawBase software. NOTE: Avoid editing the lawbase.config file directly; instead use lbdbconfig to write changes to the config file. Bad edits can render the file corrupt and unusable. If this does happen, restore a good backup copy or contact Support to obtain a blank config file. |
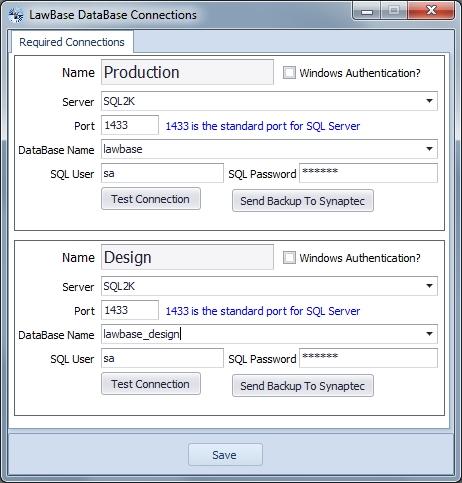
Database Connections
- By default Required Connections appears. These are two connections you must have to run LawBase and LBDesign.
Creating New Connections
- To create additional connection, right-click in the Required Connections label.
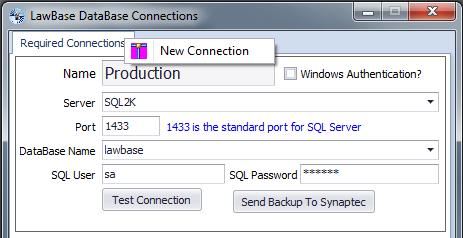
A new tab appears like the following. Fill in the fields for the SQL server and database as appropriate for your environment.
You might add another database as part of a testing environment.
Another reason you might add another database could be to get data from a database outside of LawBase. Then this data could be accessed through Show Only fields. For example, you might want to get a total from a time and billing system. To do this you'd create a new SQL Connection with the proper login and password for it and on showonly fields you could reference this connection and do whatever SQL you like to display information.

Windows Authentication
You can use lbdbconfig to use Windows Authentication to communicate with the server.
1. From within LBDBConfig, check Windows Authentication for the necessary databases
2. On the SQL Server, create the user on the server (if it does not already exist) and add the user to the DB. Then, whenever a LawBase user logs into any of the executables, this ensures that the user is part of a group with rights to the database.
Authenticating Users
A further step uses the Window Network Login to authenticate to LawBase. This means users are forced to log in to LawBase as themselves and can't change the login.
1. Set Cosmetic in LBAdmin. From System-> UseNetworkLogin. This means that LawBase login must match the windows login.
2. Create LawBase Logins that match the windows logins.
About Design and Production Environments
Synaptec Software Inc. recommends having both development and production environments for LawBase. A development environment allows you to test any screen design changes, workflows and program file updates before implementing to a live end-user environment. See Review and Synchronization for more information about how environments work.
Launching Design
LBDesign is the design tool for LawBase. Use this program to control how your LawBase screens look. This includes adding tabs, adding fields, changing labels and so on. To launch LBDesign, locate the LBDesign.exe file in your main LawBase directory and double-click it. The default login is DREW.
Top Tips
- We recommend that you limit who has access to design.
- Don't change field names after you have data – you can lose data
- Undo does not undo deletions. So save often. If you goof, you can exit without saving.
Set-up
- Use LBDBConfig to set up the environment. LBDesign runs against the Design database specified in the LBDBConfig interface. More details in Configuring Design
Logging in
- Typically, log in with the admin login DREW.
Parts of the Screen
This section covers the LBDesign user interface, including ribbons, the header, the tabs and the panels.
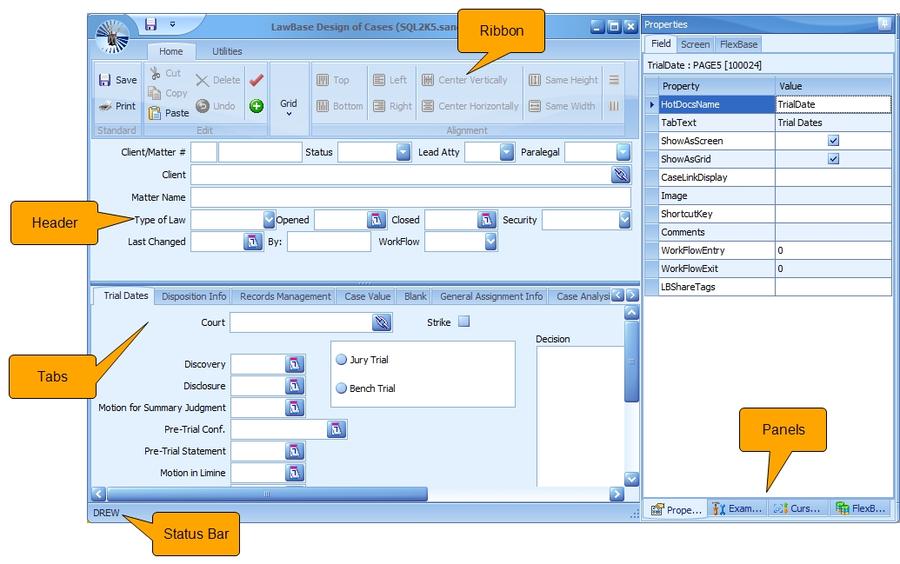
The Ribbon
At the top of the LBDesign interface you'll find the ribbon, which is made up of two tabs: Home and Utilities.
Home Tab
The Home tab holds the most-frequently used design buttons. Use the buttons to perform basic functions including Save, Undo, and Check Screen for errors.

Standard
Save Saves the current design.
Print For the selected FlexBase: Prints a screen capture of the header and tabs with all Print field information to a document.
Edit
Cut Cuts the currently selected widgets.
Copy Copies the selected widgets.
Paste Pastes the widgets currently on the clipboard.
Delete Deletes selected widget(s).
Select All Widgets Selects all widgets on the current page.
Undo Lets you reverse the most recent action.
Check Screen Checks the screen design for common errors. For more information, see Check Check Screens Screens.
Add Tab Adds a new tab to the current Flexbase.
Grid
Toggles the tab display from normal view to grid view. Grid Use this for grid screens and for repeatables. For repeatable tabs, switch to this display to select the fields you want to see in the grid on the right. For more information, see Grids and Repeatables.
Alignment
Top Aligns the top borders of the selected widgets.
Bottom Aligns the bottom borders of the selected widgets.
Left Aligns the left borders of the selected widgets.
Right Aligns the right borders of the selected widgets.
Center Vertically Aligns the vertical centers of the selected widgets
Center Horizontally Aligns the horizontal centers of the selected widgets.
Same Height Makes selected widgets the same height. Select first the one whose height you want to replicate.
Same Width Makes selected widgets the same width. Select first the one whose height you want to replicate.
Evenly Space Vertically Distributes widgets vertically within the bounds of the originally selected widgets.
Evenly Space Horizontally Distributes widgets horizontally within the bounds of the originally selected widgets.
Actions Tab

Clean Typically used only after converting to LawBase 12 from LawBase 10.
Backup makes a sql backup of the database and saves it in the main LawBase Directory. Note: You must be Backup running LBDesign.exe from a mapped drive for this to work.
Send Definitions to Excel Creates an Excel file listing the Tab Text, Table Name, Field Name, Label Text, HotDocs Name, Field Length, Send Definitions SQL Field Type, Widget Type, Default Value, Picklist to Excel Name and SQL Lookup information for each field on each tab in the selected FlexBase. Useful for data mapping purposes.
Go to Field Takes you to the tab and/or field you choose. Type in the text of the tab or the serial number of the tab and press ENTER. Example: page2.lname.
Import Screen Use this to import sample screens from LBShare.
Typelaw Filter Select a typelaw and the display will be limited to the tabs included in that typelaw definition.
Reset Docking Resets panel positions to defaults.
Select All Widgets Selects all widgets on the current page. Widgets Default Widget Sets the default height for widgets in your design. The Height factory default is 20. Default Font Sets the default height for font in your design. The factory Height default is 8.
Utilities Tab
Button Description
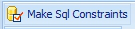
Make Sql Constraints
This option will run through your entire database and verify that all your SQL Server constraints are correct. If they are not, this option will recreate them. This utility also creates indexes on caseserial , which enables faster access of common tabs from files with LawBase.
Why might you need this? This is most often run after imports, where keys may have been ignored.
Fix NVarchar Fields
Use this utility to change all Nvarchar fields to VarChar. If you upsized your database from an access .mdb file, often all the fields will be of the incorrect type. What should be varchar fields are nvarchar and what should be text fields are ntext. If so, this selection will go through the database and change those fields to the correct type.
Text to Varchar
Will change the properties of any text fields (old LawBase Design) from type Text to type Varchar(max). Varchar(max) is a more efficient way to handle memo fields.

Delete all files in
Use this utility wisely. This utility deletes *all* files from the FlexBase you select from the drop-down. It also deletes all common items (notes, calendars, etc) which are tied to these files.
NOTE: Files deleted with this utility cannot be restored.
This is most often used before doing a complete system import or to create a design database free of data.
To delete all the files in a Flexbase:
1. Select the appropriate Flexbase from the drop-down
2. Click yes at the dialog that appears.
3. Finally, type in the secret password to complete the deletion. To obtain the password, contact LawBase Support.
Skin Preview

Will show you what your design will look like with different skins. The factory default is Money Twins.
Help

Opens the online help.
Join a Support Meeting

Will launch GoToMeeting to meet with a LawBase support Meeting technician.

Panels
There are four panels
- Cursor Order
- Examples
- FlexBases
- Properties
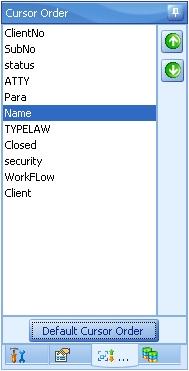
Cursor Order
Cursor order is the order in which a user moves focus from one field to another by pressing the TAB key. You may need to alter the cursor order after adding new fields; by default they newly added fields appear in the end of the cursor order even though they may be positioned at the top of the screen.
- Press the Default Cursor Order button to reset the sequence from left to right and top to bottom.
- To move an individual field in the sequence, selectthe field and press the Move Up or Move Down arrow buttons.
- To move multiple consecutive fields, select using
SHIFT+CLICK, then press the Move Up or Move Down arrow buttons.To select multiple fields that are not in order, CTRL+CLICK on the fields you want,.then press the Move Up or Move Down arrow button.
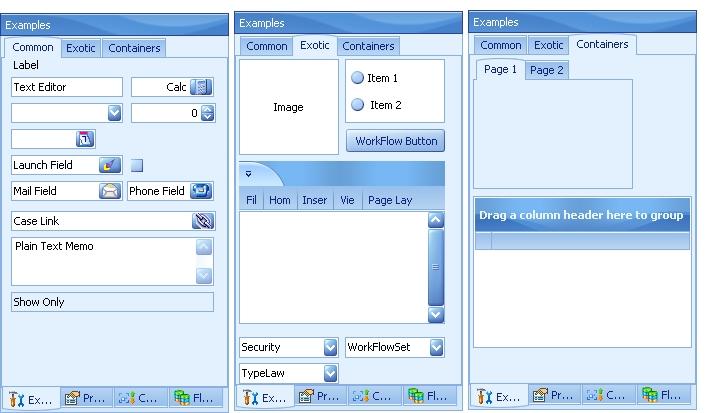
Examples
Use the Examples Panel to build screens. The Examples Panel is made up of three tabs: Common, Exotic and Containers.
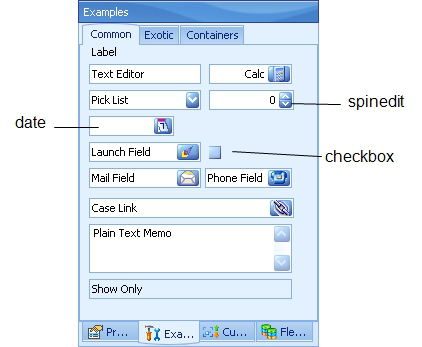
For details about the different types of fields, see Field Types
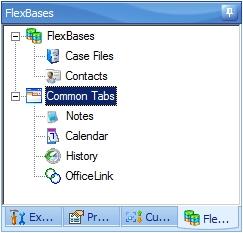
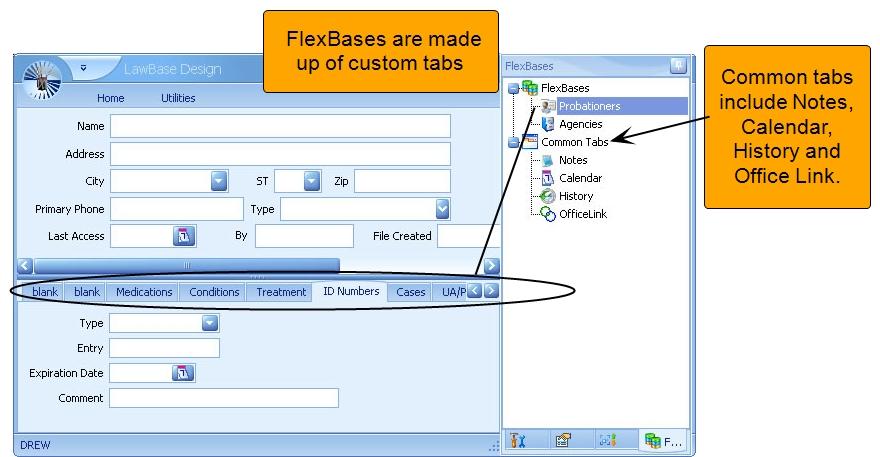
FlexBases
FlexBases are the databases that make up LawBase. Typically you'll find at least two FlexBases: a Case/Matter FlexBase and a Contacts FlexBase. So how do you decide if you need an additional FlexBase? If you need a different header, then you may need another FlexBase.
Use the FlexBases panel to: Add or delete FlexBases
- To delete a FlexBase: right-click on the FlexBase and select Delete.
- To add a FlexBase: right-click on the top of the tree where the label reads FlexBases. Add, delete or modify common Tabs

Tab Types
There are two main types of tabs: custom and common. Custom tabs are the ones built just for your organization. Common tabs are provided with a LawBase install, but can be modified to meet your needs.
Custom Tabs
You build custom tabs for each of your FlexBases. The most typical FlexBases are for managing Cases/Matters and Contacts.
Adding Custom Tabs
To add tabs to a FlexBase, right-click on the FlexBases branch and select New FlexBase.
Pink Tab Labels
Rarely you may come across a tab in LBDesign that has a pink label at the top. This indicates that the tab uses a view for its data rather than a regular database table. This is not a common situation - for assistance with this, contact LawBase Support.
Common Tabs
Common tabs are provided with your LawBase install but may be customized. Typically, the common tabs included in an installation are Notes, Calendar and History. Common tabs can appear in any FlexBase at the bottom of the file area. To add other common tabs to be included in all file types, right-click on the Common Tabs branch and click New Common Tab. Fill in the properties as described below.
Common Tab Screen Properties
Name: The name of the table.
TabText: The name which appears in LawBase. NOTE: do not include spaces in the name; if you need to punctuate, use underscores. ShowInfo The fields displayed when selecting copies.
AllowPerTab: Check this to create the equivalent of tab notes. Example: If my new common tab is Expenses, then checking this will create Tab Expenses. The name of a companion tab is not editable; it will always be the original tab name.
Order: Enter the fields you want this common tab to automatically sort by.
Image: Add an image to identify items. You'll want to use a 16 x 16 gif; just right-click, select Load and browse out to the image source. TimeLineColor Set the color to represent this common tab in the time line view.
ShortCutKey: Select a shortcut key from the drop-down.
EmailDisplay: All common tabs include an email button; this is where you set how the fields are displayed in the body of the email.
OkPressWorkFlow: You can set the workflow that is fired when the OK button is clicked. Administrators can also edit this workflow through LawBase by right-clicking on the OK button
Common Tab Order
By default a new common tab will appear at the beginning of the list, that is, to the left of Notes. To set the order from left to right, from LBAdmin, go to System Setup > DataBase Explorer and select the Common_ Layout table. Locate the column named Sorter. Set the order you want for the new common tab. These items are ordered from left to right, the lowest number being the leftmost.
Grids and Repeatable Tabs
There are three kinds of tabs in LawBase
Normal This is a single tab with one set of data.

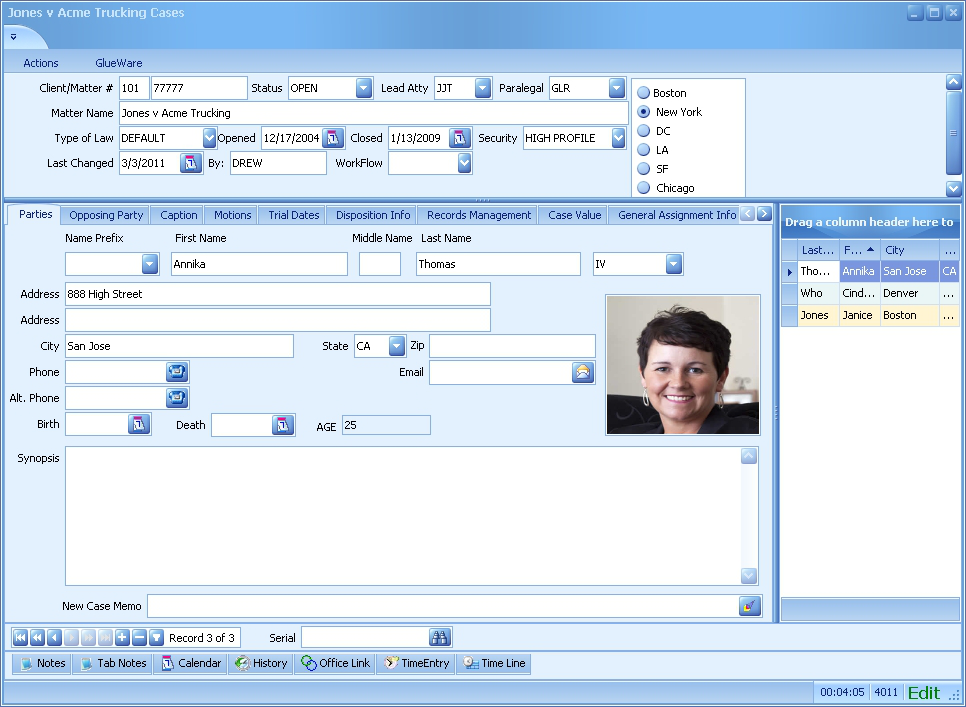
Repeatable On the left this looks like a single tab; on the right there is a grid where you can see all of the copies. There is a navigation bar at the bottom where you can add, delete and copy entries as well as move from entry to entry.
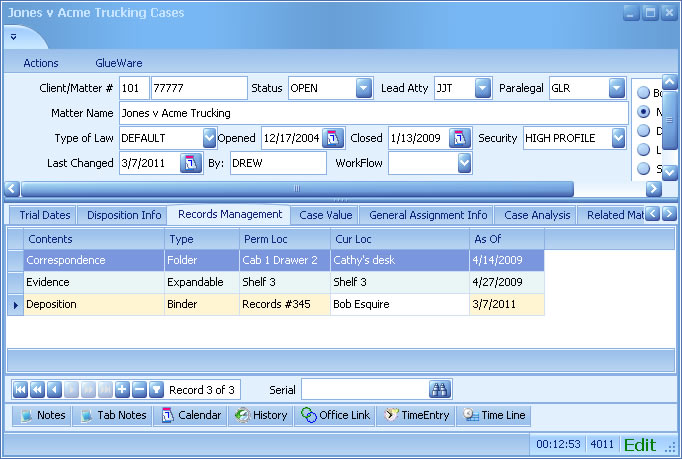
Grid The entire tab looks like a spreadsheet. There is a navigation bar at the bottom where you can add, delete and copy entries as well as move from entry to entry.
Set the tab type from the Screen Properties.

The following table indicates what to select to get each type of screen:
ShowAsScreen ShowAsGrid Normal screen x Grid Screen x Repeatable x x
Editing Grids and Repeatables
When you edit a Normal tab, what you see is what you get. Grids and repeatables are a bit different.
Repeatables
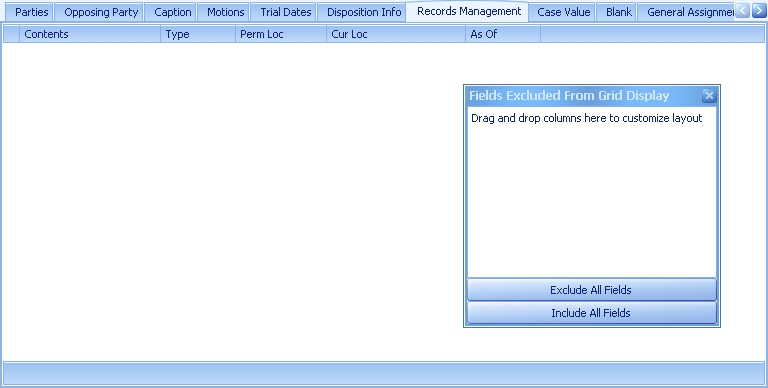
In the default design view, all you see is the main screen area of repeatable tab. To see the columns that appear on the right, click the Grid button on the Home Ribbon.
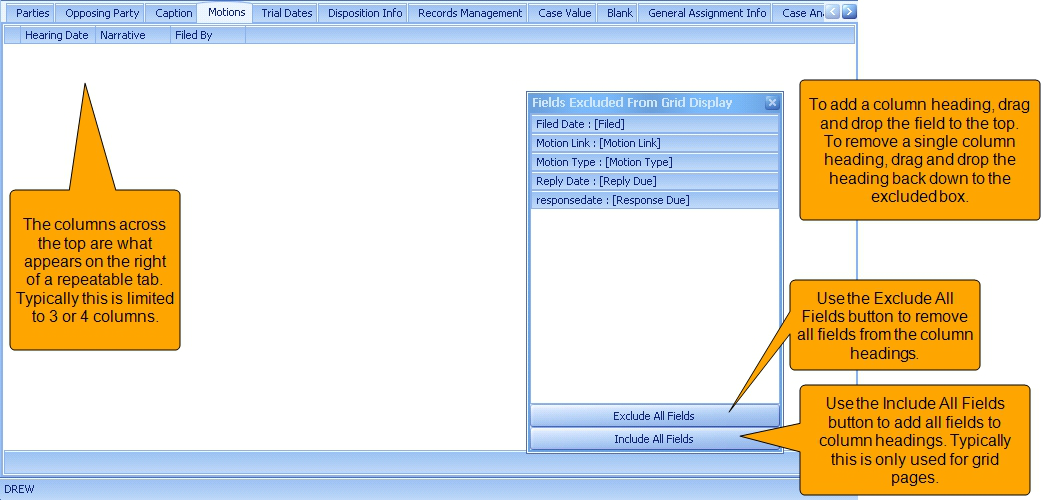
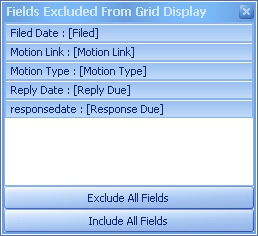
Fields Excluded from Grid Display
For ease of use, if the label text differs from the data field name, both names will be displayed in the Excluded Fields listing; the label is displayed in brackets. Note, however, that only the label text will display on the grid itself in the LawBase program.
Grids
Grid tabs look like normal screens in LBDesign. Click the Grid button on the Home Ribbon to rearrange the columns. Typically, all of the columns will appear in the list across the top and nothing will be excluded from display.
Tickler Grid
You have the ability to set what information from a calendar entry your users see by default when they open their calendar in LawBase.

To set these columns, click on Calendar from the FlexBases panel in LBDesign. In the Home ribbon click on the Tickler Grid button

You will see a layout similar to those referenced above for grids and repeatable tabs. Drag and drop the fields that should appear in the Calendar grid by default.
Footers
You can add footers to grids, repeatables and subgrids. These can be used to display a variety of calculations. Built-in calculations include:
Sum
Min
Max
Count
Average
To set up a footer:
- In LBDesign, open the tab where you want to add a footer.
- Toggle to the grid view from the Home ribbon.
- Select the field (column) that will be included in the calculation.
- In the Field Properties panel, select the Footer Type.
- Then set the format in the Footer property.
Labeling Footers
To add a label on the Footer, after select from the drop down of the Footer (e.g. Currency, Integer, etc.), save the change and go back to the screen. Issue the Footer label in front of the Footer (Total Compensation {0:c2}). Note that the column width of the field on the screen needs to be wide enough to hold the footer label and results of the calculation.
Custom Footers
Please contact LawBase support if you require another kind of calculation in your footer which is not included in the built-in list. We will be happy to work with you to set it up.

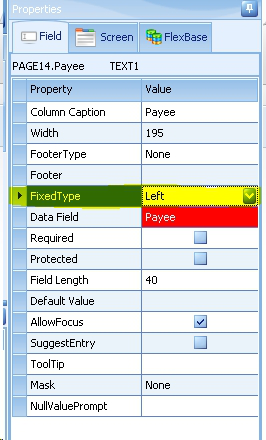
FixedType
Within LawBase, users have the ability to move columns around within grids to view information as they want to see it. If a particular column in your grid should be fixed, or frozen to the user, you have the ability to permanently pin the column to the left or right side of the grid. To set this property, toggle to the Grid view, select the column that you want to pin, and on the Properties panel select the FixedType that you want:
Data in Grids
Data in grid columns will wrap and display on multiple lines if the row height is adjusted. This will only work on text or memo fields and NOT on field types that contain functionality buttons (picklists, caselinks, emails, etc).
CellFormat - Coloring Grid Values
In LBDesign, in the Grid setup, if you select a column and look at the Field Properties associated with that column, you will see a line for CellFormat. This allows you to define a color scheme within the grid based on field values, much like you can assign in SmartFolders.
Field Types
The Example palette is organized into three tabs: Common, Exotic and Containers.
Common Fields
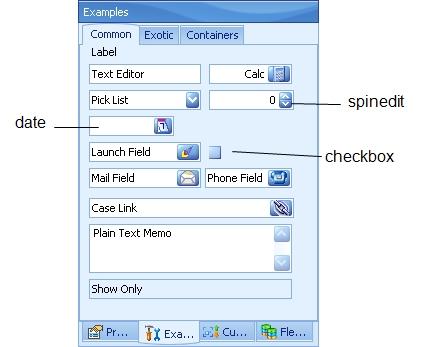
A brief description of each of the common fields is listed below. The table below is arranged alphabetically.
Case Link
This field allows you to link a another tab. Typically this is a link to a contact, but can be to another tab in the same FlexBase or another FlexBase. For details about setting up Caselinks, see Caselinks.
Calc field
This field type only accepts numbers. It also provides a pop up calculator where math functions can be performed. The underlying field in the database is created as a numeric field. Use the Precision property to set how many decimals appear. Use the IsCurrency property to display a $ (dollar sign). Use the IsPercentage to display a % (percentage sign). The result of using IsPercentage will be the number presented to the user as a percentage but the number stored as a decimal (e.g. 25% is .25).
Checkbox: This field is a box which can be selected (Y) or deselected (N).
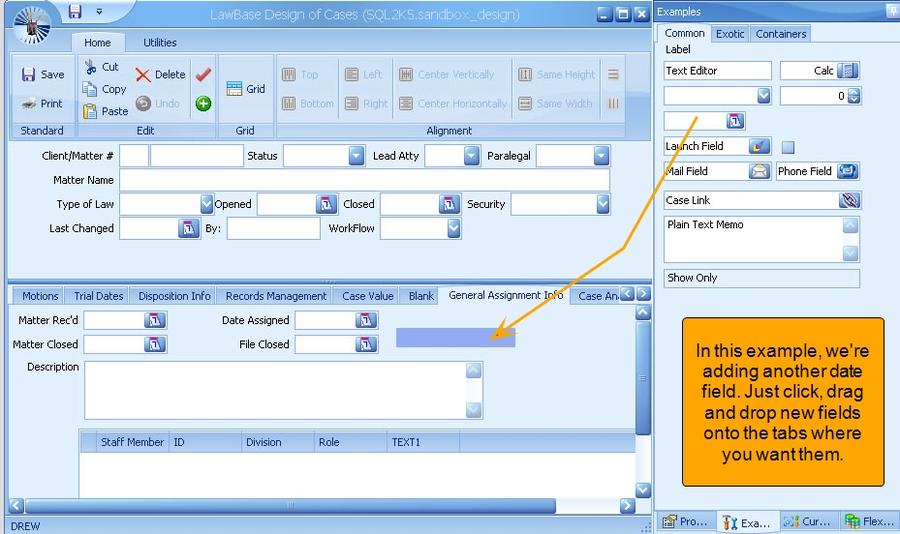
Date: This field accepts a date in an mm/dd/yyyy format. The field in the underlying database is stored as a Date/Time.
By default, a newly added date field only shows the date; you can also show the time. Just check the Show Time checkbox in the field properties panel. Another property you can set on date fields is AllowClear. When this is unchecked, users cannot clear out the date. Also, if you know you have users who use longer formats for dates such as dd-MMM-yyyy, you may want to make the date fields wider to accommodate the length. NOTE: If you change your short date and time formats on your system's control panel, LawBase will use that new format for any dates contained in the database. So different users may see different formats of date depending on their machines's settings.
Label: Use this field type to create a standalone label.

Launch: Use this field type to link an external file or directory. Users can also drag and drop email messages or Windows Explorer paths into these fields. A .msg file will be created and saved in the EmailAttachments folder within the LawBase directory (if Cosmetic is turned on). The launch field will save a path to that message and will open the Outlook message whenever the launch button is pressed. For files,LawBase will accept any format where a relationship has been established in Microsoft Windows Explorer. When a user clicks on the rocketship button, it launches the associated application and opens the linked item. To link a directory, change the field property LaunchFieldType from the default of File to Directory. After a directory is entered in the field, when users click the the launch button, Windows Explorer will open to that directory and allow regular browsing. If the user tries to launch a path to a directory or file that no longer exists, the user will receive a message stating as such.
Mail: This field accepts email addresses. When a user clicks on the envelope button, it launches their email application and creates a message addressed to the email in the field.
Phone: This field type accepts phone numbers. If your system is configured with a TAPI connection, you can click on the phone button to automatically dial the phone with the selected number. Masks cannot be applied to the phone type field. NOTE: If you are using a TAPI system, you may want to review the information about related cosmetics here: Cosmetics
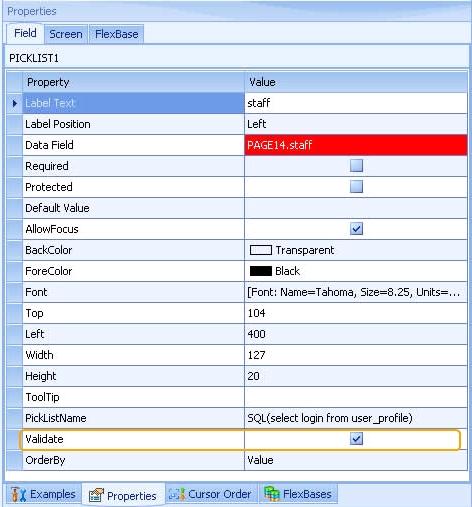
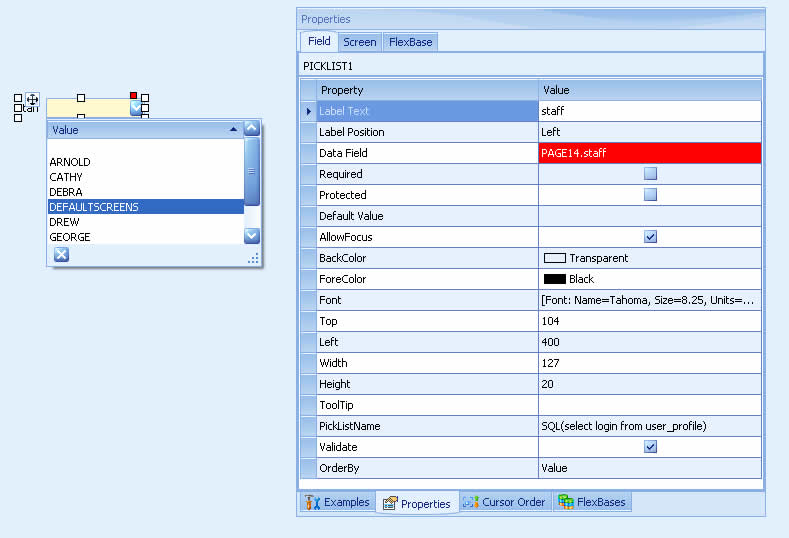
Picklist
Use this field type to add a drop-down. The picklists associated with the drop-down are named and can be used in more than one location in the same LawBase installation. For example, you could have a STAFF picklist which lists all your staff. And this picklist could be in multiple tabs as well as in the header.
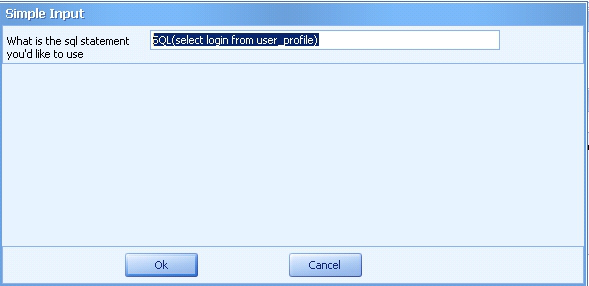
Active picklist - use the same Picklist widget, but fill in picklist name field with a sql statement to do the lookup. Example: SQL(select login from user_profile)
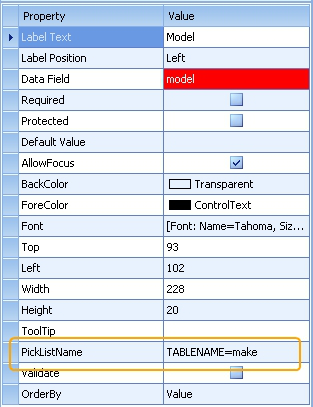
Dependent picklist - the choices depend on another field. For example, you could have two fields, make and model. The models available to select vary depending on the make. In this
case, for the model field, fill in the picklist name field as follows: TABLENAME=MAKE NOTE: Dependent picklists cannot be used on grids. For more information about picklists, including active and dependent picklists, see Picklists
Plain text memo: This field type accepts a large amount of text in a single field If the text entered into the field exceeds the space on the screen, a scroll bar will appear.
Show Only: Show Only fields display the contents of another field but cannot be edited. For example, a client's age might be calculated on one tab and displayed again on another tab through a show only field. In this way, only one field can be updated and you avoid the risk of inconsistent data. Possible sources for show only fields: external data sources, data from other LawBase fields; the data may also be calculated, such as the average from multiple database fields. As needed, you can return multiple results in a showonly field. Also, you can use '<return>' in your select list to make the display run over multiple lines. These are sometimes called External Fields. Show Only fields can be difficult to use in searches and reports. An alternative to Show Only fields is Calculated Fields. Another thing you might like to consider if you are using multiple show only fields for a summary page is to use a view to populate the page. Contact LawBase support if this is something you would like to pursue.
SpinEdit: This field type accepts integers. Use the up and down arrows to increment the value by 1.

Text Editor
This field type accepts numbers or text in any combination and has a fixed length which you determine.
Exotic Fields
The fields on the Exotic tab are described below.
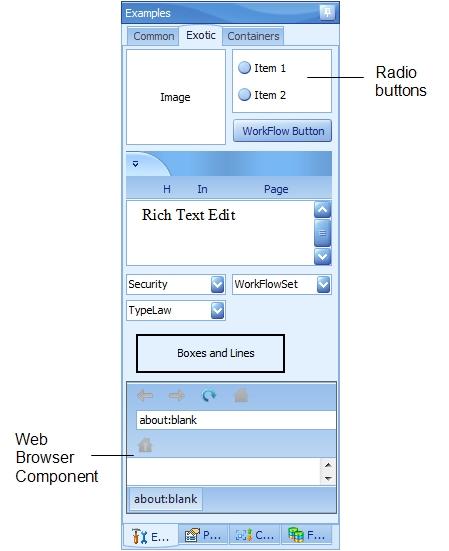
Boxes and Lines: Use Boxes and lines to add definition to your tabs. Drag out to create a box. To create a line, make a very skinny box.
Image: This field type accepts image files. To add an image in LawBase, right- click and select load. Images stored in image fields become part of the database -- they are not links to network locations.
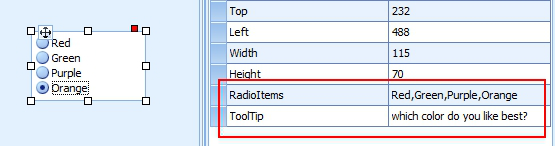
Radio Button: Radio buttons come in groups. Users can select one item from the group. Edit the button names using the properties panel. Add as many radio button groups to a tab as you like.
Rich Edit: Use this field type to store text with formatting. Example: store a caption for use on a pleading.
Security: Security is a system field and must be included in the header of every FlexBase. This is where the security for a file is set. NOTE: the security field cannot be added to tabs, only to the header. NOTE: If you used LawBase 10.7, you might be used to Tab security being applied using this field; in LawBase 12, Tab Security is applied differently. For more information, see Tab Security.
Typelaw: Typelaw is a system field and must be included in the header of every FlexBase. This field works in conjunction with LBAdmin to determine which tabs display. For example, for the typelaw "Litigation" only Litigation tabs will appear. For the typelaw Contacts, only contract related tabs will display and so on. The header always appears, regardless of the typelaw. NOTE: the typelaw field cannot be added to tabs, only to the header.
Web Browser Component: Use the Web Browser Component to include live web-based content within LawBase. The browser launched is a built in Microsoft browser. The field is saved as a varchar and saves the url information We expect this will be used most frequently with pages that provide data related to a case, such as government sites, document management sites, sharepoint and so on. Consider leaving the toolbar enabled (described below) so users can fill in the URL, or you can hide the toolbar and use a WorkFlow to populate the URL. Example: Dynamic URL using case information You can use a workflow to set the URL for each case, using the case number as part of the string. Using a Screen Entry workflow, select the Action component, select the Manual Action tab and fill in the following:
ACTION=UPDATE^TABLENAME=tablename^fieldname
=webaddress:caseid
Example: ACTION=UPDATE^TABLENAME=PAGE15^sharepoint =http://sharepoint.com.<<page0.caseID>>
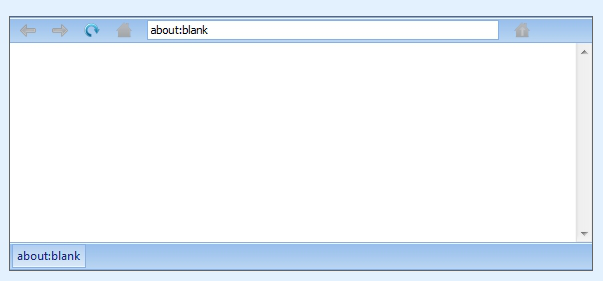
In design, leave the browser field's default value blank so LawBase each file can have its own url. Two additional properties are available for the WebBrowser Component: ShowToolbar - exposes the toolbar so users can navigate back and forth, return to home and even change the url. ForceBrowserInternal- if a website launches pages outside of the original window, check this to prevent them from opening in an external browser.
WorkFlow Button: Add a WorkFlow button when you want to have an on-demand WorkFlow. Users click this button to kick off the WorkFlow. To associate a WorkFlow with the button, use the properties panel.
WorkFlow Set: Add this drop-down to the header to assign workflow sets to files. This drop-down cannot be added to tabs.
System Fields
Most installations of LawBase include fields on the header that tell you who edited the file and when. These fields are automatically updated when users create, edit and save a file. A few system fields make this happen; here is a list of those fields:
Usage Field name Field type Common Labels Populated with
Last Edited by abfld date field Changed by Login Name of user the file was last changed by Date entered or created
defld OR dateopened
date field Open Date System date/time the file was created
Date last edited lafld text field Last Changed System date/time the file was last changed
Created by openby OR openedby
text field Opened by Login Name of user who created the file
When you add these fields keep in mind that the field names are important and must be spelled as above. NOTE: These fields work only when the update is done manually from within LawBase. They will not do anything if changed through SQL updates or inserts. So if you use a workflow to update one or more of these fields, you'll have to add logic to the workflow to update the system fields as well.
System Fields on Tabs
Abfld, defld, and lafld can also be used on tabs and common tabs. Openby does not work on tabs other than the header; to track the who created a common tab, set the default value of the field to LB_ USERNAME.
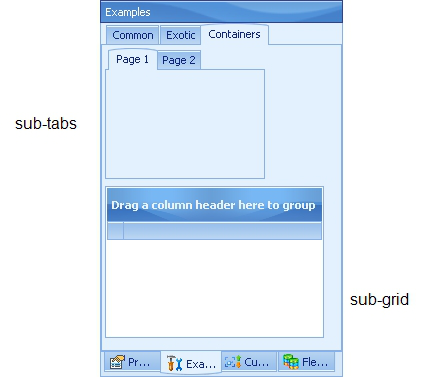
Containers
The Containers tab in the palette holds subtabs and subgrids.
DESIGN NOTE: To add new fields to a subtab or subgrid, you can drag and drop components from the Fields panel directly onto the subtab or subgrid OR you can cut and paste existing fields from a tab into a subtab. You cannot drag and drop existing fields on a tab onto a subtab or subgrid.
Subtabs
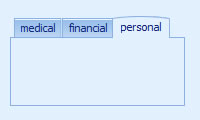
Subtabs provide a way to organize a lot of information on one tab by grouping it, typically by function or category. All of the information is saved to the same table in the database; the groupings only affect the display. The default widget includes Page1 and Page2 but you can use the properties panel to name the subtabs as needed. You also have the capability to hide subtabs based on field values by using an Appearance workflow component. To add a subtab, drag the widget on to the tab .
These properties result in these sub-tabs
Subgrids
Add subgrids to regular and repeatable tabs.
Adding a Subgrid
To add a subgrid to a tab:
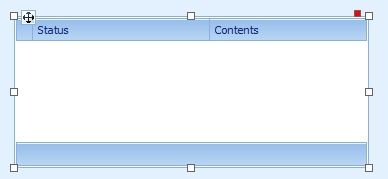
- Drag the widget onto the tab.
- Then drag fields onto the subgrid to build the columns.
NOTE: You may find when you edit an existing subgrid that the sequence of the columns reverts to the order in which the columns were created. To correct this, simply drag the columns into the order you prefer.
Editing Subgrid Field Properties
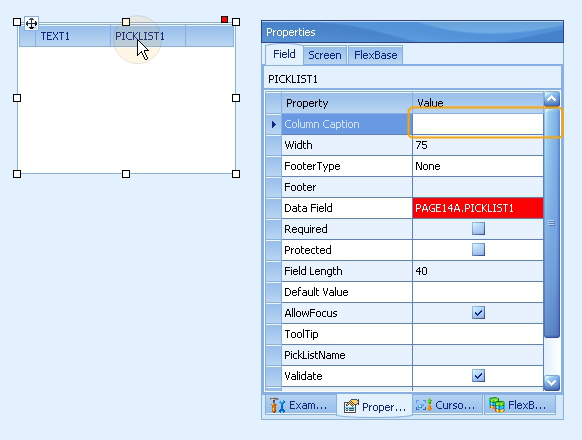
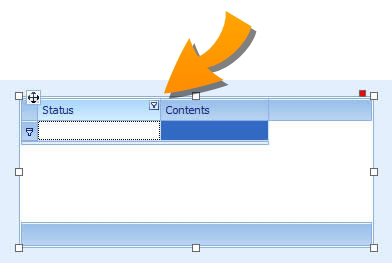
The property panel is a bit different for fields on subgrids. To edit the properties, click the column you want to edit. Below we have clicked Picklist1.
Set the field name in the Data Field property
Set the display in the Column Caption.
The picture below shows the properties of a newly-created subgrid.
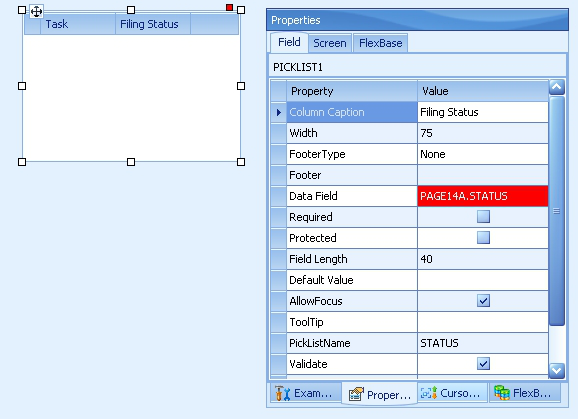
Edited Properties
Editing Subgrid Properties - While the columns have their own properties, the grid itself has its own. Select the subgrid by its handle to expose these properties.
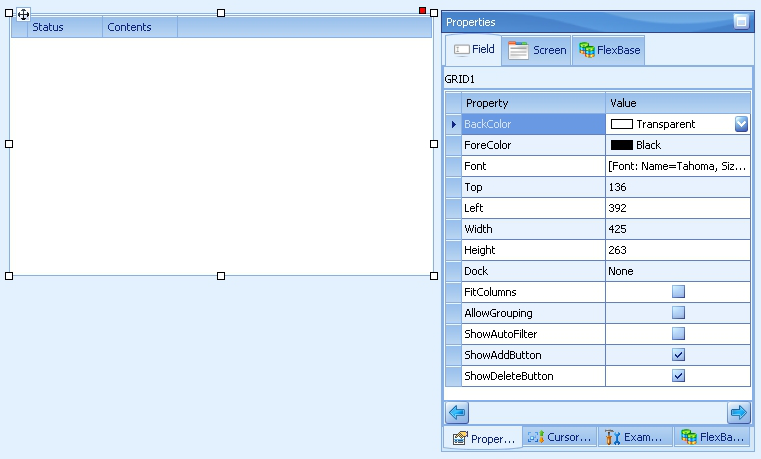
Fit Columns - will distribute the columns evenly across the width of the subgrid. Here it's checked. Compare the columns in the image above
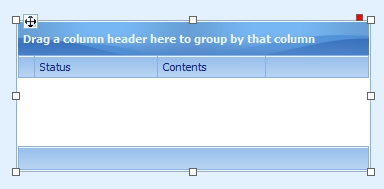
Allow Grouping - When this is on, users have the ability to group by a column of their choosing, kind of like in notes.
Show Auto Filter- adds a filter to each column
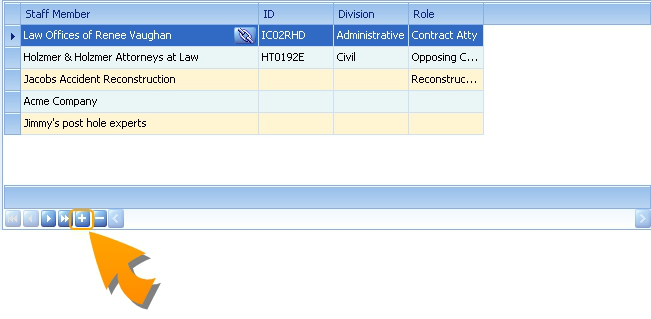
Show Add Button - when checked, the + appears on the subgrid, allowing users in LawBase to manually add a record to the subgrid
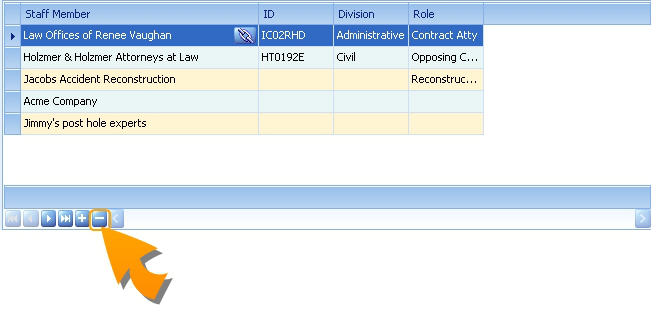
Show Delete Button - when checked, the - appears on the subgrid, allowing users in LawBase to manually delete a record in the subgrid
Subgrid Footers - Totals, Averages etc.
You can add a variety of formulas to a footer on a subgrid. For more information,.see Grids and look for the section called Footers.
Data in Subgrids
Data in grid columns will wrap and display on multiple lines if the row height is adjusted. This will only work on text or memo fields and NOT on field types that contain functionality buttons (picklists, caselinks, emails, etc).
Picklists
Setting Picklist Values
The easiest way to set picklist values is from LawBase itself. Anyone with administrative rights or the personal setting to Edit PickLists can edit picklists. For more information about setting rights, see User
Security
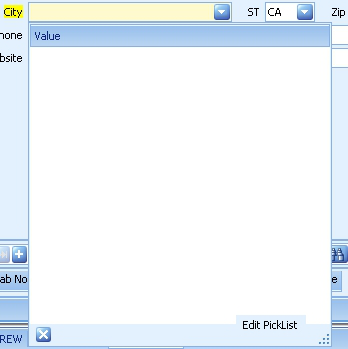
To edit a picklist from within LawBase:
1. Unlock the file for editing. If the picklist is on a common tab, you can skip this step.
2. Click on the drop-down arrow at the right of the picklist but don't pick a value; Click the button at the bottom right which reads Edit Picklist.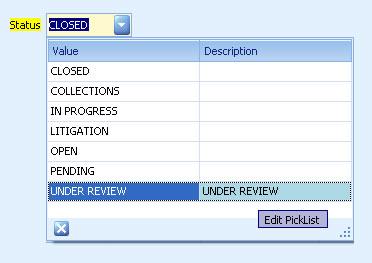
3. Use the navigation bar to create or delete entries. The properties are described below.
Editing Picklists in LBDesign
You can edit picklists in the LBDesign interface as well but picklists require a separate sync through the Other Items tab of LBSync.
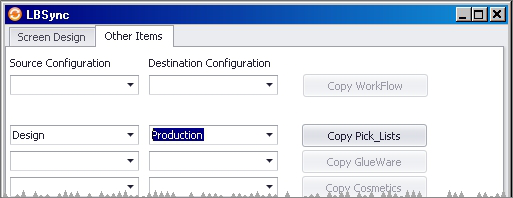
WARNING: When you sync picklists from design to production, all values will be overwritten. If your organization tends to edit picklists in LawBase, we recommend doing all picklist editing in LawBase itself.
Validated and Non-validated Picklists
When a picklist is set as validated, users can only enter values allowed by the picklist. To allow users to enter any value, uncheck the Validate checkbox. When a picklist is non-validated, users can pick an option from the picklist, or they can they can type whatever they like into the picklist field without adding their data to the picklist.
NOTE for validated picklists: If the data saved in the field does not exist in the picklist (for example, if an old selection has been removed from the picklist or if a new selection is required due to an import), the data will still be displayed in field. However, once that field is edited again, you won't be able to re-enter the old data unless the picklist is edited.
Picklist Properties
To edit a picklist in LawBase or in LBDesign, click the Edit Picklist link which appears below the choices. You'll see properties like the following.
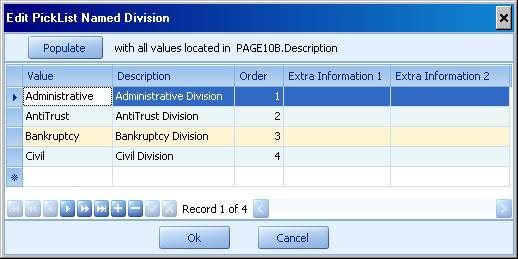
Value: This column stores the text selected by users and inserted in the field.
Description: Additional information to disambiguate the values. This value is shown when the user clicks the drop-down.
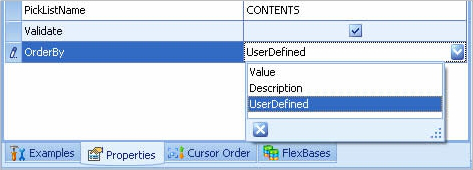
Order: By default, values are displayed alphabetically. On occasion you may want to set a custom order. Examples: days of the week, months of the year, stages of your process. To set a custom order 1. Set values in the ExtraInfo1 column. For days of the week you could enter Sunday, 10; Monday, 20; Tuesday, 30; and so on. 2. Set the field property Order to User Defined
Extra Information 1: This is an additional column to store whatever text you may want. Possible uses for this would be in WorkFlows.
Extra Information 2: This is an additional column to store whatever text you may want.
SQL Picklists
Regular picklists get their choices from lists (tables) edited by administrators. SQL picklists source data using a SQL statement. For example, to get a list of all staff, fill in the PickListName property with SQL(select login from user_profile)
NOTE: A requirement of SQL picklists is they can only select varchar fields. To work around this requirement, try casting your non-varchar fields as a varchar. For example: sql(select top 10 cast(serial as varchar) from page0)
Example A: To create a picklist displaying all the parties listed in the Opposing Party tab of a file, use an active picklist. Here's the simple SQL you might start with SQL(select fname, lname from page3 where page3.CaseSerial=:serial union select fname, lname from page0 where page0.serial=:serial order by lname, fname)
But the problem with this is the fname will show up as the value and the lname as the description. To get both into the value field use:
SQL(select isnull(fname,’’) + ‘ ‘ + isnull(lname,’’) from page3 where
page3.CaseSerial=:serial
union select isnull(fname,’’) + ‘ ‘ +isnull(lname,’’) from page0 where
page0.serial=:serial order by lname, fname)
The condition where caseserial = :serial limits results to only those parties in the current file.
Example B: To show parties which are linked by caselink to page2
select name from contact0 where contact0.linkserial = page2.counselEditing SQL Picklists
SQL Picklists can be edited in the same field they were created in LBDesign, or Administrators can edit SQL Picklists directly from the LawBase program.
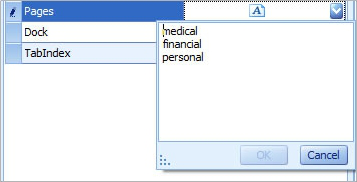
To edit a SQL Picklist from LawBase, navigate to the field where the picklist resides, click on the field to display the picklist options, and select 'Edit Picklist' from the bottom right-hand corner of the display box. The following window will appear where you can edit your SQL statement:
WARNING: When you sync picklists from design to production, all values will be overwritten. If your organization tends to edit picklists in LawBase, we recommend doing all picklist editing in LawBase itself.
Dependent Picklists
Dependent picklists limit choices using data in another field.
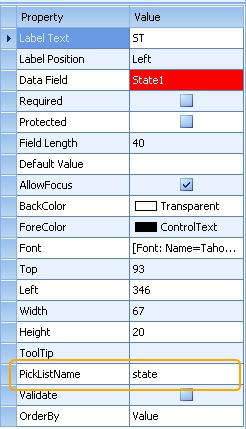
Here are a few examples: City and State You could have a City Field which depends on a State field. When you select Colorado as the State, the city drop down table may display Denver, Colorado Springs, and so on. However, when you select New York as the State, then the drop down table for the city would list other options such as New York City and Albany. First, in LBDesign, assign the State field a regular picklist name:
While still in LBDesign, assign the City field a picklist where the TABLENAME is the Data Field name of the field that City will depend on: TABLENAME=State1
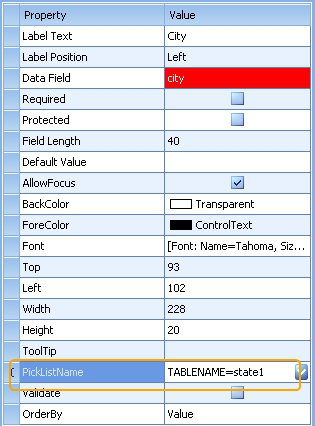
NOTE: If creating a dependent picklist based on a Header field, like TYPELAW, the dependent list value should be: TABLENAME=header.fieldname where fieldname is the data field name of the master list (example: TABLENAME=header.typelaw).
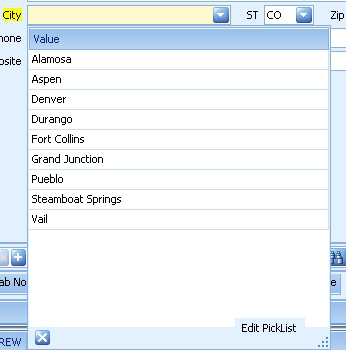
Now the individual values for each state are ready to be set. This is done in the LawBase program. Open LawBase and navigate to the page where the dependent picklists have been set up. In the State field, make a selection from the picklist; for example, CO. Next, open the dropdown menu on the City picklist and select Edit Picklist. Enter the values into this picklist that should appear when CO has been selected as the State:
When you are done entering the values for the first state, select the next state you want to enter values for. For example, if you change the State field to CA, then go to the City field to edit the picklist, you'll notice that all of the values that you entered for CO are now gone:
Edit the picklist to add the values you want to see when CA is selected as the state. Complete this process for each of the values in your State list.
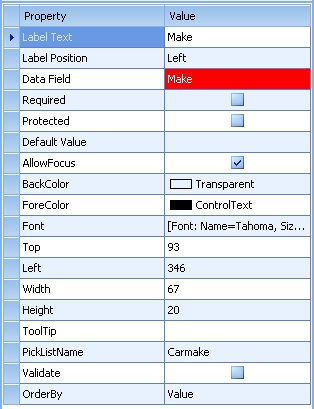
Make and Model Much like State and City, you could have two fields like make and model, where the models available to select vary depending on the make. In this case, in LBDesign, the Make field would be assigned a regular PickListName:
The Model field would have the following PickListName: TABLENAME=MAKE
States
LawBase includes a picklist called STATE, pre-populated with 53 entries, including states and territories.
Caselinks
Caselinks are fields that allow users to link data across the database. For details about the user side appearance and functionality, consult the User Manual.
Building a Caselink
Caselinks are set up inside LBDesign. There are three steps to setting up a caselink
- 1. Add the correct field type
- 2. Set up the LookupSQL
- 3. Set the display properties for the destination of the link.
1. Add the Field
To add the field itself, drag a caselink widget from the Example Panel onto the tab.
2. Set up the SQL Lookup
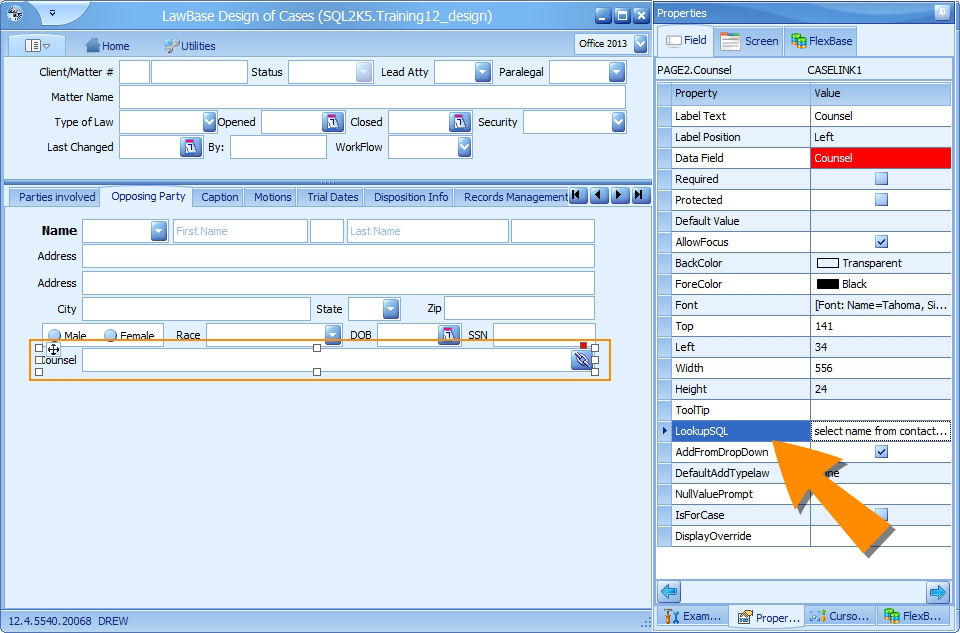
For a caselink to work properly, it needs an SQL statement in its properties. This is the SQL that runs to find the proper tab to link to when users type in the field. Set this through the field properties, under LookupSQL. Example:
select name from contact0 where name like ':lookfor%' order by nameThere are two main pieces to this. The select and the lookup
The Select
select name from contact0 where name like ':lookfor%' The select limits where the link is established. In the above example, only the name field on the header of the contact FlexBase is searched.
The Lookup
The lookup processes what users type through the lookfor parameter.
':lookfor%'
The percent sign (%) is a wildcard. So this means it uses whatever the user types in, followed by any other text. Example: If the user types Jones, they could get results with Jones as a single last name or the entity Jones Distribution Company; results can be anything that starts with Jones.
':%lookfor%'
When lookfor is surrounded by 2 wildcards, the SQL looks for the user input in context. Example: if the user types Smith, they can get results including Smith, Hammersmith, Smith and Downey.
Using More than One SQL Lookup
Occasionally you'll need more than one SQL Lookup. For example, on a screen that tracks medical providers, you may need to track individuals as well as organizations. To do this you'll need one lookup that looks at the header (to find organizations like hospitals and clinics) and another lookup that looks at individuals entered on one of the child tabs (like doctors, therapists, specialists). Here's an example: select lname, fname from contact1 where lname like '%:Lookfor%' order by lname, fname; select name from contact0 where name like '%:Lookfor%' order by name;
To separate the SQL lookups, use a semicolon (;). Multiple lookups are not only used for hospitals and doctors; the same logic applies other sets of organizations and individuals, like law firms and lawyers; courts and judges; companies and staff.
3. Set the Display Properties
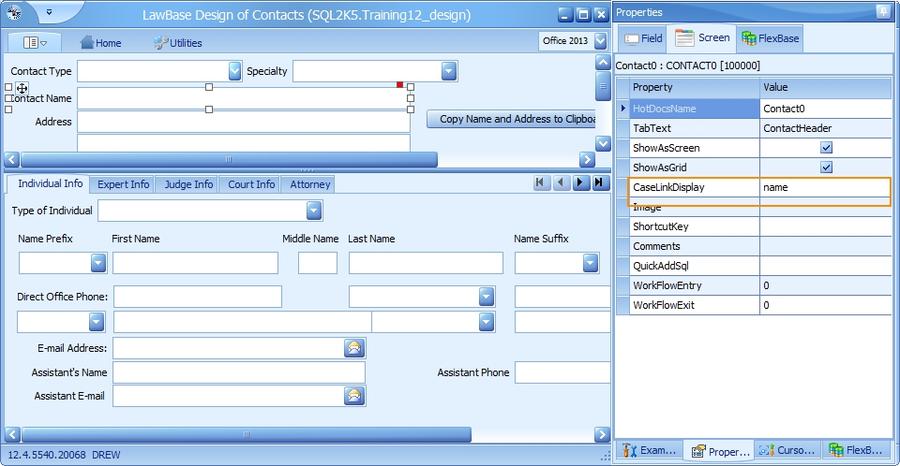
Typically, the display is set by the target of the link (what you are linking to). In the example above, contact0.name is the target of the link. So let's look at the design of contact0. In LBDesign, switch to the Contact FlexBase. Select contact0.name and look at the Screen properties. CaseLinkDisplay is filled in with name. This is in effect not just for the name field on contact0 but for any field on contact0; in other words, no matter which field you link to on contact0, the CaseLinkDisplay is the same.
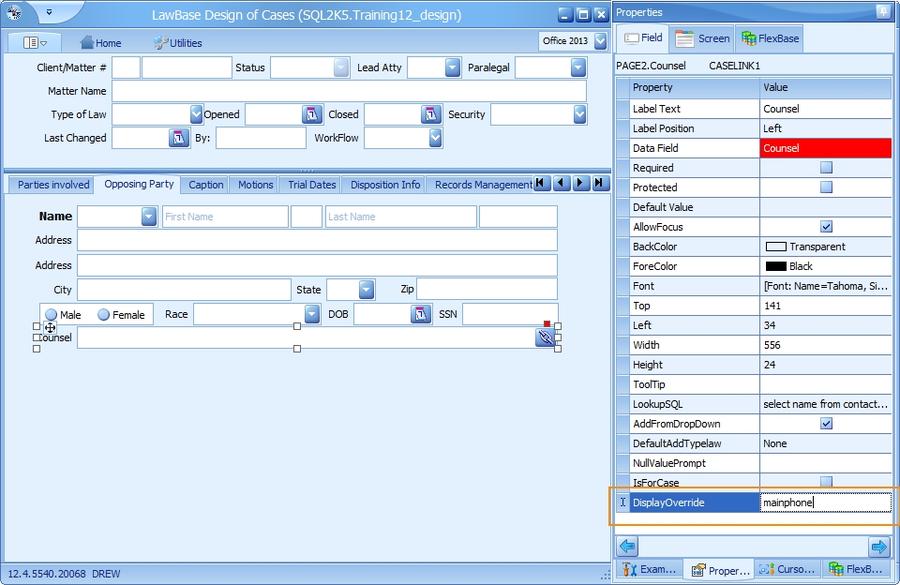
Overriding the Display
Displaying the name will probably work for most situations where you link to a contact. But for those rare occasions where you need to display another field, such as Main phone in the caselink field, you can override the display which is set in the target properties. To override the display, in the caselink field itself, fill in the field(s) you want to use.
Display Override and Grids
On Grids, if caselinks use displayoverride, the linked entries will show up twice. The first instance of each link uses the default caselink display and the second instance uses the override. This is a known issue and cannot be avoided. So for grids, we recommend using DisplayOverride only if the override is something really different from the normal display.
Display Override and QueryBuilder
In QueryBuilder, the results will display the caselink display as defined in the screen properties, not the displayoverride as defined in the screen properties.
Display Properties for a Link to a Link
Occasionally you'll need to accommodate a link to a link. How does a link to a link happen? We have an example in the screenshot below. Here we have a file that is identified by a caselink rather than by a text field. Note that Janice Jones is a client and her contact record is linked into the header. The linked client name is also the file name.
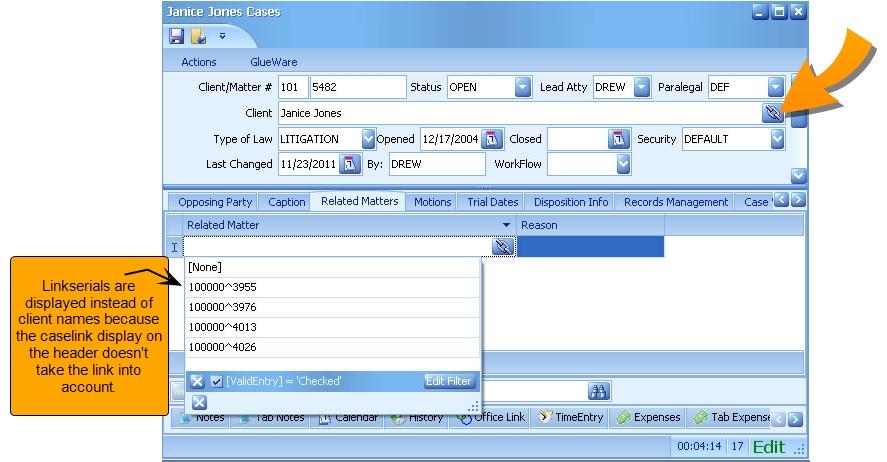
On the Related Matter tab we want to add other files which are also identified by client names, but as you can see when we attempt to add one, all we see are linkserials. This happened because the CaseLinkDisplay property on the header is set to the Client field. (To set the CaseLinkDisplay property, from within LBDesign, select a field on the tab you need and view the Screen property panel). To properly display the linked information, the CaseLinkDisplay property needs this syntax: Link(localfield:displayfield). So in this example, we need Link(client:name). This is because client is the field name on page0 and name is the linked contact0 field.
SQL Lookup
Finally, the SQL lookup needs to handle the link to link as well. For this we use a view named caselinkview. This view is automatically created on your system; for more information see Caselink Views select directdisplay from caselinkview where caselinkview.vscreenserial =0 and caselinkview.linkserial in (select page0.linkserial from page0) and directdisplay like ':lookfor%' order by directdisplay
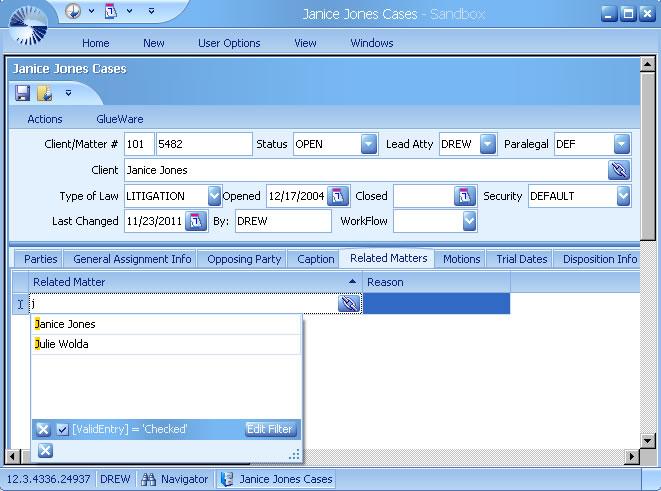
When the link display properties and the SQL lookup are defined correctly, you'll be able to use caselinks that link to links as shown below.
Caselink with a Join
The power of any caselink depends on the lookup. Here is an example where you might use a join to limit the results.
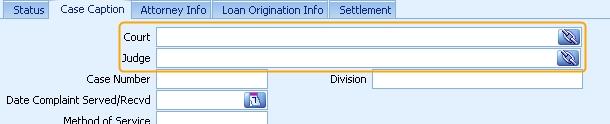
The first caselink, Court, is fairly standard. The lookup there is: select contact0.name from contact0 where contact0.name like ':Lookfor%' and typelaw = 5 order by contact0.name
The caselink for the Judge, however, limits the lookup to only those judges associated with the court identified in the court caselink: select fname + ' ' + lname from contact3 inner join contact0 on contact0.serial = contact3.caseserial where lname like ':Lookfor%' and contact0.linkserial = '<<court>>' order by name
Changing Field Types
There may be situations where want to change a text field to a picklist or vice versa. You can do this within design. Select the field you want to change. Click on the SmartTag (the red square at the top right corner) and drill down to Change to Type and select the type of field you want to change it to.
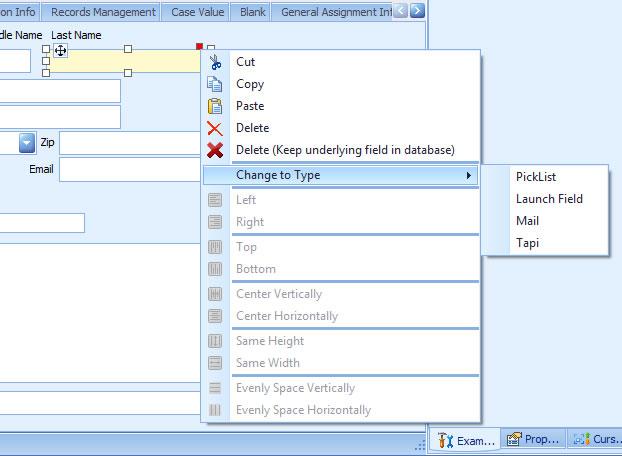
You'll find this option on the following field types:
- Text
- Picklist
- Launch
- Tapi
Properties Panel
The Properties Panel is made up of three areas:
- Field Properties
- Screen Properties
- FlexBase Properties
Whenever you select a tab or a field in LBDesign, the panel is populated with properties of that item. Select the Screen tab to reveal the tab properties and FlexBase to reveal FlexBase properties. In the screenshot below, you can see the Field Properties.
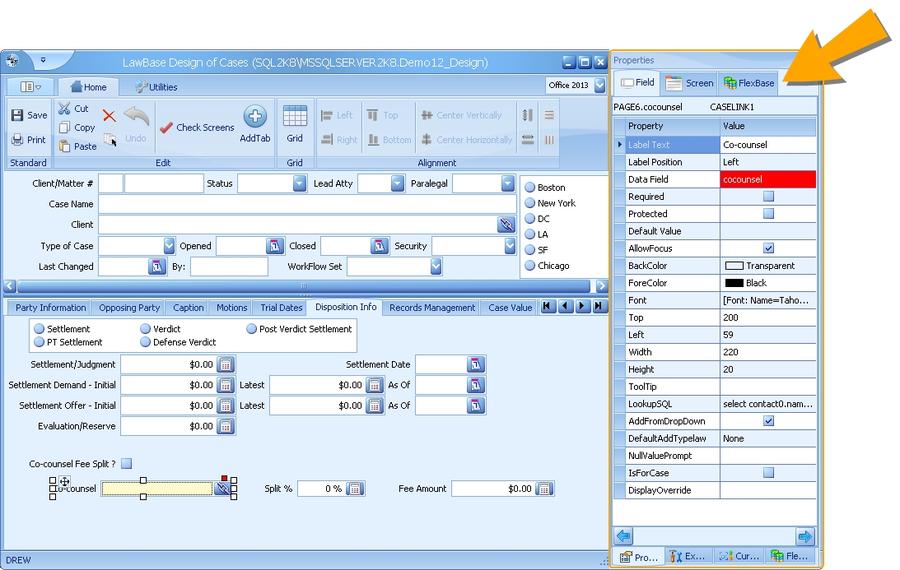
Field Properties
Property Description
AddFromDrop- Down
Note: Only available for CaseLink fields. If unchecked, users will not be able to add new files of the type that link to this field (Contact record, File record, etc) directly from the CaseLink drop down.
AllowClear Note: Only available for Date fields. Check to allow users to right-click and Clear Field.
AllowFocus
Checked by default. When it is checked, the field is included in cursor order. When unchecked, the field is excluded from cursor order (meaning it is skipped when tabbing through the screen) and is not editable. BackColor The field's background color, that is: the color behind the label and field.
Data Field
Name of the field in the database. An automatic name is provided in the form tablename.tabname; e.g. page7.text1. Replace the field portion with something meaningful; e.g. page7.location Synaptec recommends limiting field names to 10 characters or less. The main reason for this is to prevent variable names in HotDocs which are too long.
DefaultAddTyp- elaw
Note: Only available for CaseLink fields If filled in, and the AddFromDropDown checkbox is checked, the typelaw of the new file created when Add File is selected in LawBase will be automatically populated with this value.

Default Value: If set, this value will be auto-populated in new files. The Default can be set to a specific value (such as Y or N), a shortcut command (such as :CurUser or :CurDate), or a SQL statement (such as SQL(select fullname from user_profile where login = ':CurUser').

DisplayOverride: Note: Available only for CaseLinks By default the LookupSql uses the caselinkdisplay set on the linked tab. Fill in the DisplayOverride to set a value specific to this caselink instance. Field Length Maximum character length for data in this field.
Font: Select the font face, style and size. This applies to both the field and the label. Color
Property Description
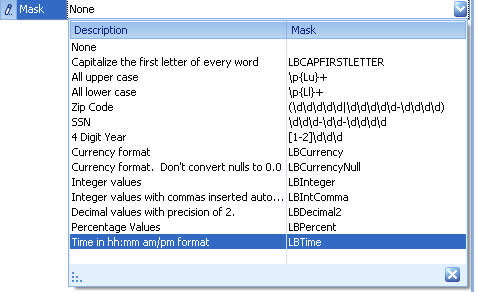
To add a custom mask, create a text file in the main LawBase directory and name it CustomMasks.txt. Add entries in quote comma format, like the following: "mask syntax", "mask name"
Examples:
"((\(\d{3}\) ?)|(\d{3}-))?\d{3}-\d{4}",
"10 digit initial parens"
"[2-9]\d{2}-\d{3}-\d{4}","10 digit w/o parens"
Masks are created using Regular Expressions. To learn more about regular expressions, we recommend http://regexlib.com
NullValueProm- pt
Note: Not available in Date, Calc or SpinEdit fields. Text entered will appear in the field prompting the user as to what to enter into the field. Disappears once data is entered into the field.

Order By
Note: Available only for Pick Lists. Current options are Value, Description and User Defined. Order by Value is the default setting. To order by the sort set in the picklist properties, select User Defined. PickListName Note: Available only for Pick List type of field.
Select an existing Pick List from the drop down or key in the name of a new Pick List.
Protected Check to set the field as protected. Users cannot edit protected fields. This is most often used for system fields or fields auto-populated by workflows.
Required Check to set the field as required. This means users can't save or close without filling in the field. Show Time Note: Only available for Date fields. Check to include time display in a date widget .
SuggestEntry Check this to display matching auto-complete entries when the user types.The values suggested are sourced from the data already populated in this field in existing files. ToolTip Fill this in to create hover text that displays when the user rests the mouse over the field.
Top Position of the top of the field relative to the top of the tab; measured in pixels. You can edit the value or it automatically adjusts when fields are moved.
Validate
Note: Available only for Pick List type of field. For more information see Picklists. Check this to prevent users from entering values not included in the picklist. Picklist validation is case-sensitive. Width The width of the field, measured in pixels.
Screen Properties
The screen properties panel displays the properties for the currently selected tab.
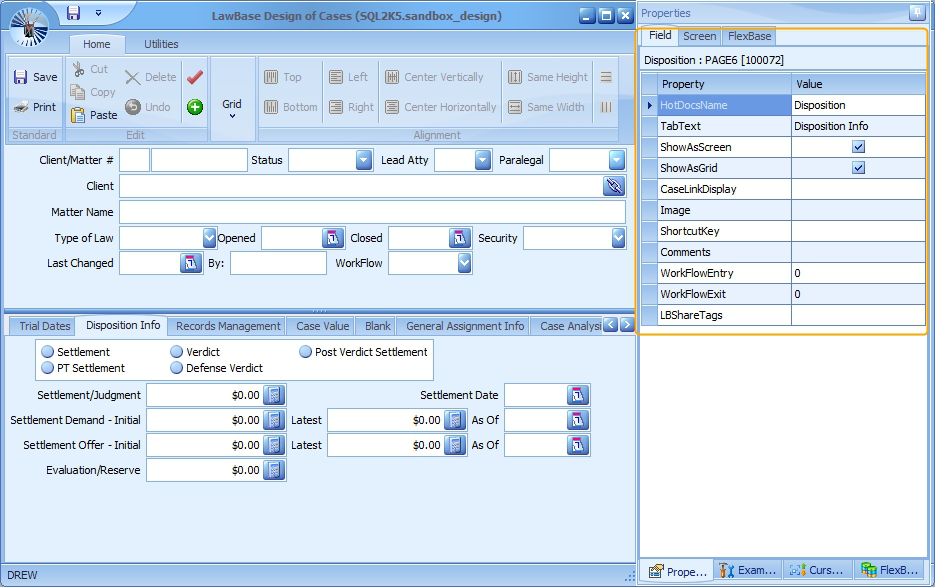
Property Description
CaseLinkDisplay Field(s) to display from this tab when another file links to it. May be overridden by the field property DisplayOverride Comments Store your comments here. This text will not be displayed to the user. Image Use this to load an image file. For best results use a 16 x 16 file.
LBShareTags
Optional. Select categories from the drop-down to share the screen design with the LawBase community. Available only if LBAdmin>Cosmetic>System>LBShare is enabled. HotDocsName HotDocs name of the tab.
ShortcutKey
Set a shortcut key combination to access the tab quickly. For example, if we set D as the ShortcutKey for the above screen, then, when in a LawBase file, a user could access the tab quickly by pressing CTRL+P+D.
ShowAsGrid Check to create a grid. Check both ShowAsGrid and ShowAsScreen to create a repeatable tab.
ShowAsScreen Check to create a standard screen. Check both ShowAsGrid and ShowAsScreen to create a repeatable tab. TabText The text that appears on the tab label.
WorkFlowEntry Identifies the merge script that is launched when this screen is entered. For more information about merge scripts, see Merge Scripts
WorkFlowExit Identifies the merge script that is launched when this screen is exited.For more information about merge scripts, see Merge Scripts
FlexBase Properties
The FlexBase properties panel displays the properties for the currently selected tab.
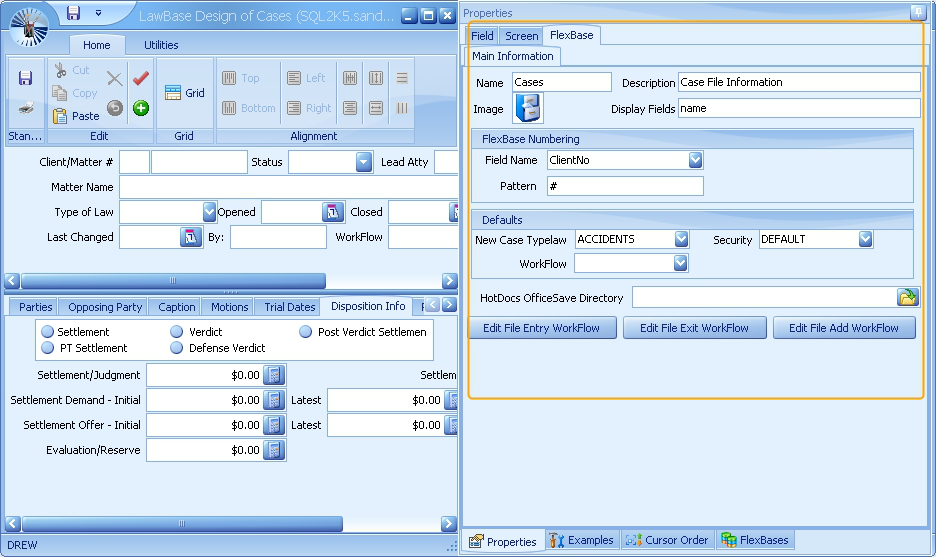
Property Description
Defaults
New Case Typelaw - select the typelaw you want on newly created files for this FlexBase Security- select the security you want on newly created files for this FlexBase WorkFlow - select the WorkFlow set you want on newly created files for this FlexBase
Description
This is a free text area where you can add some additional description. This does not appear anywhere else in the system but is here for administrative use.
Display Fields Fill in with the fields you want to use in the title bar of your files. Often these are the file number, name, sub-number and so on. Edit File Entry WorkFlow
Edit the WorkFlow which is fired when an existing file of this FlexBase is opened. Edit File Exit WorkFlow Edit the WorkFlow which is fired when a file of this FlexBase is exited .
Edit File Add Edit the WorkFlow which is fired when a file is newly created in this
Property Description WorkFlow FlexBase.
FlexBase Numbering
Field Name - select the field on the header where you want File/FlexBase numbering to appear. Pattern - fill in a pattern. Examples: #, ####, 12-## Syntax you can use: yy - two digit year yyyy - four digit year dd - the day mm - month. You can hardcode additional text if you like. Examples: # - will result in single numeric value ####### - Six number signs will left pad whatever number is entered, so with this pattern, if the number is 1 it will display at 000001. HotDocs OfficeSave Directory
Defines the Network Directory where OfficeSave documents are saved.
Image
The image used to represent the FlexBase. You can change this to be whatever you like. To change the image, right-click on the provided image and select Load Image.
Name
The name of the FlexBase. This is what is used to identify this FlexBase throughout the system: in the Search Panes, SmartFolders and in all the areas of LBAdmin among others.
Check Screens
This button will check your screen design for common errors. Your design must be saved before running Check Screens - if it has not been, you will be prompted to save the design. It is important that you run this utility after making changes to your screen design to make sure that you don't receive error messages in LawBase or make changes/additions that will complicate your data in the long run. Check screens finds errors in the design of the FlexBase that's currently selected/in view. Therefore, if you make changes in multiple FlexBases, you will need to run Check Screens multiple times.
If after running Check Screens you receive this message:
Congratulations! You are in the clear.
However, it is much more likely that you will see a screen that looks something like this:
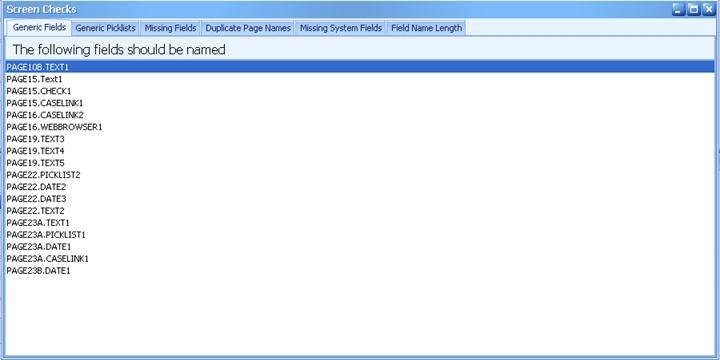
If that's the case, don't worry. This section aims to help you correct these errors.
Generic Fields
When you add a widget to a page, LBDesign automatically gives the widget a generic Data Field name (CHECK1, CASELINK1, TEXT3, etc). For ease of use purposes related to HotDocs template creation, SmartFolder creation, and data analysis, the generic Data Field name should be changed for each and every widget. Check Screens looks for widgets with generic Data Field names and returns a list of their tab Name and Data Field name (see image above). To resolve these errors. navigate to the listed widget and give it a non-generic Data Field name in the Field Properties panel.
WARNING: If check screens shows the generic name of a widget that has already been pushed to your live production database, DO NOT change the Data Field name. Changing the Data Field name and syncing to Production will erase the previous widget and ALL DATA that was in it. Only change the Data Field names on widgets that you just added or that you KNOW have not been synced to your live production database.
Generic Picklists
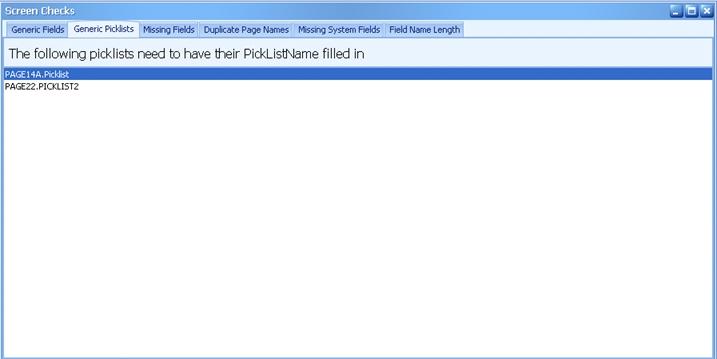
Every picklist widget must have a PickListName associated with it in the Field Properties panel. Check Screens looks for picklist widgets where the PickListName is blank. To resolve there errors, navigate to the listed widget and assign a PickList Name.
Missing Fields
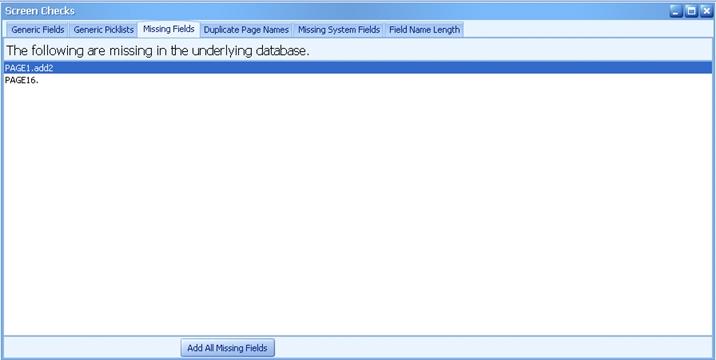
Every widget must have an associated place in the underlying database where data entered into that widget is stored. Sometimes in LBDesign, either because of renaming, moving fields from tab to tab, or giving two fields on the same tab the same Data Field Name, the widget and its database place become disassociated. Check Screens finds and lists the disassociations. To resolve these errors, click the Add All Missing Fields button at the bottom of the screen.
Duplicate Page Names
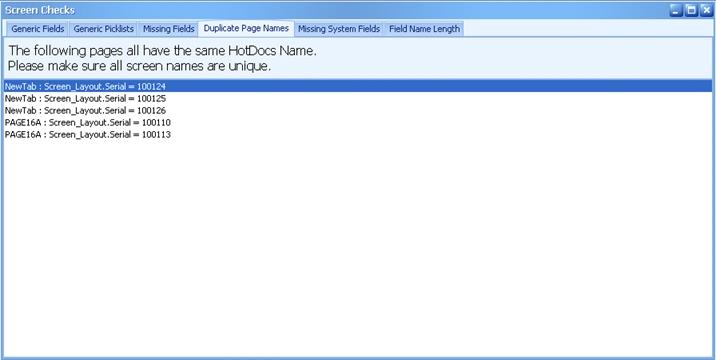
For purposes of our HotDocs integration, LawBase does not permit tabs/pages to have the same HotDocsName. Check Screens finds and lists all tabs (and their screen serial numbers) that have the same HotDocsName. To resolve these errors, navigate to the listed page and edit the HotDocsName in the Screen Properties panel, making sure that each screen has a unique name.
Missing System Fields
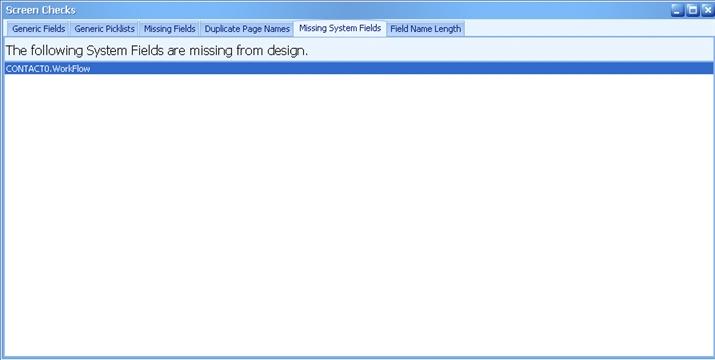
Some field types, such as Typelaw, Security, and Workflow, are required in the Header of each FlexBase design. Check Screens makes sure that required system fields are present in each FlexBase. You should very rarely see these errors, as your LawBase consultant most likely added these fields at the beginning of your project. However, if you do, the errors can be resolved by adding the required system fields, which can be found in the Exotic Fields pane, to your design.
Field Name Length

For purposes of our HotDocs integration, the combination of the HotDocsName and Data Field name cannot be more than 50 characters combined. Check Screens looks for and lists HotDocsNames and Data Field names that are more than 10 characters. To resolve these errors, navigate to the listed tabs or widgets and edit the HotDocsName (in Screen Properties) or Data Field name (in Field Properties).
WARNING: Do not change the HotDocsName or Data Field name of a tab or field that already exists in your live production database. Doing so may result in unrecoverable data loss or the malfunctioning of HotDocs templates. If there is any chance that a tab or field that Check Screens lists was pre-existing, DO NOT change the names. Contact LawBase Support for assistance.
Adding Tables to LawBase
Adding Tabs to a FlexBase
To create a new tab in a FlexBase, within LBDesign, open the FlexBase you want to add the tab to and click on the AddTab button in the Home ribbon:
You will be asked to confirm that you want to add a new tab. Press Yes and a new tab entitled BLANK will be added in the last position of your available tabs in that FlexBase. Design the tab as usual and as described in the Editing Tabs section.
Using this functionality to add a new tab, which is a new table on the back end of the database, will automatically set up all of the necessary table structure and SQL restraints. Also note that once you have added a tab using this functionality, you can not delete the tab. If it is determined that the tab is not needed, you will have to rename the tab to BLANK.
Manually Adding Tables to the Database
There may be many situations in which you want to create a new table in your LawBase database that has nothing to do with front end application interaction; whether a temp table to house external data or a table that is a copy of an existing table. While it is fine to add in these new tables, you must be careful in your naming conventions.
For example, if you wanted to make a copy of everything in Page0, you may be tempted to call the new table Page0Copy. However, using the same beginning root name in the table can cause functionality issues in LawBase. Therefore, the better name for the new table would be CopyPage0. The same goes for any of your FlexBase root names: Page, Contact, CorpMatter, etc.
If you have any questions about adding a new table to your database, please feel free to contact LawBase Support at [email protected]
Editing Tabs
This section describes how to build tabs using LBDesign.
- Adding Fields
- Modifying Fields
- Moving Fields
- Selecting Fields
- Aligning Multiple Fields
- Deleting Fields
Adding Fields
To add a field to a tab:
1. Display the examples panel.
2. Drag and drop the desired field on the tab
Modifying Fields
To modify the properties of a field: Select the field you want to modify. Display the properties panel and modify the properties.
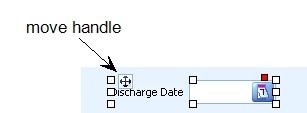
Moving Fields
Move fields with the move handle. When you select a field, the move handle appears.
To drag a field or group of fields:
1. Select the field(s) you want to move.
2. Drag the field by the move handle.
To move a single field with the keyboard:
1. Select the field so that the selection handles appear.
2. Press and hold SHIFT while you press an arrow key.
Selecting Fields
To select a group of fields: Press and hold SHIFT or CTRL while you click the fields or Click and drag to create rectangle which encompasses the fields you want to select. Release the mouse to select.
Aligning multiple fields
Select the fields as described above and use the alignment buttons to line them up with each other. Each of the buttons is described in the section on Ribbons.

Deleting a Field
To delete a field, select it and press DELETE on the keyboard. Alternatively, select the field and click the smart tag. The smart tag is the red square at the upper right of the field. Select Delete from the context menu.

Deleting a Field but Keeping Underlying Field in Database
There are two options for deleting. The first one, listed simply as "Delete" removes the field object from the tab as well as the column from the table in the database behind LawBase. The second option, "Delete (Keep underlying Field in Database"), removes the field object from the tab but the column in the table in the database behind LawBase is untouched. An example of when this might be useful is if y ou want to use a WorkFlow to save data but you don't want to display the data on the tab.
Reviewing and Syncing
After you have made design changes and saved them, use LBSync.exe to Review the changes and Sync them to the appropriate destination database.
Procedure
Before you start, you may want to back up your destination database.
1. Locate LBSync.exe in the main LawBase directory and launch it.
2. Select the destination where you want to sync your changes.
Click on the drop-down; you'll see all the databases listed in LBDBConfig. The databases are identified by the label set in LBDBConfig as well as the alias on the SQL server; the alias is shown in brackets.

3. You'll see a list of changes something like the list below. This list shows the differences between the design database and the destination. Where necessary, tabs and fields are added. Also tabs and fields may be deleted. WARNING: DO NOT SYNC CHANGES IF YOU SEE A FIELD SET FOR DELETION THAT YOU DID NOT INTEND TO DELETE. This will result in a LOSS OF PRODUCTION DATA.
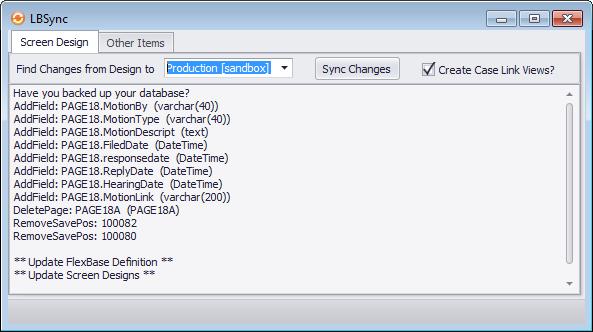
4. Click Sync Changes to push the changes from Design to the destination database.When the sync has finished, you'll see a confirmation message like the following.
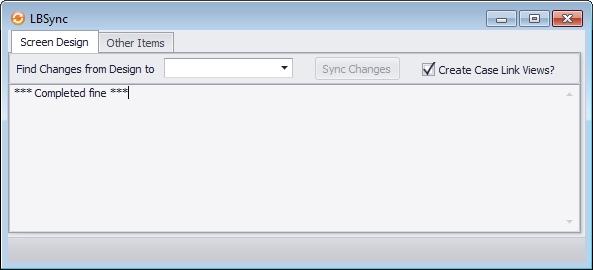
5. You can now exit LBSync - your changes have been made, or if you will continue making changes and syncing, you can leave the LBSync application running and simply click on the "Find Changes from Design to" drop-down when you are ready to do subsequent syncs.
To learn more about LBSync.exe, see LBSync.exe
What's new in LBDesign 12
This section is intended for users of LawBase 10 who want to know how the LBDesign program has changed.
Appearance of Grids and Repeatable Tabs
In LBDesign 10, grids looked like grids and normal screens looked normal, but from within design, you couldn’t tell whether a tab was repeatable without looking at the tab properties. In LBDesign 12 you can see all the kinds of screens. This is controlled in the properties panel on the Screen tab.

The following table indicates what to select to get each type of screen: ShowAsScreen x ShowAsGrid x Grid Screen X Repeatable x
To see the varieties of screen, toggle the grid view from the Home ribbon.

Field Changes from 10.X to 12
In LBDesign 10.x, fields and labels were separate. For example, in design you had an edit field for the information and a label next to it for the name.
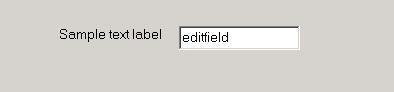
In LBDesign 12, labels are part of the field. In the example below an edit field is selected. Notice on the right hand side in the property panel that there is a property for label text. This is where the label is now entered.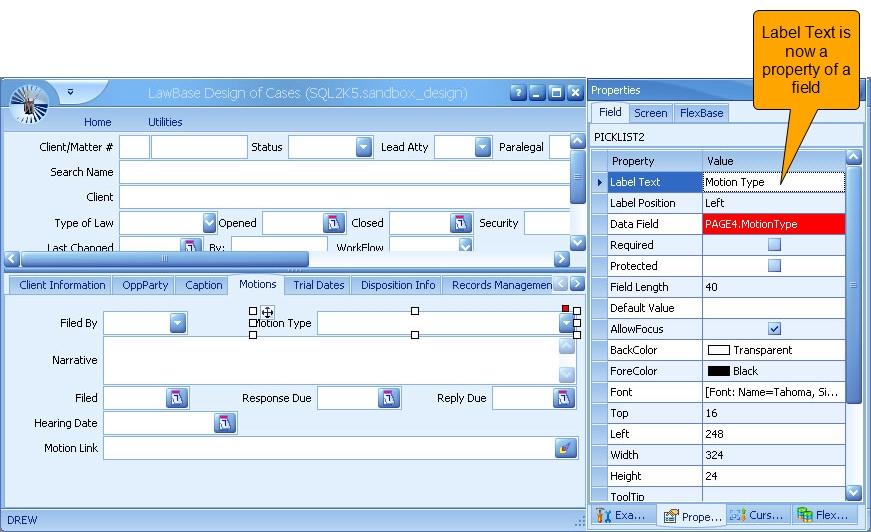
Below is an example of a label which is not a property of the field.
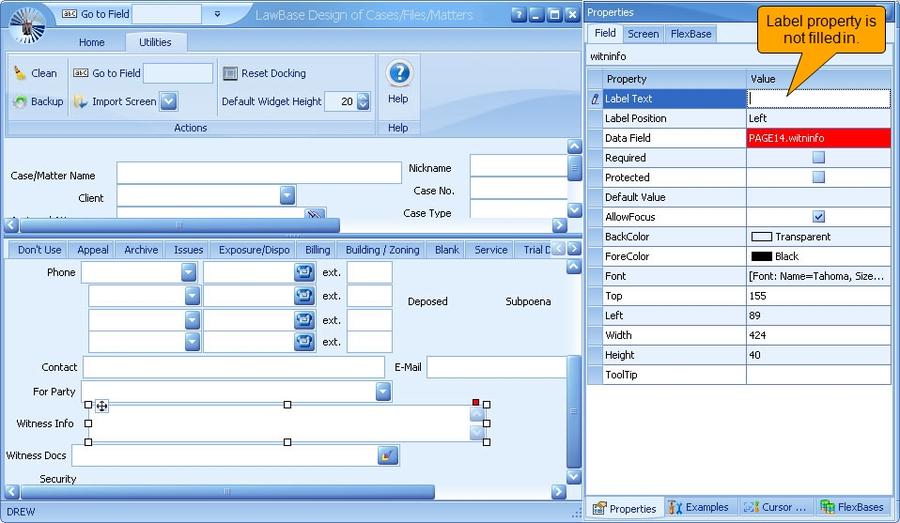
If you find in your conversion that the label text did not get populated with the correct label, you can use the clean button in the Utilities Ribbon to reassign the labels to fields for you.
Editing Widgets
Basic editing operations are a bit different from in LBDesign 10.7. For details see Editing Tabs
LawBase.ini
The lawbase.ini File has been replaced. The ini file you know from LawBase 10.7 has been replaced with a new configuration tool that makes it easier to manage environments and synchronization. See Review and Synchronization for more information.
Calculated Columns
Starting with SQL Server 2005, you can use calculated fields (or columns) to save and display the results of a formula. This can be handy if you need something like a total or a concatenation of other fields. In LawBase, the way to handle this is to create a SQL computed column and display it in a protected field. The advantage over ShowOnly fields, is that these columns can be used anywhere in SQL, HotDocs, Reports etc without having to recalculate each time.
NOTE: calculated fields are only supported for fields on the same page.
Reference about Calculated Fields/Columns.
Although LawBase users tend to think about these as fields, most other sources call them calculated columns. Here is just one site with some examples: http://www.kodyaz.com/articles/sql-server-computed- column-calculated-column-sample.aspx
Examples
Concatenate Three Fields into One
Example: set searchname as concatenated name or company name. Let's say we have a clientinfo tab with fields for lname, fname and organization. Depending on what is in these three fields, we want the field searchname to be populated. Here are the rules:
- if lname is populated, then search name is the concatenation of lname and fname
- if lname is not populated, then the search name is the organization name.
To set this up, run a calculation like this from a query window in SQL server:
alter table page1 add SearchName as (case when lname is not null then lname + Space(1) + isnull(fname,'') else organization end) Once the calculation exists, you can see it from the design properties in SQL studio and search on the field just like any other field. You can add the field to your tabs, use it in grids, repeatable displays, searches and so on.
Display values from a dependent picklist field in a repeatable grid. Imagine a repeatable tab with multiple dependent picklist fields. Normally you can't display a dependent picklist on the repeatable grid on the right-hand side. To get around this, you can use a calculated field.
To set this up:
1. Run a calculation like this from a query window in SQL server.
2. alter table Page7 add Violation_ as Violation
3. Log into LBDesign, go to the affected tab and click the Grid button on the Home ribbon
4. Drag the new field from the "Fields excluded from Grid Display" box up to the grid itself and then drag the previous Violation field from the grid down to the box.
5. Save and Sync.
Example 3: including commas in the display of numeric fields in a repeatable
grid Values in numeric fields automatically appear with commas when needed unless they are displayed in the repeatable grid on the right-hand side of the page (where the only formatting is the decimal places): To allow formatting of the commas in the numeric value:
1. Add a calculated field based on the existing numeric field
alter table Page2 add TakeShow as convert(varchar(12),Take,1)
this creates a new calculated field in the backend Page2 table called "TakeShow" that holds a varchar equivalent (with commas) of the values in the existing "Take" money field.
2. Log into LBDesign, go to the affected tab and click the Grid button on the Home ribbon
3. Drag the new field from the "Fields excluded from Grid Display" box up to the grid itself and then drag
the previous Take field from the grid down to the box.
4. Save and Sync.
Quick Add Tabs
Quick Add Tabs is a new way to add copies to tabs. Users access this from the New ribbon.

To add a new copy of a tab, from the Quick Add drop-down, select the file where you want to add a tab copy; the file will open, in edit mode, with a new copy ready for editing.
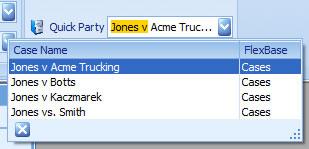
Configuring Add Tabs
To configure Quick Add Tabs for a repeatable tab or grid, from within LBDesign, add a SQL statement to the Screen properties; the property is called QuickAddSql. Examples: select name from page0 where status = 'ACTIVE' order by name select lname , fname, from page0 where status in ('ACTIVE','PENDING','INTAKE') order by lname, fname
Favorites
Users can add their own personal favorites from LawBase itself.
Group Favorites
Only Administrators can manage Group Favorites. So what is a Group Favorite? This is a favorite that is shared by multiple users/groups. For instance, you may have a group calendar that all the people in the group should have on their favorites. Or you may have a dashboard that various people in a management group would like to view. If you are an administrator, you may make Favorites show up on other users Favorite lists by assigning the favorite a LawBase Group. When you assign a group to a Favorite, then it will show up in the list for the members of the group. To make a group favorite, right-click on the favorite in the Personal list and select the group it should appear on from the drop down entry. Once a Favorite has been made global, it will show up in the Favorite Tree under Global Favorites and may be used as usual by anyone in the group. If you wish to remove it from the globals, you may delete the Favorite, or right-click on it again and reassign the group back to [None] or change the group of users it should show up on.
FlexBase Set-up
This section includes details about how to set up FlexBases. To access the FlexBase Properties, go to LBAdmin and from the System Setup ribbon, click FlexBases.
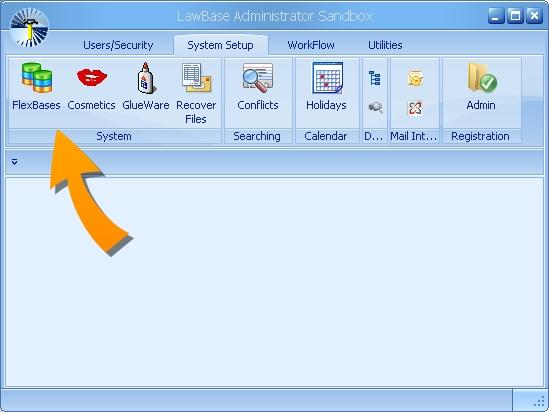
The properties panel appears as follows:
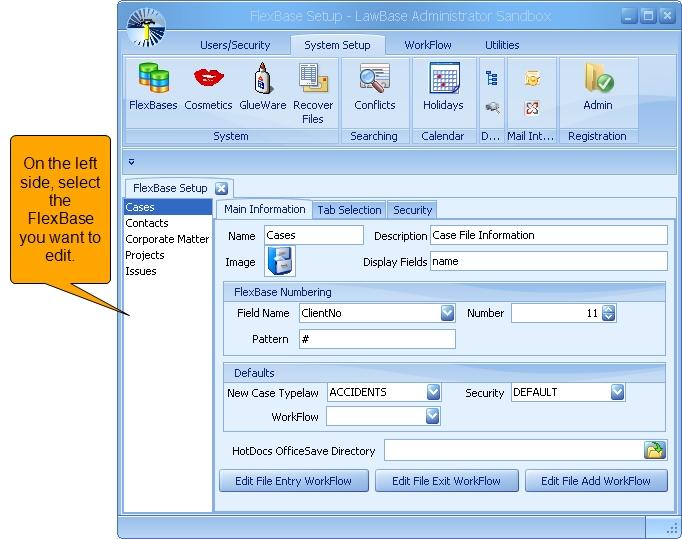
Property Description
Defaults
New Case Typelaw - select the typelaw you want on newly created files for this FlexBase
Security- select the security you want on newly created files for this FlexBase
WorkFlow - select the WorkFlow set you want on newly created files for this FlexBase
Description This is a free text area where you can add some additional description. This does not appear anywhere else in the system but is here for administrative use.
Display Fields: Fill in with the fields you want to use in the title bar of your files. Often these are the file number, name, sub-number and so on.
Edit File Entry WorkFlow: Edit the WorkFlow which is fired when an existing file of this FlexBase is opened.
Edit File Exit WorkFlow: Edit the WorkFlow which is fired when a file of this FlexBase is exited .
Property Description
Edit File Add WorkFlow - Edit the WorkFlow which is fired when a file is newly created in this FlexBase.
FlexBase Numbering
Field Name - select the field on the header where you want File/FlexBase numbering to appear.
Pattern - fill in a pattern. Examples: #, ####, 12-## Syntax you can use: yy - two digit year yyyy - four digit year dd - the day mm - month. You can hardcode additional text if you like. Examples: # - will result in single numeric value ####### - Six number signs will left pad whatever number is entered, so with this pattern, if the number is 1 it will display at 000001.
HotDocs OfficeSave Directory: Defines the Network Directory where OfficeSave documents are saved.
Image: The image used to represent the FlexBase. You can change this to be whatever you like. To change the image, right-click on the provided image and select Load Image.
Name: The name of the FlexBase. This is what is used to identify this FlexBase throughout the system: in the Search Panes, SmartFolders and in all the areas of LBAdmin among others.
NOTE: These same FlexBase settings can also be set through LBDesign.
Syncing Back to Design
Upon closing the FlexBase Setup tab, if you are working in an environment with separate production and design databases, you'll be prompted to sync the changes back. Generally we recommend that you click yes; if you don't sync the FlexBase Setup changes back to Design, they will be overwritten the next time you sync screen changes from Design to Production.
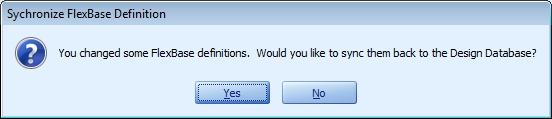
Typelaws
The Typelaw field in the header of any file is generally used for two purposes:
- Category -- The typelaw identifies a file as belonging to a category. For example: Litigation, Worker's Comp, Corporate, Trusts and Estates and so on.
- Tab Selection -- The Typelaw determines what tabs are included in the file. Worker's comp will likely have a different subset of tabs than Trusts and Estates. Typelaws are not mutually exclusive; multiple typelaws can include the same tab(s).
In the following section, Tab Selection, you'll find instructions on how to create typelaws and add tabs to them.
By default, you'll find one typelaw in each FlexBase called ALLTABS - this does exactly what the name says; it includes all tabs.
Tab Selection
In each FlexBase you can set up various Tab Selections or Typelaw that take effect within the files. In the example below, you can see that there are fifteen typelaws for the cases FlexBase. Each Typelaw, such as Appellate Case, is made up of the tabs you select, in the order you choose. This way, you don't have to use all the tabs in every file, just the tabs that pertain to that practice area.
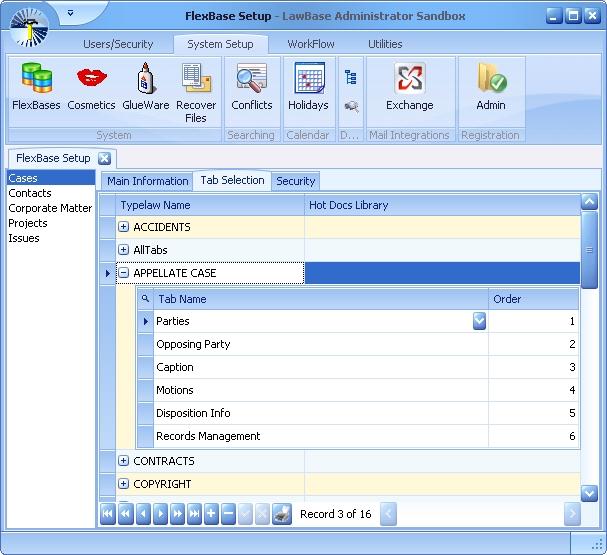
Tab Selections are not mutually exclusive; that is, you can include the same tab in multiple tab selections.
Editing the Tab Selection (Typelaws)
To add/remove tabs from a tab selection: From LBAdmin > System Setup > FlexBases
1. Select the FlexBase from the list onthe left.
2. Expand the typelaw you want to edit. In this example it is CONTRACTS.
3. The control buttons exposed are for adding new typelaws. To add tabs to a typelaw, click the magnifying glass.
4. In the grid that appears you can modify the tab selection. Close the grid with the X.
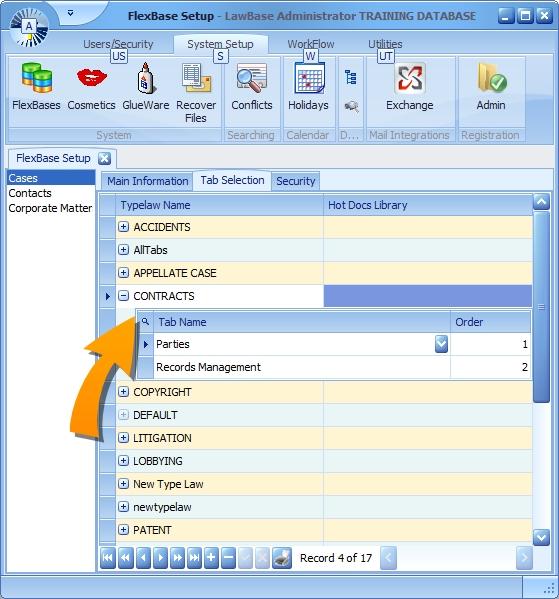
LawBase users with Administrator rights can also assign and edit typelaw tabs while in a LawBase file. Right- click on the Typelaw field (which may have a different field label in your database), select "Configure this Typelaw", and a dialog box will pop up showing what tabs are currently configured for that particular Typelaw. You can associate additional tabs to appear for that typelaw by clicking the plus sign (+) at the bottom. To delete any of the current tabs from that typelaw, click on the minus sign (-). To reorder the tabs, drag and drop the row to the desired location in the list.
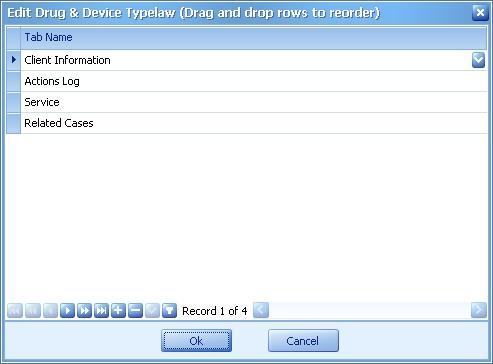
The screen will automatically refresh to show the revised Typelaw configuration as soon as the Ok button is clicked.
The "Configure this Typelaw" option will not appear for non-administrators and will only work if there is something already in the Typelaw field when the user right clicks on it.
Printing the Tab Selections
If you'd like to have a record of the Typelaw/Tab assignments, you can generate a graphical print. Just click the printer button at the bottom of the window.
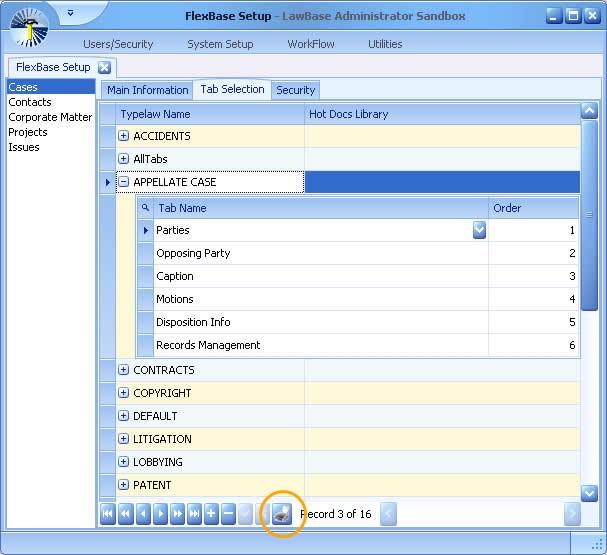
FlexBase Security
The third tab within FlexBase Setup is Security. For information about how to set FlexBase Security, see FlexBase Security.
Moving Files from One FlexBase to Another
When Might You do This?
Some users of LawBase have asked about how to move files from one area to another. A common example we hear is to be able to maintain an independent FlexBase for Intake or New Client Inquires. Then, when an intake becomes a client, the file would move out of the Intake FlexBase and into the Active Case FlexBase.
How do You Move Files?
For files to be moved (or copied) from one FlexBase to another, you must set up a stored procedure that describes how to do the conversion from each FlexBase to whichever FlexBase you wish to move to. In SQL, create a stored procedure named lb_FlexBase#To#. The first number is the serial # for the FlexBase you wish to convert from. The second number is the serial of the FlexBase you'd like to be able to convert to.
So, if you want to be able to convert from Flexbase 1 (typically this is the Cases FlexBase) to Flexbase 2 (Contacts, typically) you would make a stored procedure named lb_Flexbase1to2 LawBase looks to the stored procedures to know whether it should display menu choices (on the search results grid) to move a file from any result. In this stored procedure, you would do all the work to move (or copy) the information from FlexBase 1 to 2. Here is the simplest example which simply copies over the lname and fname from page0 to contact0. In reality you would probably have many more commands copying other pages also.
USE [DataBaseName]
GO
/****** Object: StoredProcedure [dbo].[lb_Flexbase1To2] Script Date: 04/26/2010 13:51:06 ******/
SET ANSI_NULLS ON
GO
SET QUOTED_IDENTIFIER ON
GO
ALTER PROCEDURE [dbo].[lb_Flexbase1To2]
@CaseSerial int
AS
BEGIN
SET NOCOUNT ON;
declare @serial int
-- get the serial # to insert for the table we're going to. You have to have GetSerialForTable sp installed to work exec GetSerialForTable 'Contact0',@serial output
-- inserts into tables must include the serial,linkserial. If the inserted table is not a main table like Page0, you must also include CaseSerial -- then include all fields you wish to copy across insert into Contact0 (serial,LinkSerial,lname,fname) select @serial,'100000^'+cast(@serial as varchar),lname,fname from page0 where serial = @CaseSerial
-- do any other pages that need to be copied across
-- If you wish to Move the entry (and thus delete out the case that was copied, you must call lb_DeleteEntireCase to remove the copied case. -- If you only want to Copy the case and leave the original intact, comment out this line exec lb_DeleteEntireCase @CaseSerial
END
HotDocs and LawBase
HotDocs is a document assembly program produced by the company HotDocs Ltd. The documentation you'll find here is focused on the functionality provided by the integration with LawBase and is not meant to be a comprehensive guide to HotDocs in general.
Running a HotDocs template
To run an existing template:
1. Open a case within LawBase
2. Click the HotDocs button on the GlueWare ribbon
3. Select the template from the library. Double-click to select.
4. Typically, an assembly interview will appear. Answer any questions that appear and click finish. The output will be a be a new word processing document and may be minimized.
5. At this point you can save , edit or print the document as needed.
About the HotDocs Program
HotDocs works hand-in-hand with your word processor and so must be installed on each client workstation. There are two versions of the program; one for editing and one for assembly only. Depending on your version of HotDocs, you may be using Developer and User (HotDocs 2010 or higher) or Standard and Player (through 2009). For the purposes of this LawBase help, we will refer to the programs using the most current names; that is, Developer and User.
HotDocs10 and higher Through HotDocs 2009: Editing Developer Standard* Assembly only User Player *Some customers may have upgraded to HotDocs Professional
HotDocs and LawBase Configuration
Set the HotDocs library
1. Log into LBAdmin and navigate to the System Setup Ribbon.
2. Click the Cosmetics button.
3. Under the HotDocs branch, select DefaultLibrary.
4. Drill down to your main LawBase directory. There should be a HotDocs directory at the highest level in the LawBase area. Select LawBase.hdl ( The extension .hdl means HotDocs library).
5. Click the save button in the upper right .
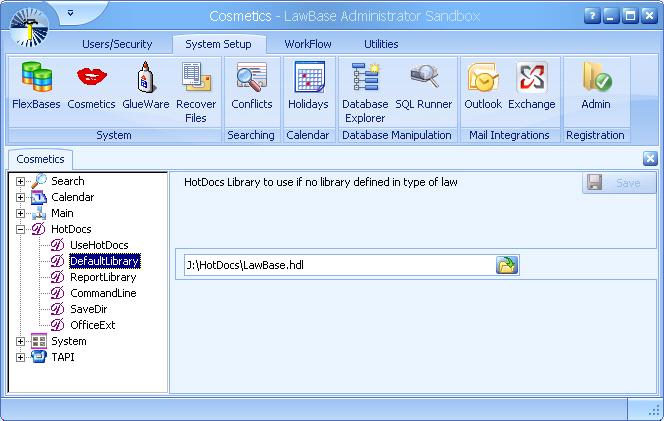
If the LawBase.hdl does not exist, create a new library and save it to the directory.
1. Launch HotDocs Developer. Start > Programs > HotDocs10 > HotDocs Developer LE.
2. File > New and create a library called LawBase.hdl and save it to the <<main lawbase directory>>\HotDocs.
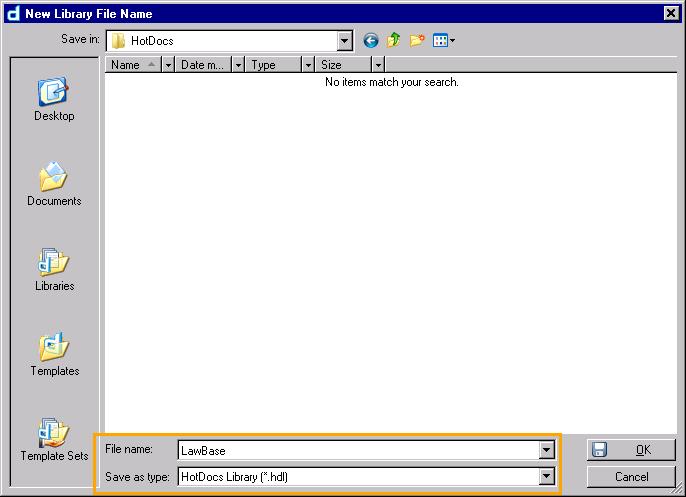
Creating a New Template
1. Launch HotDocs Developer. Start > Programs > HotDocs10 > HotDocs Developer LE. Make sure the LawBase.hdl has opened.
2. Click the New Template button on the toolbar.

3. Fill in the dialog, providing a source, title and description.
Many users find it easier to start at the bottom of the dialog, especially if you are using an existing document as the source for your template. a. Name the template and include the file path. Typically you'll want to save to the HotDocs directory. b. Assign a title for the template and a description. The title is how the template will appear in the HotDocs library. c. Select the contents of the template. If you are starting with a blank template, choose Empty. You can also work from an existing document. Select the second option if the file is already open or choose Other file to browse out the file.
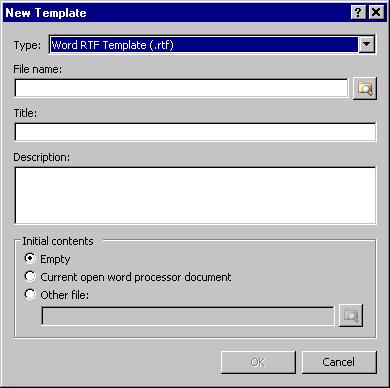
4. Click OK to finish.
This creates the template and component file
- Adds the template to the library.
Opens the new template for editing.
You are now ready to build the template!
Variables
The following sections describe how to build HotDocs variables that work with LawBase
- Field Names and HotDocs Variables
- HotDocs and CaseLinks
- Common Items
- Subgrids
- Repeats
- LawBase System Variables
- LB_RUNSQL Variables
Creating Variables
To create a variable: Within a temple (see Creating Templates for more information).
1. Position the cursor where you want the variable.
2. Click the Variable button from the HotDocs Ribbon.
3. Name the variable, following the naming conventions described in the sections below.
Note about Case-sensitivity
LawBase variables can be named using caps or lowercase text or a mixture of both. As an example, the variable lb_header_status refers to the same LawBase field as LB_HEADER_STATUS and either format will be processed correctly. However, HotDocs does enforce case sensitivity and does not handle these two variables as identical. So it's best to be consistent with variable names and to avoid "duplicates" that exist due to different cases.
Field Names and HotDocs Variables
How to determine the name of a field in LawBase
1. Inside a matter or a contact, select the LawBase field that you want to know the name of.
2. Right-click and select Show Field Name.
3. LawBase displays the HotDocs Name of the Field as well as the Database name. Use the HotDocs
Name in Hot Docs Templates.
LawBase Specific Variables
Basic Fields
Syntax: lb_<tabname>_<fieldname> Set the correct variable type to match the field in LawBase Text, Date, Number and so on Examples: lb_header_atty, lb_clientinfo_name
Caselinks
Syntax: lb_link_<filetab>_<filefield>_<contactfield> Example: lb_link_addpartyinfo_name_name Alternate syntax:lb_<filetab>_<filefield>_<contactfield>
Picklist Syntax: lb_<tabname>_<fieldname> Returns the value populated in the picklist.
Pick list description
Syntax: lb_pick_<picklistname>_<tab>_<field> Example: lb_pick_staff_header_paralegal
Pick list ExtraInfo1 Syntax: lb_pickextra1_<picklistname>_<tab>_<field>
Example: lb_pickextra1_Attorney_Header_atty Pick list ExtraInfo2 Syntax: lb_pickextra2_<picklistname>_<tab>_<field>
Repeatable
Syntax: lbr_<tabname>_<fieldname> R indicates that there are multiple (repeated) values You must create a repeat around repeatable variables When using repeatable with links, you can use lbr_link or lblr
Selected Entry from Repeatable tab
Syntax: lb_<tabname>_<fieldname> Place cursor in record to select one record from repeatable tab before running
LawBase fields and Variable Types
The HotDocs variable type has to match the LawBase variable type.
LawBase Field Type Hot Docs Variable Type Edit Field Text Variable
Pick List (field with a drop down ) Text Variable
Case Link Text variable: see Section below on Case Links Phone Field Text Variable Date Field Date Variable State Field Text Variable Launch Button Text Variable (won’t launch, but will print the file name.) Email Field Text Variable Number Field Number variable Mask Edit Field Text Variable Active Pick List Text Variable External Field Not Possible to use in Hot Docs
Image Field Not Possible to use in Hot Docs (but you can include an image if it is referred to by its network path and file name)
Caselinks in HotDocs templates
Caselink variables are built differently from straight text variables. Because caselink fields store link information, we can't just use a variable of the syntax lb_tabname_fieldname. Instead, we have to have to specify that we're using a link and what is being linked.
Caselinks
Caselink fields are used in files most often to link to contacts. They can also be used to link to other files. Caselinks have a chain icon at the end, like this:

Before you start building HotDocs linking variables, you should know where your caselinks point.To see the lookup SQL statement for a caselink, right-click on the link and select Edit Lookup SQL. Here's an example. In this example, the caselink points to contact0.
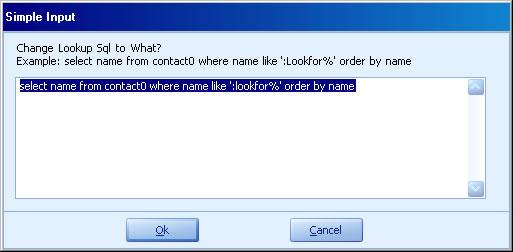
HotDocs Variables for Caselinks
There are two kinds of linking variables: direct and indirect. Direct variables use the same information established in the Lookup SQL. Indirect variables point to a field that is related to the original link.
Direct linking variables
Use direct linking variables when the field you are linking to is on the same tab as the SQL lookup. The general formula for a direct linking variable is:
LBL_TABNAME_FIELDNAME_LINKEDFIELDNAME
The example below is a direct linking variable because we want to print out the data as it is displayed in the LawBase user interface. We can see in the screenshot below that the tabname and field name are oppparty and counsel, respectively.
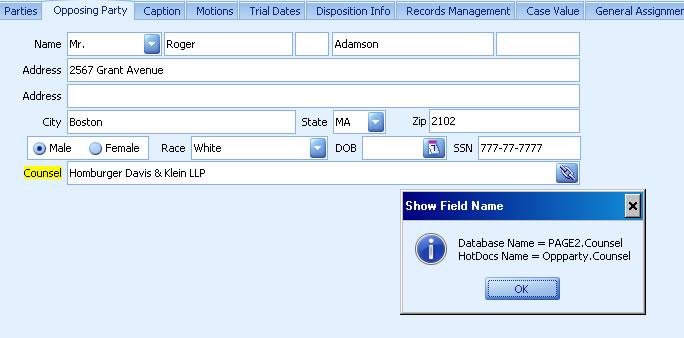
The lookup on this field (right-click and Edit Lookup SQL) is:
select name from contact0 where name like ':lookfor%' order by nameSo, using these components (highlighted), we can build the link:
lbl_oppparty_counsel_nameIndirect Linking Variables
Indirect linking variables get data not explicitly called out by the lookup SQL. The most common example of this is when the lookup example is established on a tab and you want to get the related header information. The general syntax is:
LBL_TABNAME_FIELDNAME_LINKEDTABNAME_LINKEDFIELDNAMESo if the Lookup SQL is:
select lname, fname from contact2 where lname
like ':lookfor%' order by lname
And the field we need from the contact header is name, then the caselink variable will be: lbl_tabname_fieldname_contacthead_name
Common Items
This section provides the variable names for common items (notes, calendar, history).
Notes
Use the following variable names to output the notes data for a selected file. The variables are represented here as repeatables (lbr variables), so you will need to build a repeat around them. You can also use lb variables if required.
Field name Variable name
Duedate «lbr_notes_duedate»
(make sure to set this as a date type variable) Noteby «lbr_notes_noteby» Notetype «lbr_notes_notetype» Billable? «lbr_notes_notebill» Memo «lbr_notes_memo» Time spent «lbr_notes_notespent»
You can also add the display fields for the selected FlexBase using the variable «lbr_notes_forcase». For more information about FlexBase Display Fields see FlexBase Properties.
Calendar
Use the following variable names to output the calendar data for a selected file. The variables are represented here as repeatables (lbr variables), so you will need to build a repeat around them. You can also use lb variables if required.
Field name Variable name duedate «lbr_calendar_duedate» enddate «lbr_calendar_enddate» type «lbr_calendar_type» what «lbr_calendar_what» location status «lbr_calendar_status» postdate «lbr_calendar_postdate» postby «lbr_calendar_postby» For case alarm «lbr_calendar_alarm» isroll «lbr_calendar_isroll» isappoint «lbr_calendar_isappoint» memo «lbr_calendar_memo» abfld «lbr_calendar_abfld»
Field name Variable name recurrenceinfo «lbr_calendar_recurrenceinfo» private «lbr_calendar_private»
You can also add the display fields for the selected FlexBase using the variable «lbr_calendar_forcase». For more information about FlexBase Display Fields see FlexBase Properties.
History
Use the following variable names to output the history data for a selected file. The variables are represented here as repeatables (lbr variables), so you will need to build a repeat around them. You can also use lb variables if required.
Field name Variable name duedate «lbr_history_duedate» type «lbr_history_type» method «lbr_history_method» tab1 «lbr_history_tab1» tab2 «lbr_history_tab2» what «lbr_history_what» postdate «lbr_history_postdate» postby «lbr_history_postby» memo «lbr_history_memo» attachment «lbr_history_attachment» histaction «lbr_history_histaction»
You can also add the display fields for the selected FlexBase using the variable «lbr_history_forcase». For more information about FlexBase Display Fields see FlexBase Properties.
How to Repeat Information from a Repeatable Tab
There may be times when you want to pull multiple instances of information contained in LawBase into a Hot Docs template. For example, you may want to include a list of parties , which would pull information from several different copies of screens in LawBase. You may have a single opposing party in a matter or you could have 15 different parties who need to be included in a letter. In this example, we want the template to work through each copy and add each new party to the list. In our example, we have multiple copies of a Parties screen and each screen has the name of the attorney representing the party. The information on each counsel is stored on a contact card and we need to drill down to the contact card to get the name of the firm and the firm’s address to pull into our Certificate of Service.
Here is a single tab in LawBase that has been duplicated twice.

We want the Hot Docs Template to pull each counsel into our Certificate of Service.
1. The first step in creating the form is setting up the form exactly as you would any other form in HotDocs.
2. Secondly, you need to create the variable names that you need to repeat, but instead of using a format
like <<lb_tabname_fieldname>> use the lbr prefix. This prefix informs LawBase to send to Hot Docs each instance of this field in LawBase for that matter. The format that you will use is very similar: <<lbr_tabname_ fieldname>>.
3. Note: It is best to test the form to make sure that it works prior to adding the Hot Docs repeat.
4. If the form is working, you will then need to add a Hot Docs repeat. First, highlight the information in the template that you want to be repeated.
5. Click on the Hot Docs Repeat Button on the Hot Docs ribbon. Hot Docs Repeat Button

6. Assign a name to repeat variable. This will be a new repeat since we haven’t used this repeat elsewhere in this template. Click the Edit button
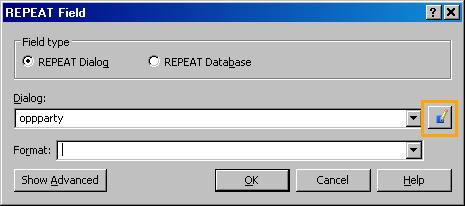
7. Add the variables that will be included in the repeat. Drag them from the list on the right to the contents area on the left.
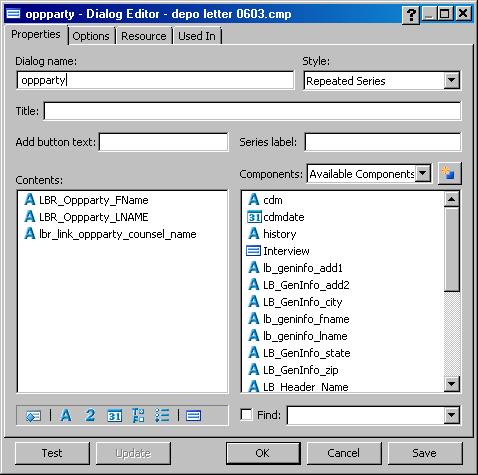
8. The template appears as follows:
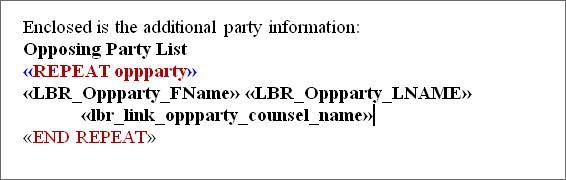
9. The final document in our example appears as follows:

Selecting a Single Copy from a Repeatable or a Grid
Sometimes you'll have a template where you need to select only one row from the grid or repeatable tab. In the example below, we need to use the contact information for only one selected party in our output.
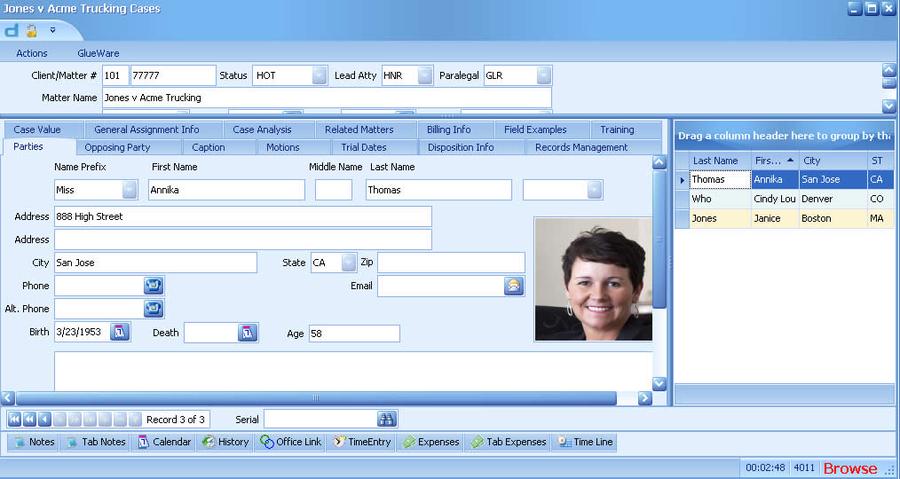
The variable syntax is «lb_tabname_fieldname» In the example above, the tab name is PARTY and the field names we want are LNAME and FNAME. So we would have variables like:
«lb_party_lname» «lb_party_fname» We don't use LBR because the repeat is not used; we use LB to select a distinct value from the copies. So if you need the output Annika Thomas, make sure to select her record before running the template that includes the above variables. If you don't select the copy you want, you'll get the first item in the list, ordered by tab serial.
Filtering a Repeat
By default, a repeat dialog returns all the copies captured by the repeat. You can limit the results that are returned by adding a filter to the repeat. Example: In the tab below, we have two defendants and a victim. Using a default repeat, all parties would be listed. To limit the results to only defendants, we'll add a filter.
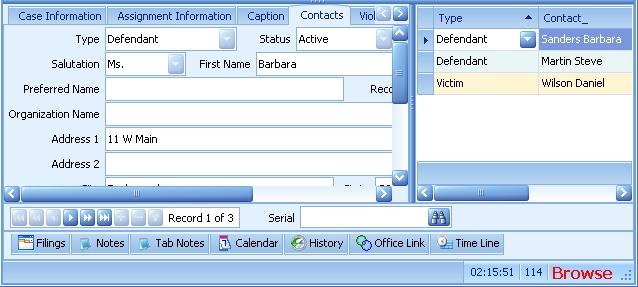
1. Create a repeat dialog normally (this was described in the previous section). Make sure the variable you want to filter on is included in the repeat. In this situation, we are using the variable lbr_contacts_type.
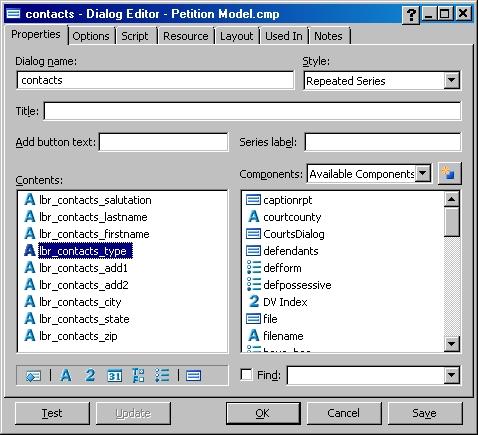
2. To set the filter, click the Show Advanced button at the bottom of the Repeat Field dialog
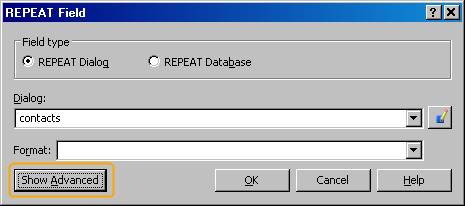
3. Towards the bottom of the expanded dialog, you'll see the Filter by drop-down.
Click the edit button just to the right of the drop-down. A computation editor appears. Fill in the script as needed and name the variable. In this example the script reads: lbr_contacts_type = "defendant" So the results returned will be only contacts of the type Defendant.
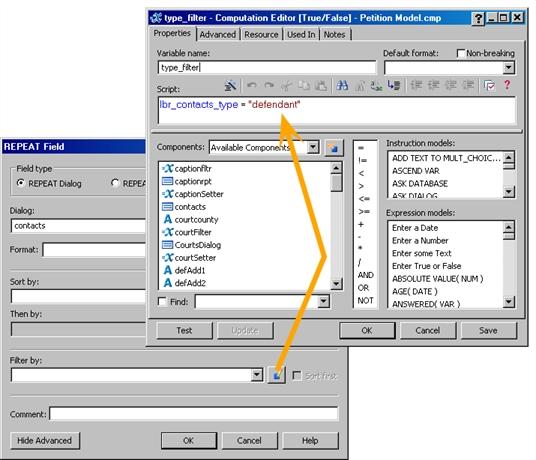
4. Click OK to exit the computation editor; make sure the new computation is listed in the Filter by drop-down.
5. Click OK to exit the repeat. The filter is set.
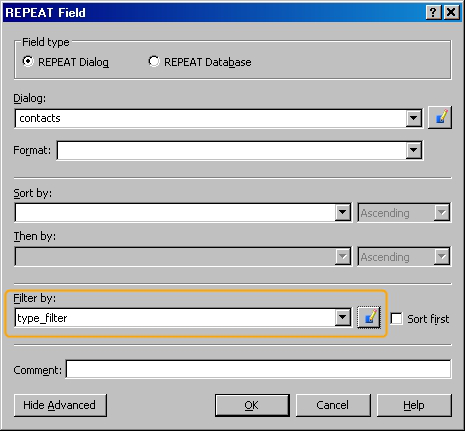
Other Computations
The example above used the filter: lbr_contacts_type = "defendant" The Type picklist includes other types: expert, witness, attorney and more.
So we might use other filters:
lbr_contacts_type != "attorney" returns all types but NOT attorney lbr_contacts_type = "witness" OR lbr_contacts_type = "victim" returns witnesses or victims
For more information about repeats, filters and dialogs, consult the HotDocs help.
HotDocs and Subgrids
Subgrids sit on normal or repeatable tabs as shown below:
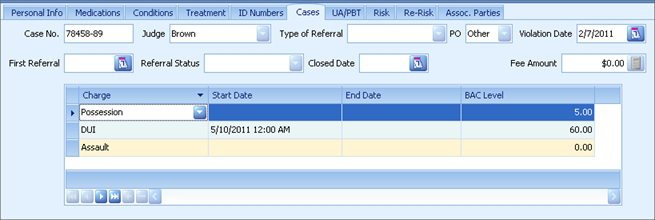
Using a Repeat to get all Copies of a Subgrid
- 1. Create the variables you need as usual. You may notice that for subgrids, the HotDocs names are
identical to the database names.
- 2. Create a repeat around the subgrid variables.
- 3. ALSO - create a second repeat AROUND the subgrid repeats. This repeat
This is required, even if you are not on a repeatable tab. Why? Essentially the subgrid is a child and the parent is the tab. So the child repeat requires the parent repeat to function correctly.
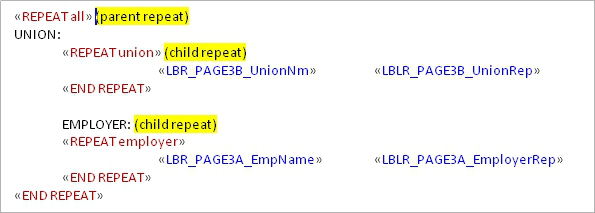
continued
The parent repeat's contents should include the subgrid repeat dialogs.
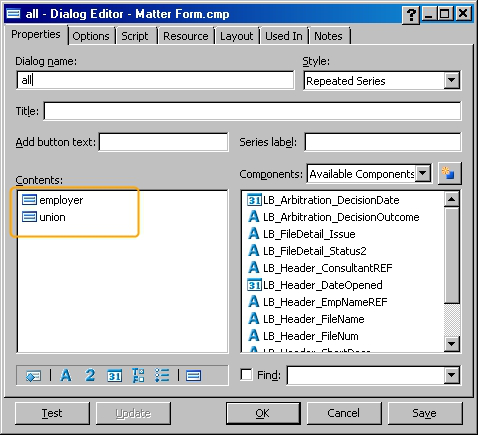
Selecting a Single Copy from a Subgrid
Sometimes you'll have a template where you need to select only one row from the subgrid. In the example below you could choose the Amazon record or the Google record. The variable syntax is «lb_subgridname_fieldname» In the example below, the subgrid name is page2a and the field name we want is employer, so the variable is: «lb_pagee2a_employer»
We don't use LBR because the repeat is not used; this is to select a distinct value.
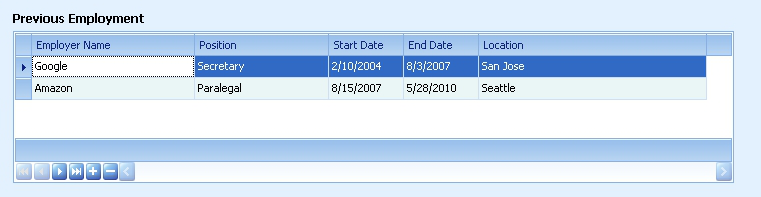
So if you need the output Amazon, make sure to select the Amazon record before running the template that includes the above variable.
Mass Mailings
There are two main ways LawBase users think about Mass Mailings from LawBase:
1. Producing the same form for all copies in a repeatable tab.
2. Producing the same form for all files in a SmartFolder.
Each of these is described below.
Mass Mailing (Mail Merge) to All Copies in a Repeatable Tab
If you know how to set up a form for one copy of repeatable tab, setting it up for all copies is easy. The difference is handling how the page breaks for each new copy. Below shows how the pages might break. You can see that the end of the first letter is the cc line followed by the letterhead of the next letter.
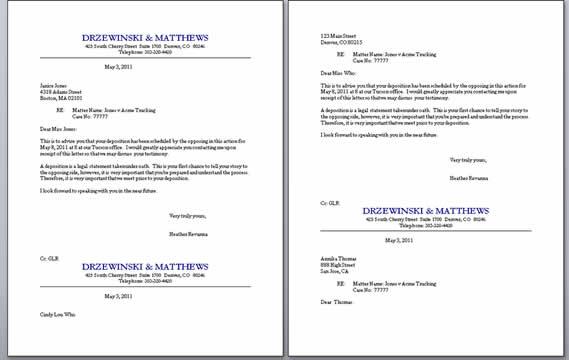
Add Page Break Formatting to the Letterhead
In Microsoft Word, you can fix this by setting the letterhead paragraph to have the Pagination setting "Page
Break Before."
To set Page Break Before on the opening line of your template:
1. Select the letterhead paragraph and open Paragraph Formatting options.
In Word 2007 and above, from the Home Ribbon in the Paragraph area, click the Paragraph Dialog icon (small icon at lower right) to access Paragraph Options. In Word 2003, select Format > Paragraph from the menu bar.
2. From the Paragraph dialog, select the Line and Page Breaks tab.
3. Check Page break before. Now the letter copies will break for each new copy of the letterhead.
NOTE: Depending on how your document is structured and where the letterhead is inserted, you may have to apply the Page Break Before to first paragraph of the letterhead template.

Add PageBreaks inside a Repeat
HotDocs help includes a section that describes how to use a manual page break to force the top of the document over. Search your local HotDocs help for "Repeat a text Template". The content is also available from the online knowledgebase: http://help.hotdocs.com/knowledgebase/dc_repeat_a_text_template_hdi-task?lbu=US&locale=en_US&audience=all
Mass Mailing to all Files in a SmartFolder
To run the same template for all files in a SmartFolder:
1. Right-click on the SmartFolder
2. Click HotDocs
3. Select the template from the library.
The template will now assemble for all files in the SmartFolder.
NOTE: By default, your users will have to click Finish and possibly Print for each file. To avoid this, consider adding the LB_Closeit and LB_printit variables to your template. These variables are described in LawBase System Variables
LawBase System Variables
In addition to being able to use the variables that have been discussed above, Synaptec has created several additional variable types that you may want to use in a Hot Docs template. To use these variables, create a text variable and name as specified below.
Variable Description
lb_closeit Add this variable to bypass the interview. Typically used in conjunction with lb_printit. If you run this without lb_ printit, the output will not be printed, displayed or saved. Especially handy when you want to run the same HotDocs template for all the files in a SmartFolder. NOTE:if you have questions that would normally appear in the interview, these will not be asked when this variable is applied. See the section below about Switches for an alternative to this variable. **Note, you cannot use this in conjunction with the HotDocs parameter = /stw /nw**
lb_filehyperlink Inserts a hyperlink into the output which links back to the case where the template was initiated. lb_fullname Inserts the full name of the user running the template into the output.
lb_officesave Inserts the «LB_OFFICESAVE» variable. For information about how this is used, see OfficeSave
lb_printit This allows you to automatically print the template to the user’s default printer. When this command is reached, it prints automatically (no need to click the print button in your word processor. **Note, you cannot use this in conjunction with the HotDocs parameter = /stw /nw**
lb_runsql Returns the result of an SQL select statement. See LB_RUNSQL Variables for more information. lb_security Inserts the Security from the header of the selected FlexBase into the output. lb_template Inserts the template's file name and network path into the output. lb_time This prints the current system time. lb_timesec Inserts the current system time with seconds. lb_typelaw Inserts the Typelaw from the header of the selected FlexBase into the output. lb_useremail Inserts the email address of the user running the template into the output;
lb_username You can use this variable when you want to insert the name of the person who is running the template. You may want, for example, to have the person who is running the letter to sign the letter. In this way, you would not need to use a multiple-choice variable but could simple insert the username command in the template. Another area where this could be used is when making a note or adding a calendar item.
HotDocs Command Line Options
HotDocs offers a number of command line options which you can use to customize the assembly. For information on all of the options, consult the HotDocs Help. Here we have listed the options most commonly used by LawBase users. To bypass the assembly window and avoid clicking Finish, use these two options together.
Option Description
/nw
No assembly window. Most often used in conjunction with /stw Note, you cannot use this command in conjunction with the lb_printit or lb_closeit variables
/stw
Send to word processor. Most often used in conjunction with /nw Note, you cannot use this command in conjunction with the lb_printit or lb_closeit variables
Using Command Line Options
You can set the command line options for use with single template or for use with all templates. Each method is described below.
Command Line Options with Individual Templates
- 1. Edit the properties of the template (select the template in the library, right-click and select properties.)
- 2. Fill in the description area with
Parameters =<option>
Example: Parameters =/stw /nw
Global Command Line Options — for All Templates
To set a command line option for all templates, use the Command Line Cosmetic under the HotDocs branch of the cosmetics tree.
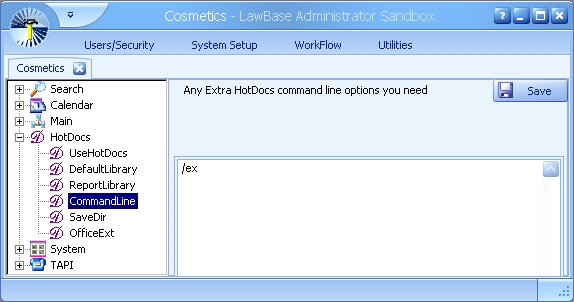
LB_RUNSQL Variables
LB_RUNSQL variables are text variables that run SQL statements against the database. To set one up:
- Create a text variable and name it LB_RUNSQL[uniquetext].You can name them to indicate what the SQL does; for example, LB_RUNSQLADDRESS or LB_RUNSQLTRIALDATES. Alternatively you can name the variables with numbers; such as LB_RUNSQL1, LB_RUNSQL2.
- Edit the variable and fill in the prompt area with the SQL statement you need. In the example below, the SQL statement returns all active users who are administrators. (Hint: you can try this on your system too, since all everyone has a user_profile table. )
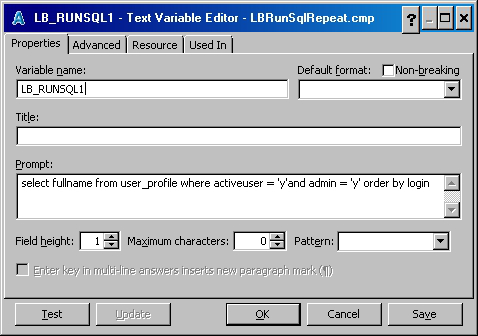
- 3. Build a repeat around the variable so it will run until all copies are captures. The variable might look like
this with a repeat:
«REPEAT RunSqlRepeat» 1. «LB_RUNSQL1» «END REPEAT»
The output looks like this in our demo database:
- Arnold Orzel
- Drew Homburger
- Georgia Jamison
- Annika Thomas
- Lucy Williamson
Using LB_RUNSQL to Populate a Multiple Choice variable
Typically, if you include a multiple choice (MC) variable in a HotDoc you run with LawBase, the choices are not sourced from LawBase but reside in the template. Below is a typical example. Because the data does not come from LawBase, the MC will appear as part of the document assembly, asking the user to fill in an answer.
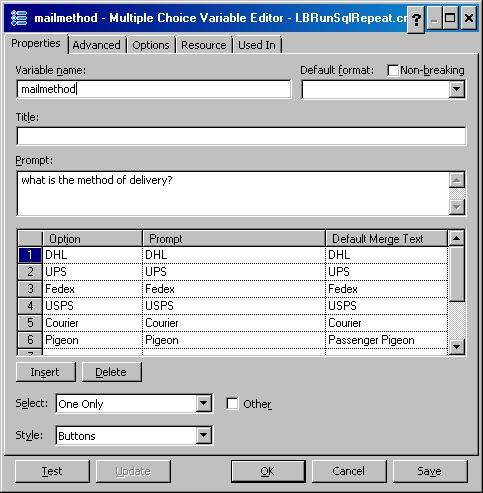
But there may be occassions where you want the MC to use data already in LawBase; a common example is a staff picklist. Instead of building an MC variable to list staff, you can use LB_RUNSQL to populate an MC variable for you. This saves a lot of time, because any time you modify the staff list in LawBase, the changes will automatically flow to HotDocs.
Example with the State Picklist
Here we will show you how to use a computation to populate an MC variable with the state picklist. There should be a State picklist on every install of LawBase, so you can try this.
- 1. Create an MC variable and name it State MC
- 2. Create a text variable and name it LB_RUNSQLSTATES; fill in the prompt with the following select
statement: select pick_value from pick_list where pick_name = 'STATE'
- 3. Build a repeat and name it Repeat State. Drag LB_RUNSQLSTATES into the contents of the repeat.
The repeat should not show in the body of the document but it will be used in a computation.
- 4. Create a computation variable and name it State Comp.
CLEAR States MC REPEAT StateRepeat ADD "«LB_RUNSQLSTATES»" TO States MC END REPEAT
- 5. Make sure both the MC and the comp variables are in the body of the document. Now you can run the
template and during the interview you should see a multiple choice prompt to pick a state.
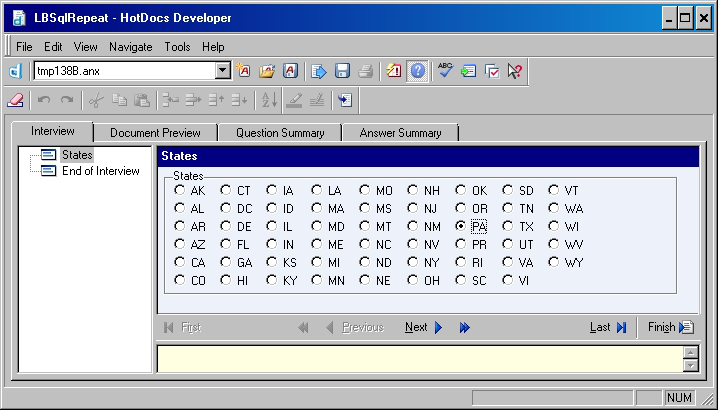
Conditionally Printing Text/ IFs
IFs in HotDocs can be used to set up a variety of conditions, but probably the post popular is omitting blank dates and lines where there is no data.
Date example:
HotDocs will insert 12/31/1999 or 01/01/1900 when the date field in the database is NULL. To avoid this, you can use an IF statement similar to:
«IF lb_court_trialdt > 30 DEC 1901»¶ «lb_court_trialdt»¶ «END IF»
Line example:
«lb_party_fname» «lb_party_lname»¶ «lb_party_add1»¶ «lb_party_add2»¶ «lb_party_city», «lb_party_state» «lb_party_zip»
The above address block will result in an extra blank line whenever there is no data for lb_party_add2. The blank line occurs because of the carriage return (¶) at the end of the line. You can use an IF to handle this situation.
- 1. Select the address 2 line including the paragraph mark (¶).
- 2. Click the IF button on the HotDocs ribbon .
- 3. In the dialog that pops up, select if expression and fill in the entry area as follows:
LENGTH( lb_party_add2 ) > 0
- 4. Click OK. The body of the document should look like this:
«lb_party_fname» «lb_party_lname»¶ «lb_party_add1»¶ «IF LENGTH( lb_party_add2 ) > 0»¶ «lb_party_add2»¶ «END IF»¶ «lb_party_city», «lb_party_state» «lb_party_zip»
What this IF expression means, is if the length of the text returned for the address 2 line is greater than 0, print that text and the following carriage return. It also means if the length of the text is 0, or effectively blank, then don't print the variable or the carriage return after it.
Writing Back to the Database
This section provides examples of how templates can automatically write to: Notes and Calendar History Any field you like
Adding Notes and Calendar Entries to a Template
Adding a Note to a Template
- 1. Create a text variable called “note” at the end of the form
- 2. Delete the variable “note” from the form so that it won’t print but is still part of the component manager
and can be used in the computation variable that follows.
- 3. Create a computation variable called “makenote” at the end of the form
- 4. Insert information into the computation variable that makes an SQL statement to create the note as in
the example below.
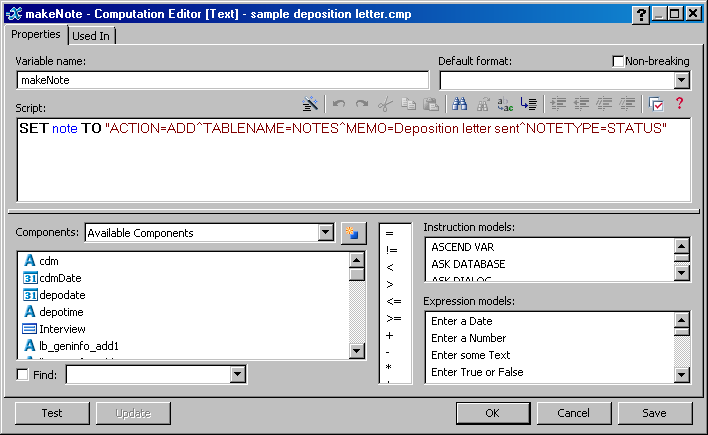
Here is a sample of the text you can copy and paste into the Computation Editor SET note TO "ACTION=ADD^TABLENAME=NOTES^Memo=Deposition letter sent to «lb_ party_fname» «lb_party_lname»^NoteType=Status"
Adding a Calendar Entry to a Template
1. Create a text variable called “cdm” at the end of the form
2. Delete the variable “cdm” from the form so that it won’t print but is still part of the component manager and can be used in the computation variable that follows.
3. Create a date variable called “cdmdate” at the end of the form
4. Delete the variable “cdmdate” from the form so that it won’t print but is still part of the component manager and can be used in the computation variable that follows.
5. Create a computation variable called “makeCDM” see below. This sets both the date of the event (14 days from today) and writes the calendar item to the calendar.
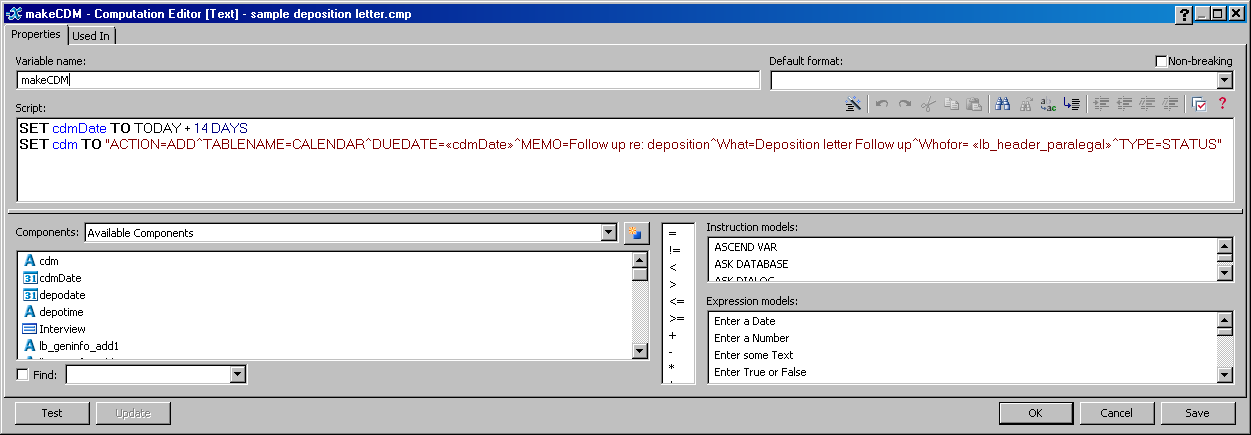
6. Keep the makeCDM variable in the form. It will not print anything but is necessary for the computation to work.
Here's a sample of the code you can copy and paste into the Computation Editor SET cdmDate TO TODAY + 14 DAYS SET cdm TO "ACTION=ADD^TABLENAME=CALENDAR^duedate=«caldate»^type=Status^memo=Followup with «lb_party_fname» «lb_party_lname» re: depo^what=Followup^whofor= «lb_ header_para»"
Adding a History Item to a template
- Create a text variable called “history” at the end of the form
- Delete the variable “history” from the end of the form. This will not print the “history” variable as part of the document but it will still exist as part of the component file so that you can use the variable in the computation later.
- Create a computation variable called “makehistory” at the end of the form
- Insert information into the computation variable that creates an SQL statement which automatically creates the history entry into LawBase.
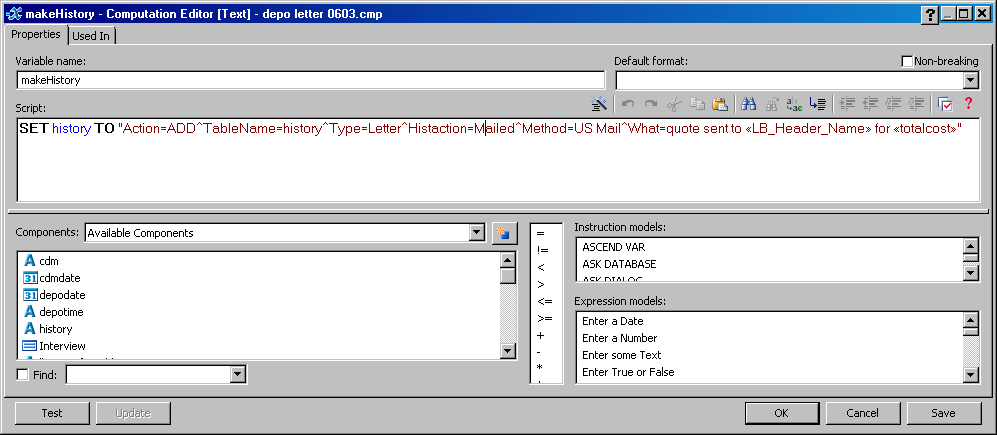
Full text from the screenshot above:
SET history TO "Action=ADD^TableName=history^Type=Letter^Histaction=Mailed^Method=US Mail^What=quote sent to «LB_Header_Name» for «totalcost»"
Using HotDocs to Write Data back to LawBase
In addition to having a template automatically create a note, calendar or history item, you may also want to have a field in the database changed each time that the form is run.
- First you need to create a text variable.
- Delete the text variable from the template so that it will not print but will still be included the component manager and can be used in the computation variable that follows.
- Create a computation variable in the template.
- Insert information into the computation variable that makes an SQL statement. See the example below.
The computation uses SQL’s update command rather than the set command used for Notes and Calendar items.
Tablename is the table where the field sits. Use the Database name, not the HotDocs name.
After the caret (^) is where you put the field name.
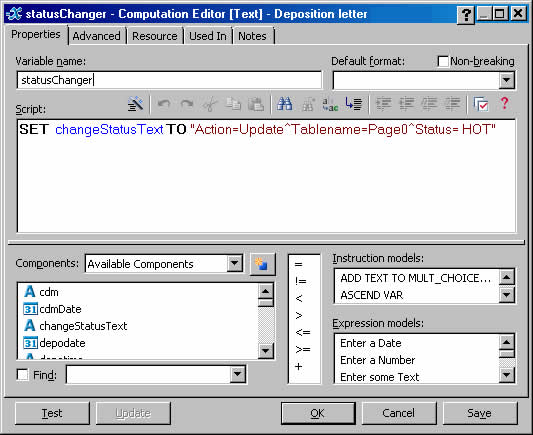
More Examples
SET update TO"Action=Update^Tablename=Page9^CheckAmount=«Check»
^where=caseserial=:serial and serial = «lb_develop_serial»
and doctor=«lb_develop_doctor»"
Since you’re comparing it to the serial on the page, another way you could approach this is:
SET update TO"Action=Update^Tablename=Page9^CheckAmount=«Check»
^where=serial = «lb_develop_serial»"
Writing Back to a Grid, Repeatable or Common Tab
The example above works because there is a single copy of page0. When you want to write back to a grid or a repeatable tab, you'll probably use something like this:
SET UpdateReqDt TO "Action=Update^Tablename=Page15^
RecReqDt= :curDate^where=caseserial=:serial~"
Note: just before the final double quotes is a tilde (~). This tells the update to repeat for as many copies as needed. Note: also, the = between where and caseserial is not a typo; this syntax is required.
Setting Gender/Pronoun in a template using a LawBase Field
Hot Docs will not accept a LawBase field directly into a Multiple Choice variable, so you need to use a computation variable to set the gender. You will also create a Multiple Choice variable. We'll start with the multiple choice variable.
Create a the Multiple choice variable
- 1. Create a new variable and make sure the type is multiple choice (MC).
- 2. Name the MC variable
gender. - 3. In the Option colum n are the options that can be pulled from LawBase . If yiou are using a gender field
in LawBase, you would have M and F; if using prefix, you may have Miss, Mrs, Ms and Mr.
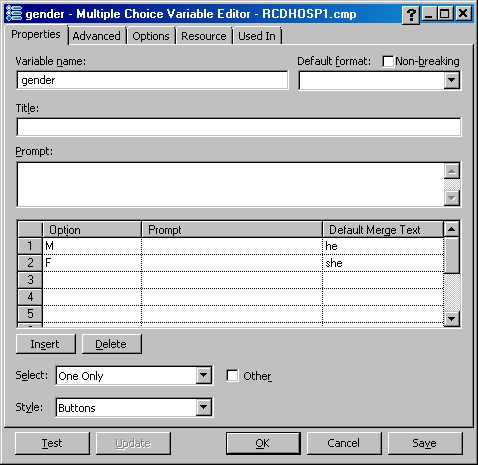
Create a computation variable to set the gender
- 1. Create a computation variable and place it before the gender variable. It is a good idea to place this
command at the top of the template so that it will execute prior to any multiple choice command.
- 2. In the computation use the SET command to set the MC variable
genderto the name of the field in
LawBase that contains the gender information.
- 3. Name the computation variable as you like; it is not a LawBase variable, so it's best not to start the
name with lb.
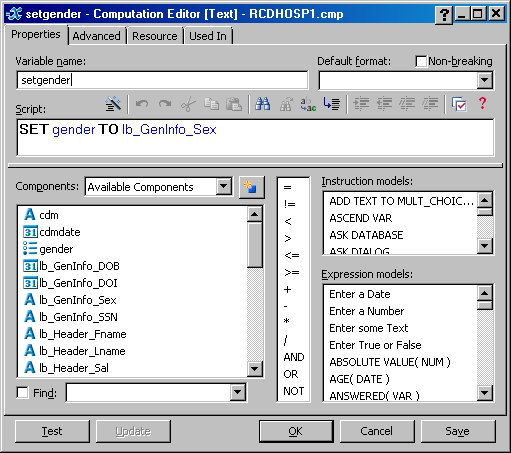
Here's how it works: When the template runs, it'll read what ever is in the lb_GenInfo_sex field. That value is then used with the MC variable. Sofor the examples we have here, if the lb_geninfo_sex field is M in LawBase, the value for gender will be set to he.
HotDocs/LawBase Quick Reference
This section summarizes the most commonly used features of HotDocs. This is intended for template editors who are familiar with HotDocs but need to refresh some items. Comprehensive content is included in the other sections.
What is HotDocs
HotDocs™is a third-party document assembly program which is integrated with LawBase.
LBAdmin Settings
System > Cosmetics > Hot Docs and fill in the path to the HotDocs library. The library file is typically lawbase.hdl, in the HotDocs directory.
<main lawbase directory>\HotDocs\lawbase.hdlEditing Templates
Start HotDocs Developer from the Start button.
HotDocs Templates
Every template is made up of two parts – the rtf file and a cmp file which holds the variables.
Adding a Template to the Library
Creating a New Template: Click New Template on toolbar.

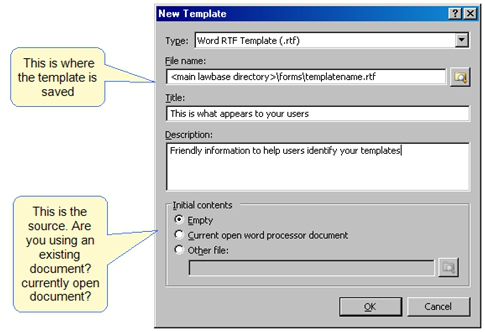
Copied from other Location - Perhaps saved from email or copied to your forms directory from C drive
- Copy the .rtf file and .cmp file to the forms directory
- Click the add item button
- Browse out to the file and add to library

Common Variable Examples
LawBase Variables
BasicFields
Syntax: lb_pagename_fieldname Use the correct variable type to match the field in LawBase Text, Date, Number and so on Examples: lb_header_atty, lb_clientinfo_name
Caselinks
Syntax: lb_link_casetab_casefield_contactfield Example: lb_link_addpartyinfo_name_name This is simplified; see the LawBase help for more details.
Charts
Syntax: lb_chart_page_chart1 This is a text variable where Chart1 is the name of the chart as it appears in LBDesign. Then create a HotDocs Insert field, select insert image, check Variable INSERT, and enter the text variable you created.
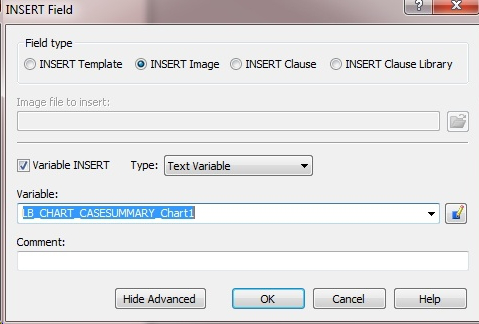
This is only valid if you have a chart in your screen design.
Repeatable
Syntax: lbr_pagename_fieldname R indicates that there are multiple (repeated) values Select the text to be repeated and add a repeat from the HotDocs ribbon.
Selected entry from
Syntax: lb_pagename_fieldname Place cursor in record to select one record from repeatable tab before running a repeatable tab
Picklist
Syntax: lb_pagename_fieldname Returns the value populated in the picklist.

Picklist Description
Syntax: lb_pick_<picklistname>_<page>_<field> Example: lb_pick_staff_header_paralegal
HotDocs Variables
Ask
Ask Dialog. Gathers questions so they appear on one page Drag the non-LB variables into the ASK
Computation Variable
Use these to set values, perform calculations, write back to LawBase This example sets a date value. SET cdmdate TO TODAY + 14 DAYS See Writing Back to the Database for the common examples of how to use computation variables with LawBase.
If
Sets behavior based on a condition. Example: If there is no address line 2, don't leave a blank line and carriage return. What the IF actually says: if the length of the field is greater than 0, print it. If it is not, then don't. In the template 1. Select the variable and carriage return lb_party_add¶ 2. Click the IF button 3. Fill it in as shown below. The text in the template looks like this: «IF LENGTH( lb_party_add2 )> 0» «lb_party_add2»«END IF»
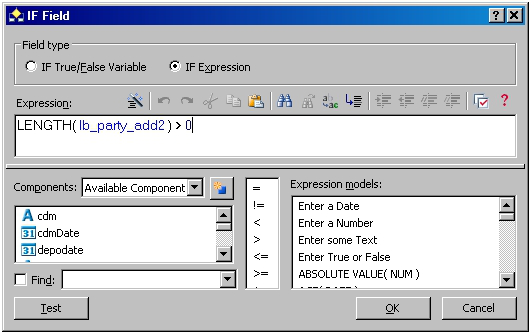
Insert
Inserts another template. Commonly used for letterhead, signature blocks. Example: Insert "letterhead.rtf" Browse to the location of the other template.
Note: do you want to include the header or footer?
Interview Questions
Example: During the interview, ask the user for a date that is not stored in LB but is used in the document. Create a variable, give it a non LB name, and fill in the prompt. Example: depodate
Repeat
Select the text to be repeated and click the repeat button on the HotDocs ribbon. Name the dialog as you like. Drag the related variables from the available list into the dialog. Typically used with Repeatable tab and grids.

TODAY Standard HotDocs variable. Use type Date.
How do LawBase Users Access HotDocs?
From inside a case, contact or other file, click the HotDocs button onthe GlueWare ribbon to launch the library.
OfficeSave
You can use OfficeSave to automatically save HotDocs output to a directory of your choice and fill in a link to the file in the Office Link common tab.
Set Up
Establish the directory where the output documents are saved on the network. Set this through LBAdmin. Go to System Setup > Cosmetics > HotDocs > HotDocsSaveDir. Fill this is with a network path. Here is where you'll save the output of HotDocs, not the templates.
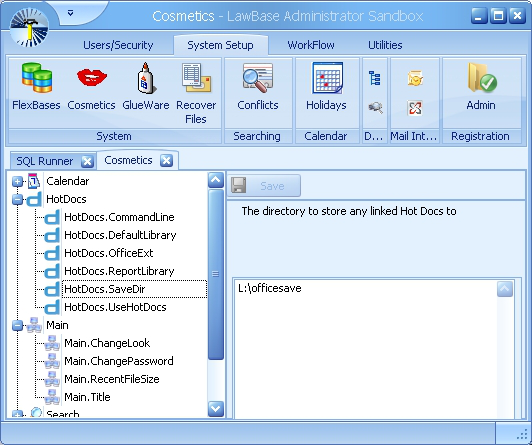
Extensions
Set the default extension you want for OfficeSave output - typically this would be doc for Word 2003 and docx for Word 2007 and higher. NOTE: You don't need to add the dot (.) before the extension.
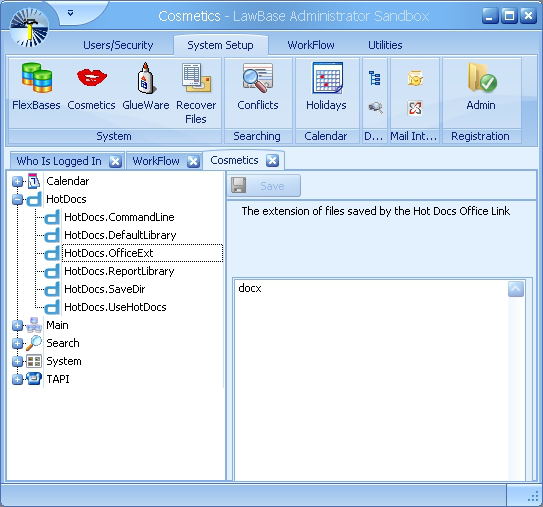
Enabling Templates
Add the LB_OFFICESAVE variable to every template that you want to have automatically saved. It must be a text variable named: LB_OFFICESAVE After you create the variable, delete it from the body of the document. It must be in the component file, but is not needed in the body.
Configure HotDocs
You'll have to perform this set up on every workstation where documents will be assembled using OfficeSave. These settings ensure that the document is saved, linked and opens properly.
- 1. Launch HotDocs
- 2. Go to Tools > Options and deselect the three items as shown below.
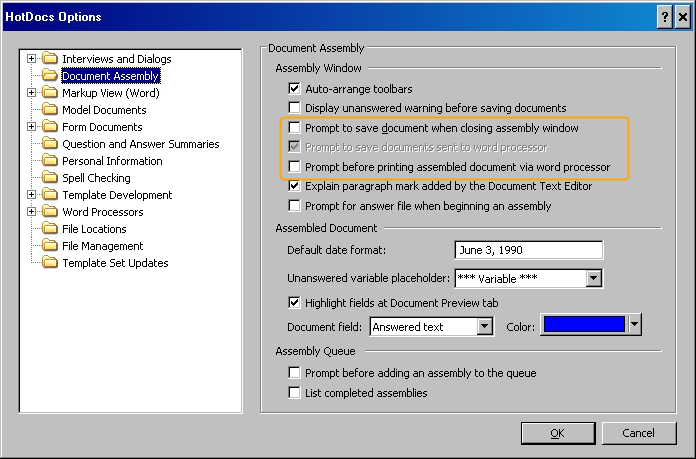
Prompt to save document when closing assembly window
Prompt to save documents sent to word processor
Prompt before printing assembled document
OfficeSave Output
When you assemble a template document will not open for editing like other HotDocs output. Locate the output in the Office Link tab and you can open and edit it there.
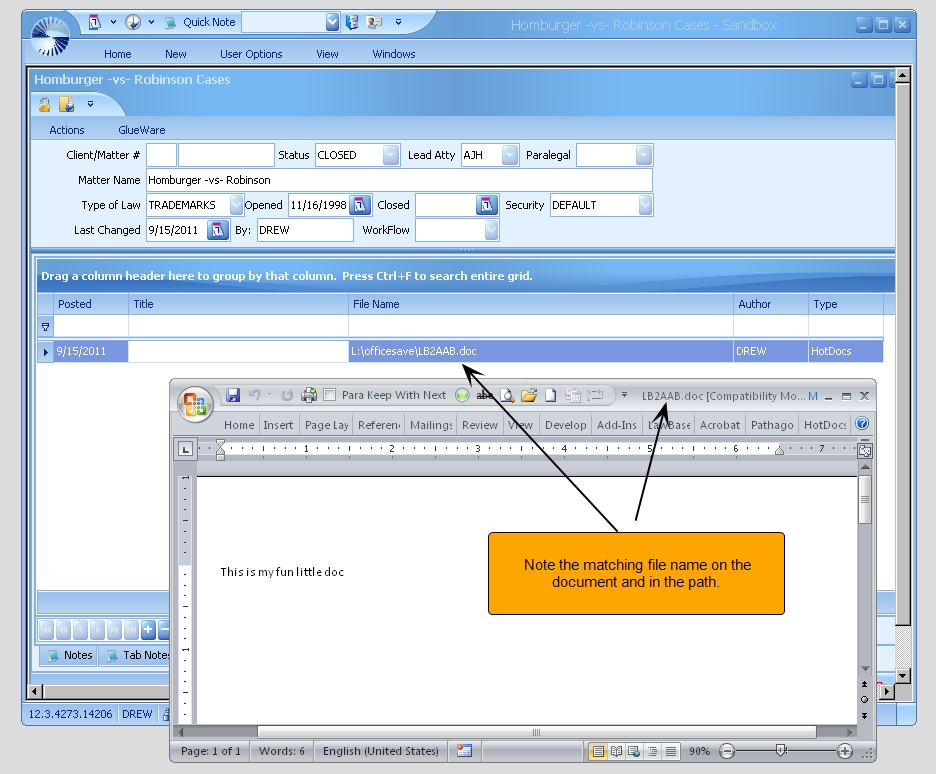
Troubleshooting
At the end of HotDocs assembly, if a save prompt like the following appears, you need to check the document assembly settings as described above in Configure HotDocs. This save prompt can interfere with the automatic save to Office Link.
About LawBase Installation
Application
Typically, LawBase is installed on an application server. Users access the lawbase.exe from their desktops via a shortcut.
The LawBase programs (LawBase, LBDesign and LBAdmin) will not be added to the Control Panel > Program list.
Nothing is installed on a local client machine, except the third-party HotDocs. And this install is separate from the LawBase install.
Users need a minimum of read rights to the entire LawBase directory, with the exception of the EmailAttachments, Dictionary files; users need to be able to write to these files. Admin will need full rights to Backup, UpdateFiles, reports and templates.
SQL Database
LawBase software works with a Microsoft SQL Server database
Synaptec provides the initial database but not the server.
The LawBase program needs dbo (database owner) rights to the database. The database user and password are set using LBDBConfig.exe
The Main LawBase Directory
The Main LawBase directory comprises several subfolders and a number of program and configuration files.
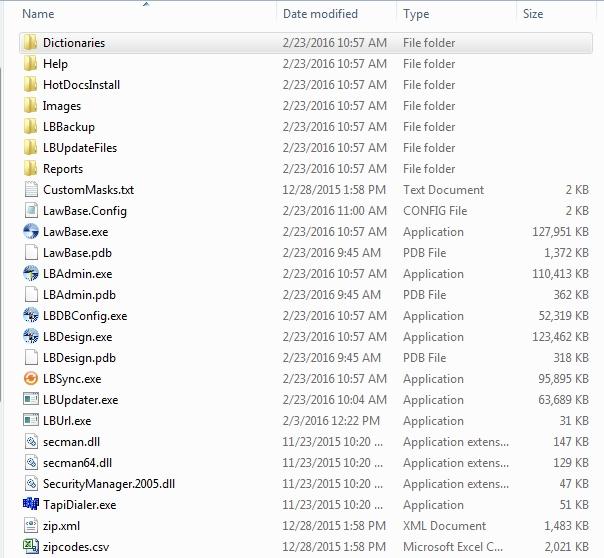
Dictionaries
This directory houses two dictionary files used for spellchecking. When users log in, custom dictionaries are created for each login name.
Help
Houses the online help files as well as the pdfs of the help. These are accessed from the user interface.
HotDocsInstall
The installer files for HotDocs are here.
Images
Common icons used in Glueware setup for Integrations to LawBase.
LBBackup
During updates, a backup of the current state of program files will go here before downloading new program files.
LBUpdateFiles
During updates, new files are downloaded to this location.
Reports
he reports directory is where Synaptec recommends storing custom HotDocs reports.
Other Files
exe – Executables, also known as application files.
LawBase.exe The main user application. Users will have shortcuts to this file. LBAdmin.exe The backend administrative tool.
LBDBConfig.exe This application helps you choose the appropriate SQL server for each of your environments. Saved settings are written to lawbase.config. LBDesign.exe The LawBase design tool.
LBSync.exe This program synchronizes settings from one database to another. This includes design changes, workflows, picklists and others. LBUpdater.exe The program processes automatically downloaded update files. LBUrl.exe Enables LawBase hyperlinks. Only needs to be run once on each workstation.
dlls – dlls are part of the program and work in conjunction with the executables. config – config files store settings that tell the applications how to work. LawBase.config is written by the exe lbdbconfig.exe; avoid editing this config file manually. pdb – these files are used in error reporting. Zip.xml and Zipcodes.csv–these are files of zip codes that can be used in WorkFlows.
Space Requirements
While systems can vary in space needs, we can provide these estimates: Application and ancillary files (including reports, templates and so on) – appx. 1.5 GB Data – initially we recommend 1 – 4 GB, but of course this will grow as your data grows.
Before you Begin
- Review the technical specifications.
- .NET 4.0 or higher is required on each workstation where you will run LawBase.
- You may need administrative rights for a few steps in the installation.
Client Installation
LBURLL.exe on Client Machines
On any other machines where you need to run LawBase 12, browse to the main LawBase directory and run LBURL.exe one time. You may need administrative rights to complete this.
Creating a Shortcut to LawBase
Because LawBase runs from a server, client installation means creating a shortcut. To create a shortcut to LawBase:
- From the user's desktop, right-click and select New Shortcut.
- Click Browse and drill down to the LawBase directory. Select LawBase.exe
Click OK
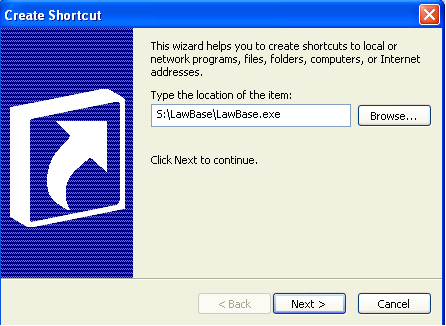
- 3. Click Next. Type LawBase as the name of the shortcut and click Finish. This will create a new shortcut
on the desktop

Add Login Information to the shortcut
You can save the LawBase user name into the properties of the shortcut. This saves the user from typing his or her login each day. When the password is set to nothing, this provides for automatic login. To edit an existing shortcut
- Right-click on the shortcut
- Select properties. At the very end of the Target area, type a space and append
/username=DREW Replace DREW with the appropriate user name.
You can edit the target area by adding any of the other switches listed in Command Line Options.
Workstation Display Settings
Display Settings: Minimum 1024 x 768 Font Sizes: LawBase does not support font sizes other than the default.
On Windows 7, this is known as Smaller (100%) On Vista, Default Scale at 96 DPI.
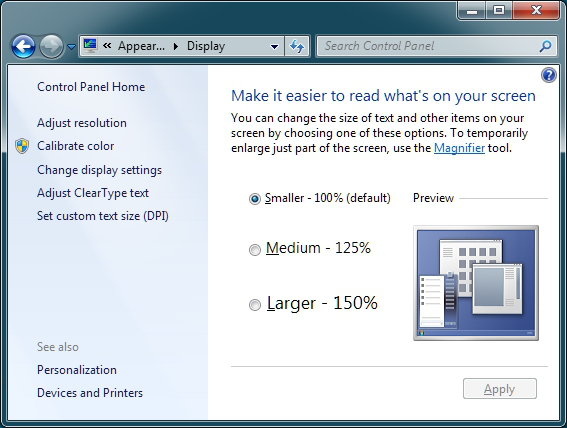
Command line switches for program startup
Both LawBase and LBAdmin allow the addition of command line switches to change their operation during execution. You can use these switches in application shortcuts as well as from the command line.
Program Switch Purpose
LawBase.exe /ns Prevent Splash Screen from appearing during program launch.
LawBase.exe /seamless
Forces correct taskbar operation in a Citrix Metaframe seamless publication environment.
LawBase.exe /mult Allows you to run LawBase more than one time on the same computer. LawBase.exe /debug Start LawBase in Debug mode level 1.
LawBase.exe /ignorenetwork
Bypasses the UseNetworkLogin requirement set in Cosmetics and allows you to log in as a different user.
LawBase.exe /nodpiwarn
Stops the display of the warning message about non-standard DPI upon login.
LawBase.exe /username=name Launch LawBase and log in using the given user name
LBAdmin.exe /username=name Launch LBAdmin and log in using the given user name
LBDBConfig.exe
/configfile=<<filepath\filename>>Example: /configfile=l:\lawbase.config
Launch LBDBConfig and specify what config file should be called.
HotDocs Installation
HotDocs is a document assembly program that interfaces with LawBase. There are two main products you may have:
HotDocs Developer This is the create/edit version of HotDocs. Install on the
machine of one template author. HotDocs User Install on the PCs of the remaining users.
HotDocs works hand-in-hand with your word processor and is not installed on the server but on the client machine.
Installation
Locate the HotDocsInstall subdirectory in the main LawBase directory. The files here are typically downloaded with the LawBase program file installation. Unzip the files into new directories (e.g. Developer and User). Additionally there are two versions to choose from: 32 bit and 64 bit. Be sure to let your LawBase project manager which version you will need.
HotDocs Developer
Log into the PC of the template author. Browse to HotDocsInstall\Developer Run setup.exe Accept all defaults.
HotDocs User
For all remaining LawBase users' workstations. Browse to HotDocsInstall\User Run setup.exe Accept all defaults.
Additional Configuration
SQL Connectivity
Tips for establishing connectivity between LawBase and the SQL Server
Make sure SQL Tools are installed
SQL should be running in mixed authentication mode
In SQL Configuration Manager, enable
- TCP/IP and Named Pipes protocols and
- SQL Browser
Open Server firewall as appropriate
Configuration on SQL Server 2012
A default setting on SQL 2012 prevents LB_Design users from adding new tabs.
- From Microsoft SQL Server Management Studio 2012, select Tools > Options
- From the list on the left select Designers.
- Deselect the option: Prevent saving changes that require table re-creation.
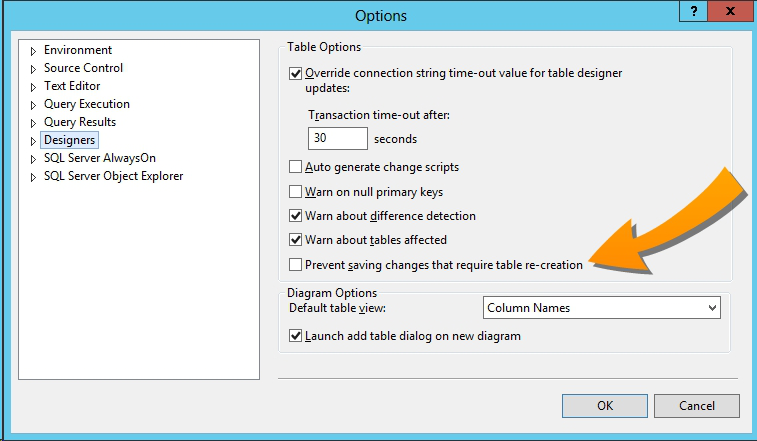
Considerations for installs in Terminal Server and other VDI Environments
This only applies to users connecting via Terminal Services, Citrix, VMWare View or any other vdi (virutal desktop infrastructure) solution. In those environments: 32-bit Microsoft Office must be used; 64-bit Microsoft Office does not support sending emails initiated by LawBase WorkFlow.
Updates
LawBase will, from time to time, release updates to the program software. Updates include enhancements and bug fixes and these changes are documented in the What's New file and Release Notes which are included with each set of updates.
How Updates Work
When new files are available, they are automatically downloaded into the LBUpdateFiles subdirectory of your main LawBase directory. When updates are applied, two things happen.
- The files that are replaced are backed up to the directory named LBBackup.
- The new files are copied into main LawBase directory.
How do I know it's time to update?
When updates are available, this is indicated in the status bar of LBAdmin.
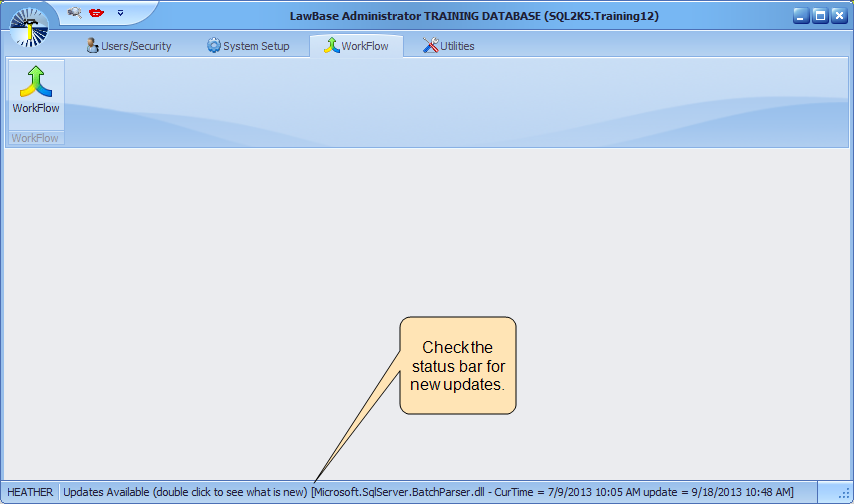
When you exit out of LBAdmin, you will be asked if you want to apply the update. If you click Yes, a screen associated with LBUpdater.exe will pop up, where the new files will show as downloading (if they haven't already been), the What's New and Release Notes are shown, and you can see who is still currently logged in to LawBase.
Before Applying Updates
Before installing any updates, we recommend that you read the What’s New documentation. To read the what's new, just double-click where indicated in the status bar of LBAdmin or within the LBUpdater.exe screen. From within the What's new you will also find a link to the release notes. To install the updated program files:
- You must run LBAdmin from a mapped drive (example L:\apps\lawbase ). The updates will fail if you run from \\server-name\dirname\lbadmin.exe.
2. Make sure the updates have completed downloading.
3. Make sure all users are logged out of LawBase. Check this in LBAdmin under Users/Security > Who is
Logged In or in the LBUpdater.exe popup screen.
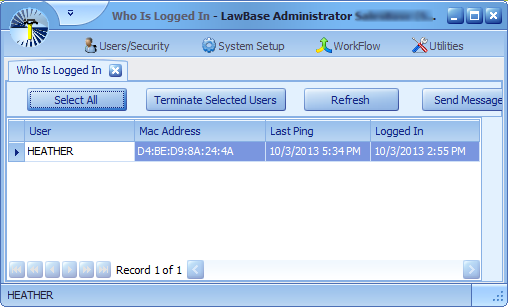
4. Check your application server to ensure that ALL LawBase files from the LawBase folder are closed.
More often than not, an update will fail because, although Who is Logged In shows no users logged in, a user terminal is actually holding open one or multiple .dll files from the LawBase directory. While all applications servers are different, see the Checking the Application Server for open files section below for instructions.
Applying Updates
- Close the LBAdmin application.
You can close with the X in the upper right-hand corner or exit under the Synaptec button. Upon exit, a prompt appears asking if you want to apply updates:
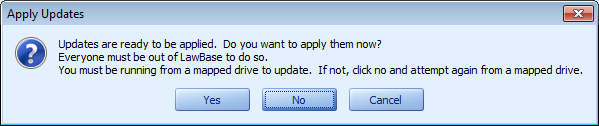
Click Yes.
- LBUpdater.exe will pop up where you can review the Release Notes and see who is logged in. The
Apply button in the top left corner will only color blue when all users are logged out of LawBase. YOU STILL NEED TO CHECK YOUR APP SERVER FOR OPEN FILES. Once you have done that, press the blue Apply button and you should receive this message after a short period of time:
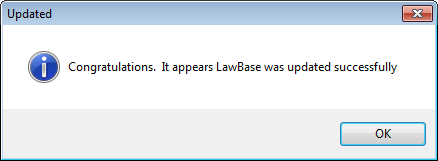
Log of Updated Files
After each update a log file is created listing all the files that were updated. It is saved under the main LawBase directory in LBUpdateFiles\Rollback.txt.
How Does the Process Actually Work?
1) When LBAdmin is launched, the program does the following:
- The database serial number is checked against a file stored on our LawBase website. If it can't connect over the internet (due to security or firewall measures), it stops. If it can connect, it figures out which update needs to be applied. - If the LBUpdateFiles directory does not exist, it is created. - LBUpdater.exe is downloaded into the UpdateFiles directory. - LB12Help.zip, LBAdminHelp.zip, ReleaseNotes.rtf and LBHDWord.zip are downloaded to the UpdateFiles directory if the web version is newer than the UpdateFiles version. - Components.cab and whichever LBCab is needed (depending upon type of update) is downloaded to the UpdateFiles directory. - Whether or not any files were downloaded, the files within the .cab files are checked to see if any are newer than the ones in the main LawBase directory. If there's at least one file that is newer, the program is notified that there's an update available.
2) Upon closing LBAdmin, if a user chooses to update program files from the prompt, LBAdmin launches LBUpdater.exe. When Apply is pressed in the LBUpdater.exe screen:
- Creates a backup directory for the current program files. - Runs through .cab files and help.zip files. If the file in the cab or help file is newer than the one on the system, the current file is copied to the backup directory, deleted from the main directory, and the new file is extracted from the cab file. If the file in the cab is not newer, nothing is done to that file. - The files that are updated are logged and the list is saved in the UpdateFiles\rollback.txt file. - If no errors occur, the .exe files are reactivated and the update is complete.
Troubleshooting Updates
You may come across a few issues that prevent you from applying updates.
Users Still Logged In
If users are still holding open the lawbase.exe, the update won't complete. A dialog like following will appear. From the screen you can
Send a message via LawBase asking them to log out
Terminate selected sessions or all sessions
Refresh the screen to verify that a session has ended.
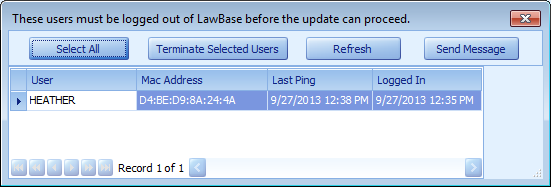
Auto Rollback
If you see a message like the following, it means the update was prevented from completing. The program files will be reverted to the state they were in before attempting the update.
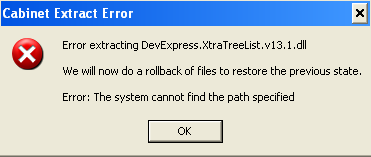
Auto rollback kicks in if:
Any program files are held open on the application server. For tips about closing open files, refer to
Checking the Application Server
The newly-downloaded program files are corrupt. To remedy this, delete the downloaded files and let
LBAdmin download the files again.
Check the files in UpdateFiles; you probably only need to remove the ones with the most recent timestamp.
Checking the Application Server for open files
LBAdmin checks whether the exe files are still being held open, but it can't check all the dlls and other files which are part of the program. On occasion, dlls may not close properly, preventing the update. So it's a good practice to check what files are held open on the application server. Monitoring the application server is something like looking at task manager except you can see all the files used by various network users. Typically you'll need to log directly into the application server or access it by remote desktop; consult your local administrator for guidance with this.
Note: These instructions are provided as a courtesy; application server management is not covered by LawBase support.
Here are the high-level steps to close open files on three server versions.
Windows 2003
- Right-click on Computer
- Select Manage > Shared Folders > Open files.
- Find the process (you may also want to check the user who started it)
- Right-click to close
Windows 2008
1. Start> Administrative Tools> Share and Storage Management
2. From the Action pane, choose Manage Open Files
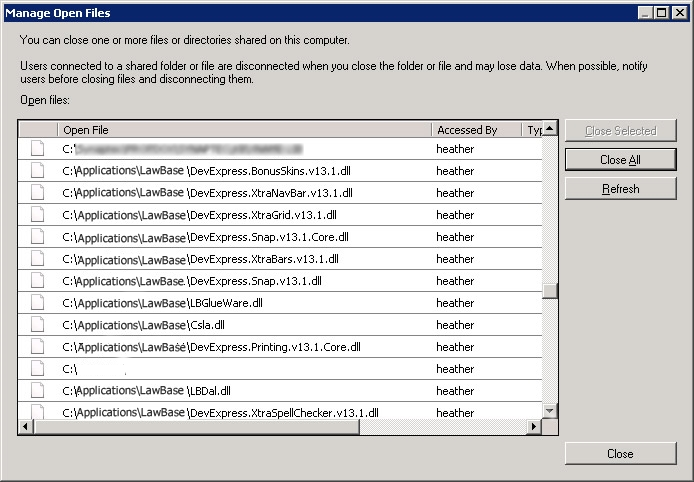
3. To close specific files, select the files and click Close Selected.
In the screenshot above you can see representative LawBase dlls.
Updates Don't Download
LBAdmin uses HTTP to check for application updates. If your Network Settings prevent LBAdmin from getting updates, here are few troubleshooting techniques to try: Click on the following link: http://www.lawbase.com/UpdateLB11/ReleaseNotes.rtf. You should get a dialog box asking you to Save, Save As, or Open the file. If you do not, ask your Network Administrator to check for the following conditions:
Is the domain www.lawbase.com added to the “safe” or “allowed” domains in your firewall?
Make sure port 80 and the protocols TCP/UDP are allowed for the LawBase domain.
If QoS is enabled, consult your Firewalls manual to modify the classification, marking, and policing
values to allow LawBase.com traffic to pass.
If you are running a firewall that has application level security, add the LawBase application files
(LawBase.exe, LBAdmin.exe, LBDBConfig.exe, LBSync.exe, and associated DLL files) to the list of allowed applications to access the web.
Manual Updates
Sometimes network/firewall security prevents LBAdmin from downloading program file updates for LawBase. In such situations you can download the files in batches from the web.
Steps to manually update LB
1. Download http://www.lawbase.com/xfer/LB12.5.zip
2. Unzip LB12.5.zip into the LBUpdateFiles subdirectory. You'll need a password to unzip this file; contact LawBase Support to get the current password.
3. Unzip FullUpdate.zip and SupportingFiles.zip into the main LawBase directory.
4. Move LBUpdater.exe from the LBUpdateFiles to main LawBase directory.
5. Run LBUpdater.exe from the main LawBase directory. Once all downloads are complete, click Apply.
Note: make sure to use a mapped drive to execute. The updater will not run correctly from a directory accessed through \\servername\directoryname.
If LBUpdater fails, you can manually extract both components.cab and lbcab.cab to the main LawBase directory.
Manually Extracting Cab Files
Cab files are like zip files; they contain a number of compressed files and need to be uncompressed or extracted. On occasion not all of the files are extracted. You can extract the missing files manually. To extract the contents:
- Open the cab file (double-click).
- Select the file(s) you want to extract.
- While the files are selected, right-click and select Extract.
- Select the main LawBase directory as the destination.
Rolling Back Updates
From time to time you may encounter problems after applying an update and opt to rollback to the previous files. To rollback, run LBUpdater.exe from the main directory and click on the red Rollback button in the top left corner. This will put you back to the version you were running before you updated.
Technical Specifications & System Requirements
LawBase is a .NET, fully threaded, multi-tiered application created in the C# programming language. It utilizes the Microsoft SQL database as its database engine. Clients can execute directly using Windows 10, 8 or 7. Alternatively, clients can use nothing more than a web browser and connect to an application server. LawBase is not supported over a VPN connection. In the table below, the specifications are based on typical usage and can vary widely based on individual requirements. Please contact Synaptec Software for assistance.
WORKSTATION
Client/ Server
Hardware Intel Core i7 - 4GB RAM - 1GB available hard disk space
Software Windows 7 or higher with .NET 4.0 or higher
Display Minimum 1024 x 768; Resolution at 96 DPI.
Browser based
Requires an appropriate application server, contact Synaptec Software for details.
DATABASE SERVER
Hardware Intel Xeon – 4GB RAM – 10GB available hard disk space. Virtual
servers are supported. Dedicated SQL server no required.
Operating System Microsoft Windows Server 2008 or higher
Database Software
Microsoft SQL Server 2008 or higher (All defaults used on installation including Dictionary order and case insensitive). Difference versions such as Microsoft SQL Server Express may be acceptable for some installations.
LawBase Hyperlinks
What is a LawBase Hyperlink?
Thanks to a new one-time setup, your users can use hyperlinks to access:
- Files (Cases, Contacts, etc.)
- SmartFolders
- Tabs within Files
- Favorites
- Search and Query Results.
For more information about the user end functionality, refer to the section on LawBase Hyperlinks in the User Manual.
About the URL Protocol
Any time you click a hyperlink, Windows looks in the registry to a specific key to determine how to handle the hyperlink. For example, when the hyperlink is a mailto link ([email protected]), the default mail program is launched. When the hyperlink is a web address, the default web browser is launched. To enable the same kind of behavior for LawBase hyperlinks, the program LBUrl adds entries to the registry so it can recognize what to do when a LawBase hyperlink is clicked.
Installing LBUrl
If you have a new installation after March 2011, LBUrl will be installed for you with your initial setup and you can skip this section. For installs before March 2011, to enable LawBase hyperlinks, you will have to run the program LBUrl.exe once on each machine where LawBase is used. To Install LBUrl:
- If your program files are up-to-date, you'll find LBUrl.exe in your main LawBase directory. Run LBUrl; it will attempt to create the proper Registry keys for you. Many systems have restrictions that prevent the modification of the registry so they may have to run this once as administrator.
Registry Keys Created by LBUrl
The keys created are all in HKEY_CLASSES_ROOT
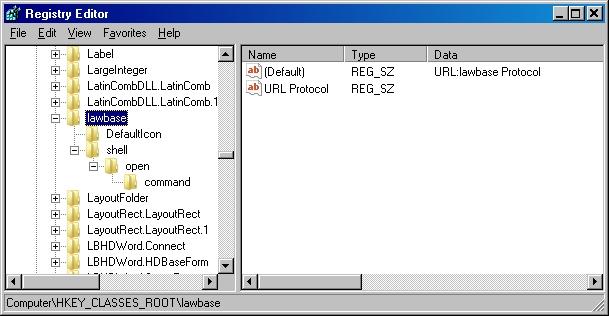
If you have to set the keys manually, you must set the lawbase and command keys like the following; only lawbase and command need anything other than default values.

What if you move LawBase?
If you move LawBase to another network location, you'll need to reset the keys that were previously set. To reset the keys for another location of LawBase, run LBUrl from a command prompt. Here's an example:
L:\LawBase12>LBUrl.exe /reset
What Happens When you Click a LawBase Hyperlink?
When a user clicks a hyperlink, the program LBUrl.exe is called. This program takes the parameters set in the hyperlink and checks to see if LawBase is running. If it is not, it launches a new session of LawBase and launches whatever item was specified by the hyperlink. If LawBase is already running, it brings it to the foreground and then launches whatever item was specified by the hyperlink.
Office Security Warnings
LBUrl will also now create the following registry keys:
For Office 2007 HKEY_CURRENT_USER\Software\Policies\ Microsoft\Office\12.0\Common\Security\ Trusted Protocols\All Applications\lawbase:
and
For Office 2010 HKEY_CURRENT_USER\Software\Policies\ Microsoft\Office\14.0\Common\Security\ Trusted Protocols\All Applications\lawbase:
As per the document: http://support.microsoft.com/kb/982301/en-us . Otherwise, every time you attempt to link, Office 2007 prompts to verify if you want to.
Office 2003 needs the following DWORD registry key set to 1. LBUrl does not create this registry entry in LBUrl because it lets all url links through, not just lawbase:
HKEY_CURRENT_USER\Software\Microsoft\Office\11.0\Common\Security\
DisableHyperlinkWarning
Using LawBase Hyperlinks
Built-in Hyperlink Functionality
There are several places in LawBase where you can right-click on an item and put a hyperlink to that item on your clipboard. Once on your clipboard, it's available for easy pasting into email or another application.
NOTE: Hyperlinks will work for users who have sufficient security to access the linked targets. For example, if you send a SmartFolder link to a user who doesn't have rights to that folder, the link will fail.
Files Common Tabs SmartFolders Tabs Favorites
You can also include hyperlinks in SmartFolder results. For information about hyperlinks in SmartFolders, see Hyperlinks in SmartFolders
File Hyperlinks
You can get the hyperlink from the results pane as well as from inside a file.
From the results pane, right-click on the file and select Copy Hyperlink to Clipboard.
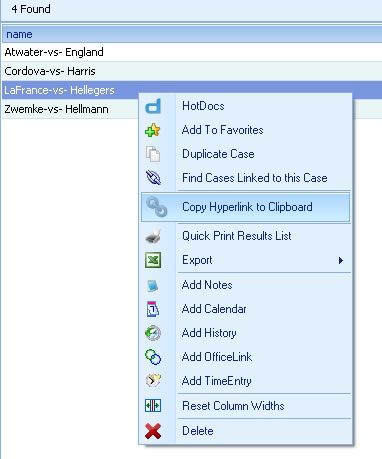
From inside a file, right-click on any field in the header and select Copy Hyperlink to Clipboard
Common Tabs
You can get the hyperlink from the common tab grid as well as from inside a common item . From the grid To copy the hyperlink for a common tab item, right-click on that item within the grid and select Copy Hyperlink to Clipboard. Use this to create a link to a specific note, calendar entry or other common tab item.
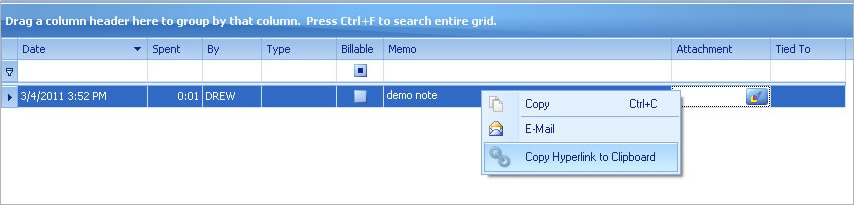
From within a Common item Use the drop-down next to the email button to access the link option. This creates an email message with a hyperlink back to this item directly in the new message.
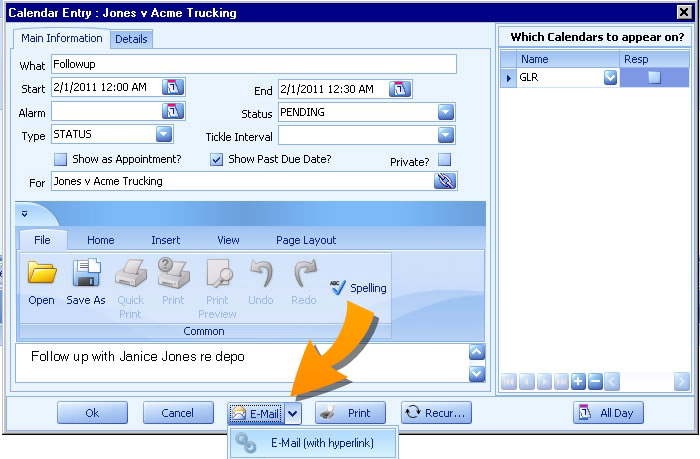
SmartFolder Hyperlinks
To copy a link to a SmartFolder, right-click on the SmartFolder and select Copy Hyperlink to Clipboard. For more about using SmartFolders with hyperlinks, see Hyperlinks in SmartFolders.
Tab Hyperlinks
To copy the hyperlink to a tab, right-click on any field in that tab and select Copy Hyperlink to Clipboard
Favorites
Right-Click on a favorite to copy a link to the favorite. Examples: favorite reports, dashboards, group calendars.
Query Builder
In Query Builder, select the Include Hyperlinks checkbox to add a column to the results with the hyperlink for each file. These links will also be included in any export. Note: the Include Hyperlinks checkbox is selected by default.
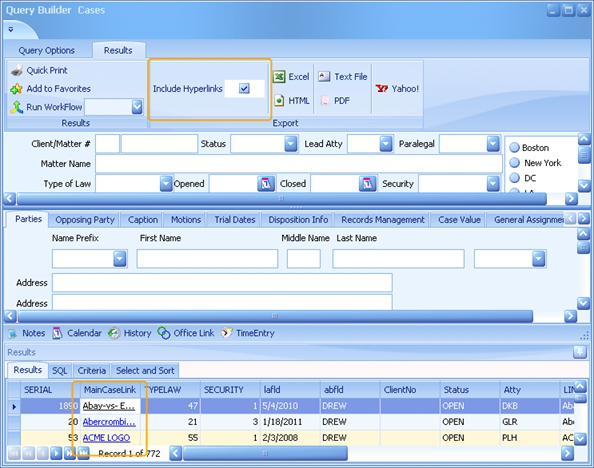
Hyperlink Syntax
You may have the need to build your own links for use in email, word processing, web pages etc. The general syntax of a LawBase hyperlink is:
lawbase:<<itemtype>>=<<itemnumber>>The following table describes supported LawBase hyperlinks and provides an example for each one.
Item Type Description Example File (Caseserial)
Launches a LawBase file (e.g. a case, contact or other FlexBase file) lawbase:caseserial=2468
SmartFolder Launches a specific SmartFolder lawbase:SmartFolder=234
LinkSerial Launches a specific tab from a file; works for regular tabs, repeatables and grids. lawbase:LinkSerial=11^245
Favorite Launches a favorite. lawbase:Favorite=7
Common Item
Launches a specific common item (notes, calendar, history and so on). Include the common item table name in parentheses.
lawbase:CommonItem (Notes)=23 lawbase:CommonItem (Calendar)=5782 lawbase:CommonItem (History)=875
LawBase Hyperlinks in HotDocs
Use a text variable of the syntax: <<LB_FILEHYPERLINK>> to include a link to the file.
NOTE: The link will not automatically be enabled upon insertion. To automatically enable hyperlinks in your HotDocs output, you'll need to create a post assembly macro.
LawBase Hyperlinks in WorkFlows
You might want to add a hyperlink to an email message generated by a WorkFlow. To add a hyperlink to the email component, use one of the syntax examples from above. Example To add the LBUrl for the filename, use the syntax
url:lawbase:CaseSerial=:serialThe resulting email will not have a functioning hyperlink until it has been sent. The resulting hyperlink will look something like this:
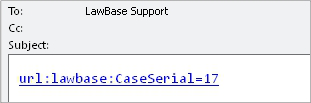
To make it easier for your users to understand, try adding more fields. Make sure you leave a space before the start of the url or it won't be processed as a hyperlink.
File Name: <<Name>>
Link: url:lawbase:CaseSerial=:serial
Here's the result.
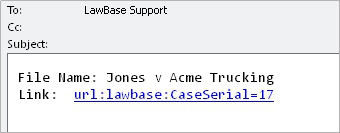
Why do Hyperlinks from WorkFlows look like Code?
Because the automatic email messages triggered by WorkFlows are sent in plain text. Plain text only supports the address of the URL, not the display.
LB2OutFor12
LB2OutFor12 is a uni-directional LawBase to Outlook integration used with LawBase12. It syncs calendar items from LawBase to Outlook.
About the Integration
LB2OutFor12 runs locally for each user logged into LawBase. For a single login, it checks the LawBase database for new entries, changes, and deletions and updates that user's Outlook calendar accordingly. Additions and changes can be updated as often as every minute. Deletions are synchronized less frequently.
Server Installation
Before you get started, obtain the current LB2OutFor12.exe and a sample lawbase.ini file from Synaptec.
- Create a subdirectory under the main LawBase directory; name it LB2OutFor12.
- Put LB2OutFor12.exe into this new directory along with the sample lawbase.ini file. If you don't have a
sample file, just create a .txt file, name it lawbase.ini, and edit it as described below.
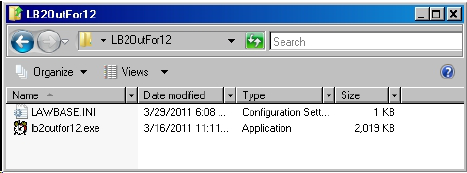
Editing the .ini
Edit the lawbase.ini for your environment.
Sample lawbase.ini
DATABASE=SQLSERVER
SERVER=DenverSQL
ALIAS=LawBase12
USERNAME=sa
PASSWORD=sesame
CASESHOW1=isnull (lname, ' ') + isnull(fname, ' ')
CASESHOW2=nameDescription of each line
DATABASE This should always be SQLSERVER SERVER This is the name of your SQL server on your network
ALIAS
The name of the database on the SQL server. this is the same as the Database name as displayed in LBDBConfig.exe in your LawBase directory.
USERNAME
The name of the SQL user LawBase users to authenticate to the database. NOTE: You must use SQL authentication; Windows authentication is not supported for LB2Outfor12. PASSWORD The password for the about Username. CASESHOW1 These are described on the next page. CASESHOW2
If you're not sure about some of these values, launch LBDBConfig.exe and compare the values there.

Setting up the CASESHOWs
The CASESHOW is used in the calendar entries synced to Outlook to identify which LawBase file a calendar item is related to.
The sample .ini file shows two entries for CASESHOW, one for each flexbase in the system. There should be a CASESHOW entry for every Flexbase; if you have more than two, add entries for all of them.
The syntax is: CASESHOW#=<<partial SQL select>>
# is the serial # of the flexbase
<<partial sql select>> Fill in the object of an SQL select which returns a field or fields from the header of the flexbase.
FlexBase Serial
Tofind out the flexbase serial, look at the Flexbases table through the Database Explorer in LBAdmin.exe.

Partial SQL Select
Example: isnull(lname,'') + isnull(fname,'') This is the object of the full SQL statement: Select isnull(lname,'') + isnull(fname,'') from page0
The rest of the SQL statement is handled by the program.
Another Sample .ini
This sample reflects the system with three FlexBases shown in the screenshot above:
DATABASE=SQLSERVER
SERVER=SQL2008
ALIAS=Sandbox12
USERNAME=sa
PASSWORD=sesame
CASESHOW1=name
CASESHOW2=name
CASESHOW3=matternameUser Set-up
In LBAdmin, go to Users/Security > Users For each person that will use the integration, fill in the appropriate email profile in the OutlookName Name field.
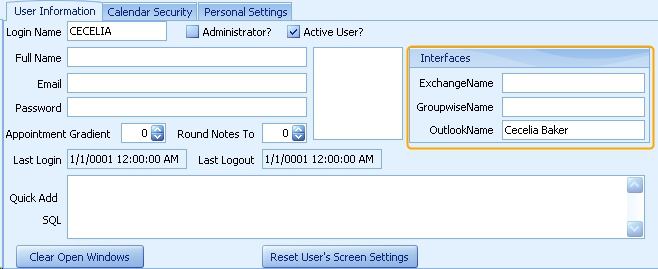
To find the email profile, look within a user's Outlook account: go to Tools > Options > Mail Setup > Email Accounts. Find the user name associated with the account. TIP: typically the profile name is found in the Outlook folder tree


Enter it the same way in the LawBase user profile.
Running the Integration
The LawBase to Outlook integration runs automatically on each workstation when the user launches LawBase.
When the application is running, an alarm clock appears in the system tray at the bottom right of the screen. If you do not see the alarm clock, the Outlook profile name may not be correct. For debugging instructions, see below.
To watch the integration in action, right click on the clock and the application window will appear. To restore the application to the system tray, click the minimize button. If you click the X it will close the application. Should you close the application unintentionally, restart LawBase to launch lb2outfor12 again.
Debugging
If you don't see the alarm clock in the system tray, you can debug the integration on this user's machine.
To test the Outlook profile on a workstation, from a command window, cd to the main lb2outfor12 directory and type: lb2outfor12 “outlookprofilename” “lawbaseusername” /debug
then press ENTER.
NOTE: Replace outlookfprofilename with the Outlook profile name and lawbaseusername with the LawBase user login name. Example: lb2out “Jones, Henry” “HJONES” /debug
The output displays: 1. The Outlook profile name as you entered it into LawTool 2. The actual Outlook profile name. Are the names in display 1 and display 2 the same? If not, change the Outlook profile name in the LawTool user profile to match the actual Outlook name that was in display 2.
LB2OutFor12
LB2OutFor12 is a uni-directional LawBase to Outlook integration used with LawBase12. It syncs calendar items from LawBase to Outlook.
About the Integration
LB2OutFor12 runs locally for each user logged into LawBase. For a single login, it checks the LawBase database for new entries, changes, and deletions and updates that user's Outlook calendar accordingly. Additions and changes can be updated as often as every minute. Deletions are synchronized less frequently.
Server Installation
Before you get started, obtain the current LB2OutFor12.exe and a sample lawbase.ini file from Synaptec.
- Create a subdirectory under the main LawBase directory; name it LB2OutFor12.
- Put LB2OutFor12.exe into this new directory along with the sample lawbase.ini file. If you don't have a
sample file, just create a .txt file, name it lawbase.ini, and edit it as described below.

Editing the .ini
Edit the lawbase.ini for your environment.
Sample lawbase.ini
DATABASE=SQLSERVER
SERVER=DenverSQL
ALIAS=LawBase12
USERNAME=sa
PASSWORD=sesame
CASESHOW1=isnull (lname, ' ') + isnull(fname, ' ')
CASESHOW2=name
Description of each line
DATABASE This should always be SQLSERVER SERVER This is the name of your SQL server on your network
ALIAS
The name of the database on the SQL server. this is the same as the Database name as displayed in LBDBConfig.exe in your LawBase directory.
USERNAME
The name of the SQL user LawBase users to authenticate to the database. NOTE: You must use SQL authentication; Windows authentication is not supported for LB2Outfor12. PASSWORD The password for the about Username. CASESHOW1 These are described on the next page. CASESHOW2
If you're not sure about some of these values, launch LBDBConfig.exe and compare the values there.
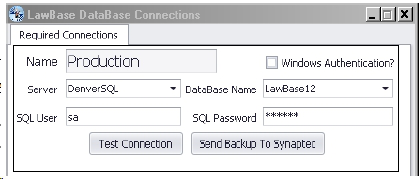
Setting up the CASESHOWs
The CASESHOW is used in the calendar entries synced to Outlook to identify which LawBase file a calendar item is related to.
The sample .ini file shows two entries for CASESHOW, one for each flexbase in the system. There should be a CASESHOW entry for every Flexbase; if you have more than two, add entries for all of them.
The syntax is: CASESHOW#=<<partial SQL select>>
# is the serial # of the flexbase
<<partial sql select>> Fill in the object of an SQL select which returns a field or fields from the header of the flexbase.
FlexBase Serial
Tofind out the flexbase serial, look at the Flexbases table through the Database Explorer in LBAdmin.exe.
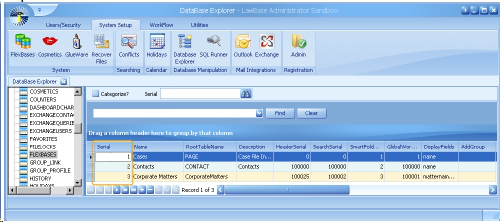
Partial SQL Select
Example: isnull(lname,'') + isnull(fname,'') This is the object of the full SQL statement: Select isnull(lname,'') + isnull(fname,'') from page0
The rest of the SQL statement is handled by the program.
Another Sample .ini
This sample reflects the system with three FlexBases shown in the screenshot above:
DATABASE=SQLSERVER
SERVER=SQL2008
ALIAS=Sandbox12
USERNAME=sa
PASSWORD=sesame
CASESHOW1=name
CASESHOW2=name
CASESHOW3=mattername
User Set-up
In LBAdmin, go to Users/Security > Users For each person that will use the integration, fill in the appropriate email profile in the OutlookName Name field.

To find the email profile, look within a user's Outlook account: go to Tools > Options > Mail Setup > Email Accounts. Find the user name associated with the account. TIP: typically the profile name is found in the Outlook folder tree

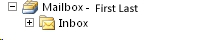
Enter it the same way in the LawBase user profile.
Running the Integration
The LawBase to Outlook integration runs automatically on each workstation when the user launches LawBase.
When the application is running, an alarm clock appears in the system tray at the bottom right of the screen. If you do not see the alarm clock, the Outlook profile name may not be correct. For debugging instructions, see below.
To watch the integration in action, right click on the clock and the application window will appear. To restore the application to the system tray, click the minimize button. If you click the X it will close the application. Should you close the application unintentionally, restart LawBase to launch lb2outfor12 again.
Debugging
If you don't see the alarm clock in the system tray, you can debug the integration on this user's machine.
To test the Outlook profile on a workstation, from a command window, cd to the main lb2outfor12 directory and type: lb2outfor12 “outlookprofilename” “lawbaseusername” /debug
then press ENTER.
NOTE: Replace outlookfprofilename with the Outlook profile name and lawbaseusername with the LawBase user login name. Example: lb2out “Jones, Henry” “HJONES” /debug
The output displays: 1. The Outlook profile name as you entered it into LawTool 2. The actual Outlook profile name. Are the names in display 1 and display 2 the same? If not, change the Outlook profile name in the LawTool user profile to match the actual Outlook name that was in display 2.
LBExchange
LBExchange integrates LawBase data through Exchange to Outlook.
- Calendar items that have a PENDING status in LawBase are synced to Outlook as appointments or tasks. Calendar items where “Is Appointment” is checked are synced as Outlook appointments. Calendar items where “Is Appointment” is unchecked are synced as Outlook Tasks.
- If an item originally created in LawBase is changed in Outlook, the changes are reflected in LawBase.
- Items from Outlook can also be synced to LawBase; this is on a per-user basis and requires some minor configuration.
- Generally the recommendation is to maintain LawBase as the system of record and to sync calendar items from LawBase to Outlook. However, there is additional functionality that gives the organization the capability to delete Outlook records which in turn deletes LawBase calendar items. This functionality is on a company level and requires additional configuration.
- Synchronization occurs from the server, therefore users get updates to Outlook even if they don't log in to LawBase.
- Contacts can be synced from LawBase to Outlook (one-directional only).
NOTE: If you are upgrading from Exchange 2007/2010 to 2013 while integrating with LawBase, contact Synaptec for program assistance! Exchange 2013 has different field properties for LawBase data.
Shortcuts
1. Summary of Functionality
2. Exchange Server Set-up
3. LawBase Directory Set-up
4. Database Set-up
5. Common LBExchange Test Errors
6. Syncing Process
7. Initiating Calendar Items in Outlook
8. Deleting Calendar Items in Outlook
9. Synching Contacts
Summary of Functionality
This is a brief summary of what LBExchange does. If you do not have the LBExchange integration but are interested in purchasing it, please contact [email protected] for more information. Details on specific set-up items should be found in the LBExchange Set-Up and Configuration sections.
LBExchange integrates LawBase data through Exchange to Outlook.
1. Calendar items that have a PENDING status in LawBase are synced to Outlook as appointments ortasks.
- Calendar items where “Is Appointment” is checked are synced as Outlook appointments.
- Calendar items where “Is Appointment” is unchecked are synced as Outlook Tasks.
- When the LawBase calendar status is changed to something other than PENDING, the item will be removed from the Outlook calendar.
- Any configuration of the LawBase calendar fields What, Type and For (Case/Matter) can be synced to the Outlook subject field. LawBase recommends to changing the design of the LawBase What field to 255 characters.
2. To sync “Location” between LawBase and Outlook, the Location field must exist within LawBase.
LawBase recommends that the character length of the Location field be 255 characters to match Outlook.
- If the Location field within LawBase is a text field, the location between Outlook and LawBase will sync regardless where changed.
- If the Location field within LawBase is a caselink, the caselink display will sync to the Location field in Outlook. If the Location is edited in Outlook, the change of the Location within LawBase will not be changed.
3. Alarms are synced between LawBase and Outlook, however the Tickler functionality is within LawBase ONLY.
4. If an item originally created in LawBase is changed in Outlook, the changes are reflected in LawBase.
5. Items created in Outlook can be synced to LawBase, on a per-user basis. This requires some minor configuration.
- Any records created in Outlook and LawBase will result in duplicate entries (example: meeting invites).
- Syncing from the Outlook side only applies to calendar appointments and tasks; contacts are not synced.
- Tasks created in Outlook must have a start date in order to sync to LawBase.
- Calendar events created as a result of an email meeting invite will sync to LawBase even if they have not been accepted.
6. Synchronization occurs from the server, therefore users get updates to Outlook even if they don't log in to LawBase.
7. Set-up is possible where if a user deletes a calendar record in Outlook, the calendar record in mLawBase will be removed.
- The determination to have this functionality is made on a firm-by-firm basis. The functionality requires a minor independent configuration.
- When a user deletes an item in Outlook, LBExchange will remove the user's name from the LawBase calendar item. If the user is the only remaining name on the LawBase calendar item, the item will be deleted and a record written to ExchangeCalArchive table.
- If the user deletes an item in Outlook, but the user is part of a LawBase Group that is on the LawBase calendar item, the calendar record will reappear in Outlook.
8. Contacts can be synced from LawBase to Outlook.
- Difference SQL Statements can be utilized to sync specific records to specific folders set up within the user's Outlook Contacts.
- Using LBOutlookConnector (another program), you can use a hyperlink to launch a file that the contact is linked to.
9. LBExchangeConfig.exe improvements
- Additional testing capability, ability to sync Contacts less frequently, and various utilities fro troubleshooting and syncing changes.
Exchange Server Set-up
- Exchange 2007 or better is required; if using 2007, we recommend installing SP2.
- WebServices is required.
- LBExchange administrator (either create new one or use one with correct permissions) must enable WebServices
- LBExchange administrator must have an Exchange account that has permission to use WebServices.
o Recommendation: create a new user called LawbaseMail.
- For every exchange user that will receive data from LawBase, enable impersonation by the exchange login LawbaseMail. (This allows the program to access/modify other user’s data)
For more information about email impersonation, you may find the following links useful: http://technet.microsoft.com/en-us/library/dd335193.aspx http://technet.microsoft.com/en-us/library/dd335137.aspx http://www.thesoftwaregorilla.com/2010/06/exchange-web-services-example-part-3-exchange- impersonation/
LawBase Directory Set-up
1. Under the main LawBase directory, create a new directory and name it LBExchange.
2. Copy the following files to this sub-directory
- LBExchange.exe
- LBExchange.exe.config
- LBExchangeConfig.exe
- A copy of the existing Lawbase.ini (v10) or LawBase.Config (v12).
3. Run LBExchangeConfig.exe. This will make modifications to your LBExchange.exe.config. The settings are described in LBExchangeConfig.exe.
Test connectivity to your Exchange Server
For your Exchange environment, you'll need to know:
- Server address
- Domain
- Exchange version
- Exchange user name
- Exchange password
- User to impersonate: this should be a valid email address for an existing LawBase user
1. Launch LBExchangeConfig.exe,
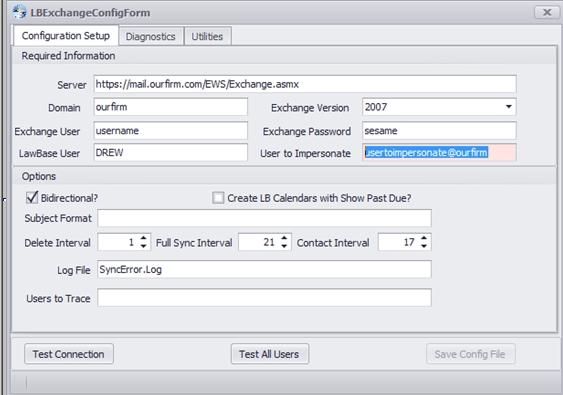
2. Fill in the fields for the Configuration Setup and click Test Connection.
3. When the test is complete a dialog will appear, indicating if the test succeeded. If you get an error, consult your local IT about the settings. For a list of common errors, see LBExchange Test Errors.
Test Connectivity through the Browser
Another way to test connectivity to the Exchange Server is to access it through an Internet browser. Point your browser at the server address. Example: https://server.acme.local/EWS/Exchange.asmx
If the server name is correct, you should see a screen like the following. If your browser cannot display the page, check the URL.
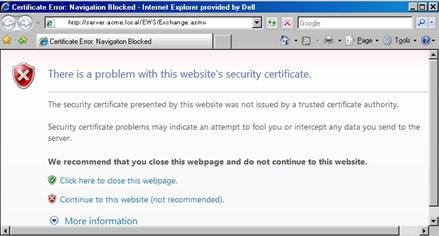
Once you get the screen above, click Continue. A prompt will come up asking you to log into the server. Note: You may have to specify the domain while logging in; e.g. domainname\username.
If you have the correct user name and password you'll get a screen like the following. This also confirms that you have the correct domain and server.

Database Set-up
- In LawBase, make sure there is a varchar(100) column named
ExchangeNamein theUser_profiletable:alter table user_profile add ExchangeName varchar(100) - Fill in the ExchangeName column of the User_profile table with the full email addresses of users whose email will be synced. In LawBase 12, this can be done under LBAdmin>Users. Example: [email protected]
NOTE: While you will need to fill in the email addresses for all your users, we recommend that you first test the integration with one test user before filling in all the addresses. See more about testing in Syncing Process.
This tells LawBase what the user’s name is in exchange so that it may modify that user’s exchange data. You can enter this directly in the user_profile table or through the User Configuration area of LBAdmin.
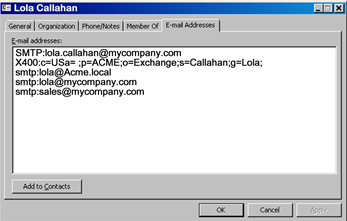
NOTE: Use the primary SMTP address. This is the address with SMTP in all caps.
3. Run the following two scripts. These are required regardless of whether you want to enable the functionality they support, which is explained at the link referenced.
alter table user_profile add exchangecreateitems VARCHAR(1)
NULL
update user_profile set exchangecreateitems = 'N'These new columns support the ability to sync items from Exchange to LawBase. For more information about this feature, see Initiating Calendar Items in Outlook on page 15.
4. With the capability to create LawBase items from Exchange, the Subject and Location fields in Outlook are 255 characters. If the destination fields to LawBase are too small, the data will be truncated. Consider changing the field size of the “What” and “Location” fields on the Calendar FlexBase within LBDesign for LawBase V12. For LawBase V10, would need to make the change directly to the database.
5. Sync “Location” between LawBase and Outlook. The Location field has to exist within LawBase.
If the Location field within LawBase is a text field, the location between Outlook and LawBase will sync regardless where changed.
If the Location field within LawBase is a caselink, the caselink display will sync to the Location field in Outlook. If the Location is edited in Outlook, the change of the Location within LawBase will not be changed.
6. If you want calendar records deleted in Outlook to remove the calendar record in LawBase, see
Deleting Calendar Items in Outlook on page 16. ***Caution should be exercised in using this functionality because it is on a company level. Once this table exists, the functionality will be available for LawBase 12 users, but not for not LawBase10. CREATE TABLE [dbo].[ExchangeCalArchive]( [Serial] [int] IDENTITY(1,1) NOT NULL, [DeleteDate] [datetime] NOT NULL CONSTRAINT [DF_ExchangeCalArchive_ DeleteDate] DEFAULT (getdate()), [DisplayInfo] [varchar](255) NULL, [Whofor] [varchar](2048) NULL, [Info] [varchar](max) NULL, CONSTRAINT [PK_ExchangeCalArchive] PRIMARY KEY CLUSTERED ( [Serial] ASC )WITH (PAD_INDEX = OFF, STATISTICS_NORECOMPUTE = OFF, IGNORE_DUP_KEY = OFF, ALLOW_ROW_LOCKS = ON, ALLOW_PAGE_LOCKS = ON) ON [PRIMARY] ) ON [PRIMARY] GO
LBExchangeConfig.exe
The following table describes the various settings in the LBExchange.exe.config file. The settings are listed alphabetically.
Setting Description
Bidirectional Enables/disables whether changes come back from Outlook. Check/uncheck in the gui or enter either True or False into the config file.
Contact Interval Default is 17 minutes. This mean that if the Contacts are defined to Sync, will occur every 17 minutes. Recommendation: to actually sync less frequently.
Create LB Calendars with Show Past Due? Checkbox on the calendar record to determine if the “Pending” status records should still be displayed on the Tickler list if past due.
DeleteInterval Default is set to 5 minutes. This means that Exchange entries will be compared to LawBase entries for any deletions from LawBase every 5 minutes.
Domain The Domain of the Exchange server.
Exchange Password Exchange user that has access to WebServices (this is the user you set up, typically LawbaseMail).
Exchange Version Version of your Exchange – can be 2007 or 2010.
FullSyncIntervalSetting Default is set to 21 minutes. This means a fresh pass of syncing (all LawBase and Exchange items will be synced) will occur every 21 minutes starting back at the original date set in the command line. This is a lengthier sync and can use up resources. Designed to catch things in case of time issues, non-synced clocks.
LawBase User The login for any admin user in LawBase. ‘DREW’ is usually a good choice!
LogFile Name of Error Log to create in folder where lbexchange.exe runs in the event of errors.
Server Exchange WebService address. Example: https://server.acme.local/EWS/Exchange.asmx This address almost always ends with /EWS/Exchange.asmx
SubjectFormat Determines the subject line of the Exchange item. Default is <<casename>> Type: <<type>> What: <<what>>.
Casename uses the content of the Display Field from the FlexBase setup in LBAdmin.
If you modify the SubjectFormat, you must include the word What along with a colon and a space before <<what>>. This is also true for Type. The reason for this is if the Subject is edited in Outlook, LBExchange knows where to edit the What in LawBase. So an example is that does not include include Type would looke like this: <<casename>> What: <<what>>
If you edit the config directly (not recommended) - note that the chevrons (<< >>) used as part of the value must be replaced by their XML equivalents < (<) and > (>) or they won’t be processed.
<<casename>> <<type>> < <what>> Any other characters will be placed exactly as typed. The setting <<what>> Re: <<casename>> Will result in something like this: Lunchtime meeting Re: Acme Inc.
User to Impersonate Will default to the first Exchange Name found within LBAdmin under Users/Security>Users. This will be within the “Test Connection” option.
Users to Trace Used for troubleshooting Valid email address on Exchange that will be used to trace the exchange activity detail.
The LBExchangeConfig.exe provides some additional Diagnostics and Utilities for troubleshooting. Synaptec strongly recommends working with a LawBase support representative to utilize these functionalities.
Diagnostics
Use this to find an Outlook item based on the LawBase Calendar Serial:
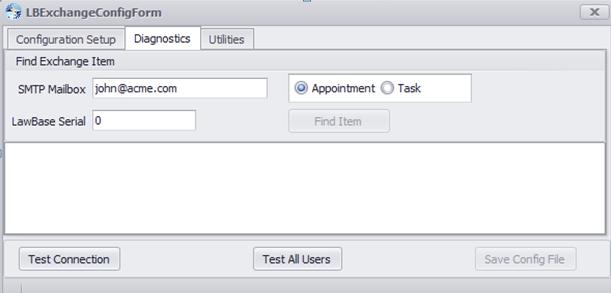
Utilities
Use this to edit a user’s Outlook calendar.
Remove All References removes the LawBase association from Exchange entries. Delete all LB Entries removes all calendar entries associated with LawBase.
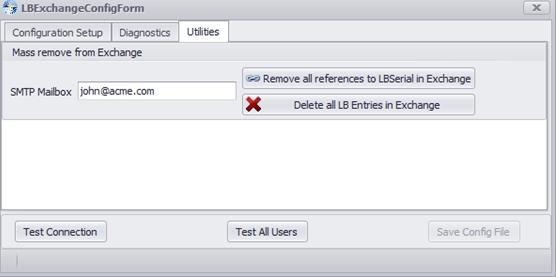
LBExchange.exe.config Sample
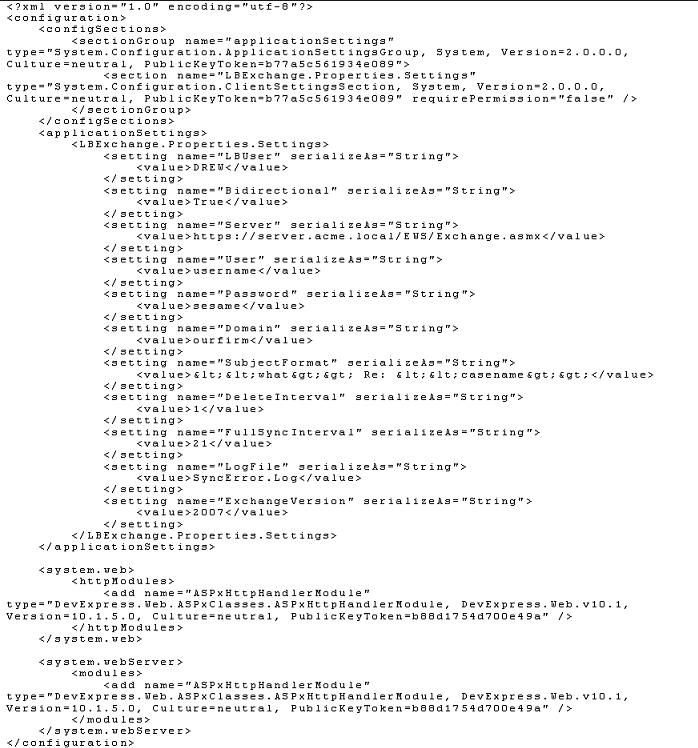
Portion of LBExchange.exe.config Sample for Hosted Exchange (Cloud/Online Exchange/BPOS)
This is supported only when Exchange is on a dedicated server.
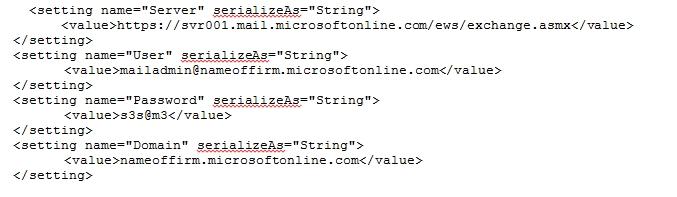
Command Line Options
Add these options when running LBExchange.exe from the command line.
/Debug Print some diagnostic messages.
/deletefirst Run the deletion of items no longer in LB before doing the regular synchronization.
/DefaultProxyUnusual but may be required if the setup has a proxy server setup that intercepts calls to Exchange. When utilized, you have to set up Exchange impersonation for the Proxy name instead of the lawbaseuser name. (1375) /NoCalendar Don't send calendar items across. /NoContacts Don't send contacts across.
/StopAfter=23:30Exit the program at the input time. Make sure to use 24-hour time, so not 11:30 PM, but 23:30. Due to regularly scheduled backups, many firms need to close LBExchange.exe every evening prior to the backup running. Therefore, they use this switch to end the program and then use Windows Task Scheduler to restart the program after the backup has completed.
/SyncDateLBExchange /SyncDate=01/01/2001Means on the first run get everything modified since 01/01/2001. Replace with a date of your choosing.
LBExchange /SyncDate=60 Means on the first run get everything modified in the last 60 days.
If you don’t use the command parameter, then LBExchange will only sync items modified in the last 30 days. Note – the specific date fields used to determine this are from LawBase calendar.lafld from Outlook ItemLastModifiedTime
/verbose Turns on verbose error messages; typically used when encountering unknown errors.
Sample Command Line: L:\LawBase12> LBExchange /SyncDate=60 /NoContacts /StopAfter=23:30
Running LBExchange from Task Scheduler
Generally command lines are used within Task Scheduler to indicate the Task to run. When setting up the Action, the field for Start in (optional) must be filled in with the path where LBExchange resides. This is necessary because the LBExchange program has to find the two configuration files used by the program.
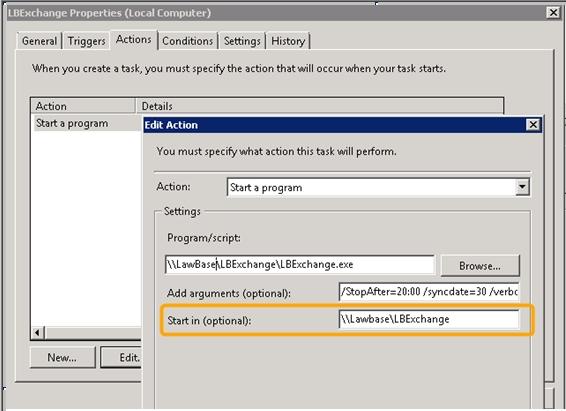
Common LBExchange Test Errors
The following is a list of the most common errors you may encounter when setting up your config file and testing using LBExchange Tester.
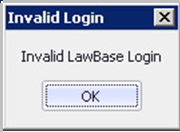
This error mostly likely comes up because you don’t have all the files needed in the LBExchange directory, such as lawbase.config.
Remote name could not be resolved
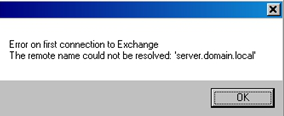
The part of the EWS Url representing the server name is wrong. It may be misspelled. The rest of it, highlighted in yellow here: https:// server.domain.local /EWS/Exchange.asmx
appears to be fine.
404 not found
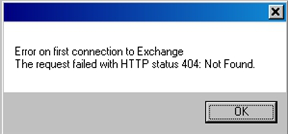
Error returned when domain is good, but page is unknown. https://good.domain.local/EWS/Exch- ange2.asmx
403 forbidden
Error returned when the URL should be secure but is not. In this URL, we have http, not https http://good.domain.local/EWS/Excha- nge.asmx
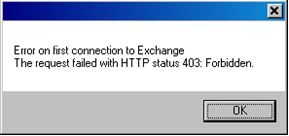
401 unauthorized
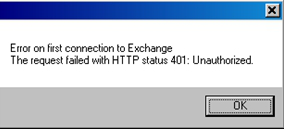
Several possible causes: • Wrong Exchange user • Wrong Exchange password • Wrong domain • Also if impersonation is set up, but is set up incorrectly; e.g. not through powershell but through the gui
Error on first connection to Exchange
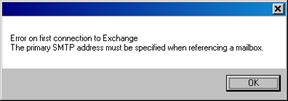
Bad email address for User to Impersonate. May be because: • This user is not set up for LBExchange in the user profile in LBAdmin • Email address is misspelled • Not primary SMTP address. E.g. our friend Robin has two aliases: [email protected] and [email protected]. Only one of these can work. The SMTP address has no mailbox associated with it.
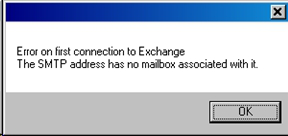
The user to impersonate does not exist. [email protected]
The mailbox that was requested doesn't support the
specified RequestServerVersion
The email address entered for user to impersonate exists, but is associated with mail on a different Exchange Server.
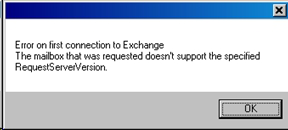
The account does not have permission to impersonate the
requested user.
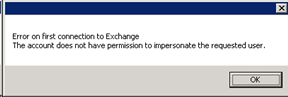
The account exists on the exchange server but impersonation has not been set up for this user.
Syncing Process
NOTE: We recommend that you initially test with only one test user (defined within the User Profile in LBAdmin). This way if there is a problem with the configuraton or set up of Exchange, it will not affect any production user’s calendar.
- After testing with a test user, add the Exchange Name to one or two production users that will continue to test. Each time you add the Exchange Name to the User Profile, run the LBExchangeConfig.exe and click Test All Users.
- Once LBExchange has been fully tested, add the Exchange Name to all User Profile Records and click on Test All Users within the LBExchangeConfig.exe.
- Be sure to work with each user individually to determine if they would like the option to create LB items from Exchange.
Run LBExchange.exe (with any optional command line parameters outlined in "Command Line Options" on page 246).
- It will run as defined within the LBExchangeConfig.exe for the Delete, Full Sync and Contact Interval.
- The program will sync Calendar records from LawBase that have a PENDING status.
- If the LawBase calendar record that has already been synced to Outlook has been changed to a
different status (such as COMPLETED), the Outlook record will be deleted.
- The program will update all calendars that need updating.
- Initially, upon execution, lbexchange.exe will get all items that have been modified (based on the date you enter in the command line.)
- After the initial run, it will only find those that have changed since the last time it ran.
As a result of running LBExchange.exe, if there are any sync errors primarily relating to problem records, a .Log file will be automatically created; it is updated in real time within the LBExchange folder. The name of the file is defined within LBExchangeConfig.exe under Log File (e.g. SyncError.Log).
You might want to review the folder periodically for this .Log file and address any errors as needed. You can delete or rename the .Log file when you’ve addressed the issue(s) and if additional errors occur, a new .Log File will be created.
Initiating Calendar Items in Outlook
Users can create calendar entries in Outlook and these items will sync to LawBase.
NOTE: Recurring Calendars created in Outlook will only sync the first occurrence to LawBase. The functionality in Outlook to have recurring calendar record is very different than LawBase. As a result, we recommend that you create any recurring appointments in LawBase rather than in Outlook.
Set-up
LBAdmin
You can set this on a user-by-user basis. Discuss with each individual user to determine if they want this functionality. Emphasis is that all Outlook appointments will sync to LawBase including Personal appointments. If the Private flag is initially set in Outlook, will sync to LawBase also as a Private calendar record.
For LawBase 12 - from within LBAdmin, go to Users/Security > Users and under Interfaces, check Create LB items from Exchange.
Handling the two types of Calendar items
1. Once an appointment or task created in Outlook has been synced to LawBase, LawBase then becomes the owner of that appointment or task. This means that if the entry is deleted from LawBase or the status changed from PENDING, it will also automatically be deleted from Outlook during the next sync. If you delete an item in Outlook only, the entry will reappear after the next sync from LawBase unless the table ExchangeCalArchive exists. If you ran the sql statement from "Database Set-up" on page 240 then a calendar item deleted in Outlook will also delete the related LawBase item.
2. Items initiated in Outlook will not have the For caselink field filled in. However, users can fill this in normally through LawBase.
3. Any records created in Outlook and LawBase will result in duplicate entries (example: meeting invites).
4. Show Past Due Date will be set to Y for all new calendar appointments/tasks if the flag indicator for Create LB Calendars with Show Past Due is checked within LBExchangeConfig.exe.
5. Syncing from the Outlook side only applies to calendar appointments and tasks; contacts are not synced.
6. Tasks created in Outlook must have a start date in order to sync to LawBase.
7. Calendar events created as a result of an email meeting invite will sync to LawBase even if they have not been accepted.
8. If the “Location” field exists within the calendar table as a text field, the Location from Outlook will sync
to LawBase. If the Location field on the LawBase calendar is a caselink type field, the Outlook data for the Location will not sync.
Deleting Calendar Items in Outlook
In order to use this functionality, the table ExchangeCalarchive has to exist in the database. This script is provided in Step 6 of the Database set up.
Once this has been set up, users can delete Outlook calendar items which will either delete their name from the Calendar in LawBase or delete the Calendar if they are the only user
NOTE: This functionality is on a database level so it is important that all your users understand how this functions.
Explanation of functionality
1. LBExchange utilizes the user’s deleted items folders in Outlook to determine if should delete
Calendar from LawBase. As a result: a. Don’t empty the deleted items folder until the sync process has occurred. b. Uses the deleted items folder for that user. This is extremely important if have situations where someone maintains a calendar for another person. For example, a secretary deletes a calendar record in Outlook for an attorney, the outlook record might exist in the secretary’s deleted folder so will only remove that user’s name from the LawBase calendar. There is Outlook setting when managing another user’s calendar that should be considered
http://office.microsoft.com/en-us/outlook-help/manage-another-person-mail-and-calendar- items-HA010075092.aspx#BM9
2. When delete Outlook, will remove the user’s name from the LawBase calendar. If they are the only user remaining on the LawBase calendar, the LawBase calendar will then be deleted and a record written to ExchangeCalArchive table.
3. If the User deletes the Outlook calendar but they are part of a group in LawBase, the calendar record will return back to Outlook.
4. If delete from Outlook and name is removed from LawBase, in order to add the name back on the LawBase calendar as well as Outlook, need to remove the Outlook deleted items record.
Syncing Contacts
LawBase allows for a one-way synchronization of case/contact information to Exchange. Here are the basic steps:
1. Configure the data to be synced
- You'll need a SQL statement
- Map the LawBase fields to the Outlook fields.
2. The sync settings are then available to subscribers. Sign people up.
access this screen from LBAdmin > System Setup > Exchange The example below shows a set up for Judges.
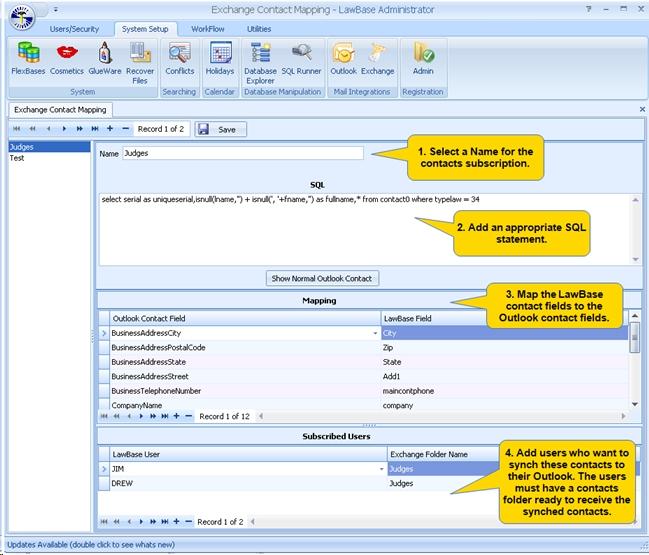
Set-up
1. Name the contacts grouping.
2. Add a SQL statement.
- You must select a field named
uniqueserialthat acts as the primary key for the items that get synchronized. In simple cases, such as this one,uniqueserialis simply the serial of the contact that is selected.
In this example we also use
isnull(lname,’’) + lname(‘, ‘+fname,’’)as fullname to concatenate the field lname, an optional comma and then the field fname to make up a field named fullname. We may then use fullname to be set in the mapping for fullname.
3. Map the LawBase contact fields to the Outlook contact fields. If you need to do any data massaging before placing information in Exchange, use the SQL statement to do the massage.
4. Add users who want to sync these contacts to their Outlook. The users must have a contacts folder set up to receive contacts. The users can name their folders whatever they like.
Client Side set-up
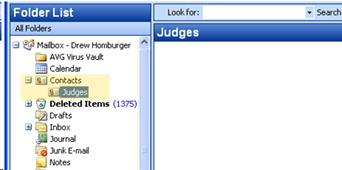
LBAdmin set-up

At the lower part of each synchronization grouping is the Subscribed Users list.
- Add here the user names and the Outlook Folder where these contacts should go.
- The Judges here refers to the Outlook folder.
- When you have sub folders under the Contacts in Outlook, refer to them such as
FirstFolder/NextFolder. (i.e. Use a forward slash to indicate the tree level) Once the synchronization is defined then any user can subscribe to that synchronization. As many LawBase users as needed may subscribe to a Synchronization grouping.
SQL Examples
Here are some more complex examples of SQL that could be used to gather information from multiple tables:
select contact2.serial as
uniqueserial,contact2.demail,contact2.name as contactname,
(select contact0.name from contact0 where contact0.serial =
contact2.caseserial) as companyname,contact1.city,contact1.state,contact1.zip,contact1.add1,contact1.ad-
d2,contact1.webpage,contact1.phone,contact1.faxfrom contact2inner join contact1 on contact1.caseserial = contact2.caseserialwhere contact1.serial = (select min(contact1.serial) from contact1
where contact1.caseserial = contact2.caseserial)This example is from a database such as this, where the main contact is simply a company and all the contacts are listed on a repeatable tab (contact2), and the office information is listed on another tab (contact1).
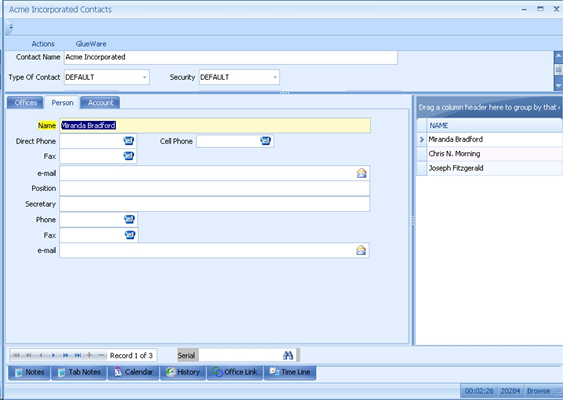
Launch in LawBase
If you have LBOutlookConnector installed (a separate program which is a LawBase Add-in to Outlook), including LBLink in the SQL statement will allow you to launch the related Contact file in LawBase from within Outlook. Below is an example of the SQL statement and the Launch in LawBase result that occurs, which can be seen when right-clicking on a Contact in Outlook that was created from a LawBase record.
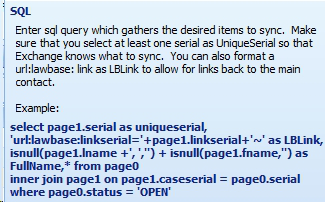

LBConcierge
LawBase Concierge can bring you the information you need, when you need it . . . even before you need it. LBConcierge can do almost anything you already do manually in LawBase – but it does the work for you, according to your schedule. Here are just a few ways LBConcierge can make you more productive:
Information Flow
You already know LawBase is a powerhouse of information about your cases – records of time billed, documents produced, goals met – it's all there. Now LBConcierge can update you about all the things you want to know. Things such as:
- Daily updates of new files
- Notification of files with no activity
- Quarterly report of case outcomes
Events and Deadlines
- Notification when the statute of limitations date is growing near
- Upcoming contract expiration dates
- Legal hold notification dates.
- Upcoming Birthdays and anniversaries
Automatic Processing
- Update statuses based on completed data
- Move files from one stage to another
- Automatic document assembly triggered by dates and statuses
- Automatic email notifications to clients of status changes, deadlines
Team Management
- Find out how your team spends its time -- daily tallies of staff activity
- Check on milestones for your open cases: find out where document production stands
- Staff Caseload report
Billing and Budgeting
- Automatic notification when budget thresholds approach. You define when you want to be notifiedbased on phases, tasks, and/or the entire matter
- Reports of billing totals by client
LBConcierge Set-up
Machine Requirements
Must be able to run Windows Services
Must have .Net 4.0 loaded
Must have access to the LawBase SQL database
If you plan on running HotDocs, you must have that and Microsoft Office installed
To send email, the machine must be able to connect to your SMTP Server
Installation
- Download LBConcierge program files to directory of your choosing.
- Run LBConciergeInstall.msi to install service.
- Copy LawBase.config file from the LawBase directory to the directory to LBConcierge directory.
- Edit the LBConciergeService.exe.config file and enter a valid LawBase user (LBUser) that is an administrator in LawBase.
If you want automatic email to work, you must also fill in the SMTPServerAddress and EmailFrom items in this config file with valid entries. If you do not know your SMTPServer, first try ping smtp.domain.com or try the DNS Server from ipconfig /all or refer to the following article: http://www.exclamationsoft.com/exclamationsoft/netmailbot/help/website/ HowToFindTheSMTPMailServerForAnEmailAddress.html. This step is the client’s responsibility, so you may need to get your networking people involved (see the section on Troubleshooting below). Example:

1. Open up the Service Manager. On Windows Server, go to Control Panel > Administrative Tools > Services.
2. Use the Local System Account. To do this, right-click on the LBConcierge service, select Properties and then goto the Log On Tab. Select Local System account.
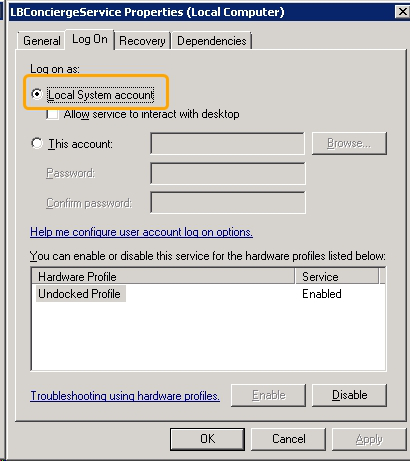
3. Locate the LBConciergeService and right-click on it and select Start; this will initiate the service which should then continue to run until stopped.
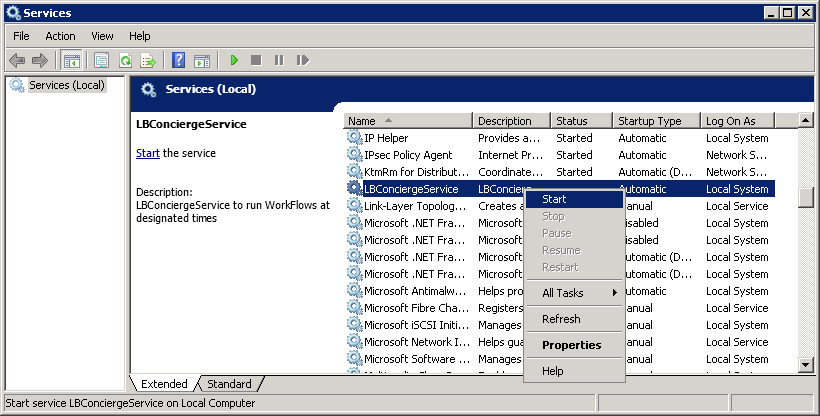
Using LBConcierge
This section describes how set up a scheduled concierge task.
- Each task calls a workflow from the associated LawBase installation. For advice on using Workflows with LBConcierge, see Workflow Considerations
- These WorkFlows must be Merges; we recommend naming the workflows you'll use with LBConcierge with this syntax: Concierge.namex. Steps:
1. In LBAdmin, create a Merge WorkFlow for whatever task you want LBConcierge to automatically execute.
2. Run LBConciergeAdmin (located in the same directory as the installed LBConcierge application).
3. The LBConciergeAdmin interface is has a tree on the left. tasks are organized by their frequency: Minute, Hourly, Daily, Weekly, Monthly, or One time. Select the frequency for the task you're about to create. Right-click and select Add.
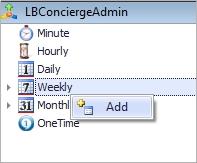
4. Fill in the information under the Standard and Unique sections (the workflows will appear in a drop- down list, so select the one created in step one above).
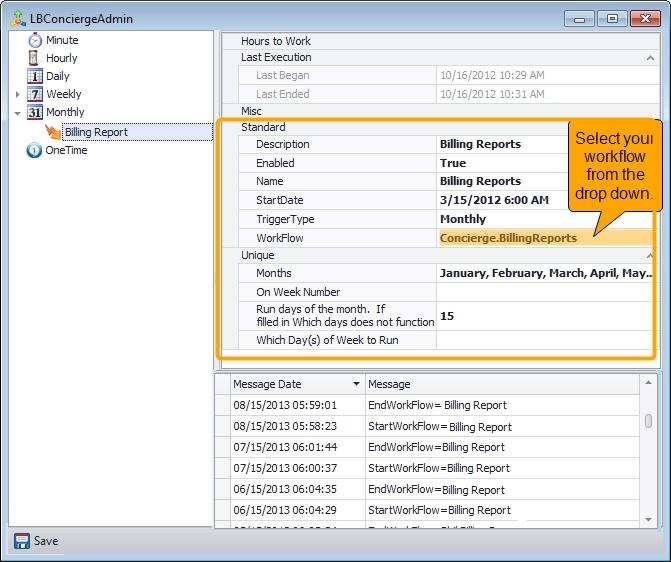
5. Click Save at the bottom left.
- As long as the LBConcierge service is running, the tasks will run at their scheduled time. The log/history appears in the lower part of the window.
- Any number of Tasks can be created to run any number of workflows at different intervals.
- You can re-run a task at any time. Just right-click on the task and click Test Run
- Errors will be written to the event log Applications and Services – LBConcierge.Log (EventViewer is usually under the Control Panel, but its location depends upon the version of Windows – Google it if you can’t find it).
Workflow Considerations
For automatic emailing to work, you must correctly fill in the SMTP server entry in LBConciergeServices.exe.config. Windows Services do not allow for any user interaction, so the following restrictions apply to workflows run from LBConcierge:
All Display messages will be swallowed.
No Input statements are allowed. Any Input statement encountered will be filled with the value No
Input From ConciergeAny Workflow Mail statement will have to be sent silently even if that is not selected in the Workflow
step.
If you do not supply an OutputFile= parameter, then LBConcierge will create a temp file in the
directory where LBConcierge resides.
We have created a new manual Workflow action to automatically run saved QueryBuilder files and put their exported output to a file (which can then be emailed, etc.). To do this, create a Manual Action and put something like: QueryBuilder=C:\LawBase12\Example.qry^OutputFile= c:\LawBase12\output\ExampleOutput.xls
You may change the .xls extension to .txt, .pdf, or .html to create those types of exports also. To run a report, build a workflow with a manual action that calls a report and specifies an output location. Example: HotDocs=\\sbserver\Acme\LawBase12\Reports\WeeklyStatus.rtf ^OutputFile=\\sbserver\Acme\LawBase12\WeeklyOutput.docx
HotDocs reports may be run, but any {Ask} variables will be filled in with their default values.
Troubleshooting
You may get a net_io_connectionclosed error when it tries to send email. This is a problem with SMTP – first make sure there is a valid EmailFrom entry in LBConciergeServices.exe.config. If the problem persists after fixing that, there is probably a problem with Exchange that limits what machines can relay and connect to send mail by going into Exchange System Manager and open the SMTP protocol properties for the Default SMTP virtual server, add the IP address of the machine that runs LBConcierge to the Connection and Relay Restrictions under the Access tab).
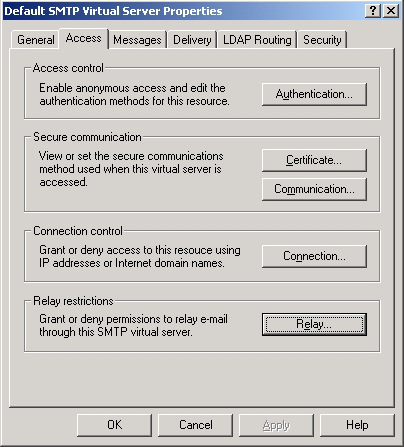
LBHDWord
LBHDWord is an add-in for Microsoft Word that makes building HotDocs templates for LawBase fast and easy.
Technical Specifications
The add-in is produced by Synaptec Software, Inc.
LBHDWord is supported on Microsoft Word 2007 and higher.
HotDocs Developer LE 2010 or higher is required.
As it is an add-in, it is installed on each client. It is a separate install from the LawBase application files.
This add-in requires .NET 4.0; if your PC does not have this, it will attempt to install it for you during the
LBHDWord Install.
Installation
The installer files for LBHDWord are downloaded when you download program updates. The file LBHDWord.zip is downloaded to the LBHDWordInstall directory; unzip this file in this directory
NOTE: You may need to log in as an administrator to complete the installation. Alternatively you can execute the setup.exe by right-clicking and selecting Run as administrator.
1. Unzip the LBHDWord.zip and locate the setup.exe file.
2. Double-click to execute the setup (or right-click and choose Run as administrator).
3. A series of screens will appear. Click next to move through them, verifying the install location. You may be prompted to install .NET 4.0.
4. When the installer screens finish, launch Microsoft Word.
5. When Word starts, a dialog will appear. Fill in the fields with the LawBase install location, for example: L:\LawBase12 and key in the login you want to use. LBHDWord uses the database information stored in the lawbase.config file.
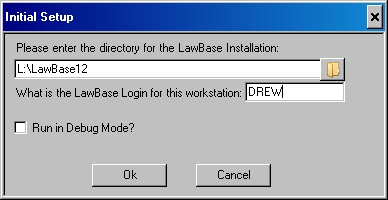
6. The installation is complete.
The LawBase Tab
After installing the add-in, a new tab appears in the Word ribbon.
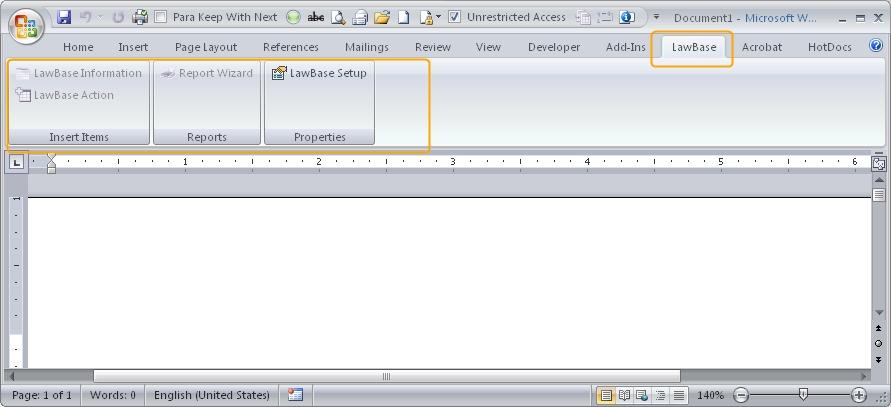
At this point the only button which is activated is the LawBase Setup button. This is where the LawBase installation information is stored.
Using LBHDWord
To activate the buttons on the LawBase tab, you must be editing a HotDocs template which is made up of an .rtf and .cmp file or .dot and .cmp file. Note: the Reports Wizard button will not be activated.
Button Description More Info
LawBase Information
Use this button to create variables from fields in your custom FlexBases
LawBase Action
Use this button to create computations which write data to common tabs
Report Wizard
The Report Wizard helps you build a report from scratch. This is only activated on blank documents. under construction
LawBase Setup
Use LawBase setup to change the directory or login See LawBase Setup
Creating and Inserting Variables
Click the LawBase Information button and a form will appear that looks like a version of your FlexBases.
Quick Start
To create a HotDocs variable:
1. Place the cursor in the document where you want the variable.
2. Locate the field you want to base the variable on and double-click. At this point you can continue to create variables (just reposition the cursor and double-click on other fields) or click the X to exit this form.
TIP: To replace every instance of a word with the corresponding variable, select the word, then insert the variable. This creates the variable in the component file and inserts into the template.
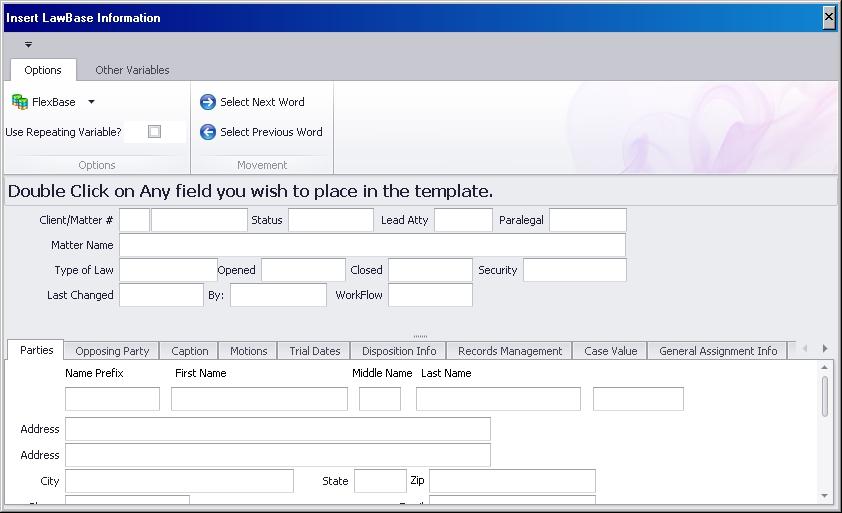
To change the FlexBase, use repeatables and other options, review the options below.
The LBHDWord Ribbon
Options Tab
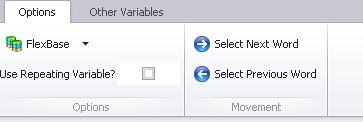
FlexBase
Use this drop-down to select the FlexBase you want to work with
Use Repeating Variable
Check this and the variables created will begin with LBR. Uncheck to turn it off. Click these buttons to navigate through the text of the document.
Select Next/Previous
Word You can also pull the LBHDWord interface to the side and use the mouse normally.
Other Variables Tab
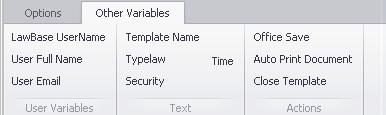
User Variables - This data comes from the user setup in LBAdmin
UserName «LB_USERNAME»
Inserts the login name of the user running the template into the output;
Full Name «LB_FULLNAME»
User Inserts the full name of the user running the template into the output;
User Email
Inserts the email address of the user running the template into the output; «LB_USEREMAIL»
Template Name
«LB_TEMPLATE» Inserts the template's file name and network path into the output. Note, this variable cannot be made repeatable using LBR functionality
Typelaw
Inserts the Typelaw from the header of the selected FlexBase into the output. «LB_TYPELAW»
Security
Inserts the Security from the header of the selected FlexBase into the output. «LB_SECURITY»
Time
Inserts the time the output was generated. «LB_TIME»
Actions
Inserts the «LB_OFFICESAVE» variable. For information about how this is used, see
Office Save
OfficeSave Sends the output to the user's default printer.
Auto Print
«LB_PRINTIT» **Note, if using this action, you cannot use the HotDocs parameter = /stw
Document
/nw** Closes the output document. Usually used in conjunction with Close Template LB_PRINTIT.«LB_CLOSEIT» **Note, if using this action, you cannot use the HotDocs parameter = /stw /nw**
Applying Colors
LBHDWord inserts all variables without HotDocs formatting. To see variables in blue, IFs in green, ASKS in gold and so on, use the HotDocs Apply Colors command. For more information about Applying Colors, consult the HotDocs help.
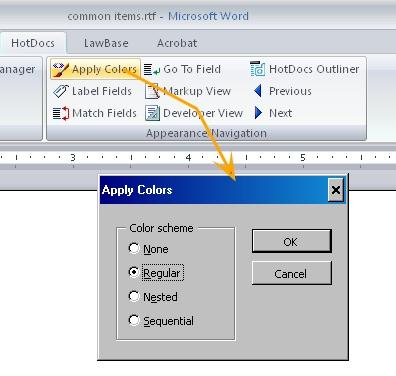
Write Notes and Create Calendar Entries with LBHDWord
Use the LawBase Action button to create computations that update notes, calendar and other common tabs when a template is assembled. A popular usage is to have a note written into a file every time a template is assembled. Below is an example of the Notes common tab; this will write a note which fills in a timestamp, the current user's login, note type and a memo including the selected party's name.

When you fill in one of these action forms and click ok, it creates a computation variable that it puts into the body of the template as well as any required text and date variables required by the computation. Other than the computation, the other variables are added only to the component manager but not to the body of the document. The LawBase Action is used only for creating these variables; if you need to edit the computation, edit it normally with HotDocs command.
The LawBase Setup Button
This button determines what database LBHDWord uses, sourcing the information from the lawbase.config file in the directory mapped here. This was filled in upon install, but you can change it as needed.
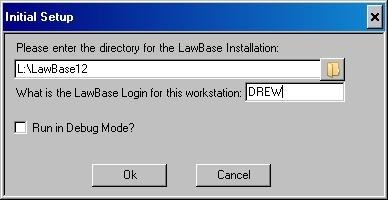
Report Wizard
Use LBHDWord to build HotDocs Reports. Use the wizard for initial field selection; once you have added fields and labels to the report, the wizard will be disabled but you can continue to edit the report manually. Refer to LBHDWord for information about this add-in.
(see HotDocs for Reports)
Set-up
Start with a blank report. If there is any text in the body of the template, the wizard will not work. You can create a new template and link it into the reports tab. Or as a shortcut, right-click in the reports tab and add a new report. When it opens for editing, delete all the text. Save and Close the template; when you reopen it you'll be able to access the wizard.
Set up LBHDWord. This is described in LBHD LawBase Setup
Step-by-Step
We're going to build a case status report to track the same information as the example in the reports section of this help. For information about this example,refer to Step by Step
1. Open a blank template for editing.
2. Go to the LawBase ribbon and click on Report Wizard.
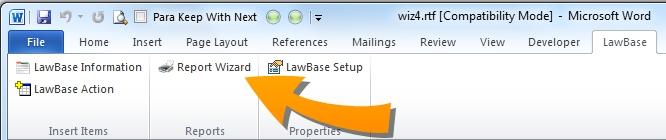
3. Fill in the SQL Input tab.
a. Select the FlexBase you want to use (main area for the query) b. Enter the title you'd like c. Edit the SQL Statement as needed. d. Click Next to go on to Fields.
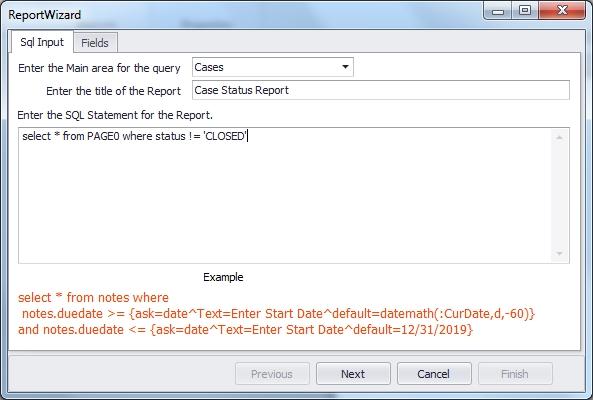
4. On the fields tab, add the fields you want to include in the output. Just double-click on each field you want.
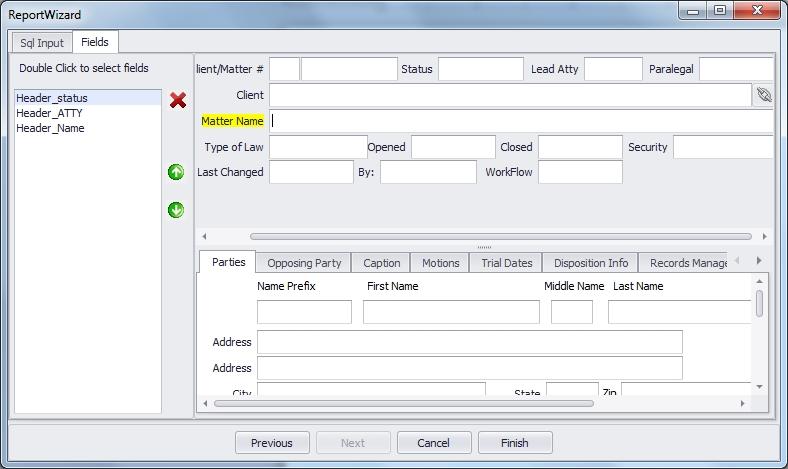
5. Click Finish and the wizard will build the report for you.
It creates the variables, the LB_SQL1, sets up a table with a repeat around it and builds a footer with information about who generated the report and when. You may need to make some formatting adjustments, but the content of the report is there. Here is how the template looks.
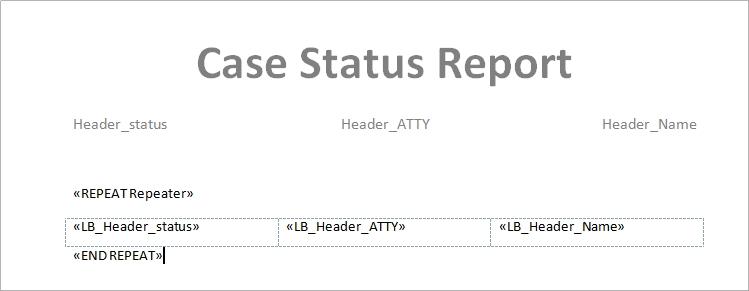
6. And here is some sample output:
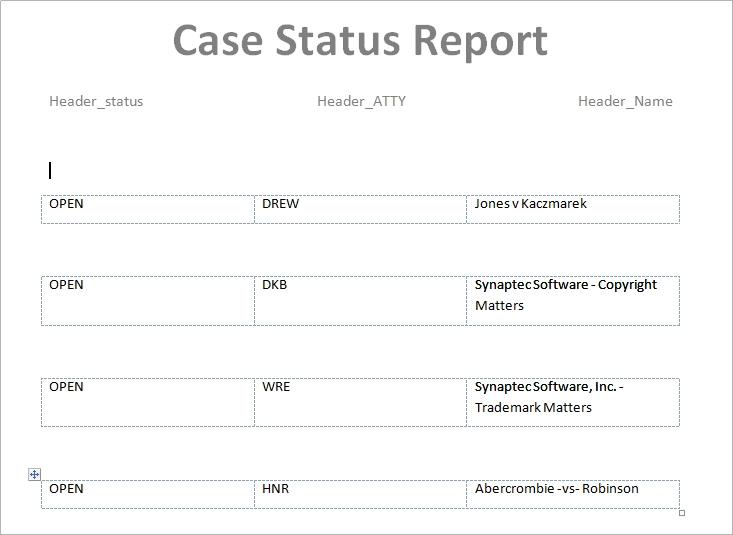
Master/Detail Reports
In the example above, we only selected fields from the header and the report was automatically built using a single repeat. When you select fields from tabs as well as the header, you'll be prompted to choose if you want to create a Master/Detail Report.
- Yes - means there will be a repeat for the header as well as a repeat for the selected tab.
- No - means there will only be one repeat for the header; only the first copy of data from tabs will be included in the report.
LBOutlook Connector
LBOutlook Connector is an Outlook add-in that makes it easy to save email messages to LawBase, access LawBase files and create LawBase calendar entries from within Outlook.
Introduction
LBOutlook Connector provides a ribbon with three buttons.
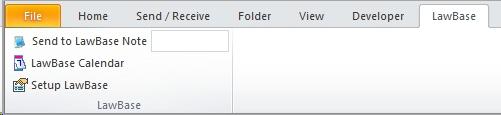
Send to LawBase Note
Saves the currently selected email message as a note. To select the LawBase file where you’ll save the note, type the LawBase file name into the field and press enter.
LawBase Calendar
Click to create a new calendar entry in LawBase.
Setup LawBase
This is what the program uses to find your LawBase installation.
Installation
The add-in must be installed on each user’s workstation, as it runs locally. It is supported on Outlook 2007 and higher. Supported Operating Systems: Windows 7, Windows 8, Vista (possibly Windows XP). Depending on your system’s security settings, you may need run the install as an administrator.
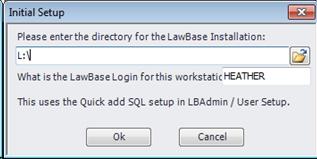
To install:
1. Exit the Outlook program.
2. Run the setup.exe provided by Synaptec (run from and LBOutlookConnector subdirectory - the setupcannot be run directly from your LawBase directory).
3. Launch Outlook.
4. Fill in the initial setup dialog:
a. Fill in the directory with the location of the LawBase install. Example: L:\LawBase b. Fill in the LawBase user name for this workstation.
NOTE: If the Quick Add is not defined for the user within LBAdmin, the Send to LawBase Note will not be available. Refer to the Users and Groups section of the LawBase Admin Help to set up Quick Add for a user or see SQL Set-up below.
Install Troubleshooting: If you have trouble running the setup.exe file, try running the file as an Administrator. If you receive the error MSI install error: This advertised application will not be installed because it might be unsafe, get to a DOS prompt as an Administrator and run: Msiexec /i LBOutlookConnectorSetup(1.0.0).msi /qb
SQL Setup
LBOutlook Connector uses the same SQL that is used for Quick Add (this is part of user set-up in LBAdmin and so it may vary for each user). The SQL should return a list of the files in one or more FlexBases; typically the select will include key identifiers. Basically, it needs to select from any FlexBase(s) you want with union in between each select. Example: select lname, fname, status from page0 union select name from contact0
NOTE: If you are familiar with SQL, you may know that typically unions require an equal number of fields for all the tables. Our code handles this so you can don’t have to maintain equal numbers.
You can add where clauses to the Quick Add SQL. For example: select lname,fname from page0 where status = ‘L100’ union select name from contact0 where typelaw = 5
NOTE: Very large results sets (in the tens of thousands) may prevent the save to note function from working. We recommend starting with a limited select statement and scaling the results up.
Send Email to LawBase as a Note
1. Select the message.
2. Start typing the name of the file where you want to add the note; you don't have to type the full name. As shown below, all files that start with 'Jones' were displayed. Press enter to return matching results.
3. From the results, double-click the file name.
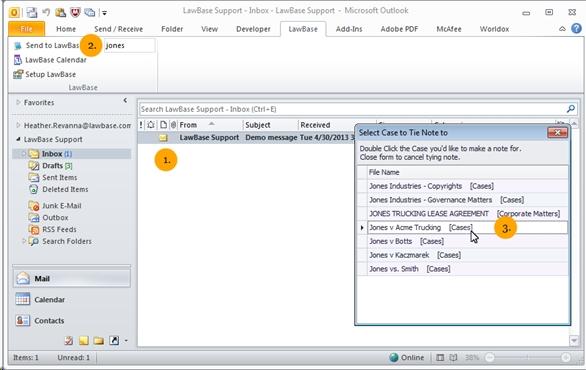
The message header and body are copied into a note, and the message and all attachments are saved into an .msg file. A note created by LBOutlook Connector might look like this:
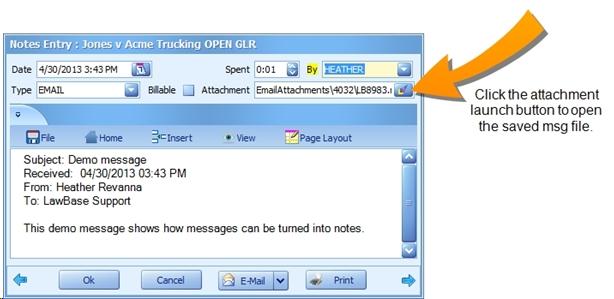
Alternate method using right click:
Right click on an Outlook message. You will see additional options to:
1. Copy to LawBase Note - This is similar to the Send to LawBase Note.
2. Copy to Recent - This will display the most recent LawBase files that the user has called via the tool. The same number of records will be displayed as within LBAdmin>System Setup>Cosmetics>Main>RecentFileSize
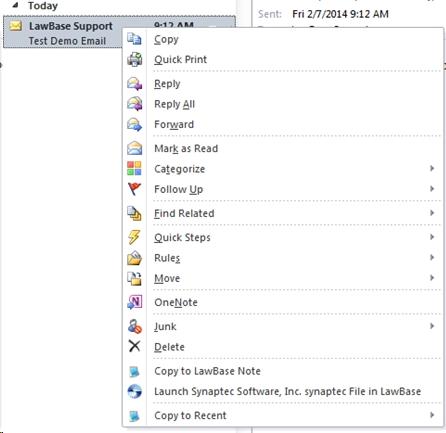
3. Launch File in LawBase
NOTE: For the right-click options to appear and function properly, a view must be created in the LawBase database named OutlookConnectorSearch. If multiple fields are used for emails then a union of these in the view should work just fine.
Example of view: ADD view [dbo].[OutlookConnectorSearch] as select page1.caseserial as serial, ltrim(rtrim(page1.email)) as email, isnull(PAGE0.lname +' ','')+isnull(page0.fname,'') as DisplayName, 'url:lawbase:linkserial='+page1.linkserial+'~' as LBLink from PAGE1 inner join page0 on page0.Serial = page1.caseserial where len(email) > 2
Alternative method within opened Outlook message:
From within an opened Outlook message, locate the LawBase ribbon and the Send to LawBase Note button. Type the name of the file and press enter to return matching files. Double-click on the name of the file where you want to create the note.
Note Type
The Note Type will be “EMAIL” when the LawBase Note is created. There is an option for the user to control the Note Type every time the functionality Send to LawBase Note is used. The setting is within LBAdmin > System Setup> Cosmetics > System > OutlookSelectNoteType. If this is enabled (checked), when the user selects the file to make note for, an additional popup will appear for the user to select the Note Type.

LawBase Calendar
To create a new calendar entry in LawBase from within Outlook, select the LawBase ribbon and click on the LawBase Calendar button.
LawBase Navigator
The LawBase Navigator provides a location within Outlook where you can:
- View and use SmartFolders
- Use the Search Tabs
Setting up the Navigator
From within Outlook:
1. From the folder tree, select the mailbox name.
2. Right-click and create a new folder (in the Folder Contains dropdown, select Mail and Post Items).
Name this new folder LawBase Navigator. If the setup for the connector is correct, you'll see SmartFolders and Search Tabs when you select this folder.
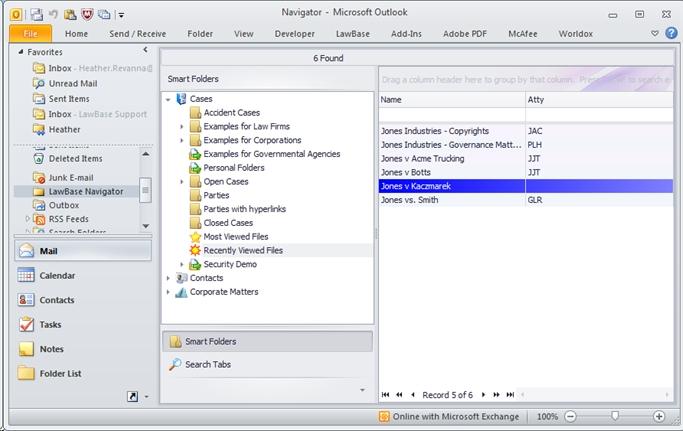
Launch in LawBase
If you utilize LBExchange to sync Contacts to Outlook, the Launch in LawBase functionality will be enabled if you have included LBLink within the SQL Statement. Select the Launch in LawBase option and the record that this Contact is linked to will open within LawBase. This is defined within Exchange Contact Mapping under LBAdmin>System Setup>Exchange. Please refer to the LBExchange Set-up and Configuration document.
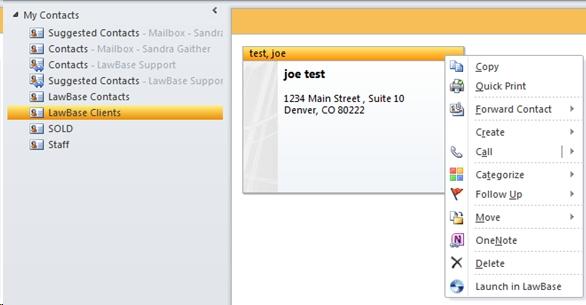
Example from Exchange Contact Mapping:
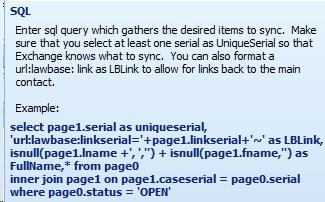
LBShare
LBShare is an easy way to set up various portions of the LawBase system. LBShare does not share actual firm data, but rather the metadata needed to create various items in LawBase. Think of LBShare as a global library of useful items that you may decide to use as needed in your own situation. If you prefer to not share and/or have access to LBShare, you can turn it off using the Cosmetic System.LBShare
The following types of items can be accessed using LBShare.
Screen Templates. This includes any WorkFlow that the screen uses.
HotDocs Reports.
Chart Definitions.
PivotGrid Definitions.
How LBShare works
LBShare requires your machine to be able to communicate with the LawBase web server. If you can automatically download updates, you can probably use LBShare. You must also have the Cosmetic System.LBShare turned on. All LBShare items are all stored securely in a library at Synaptec Software. No actual information is ever transmitted other than from or to Synaptec Software.
Importing From LBShare
Screen Templates
In LBDesign under the Utilities Ribbon Group, you will find an option to Import Screens. When you select this item, you will see checkboxes to inform what type of screens you'd like to see. Every LBShare screen template is tagged as to what type of screen it is. On the right hand side of the pulldown, you'll find different screen templates. Hover your mouse over any screen and you will see a preview of what the screen looks like. When you find a screen you'd like to import, simply double-click on the name, and a new tab will be created with the all the fields you saw on the preview.
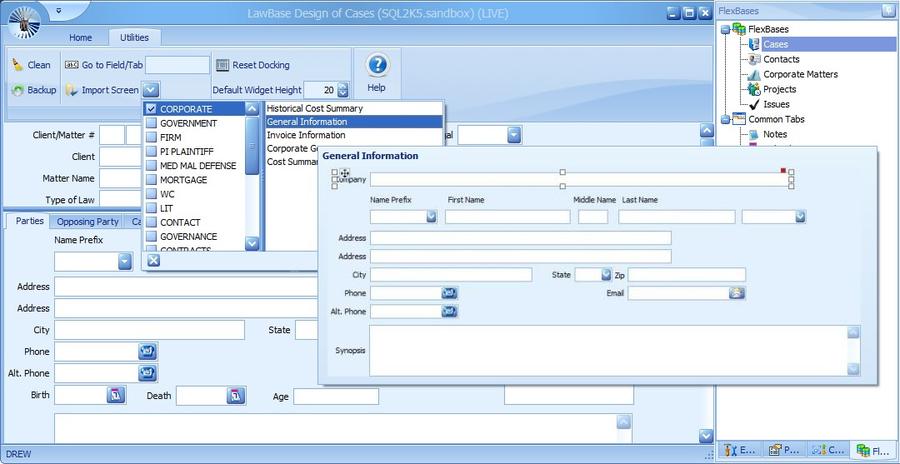
HotDocs Reports
To import a HotDocs Report Template, right-click on any Report (in the Reports SmartFolder group) and select Import From LBShare and further select what type of report you'd like to import and finally click on the report name.
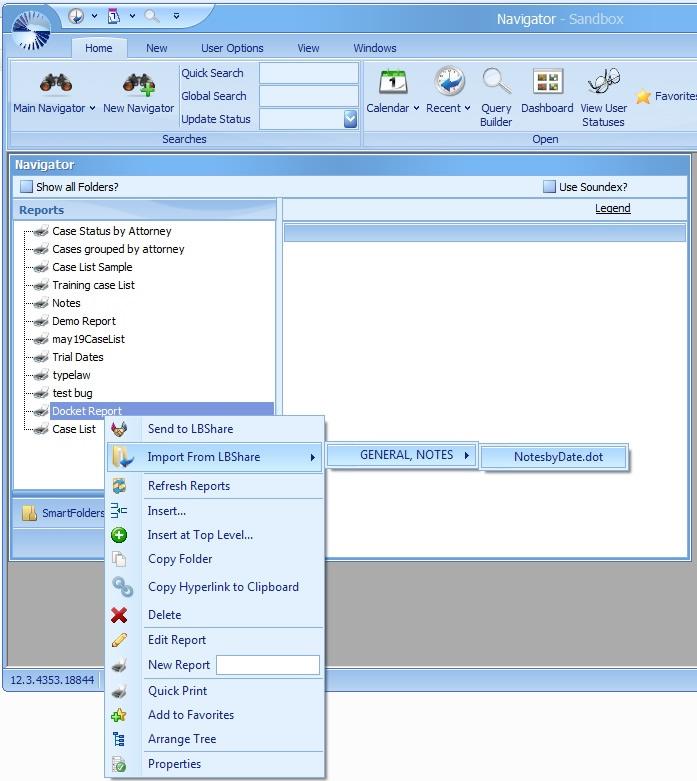
Chart and Pivot Grid Definitions
To import a chart definition, first open a Dashboard. Then Click on the Edit Chart Templates button. Once there, you can click on the Import Button and further filter by what type of chart you are looking for. Just like in the Screen Import, you can hover above any item to see a quick preview of what the chart will look like. Double Click on the chart you'd like to import into your system. Pivot Grid Importation works just like importing charts. The only difference is you must click on the Edit Pivot Grids button on the dashboard rather than the Edit Chart Templates.
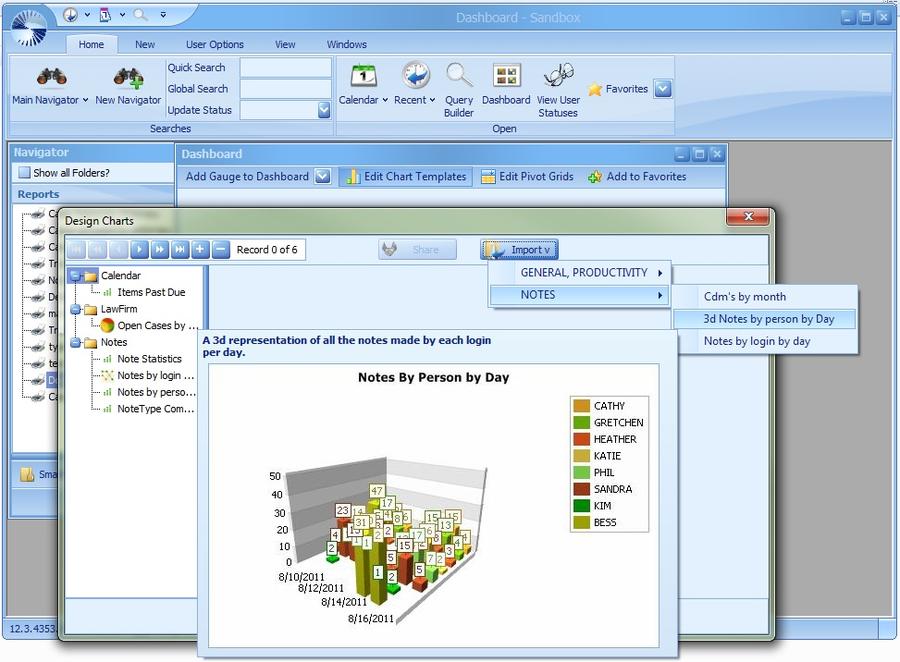
Exporting to LBShare
You can choose to share any of the items from your system that you can import.
Exporting Screens
One of the most useful items you can share are screen definitions. As more and more users share their screens, there will be a larger library ready to aid others in quickly designing their system. To share any screen definition you only need to define what type of screen the definition is one time. There after, it will update the LBShare version anytime you change the screen. You can also choose to stop sharing the screen at any time. To find the LBShare items, get into LBDesign and highlight the screen you'd like to share. On the Screen Properties, there is a property called LBShareTags. Simply check any and all of the appropriate tags that describe what the screen is.
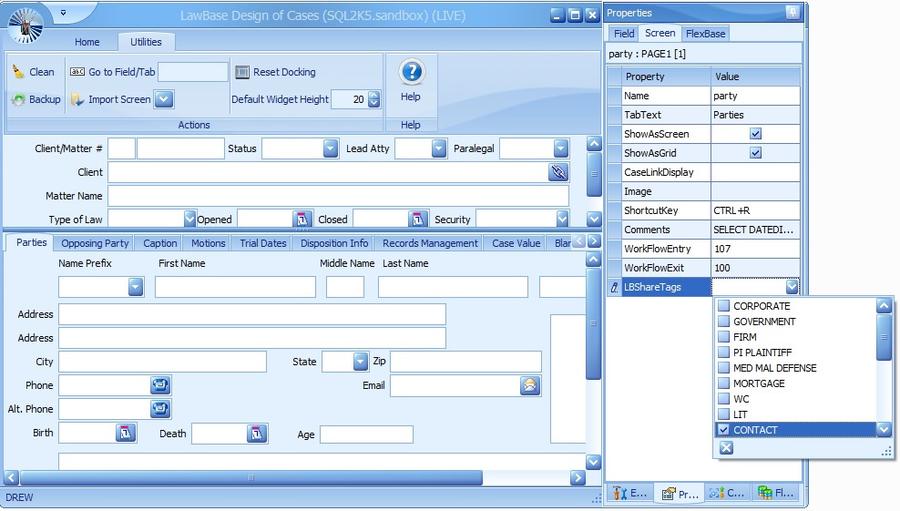
Exporting HotDocs Reports
To Export a HotDocs Template, right click on the report you'd like to export and select Send to LBShare. You will be presented with a form allowing you to select what type of report it is and type in optional comments about the report. When you click OK, the template will be shared.
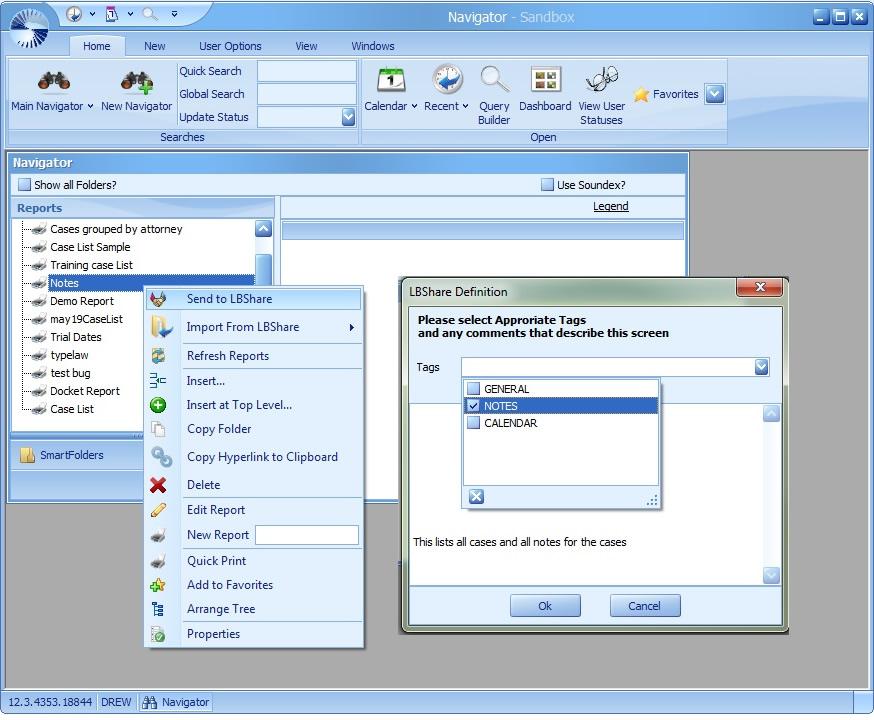
Exporting Charts and Pivot Grids
To export a chart or Pivot Grid to LBShare, pull up a dashboard and select to edit charts or pivot grids as desired. Highlight the item you'd like to share and you will be presented with a form allowing you to comment and tag the item. When you press Ok, the item will be shared.
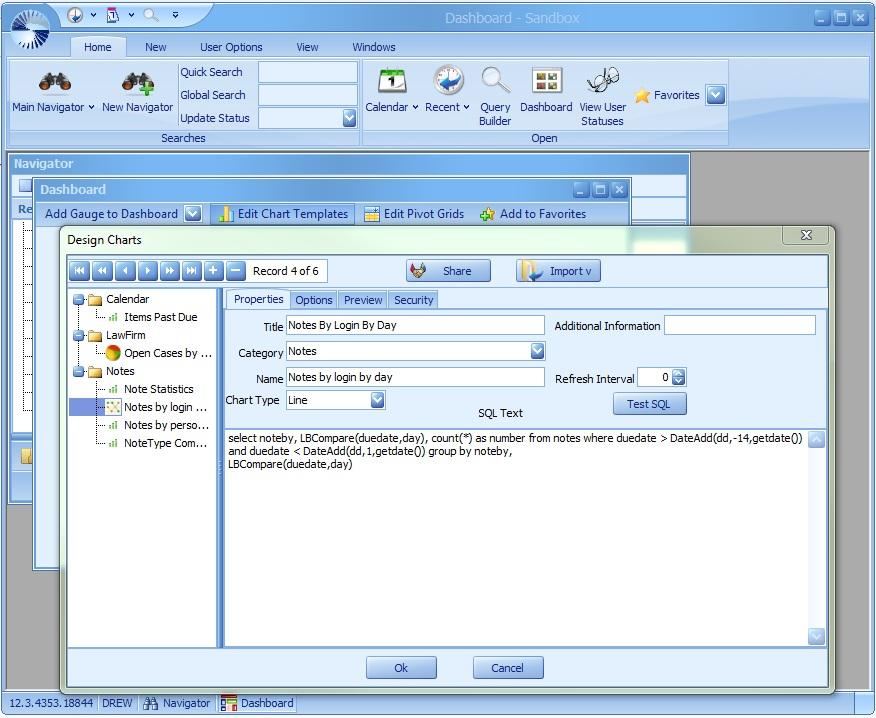
LBSync
Use LBSync.exe to synchronize elements between your databases.
Syncing Screen Changes
Most commonly this is used for syncing screen changes from design to production; read about this in Review and Synchronization.
Syncing Other Items (Not Screens)
You can also sync a number of other things: Conflicts, Cosmetics, GlueWare, Holidays, Pick_lists, Typelaws, User and Groups; and WorkFlow.
Why might you need to do this?
- For example, you might want to copy users/groups if would like to use the same logins and passwords in LBDesign.exe that you use in LawBase.
- You can filter the tabs that appear in Design by typelaw, but typically the typelaws are not maintained in the Design database. So to have the tab selections match in both databases, you would sync Areas of Law from production to design.
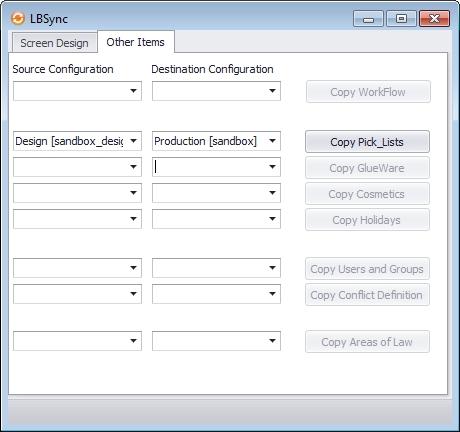
For the area you want to sync, just select the source database under Source Configuration and the destination database under Destination Configuration and click the coordinating button on the right. The databases are identified by the label set in LBDBConfig as well as the alias on the SQL server; the alias is shown in brackets.
Reports
LawBase provides three main ways to report data.
- HotDocs Reports
- Quick Print Results Reports - see the User Help for details about these reports
- Query builder reports
HotDocs for Reports
In LawBase12 you can use HotDocs as your report writer.
NOTE: This section assumes you have read the LawBase/HotDocs user documentation and already know how to create HotDocs templates for individual LawBase cases.
About Reports
There are two types of HotDocs reports in LawBase: Standard Reports and User Reports.
- Standard reports are tied to common items (such as Notes, Calendar and History)
- User Reports are tied to the report tree on the main LawBase Navigator.
All reports should be placed into a HotDocs Library in the Reports subdirectory of LawBase (this directory and library may be changed by using Cosmetics in LBAdmin).
HotDocs Library for Reports
In the HotDocs Report Library, you need two sub folders. One named User Reports and one named Standard Reports. Typically you'll have a few Standard Reports already loaded for you with your install. Typically, the library is named LawBaseReports.hdl.
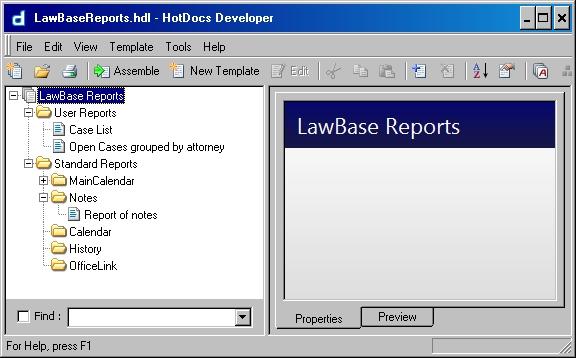
Cosmetic for the Report Library
For reports to be available in LawBase, the ReportLibrary cosmetic in LBAdmin must be set.
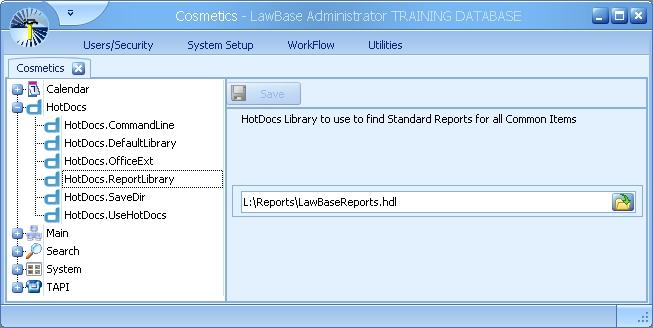
Minimum Report Requirements
In each LawBase HotDocs report, you need to have:
- A text variable named LB_SQL1 which contains the SQL statement you desire to find the cases or items that you’re interested in (the actual SQL is stored in the prompt.)
- At least one repeat section around the printout of the information you’re looking for.
You may have additional repeat sections inside this main section, depending upon your reporting needs.
User Reports
User Reports appear in the Report Tab. These generally contain information from multiple cases. Here is an example of what a simple report template might look like. This report lists cases which are open, displaying the case name, the attorney name and the case status.
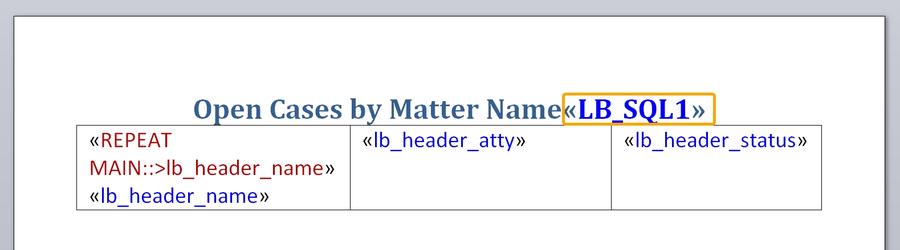
- The first line is simply text and acts as a title for the report.
- At the end of the first line is the LB_SQL1 variable. This is where the SQL is stored.
- The table include the variables to be printed out as well as a repeat. NOTE: When a repeat is applied to a table row in MS Word, the end repeat does not display.
LB_SQL1
Every report must have a variable called LB_SQL1 to store the query used to run the report. To create an LB_SQL1 variable:
1. Create a text variable and name it LB_SQL1.
2. Edit the prompt area of the variable. This is where you add the SQL select.
Below is what the variable looks like for our sample report.
This is the text in the prompt: select * from page0 where status != 'closed' order by name
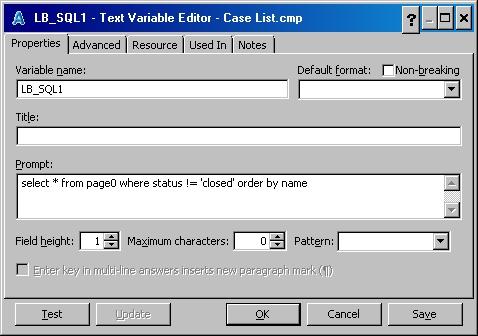
Repeat Variables
Every report will have at least one repeat. Just as in regular HotDocs templates, make sure to add the repeated variables to the repeat dialog.
Adding Reports to the Reports Tab
Existing Reports
This is most common when you copy or move a report from one environment to another.
1. Right-click in the reports tab where you want to add the link. Select Insert to add the link as a child of anexisting pointer; select Insert at Top Level to keep as a parent.
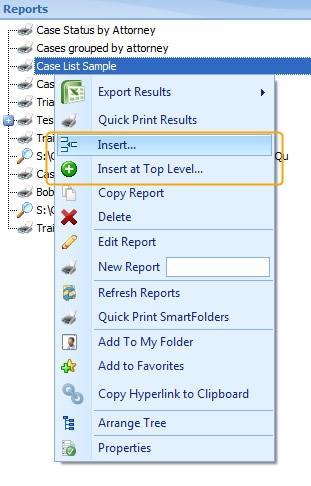
2. The Set-up dialog appears. The Display Text is where you put the name of the report your users will see. In the Report Template field, browse out to the location of the report; keep in mind that the location should be accessible to your users.
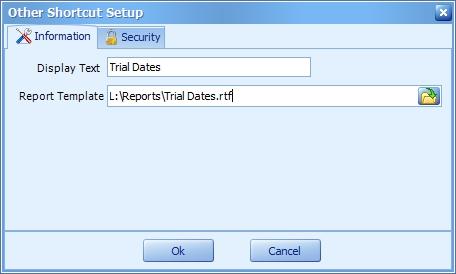
Bypassing the Finish Button
By default, HotDocs will require you to click Finish to finish the document assembly. To bypass the Finish button. add the following switches to the Report Template location. /stw /nw
These are HotDocs switches which mean: send to word processor and no window, respectively.
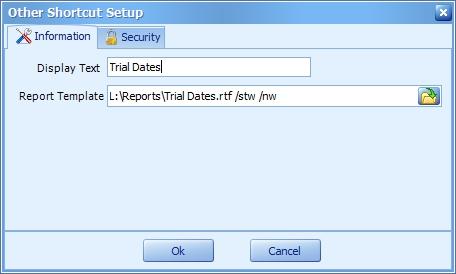
Creating a New Report
For information about creating a new report and adding it to the reports tab all at once, see Simple Reports, Step by Step.
Copying a Report to Build a New Report
If you want to make a template that is substantially similar to a preexisting report, right click on the preexisting report in the Reports Tree and select Copy:
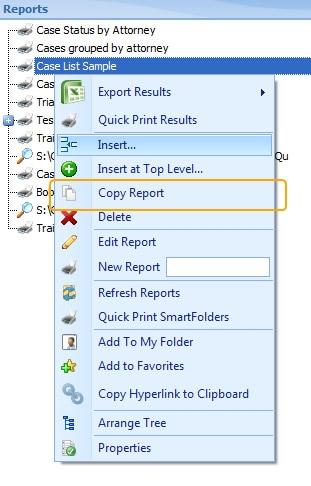
A item will appear in the Report tree with the name Copy of [preexisting report name]. Rename the report, right click on the new name and select Edit. From there you can make the requisite changes.
Standard Reports
Standard reports are available only from within Common Tabs and automatically report on just the current file (or calendar) that the user has selected.
Standard Reports must be added to the reports library (LawBaseReports.hdl )
Here is an example of a standard note report:
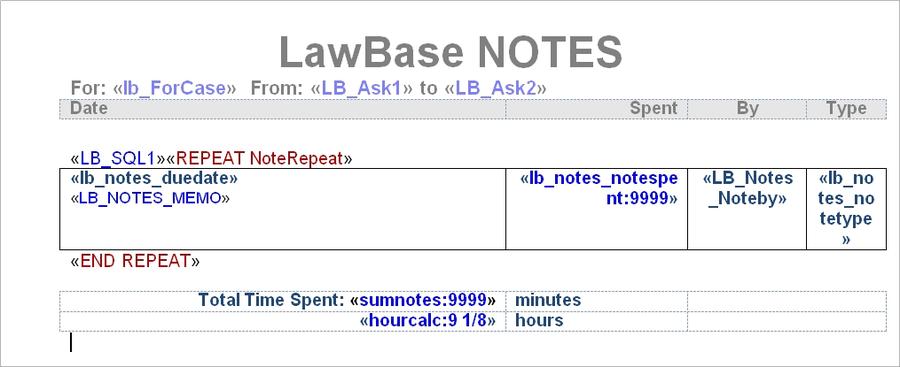
The code for the LB_SQL1 looks like this: select * from notes where notes.duedate >= {ask=date^Text=Enter Start Date^default=DateMath(:CurDate,w,-2)} and notes.duedate < DateAdd(dd,1,{ask=date^Text=Enter End Date^default=:CurDate}) order by duedate desc
This says get all the notes from two user input variables and order them by duedate. You can read more about how the user input (ASK) variables work here: Ask Variables
Sample Output
Here's sample output for the report described above. You'll fine this report on your system; it's called Sortable Notes.
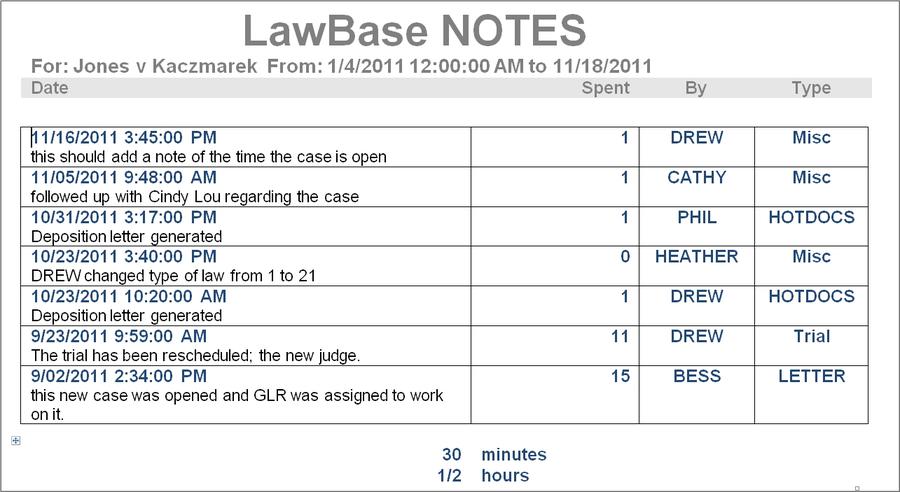
Simple Report, Step by Step
This section walks you through the necessary steps to build a report from scratch.
1. Before you Start
Before you start with the actual report template, think about what you want to get. Sketch it out so you know what fields you want.
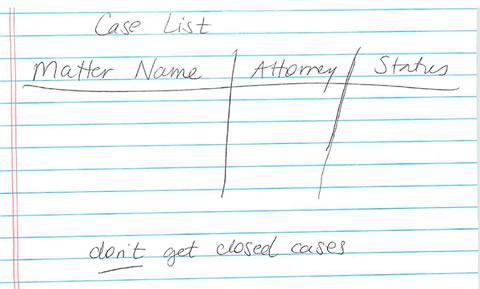
2. Create a New Template
In the reports tab, right-click and in the field next to New Report, type the name for your report. This creates:
- the .rtf and .cmp files in your reports directory
- A pointer to the report in the reports tab.
Also, creating the new report from the Report Tab automatically opens the template for editing.
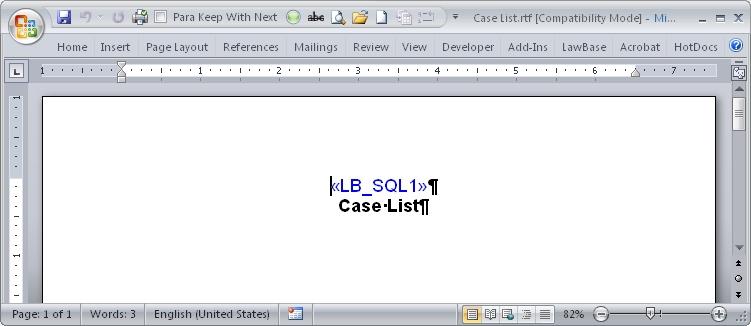
3. Add the Query
The report needs an SQL statement to get the data from the database
a. Locate the variable LB_SQL1 in the body of your new tempate and double-click to edit it.
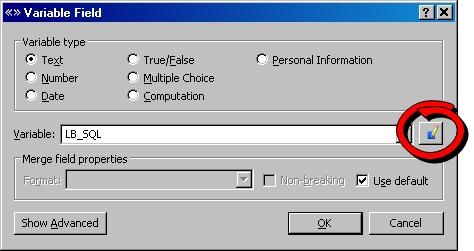
b. Key the SQL statement into the prompt area of the variable.
c. Click Save and then OK to insert the variable into the template.
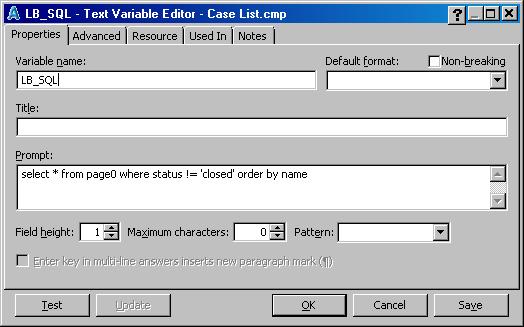
4. Set up the Output
a. Add HotDocs variables to the document so that the fields you want to see are printed. We formatted this template with a table as well.
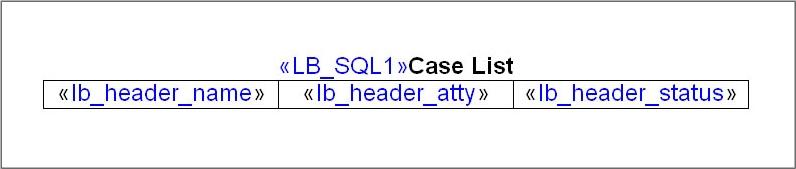
b. Build a Repeat around the fields. Make sure to add the fields to the repeat. In this example we also sorted by the file name.

This is a good time to test the report.
- Save and close the report template.
- Go back to LawBase, and from the reports tab run the report (double-click on the report in the tree).
- When the HotDocs dialog appears,click finish.
5. Sample Output for the Example above.
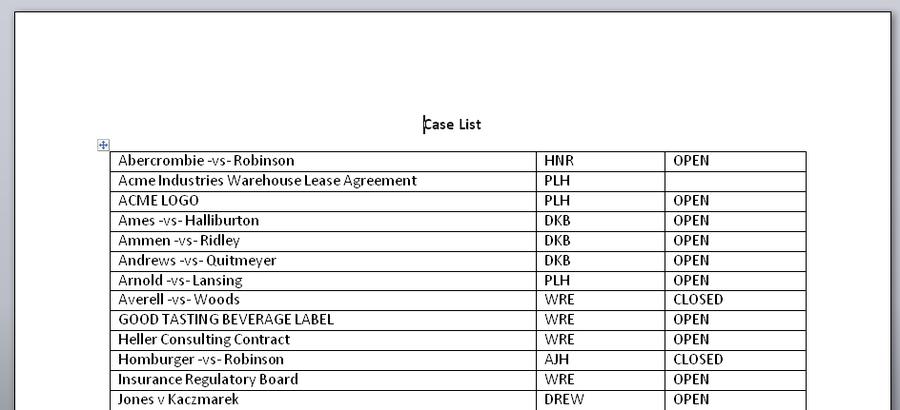
At this point, if the data is coming out as expected, you'll probably want to add page numbers and other formatting items.
Special Report Variables
Math Variables
Use the following variables to perform some common mathematical functions
Format Description
LBM_SUM_TableName_FieldName Adds up all the found values of the TableName_ FieldName
LBM_AVG_TableName_FieldName Finds the average of all the values of TableName_FieldName LBM_COUNT_TableName_ FieldName
Finds out how many entries for the TableName_ FieldName were found (count)
Other Variables
Use text variables for all of these.
Format Description
LB_ASK# Where # is the order that the ask appears in the query. LB_FORCASE The case that the report is working on.
LB_CALUSER In calendar reports, this is the user whose calendar was viewed when the report was run. LB_ [COMMONTAB]_ DUETIME
Returns just the time portion of the duedate in common tabs. Examples: lb_notes_duetime, lb_calendar_duetime
LB_TYPELAW Returns the Typelaw for the related file.
For more information about the construction of ASKs, see Ask Variables
Repeats in Parent/Child Reports
This section describes some considerations for using parent/child repeats in reports.
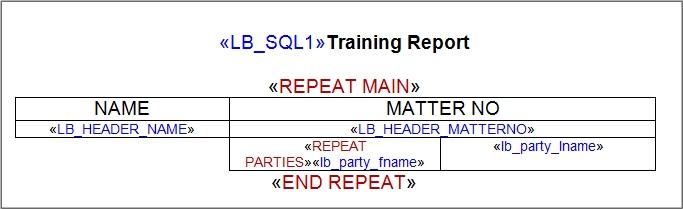
Parent/child reports use nested repeats. A common example using parent/child repeats is when the parent data comes from the header while data from a repeatable tab acts as the child.
Two basics for Parent/Child reports
1. The Parent and the Child repeats cannot be in the same table row. The child repeat in this example above is the one repeat around the page1 records, fname and lname. (And by the way, you don’t have to have the header within a word table; some people put the header outside of a table.)
2. The Parent repeat (this includes the fields from the header and the Child repeat), should be Regular Style and the Child repeat should be a Repeated Series Style. This is the parent.
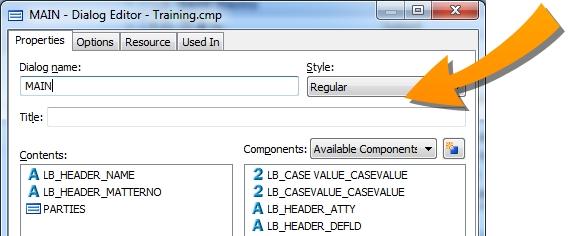
This is the child:
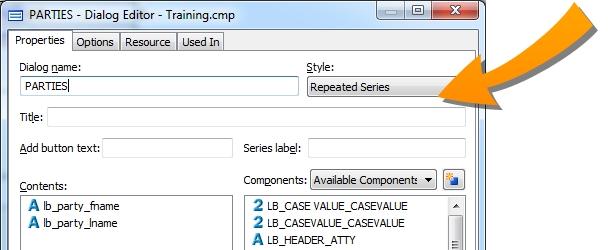
Ask Variables
In HotDocs Reports, LawBase WorkFlows and LawBase Dashboards, you can use {ask} variables to get user input in construction of a query. When these queries see an {ask} section, the entire section is replaced by whatever the user inputs. The {ask} section contains sections divided by carets ‘^’ that instruct LawBase how to ask for the input. {ask} sections begin by telling LawBase what kind of field to input and then what the text of the prompt should be and what the initial (default) value of the field should be.
Examples
Here’s a sql statement from a note report:
select * from notes where  notes.duedate >=
{ask=date^Text=Enter Start Date^default=DateMath(:CurDate,w,-2)}
and notes.duedate < DateAdd(dd,1,{ask=date^Text=Enter End
Date^default=:CurDate})
and noteby like {ask=picklist^PickListName=sql(select login from
user_profile where activeuser = 'Y' order by login)^Text=Who
entered the notes?^default=%}
order by duedate
Here’s what each {ask} section does
{ask=date^Text=Enter Start Date^default=DateMath
(:CurDate,w,-2)}
This says to input a date, with a prompt of “Enter Start Date” and the initial value should be the Current Date minus two weeks. The result is used after the notes.duedate >= section which means that query will find notes where the duedate is greater than or equal to whatever date the user inputs for this section.
{ask=date^Text=Enter End Date^default=:CurDate}This says to input a date with the prompt of “Enter End Date” and initial value of the current date. This section is in part of a DateAdd in the query. DateAdd is a SQL function that in this case adds 1 day to whatever the user enters.
{ask=picklist^PickListName=sql(select login from user_
profile where activeuser = 'Y' order by login)^Text=Who
entered the notes?^default=%}
This says to gather the input from a picklist box. The possible selections will be found by executing the sql statement shown (which goes and gets all the active LawBase user names). The prompt will say “Who
entered the notes?” and the initial value will be ‘%’ which means all values. In the query it says to make sure the noteby is like whatever was entered in the box. So if % is selected, it will find all entries. If you select DREW only Drew’s notes would be found.
To ask user for a date with no time element associated with it:
{ask=date^Text=Enter Start Date^notime^default=DateMath
(:CurDate,w,-2)}
Asks - Supported Field Types
The following field types can be used in an ask variable.
Checkbox
Example: {ask=check^Text=Use this entry^default=Y} Checkbox asks are mostly used in Workflows, not reports.
Date
Example: select * from notes where notes.duedate >= {ask=date^Text=Enter Start Date^default=DateMath(:CurDate,w,-2)} and notes.duedate < DateAdd (dd,1,{ask=date^Text=Enter End Date ^default=:CurDate})

To ask user for a date with no time element associated with it:
{ask=date^Text=Enter Start Date^notime^default=DateMath
(:CurDate,w,-2)}
Memo
INPUT={ask=memo^Text=If the question is too long to fit on one line
<return>you could use an ASK with a memo <return>
and coded carriage returns in order<return>
to display the question in multiple lines<return>^default=}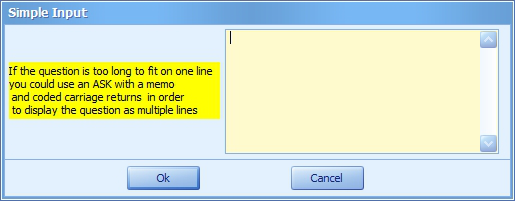
Multi-select
This option presents multiple choices to the user input={ask=MultiSelect^Text=Which People^Items=Ed,Sam,Frankie,Johnny,Rick,John,Billy,Tom^default=Ed,Sam,Bill- y}
The result is a comma separated list of selected items.
Below is an example of the contents of two variables within the workflow. The first is the select list but the second variable takes the results of the first that have comma separated values and replaces with comma separated values with single quotes around. WHICHPICK:
Input={ask=MultiSelect^Text=Which Distribution List do you want to
email to?^items=CLIENT SUBSTANTIVE,CLIENTS,CLIENTS INVOICE,IN-
HOUSE,LOCAL COUNSEL,SERVICE}
WHICH:
<<sql(select replace(''''+replace('<<var.whichpick>>',',',''',''')
+'''',','' ',','''))>>PickList
When using a PickList you need to describe the PickListName. This can be the name of a picklist (defined in LBDesign) or a sql() statement that gathers its selections from the database. Example using a named picklist: {ask=picklist^PickListName=role^Text=Pick a role. Type % to select all roles^default=%}

Example using a SQL picklist: {ask=picklist^PickListName=sql(select login from user_profile where activeuser = 'Y' order by login)^Text=Who entered the notes? ^default=%}

Example using a MultiSelect SQL picklist: {ask=MultiSelect^Text=Agency^Items=sql(select distinct agencyname from RPTEmployAgency order by agencyname)^default=%}
RadioEdit
When using a RadioEdit, you must supply RadioItems as a common delimited list like select * from page0 where name ={ask=RadioEdit^Text=Which status? ^RadioItems=Intake,Open,Closed^default=Open} order by name

Text
Example: select * from page0 where name like {ask=text^Text=Which case? (use % as a wildcard) } order by name

Typelaw
Example: select * from page0 where typelaw in (select serial from typelaw where typename = {ask=PickList^PickListName=sql(select typename from typelaw where flexserial = 1 order by typename) ^default=%} )

Repeating an Ask
There may be situations where the same input needs to be used more than once while running a report. For example, you may want to find cases where JEJ is the primary attorney *or* the secondary attorney. Outside of HotDocs reports, in straight SQL, you might have a query like this:
Select * from page0 where priatty = 'JEJ' or secatty = 'JEJ'If we echo this syntax using Asks, we'll have an LB_SQL1 variable like the following:
Select * from Page0
where status ={ask=picklist^PickListName=status
^Default=Open^Text=Select the status}
and
typelaw in (select serial from typelaw
where typename = {ask=PickList^PickListName=sql(select typename
from typelaw where flexserial = 1 order by typename)^default=%} )
and (priatty like {ask=picklist^PickListName
=staff^Text=Which staff
member?^Default=%} or secatty like{
ask=picklist^PickListName=staff^Text=Which staff
member?^Default=%}) order by mattername
While this is not wrong, it will result in the user having to fill in the same initials twice because an identical ask appears twice. In the example above there are four asks. The first is blue, the second pink, and the third and fourth are both yellow. You can use the order of the asks in a variable, using the format {ask#}. Because the first yellow example above is the third ask, we'll use the variable {ask3}. The above example would look like this:
Select * from Page0 where status={ask=picklist
^PickListName=status^Default=Open^Text=Select the status}
and typelaw in (select serial from typelaw where typename =
{ask=PickList^PickListName=sql(select typename from typelaw where
flexserial = 1 order by typename)^default=%} )
and (priatty like {ask=picklist^PickListName
=staff^Text=Which staff member?^Default=%} or secatty like {ask3}
order by mattername
Asks - Handling Nulls
Often, the SQL in the LB_SQL1 can include the wildcard % as part of an ASK to get all data. When you use the wildcard, if there are records that return blank or null data, the % won't work for the null or blank data. You'll need to add something extra to the SQL:
or ({ask1} = '%' and region is null)Here is an example in context:
select * from RPTRealProperty where (region like
{ask=picklist^PickListName=sql(select distinct region from
RPTRealProperty)^Default=%^Text=Select the Region} or ({ask1} = '%' and
region is null)) order by region, county, stateproject, federalproject
SQL Views for Reports
This section provides an introduction to views in the context of LawBase and is intended for LawBase administrators who need views to be used in HotDocs reports.
What is an SQL view?
An SQL view is virtual table or subset of data that can be accessed just like an SQL table.
When do you use Views?
One typical situation that is easier with a view, is when you need a report which pulls data from multiple tabs.
How do you create a View
Since a view is basically a query saved with a name, the first thing to do is build the query. You can test this out in LBAdmin's SQL Runner or in the Query Window of SQL Server.
NOTE: What follows is a brief introduction to views. SQL views are not unique to LawBase and we do recommend further study beyond what we present here. This section is provided to get you started with views.
Simple Example
In this example we'll create a view that pulls data from multiple tabs. This will make it easier when we build the report, because we'll be able to use a simple select statement The desired report is intended for printing out trial dates plus some basic information about the case. The fields that we would like to include are:
Header
page0.clientno page0.matterno page0.name
General Assignment Info tab
page10.matterrecd page10.matterclsd page10.descript
Trial Dates page5.ptc page5.trial
Header (page0)
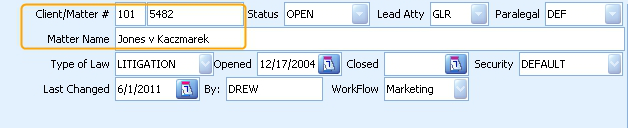
page10
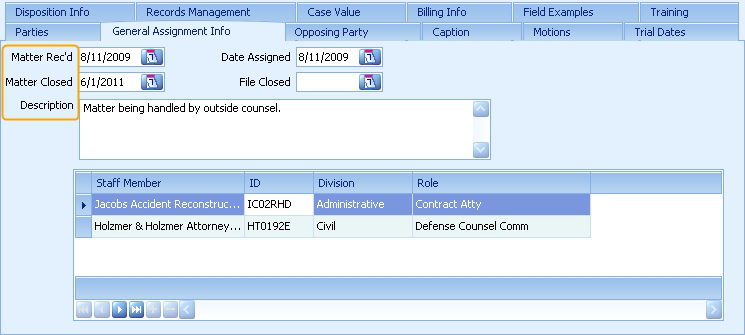
page5
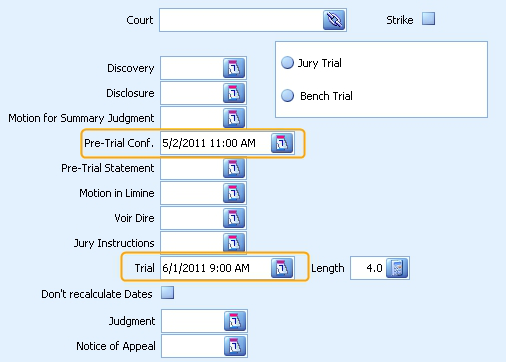
Let's build a query to pull these field together using LBAdmin > System Setup > SQL Runner. It should look something like the following. The results are shown below.
Select page0.serial,page0.security,
page0.Name,
page0.clientNo,
page0.matterno,
page10.matterrecd,
page10.matterclsd,
page10.descript,
page5.ptc,
page5.trial
from page0 joinPage5 on page0.serial = page5.caseserial join
page10 on page0.serial = page10.caseserial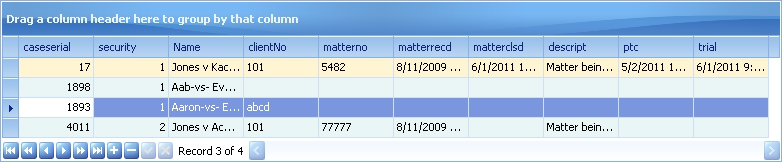
Serial and Security fields
Notice above, the first two fields selected are the serial and security fields from page0.
The serial is needed within LawBase reports but titled as “caseserial” in order to use internal
functionality so we can get distinct results.
The security field is required for when the view is accessed by HotDocs reports.
NOTE: If a report view contains a field named "security" this will be used to make sure only the correct people can see the granted files. If a report view does not contain a field names "security" then all users can see all files that are in the view.
Creating the View
Now that we have the query, we're almost there. At this point we recommend using SQL server's Management Studio to build the view. You can use LBAdmin's SQL runner, but the error reporting is more robust in the SQL server. These instructions assume SQL Server 2005 or better.
1. From SQL Server, locate the database. We're using Training12.
2. Right-click on the database and select New Query
3. In the query window that opens type the following. Note that the SQL is nearly identical to the query
we ran above. The first difference is the first line which saves the select to a view named RPTTrialDates; this is standard to create any view. The second difference is that we aliased the header serials as caseserial. This is necessary so the view can be handled by HotDocs reports.
Create View RPTTrialDates AS
Select page0.serial as caseserial,
page0.security,
page0.Name,
page0.clientNo,
page0.matterno,
page10.matterrecd,
page10.matterclsd,
page10.descript,
page5.ptc,page5.trial
from page0 joinpage5 on page0.serial = page5.caseserial join
page10 on page0.serial = page10.caseserial4. Press F5 or click the Execute button. The view is now saved.
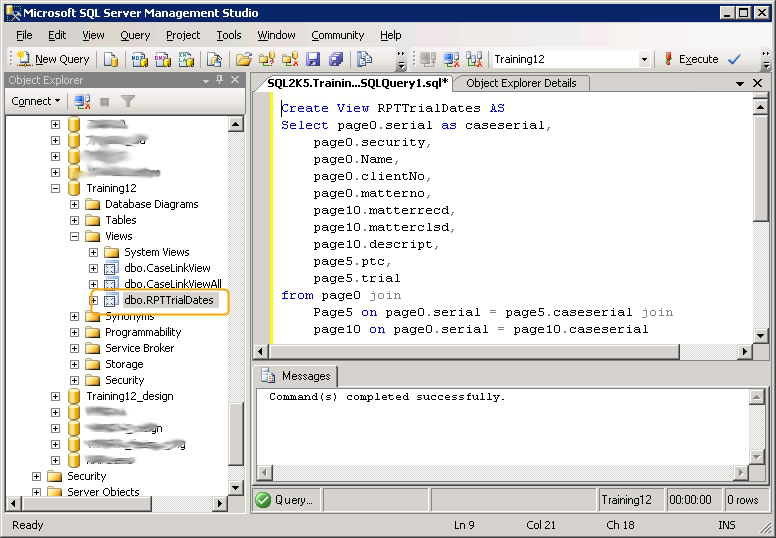
Example SQL for View that joins a caselink field, where page5.court is a caselink field that links to contact0:
Create View RPTCasesforTrial AS
Select page0.serial as caseserial,
page0.security,
page0.name,
page0.typelaw,
page0.atty,
page0.status,page5.court,
contact0.name as courtname
from page0inner join page5 on page5.caseserial = page0.serial
left outer join contact0 on contact0.linkserial =
page5.courtNote: If you intend to use the view with HotDocs, make sure to name the view without using any underscores. Because LawBase HotDocs variables use underscores to distinguish tables from fields, additional underscores will cause problems in HotDocs reports. In the example above, the view is named RPTTrialDates.
Note: Your view must be named starting with RPT or the report will not return any data.
Building a Report Using a View
This section assumes you are familiar with the steps and concepts in Reports from Scratch
1. Before you Start
Before you start with the actual report template, think about the expected output. Sketch it out so you know what fields you want. And use that same information to build the view.
2. Build the View
Refer to the section on Views
3. Create a New Template
In the reports tab, right-click and in the field next to New Report, type the name for your report. This creates:
- the .rtf and .cmp files in your reports directory
- A pointer to the report in the reports tab.
NOTE: The template is saved to the Reports directory but is not added to the library file. It does not need to be part of the library to run, but if you are accustomed to typical HotDocs management, this might surprise you.
4. Add the Query
The report needs a SQL statement to get the data from the database
- The report should already include a text variable named LB_SQL1. Open it for editing and click the edit button to add the select statement to it.

- Key the SQL statement into the prompt area of the variable.
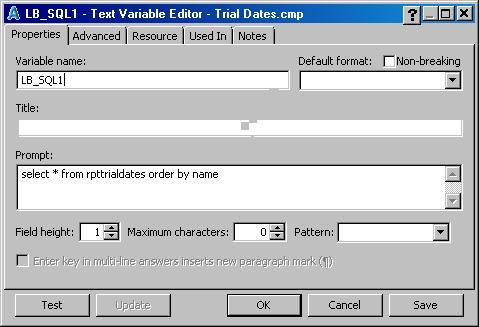
- Click save and OK.
- The select statement above:
select * from rpttrialdates order by name
6. Set up the Output
- Add HotDocs variables to the template. And add the repeat.
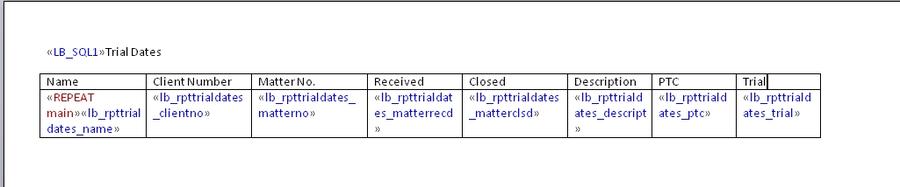
This is a good time to test the report.
- Save and close the report template.
- Go back to LawBase, and from the reports tab run the report (double-click on the report in the tree).
- When the HotDocs dialog appears,click finish.
7. Sample Output for the Example above.
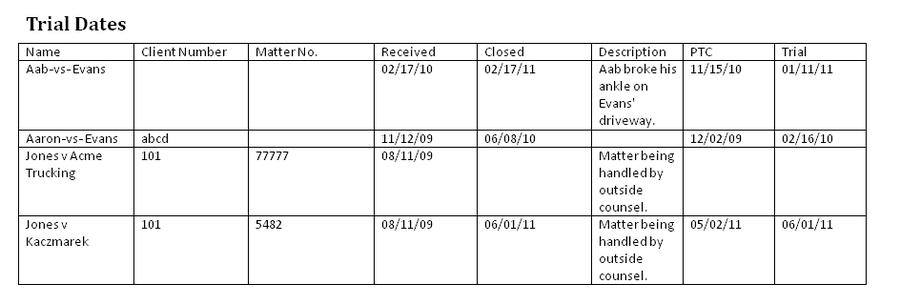
At this point, if the data is coming out as expected, you'll probably want to add a title, page numbers and other formatting items.
Common Items in Reports
This section provides the variable names for common items (notes, calendar, history) that you can use in building HotDocs reports.
Notes
Use the following variable names to output the notes data in a report.
Field name Variable name
Duedate «lb_notes_duedate»
(make sure to set this as a date type variable) Noteby «lb_notes_noteby» Notetype «lb_notes_notetype» Billable? «lb_notes_notebill» Memo «lb_notes_memo» Time spent «lb_notes_notespent»
Calendar
Use the following variable names to output the calendar data in a report.
Field name Variable name duedate «lb_calendar_duedate» enddate «lb_calendar_enddate» type «lb_calendar_type» what «lb_calendar_what» location status «lb_calendar_status» postdate «lb_calendar_postdate» postby «lb_calendar_postby» For case «lb_calendar_forcase» alarm «lb_calendar_alarm» isroll «lb_calendar_isroll» isappoint «lb_calendar_isappoint» memo «lb_calendar_memo» abfld «lb_calendar_abfld» recurrenceinfo «lb_calendar_recurrenceinfo» private «lb_calendar_private»
Ticklers
Field name Variable name ticklername.login «lb_tickler_login»
History
Use the following variable names to output the history data in a report.
Field name Variable name duedate «lb_history_duedate» type «lb_history_type» method «lb_history_method» tab1 «lb_history_tab1» tab2 «lb_history_tab2» what «lb_history_what» postdate «lb_history_postdate» postby «lb_history_postby» memo «lb_history_memo» attachment «lb_history_attachment» histaction «lb_history_histaction»
Headings and Groupings
Here's an example of a common way report output may appear. The entries show one after another in a table.
Note by Case Date Type BESS Smith -vs- Jones 6/23/2011 9:47 Misc BESS Jones v Kaczmarek 6/23/2011 9:52 Misc DREW Aaron-vs- Evans 6/2/2011 17:08 Misc DREW Jones v Kaczmarek 6/7/2011 15:16 HOTDOCS GRETCHEN Aab-vs- Evans 6/2/2011 17:06 Misc GRETCHEN Jones v Acme Trucking 7/26/2011 9:18 Misc GRETCHEN Jones v Acme Trucking 7/26/2011 9:52 STATUS HEATHER Abramowitz-vs- Everley 7/18/2011 16:20 STATUS HEATHER Jones v Acme Trucking 8/16/2011 11:27 STATUS PHIL Jones v Kaczmarek 6/7/2011 15:15 HOTDOCS PHIL Jones v Kaczmarek 6/23/2011 9:59 Trial PHIL Jones v Acme Trucking 8/5/2011 14:09 Misc
An alternative to this output method is to group by one of the columns; in our example we'll add a header for the Note by. It will look something like this. Note how each name is listed once before a group of that user's notes.
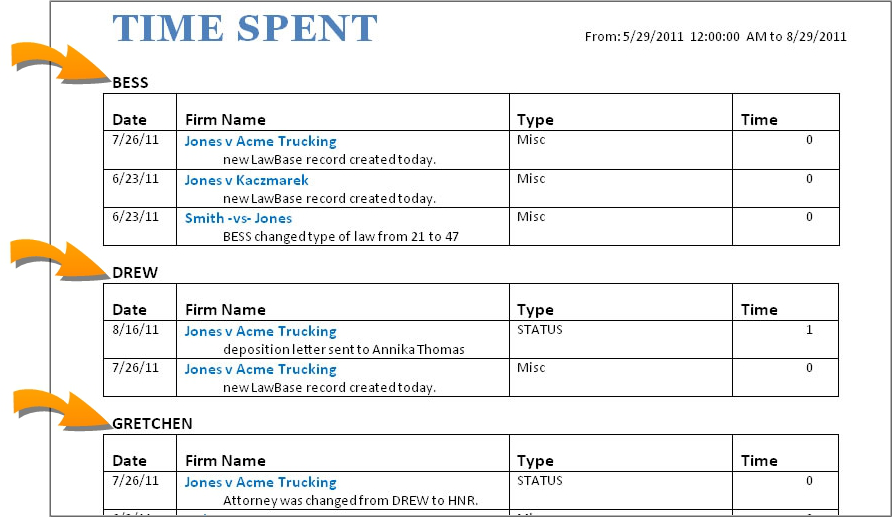
Procedure - Step by Step
These steps assume you are starting with a simple table like the following and walk you through adding the logic to group by the Note by.
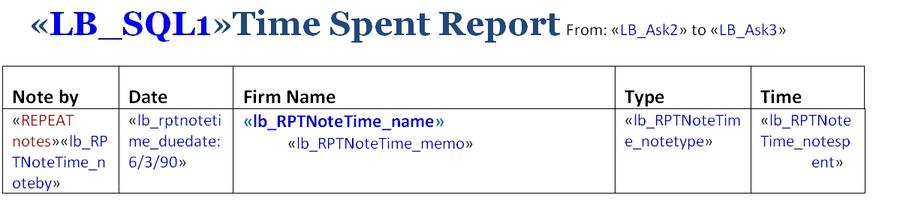
1. Remove the repeat from the table row and position it outside the table. Also, delete the first column and add a heading for the field you want to group by. In this example we're taking out Note by.
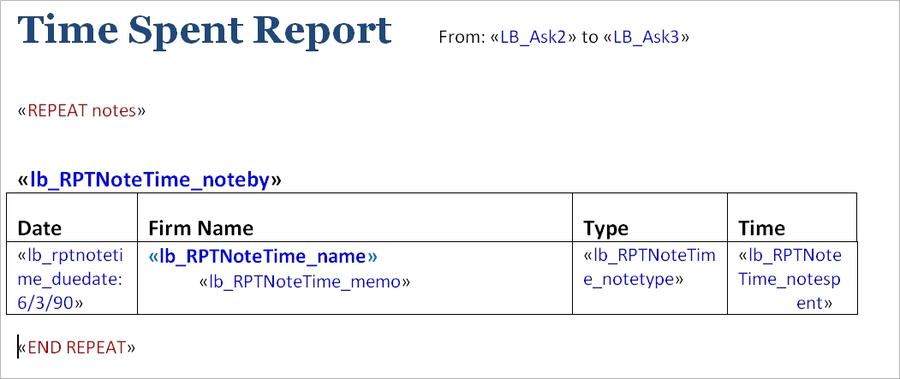
2. Cut the table heading row and paste it below the beginning of the repeat. Add a carriage return (press ENTER) and paste another copy. You'll have two copies of the table heading row and it should look something like this.
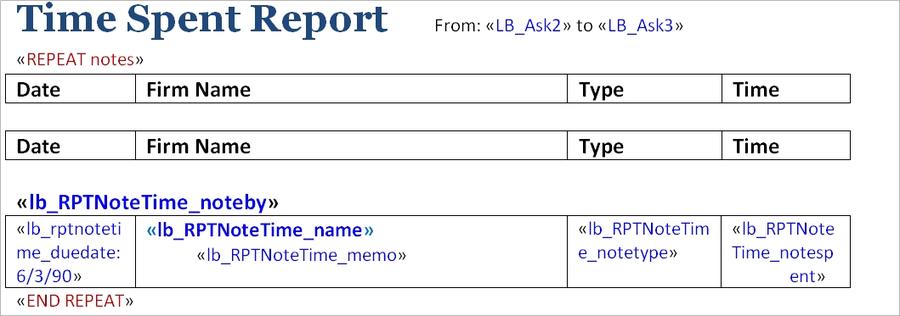
3. Cut the heading, which in this example is lb_rptnotetime_noteby, and paste it above each of the table heading rows.
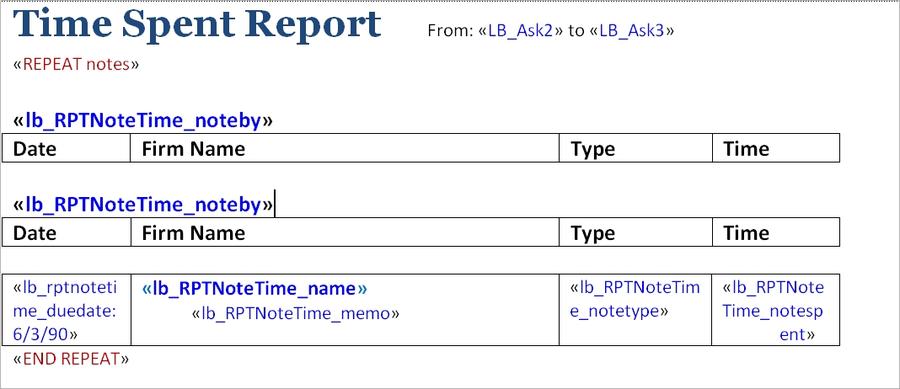
4. Build an IF expression around the first heading text and the first table heading row. The expression should say: COUNTER = 1 Hint: make sure to leave spaces around the equal sign. COUNTER is a built in function that counts the iterations of the repeat.
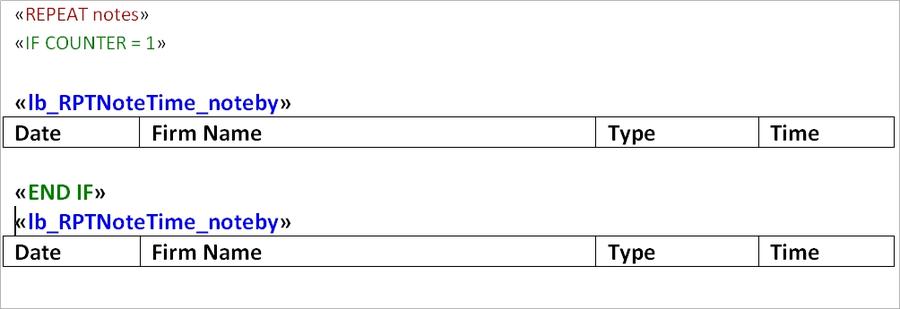
5. Now we want to add an ELSE IF. Select the text starting with the END IF until just after the second table heading row.
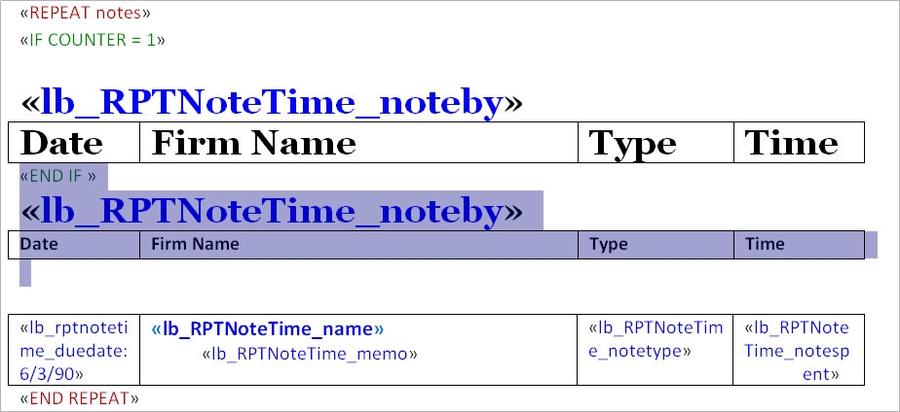
6. Click the IF button and an ELSE IF option is available. Select ELSE IF Expression and enter
something like the following, b_RPTNoteTime_noteby with the variable that you want to use as the field to group by. COUNTER > 1 AND lb_RPTNoteTime_noteby != lb_RPTNoteTime_noteby [ COUNTER -1] What this means is: if this is not the first copy of noteby and if the value is not the same as the previous
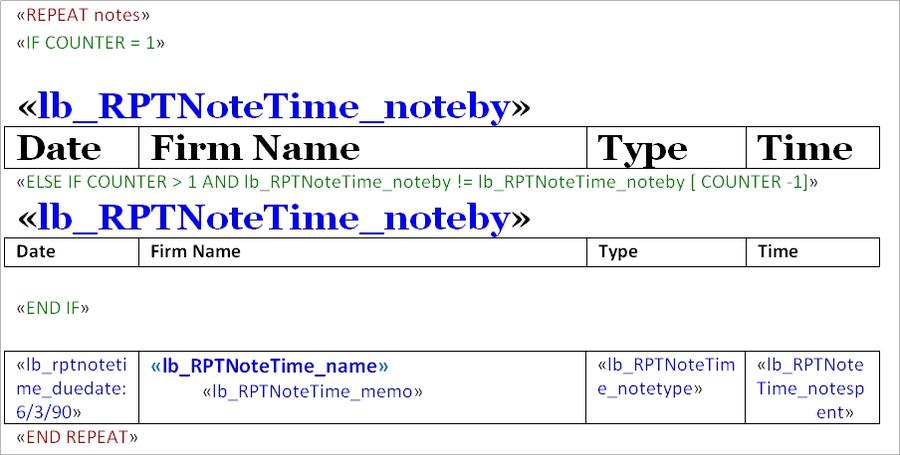
7. Finally, remove any extra carriage returns as these will only result in extra blank lines in the output.
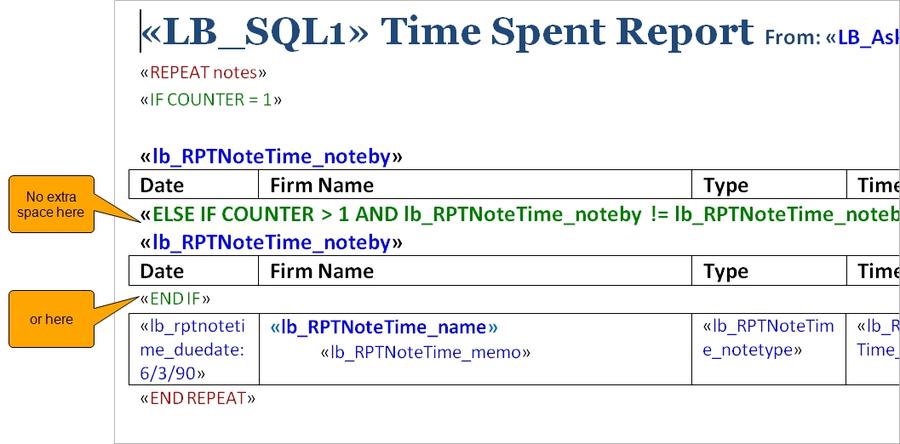
Formatting tips for Microsoft Word users:
- Use Heading 1 to format the text you are grouping by (in this example, the Noteby line), and modify the style to your needs. This will ensure a consistent look to the entries.
You may want each new heading/grouping to appear at the top of the page. You can achieve this with paragraph formatting.
1. Select the letterhead paragraph and open Paragraph Formatting options. In Word 2007 and above, from the Home Ribbon in the Paragraph area, click the Paragraph Dialog icon (small icon at lower right) to access Paragraph Options. In Word 2003, select Format > Paragraph from the menu bar.
2. From the Paragraph dialog, select the Line and Page Breaks tab.
3. Check Page break before. You should get results like these, where each new group appears on a new page.
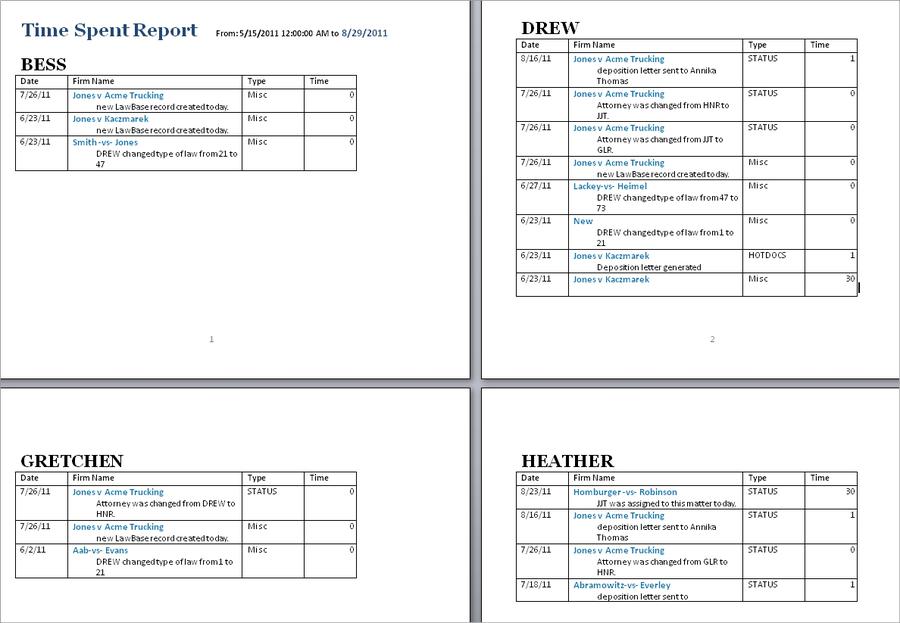
Query Builder
The Query Builder is a powerful tool you can use to create ad hoc reports. Because this functionality may be made available to users as well as administrators, you'll find the content about Query Builder in the User Help.
Searches
LawBase includes a variety of ways to find the data in your System.
- SmartFolders - predefined, saved searches
- Search Tabs - search by FlexBase, searching by the fields you choose.
- Quick Search -search by the most common fields
- Global Search - search the WHOLE database.
- Conflict Search - search fields defined by your administrator
- Query Builder - this powerful tool helps you build complex searches with layered criteria. See the User
Manual for information about the Query Builder.
Search Tabs
You'll find the Search Tabs along the left-hand edge of the main navigator. They typically start just after the SmartFolder tab. There is a tab for each FlexBase in your system . You choose which fields your users can search.
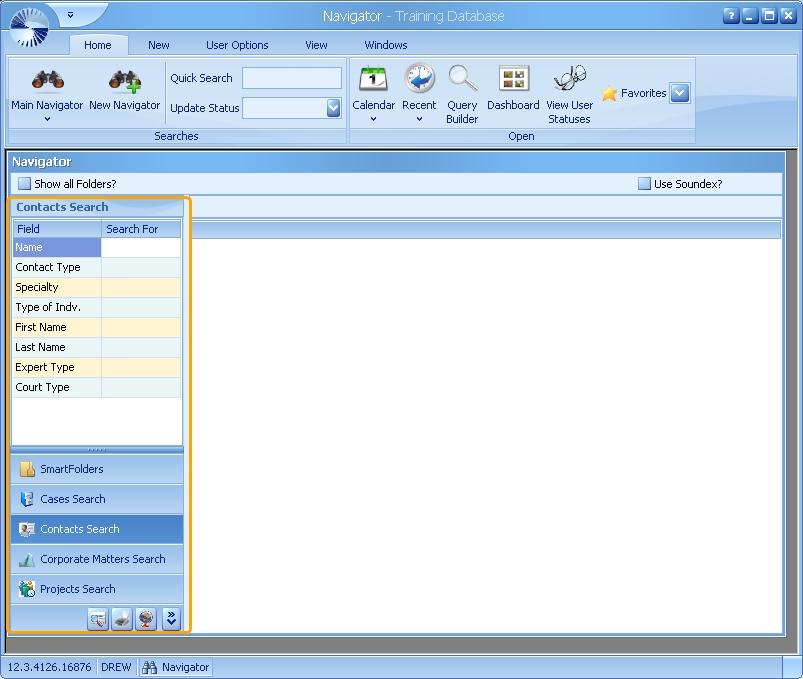
Editing/Adding fields
To edit the fields available in a FlexBase search, right-click in the search area and click Properties
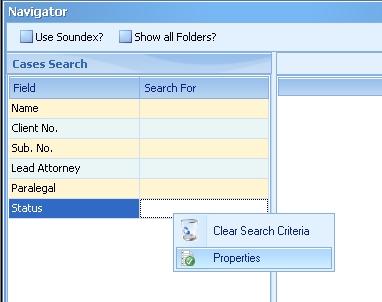
In the Filters Tab, add the fields you want to search by.
1. Select the tab or header.
2. Select the Field Name.
3. Set the display text to read as you wish.
4. Select the type of field (text, date, picklist etc). In this picklist you also have the ability to determine the. way the field is searched. By default, None adds a wildcard to the end of the user's search. If ExactMatch is chosen, the search will only include exactly what the user enters, no more or less, which may be helpful in SSN, phone number, or File Number fields. ExactMatch will NOT read wildcards, even if manually entered by the user. If WildcardStart is chosen, the search will by default include a wildcard at the beginning, whether the user types in * or not.
5. If it is a picklist, select the picklist name.
6. Use the order column to set which field appears first, second and so on.
7. Repeat for each field and click OK to save.
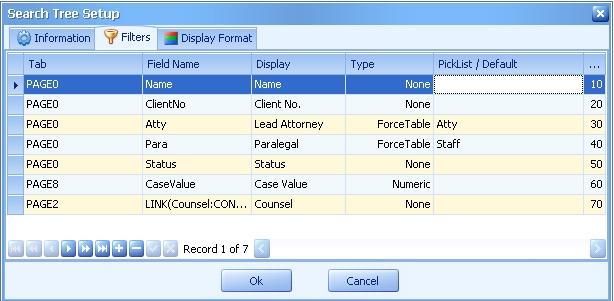
Adding Default Values to Search Fields
You may want one of your search fields to contain a default value.To assign this value, fill in the Picklist/Default column for the field where you'd like the value as DEFAULTVALUE=value
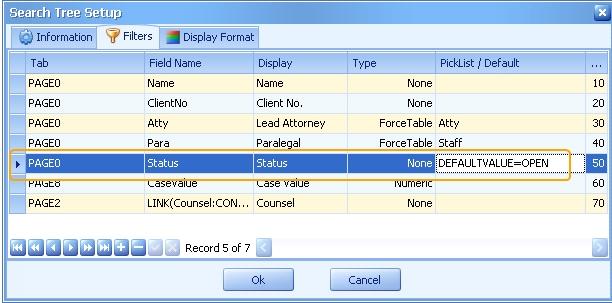
This setting causes the following to appear in the Search Tabs:
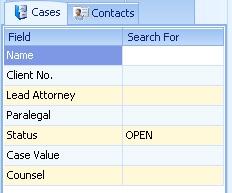
To set the default value to the user's own login (best for a Lead Attorney or Paralegal or Responsible field where login names are used as values) use the following: DEFAULTVALUE=<<LB_USERNAME>>
Common Tabs
To set up rows to search Common Item fields, add a filter with Tab = Header, Field Name = [Common Item]. [FieldName] like this:

Quick Search
Quick Search makes it easy for users to search by the most commonly searched fields. Commonly searched fields often include: case name, matter name, last name, matter and case numbers and contact names. Quick Search appears on the home ribbon; it is also shown on the quick access toolbar.
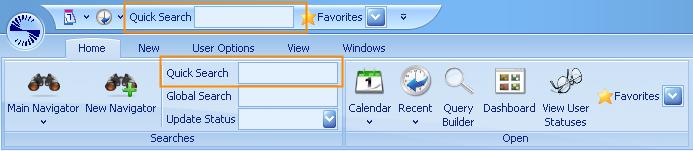
When you type anything into the quick search box, LawBase checks the input against all fields in the quick search setup and finds any matches. The results are displayed in the Results Pane. The search proceeds upon each keystroke, so you can quickly narrow the result list by entering more information.
Quick Search Setup
Set up quick searches in LBAdmin, under System Setup > Cosmetics > Search > QuickSearch. Here are some examples
clientname field on page0 select * from page0 where clientname like ':lookfor%';
firmname field on page0 select * from page0 where firmname like ':lookfor%';
client's lastname on page1 select * from page1 where lastname like ':lookfor%';
name on contact0 select * from contact0 where name like ':lookfor%';
client caselink on page0
select * from page0 where link(client:contact1.lname) like
':lookfor%';
In each of the sql statements above, the :lookfor is replaced by whatever is typed in by the user. The % at the end of each is the sql wildcard that says they only have to type in the first part of the name. Without it, only exact matches would be found.
Sample Search Results
The results will look something like this. You can see in the Quick Search entry we typed sm. The results show all matches; in the third column it indicates where the match was found.
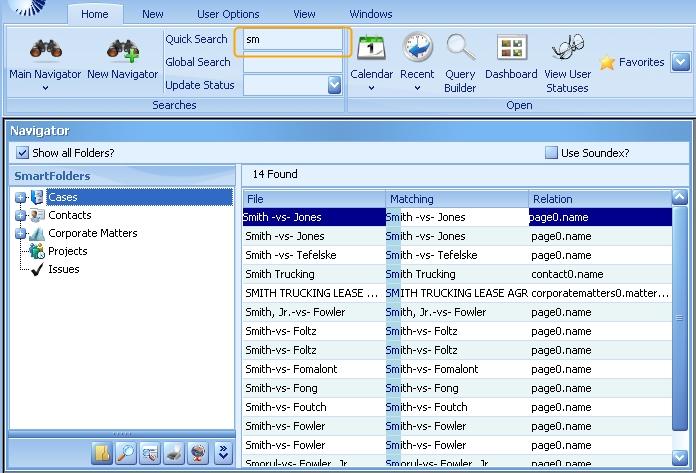
Global Search
Use the Global Search to search every field in every FlexBase that has been designed in LawBase. Depending upon your LawBase design, this may need to search several hundred or even several thousand fields. This means that Global Search may be somewhat slow. When you perform a Global Search, you are also presented with the option of searching all your common items also (for example, your Notes, Calendar, and History Items). Adding these items to the search will make it even slower. However performing a search like his is very thorough and may help in finding any references to any name, or text, anywhere in the normally used database. The resulting matched files will be presented on the Main Navigator result panel so you can access any file that matches the search.
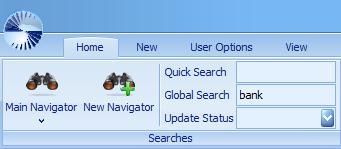
Enabling Global Search
To enable/disable global search: In LBAdmin go to System Setup > System > Cosmetics > Search > Super Search
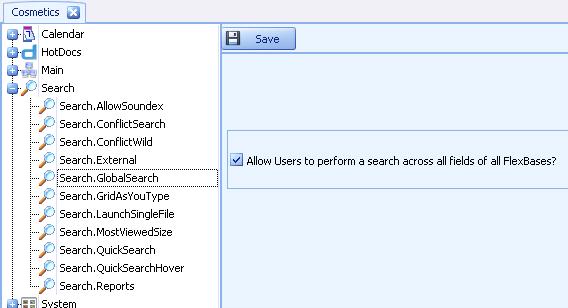
Performing a Global Search
From the LawBase interface:
1. Enter the search item in the Global Search box and press enter.

2. An dialog appears. Select Yes to search common items (this includes notes, calendar and history).
Select No to exclude the common items. Be aware, if you search the common items as well, the search will be slower. However doing a search such as this is very thorough and may help in finding any references to any name, or text, anywhere in the normally used database.
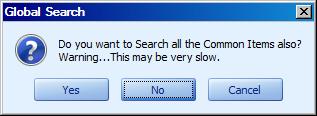
The resulting matched files will be presented on the Main Navigator result panel so that you may access any file that matches the search.
Sample Global Search Results
The results will look something like this. You can see in the Global Search entry we typed john. The results show all matches; in the third column it indicates where the match was found.
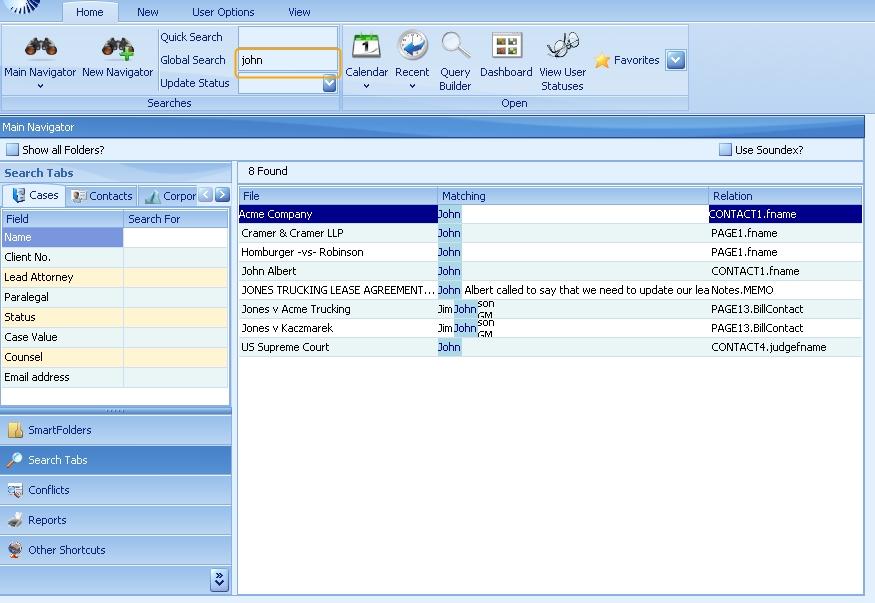
Conflicts
The Conflict Search Tab was originally intended for traditional law firm conflict searching; that is, to search through case files and find whether a party is already represented by the firm and if therefore a conflict of interest exists. Of course you can use the Conflicts Tab for this function. Alternatively you can use it as a System Wide Search. The screenshot below shows the results of a search for jones. Results are found across the system in a variety of fields.
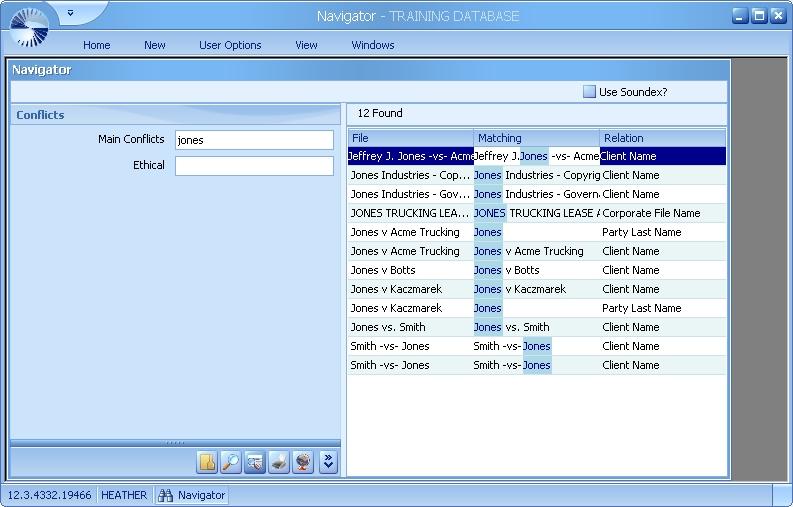
Renaming/Hiding the Conflicts Tab
You can change the name that appears on the tab . Go to System Setup > Cosmetics > Search > Conflict Search. Replace the Conflicts label with whatever you like and click Save. Alternatively, if you'd like to hide the tab altogether, change the label to NONE.
Setting up Conflicts
Only the fields configured through LBAdmin are searched through Conflicts. To set up the fields you want to search:
1. In LBAdmin go to System Setup > Conflicts.
2. On the left add groups to search by. You might group the search fields by usage: name fields, ethical conflicts, business conflicts.
3. On the right, add a row for each field you want to search.
Select the FlexBase and field from the drop-down. Under Relation, fill in the text that will appear with the results as a label.
To search a link field, fill in the Field in the following format: LINK(FIELDNAME:FLEXBASE.FIELD) where FIELDNAME is the field where the link occurs and FLEXBASE.FIELD is the FlexBase and field of the linked entry that you’d like to search.

SQL
Selecting Fields
To return all the fields from the header for all cases select * from page0
To return specific fields from the header for all cases
select casename, matter from page0To sort the results, add an order by clause Select * from page0 order by defld, casename
To find results that match certain criteria, add a where clause. Generally, when you’re searching text fields, enclose what you’re searching for in single quotes.
Select * from page0 where atty
= ‘JJT’
Select * from page0 where (atty
= ‘JJT’ or atty = ‘AJH’)
To search for data in numeric fields, don’t use quotes.
Select * from page30 where
futurewage > 50000
To search dates use single quotes Select * from page0 where defld >= ‘01/01/2009’
To combine criteria, use AND and OR. Use parentheses to group the OR
Select * from page0 where (atty =
‘JJT’ or atty = ‘AJH’)
Greater than/Less Than To find all cases that were entered between Jan 1, 2002 and Feb 1, 2002:
Select * from page0 where defld >=
‘01/01/2002’ and defld <
‘02/01/2002’
Not equal to. != Select all cases that are not closed.
Select * from page0 where status
!= 'closed'
You can combine many of these methods to refine your search
Select * from page0 where (atty =
‘JJT’ or atty = ‘AJH’) and defld
>= ‘01/01/2002’ and defld <
‘02/01/2002’ order by defld
LawBase Database Structure
This section explains how the LawBase database is set up and the relationships between tables. When you design your LawBase screens, underlying tables are created to represent that data. The header information of case files is stored in a table named PAGE0. The tabs are stored in tables named PAGE1, PAGE2, PAGE3 and so on. Any fields on the tab (or header) that require the storage of data are created as fields on the corresponding table with whatever name and type you give them.

On PAGE0 there is also an invisible field named SERIAL. Everything that ties to a particular case (other tabs, Notes,calendar items and so on) uses this SERIAL field to indicate what case the item is tied to. On all other PAGEs (PAGE1, PAGE2, PAGE3…) there is a field called CASESERIAL that points to the PAGE0.SERIAL to tell the system what copy of that tab belongs to which case. Your other FlexBases work the same way except the tables have names like CONTACT0, CONTACT1 - CONTACT#, PROJECT0, PROJECT1 - PROJECT# and so on.
Example - Serial and CaseSerial
You can use the database explorer in LBAdmin to look at your data in a grid format. This can help show how thing are related.
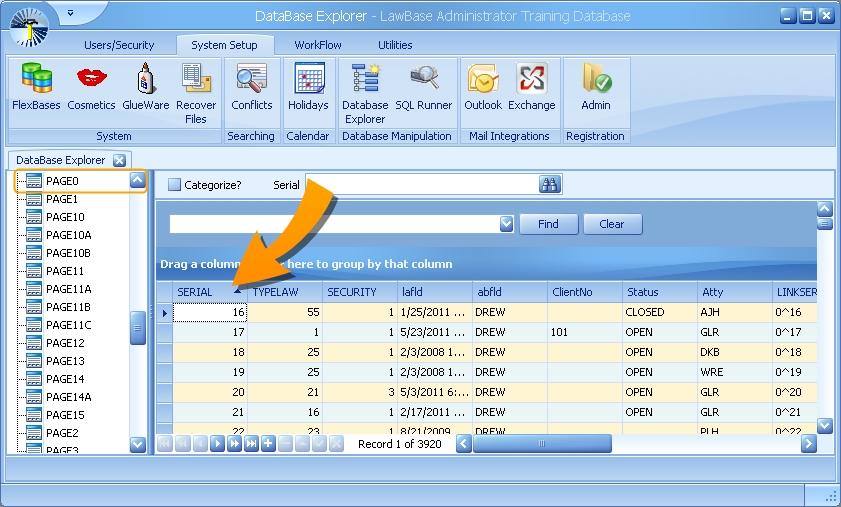
In the screenshot below, there are three PAGE1 entries for the case with the serial number 17. We can say this because there are three entries in PAGE1 where CASESERIAL = 17. Caseserial refers to the serial number in PAGE0.
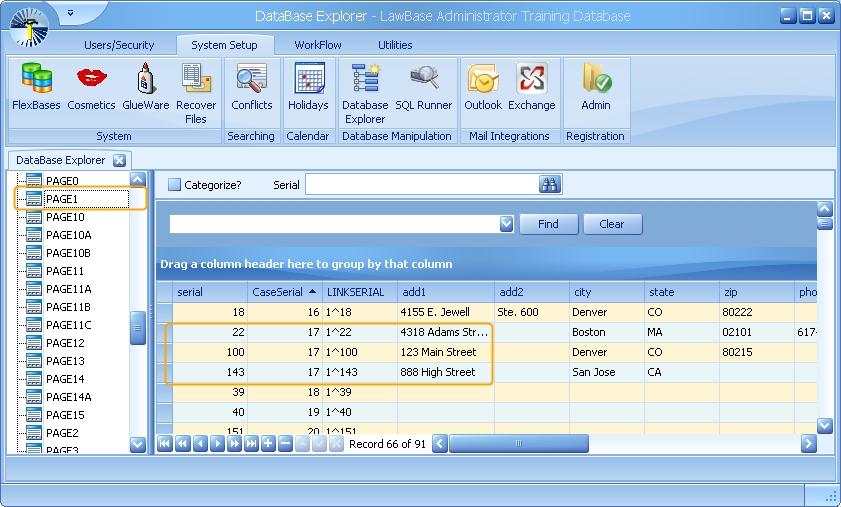
So what does this look like in LawBase itself? This is a repeatable tab. And there are three copies of page1.
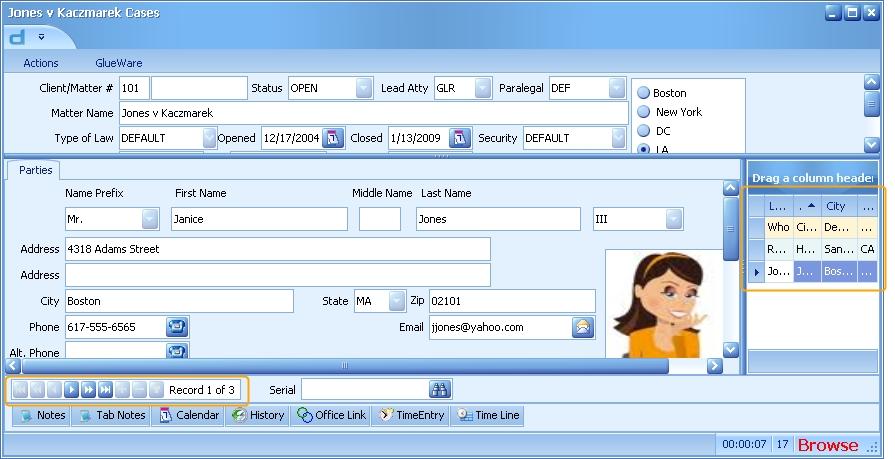
Using SQL to Find Related Items
If you want to use SQL (in reports or in the search tree, for example) and you need to be able to search for things that are on tabs other than the header, you must use the CASESERIAL = SERIAL relation to make sure you’re looking at the correct information.
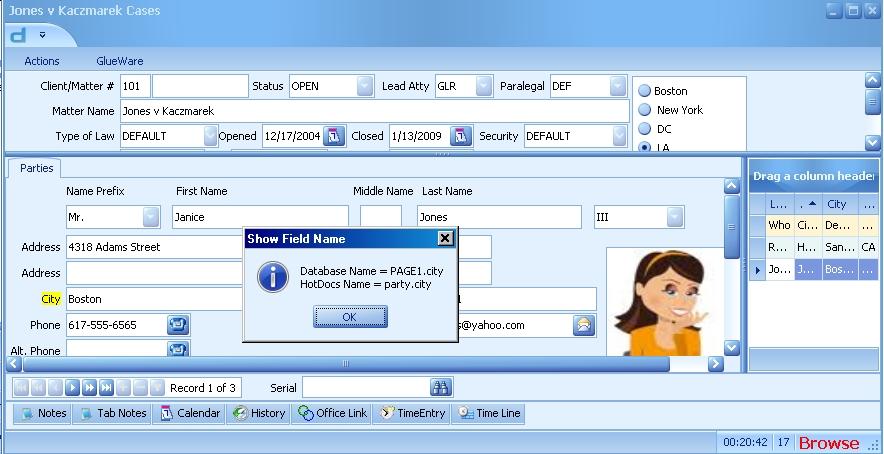
For instance say you want to find all cases where the city field above is equal toDenver. Your SQL statement would look like:
Select * from page0
Inner join page1 on page1.caseserial = page0.serial
where page1.city = 'Denver'
The join is used so that you only get the page1(s) that go with this header (page0). To get more related tabs, add joins for those as well. For example, to find cases in Denver with outstanding expenses over $1000.00 (expenses are tracked on page13)
Select * from page0
Inner join page1 on page1.caseserial = page0.serial
inner join page13 on page13.caseserial = page0.serial
where page1.city = 'Denver' and
page13.outexp > 1000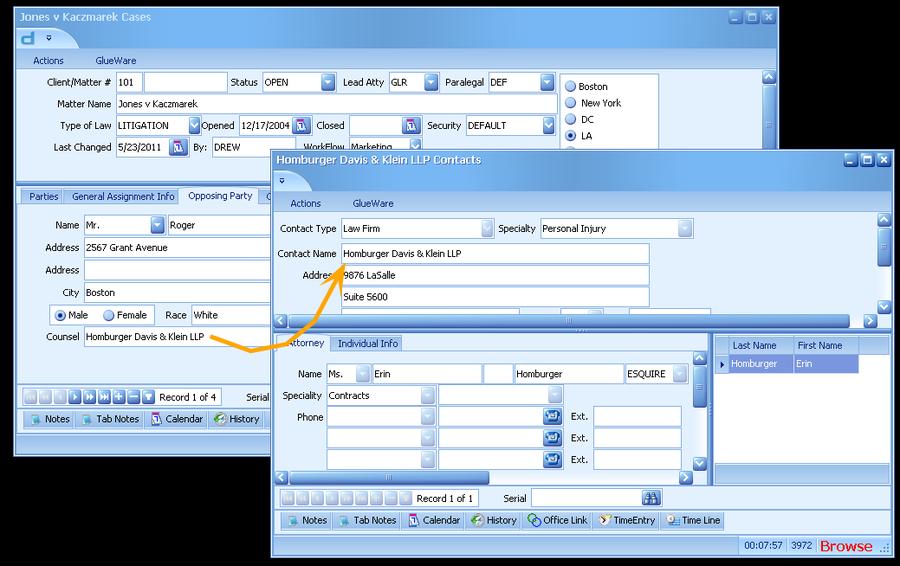
CaseLinks and LinkSerial
When you use a CaseLink field to link to a contact or other file, the system really puts information in that field that indicates what tab and what copy of the tab you linked to that field. The information you see displayed is not stored in the database, but is collected each time so that you can store the information one place and always be up-to-date. In the following example, the Counsel field is a caselink. Even though it displays Homburger, Davis and Klein, the field actually contains the link information 100000^3972
100000^3972 is stored in the LINKSERIAL field of the CONTACT0 table.
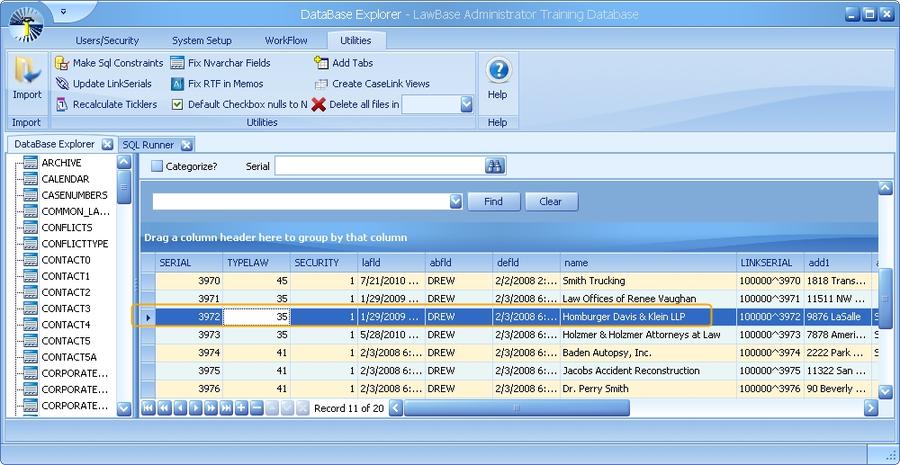
In the number 100000^3972, the 100000 means the field is linked to the table CONTACT0. The 3972 means link to serial number 3972 on the CONTACT0 table. In this way, you can link from any tab in any file to any other file (or contact).
Every LINKSERIAL is simply the combination of the Table that you’re linking to and the particular serial number for the entry.
Using SQL To Find Caselink Items
Just as in the tabs, you can use SQL to find where files are linked to other files. In our above example we looked at the linked contact Homburger Davis & Klein. Let's say we want to find all files where Homburger Davis & Klein appears as the counsel. To find these files, you would use an inner join for CASESERIAL and a subselect for the LINKSERIAL.
select *from PAGE0
inner join PAGE2 on PAGE0.Serial = PAGE2.CaseSerial
where PAGE2.COUNSEL in (select linkserial from contact0 where
contact0.name like 'homburger%')
In the above example, “like” tells SQL to use a wild card and find anything that starts with Homburger.
Security
This section is divided into two main areas:
- Security Areas (below)- describes the security available for each area of LawBase and how it works
- Understanding and Applying Security - describes the general principles of security in LawBase and how to use the security editor.
Security Areas
There are a number of things you can secure in LawBase. They are organized below in functional groups.
User and Calendar
Users - User security includes giving rights to edit picklists, to run LBAdmin and Query Builder, among other things. See User Security for more information.
Calendar - By default, all calendars are viewable by all users. You can apply security to change this. See Calendar Security for more information.
FlexBase and File Security
Set FlexBase security to control who can view a FlexBase, create and delete files and create SmartFolders. File Security - File Security is probably the most frequently applied security area. File security determines what rights users have to individual files (case, contacts, matters and so on). See File Security for complete details. GlueWare, Tab and Field Security are part of File Security. GlueWare security controls who can use third-party integrations or GlueWare. Read about it in GlueWare Security. Tab Security restricts/permits access to tabs. See more in Tab Security. Field Security - Security can be as granular as the field level. See how to set this up in Field Security.
Report and SmartFolder Security
Use these settings to limit who can view and edit Reports and SmartFolders. See more at Report Security and SmartFolder Security.
Administrators
In addition to these areas, you can have some users who are administrators. Administrators have rights to everything. Assign administrators through the user profile.
General Security Principles
In all of the security areas (see Security Overview for a list) you'll see a security editor where you add users and groups, set the rights and the order. Here's a sample of the editor:
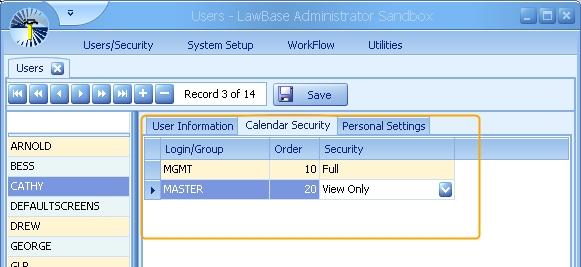
You'll typically find these three columns
Login/Group
Identifies the users and groups which have explicitly assigned security. To add or remove a user or group, use the control bar at the bottom of the screen. Plus (+) to add, minus (-) to remove.
Order
This establishes the order in which security is checked by LawBase and enforced. Lower numbers get checked first, higher numbers next. To set order, type in numbers as needed. If you type in values like 1,2,3,4 you may notice that the values are converted to 10, 20, 30, 40. The order is maintained, it's just easier to make adjustments with some built in gap. For more information about how the order is used to enforce security, see How Order is Applied below
Security
The assigned security for the login/group. Use the drop-down to select the rights you want and the name will be filled in.
How Order is Applied
The numbers you assign in the order column establish the order in which security is checked by LawBase and enforced. Lower numbers get checked first, higher numbers next. Because of this, typically MASTER will be the last entry in the list; that is: the entry with the highest value for Order. Why? Since everyone in is in the MASTER group, if it is checked earlier, then it may restrict rights. Let's consider this for the example above; if we give MASTER an order value of 10 and MGMT 20, it will actually prevent Cathy from editing her own calendar. How? Well, if it checks MASTER first, it'll find she is a member of that group and apply View Only rights and stop checking entries. To ensure that she gets the rights for the MGMT group, we need to set a lower order for MGMT and a higher value for MASTER.
Setting up Security
To apply security:
1. Select the user or group you want to modify from the list on the left.
2. Click the Security tab.
3. Click the plus (+) at the bottom of the screen to add a new user or group.
4. Assign the desired security; assign the order.
5. Click the checkmark at the bottom of the window.
6. Click ok to save.
Calendar Security
Calendar security is managed through User Setup and Group setup; this is available under the Users/Security tab in LBAdmin. By default, all users have rights to all calendars.
Since all calendars belong to users or groups, read about Calendar Security in the User section.
File Security
File Security is applied within each file (i.e., every case, contact, loan item, property and so on). Example: In the screenshot below, the effective security is RE & KX (Real Estate and Contracts).

So what does this mean? Let's take a look in LBAdmin. Go to the Users/Security Ribbon and click File Security. Below we see who has access to RE & KX cases.
- Lucy has full rights
- George has limited editing rights
- Arnold has view only rights
- And the Master group has no rights. Which means that all users other than Lucy, George and Arnold, have no rights to see cases with Real Estate and Contracts security. For more information about Groups and Users see Groups and Users.
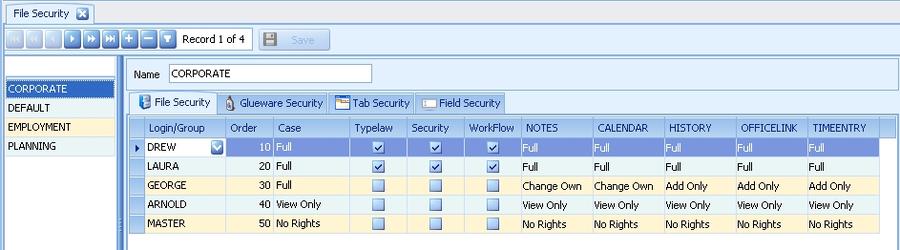
So File security is applied starting with the FlexBase. To give a user rights to a FlexBase, add that user to the applied security definition. For details about creating and applying FlexBase security, see FlexBase Security.
Parts of the Screen

The table below describes the columns available under the File Security tab.

Login/Group Drop-down menu of active users and groups. Sets the order in which security settings are checked. Items are checked in ascending
Order
Sets the order in which security settings are checked. Items are checked in ascending order. Typically the Master group is last.
Case
Select the rights to the FlexBase Item.
Typelaw
Check to allow this user/group change the Typelaw.
Security
Check to allow this user/group change the Security.
WorkFlow
Check to allow this user/group change the WorkFlow.
Notes and other Common Tabs
Assign rights for the selected Common Tab.
Configuring File Security
NOTE: Before you begin creating security profiles, first add users and groups.
1. Go to the Users/Security Ribbon and click File Security. The File Security window displays.
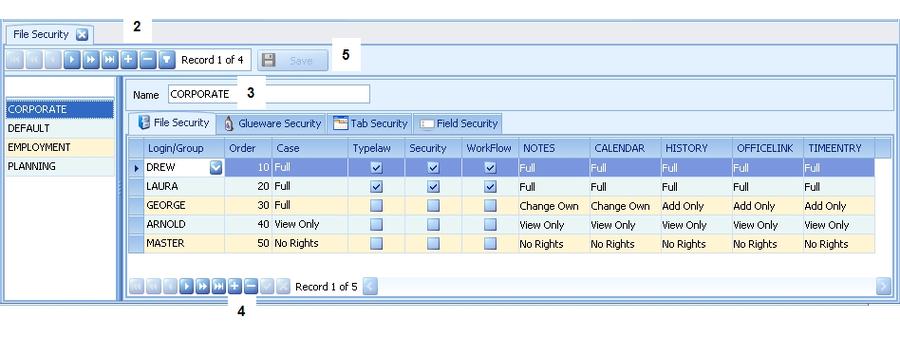
2. Click the + in the middle of the screen to create a new profile, or the cup symbol to duplicate the profile you currently have selected.
3. Name the profile
4. Click the + button at the bottom of the screen to add users and groups to the profile.
5. Save.
LawBase users with Administrative rights can add/edit File Security types from within LawBase by right- clicking on the Security field and selecting "Configure this Security". A dialog box containing the File Security grid for the current value in the Security field will appear and can be edited.
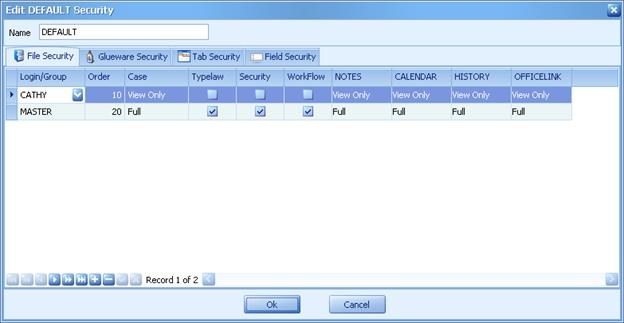
Any changes to the Security will be in effect after the Administrator clicks to Ok button.
This feature will only work if the Security field in the file has already been populated with a value.
GlueWare Security
Apply GlueWare security to give/restrict access to GlueWare (GlueWare is typically access to a third-party application). GlueWare security depends on the main file security. Notice in the example below, the GlueWare settings are all part of DEFAULT file security. Another file security can have different GlueWare privileges.
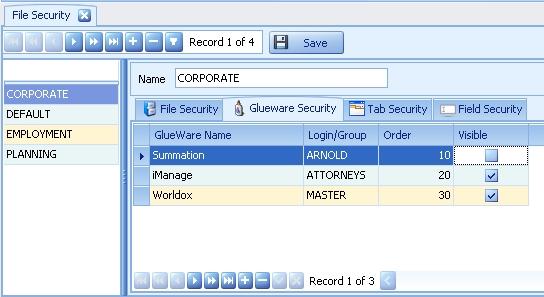
GlueWare Name
This is a read-only list of the GlueWare selections as defined in System Setup > GlueWare.
Login/Group
The user or group for whom you are giving/limiting rights.
Order
The order column is used to set priority; in the example above, the record for George has order 10. Even though George is part of the Master group, the setting for his account is processed first, so he has no rights. For more information about how the order is used, see General Principles.
Visible
Check to make the selected GlueWare visible to the user/group on the same row. Uncheck to hide the selected GlueWare.
Tab Security
Tab security depends on the main file security. Notice in the example below, the Tab Security settings are all part of DEFAULT file security. HIGH PROFILE can have different settings.
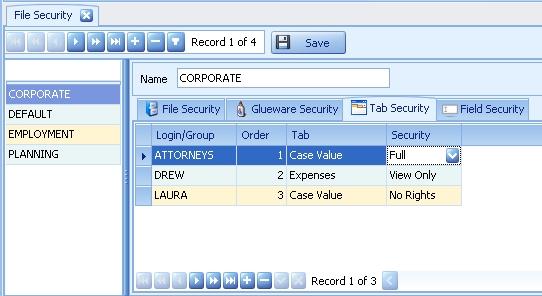
Login/Group Drop-down list of active users and groups.
Order
Sets the order in which security settings are checked. Items are checked in ascending order. Typically the Master group is last. The order column is used to set priority; in the example above, the record for Heather has order 30. Even though Heather is part of the Master group, the setting for her account is processed first, so she has rights, while the Master group does not. For more information about how the order is used, see General Principles.
Tab
Select the tab you want to restrict. The Header can also be restricted. Security Select rights as needed.
You might also be interested in Individual Tab Security, which you can use to restrict access to individual copies of a repeatable tab.
Individual Tab Security
Individual Tab Security is a way to restrict access to a individual copies of a repeatable tab. Unlike the other areas which are managed from within LBAdmin (such as tab, field and file security), individual tab security is applied from within the LawBase interface.
Example In the opposing party tab, we want to hide one of the records from everyone except the management team. Here are the steps:
1. Select the copy you want to add security to. In this example, it's the last visible record which is for Greg Johnson.
2. Right-click on the tab label as indicated by the arrow; here it reads Opposing Party.
3. Select Individual Tab Security.
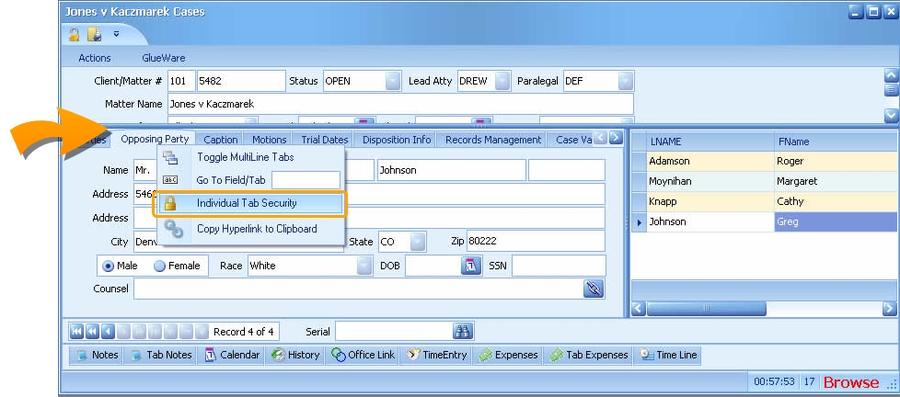
4. Apply security. Here we give full rights to Management (MGMT) and no rights to the master group.
For more information about how the order is used, see General Security Principles.
So now users who are not in the MGMT group will not see a listing for Greg Johnson. Administrators will see all copies of this tab, regardless of the security applied.
Field Security
Apply field security to limit rights to specific fields.Field security depends on File Security. Typically a user would have rights to a file and to a tab but not to the fields where security is applied. When might you apply field security? For specific data where you want to limit who can change it. Examples might be date of birth, date of incident, date file entered into system.
Applying Field Security
From within LBAdmin go to Users/Security > File Security
First choose the File Security, then add records for the specific fields. In the example below, these fields are being restricted as part of the DEFAULT file security definition.
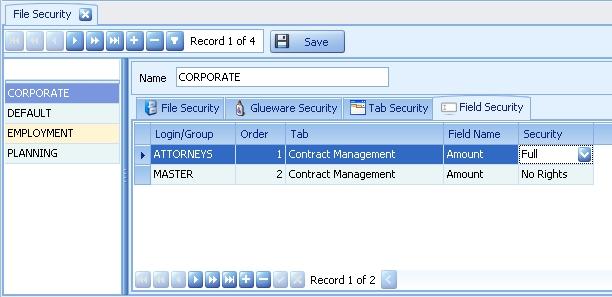
Login/Group
Drop-down menu of active users and groups.
Order
Sets the order in which security settings are checked. Items are checked in ascending order;typically the MASTER group is last. For more information about how the order is used, see General Principles.
Tab
Select the field you want to restrict. Security Select rights as needed.
FlexBase Security
FlexBase Security controls who can view a FlexBase, create and delete files and create SmartFolders.
To manage FlexBase security, from LBAdmin:
1. Go to System Setup > FlexBases
2. A screen like the one below appears. From the list on the left select the FlexBase you want to edit.
3. Click the Security tab to view the settings.
4. Add users and groups as needed and apply the privileges and order needed. For more information about security set up, see General Security Principles.
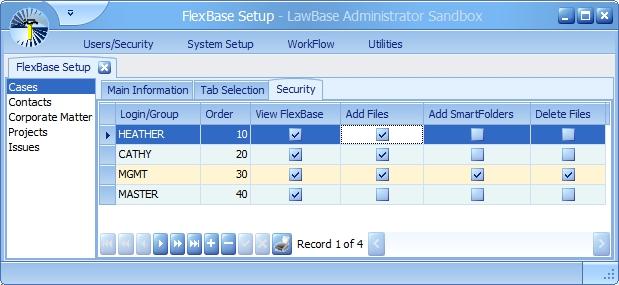
Report Security
Report security includes
- Access to view and run reports
- Giving rights to edit reports
- Viewing and Running Reports
By default, all reports in the report tree can be accessed by all users. To limit access:
1. Select the report you want to modify.
2. Right-click and select properties.
3. Click the Security tab and add users/groups as needed. For more information about how the security editor works, see General Principles.
Editing Reports
- Administrators can edit reports
- You can also give Report editing to select users via User Security. For more information about how to build and edit reports, see Reports.
SmartFolder Security
SmartFolder security includes
- Access to view and edit SmartFolders
- Giving rights to Add New SmartFolders
Viewing and Editing SmartFolders
By default, all SmartFolders in the tree can be viewed and edit by all users. Users with edit rights can change the SQL, the fields, and the security. To limit access:
1. Select the SmartFolder you want to modify.
2. Right-click and select properties.
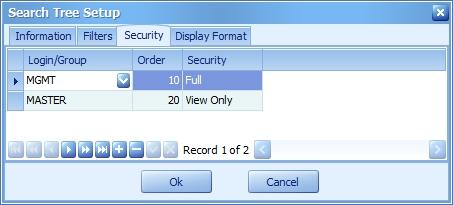
3. Click the Security tab and add users/groups as needed. For more information about how the security editor works, see General Principles.
Adding New Folders
- Administrators can add new SmartFolders
- You can also give rights to create new SmartFolders to select users via User Security. For more information about how to build and edit reports, see Reports.
User Security/Personal Settings
Access User Security from Users/Security > Users.
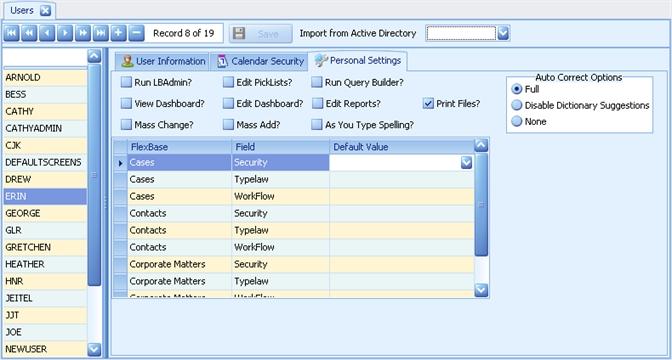
A number of privileges may be given/restricted through the Personal Settings tab. Administrators have all of these rights regardless of what is checked here. Each of the checkbox items is explained below:
As you type Spelling
When this is checked, the selected user will see red squiggles under misspelled words in Rich Text Memo fields.
Auto Correct Options
Select from one of three options: Full - Auto Corrections are enabled and may be sourced from the dictionary as well as from the user's autocorrect list. Disable Dictionary Suggestions - limits AutoCorrections to those defined in the User's AutoCorrection list. None - will turn off AutoCorrections entirely for the selected user .
Edit Dashboards
Check to allow the selected user to Edit Dashboards.
Edit Picklists
Check to allow the selected user to Edit Picklists. Edit Reports Check to allow the selected user to Edit Reports.
Mass Add
Check to allow the selected user to perform Mass Add Operations on SmartFolders.
Mass Change
Check to allow the selected user to perform Mass Change Operations on SmartFolders.
Print Files
Check to allow the selected user to print screens out of LawBase. The user will see a Print Screens to Word option in the Actions ribbon within a file.
Run LBAdmin
Check to allow the selected user to log into LBAdmin
Run Query Builder
Check to allow the selected user to Run Query Builder.
View Dashboard
Check to allow the selected user to View Dashboards
SmartFolders
SmartFolders are a quick way to find the files you need.
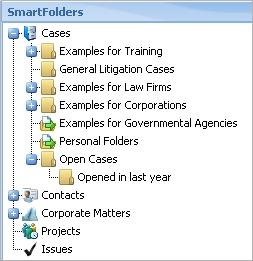
The SmartFolders are organized by FlexBase. In the picture above the Cases SmartFolders are expanded. Note that each SmartFolder is identified by its own icon. Typically, Rule-Based SmartFolders are indicated by a plain file folder image, while drag and drop folders are indicated by a folder with a green arrow.
For more information about each type of of SmartFolders, see Rule-based and Drag-and-Drop.
SmartFolder Context Menus (Right-Click Menu)
When you right-click on any SmartFolder, you'll see a menu like the one on the below. Users who don't have sufficient security won't see all of these commands. A description of these commands follows.
When you right-click on one of the results , the menu offers slightly different options. As with the folder results, users will only see commands that they have rights to. See a description these commands below.
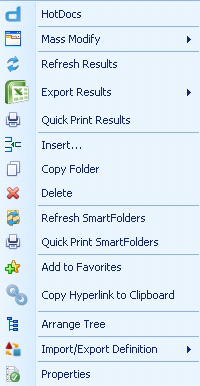
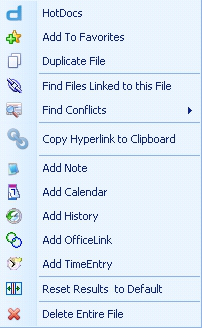
SmartFolder Context Menu Items (Right-Click)
These items appear on the context menu when you right-click on a SmartFolder.
Add to Favorites
Adds the selected SmartFolder to the User's personal favorites.
Arrange Tree
Opens another window where you can arrange folders; that is, change position, move toanother branch.
Copy Folder
Creates a duplicate of the folder which you can use as a model to build a similar folder.
Copy Hyperlink to
Copies the hyperlink of the selected folder to the clipboard. Often this is used for pasting into email.
Clipboard Delete
Deletes the selected folder.
HotDocs
Launches the HotDocs library where you can select a template to assemble for all the files returned from the selected SmartFolder.
Import/Export Definition
Creates a file with the SmartFolder properties. This is a useful and easy way to get SmartFolders from Design/Testing to Production or to/from LawBase Support.
Insert
Creates a new SmartFolder.
Mass Modify
Use this to make bulk changes to the files in a SmartFolder. Choices include: changing common items, creating new common items and running a WorkFlow. For more detailed information, see Mass Modify.
Properties
Exposes the properties of the SmartFolder, including the SQL select, filters, security and display properties.
Quick Print Results
Creates a printable document of the SmartFolder results as they appear in the results pane. The output is not editable.
Quick Print SmartFolders
Creates a printable document of the organization of the SmartFolder tree. The output is not editable. Refresh Results Refreshes the results for the selected SmartFolder.
Refresh SmartFolders
Refreshes the folders displayed.
Results Right-click Menu
Add Calendar Add History Add Notes Add OfficeLink
Select one of these to add a common item to the selected file.
Add to Favorites
Adds the selected file to Favorites.
Copy Hyperlink to Clipboard
Copies the hyperlink of the selected file to the clipboard. Often this is used for pasting into email.
Delete Entire File
Deletes the selected file.
Duplicate File
Creates a copy of the selected file.
Export
Exports the results to an Excel file. You have a choice of with or without file hyperlinks.
Find Conflicts
Runs the Conflict search selected against the particular file.
Find Files Linked to this File
Click this to return results of all the files this file is linked to.
HotDocs
Launches the HotDocs library where you can select a template to assemble for all the selected file. Quick Print Results Prints all the results. The output is not editable.
List Reset Results to Defaults
Resets columns to default widths. Also restores the original sort on the results and sequence of columns.
Rule-Based Folders
Rule-Based SmartFolders are saved searches; what this means is no one has to manually add files to a folder, the folders find files that match saved criteria.
Examples of Common SmartFolders
Below are some very commonly used SmartFolders
- All files
- Files by attorney
- All pending files
- All files of a particular type (litigation, personal injury, real estate, and so on)
- Files by client
How SmartFolders Work
Rule-based SmartFolders are saved searches, so they don't actually hold any data; the only data saved by a rule-based SmartFolder is the SQL which does the search. So altering or deleting the folder does not change any files.
Creating Rule-Based Folders
To create a rule-based SmartFolder:
1. Identify where you want to create the folder. To create a folder that is the child of an existing folder, select the folder. Alternatively, select the root of the tree.
2. Right-click and select Insert ... .
3. A new SmartFolder dialog appears
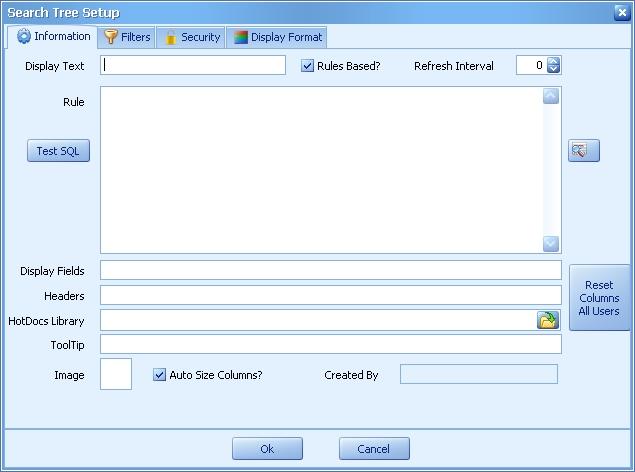
4. Name the folder. Enter the name into the Display Text field.
5. Make sure Rules Based is checked.
6. Enter an SQL statement into the Rule field. To get help building a select, use the Query Builder button which appears to the right of the Rule field.
7. At this point, you have enough to use the SmartFolder. You might like to test the SQL select with the Test SQL button. For information about the other fields, consult the table below.
8. Click OK to save and exit the SmartFolder setup
Parts of the SmartFolder Information Screen
Auto Size Columns?
Check this if you want the columns to resize according to the width of the SmartFolder Results pane. Uncheck if you would like to utilize the horizontal bar at the bottom of the SmartFolder Results pane (useful if your SmartFolder has a lot of Display Fields).
Display Fields
Enter the specific fields you would like to appear in the results pane. You can skip this and the default display fields for the FlexBase will be used. For more information about Display
Fields
see FlexBase Set-up.
Display Text
The Name of the folder; this is what is displayed in the tree.
Headers
The friendly labels that appear in the SmartFolder results pane. These are optional; if you don't fill these in, you'll see the field names.
HotDocs Library
Fill this in to use a different library than the standard library when users assemble HotDocs templates from the SmartFolder. If this is not filled in, the standard library is used. NOTE: The HotDocs Library set in the SmartFolder properties will only launch when the HotDocs option is selected after right-clicking on the SmartFolder itself. Right-clicking over a file in the SmartFolder results and selecting the HotDocs option will result in launching the default library (as assigned in LBAdmin).
Image
Right-click to load a custom image to identify the SmartFolder. For best results use 16 x 16 png files. Refresh Interval Sets how frequently the results will auto-refresh. Set a time in minutes.
Reset Columns All Users
When editing the order of columns or grouping in a smartfolder, use this button to clear the savepos for users not currently logged in the system so those users will see the smartfolder as it is designed. When pressed, this message will appear:
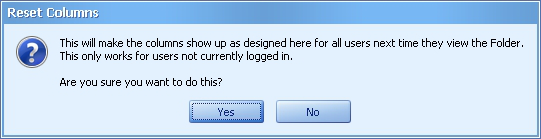
Rule The Rule is the SQL select statement used by the SmartFolder to search. Rules Based
Check this if the folder should use the rule in the Rule Field. If this is unchecked. the folder is a drag and drop. Test SQL Click this to test the syntax of the SQL. ToolTip Optional hint language that appears when hovering over Smartfolder.

Use the query builder button to build the rule. You can use this button to create a new rule, but you can't edit an existing rule with this button. NOTE: It is possible that QueryBuilder will create an alias name, rather than the actual field name, to aid in the display of results. Make sure that in the Smartfolder display properties you reference whatever field name the SQL is referencing.
Changing a Rule-Based Folder to a Drag and Drop Folder
There are two ways to change a Rules Based folder to a Drag and Drop folder:
- On the Search Tree tab, simply drag cases into your Rules Based folder. If you drag a case into the
folder which does not conform to the rules which you have set up, LawBase will ask you if you want to make this folder a Drag and Drop folder.
- Answer yes to begin using this folder as a drag and drop folder.
-or-
- Right click on the folder and select Properties... from the popup list.
- On the top of the Search Tree Setup dialogue box, click on the Rules Based? box to remove the check mark.
Changing the Formatting of a SmartFolder
NOTE: To change the formatting of a SmartFolder, you must first have the proper security access to perform the task. If you are not sure whether or not you are able to make these changes, contact your LawBase administrator. To change the settings of a folder:
1. Right click the SmartFolder you would like to change
2. From the popup list, select Properties...
3. Make your desired changes
SmartFolder Examples
Cases without a Status Note
select * from Page0 where page0.status='OPEN' and not exists(select serial from NOTES where caseserial=Page0.serial and NOTETYPE='STATUS') order by mattername
Cases by Login – My cases for the current user
Select Page0.serial, Page0.security, Page0.name, Page0.clientno, Page0.matterno from page0 where page0.status = 'Open' and page0.atty = '<<lb_username>>'
Cases without a Status Note for a specific time frame
Finds all active cases with no status notes from the past 90 days. select * from Page0 where Page0.status='ACTIVE' and not exists (select serial from NOTES where caseserial= Page0.serial and NOTETYPE = 'STATUS' and DUEDATE > DATEADD(day,-90,:CurDate)) order by order by mattername
Calendar Items for Today
select * from PAGE0,CALENDAR where PAGE0.SERIAL = CALENDAR.CaseSerial and CALENDAR.DUEDATE >= :CurDate and CALENDAR.DUEDATE < DATEADD(day,1,:CurDate)
Calendar Items for One Person
select Page0.Security, Page0.Serial, Page0.CaseName, Calendar.DueDate, Calendar.What, TicklerNames.Login from Page0 inner join Calendar on PAGE0.SERIAL = Calendar.CaseSerial inner join TicklerNames on TicklerNames.CalSerial = Calendar.Serial where Calendar.Status = ‘Pending’ and TicklerNames.Login = ‘DREW’ order by Calendar.DueDate
All Notes entered today
select page0.serial, security, lname,fname,noteby, notetype, notespent, substring(cast(duedate as varchar(18)),13,8) as d1 from Page0, notes where PAGE0.SERIAL = NOTES.CaseSerial and NOTES.DUEDATE >= :CurDate and NOTES.DUEDATE < DATEADD (day,1,:CurDate) order by notes.duedate desc
All Notes entered today for one person only
select page0.serial, security, lname,fname,noteby,notetype, substring(cast(duedate as varchar(18)),13,8) as d1,duedate from Page0, notes where PAGE0.SERIAL = NOTES.CaseSerial and NOTES.DUEDATE >= DATEADD(day,-1,:CurDate) and NOTES.DUEDATE < DATEADD(day,1,:CurDate) and noteby='Kermit' order by notes.duedate desc
No Recent Notes
Searches where notes have not been made in the last 90 days select * from page0 where exists (select * from notes where NOTES.CASESERIAL = PAGE0.SERIAL and NOTES.DUEDATE >= DATEADD(day,-90,:CurDate) and NOTES.DUEDATE < '01/01/2011')order by MATTERNAME
No recent notes from open cases
Excludes closed and suspended cases. select * from page0 where status not in ('CLOSED','SUSPENDED') and exists (select * from notes where NOTES.CASESERIAL = PAGE0.SERIAL and NOTES.DUEDATE >= DATEADD(day,-90,:CurDate) and NOTES.DUEDATE < '01/01/2011')order by MATTERNAME
No Recent Calendar Items
select * from page0 where status not in ('CLOSED','SUSPENDED') and exists (select * from notes where NOTES.CASE_SERIAL = PAGE0.SERIAL and NOTES.DUEDATE >= DATEADD(day,-90,:CurDate) and NOTES.DUEDATE < '01/01/2011' and not exists (select * from calendar where case_id=page0.serial))
Like Statements
Select * from page0 where casename LIKE 'Jones%'
Not Like Statements
Select * from page0 where casename NOT Like '%jones%'
Drag and Drop SmartFolders
Rule-based SmartFolders are essentially saved searches, but you can also have searches that don't depend on rules these are called Drag and Drop folders. Drag and Drop folders are best used to organize items which can't be organized in a Rules Based Folder. This would include cases which are currently very active and are therefore constantly being referenced.
Creating a Drag and Drop Folder
To Create a Drag and Drop Folder:
1. Identify where you want to create the folder. To create a folder that is the child of an existing folder, select the folder. Alternatively, select the root of the tree.
2. Right-click and select Insert ... .
3. A new SmartFolder dialog appears
4. Make sure that the "Rules Based?" check box is unchecked.
5. Name your new folder by typing its title into the Display Text field.
6. Click OK.
Adding Files to a Drag and Drop Folder
To add files to a drag and drop folder, locate the file you want to add using a search or another SmartFolder. Drag the the file(s) to the drand and drop folder.
Keep in Mind
But do exercise caution when altering or destroying Drag and Drop folders, because many times the specific collection of files they reference might be quite tedious to reproduce (you would have to drag every file back into the folder.)
Changing a Drag and Drop Folder to a Rule-Based Folder
1. Right-click on the folder you want to change.
2. From the right-click menu, choose Revert to Folder Rules.
-or-
1. Right-click on the folder you want to change.
2. From the ight-click menu, choose Properties...
3. Check the "Rules Based?" checkbox.
4. Click OK.
Both methods tell LawBase to use the SQL defined in the Rule area of the Search Tree Setup. If no rules are defined, the folder will not return any results.
Filters
Some SmartFolders may return a large number of results. You can give your users another way to narrow down the results - by adding filters to SmartFolders. Filters, when they are set up, appear at the bottom of the results pane. In the example shown here, typing in the filter robert limited Laura's cases from over 1,300 to a set of five.
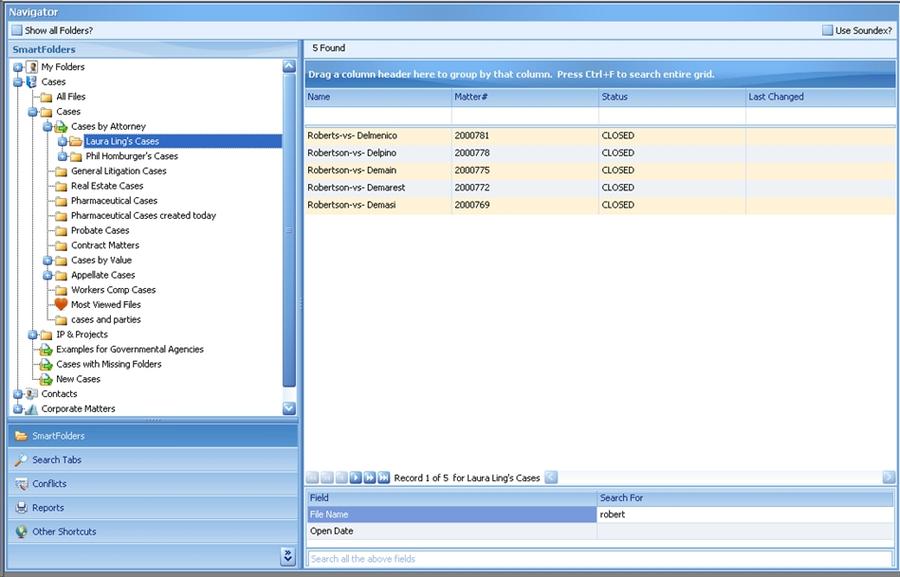
How to Use Filters
Instead of creating numerous similar SmartFolders, such as Linda's Real Estate Cases, Fred's Real Estate Cases and so on, you could use filters. In this situation, you would set up a folder for Real Estate Case and add a filter that searches by the Attorney field in the header.
Creating Search Filters on SmartFolders
To add search filters to a SmartFolder:
1. Right click on the folder you would like to modify and select Properties.
2. Click on the Filters tab.
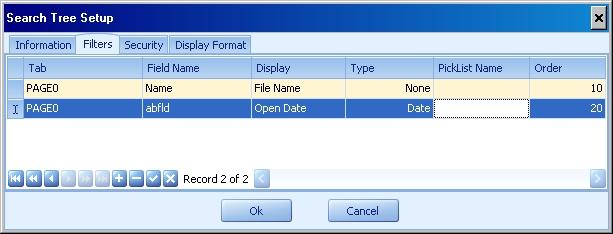
3. Click the plus button at the bottom to add a new filter
4. In the Tab column, select the Tab that holds the information you would like to filter. In the example above we wanted to filter by file name, so we selected the header.
5. In the Field Name column, select the field name.
6. In the Display, enter the label you want your users to see.
7. The Type column is used to distinguish different data types.
None Text Fields Date Date Fields Numeric Calc fields Table Non validated picklists Force Table Validated Picklists
8. The Picklist name is only needed if you are filtering on a picklist field.
9. Set the order from lowest to highest to establish what order the filters appear in .
7. Click OK to save.
Search all the above fields
When you add filters to a SmartFolder, you will notice that an additional field appears stating Search all the above fields.

This enables the user to search the fields with defined filters all at once for the same piece of information.
Security
There are two kinds of SmartFolder security: FlexBase level and Folder level
- FlexBase Level Security determines who has the rights to create SmartFolders
- Folder Level determines who has edits to view, modify and delete SmartFolders.
FlexBase Level Security
From within LBAdmin, go to System Setup > FlexBase Setup. Select the FlexBase from the list on the left and then click on the Security tab. Here is where you can give rights to users to add SmartFolders. And as with other security setups in LawBase, you can also set rights for groups.
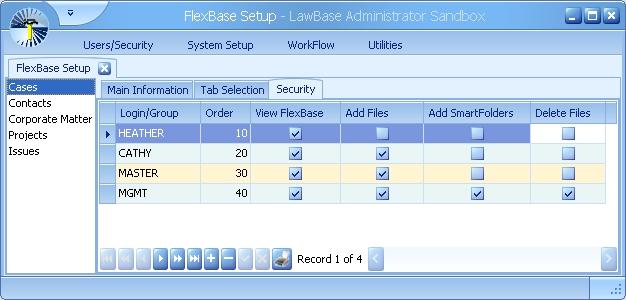
SmartFolder Level Security
To set the security for an individual SmartFolder:
1. Right-click the SmartFolder and select Properties.
2. Click the Security tab.
3. Click the plus at the bottom to add a new row.
4. Select a user or group from the drop-down and set the appropriate rights.
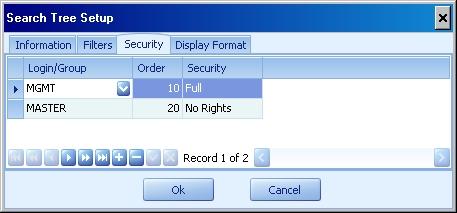
Create SmartFolder through QueryBuilder
You can create the logic for a new SmartFolder by using QueryBuilder.
1. Insert a new SmartFolder in your SmartFolder tree. In the Properties window that opens click on the QueryBuilder button on the right side of the window:
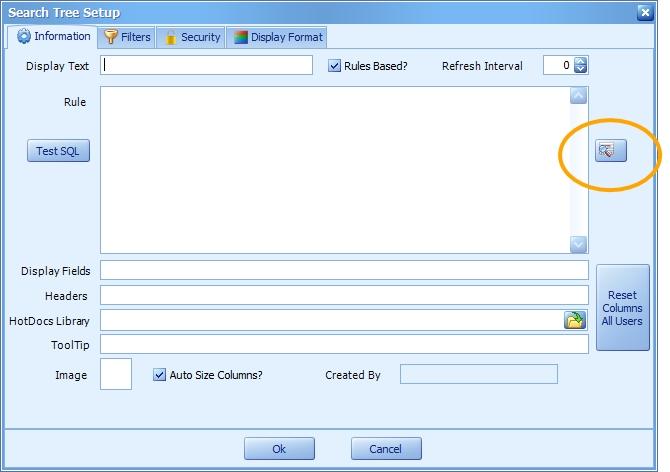
2. Build your query in QueryBuilder as usual, including dragging and dropping the fields you want to see displayed in the smartfolder to the Results tab at the bottom of the QueryBuilder. In addition, if you'd like the field labels used as the display names in the SmartFolder, be sure to check the 'Use Attached Labels for Headers' checkbox in the QueryBuilder Results ribbon.
3. In the QueryBuilder Results ribbon, select the Send to SmartFolder option:

4. The SQL statement you built in QueryBuilder will automatically populate the Rule in the SmartFolder properties, the Display Fields line will populate with the fields you dragged and dropped to the Results tab, and the Header line will populate with the attached label texts for those fields in the Display Fields line.
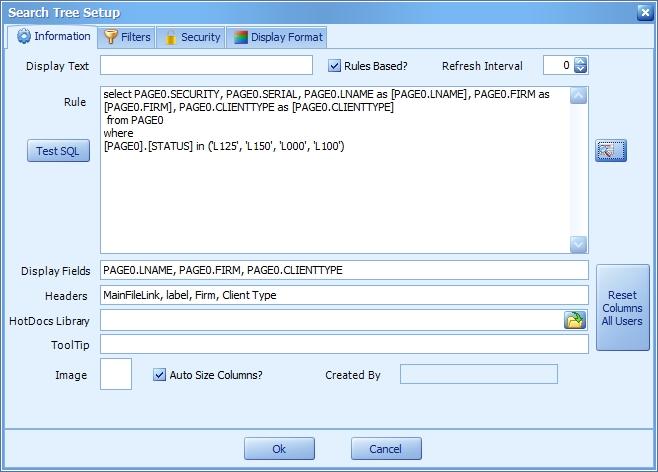
SmartFolder Result Highlighting
SmartFolders can be color-coded to make it easier to find things. Below is an example. The results are color- coded by the case value; the darker the green, the higher the value.
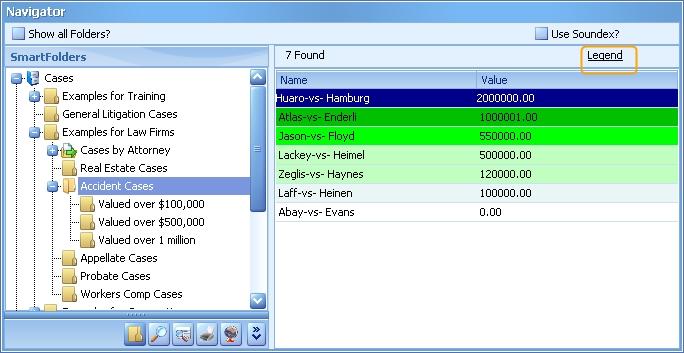
To find out what the color means, hover the mouse over the Legend.
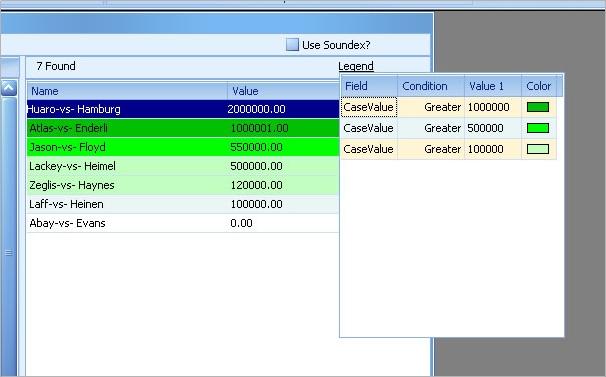
Configuring Color Coded Results
1. Select the folder you want to modify from the search tree.
2. Right-click and select Properties
3. Select the Display Format tab.
4. Click the plus button to add a row and select the fields and settings you need. You can set a condition upon any one field at a time (if you need to do something based on more than one field, then you must select the combination of the fields using SQL to get the combined results into one sql field).
Here is an example of what the setup may look like:
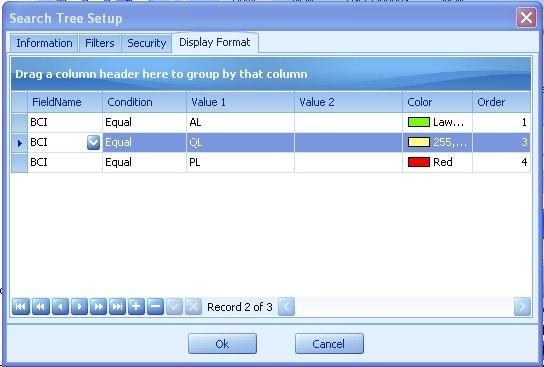
This indicates that when the BCI field is Equal to AL we want it to show in green. When BCI is Equal to QL we want yellow and when it's PL we want it to be Red. It's possible to have multiple display formats on multiple fields. Consider the following:
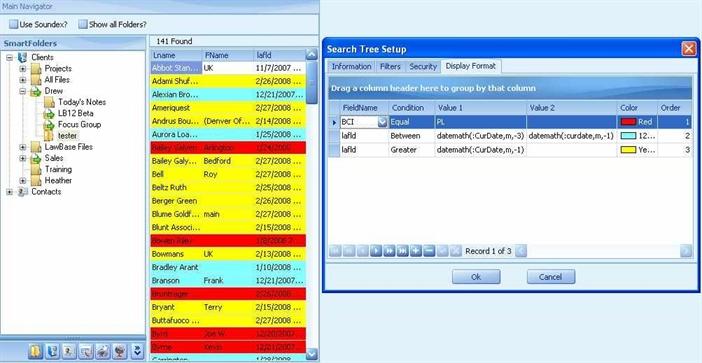
We have three rules and they are applied from top to bottom. If a record matches multiple rules, only the first match will be applied. For instance in this example, if a BCI is Equal to PL and the lafld is Greater than one month from today then it will show up in Red since the BCI rule comes first. This example says to display all BCI of PL as Red, all files with a lafld between three and one month ago as Cyan and any lafld Greater than one month ago in yellow. As can be seen in the example, you may use DateMath functions to calculate where values should fall.
Arranging SmartFolders
You can arrange how SmartFolders appear in each FlexBase grouping as well as move the FlexBase groupings up and down as you like.
Arranging FlexBase Groupings
SmartFolders are grouped together by FlexBase and they appear in a default order (by FlexBase Serial) but you can rearrange them. To move a FlexBase Grouping up or down, right-click on the grouping and choose Move Up or Move Down.
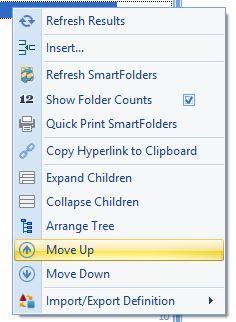
Arranging SmartFolders
When you create a SmartFolder it is automatically inserted under whatever folder you right-clicked on. But you can move folders around as you like. To change the position of a SmartFolder, right-click on any folder in the SmartFolder grouping where you want to make changes and select Arrange Tree. To move folders, simply click and drag them where you want them to be. There are Undo and Redo arrows at the top of the tree.
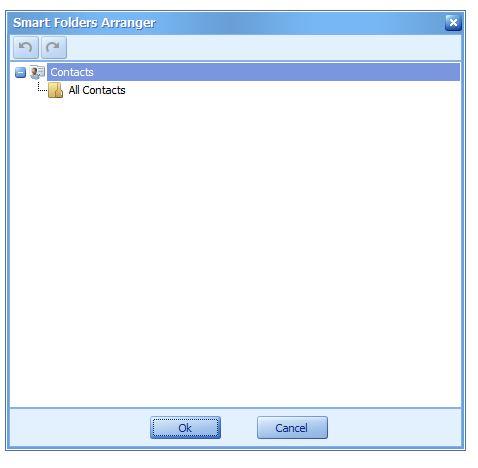
Speeding up SmartFolders
Over time you may find that SmartFolders aren't returning results as quickly as you might like. You may be able to improve the speed using the following tips.
Set-up
Get into SQL Server Management studio and open two query windows. Into one window copy the SQL statement in question and break the statement into logical lines using returns. Add the following two sql statements at the top that will tell SQL to show usage statistics:
Set statistics time on
Set statistics io on
Along with your results, there will be an additional messaging tab that reports the speed of the query.
Tips
1. Only select the fields you need rather than using select *.
2. Look for any unused tables and remove them. Unused tables are tables that are in the from section, but aren't used in select portion, the where or order by sections.
3. Change any old style joins =* and = to the more standard "inner join" or "left outer join" syntax
4. Look for any criteria that don't need to be searched for.
5. Move any where sections for the main page to the start of the query. SQL can "short circuit" results, meaning once it finds something that doesn't match, it stops looking at that row. So put things that can take awhile to search (like subqueries) at the end.
6. Change any (field = a or field = b) to ins and any field != a and field != b to "in" and "not in"
7. Change any "serial in " type logic to "exists" logic if possible.
8. Look at the statistics portion that shows scan counts etc for the worst offenders and try to fix them up. Here's a rule of thumb about what slows SQL down: High scan number = bad, NestedLoop = worse, TableScan behind a NestedLoop = worst.
9. Try using Set ShowPlan_all on.
10. Try to see if putting a SQL index on any of the fields makes sense.
11. Use SQL's built in Tuning Advisor to suggest other changes to the query. It's a good idea to run the query after each step to make sure you're getting the same number of results as your original and to see if your changes have sped it up enough so you don't have to go any further.
Hyperlinks in SmartFolders
Commonly used URLs can be used in SmartFolders without any special configuration; these include websites, and links to files. This section describes how to activate a few other types.
Email (mailto) links
Click on an email address in SmartFolder output to launch a new email message.
Phone links that dial the phone
Click on a phone number in SmartFolder output and dial the phone. NOTE: This is only supported on TAPI systems.
Links to copies of repeatable tabs/grid tabs.
The hyperlink opens the resulting case and the specific copy of the tab linked.
Links to calendar items and notes The hyperlink opens the specific calendar entry or note.
Email and Phone links
The data for email and phone links may already be in your SmartFolders -- a simple change to the display properties will activate the links. The SmartFolder below uses the following SQL select page0.serial, page0.security, page0.name, isnull(page1.lname,'') +' '+isnull(page1.fname,'') as contactname, page1.email, page1.phone from page0 inner join page1 on page1.caseserial = page0.serial where len(email) > 0 order by lname, fname
And the following Display fields: Name, Email, phone, contactname
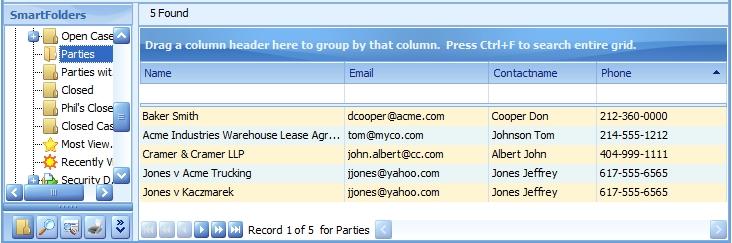
To activate the Email address as a mailto link, we just need to make a small change to the Display fields. Enclose the phone and email fields with parentheses and prepend the word hyperlink. Here's how the Display fields might look. Name, hyperlink(Email), hyperlink(phone), contactname
Now the same fields display active hyperlinks.
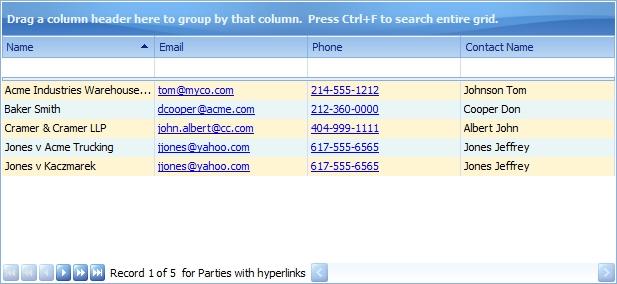
Customizing the URL Display in the Results
When returning dates and numeric data as the display of your URL, you may find it handy to use the SQL functions CAST and CONVERT in the substring of your query. The substring is everything after the ‘~’ (tilde) in your query and defines the display returned. Consult a good SQL reference for more information about these functions.
In a LawBase hyperlink, the syntax might be something like this: 'url:lawbase:linkserial='+page.serial+'~' + substring(convert(varchar (20),page.fieldname,1),1,20) + ' ' as link
Hyperlinks to Copies of Tabs
To add a hyperlink to a copy of a tab, we need to add URL code to the SQL in the smartfolder. This is nearly the same as the SQL in the email/phone example but we've added the highlighted part: select page0.serial, page0.security, page0.name, isnull(page1.lname,'') +' '+isnull(page1.fname,'') as contactname, page1.email, page1.phone, 'url:lawbase:linkserial='+page1.linkserial+'~'+isnull(page1.lname,'') + ' ' + isnull(page1.fname,'') as partylink from page0 inner join page1 on page1.caseserial = page0.serial where len(email) > 0 order by lname, fname
This added line means we'll display the first name and last name from our page1 as the alias partylink. Then, like we did with the phone and email above, we need to adjust the Display fields. Name, hyperlink(Email), hyperlink(phone), contactname, hyperlink(partylink)
Here is the full Properties window:
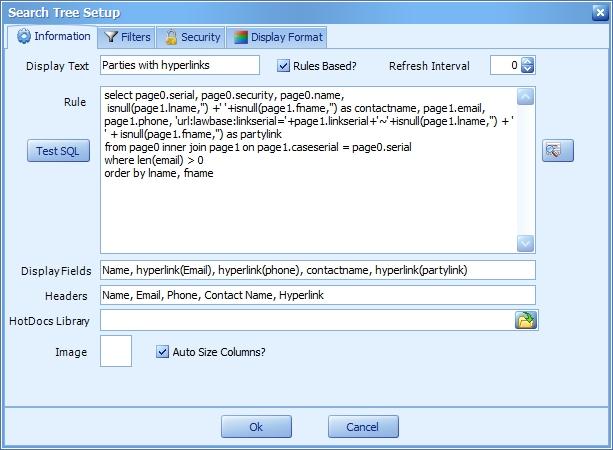
And the resulting SmartFolder:
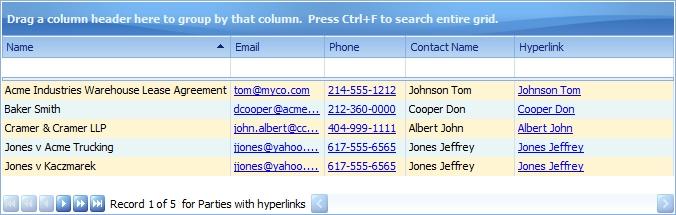
At this point we may choose to remove the redundant Contact name column.
Hyperlinks to Notes
SmartFolders that return notes results make it easy for users to find frequently referenced notes; you might have a folder that returns the notes created in a specifc time period, or for a certain practice area. Here’s an example of a SQL statement that calls specific notes and displays the date of the note as well as the note type.
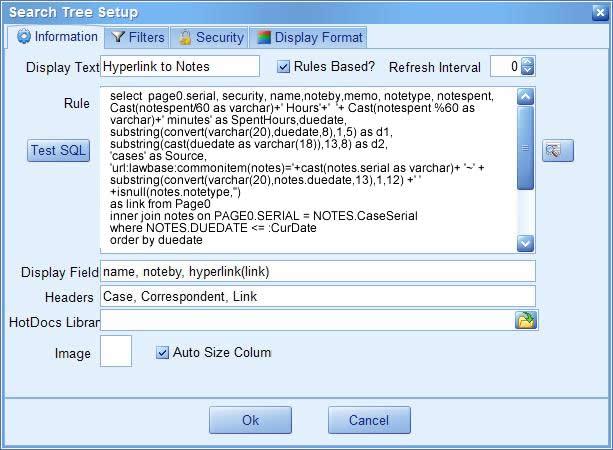
The base syntax for a URL calling notes looks like this: lawbase:CommonItem(Notes)=23 In our example
The URL portion of the SQL statement looks like this: 'url:lawbase:commonitem(notes)='+cast(notes.serial as varchar)+ '~' +
substring(convert(varchar(20),notes.duedate,13),1,12) +' ' +isnull
(notes.notetype,'') as link
The substring in this statement allows for the display of the date and the type of note in the hyperlink.
The results pane of the SmartFolder look like this. Clicking on one of the hyperlinks launches the linked note.
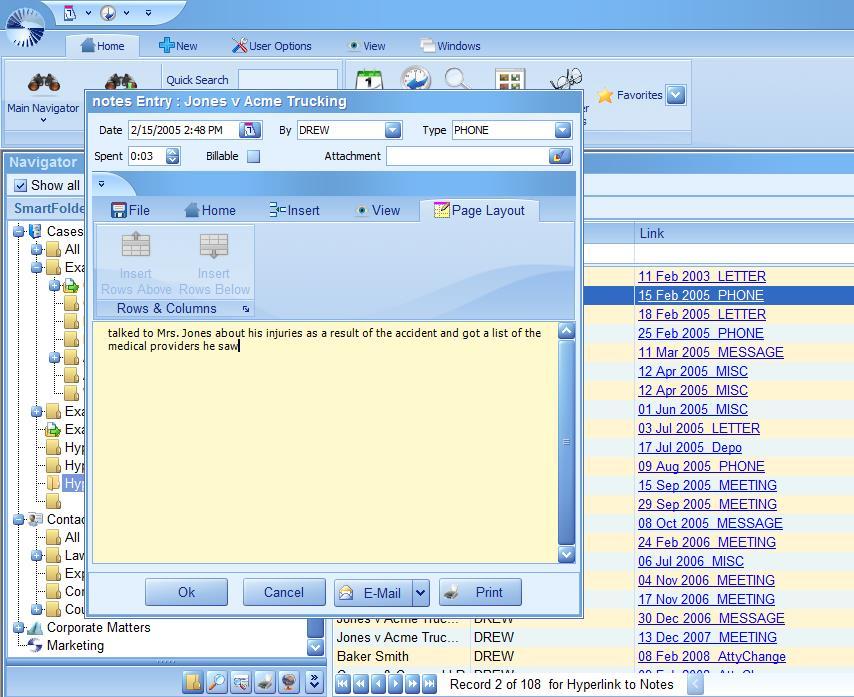
Hyperlinks to Calendar Items
The following example shows a SmartFolder that has been set up to return all calendar items where the Calendar Type has been set to CALL.
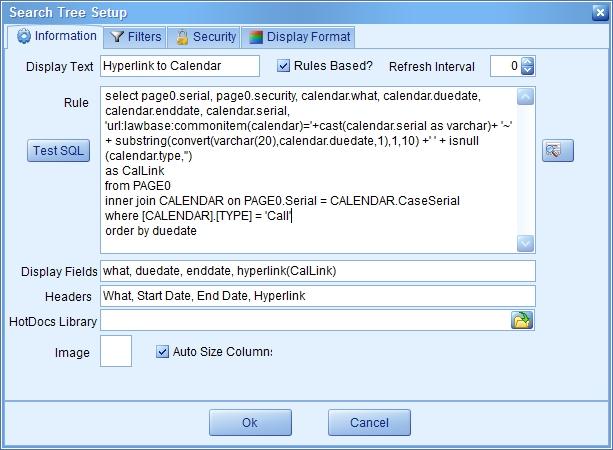
Since the calendar is classified as a Common Item, the base syntax for the URL is something like this: lawbase:CommonItem(Calendar)=5782
In the sample SQL statement, the URL portion looks like this: 'url:lawbase:commonitem(calendar)='+cast(calendar.serial as varchar)+ '~' + substring(convert(varchar(20),calendar.duedate,1),1,10) +' ' + isnull (calendar.type,'')as CalLink
Use a substring to define the display. In this example, the substring calls both the calendar.duedate and the calendar.type for the display.
The results of the sample SmartFolder look like this:
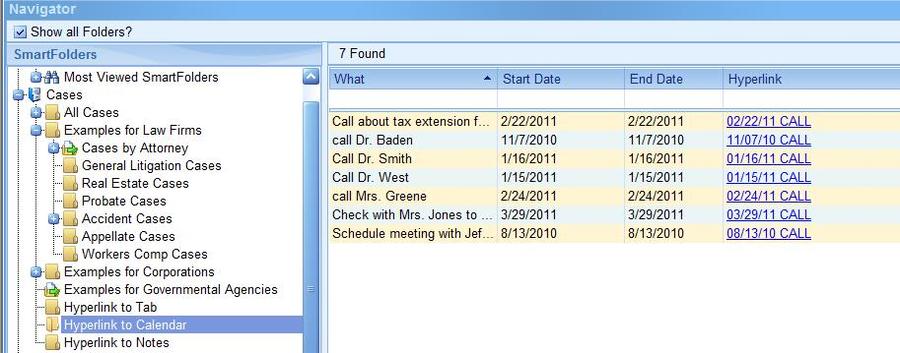
A single-click on a hyperlink will bring up the calendar item, eliminating the need to search through multiple calendar items to find the one you’re looking for:
My Folders
My Folders is an area in SmartFolders that helps individual users find the folders they use most often.
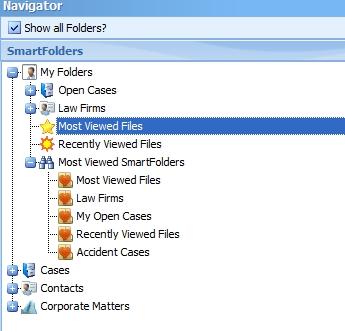
Branch Type What it does Set-up
Most Viewed SmartFolders
This folder is updated dynamically; it displays the SmartFolders viewed most often.
This branch will appear automatically. By default, 10 results are returned. You can adjust the value through the cosmetics: Cosmetics > Search > MostViewedSize
Recently Viewed Files
This returns the same results as the Recent items button on the Home Ribbon. This is a dynamically updated list of the files most recently viewed by the currently logged in user. They can be cases, contacts, or any other kind of FlexBase item.
This requires a one time set-up. To create this folder 1. Create a new SmartFolder 2. Set it as Rule Based. 3.Fill in the rule with: RecentlyViewed 4. You can set the name of the folder (display text) to be whatever you like. You can otherwise manage this folder like other SmartFolders; you can set formatting, set security, and change what fields are displayed.
Most Viewed Files
This returns the files viewed most by the currently logged in user, using historical system data. They
This requires a one time set-up. To create this folder
Branch Type What it does Set-up
can be cases, contacts, or any other kind of FlexBase item.
- Create a new SmartFolder
- Set it as Rule Based.
- Fill in the rule with:
MostViewed - 4. You can set the name of the folder (display text) to be whatever you like . You can otherwise manage this folder like other SmartFolders; you can set formatting, set security, and change what fields are displayed.
Favorite SmartFolders
Users add their own favorites by right-clicking on a folder and selecting Add to My Folder
This requires no set-up
SmartFolder Masks
Have you ever wanted to display the date and time in SmartFolder results? How about add a dollar sign to a number to show that it is currency? You can format your results with a few simple masks as follows. Apply the masks to the field names in the Display text area of SmartFolder properties.
Typelaw
Typelaw is stored as a numeric value in the database, but you can use this for a column display in SmartFolders and it'll return the associated typelaw name
Link(field)
Use this simple syntax to return the linked information instead of the link.
Datetime(date)
Displays the date and time
Time(date)
Displays only the time
Currency(numeric)
Prepends a numeric value with a dollar sign
Comma(numeric)
Numeric values display with commas.
Percent(numeric)
Numeric values display with a percent sign,
Here are examples of the masks in use.
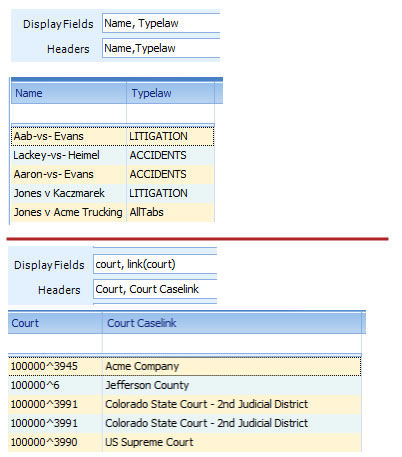
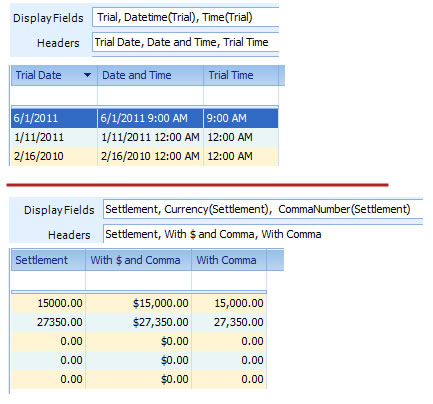
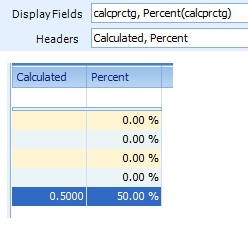
System Information
This section describes the options available under the System Setup Ribbon.
Conflicts Cosmetics GlueWare Database Explorer Exchange Integration FlexBases Holidays Recover Files SQL Runner
Conflicts
See the section about Conflicts under Searches.
Cosmetics
Cosmetics is a series of configuration options you can use to tailor your system. Most of these are used once for initial set-up and then rarely after that .
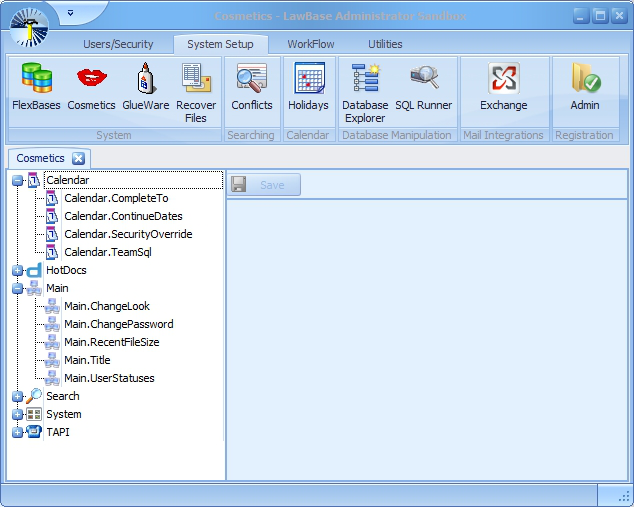
Calendar
Complete To
Select the destination for completing calendar items or any other common items where mapping is configured. Choose from History, Notes and Calendar. For more information about completing, see Completing. Continue Dates List the date options to appear on the calendar context menu.
SecurityOverride
Security applies independently to Calendars and Files. Most Calendar entries include a link to a file, so you have a choice which security should be in effect. Check this box for Calendar security to override file security. When this is unchecked, the security of the linked file takes precedence. TeamSQL Fill in a SQL select that pulls users from fields on the header.
HotDocs
CommandLine
Use to add HotDocs command line options to be used by all HotDocs run through LawBase. Consult the HotDocs help for details on command line options.
DefaultLibrary
Browse out to the main HotDocs library. This library is used unless a value is filled in for the typelaw. For more about setting paths, see NOTE at the top of this section.
OfficeExt
The file extension used when documents are saved by Office Save. Typically this will be set to .doc or .docx. For more information about Office Save, see Office Save.
ReportLibrary
The HotDocs library where Standard Reports are linked. For more about setting paths, see NOTE at the top of this section.
SaveDir
Set the directory where documents are saved to when using Office Save. For more about setting paths, see NOTE at the top of this section. For more information about Office Save, see Office Save.
UseHotDocs
Uncheck this box to turn off HotDocs. This will remove the HotDocs button from the GlueWare ribbon in files and will hide all Report access. If checked, then HotDocs button and options will only appear for those users who have HotDocs installed.
Main
Change Look
Check to allow users to select a skin. Uncheck to remove this option.When this is unchecked, the skin will default to MoneyTwins, which is the default skin.
Change Password
Check to allow users to change their own passwords. Uncheck to remove this option. Change Password appears in LawBase on the User Options Ribbon, under Tools.
Recent File Size
Set the number of files to appear in the recent files list. The recent files list appears in LawBase under the Home ribbon as well us under the main LawBase button.
Title
The text that appears in the Title Bar of LawBase. If left blank, defaults to the organization name set in your database by Synaptec. The most common reason to change this is to distinguish a production system from a test system.
Search
AllowSoundex
Check this box to allow users to search by soundex. Soundex enhances searching by using sounds rather than strict spelling to find matches.For example, when Soundex is enabled, searching for Smith may yield Smythe; Johns may yield Jones; Neil: Knowle, and so on.
ConflictSearch
By default the label for this tab reads Conflicts Edit it here to display other text, or delete it completely to remove the Conflict Search tab. Example: some users prefer to call this System Wide Search. Conflict Wild Check to automatically precede conflict searches with a wildcard (*).
External
By default the label for this tab reads Other Shortcuts. Edit it here to display other text, or set the label to NONE to disable the Other Shortcuts tab.
Global Search
Check to enable users to search across all fields of all FlexBases.Uncheck and the field will not appear in LawBase. In LawBase this appears in the Home Ribbon as Global Search.
GridAsYouType
When this is checked(ON), the search tabs will return results as you type. When this is off, you have to press enter to complete the search Note: when searching by date, you always have to press tab to complete the search.
Launch Single File
When this is checked, if a search returns only one result, the resulting file will automatically open.
Most Viewed Size
Sets the maximum number of SmartFolders that will be shown under the Most Viewed branch of Smartfolder tree.
Quick Search
Edit the SQL for your Quick Search. If there is no SQL here, then the Quick Search will not appear in the Home Ribbon of LawBase. For information about Quick Search, see Quick Search.
Quick Search Hover
Fill this to add custom hover text to the quick search field. Example: This search searches: File Number, Case name and Main Contact Name.
Reports
By default this text reads Reports Edit it here to display other text, or set the label to NONE to disable the Reports tab.
System
AddTabs
Check this so that the background tables for all tabs are created upon file exit. This is typically required to support WorkFlows that act on tabs that otherwise might not exist.
CommonGrid ReadOnly
Many of the fields in the common tabs (notes, calendar, history, etc) can be edited directly from within the grid. To prevent editing entries from the grid and to force users to open the common item for editing, check this cosmetic.
DefaultFont
Set the font for most parts of LawBase. The default is Tahoma, 8.25 pt.
Dictionary
Set the location for personal and system spellcheck dictionaries. Typically, this is under the main LawBase directory.
EmailSubject
Use this to format the subject of emails initiated from common tabs. By default, email messages will be identified using the FlexBase display fields. You can add some text to precede the FlexBase display. Use the text <<TableName>> to include the name of the common tab in the subject line of the emai message. So the model here
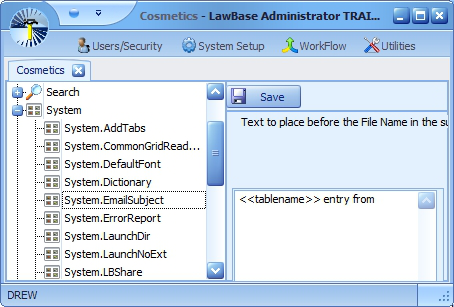
would have this result in email, when initiated from a note.

ErrorReport
Check to allow error reports to be sent to Synaptec. Uncheck to prevent sending error reports. This might be required with some firewall settings.
ExcelDirectory
Allows you to define a default path for all users where Excel exports from QueryBuilder or Smartfolders are saved. To set paths on a per-user basis, see NOTE at the top of this section.
LaunchDir
If the cosmetic Launch Dir is filled in, whenever the launch button is utilized to add data, the windows dialogue will always open the location in the cosmetic. If the cosmetic Launch Dir is left blank, the windows dialogue to open will be dependent on the Launch Field Type defined in LBDesign. If defined as File in LBDesign will open the last windows dialogue utilized. If defined as Directory in LBDesign will open My Computer (or the default you have on my computer). For more about setting paths, see NOTE at the top of this section.
LaunchNoExt
This cosmetic typically supports integrations with document management systems. It allows a launch field to be populated with a string, such as a document number, instead of a directory path\filename. Fill in the default program name here. LBShare Check to activate LBShare.
NavGridReadOnly
Check this to prevent users from editing items in the grid portion of repeatable tabs.
NotesTimeSpent
Sets the format for note time. Check to display time in hours:minutes or uncheck to display total minutes. Example: the same time would show as 1:31 or 91.
OutlookAllowDrop
By default this is checked. When checked, users can drag email messages to LawBase files to create notes. Uncheck to disable drag and drop of emails
OutlookAttachDir
Browse to the directory where email attachments are saved. Leave the field blank and attachments will not be saved. When there are multiple attachments, only the first is saved and linked to the note.
OutlookDrop
This applies to email messages dragged and dropped from Outlook to LawBase notes. Use this cosmetic to set the order data is saved in notes created from email messages. The fields you can order are: date, from, subject and to. To display the values without the labels put a ~ (tilde) right after the keyword and LawBase will create the email with the item but not the prompt.. Example: subject~
OutlookSelectNoteType
If enabled (checked), when a note is created by dragging and dropping from Outlook to LawBase (or from LBOutlookConnector), a pop up for the Note Type will be provided to the user.
PhoneMask
The following choices apply to phone type fields.
AreaCodeOptional
Numeric values only
Domestic numbers only
Automatically formats it based on the number of digits entered
30332044207342070 formatted automatically as 303-320-4420
(303)3204420 formatted automatically as (303)320-4420 (had to enter the
opening parens)
3204420 formatted automatically as 320-4420
Full
Numeric values only
Applies formatting automatically -- entered 3033204420; it automatically
formatted it as (303) 320-4420
Domestic numbers only
None
This the default setting. Users can enter as many digits as needed.
No mask (therefore, no formatting)
Allows alpha/numeric values
Permissive -
Numeric values only
Enter domestic numbers with or without area code but must manually add formatting, otherwise it will only let you enter 6 digits and will not save (therefore, no international numbers)
UpdateLastAccess
The last access date in the header of any file is updated whenever that file is unlocked and locked. The last access date can also reflect a change whenever a common item on that file, such as a note, calendar item or history, is updated. Check this box to have the last access date reflect common item changes.
UseNetworkLogin
Check this to use the Windows network login automatically. LawBase user names must match Windows names for this to function. One way to ensure this is by creating LawBase users via Active Directory import. For more information about Importing Users from Active Directory see Users. If you find yourself unable to log in while testing this, you can turn it off via the database. From SQL Server Management Studio, run the following update statement against the affected database:
update cosmetics set info = 'N' where keyname =
'UseNetworkLogin'
In the alternative, you can add the command line parameter:
/ignorenetworkThis will bypass the network login and do the normal login procedure.
TAPI
Legacy
Allows the tapi fields in LawBase to revert back to the old settings in LawBase10.7. This is intended for clients who upgrade to 12 and can't get the new tapi to work. There are some drawbacks as the newer tapi integration allows for timed calls. LocalAreaCodes Comma-delimited list of local area codes. Do not use parentheses.
NotePopup
Check to pop up a note when users click TAPI phone buttons. This is meant to make it easy to make a note about the phone call. Unfortunately, you cannot program the resulting Note to include any other variables from the database other than the default values that appear. Uncheck this to disable the pop up.
Prefix Number(s) to prepend before dialing. For example, you might need to dial 9 to get an outside line.
StripLocalArea Check to strip the local area code before dialing. Usage depends on your particular dialing needs. Suffix Number(s) to append to a number before dialing.
DefaultType Value entered here will automatically populate the Note Type if NotePopup cosmetic is turned on.
DefaultMemo
Values entered here will automatically populate the Note Memo if NotePopup cosmetic is turned on. Unfortunately, the TAPI system does not see any LawBase variables, therefore the only variable that can be entered into the Memo is the <<phone>> number dialed.
Database Explorer
Database Explorer provides access to view all the tables in the underlying LawBase database and modify their contents. This is a “low-level” look at the data much like in Access or SQL Server Enterprise Manager.
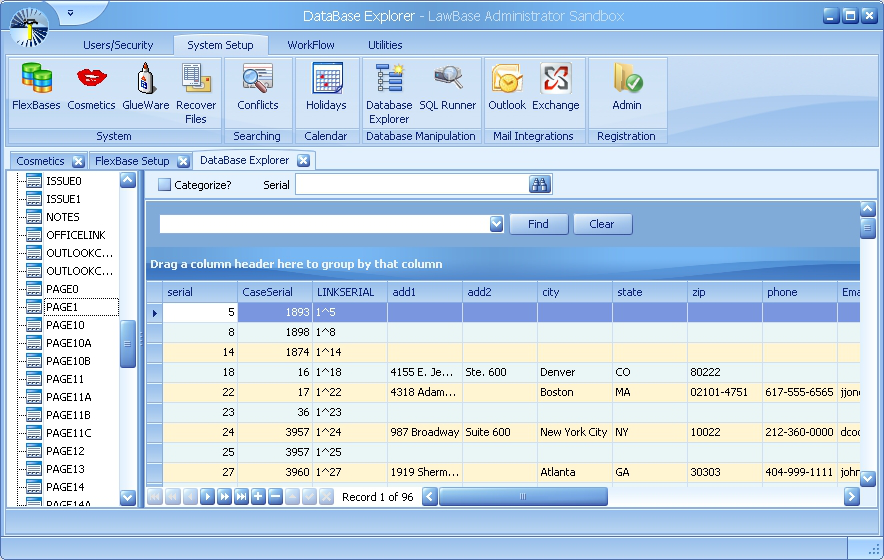
Searching, Sorting and Filtering the Results
The columns displayed can be sorted, filtered and searched just like the results pane in the LawBase Program. For information about these features, consult the User Help under Parts of the Screen > Results Pane.
Operations in the Database Explorer
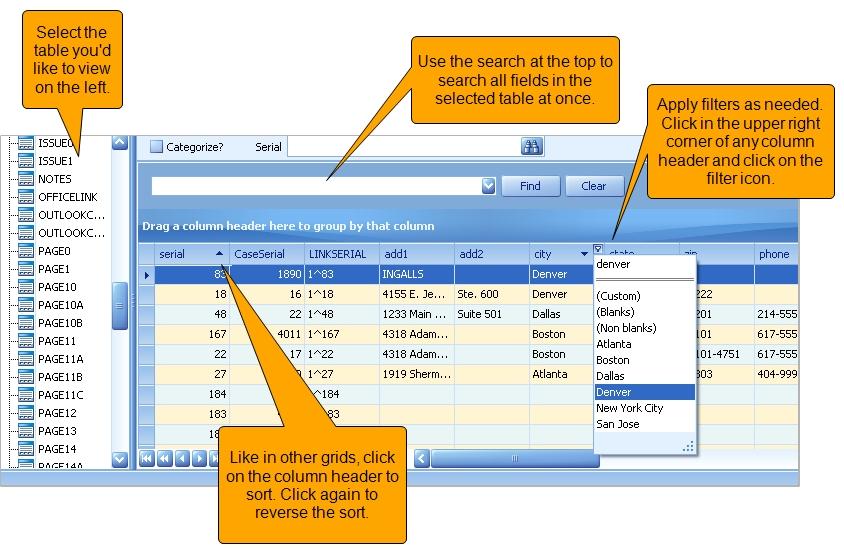
Exchange Integration
This button is designed to be used by offices who have purchased the LBExchange integration. Refer to the documentation provided with that install.
FlexBases
LawBase was the first case management application to offer a user defined database, which we call a FlexBase. Until now there have been just two main FlexBases: cases and contacts. Starting with LawBase 12 you can create as many different FlexBases as you need. For example, in a mass torts litigation practice, a firm could also set up a FlexBase to track litigation groups which are made up of various matters. With LawBase you can track complex data such as pictures, sound files, movies and more. And you can create or modify your data structure with our included easy to use LawBase Design program. For more information about FlexBases, see FlexBase Set-up
GlueWare
GlueWare is where you configure interfaces from LawBase to external programs. LawBase supports a number of integrations with third-party software; some of these are set up through GlueWare. Common integrations include (but are not limited to): Document Management, Litigation Support and Time & Billing.
How GlueWare Works
A popular example of GlueWare is a Document Management System (DMS). Typically the way this works is, from within a file, users click a button to execute a search against the DMS using data from the selected file. The search is executed with a unique identifier like file number. The button in the GlueWare tab might look something like this.
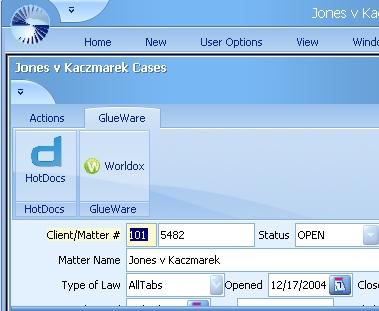
GlueWare Configuration
To set up a GlueWare, fill in the fields of the GlueWare configuration screen as described below.
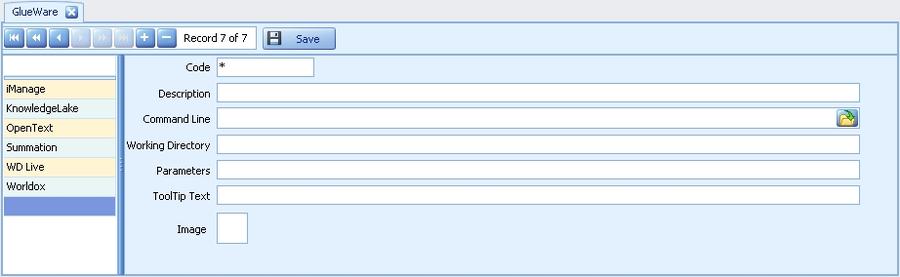
Code
Common integrations that are purchased from Synaptec have custom codes; these should be provided when the GlueWare is set up during the implementation of your system. Contact LawBase Support for assistance with custom codes. For your own in-house GlueWare, use the generic code 1.
Description
Enter a name for this integration. This is how it will be listed on the left area of the GlueWare window in LBAdmin.
Command Line
This is where you enter the command line this GlueWare executes.
Examples: L:\LawBase\Programs\myapp.exe Working Directory
For some integrations the command line and working directory are in two separare locations; typically the Command Line handles this. Parameters Use this area for fields that are called by the program identified in the command line.
ToolTip Text
By default, the Description of the GlueWare appears as the hover text. To help your users, enter whatever you like here so they know how to use each GlueWare. So instead of "WebPage" they'll see "View the County Ticketing Site".
Image
This is where you load an image for the button that appears in LawBase files. To load an image, right-click select Load Image. For best results use 16 x16 png files and make the background transparent.
Developing Your Own GlueWare
Admin users of LawBase have also set up their own custom GlueWare for: web reports, check requests, time cards, and expense reports. Use the generic code of 1 when developing your own GlueWare.
Holidays
You can configure how the calendar handles critical dates when a critical date or repeat factor for a calendar falls on a holiday.
- You can use standard holidays
and
- You can create holidays from scratch
Setting up Holidays
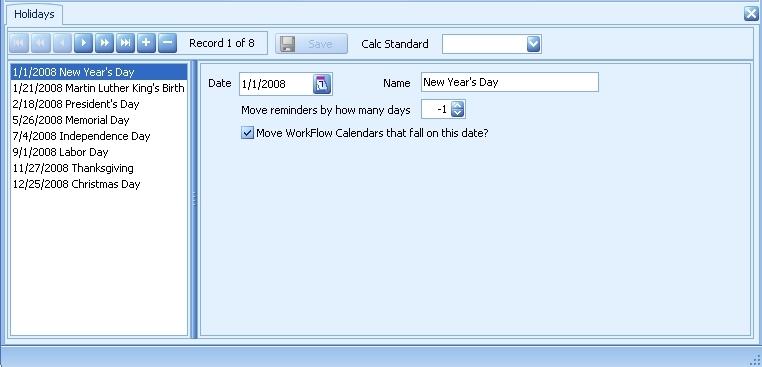
Set up holidays from LBAdmin. You can set up as many holidays as far in the future as you like.
To create a holiday:
- Click the

button to create a new entry.
2. Fill in the fields as desired
Date The calendar date of the holiday. Name Familiar name for the holiday. This name will appear in the LawBase calendar.
Move reminders by how many days
Tells LawBase what to do when a repeat factor for a calendar item lands on this date. For instance -1 says to move that tickler to the previous day. one day. If a holiday lands on a Monday, you may wish to put -3 in this field so that it moves back three days or to the previous Friday.
Move WorkFlow Calendars
Check this box to move critical dates created by workflows the requested number of days. If this is not checked then all WorkFlow calendars created will continue to fall on this date.
3.Click the Save button.
To use standard holidays:
- Click the CalcStandard pulldown menu.
- Select a year. The standard U.S. Holidays for that year will be populated.
- Check each holiday to verify that the date shifts are as expected.
- Make any changes needed and click the Save button.
Recover Files
This feature will allow you to recover a file that was completely deleted. Simply double click on the file that you wish to recover and LawBase will restore the chosen file from the archive.
SQL Runner
SQL Runner allows you to send SQL commands to the database and return results (if needed). Any SQL can be run here for testing or other purposes. For instance you could test commands you wish to use in Smart Folders or Reports. You should be careful in this section, because SQL can modify or delete items in the database, so always make sure you know what you’re doing before running and update or delete statement in this section.
Audit Trail
In Fall 2015, LawBase added new functionality that allows for the designation of fields as "audited" and the ability to review the activity on such designated fields.
To add the Audit Feature to LawBase, a new table must be created in all SQL databases (production, development, design, etc.). Contact your DBA to run the following script in each database:
CREATE TABLE [Audit_UserChanges](
[Serial] [int] IDENTITY(1,1) NOT NULL,
[ChangeDate] [datetime] NOT NULL CONSTRAINT [DF_Audit_UserChanges_
ChangeDate] DEFAULT (getdate()),
[ChangeBy] [varchar](50) NOT NULL,
[CaseSerial] [int] NULL,
[LinkSerial] [varchar](21) NULL,
[FieldName] [varchar](50) NULL,
[PreviousValue] [varchar](4000) NULL,
[NewValue] [varchar](4000) NULL,
primary key([Serial]))
Once the table exists in your databases, run LBDesign and designate which fields to be included in the audit search in the field properties. By placing a checkmark in the Audit Box, the field will be included when running the audit feature.
NOTE: Remember to sync your design changes to production.
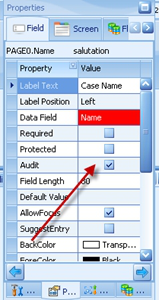
The field auditing is now active. To review audited fields in the database, go into LBadmin, click the “Review Audited Fields” button in System Setup. This is a view of the audit table in the database showing which Files in LawBase were changed:
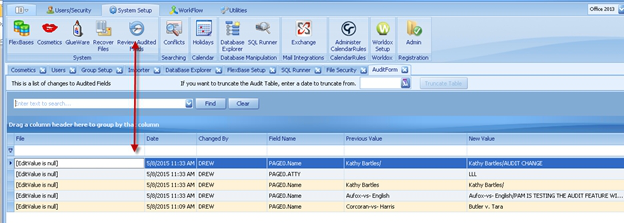
Over time this audit table will become very large, there is an option to delete from the table using “Truncate Table” to delete data from your table.

Disaster Recovery and Backup
The following is a list of items that LawBase recommends you should back up to prevent data loss in the case of hardware failure or other disaster. This is list is by no means exhaustive and will vary from system to system. Synaptec in no way accepts responsibility or liability in the case of a system failure where LawBase data is unrecoverable.
Databases
Synaptec recommends that you back up the SQL databases used by the LawBase program on a nightly basis. Typically this includes: a. Production b. Design c. Optional - You may have added additional environments for testing (Test, QA, QAT, and so on). If so, make sure to back those up as well.
TIP: Use LBDBConfig.exe to verify the names of your databases.
The Main LawBase Directory
Synaptec recommends that you back up the entire contents of your main LawBase directory. This directory typically contains:
1. Program files (Synaptec can replace program files in the event they are lost, but we cannot replace your data or your other custom items (items a - c and the following items on this list)
2. Configuration file (lawbase.config)
3. HotDocs library (or libraries) and templates (docx, rtf, cmp, etc)
4. Reports (docx, rtf, cmp, etc)
5. Dictionaries
6. Saved queries for use within QueryBuilder
7. Any other materials you may have created to support your install
Linked Documents outside of LawBase
If you launch buttons to link documents and spreadsheets outside of LawBase (launch fields spread throughout your tabs or on the OfficeLink common tab, links in Notes, Calendar items, and so on), we recommend that you review your back up procedure for those files as well. Furthermore, if you use a document management system that integrates with LawBase, you will need to review the back up procedure for that system, as it will not be included when backing up your LawBase components.
Test and Production Environments
After Synaptec Software completes your initial installation, we recommend having both test and production environments for LawBase. A test environment allows you to test any screen design changes, WorkFlows and program file updates before implementing to a live end user environment. This section of the help assumes that you are familiar with using LBAdmin and LBDesign.
Suggested Method
There are different ways of setting up these environments and rolling out changes from test to production. However, the most popular way of doing this is to create two program file directories.
- One directory intended for LawBase TEST.
- The other intended for LawBase PRODUCTION (aka PROD). This is the environment your users work in.
Set up the Databases
On the SQL server, back up and restore a copy of your current production database. Name this LawBase_ test You should have 3 databases total:
1. LawBase_prod
2. LawBase_test
3. LawBase_design
Set up the Windows Directories
1. Copy your main LawBase directory to create the Test directory. What was the main directory will now act as the Production Environment. Rename the copied directory "LawBase Test".
2. Run LBDBConfig.exe in each directory to set the appropriate connections.
Typically, the connections are set as follows: Production Design Database name Database name
Production Database name
Design Database name Test Environment LawBase_Test LawBase_Design
Production
Environment LawBase_Prod LawBase_Design
Test Configuration
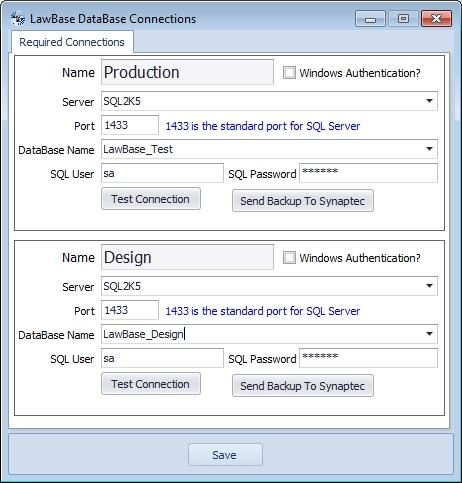
Product Configuration

Using these Environments
Recommended
To keep your environments straight, we recommend that you change the Title of your database that displays at the top of your programs to reflect which environment you are in. You can change the Title setting in LBAdmin > System Setup > Cosmetics > Main > Main.Title. Therefore, your Production database title may be Cagney & Lacey, LLP, but your test database title would be Cagney & Lacey TEST DATABASE, and the design title would be Cagney & Lacey DEVELOPMENT.
Furthermore, you have the ability to change the skin in LBAdmin. Consider setting a different skin for each environment under Users/Security to help you differentiate between environments at a quick glance.
New Design Work
- Make new design changes using the LBDesign.exe in the TEST directory. When you run LBsync.exe in this environment, sync from design to prod and changes sync to the to the test SQL database.
- Once thoroughly tested, initiate LBSync from the PROD directory to sync the changes to the production environment.
Software Updates
- To update the TEST environment, run LBAdmin.exe in the TEST directory and apply the updatesthere. This gives you an opportunity to test the software updates before updating your production environment. Once you have tested the changes you can update PROD as well.
- To update PROD, run LBAdmin.exe in the PROD directory
WorkFlow
Any time you create a new WorkFlow, we recommend that you create it first in TEST. Once the functionality has been tested, you can export the new workflow from TEST and import it into PROD.
Users
This is the setup screen for each individual in LawBase. Create an entry for every user (or calendar resource) that will log into the system. The parts of the screen are described below.
Tip: to locate a user record quickly, click in the list of users on the left and begin typing the user name.
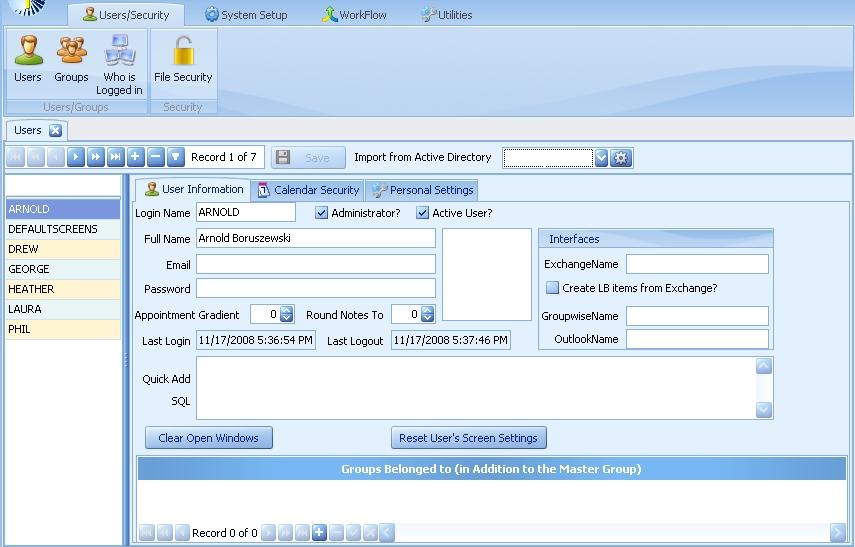
User Information Tab
The parts of the User Information tab are listed alphabetically.
Active User
Check this box for all current users. Deselect to deactivate.
Administrator
Assigns administrative rights to the user. NOTE: Any user you designate as an Administrator can do ANYTHING in LawBase regardless of their security setups.
Appointment Gradient
Also called the appointment increment. This is the default number of minutes between each item on the appointment calendar.
Clear Open Windows
When users log out of LawBase, they may choose for the program to remember the windows they have open. Click this and the next time the selected user logs in, no windows will be open; LawBase will open to the main navigator.
Email address. This is not required, but can be useful for reports and HotDocs that may reference this field.
Full Name
The Full Name of the user. This appears in the LawBase calendar.
Interfaces
ExchangeName - this is used by the integration LBExchange. For the selected LawBase user, fill in the primary SMTP address. GroupwiseName - this is used by the integration with Groupwise. Fill in the email address of the Groupwise user. OutlookName - this is used by the integration lb2outfor12. Enter the Outlook full name.
Import from Active Directory
Tool that can be used to load multiple Users simultaneously by reading from Active Directory. The gear icon permits you to apply or change your LDAP filter. See Importing from Active Directory below. Last Login Shows the last time the user logged into LawBase Last Logout Shows the last time the user logged out of LawBase
Login name
The Login Name (pulling from Novell, NT or an environment variable) of the LawBase user.
Password
The password for the user to access LawBase. A password is not required.
Quick Add SQL
This SQLis used to populate the Quick Add drop-downs in LawBase. Example: select lname, fname, status from page0 union select name from contact0 order by lbdisplay R
Reset User's Screen Settings
Clears the selected user's screen settings and restores the selected user's screen settings to defaults (as defined by Default Screens).
Round Notes To
How the user wants the time in the Activity Notes Section to be rounded when they make a new note (e.g. 6 minute blocks; 15 minute blocks, etc.).
Importing Users from Active Directory
Active Directory is the mechanism Microsoft uses to track users, groups, networked devices, PC’s, and so on. LawBase has a feature that allows users to be imported into LawBase as Users by tapping into this feature.
LDAP Filter
Only 2000 records can be returned in the Active Directory picklist. If your organization has more than 2000 AD records, you may have difficulty finding a particular user. To avoid this issue, you can apply a filter to reduce the number of records retrieved and displayed in the picklist.
Access the filter by clicking on the gear icon next to the AD picklist field. A window will appear where you can enter your filter logic:
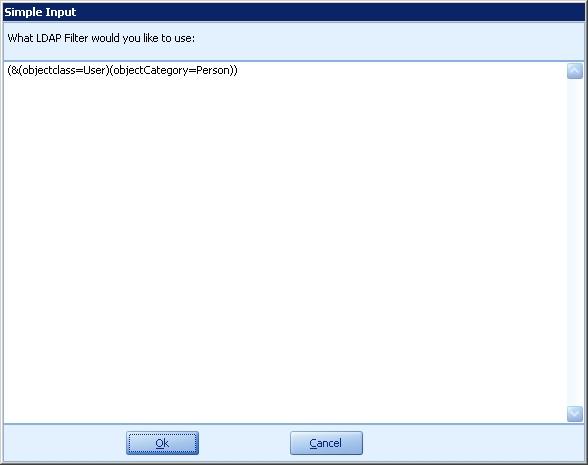
The filter follows standard LDAP conventions. Here are a few examples: All users, but exclude disabled users: (&(&(objectclass=user)(objectcategory=person))(!(userAccountControl=514)))
All user objects (users and aliases) that are designated as a “person” and all group objects (distribution lists): (|(&(objectclass=user)(objectcategory=person))(objectcategory=group))
A single user by name (givenName=John)
Once you define the filter and press Ok, simply click on the dropdown arrow to display the filtered picklist.
NOTE: Sometimes the dropdown window needs to be expanded in order to view the available options. To expand the window click on the bottom right corner and drag it to your desired size.
NOTE: Use of LDAP filters is only for convenience and is not required. If no LDAP filter is defined, the top 2000 AD records will be returned.
Importing AD Users into LawBase
To create one, or multiple users simultaneously, using Active Directory (AD), click on the Import Users from Active Directory pulldown.Your AD users will appear in the picklist. Select the checkbox next the name(s) that you would like to create LawBase user accounts for and click OK.
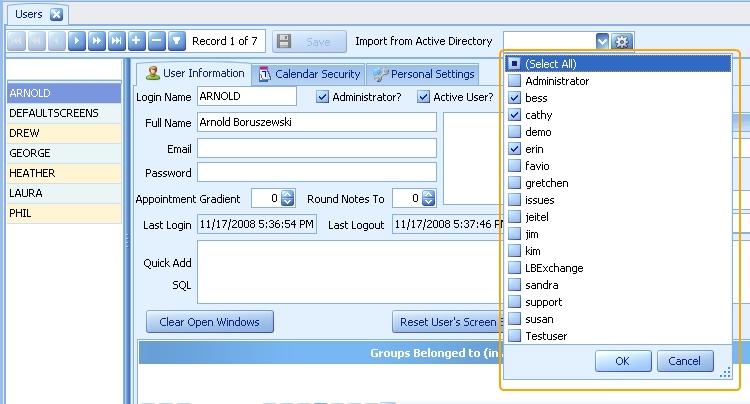
You will be asked to confirm whether you want to import the selected user(s). Click Yes and the AD Users you selected will appear at the bottom of the LawBase user list in the left pane. The information imported from AD (assuming that it existed in AD) is Login Name, Full Name, and Email.
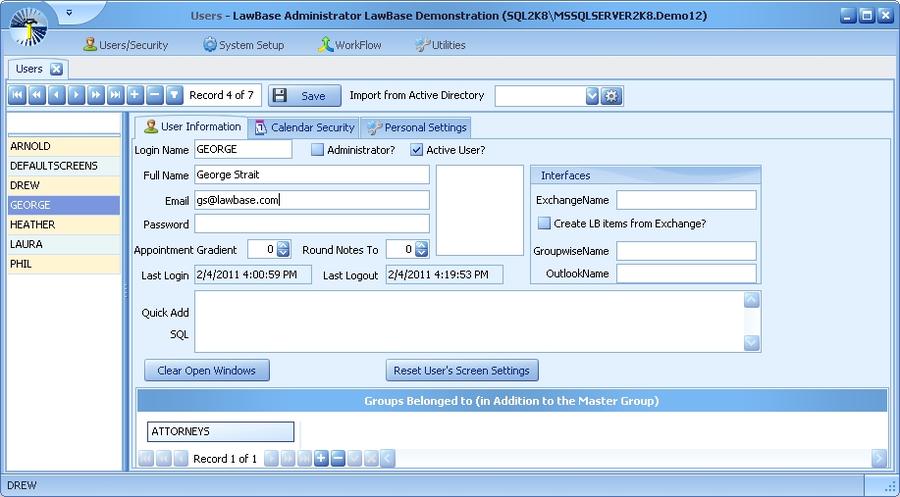
LawBase offers a setting that automatically uses Active Directory/Network Login to log in users in when upon launching LawBase. Users must have LawBase user profiles in order for this feature to work. For more about this feature see Cosmetics.
If User Forgets Password
If a user contacts you to reset their password, simply clear out the Password field on that user's profile. You can either assign them a new one or leave it blank and let them sign in without one. They can then change their password using the Change Password utility in the User Options ribbon within the LawBase program. Note that in order for a user to change their own password, they must have permission to. This permission is set in Cosmetics.
Adding Users to Groups and Group Membership
By default, all users are part of the Master Group but you have to add them to other groups. For more information about groups, see Groups
To view what groups a user belongs to:
1. Select the user from the list on the left.
2. At the bottom of the User Information Tab, locate Groups Belonged to.
3. Here you'll see the groups this user belongs to.

To add users to groups:
1. Select the user from the list on the left.
2. At the bottom of the User Information Tab, locate Groups Belonged to.
3. Click the + (plus) button at the bottom
4. Another dropdown will appear where you select the group.
5. Click the Save button at the top of the Users area.
Calendar Security Tab
Use the Security Tab to set the rights of other users to view and edit a user's or group's calendar. By default, no users are groups are filled in; this means all users have rights to that calendar. Here is an example of one way you might set up security. Cathy is part of the management team and we want to limit who can modify her calendar.
- The group MGMT has full rights to Cathy's calendar.
- The MASTER group has view only rights, so it can't add or modify anything on Cathy's calendar.
- We know Cathy is part of the MGMT group, so we don't need to add a separate line item for her id.

For more information about general security principles, see General Security Principles.
Personal Settings Tab
Use the Personal Settings tab to
1. Set what basic rights each user/group has
2. Set default values for Typelaw, Security and Workflow for each FlexBase.
3. Set Extra Field Values for users in fields manually added to the User_Profile table.
For a full description of the checkboxes and defaults grid, see User Security/Personal Settings.
The Extra Field Values grid will automatically display any extra columns that have been added to the User_ Profile table. Extra columns would be added to the User_Profile table if you want to keep additional information about Users but don't have a place to store it in the User Information tab. For example, if you wanted to store a User's Title in their user profile, you would add that column to the User_Profile table, then set or edit the value on a per-user basis in the Extra Field Values grid:
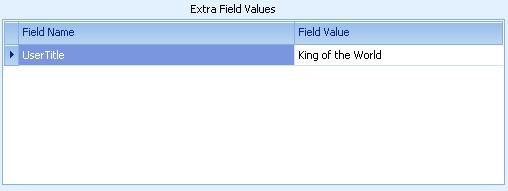
Default Screens
LawBase is extremely flexible and the way items appear is customizable by individual user to their liking. This can create some issues when new users first login, or if you'd ever like to return a user to a default view. Whatever views you setup as DefaultScreens will be what users see the first time they visit a section of LawBase. After that, their preferences will take over.
Creating a Default View
To set up a default view for LawBase:
1. Create a user named DefaultScreens in LBAdmin > Users and make this an active user.
2. Then log in to LawBase as DefaultScreens. Run the program normally, but set up the look and feel like you'd like it to appear by default.
You probably want to set up
- Quick access toolbars
- Screen sizes
- Docking preferences
- Skins.
User preferences you set while logged in as DefaultScreens will be the default settings for LawBase.
3. Once you are satisfied with how LawBase is set up then you may wish to go back into LBAdmin and set DefaultScreens as an inactive user so to prevent it from showing up in User List drop downs throughout the program.
Groups
Use Groups to
- Manage user permissions
- Share calendars
- Users can belong to multiple groups
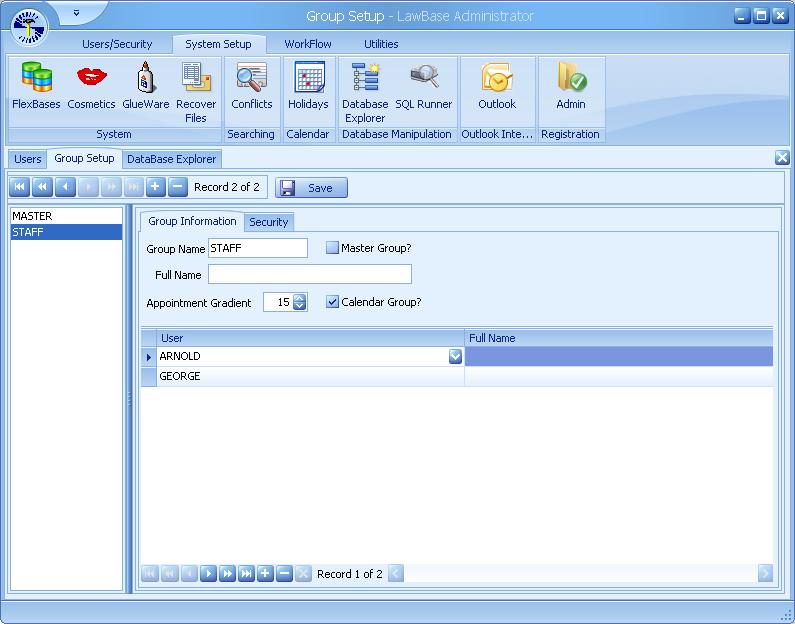
Creating Groups and Adding Users
To create a group:
1. Click the + (plus) button in the toolbar in the Groups Setup area.
2. Fill in Group Name with a short name to identify the group.
3. (Optional) Fill in the Full Name. This can help your users understand abbreviated calendar names.
4. Add users from the lower half of the Group Setup; click the + (plus) at the bottom of the window.
5. Click the Save button at the top of the Group Setup area.
Calendars
- Each group calendar is a composite of all the individual calendars for the members. Any any item placed on a group calendar will appear on the calendars of the group's members.
- There can only be one MASTER group. All users are members of this group, by default, and the only thing you can change about it is the name.
- This is the group that contains a serial number of 0, which you can view using the database explorer.
- The only field not covered under the User Profile is the Calendar Group checkbox. If you want an entry to appear on the calendar selections, check this box. Otherwise, the group exists for security setup only
Quick Add
Quick Add is an optional feature that appears on the new ribbon in LawBase. Configure the Quick Add feature to add a pull down for all of your common tabs.
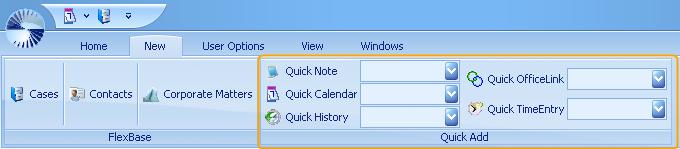
Configuring the Quick Add Feature
Quick Add will not appear until it has been configured for your system. To configure Quick Add, from LBAdmin:
1. Go to the Users/Security Ribbon
2. Click Users and view the User Information Tab
3. In the Quick Add SQL field, add a SQL statement.
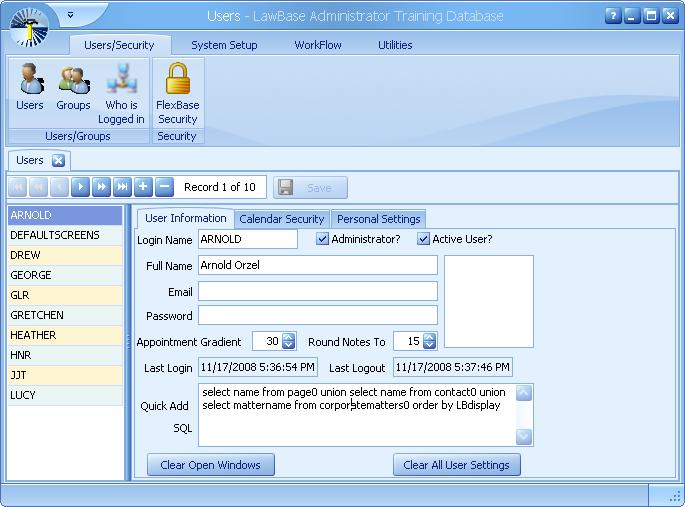
4. The statement should look for key identifiers from the headers of your FlexBase(s).
5. Here are some examples. Keep in mind, statements will vary depending on your database structure and what each user would like to search for.
select lname, fname, status from page0 union select name from contact0 order by lbdisplay select name from page0 union select name from contact0 union select mattername from corporatematters0 order by LBdisplay select lname, fname,status from page0 union select fname from page0 where status in('OPEN','SOLD','CLSD') order by lbdisplay
select contact0.name, Page0.MatterNo from Page0 left outer join Contact0 on Contact0.LinkSerial = Page0.Name order by lbdisplay
6. Add a SQL statement for each of your users who need the quick add.
Replacing Users
We just replaced an existing user with a new user. How do I move all of the Calendar Items and Notes from one user to the next? You don't need to create a new user in this situation - just replace the existing user within LBAdmin.
Procedure
1. Open LBAdmin and go to the Users/Security Ribbon. Click Users.
2. Select the user you want to replace. (In this example, Arnold's login will be replaced by Annie.)
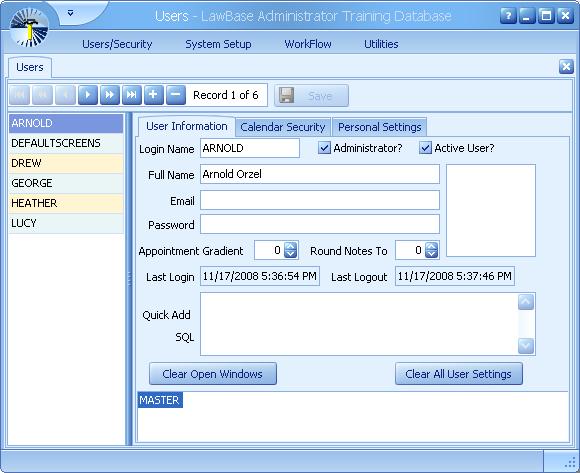
3. Replace the existing Login Name and Full Name fields with the new user's login and full name
information Type over ARNOLD and replace with the text ANNIE. Also replace Arnold Orzel with Annie Green.
4. Click Save at the top of the window.
5. The following prompts will appear:
The first prompt asks if you want to update all calendars. Updating the calendar will move all of Arnold's existing calendar Items to Annie's Calendar.
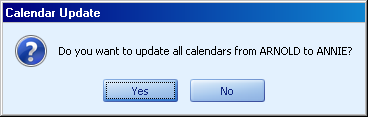
The next prompt will ask if you wish to change the name on notes. Changing the name on the notes will update all of Arnold's notes with Annie (change the noteby field from Arnold to Annie).
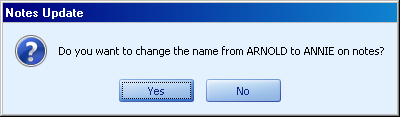
Who is Logged In
The Who is Logged in screen shows who LawBase thinks is logged in at this moment. You may want to terminate a user's session in order to apply program updates. To terminate a user's session, select their row and click Terminate Selected Users. It may take a moment for the termination to commence. After a few minutes, click Refresh to verify that their session has ended.
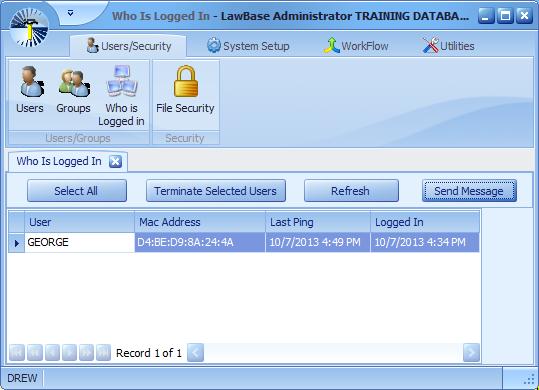
Send Messages to LawBase Users
Use the Send Message button to send a message to all logged in users.
On the user end, the message will display in LawBase. If LawBase is not currently in focus for the users, the message will pop up, bringing LawBase to the foreground.
Utilities
This section describes the items available from the Utilities tab in LBAdmin.

These utilities are intended for very specific uses and it may turn out that you don't need to run any of them. So how do you know if you need one of these utilities? Often you'll find out while troubleshooting an issue with LawBase Support. The letter in front of each option in the SQL Structure and Data Modification sections is the parameter to use when running the utilities via command prompt. For example, the following command runs the Update LinkSerials utility:
l:\LawBase12\lbadmin.exe/username=DREW /utilities=B
Click on the following links to view more about each utility:
- Add Tabs
- Create Caselink Views
- Default Checkbox nulls to N
- Delete all files in [Flexbase]
- Fix Nvarchar fields
- Fix RTF in Memos
- Import
- Initialize AutoCorrect
- Make SQL Constraints
- Recalculate Ticklers
- Remove File Locks
- Spellchecking and Dictionaries
- Update LinkSerials
Add Tabs
The Add Tabs Utility adds underlying database entries for all tabs that every file has in its Typelaw.
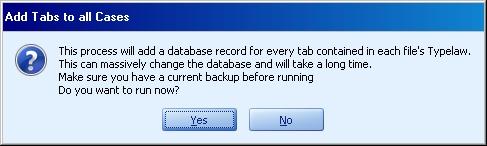
Background Information
When you create a new file, not all tabs are created in the background database automatically. Until a tab has been edited or viewed, it is does not exist in the background database. For normal manual editing of files, this is not an issue; tabs are added to the background database as needed.
Application
Why might you need the AddTabs Utility? This can be useful to support some WorkFlows. For example, you might have a WorkFlow that updates page23 but in certain files, page23 does not yet exist. The WorkFlow would fail it when it attempts to update a tab that has not been created. To avoid these errors, run this utility to add the entries for all tabs.
Adding Tabs to New Files
The AddTab utility adds tabs to existing files but has no effect on future files. To ensure that newly created files include all tabs, use the cosmetic System > System. AddTabs. For more information about this cosmetic, see AddTab Cosmetic.
Create Caselink Views
This utility refreshes the definition of the two automatically created views, CaseLinkView and CaseLinkViewAll. The views are normally recreated whenever you sync design changes, but you may need to refresh the view definition on other occasions.
CaselinkView and CaselinkViewAll
These views are both quite useful for getting the display from a linkserial while avoiding complex SQL. CaselinkView - LawBase automatically creates a view which gathers all the targets of caselinks. The view is created when you sync changes in LBDesign. The view gathers: the linkserials and display names for caselink targets. Take advantage of this view when developing WorkFlows, Reports and other views. It simplifies the SQL needed to find out what actually is displayed in the field. This will come in especially handy when you have caselinks with multiple lookups (e.g. contact0, contact1 and contact5). CaselinkViewAll - works in the same way as CaselinkView, but the view captures more. It works on all tabs and contacts and not just the ones that are linked to. It does exclude blank tabs,however.
How are the views created
The views are created automatically when design is synced or, if designing live, when saving.
Calendar Utilities
There may be times when a user leaves and you want to transfer all of the former user's Calendar entries to a new or pre-existing user. Or, you may assign an attorney a new paralegal and would like to add that paralegal to all of the same Calendar entries as that attorney. Calendar Utilities in LBAdmin allows you to do both of these, in addition to removing a user's name from all calendar entries.

WARNING: Before running this utility you must MAKE A BACK-UP of your database. The system has no memory of who was on calendar entries, so if you make a mistake on live data, there is no way to undo it.
Adding a User to all Calendar Entries of Another User
1. Click on the Calendar Utilities icon in your Utilities ribbon.
2. The following window will appear:

3. From the Source User picklist, select the user who is already on the calendar entries. From the Target User picklist, select the user who you would like to add to all of the entries where the Source User is listed. In the bottom left corner you will see how many items will be affected. For example, if I want to add Arnold to all 27 Calendar entries that Drew is already on, the setup would be as follows:
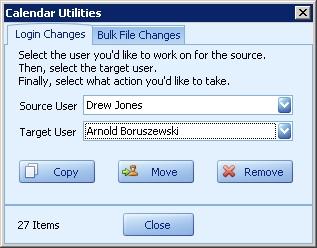
4. Click COPY and the window below will appear. Click Yes to proceed or No to cancel.

Replacing one User with another User on All Calendar Entries
1. Click on the Calendar Utilities icon in your Utilities ribbon.
2. The following window will appear:
3. From the Source User picklist, select the user whose entries are being moved. From the Target User picklist, select the user who will be receiving all of the Source User's calendar entries. In the bottom left corner you will see how many items will be affected. For example, if I want to move all of Drew's 27 calendar entries over to George, the setup would be as follows:
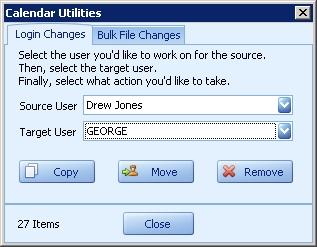
4. Click MOVE and the window below will appear. Click Yes to proceed or No to cancel.
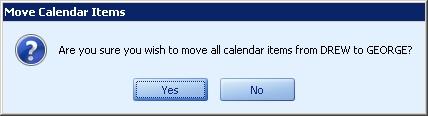
Removing a User from All Calendar Entries
1. Click on the Calendar Utilities icon in your Utilities ribbon.
2. The following window will appear:

3. From the Source User picklist, select the user you would like to remove from ALL calendar entries and click Remove:
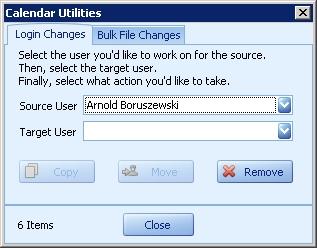
4. The following window will appear, asking if you are sure. If you are, click yes. Note that if the user is the only user on a calendar entry, the calendar entry will be orphaned (will have no responsible party associated with it), therefore we do not recommend running this utility unless you are absolutely sure that the entries have at least one other user associated with them.
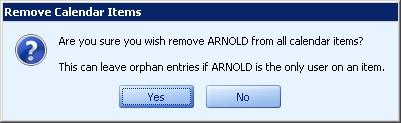
Adding a User to ALL Calendar Entries in a Particular File
1. Click on the Calendar Utilities icon in your Utilities ribbon.
2. The following window will appear:
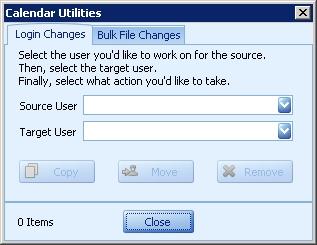
3. Click on the Bulk File Changes tab:
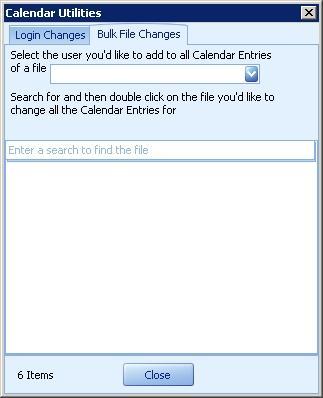
4. From the picklist, choose the user you want to add to ALL Calendar entries. To find the case for which you want to add the user to all calendar entries, enter the search criteria in the search field. The search field uses the same search criteria that your QuickSearch uses.
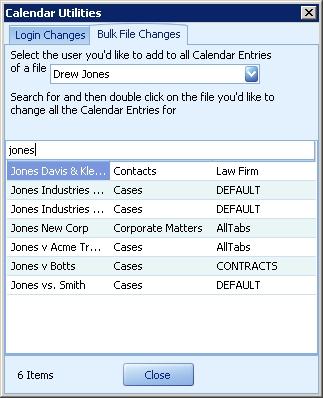
5. To select the file, double click on the search result. The window below will appear. Click Yes to proceed or No to cancel.
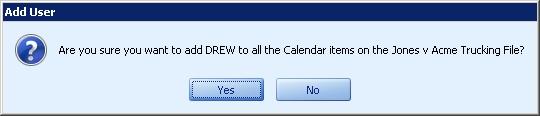
Default all Checkbox Nulls to N
By default, all new checkbox fields are saved as N in the background database. But you may find with imports or conversions that the data is saved as a Null value. When this happens you may see grayed out checkboxes in LawBase. Run this utility to update all Null checkboxes to Ns.
Delete all files in [FlexBase]
Use this utility wisely. This utility deletes *all* files from the FlexBase you select from the drop-down. It also deletes all common items (notes, calendars, etc) which are tied to these files.
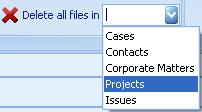
1. Select the appropriate Flexbase from the drop-down
2. Click yes at the dialog that appears.
3. Finally, type in the secret password to complete the deletion. To obtain the password, contact LawBase Support.
Fix NvarChar Fields
Use this utility to change all Nvarchar fields to VarChar. If you upsized your database from an access .mdb file, often all the fields will be of the incorrect type. What should be varchar fields are nvarchar and what should be text fields are ntext. If so, this selection will go through the database and change those fields to the correct type.
Fix RTF in Memos
Rich-text fields are used in most common tabs. Here's an example from notes:
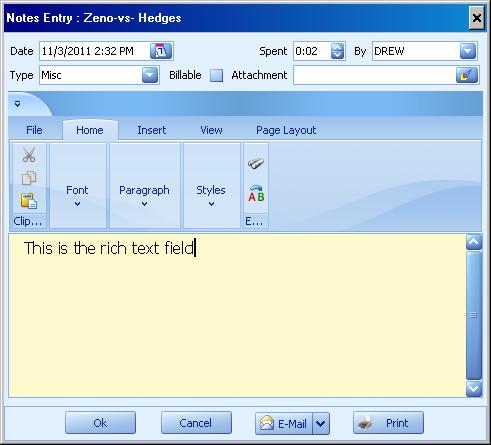
While the user side of the memo field shows the text entered by the user, formatting information is also saved - font face and size, bullets, carriage returns and so on. So the data in the database actually looks like this:
{\rtf1\deff0{\fonttbl{\f0 Times New Roman;}{\f1 Tahoma;}}
{\colortbl\red0\green0\blue0 ;\red0\green0\blue255 ;}
{\*\listoverridetable}{\stylesheet {\ql\cf0 Normal;}{\*\cs1\cf0
Default Paragraph Font;}{\*\cs2\sbasedon1\cf0 Line Number;}
{\*\cs3\ul\cf1 Hyperlink;}}\sectd\pard\plain\ql{\f1\cf0 This is the
rich text field}\f1\par}
But if data has been brought into memo fields by some other means - through an import, a workflow, or perhaps directly through the SQL server, the rich-text format information is not added to the background data. For the most part, lack of rtf formatting is not a problem, but you may find the inconsistency between formatted and unformatted fields distracting. Also, if you need to export data from rich text fields, you might like to have all of the fields formatted the same way.
Importing Data into LawBase
You can use Import Manager in LBAdmin to import CSV and Quote-Comma delimited files into LawBase tables.
Procedure
Because every installation of LawBase and every set of data to import will be different, the precise steps you take to import will vary. Below is an example of a typical set of data and the steps to import it.
1. Data to Import
In this situation, we have a csv file with data exported from MS Outlook. It is organized in columns with headers assigned by MS Outlook. (Your data may need cleanup- refer to "Data Cleanup" on page 484 for tips.
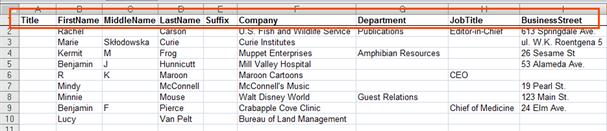
2. Assign LawBase Names
You need to replace the Outlook names with the field names used in LawBase. NOTE: You may want to back up the original csv file before replacing the column headings.

3. Add Serial Numbers
Every case and every contact in LawBase has a serial number. When you import records, you can either allow the import to assign the serial number or you assign the serial number. Allowing the import to assign the serial number is helpful only when importing just records for the header (e.g. Page0, Contact0). If importing multiple tables, it is suggested that you assign the serial number in order to tie the records for page1 as caseserial to page0 serial.
IMPORTANT: No one else should be using LawBase when you are importing data with assigned serial numbers. Otherwise, there’s a very real possibility of it getting duplicate serial numbers. a. To determine the next available serial number Go to LBAdmin > System Setup > SQL Runner Run:SELECT MAX(SERIAL) FROM CONTACT0 Make note of the serial number. In our example, the last serial is 4458. b. Pages use the same serial set as Contacts, so check the max there as well. Run:SELECT MAX(SERIAL) FROM PAGE0 Make note of the serial number. In our example, the last serial is 4430.
Our system only has Cases and Contacts, so we can safely add a serial of 4459 or higher. To make things simpler, let’s add values for contact0.serial starting with this 5000. Add the same series for contact1.caseserial also. What this does is establishes a relationship between the contact1 information and the header. If your import includes more contact tabs, such as contact2, contact3 and so on, add the same value under the heading contact2.caseserial and contact3.caseserial. Again, this keeps the contact tabs related to the correct contact header.
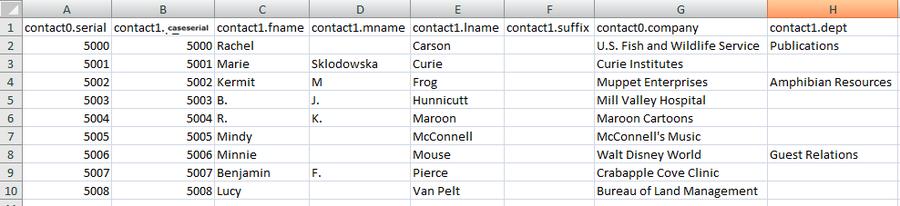
For information about adding multiple entries to a repeatable tab, see "Importing Multiple Entries into a Repeatable Tab" on page 484 on page "Importing Multiple Entries into a Repeatable Tab" on page 484.
4. Add Security and Typelaw
The security information and typelaw are stored in the header, so add columns for contact0.security and contact0.typelaw. Fill in the appropriate values for your database. NOTE: the typelaw in our example is 2 (default for contacts).
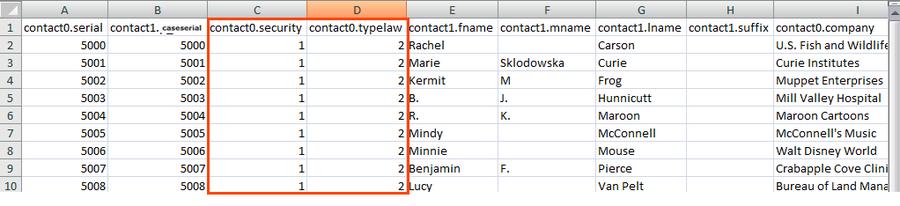
5. Add Last Updated and Updated by fields
It is a good idea to fill in values for who created each case (conact0.abfld) and the import date (contact0.defld). We recommend using LBIMPORT and a known date. Then, if you find that something went wrong with the import, you can use this information to find the problem records and then delete or update them as needed.
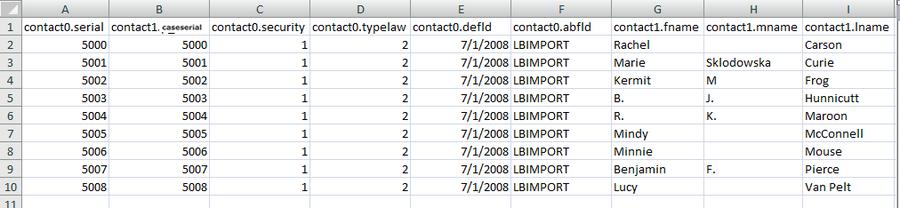
6. Split the Data into Pages
Create a separate CSV file for each page you are importing into in LawBase. In this example, we have a contact0 file and a contact1 file. (Tip – you may find it faster to make two copies of the original file, one for contact0 and one for contact1, and simply delete the columns you don’t need.)
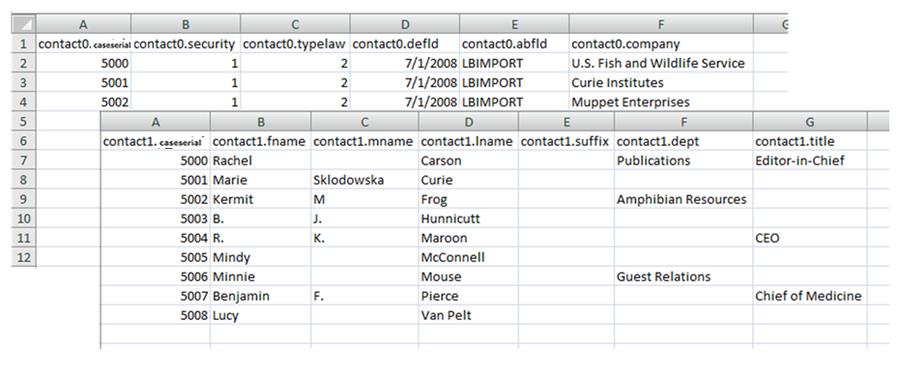

7. Importing the Prepared Data
1. From within LBAdmin, go to Utilities, then Import Manager
2. Click the folder button on the Import What field. Browse and select the file to import. Always import the header (contact0 or page0) first.
3. Click the Get Info button This loads a grid with your import data. At this point you can verify that things look as you expect. If things don’t look right, click the X in the corner to exit the import manager. Correct the errors in the source file and you can attempt to Get Info again. NOTE: the file you are importing must be closed in order to display it in the grid.
4. When you’re satisfied that the data looks good, click the Import button. Select the first option, Add All Entries, and click OK. LBAdmin will display a message indicating whether the import was successful.
5. Repeat this process for Contact1 and all further tabs.
8. Checking the Imported Data
You may be able to find your data using the contact search or an existing SmartFolder. Another way to view what you just imported is through Query Builder. Search for all contacts created by LBIMPORT that have the known date in the defld field.
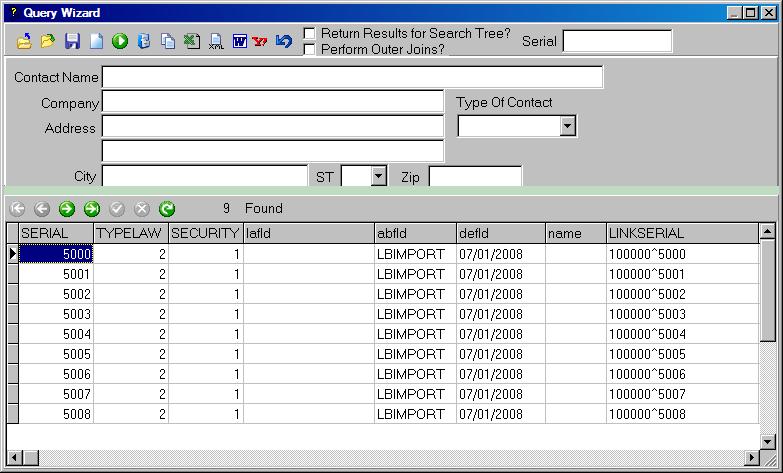
Tips
- Data types must match – for example, if you are importing into a calc field, then your input can only be numeric. Similarly, date fields accept dates.
- Validated picklists are case sensitive. So make sure what you import matches the case used in the picklist. Example: if the data you are importing is mixed upper and lower case but the pick list is all upper case, you will not see your imported data in LawBase.
Importing Multiple Entries into a Repeatable Tab
The example above shows how to import multiple unrelated contacts. To import multiple contacts into one header, use the same serial for each. Your spreadsheets might look something like this:
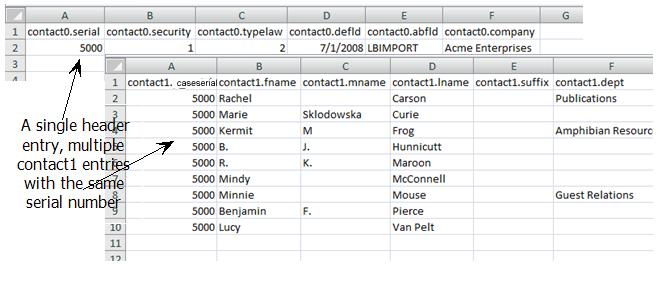
Importing Data to Tabs Only
Serial numbers, typelaw and security are only needed if importing into page0/contact0. If you are trying to add content to a page in an existing file, the caseserial should be used to find the correct copy of the page. Please contact [email protected] if you are unsure how to match up data, as imports that are not done properly can irreparably damage your data.
Data Cleanup
Your data file may need some clean up before importing. Watch out for carriage returns and other non printing characters within cells. These are interpreted by LawBase as row ends and force the creation of a new record. Some handy MS Excel functions are CLEAN and CONCATENATE. For information about how to use them, consult Excel’s online help.
Concatenation Example
Below is an example of how to use excel functions to solve a typical data situation.
- The source data includes values for company for some entries, but not for others.
- Also, the contact0.name field is typically populated with the full name of the individual or the company name. How do you get the full name into that field automatically?
Here is how you can fill in the contact0.name column using a formula:
=IF(ISBLANK(C2),CONCATENATE(B2,","," ",A2),C2) Tip: when you save the spreadsheet in csv format, the formula will no longer appear – only the results.
AutoCorrect
Many of us have grown used to software which corrects common typing errors like the following:
teh > the
definately > definitely
SYnaptec > Synaptec (corrects two initial capital letters)
they;ll > they'll (wrong punctuation)
and so on. Autocorrect like this is available within rich-text memo fields in LawBase.
Initial Set-up
To use autocorrect, there is a one time set-up. From within LBAdmin on the Utilities ribbon, click Initialize AutoCorrect.
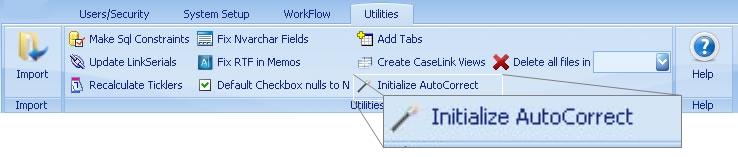
Click this button once and users will find a new button in rich-text memo fields.
Enabling/Disabling AutoCorrect for Individuals
After you've done the initial set-up, you can turn autocorrect on or off for individual users. This is controlled through User Security/Personal Settings.
Using AutoCorrect in Common Tabs
AutoCorrect is located on the File ribbon under Spelling. Click AutoCorrect to expose the AutoCorrect Editor. There are two parts - Personal Entries and System Entries.
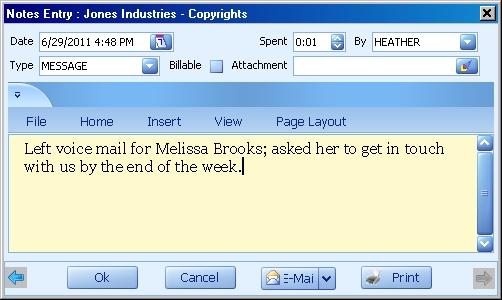
Note you can add frequently misspelled words as well as text expansions for abbreviations. For example, you might add lvm which will autocorrect to left voice mail.
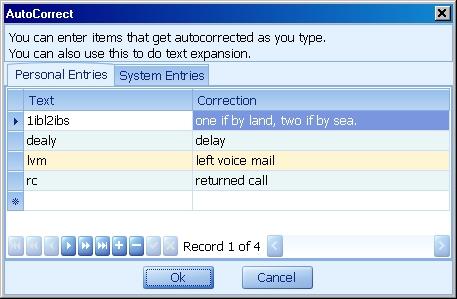
The System Entries are global. Administrators can edit System Entries while non-administrators have read- only privileges.
Recalculate Ticklers
Run this utility to ensure that ticklers fall on the correct days. Typically, this is run after importing data that includes calendar events. After running the utility, you will receive a notification that the utility completed running.
Remake Functional Constraints
This option will run through your entire database and verify that all your SQL Server constraints are correct. If they are not, this option will recreate them. This utility also creates indexes on caseserial , which enables faster access of common tabs from files with LawBase.
Remove File Locks
Files are locked any time a user changes from Browse Mode to Edit Mode. From time to time, the system may indicate that a user has a file open even though they have logged out. This can happen because of a power outage or other event that terminates their LawBase session without properly closing the file. When this happens, you'll see a message like this when you try to edit a file:
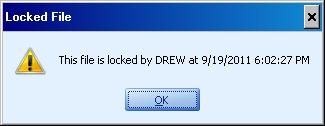
To remove these locks, you can use the Remove file locks utility. But before you removing all locks, you might want to check what is locked.
1. From System Setup run SQL Runner
2. First run: select * from filelocks
To see what is locked
3. To unlock all files,click the Remove File Locks Utility.
Remove Selected File Locks
An alternative to Removing all Locks is to use SQL to remove selected entries. In the example below there are two files locked. One from 11/1 and one from 10/15. The one from 10/15 is the one we want to unlock. If you run the utility it will unlock both of these. Using SQL you can remove just the 11/2 file. From SQL Runner run:
delete from filelocks where caseserial = 58
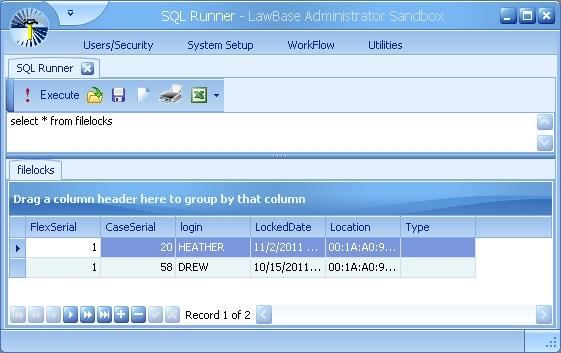
Spellchecking
This section describes how spellchecking works - for infomation about how to activate it, see User Security /Personal Settings Spellchecking is available in rich-text memo fields. You'll find these rich-text fields in common tabs, such as notes and the calendar. Here is an example from a note:
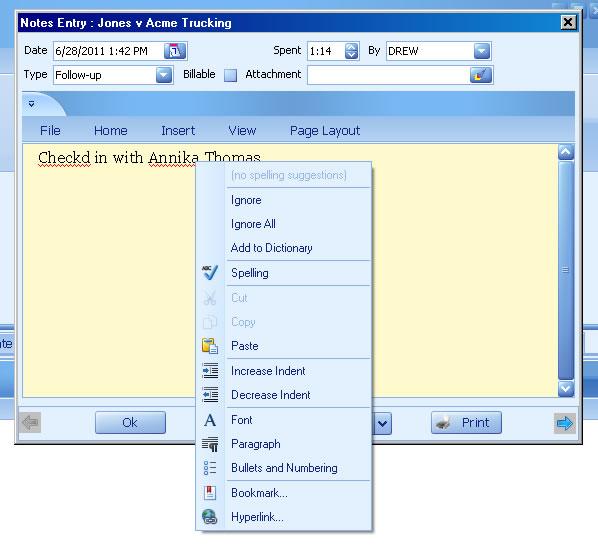
Using the right-click menu you can correct misspellings and add words to the dictionary. In the example above, the name Annika is not recognized. But each user can add the name to their dictionary.
Alternate Method of Spellchecking
You can also spell check from the File Menu within the rich-text field. And, as in many Windows applications, the keyboard command for this is F7.
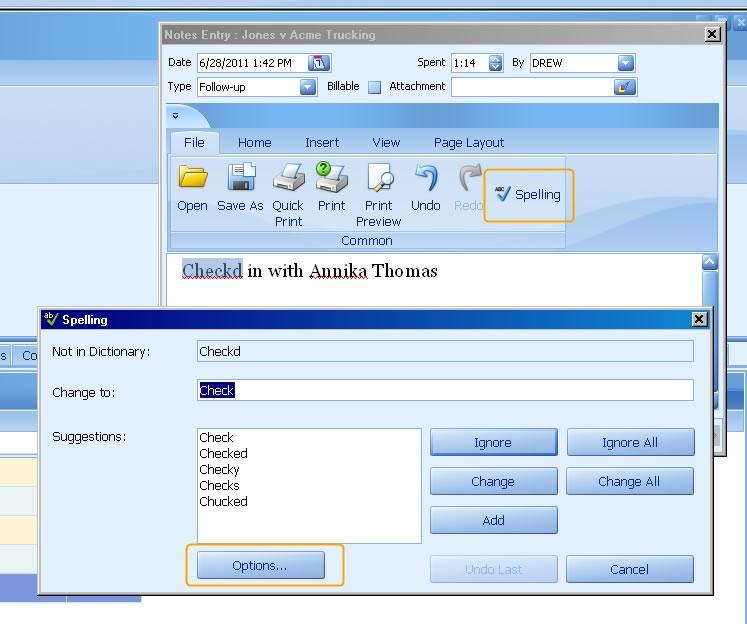
How Dictionaries Work
Under the main LawBase directory is a subdirectory called Dictionaries. When a user adds a word to the dictionary, it adds it to that user's file.
- To add words for everyone's use, you can edit the american.xlg file. Common examples of words you might add would be: organization/firm name, employee names and local geographical names. We recommend backing up the dictionary file before editing; you can edit the file with a text editor like notepad.
- Individual users can edit their personal library through the Options button shown above. Then from the spelling options, click Edit to access the editor.
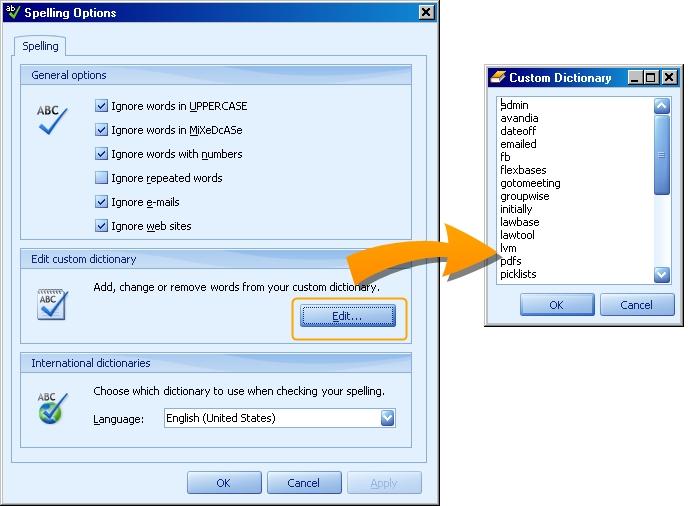
You might want to review the section on Autocorrect as well.
Update LinkSerial
Occasionally, you may import records or convert records and the LinkSerial field in the database may not be set correctly. This item will run through all your records and make sure the LinkSerial field is correct. After running the utility, you will receive a notification that the utility completed running.
WorkFlow
WorkFlow is a module in LBAdmin where you can set up automatic actions that run in LawBase. By definition, a WorkFlow is a series of actions that is triggered by some other action; possible actions that trigger workflows are: when a user changes a field, when a tab is opened, when a file is closed.
Examples:
- When a trial date is entered or modified, certain other dates are adjusted, both in the tabs and in the calendar.
- When the billing status changes, key users are notified by email.
- When the typelaw changes, the security is automatically updated.
- When a new file is created, an email is sent to the department head.
Where do I Start?
To learn the basics of WorkFlow creation, start with Simple WorkFlow Creation.This describes the most commonly used WorkFlow, which is triggered by a field change. If you are already familiar with the mechanics of WorkFlow, and need a WorkFlow for a particular situation, try one of the links below.
I want a WorkFlow that fires when .... See Section A field is changed Simple WorkFlow Example A tab is opened Screen Entry/Screen Exit A tab is exited Screen Entry/Screen Exit A file is created File Level WorkFlows A file is opened (viewed) File Level WorkFlows A file is closed/exited File Level WorkFlows A button is clicked (on demand) WorkFlow Button A common tab is edited Common Tab WorkFlows LawBase is launched Program Entry/Program Exit LawBase is exited Program Entry/Program Exit
NOTE: Each of the above can have conditions included; for example a WorkFlow that fires when LawBase is launched can be set to run only for certain users.
WorkFlow - Parts of the Screen
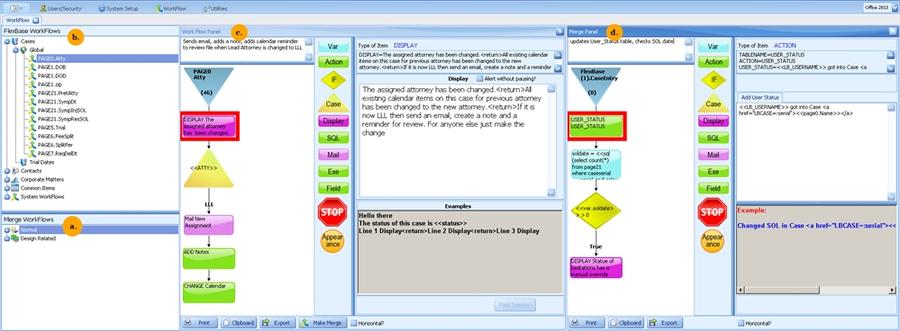
a. Merge WorkFlows - Merge Scripts are objects, which you may think of as macros or routines, that can be called by other WorkFlows.
b. FlexBase WorkFlows - Here you'll find the WorkFlows for each FlexBase as well as Common Items and System WorkFlows. Each of these categories is described below.
c. WorkFlow Panel - The WorkFlow Panel displays the currently selected WorkFlow. On the left are the existing steps in the WorkFlow, topped off with a memo box in which the workflow creator can explain what it is that the workflow does. In the middle are template/new steps that can be dragged and dropped into the new or existing WorkFlow. On the right the properties of the existing WorkFlow step that is highlighted in red are displayed.
d. Merge Panel - The Merge Panel displays the currently selected Merge. On the left are the existing steps in the Merge. In the middle are template/new steps that can be dragged and dropped into the existing Merge. On the right the properties of the existing Merge step that is highlighted in red are displayed.
FlexBase WorkFlows
The FlexBase Tree is divided into three main categories:
- FlexBases
- Common items
- System WorkFlows
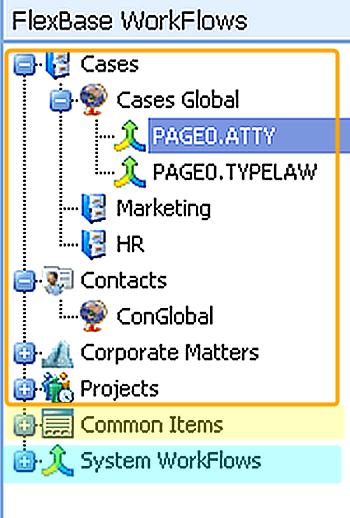
FlexBase WorkFlows
There is a branch for each FlexBase on your system. Many systems have only Cases and Contacts but you may see more like here, where we have Cases, Contacts, Corporate Matters and Projects. If your FlexBase is called Cases, then the first branch will probably be named Cases Global; you may also find it named Global Cases. What this means is the WorkFlows under this branch apply to all files in that FlexBase. Another way to say this is the WorkFlows are global. In the image above you can see branches that are not labeled global. These are WorkFlows sets; they are only in effect if the WorkFlow Set drop-down on the header of the FlexBase is filled in with the same name.
WorkFlow Sets
In the image above you can see two WorkFlow sets: Marketing and HR. It is likely that you won't see any WorkFlow sets on a new system. WorkFlow sets are custom and are created by the administrator.
Common Item WorkFlows
If there are any WorkFlows associated with the Common Tabs, you'll see them listed here.
System WorkFlows
System WorkFlows can be one of three possible workflows: ProgramEntry. ProgramExit and Every Minute.
Merge WorkFlows
Normal
Any WorkFlow that is made into a Merge or any Merges used in other WorkFlows can be found here.
Design Related
Merges that occur specifically in relation to a design item - such as Case Entry, Case Exit, Case Add, Action Buttons, Screen Entry, Screen Exit - are listed here.
WorkFlow Components


Use Actions to add/change/delete common items automatically. These include Notes, Calendar, History or Office Link items as well as any common items you have customized for your system. This is a Note Action. This particular one is on the ATTY field so any time that value changes, a record is written to Notes without any additional input from the user.

Add
An entry will be made every single time this action is triggered; i.e. a new note, new calendar item and so on.
Change
This will change a previous item that was created by this workflow. If this is the first time the workflow was called, it will create a new entry. For instance if you have a deposition date that might change frequently, you would want to use the Change option so that every time you change the date in the database only one date would be entered. Compare this to using Add -- if you used Add for a date which is frequently rescheduled, you would have several invalid dates left on the calendar. Delete Delete simply deletes a previous item made by this action if there was any.
Interactive
This will pop up the window of whatever type of Common Item is being added so the user can manually enter information into the screen. For more information, see below.
You can enter text, variables or VARs into the fields on the action item screen. When the action is triggered the proper item will be created with the information you requested.
Note: In a WorkFlow action to create a note, you can use :TimeSpent in the spent field to indicate how long you were in a file (or since the last note created by WF). The logged in user's Round Notes To information (found in the User settings within LBAdmin) will be used when making the note.
Here is the Calendar Action dialog. As you click in each field of the dialog, you'll see tips at the bottom that tell you how to fill it in.
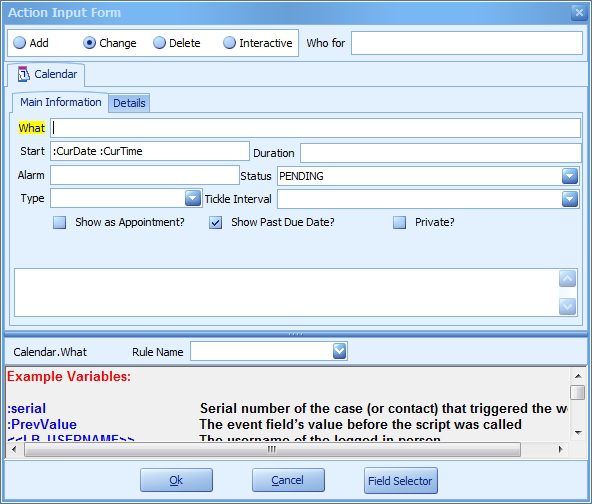
Note: For Calendar Items you must enter a list of names separated by commas in the Who For field to indicate whose calendar the item goes on.
Interactive Actions for Common Items
The Actions items described above write common items to the current file without any user interaction. There is also an Interactive option. When you select Interactive (indicated by the arrow below), the common item is displayed to the user and they have the opportunity to edit the item before it is saved. In this item, we have added some text to help users enter billable time entries.


Rule Name
The Rule Name function enables a common item to be created by an action on one field and then subsequently changed or deleted by action on another field.
For example, you have a Discovery Due date field and a Discovery Sent date field. You create a workflow on the Discovery Due field to create a Calendar record for the responsible attorney on the date the discovery is due, reminding he/she that there is a deadline and discovery is due:

However, if the attorney has already sent the discovery and the deadline was met, he/she may not want to see that reminder on his/her calendar. So what you might want to do is have that calendar reminder item automatically deleted whenever the Discovery Sent date is filled in. To do this, you would use a Rule Name in the Action workflow components on BOTH fields. The Discovery Due Action workflow would look like this:
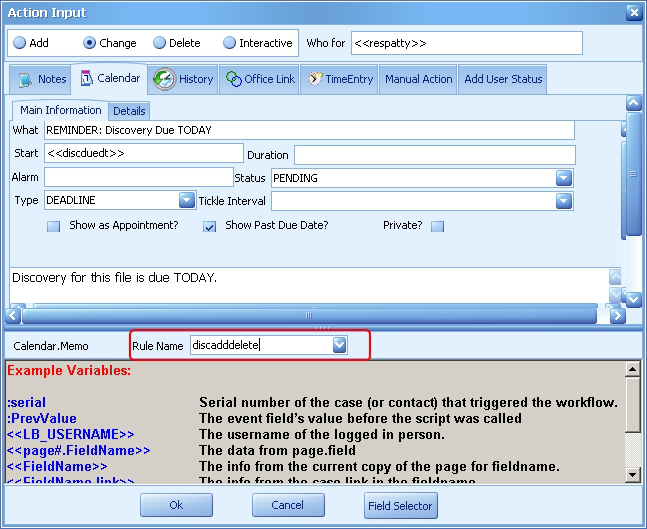
The Discovery Sent Action workflow would look like this:
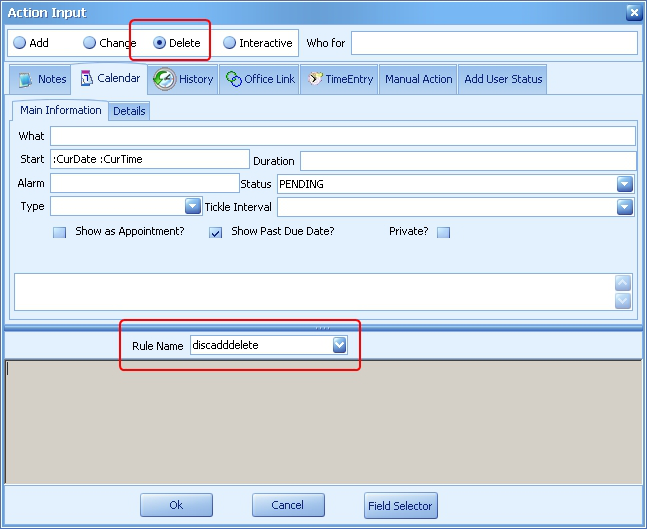
Note that the field values from the Discovery Due item did not have to be recreated in the Discovery Sent item.
When using Rule Name on fields that are present in a Repeatable Tab or Grid screen, it is necessary to add <<serial>> to the Rule Name, so the correct version of the item is altered or deleted.
Manual Actions
Another choice in the Actions component is the Manual Actions tab. The following table describes manual actions you might use.
Action Examples: Description
Action= Action=ADD^TableName=Page2^ FName=Drew^LName=Homburger
A standard Action. Read more about this in the HotDocs section - see Writing Back to the Database
Clipboard
Clipboard=<<lname>> <<fname>><return><<address>><return><<city>>, <<state>> <<zip>>
This manual action would likely be called from a workflow button. The data in the fields included after the = is copied from the current tab and available on the WIndows clipboard. You can also include some hardcoded text as needed.
Focus= Focus=Page#.Fieldname Moves the user cursor to the Page#.Fieldname field.
HotDocs=
HotDocs=L:\LawBase\Forms\NewClient.rtf HocDocs=L:\LawBase\Forms\Hearing.dot ^OutputFile=L:\Lawbase\OutputFiles\Hearing.rtf
Runs the requested HotDocs Template on the current file. The HotDocs= manual action has an optional "^OutputFile=" parameter that allows you to automatically save the output from the HotDocs merge to an .rtf file.
HotDocsRepo- rt=
HotDocsReport=L:\LawBase\Reports\AllOpenCases.r- tf
Runs the requested HotDocs Report from within a file (ex: from an Action button).
PreventFileExi- t=
PreventFileExit=You can not exit this file until number of requests sent equals the total number of providers on the Providers tab.
This can be used on File Exit workflows to prevent the closing of a file until a particular condition is met. NOTE - your File Exit workflow MUST have a branch where this manual action is NOT hit, or else the file can never be exited.
QueryBuilder= QueryBuilder=L:\LawBase\SavedQuery.qry
^OutputFile=L:\LawBase\OutputFiles\Output.xls
Runs the saved QueryBuilder query and puts the results in the indicated OutputFile. OutputFile can be in the .pdf, .xls, .txt or .html format. Before using this command you must make sure that you have gone into QueryBuilder and saved a query that finds the records you'd like to find.
Refreshall
Saves the current file AND immediately shows change on screen if the workflow that was just fired updates fields via SQL or stored procedure.
Saveall
Save the current file. Useful when changes have been made to a file (on the screen) and you need to save them to the SQL database so that subsequent SQL commands will get the most up-to-date data.
Appearance Component

Use the appearance component to change how fields appear depending on the data currently in the file. Options:
- Hide or show fields or subtabs (Note: Appearance workflows DO NOT work in subgrids)
- Change field labels or picklists
- Require fields
- Protect Fields
- Change the font of the data
- Apply a background color
- Make fields visible or invisible
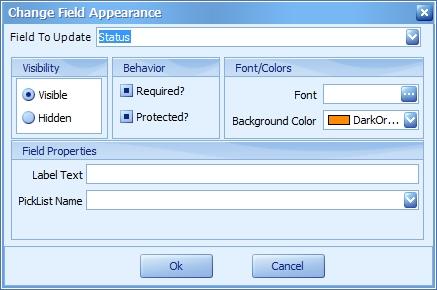
Example: Let's say you want the status field on the header to show up in a different color for certain statuses. In the case below, OPEN would have no special color, but PURGE should show up in orange.
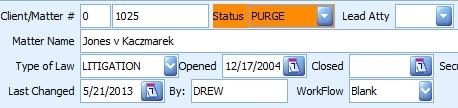
Note that this is different from setting a color in design; when you apply a color through design, that color is always applied to the field. The properties set by the appearance workflow are temporary and are applied only if the workflow that changes the appearance has been initiated. In the example above, let's compare the ways you could initiate the workflow. If you initiate the worklfow from the status field itself, the color will appear as orange at the moment the field changes to PURGE but not when a user views the file. Another way you could initiate the workflow is upon case entry, so that every time users view the file, the appropriate color is in effect. Probably the best way to do it for this example is to use both a workflow that is initiated from the field as well as one on case entry
Tips for Using the Appearance Component
- Take advantage of merge workflows so that you can create one workflow and associate it with both case entry/screen entry and field changes.
- If you use an appearance component on the Typelaw field (or any field that has a default value) the workflow will only be activated when the user changes the field or on screen entry but not upon file creation; if you use a default typelaw or value without touching the field, the workflow won't be triggered.
- Each field that you want to change with an appearance component requires its own workflow.
- Use separate branches for hiding and displaying fields; that is, use one branch for hiding, one for displaying.
- Appearance components are not supported on file exit.
- If you have trouble getting an appearance workflow to 'stick' - it works once but disappears once you revisit the file later - try adding it to the screen entry or file entry workflow.
Case Component

Use a Case component to control what happens under different conditions. For instance you may wish to do different things if a case is open, closed or pending. The case entry looks like:
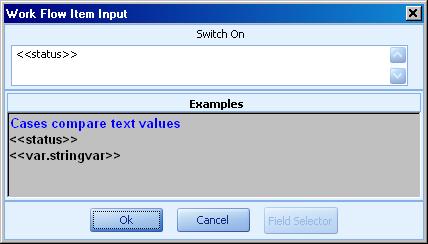
This says check what’s in the status field on the current tab. When you drop items on top of the case item, you'll be prompted to fill in a value. Below, we fill in OPEN as the first value.
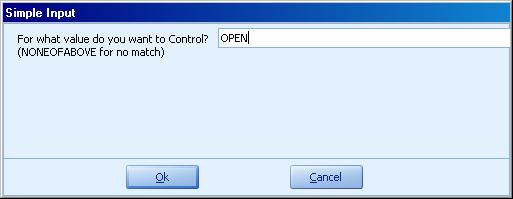
To add a default branch that occurs if none of the other stated cases apply, type NONEOFABOVE as shown above.
Other typical scenarios for using Case components: currently logged in user, case type, assigned attorney.
Display Component

Display components simply show a message to the end user; these are common on Program Entry as well as fields where extra attention is needed. You can use straight text and use any variables as usual in a display.
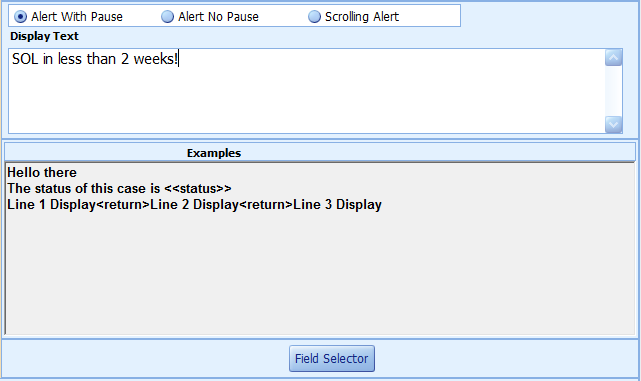
You have the ability to use the Display in three different ways: 1) Alert with Pause - this will pop up a dialog box to display the message entered and requires the user to acknowledge the message by clicking Ok. 2) Alert No Pause - this will show an alert window in the lower left corner of the screen. It does not require the user to take action (much like an Outlook message alert). 3) Scrolling Alert - this will display information as scrolling text across the bottom of the file. This is useful to show messages that you want to remain on the screen, but not interfere with a user's ability to work within the file. This type of display can contain small HTML tags as needed to change the look of the displayed message. For example, if you put the following in a scrolling display: <color=255,0,0> The statute of limitations is due within one week!</color> LawBase will scroll a message that looks like this: The statute of limitations is due within one week! For a list of supported HTML tags, please visit:
https://documentation.devexpress.com/#WindowsForms/CustomDocument4874
Exe (Executable) Component

Use an EXE component to call an external program. For instance you may want to launch a billing program that would display the current balance for a case.
Field Updater Component


Use Field components to update a field which is on the same tab as the WorkFlow event trigger. If the field that you change this way also contains a workflow event workflow, that workflow will be triggered. In the above example, the docket field is restored to the previous value (the edit is essentially rejected).
IF Component

IF components establish mathematical or true/false conditions. The entry box looks like:
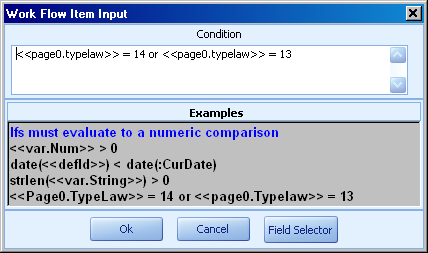
The condition defines whether the thing is true or false. The above example establishes the condition as 2 typelaws: if the typelaw is 13 or 14, the True branch will be followed. To add true and false branches, drop subsequent components onto the IF and select TRUE or FALSE from the dialog that appears. To use multiple conditions, use AND and parentheses as needed to group items. For example if you wanted to only do something if the statute date was changed to something within 20 days (and after today) and if the case had over $10,000.00 in fees so far, you could do something like:
date(<<statute>>) <= date(:CurDate)+20 and date(<<statute>>) > date
(:CurDate) and <<fees>>  > 10000
If you want a workflow to fire on a field only when that field (or another field) has a value, the IF component will help you determine whether a field is NULL by using string length logic:
strlen(<<statutedt>>) > 0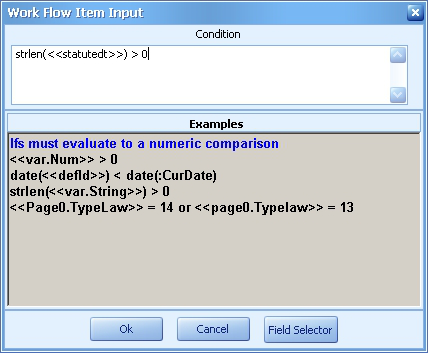
So if you want to add a calendar item only when <<statutedt>> has a value, you would add the ACTION component to the TRUE branch of this IF component.
Mail Component

Add a mail component when you want the WorkFlow event to send an email to a person or group of people. To mail to several address, separate the list with commas.
Stop Component

Use the STOP component to end a branch or to disable a workflow.
SQL Component

Use SQL components to run a SQL statement. SQL statements can use SQL to do anything a normal SQL statement may do including calling stored procedures. Examples: update page0 set status = 'CLOSED' where serial = :serial exec sp_storedProcedure :serial exec sp_storedProcedure :serial, '<<variable_name>>', '<<variable_name>>'
Using a Stored Procedure to Return a Value to a Variable
Here is an example of a stored procedure:
Alter PROCEDURE [dbo].[testvariable](@serial int, @input varchar(10))
AS
if @input = 'text'select 'this is text'
if @input = 'date'select getdate()
if @input = 'int'select 1234567890You must pass the serial as the first parameter to the stored proc even if you don't need it. Additional
parameters are not required although this example shows one additional parameter.
You must use SELECT in the Stored Proc to select the value to be passed out to the Variable.
Execute the stored procedure form the Workflow VAR item.
Example for above workflow:
<<sql(exec testvariable :serial, <<var.input>>)>>Var (Variable) Component

Use a Var to set up a variable that you can use elsewhere. This variable may contain numbers and math or text. Sample VAR dialog:
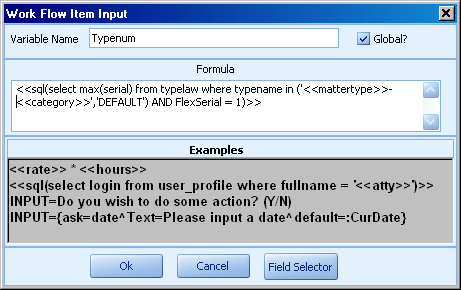
Name Name the variable as you like. The example above shows Typenum, so this will be known as <<Var.Typenum>> in other WorkFlow components.
Global
Check the Global box to make this var available to all workflows that might be merged into this same workflow. If it is not checked then this variable will only be valid for the current workflow. Formula This is where you type in the text to be evaluated.
Math
In the formula field you may use simple math such as “5 + 3 * 2” or use variables to represent any part of the formula. For instance “<<settlement>> * .33” would calculate a settlement of 33% from the information located in the <<settlement>> database field. The result is placed in a variable that you refer to later by calling it <<var.name>> where name is whatever you called it. Variables can be re-used or even refer to themselves. For instance you could have a variable “Count” that simply counts each time it’s hit with “<<Var.Count>> + 1”
Text Examples
Formulas may also contain straight text such as “<<LB_USERNAME>> is the current User”. There is a Substr routine that allows you to get at any portion of the string. For instance if you wanted to get the first three letters of the username for some reason, you would do “Substr(<<LB_USERNAME>>,1,3)” To find out the
length of any string you may use strlen. “Strlen(DREW)” would result in 4. There is also UpperCase() and LowerCase() which change all the characters to the desired case.
Date Arithmetic
Formulas may also do date arithmetic. To do so, you must surround any date with the date() command. For instance if you wish to find the number of days since a file was opened, you could do “date(:CurDate) – date(<<defld>>)” assuming defld is the field that contains the date opened. You may also add or subtract a number of days from a date with something like “date(:CurDate) + 60”, which would add 60 days to today.
Input
There may be occasions where you wish to ask the user for a value to put into the variable. If so, you may use something such as: “Input=What is your name? Default=<<LB_USERNAME>>” The portion after Input= is the prompt you wish to display. The DEFAULT= portion is optional and is what the value is if the user does not change it. Read more about INPUT options below.
Input Variables
Input requested can range from the simple to sophisticated. Here's a more sophisticated example. This input uses an ASK syntax to produce a radio button.
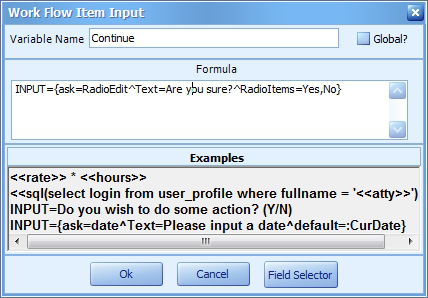
Here's how it appears to the user:
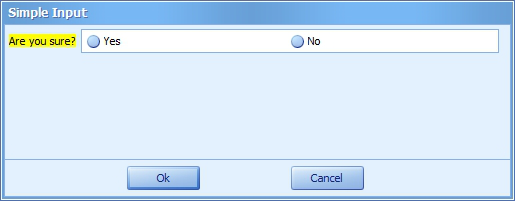
The ASK syntax supported by Workflows is the same as used for Reports. For all the support input types, see Ask Variables and Asks - Supported Field Types in the report section of this help.
Copying Components
When building a workflow, you have the ability to copy and paste previously created components and edit them accordingly. You can copy the component from within the same workflow or from a different workflow. This can be helpful, for example, when a particular workflow contains a lot of Appearance components that are changing the properties of a lot of fields. Another example is when you've created a Manual Action or Variable with complex commands or strings that you would rather copy/edit than recreate/retype.
To copy, simply right click over the component you want to copy and select Copy Step:
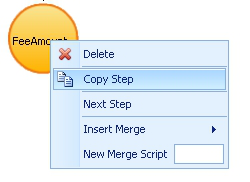
Navigate to where you would like to paste the copied component. On the widget ABOVE where the component should go, right click and choose Paste Step:
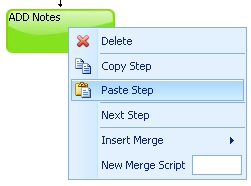
The component property pane will appear with the same properties as the original component. Here you can either keep the same properties or make any needed edits, as the properties apply only to your newly pasted component:
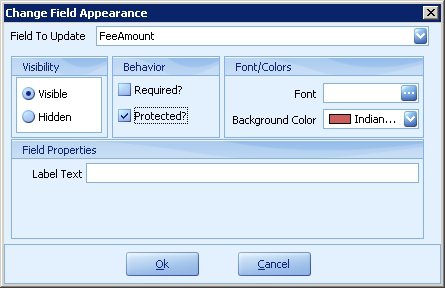
Variables
There are several types of variables that may be used in any Item of the WorkFlow. Variables can generally be placed in any component where normal text can be used.
Current and Previous Values
:CurDate :CurTime :serial :PrevValue
The current date The current time The serial # of current file Value of the event field before it was changed
Date/Time
Syntax Example Returns <<tabname.fieldname>> <<page0.sol>> 3/21/2011 <<tabname.fieldname.time>> <<page0.sol.time>> 9:45 am <<tabname.fieldname.datetime>> <<page0.sol.datetime>> 3/21/2011 9:45 am
Fields from Current Tab
Syntax Example Returns
<<fieldname>> <<location>> Value of filelocation field on the current tab of the event. <<fieldname.link>> <<location.link>> Returns value of the caselink display for a caselink field
Fields from Other Tabs
Syntax Example Returns
<<tabname.fieldname>> <<page1.status>> Value of the field status on the first copy of Page1 of
the current file.
Formatting
Pressing ENTER does not add a carriage return to a display component. To add a carriage return type: <return>
Serials
:serial Value of the page0.serial of the file you are in.
<<serial>> Value of the pageX.serial of the copy of the tab you are currently in. For
example, if on the header then value = page0.serial, if on a tab page1 then value = page1.serial, if on a subgrid or subtab page1A, then value = page1A.serial
<<caseserial>>
Value of the pageX.caseserial of the copy of the tab you are currently in. Most commonly used to link they record you are in back to the page0 of the file: where <<caseserial>> = :serial
System Variables
<<LB_Useremail>> The email address of the logged in user. This must be entered in the user profile; see Users for more information. <<LB_USERNAME>> The user name of the logged in user.
SQL Variables
Syntax Example Returns <<SQL (statement) >>
<<SQL(select count(serial)
from page3 where caseserial
= :serial)>>
The number of copies of page3 for the current case.
User Variables
Syntax Example Returns <<var.variablename>> <<var.v1>> The value of the variable defined by the user named v1.
Ask Variables
In HotDocs Reports, LawBase WorkFlows and LawBase Dashboards, you can use {ask} variables to get user input in construction of a query. When these queries see an {ask} section, the entire section is replaced by whatever the user inputs. The {ask} section contains sections divided by carets ‘^’ that instruct LawBase how to ask for the input. {ask} sections begin by telling LawBase what kind of field to input and then what the text of the prompt should be and what the initial (default) value of the field should be.
Examples
Here’s a sql statement from a note report:
select * from notes where  notes.duedate >=
{ask=date^Text=Enter Start Date^default=DateMath(:CurDate,w,-2)}
and notes.duedate < DateAdd(dd,1,{ask=date^Text=Enter End
Date^default=:CurDate})
and noteby like {ask=picklist^PickListName=sql(select login from
user_profile where activeuser = 'Y' order by login)^Text=Who
entered the notes?^default=%}
order by duedate
Here’s what each {ask} section does
{ask=date^Text=Enter Start Date^default=DateMath
(:CurDate,w,-2)}
This says to input a date, with a prompt of “Enter Start Date” and the initial value should be the Current Date minus two weeks. The result is used after the notes.duedate >= section which means that query will find notes where the duedate is greater than or equal to whatever date the user inputs for this section.
{ask=date^Text=Enter End Date^default=:CurDate}This says to input a date with the prompt of “Enter End Date” and initial value of the current date. This section is in part of a DateAdd in the query. DateAdd is a SQL function that in this case adds 1 day to whatever the user enters.
{ask=picklist^PickListName=sql(select login from user_
profile where activeuser = 'Y' order by login)^Text=Who
entered the notes?^default=%}
This says to gather the input from a picklist box. The possible selections will be found by executing the sql statement shown (which goes and gets all the active LawBase user names). The prompt will say “Who
entered the notes?” and the initial value will be ‘%’ which means all values. In the query it says to make sure the noteby is like whatever was entered in the box. So if % is selected, it will find all entries. If you select DREW only Drew’s notes would be found.
To ask user for a date with no time element associated with it:
{ask=date^Text=Enter Start Date^notime^default=DateMath
(:CurDate,w,-2)}
Asks - Supported Field Types
The following field types can be used in an ask variable.
Checkbox
Example: {ask=check^Text=Use this entry^default=Y} Checkbox asks are mostly used in Workflows, not reports.
Date
Example: select * from notes where notes.duedate >= {ask=date^Text=Enter Start Date^default=DateMath(:CurDate,w,-2)} and notes.duedate < DateAdd (dd,1,{ask=date^Text=Enter End Date ^default=:CurDate})
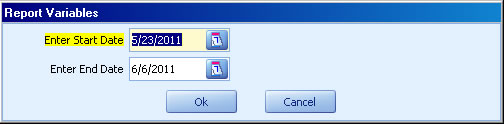
To ask user for a date with no time element associated with it:
{ask=date^Text=Enter Start Date^notime^default=DateMath
(:CurDate,w,-2)}
Memo
INPUT={ask=memo^Text=If the question is too long to fit on one line
<return>you could use an ASK with a memo <return>
and coded carriage returns in order<return>
to display the question in multiple lines<return>^default=}
Multi-select
This option presents multiple choices to the user input={ask=MultiSelect^Text=Which People^Items=Ed,Sam,Frankie,Johnny,Rick,John,Billy,Tom^default=Ed,Sam,Bill- y}
The result is a comma separated list of selected items.
Below is an example of the contents of two variables within the workflow. The first is the select list but the second variable takes the results of the first that have comma separated values and replaces with comma separated values with single quotes around. WHICHPICK:
Input={ask=MultiSelect^Text=Which Distribution List do you want to
email to?^items=CLIENT SUBSTANTIVE,CLIENTS,CLIENTS INVOICE,IN-
HOUSE,LOCAL COUNSEL,SERVICE}
WHICH:
<<sql(select replace(''''+replace('<<var.whichpick>>',',',''',''')
+'''',','' ',','''))>>
NOTE: Save yourself time - if you are selecting single items from a picklist, use the "PickList" on page 529
NOTE: This works very well in workflows but may require advanced SQL skills for use with Reports.
PickList
When using a PickList you need to describe the PickListName. This can be the name of a picklist (defined in LBDesign) or a sql() statement that gathers its selections from the database. Example using a named picklist: {ask=picklist^PickListName=role^Text=Pick a role. Type % to select all roles^default=%}
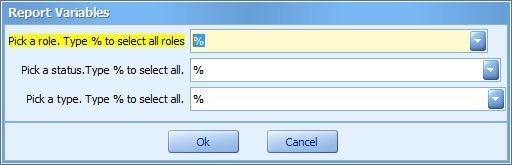
Example using a SQL picklist: {ask=picklist^PickListName=sql(select login from user_profile where activeuser = 'Y' order by login)^Text=Who entered the notes? ^default=%}
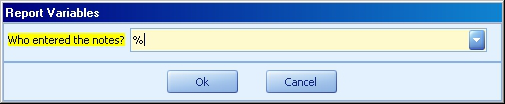
Example using a MultiSelect SQL picklist: {ask=MultiSelect^Text=Agency^Items=sql(select distinct agencyname from RPTEmployAgency order by agencyname)^default=%}
RadioEdit
When using a RadioEdit, you must supply RadioItems as a common delimited list like select * from page0 where name ={ask=RadioEdit^Text=Which status? ^RadioItems=Intake,Open,Closed^default=Open} order by name
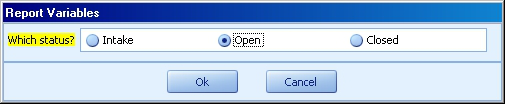
Text
Example: select * from page0 where name like {ask=text^Text=Which case? (use % as a wildcard) } order by name

Typelaw
Example: select * from page0 where typelaw in (select serial from typelaw where typename = {ask=PickList^PickListName=sql(select typename from typelaw where flexserial = 1 order by typename) ^default=%} )

Simple WorkFlow Example
In this example, we'll build a WorkFlow event that:
Makes a note
Emails a certain user
every time the Paralegal field changes.

See how to create this starting in LawBase - Sample WorkFlow from Front End or Through LBAdmin - Sample WorkFlow through LBAdmin
Sample Procedure through LawBase Front-End
Creating the WorkFlow
- Right-click on the atty field, click Global and a new WorkFlow editor will appear.
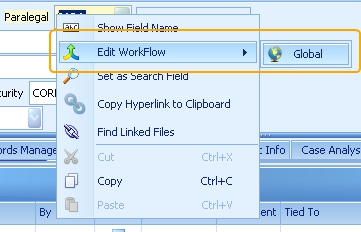
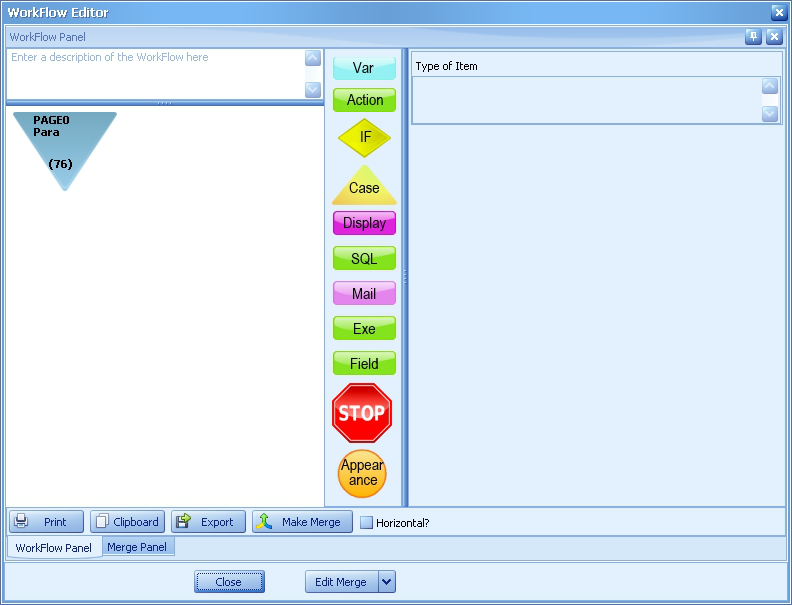
Writing the Note
- Drag an Action button from the component panel in the middle onto the blue
triangle at the top of the event.

Fill in the Action Input form as show below and click OK to save it. The text:
The paralegal changed from :PrevValue to <<para>>.
Add, Change or Delete
Add means a new note is created for each change to the field that the workflow fires from. Change means that only one note is ever added and it changes each time the workflow is fired. Delete, if Rule Name is used, means that a previously added note will be deleted. Interactive will pop up a note entry box when the user fires the workflow for manual/ad hoc entry. We will pick Add, as we'll want a record in Notes of every time this field is changed. Date Puts a current timestamp on the note. Spent Indicates how long the user was in the case, or how long the task took. By: Who performed the action; we're recording the currently logged in user. Type This is up to you; we are indicating a Misc. Note Body (memo)
This is the body of the note. Ours records the paralegal before the change and after.
- The resulting WorkFlow looks like this

Triggering the Email
- Drag a Mail button from the component panel on the left onto the green notes component in the WorkFlow.

Fill in the Mail Item dialog as shown here

This says send [email protected] an email informing him that paralegal on this case has changed.
The final event looks like the following:
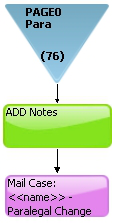
To modify an existing workflow see Editing Workflow.
Describing the Workflow
After you have completed and tested your workflow, you should describe what it is that the workflow does in the memo box above the graphical representation. This is a best practice and helps to minimize any confusion in the future about what a workflow is doing. Furthermore, these descriptions can be exported for system summary requirements. For more information about, please see Exporting Workflow Definitions.
Sample Procedure through LBAdmin
This sample adds a workflow to the Cases FlexBase, however the same steps would be followed for any of your FlexBases.
Creating the WorkFlow Event
- From LBAdmin, under the Workflow ribbon click on the Workflow button.
- From the tree on the left, right-click on Global and select New WorkFlow.
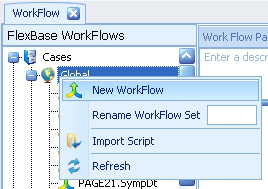
3. Select the tab and field. In this example we're using page0 (header) and the para field.
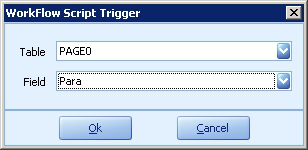
Click OK to create.
4. Select the newly-created event in the tree (it typically appears at the bottom) and a blank WorkFlow
Panel appears.
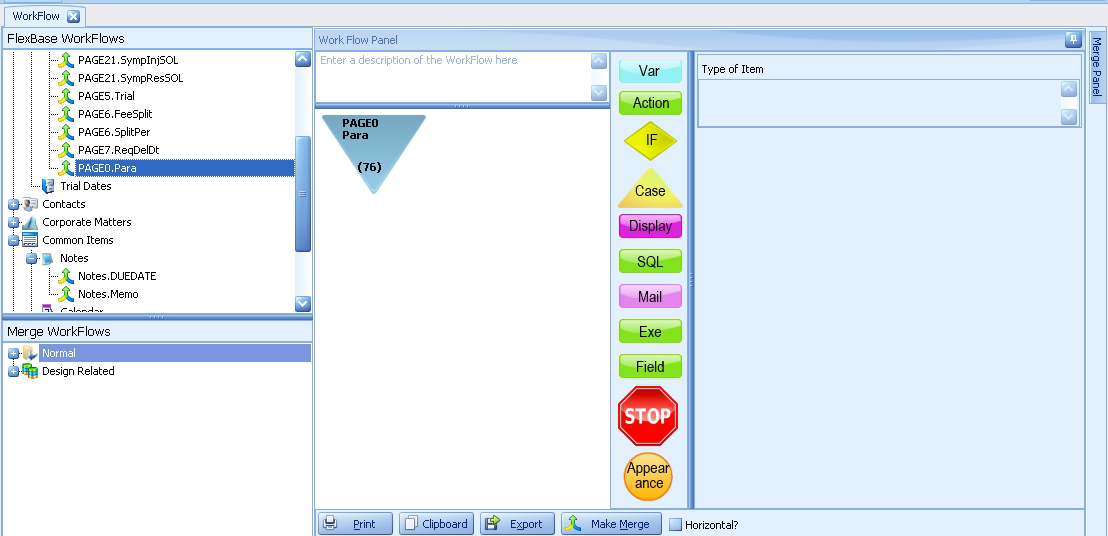
This is the first step in the WorkFlow. What this means is: whenever this field is changed in the LawBase interface, perform the steps that follow. So let's build those steps.
Writing the Note
- Drag an Action button from the component panel in the middle of the
Workflow Panel onto the blue triangle at the top of the event.

Fill in the Action Input form as show below and click OK to save it.
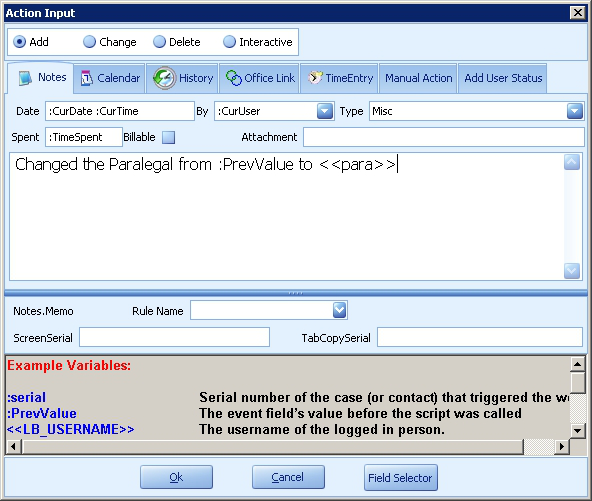
Add, Change, Delete, Interactive
Add means a new note is created for each change to the field that the workflow fires from. Change means that only one note is ever added and it changes each time the workflow is fired. Delete, if Rule Name is used, means that a previously added note will be deleted. Interactive will pop up a note entry box when the user fires the workflow for manual/ad hoc entry. We will pick Add, as we'll want a record in Notes of every time this field is changed. Date Puts a current timestamp on the note. Spent Indicates how long the user was in the case, or how long the task took. By: Who performed the action; we're recording the currently logged in user. Type This is up to you; we are indicating a Misc. Note Body (memo)
This is the body of the note. Ours records the paralegal before the change and after.
- The resulting WorkFlow looks like this
Triggering the Email
- Drag a Mail button from the component panel in the middle onto the green notes component in the WorkFlow.

Fill in the Mail Item dialog as shown here
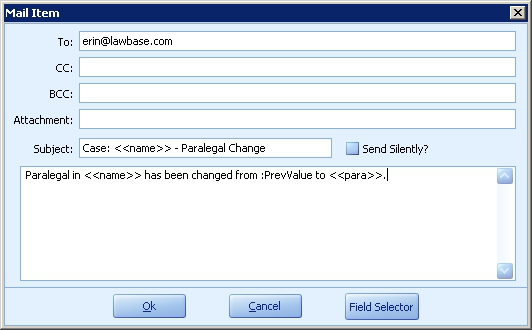
This says send [email protected] an email informing her that the paralegal on this case has changed.
The final event looks like the following:

To modify an existing workflow see Editing Workflow.
Describing the Workflow
After you have completed and tested your workflow, you should describe what it is that the workflow does in the memo box above the graphical representation. This is a best practice and helps to minimize any confusion in the future about what a workflow is doing. Furthermore, these descriptions can be exported for system summary requirements. For more information about, please see Exporting Workflow Definitions.
Editing WorkFlow
Once a workflow exists, you may wish to change how it works.
Editing WorkFlow Steps
When you initially drag and drop a new component into a workflow, a window for that new step appears where you set the definitions and press OK to add it to the workflow tree.
To edit an existing step in a workflow, click once on the step. A red box will appear around the step that you're currently viewing and the properties of that step will appear on the right:
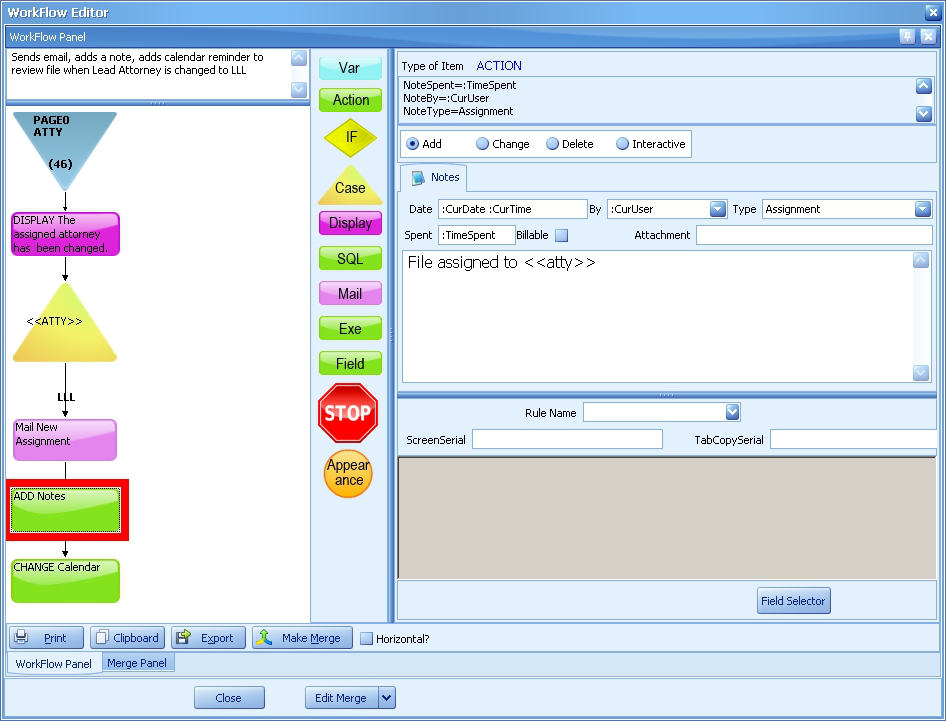
Make your changes to the step in the right panel. When you click to another step or exit the workflow, you will be asked if you want to save your changes.
Editing Case Selections
The <<ATTY>> case in this workflow states if the ATTY field is changed to LLL, take all of the following steps.
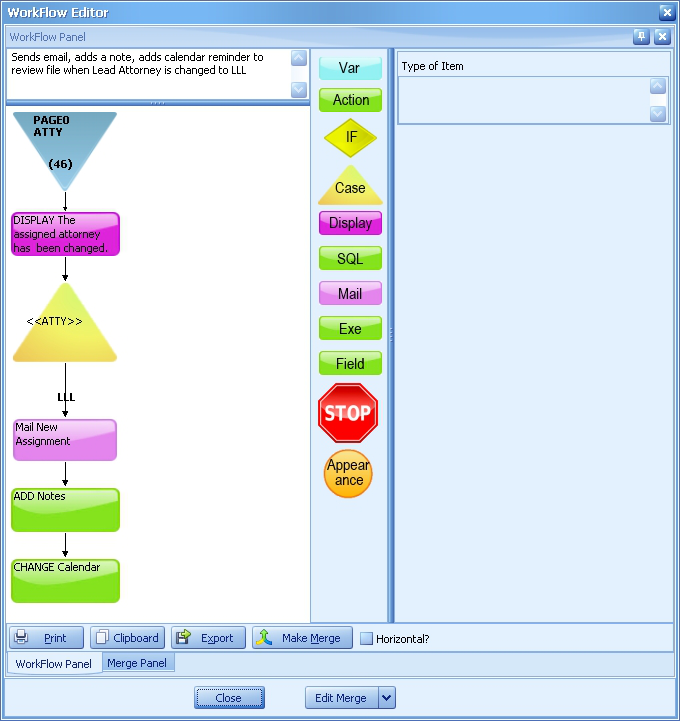
If you wanted to either remove LLL and add a different value, or ADD a value, right-click over the LLL in the tree and select Multiple Cases. The following dialog appears:
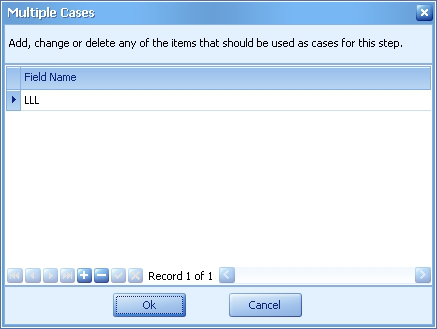
Use the buttons at the bottom to remove LLL (click the minus) and/or add another value (click the plus and type in the value).
Exporting and Importing WorkFlows and Merge Scripts
There may be the need to export a Workflow or Script once created from one database to another. For example, you create a Workflow in a TEST/DEV database and want to move it to the PRODUCTION database once tested and approved.
Exporting WorkFlow Events and Scripts
To export:
- Select the workflow event from the workflow tree.
- Click the Export button at the bottom of the panel.
- Save the file with the automatic name and .wfl extension. The name indicates whether it is a merge.
It is a good idea to save the exports to your main LawBase directory or a subdirectory there.
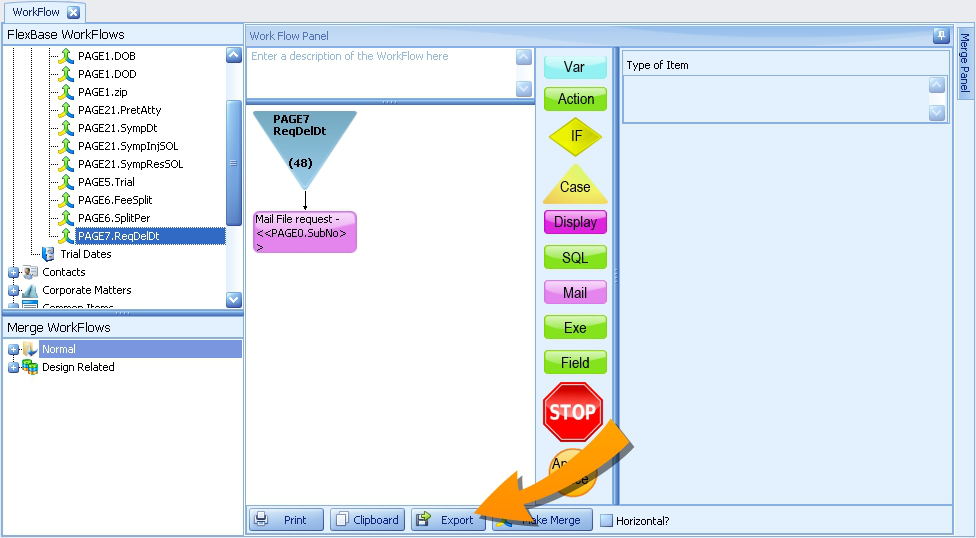
Importing WorkFlow Events and Scripts
To import a workflow event, in the workflow area of LBAdmin:
- Right-click on the tree where you want the workflow to be (typically Global) and select Import Script.
- Select the appropriate .wfl file from the main LawBase directory.
- Click Open to import.
Importing Merge Scripts
To import a Merge Script, right-click on the Merge Scripts menu, select Import Merge and select the.wfl file to import.
Exporting Workflow Definitions to Excel
For system summary purposes, it may be beneficial to export all workflow names and their associated definitions into an Excel document. As suggested in sections about how to create workflows, best practice is to use the workflow definition memo box to describe what the workflow does. This description, along with workflow serial, the workflow type, the page.fieldname that the workflow fires from, and the text label of the field the workflow fires from will be exported into an Excel file when the Export Workflow Definitions to Excel button is pressed:
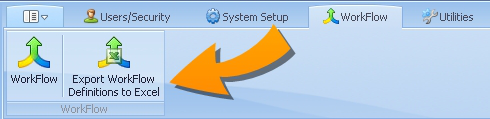
The resulting Excel file should look something like this:

Merges
Merge Scripts are objects, like macros, that can be called by events, such as FlexBase exit, and by other WorkFlows. They are built the same way as field level WorkFlows except that a particular field trigger is not defined. The trigger is established when you associate a merge with a WorkFlow event or a global action.
Creating a Merge Script
1. Right-click in the Merge area . The first item on the menu is New Merge Script. Fill in a name for your script and press enter.

2. The script is added to the merge listing in the bottom left. Select the script name and you can edit it the script in the merge panel. In the screenshot below, it is on the left.
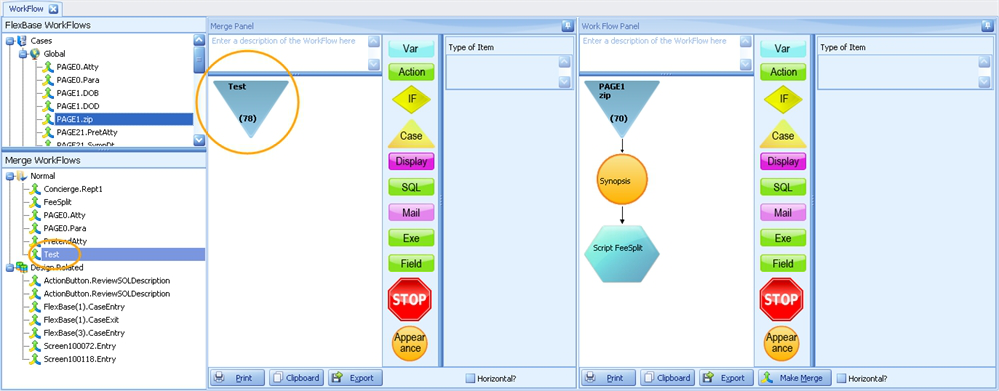
3. Build the merge just as you would a field level WorkFlow. See WorkFlow Example.
Note: Merge Scripts can contain Merge Scripts themselves.
Using Merges Scripts in WorkFlows
Use a merge when the same actions are needed in multiple workflows. To add a merge to an existing WorkFlow:
1. Right-click on the component where you want to add the merge and select Insert Merge. From the merges which are listed on the submenu, select the one you want.
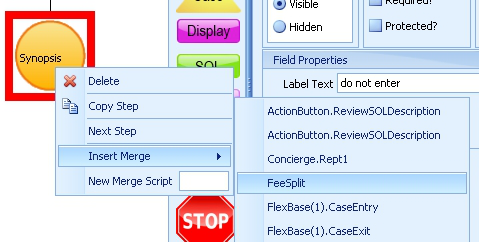
2. A blue hexagon appears, which is the merge.Double-click on the blue hexagon to open/edit the merge, the script of which will appear in the Merge Panel.
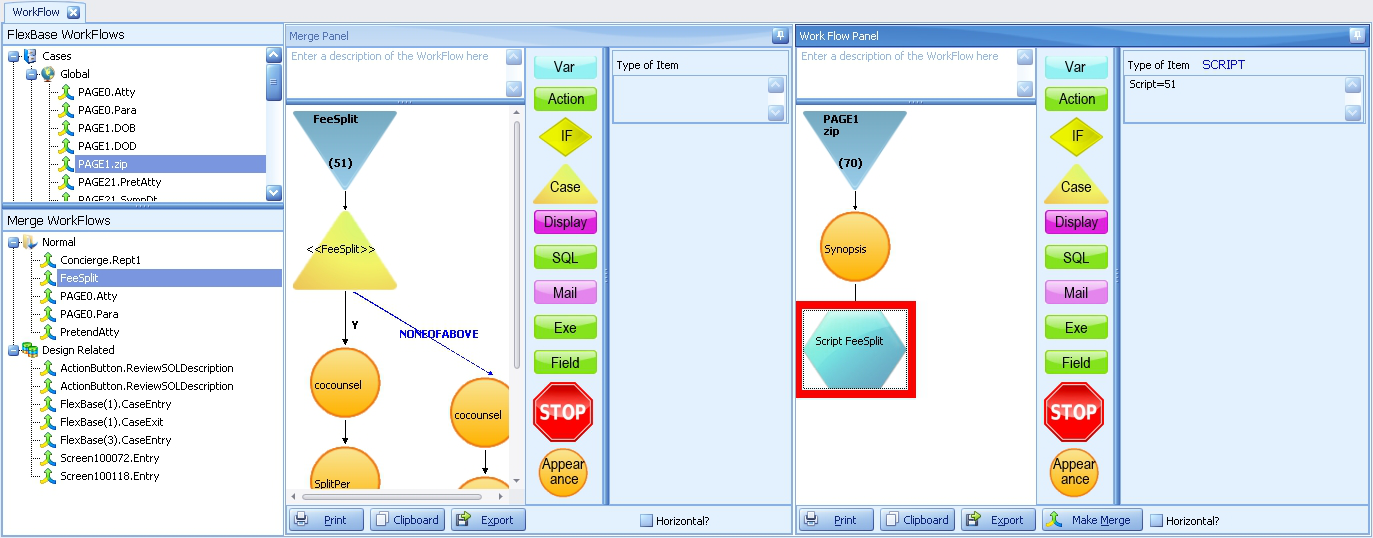
WorkFlow Types
Read about each of the following types of WorkFlows in their respective sections. Common Tab WorkFlows File Level WorkFlows Program Entry/Program Exit Simple WorkFlow Example Screen Entry/Screen Exit WorkFlow Button
Common Tab WorkFlows
Common Tabs WorkFlows are those triggered by events on common tabs, such as notes, calendar and history. There are two ways to create/edit Common Tab WorkFlows
From LawBase
From LBAdmin
Create a Common Tab WorkFlow from LawBase
The following will work for users with administrative rights.
1. Open a file and open the common tab type where you want to create the WorkFlow.
2. Determine which field you want to the WorkFlow to be triggered by.
3. Right-click on that field and select Edit WorkFlow.
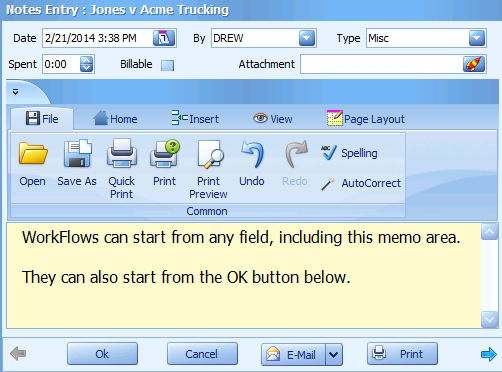
4. A WorkFlow editor window will appear and you can build the workflow normally, as described in Simple WorkFlow Example
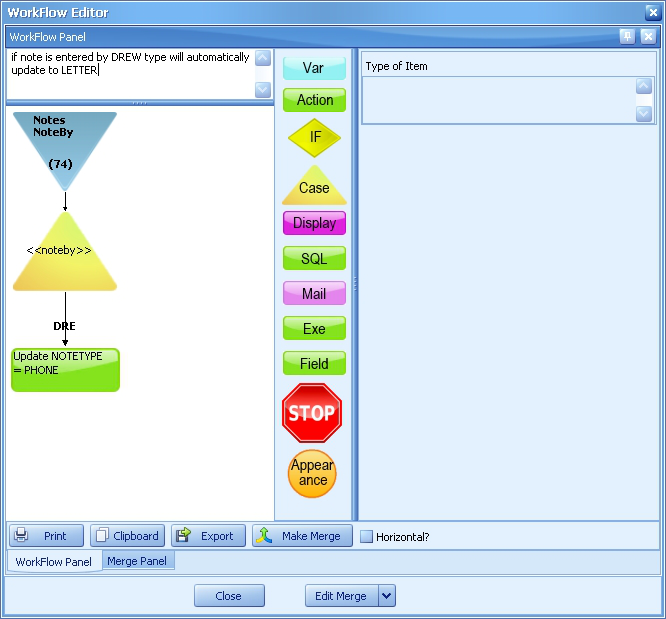
5. Click Close to save the workflow and you'll be returned to the LawBase interface.
6. The workflow you created will be triggered whenever the field you started from is changed or the OK button is pressed. Note in the example above, the name of the workflow is Notes Memo, so this workflow will fire whenever the memo field is modified.
Create a Common Tab WorkFlow from LBAdmin
1. Right-click on the common tab branch where you want to create a workflow. In this example we're using Notes.
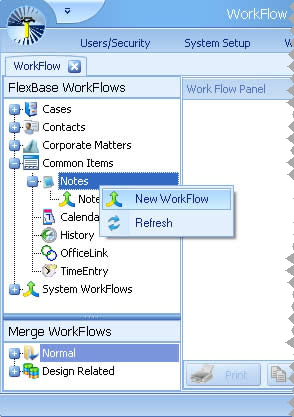
2. Select New WorkFlow. A dialog appears where you choose the field you want to use to trigger the workflow.
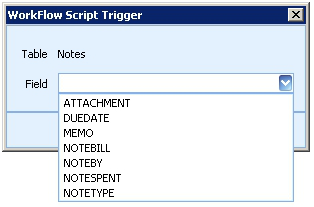
3. Select the appropriate field and a new item appears under the Notes branch.
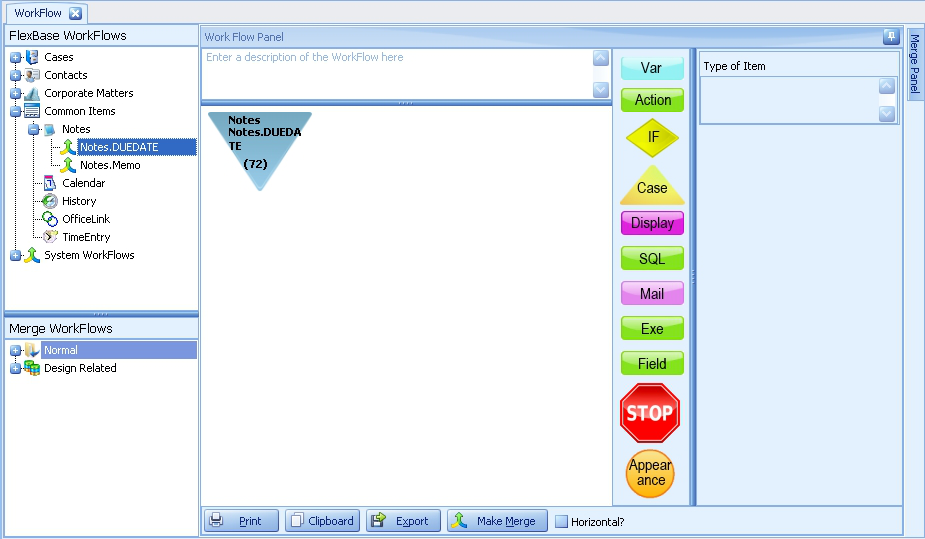
4. Select the new item. In this example, it's the Notes.DUEDATE item under the Notes Common item. At this point you can edit the workflow normally, as described in Simple WorkFlow Creation
NOTE: When referencing a common item field within the workflow, only use the name of the field:
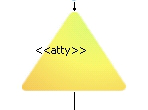
NOT
File Level WorkFlows
This section describes how to create workflows which are activated by
Creating a new file
Opening an existing file
Exiting a file (you don't have to unlock the file)
To create one of these:
1. From LBAdmin, go to System Setup > FlexBases
2. From the list on the left, select the FlexBase where you want to create a WorkFlow. In this example we are using the Projects flexbase.
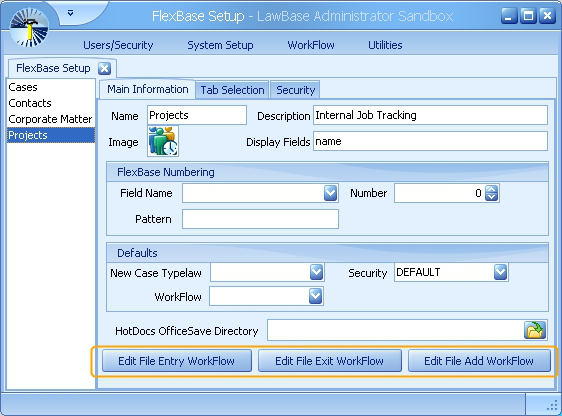
3. Select the type of workflow you want.
File Entry -the workflow will fire whenever a file is viewed. File Exit - the workflow will fire whenever a file is exited (you don't have to unlock the file) File Add - the workflow will fire whenever a file is newly created.
Click the appropriate button and workflow editor dialog appears.
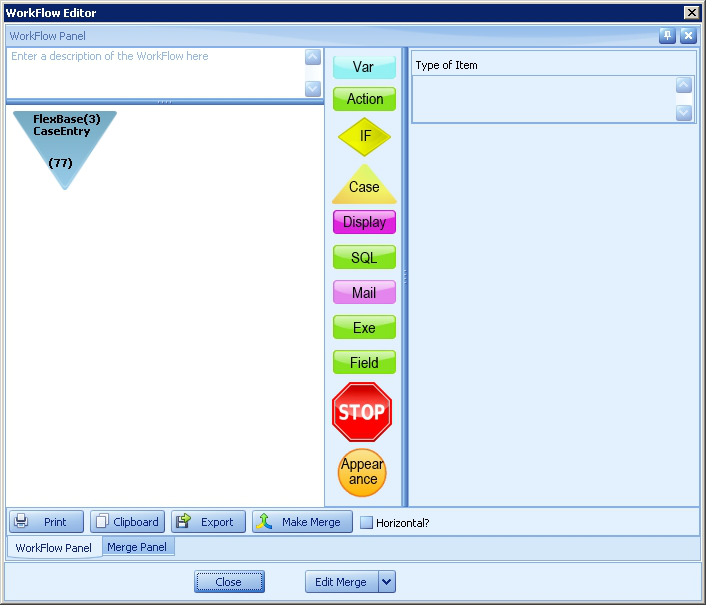
At this point you can build the workflow as described in the Simple Example. Click Close to save the workflow and return to the FlexBase window.
4. You can edit the workflow by returning to FlexBase properties. Alternatively you can find it in the WorkFlow area as well. It will be listed under Merge Workflows> Design Related.
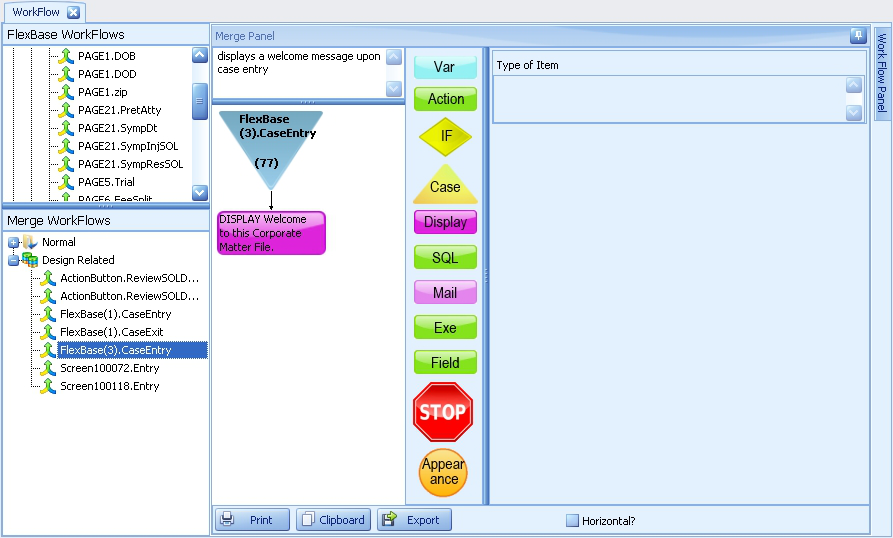
Program Entry/Exit WorkFlows
These are workflows that are triggered whenever users log in to and out of LawBase. To create a program entry/exit workflow:
1. Launch LBAdmin and open the WorkFlow module.
2. Stubs for Program Entry and Program Exit should be visible under FlexBase WorkFlows > System WorkFlows
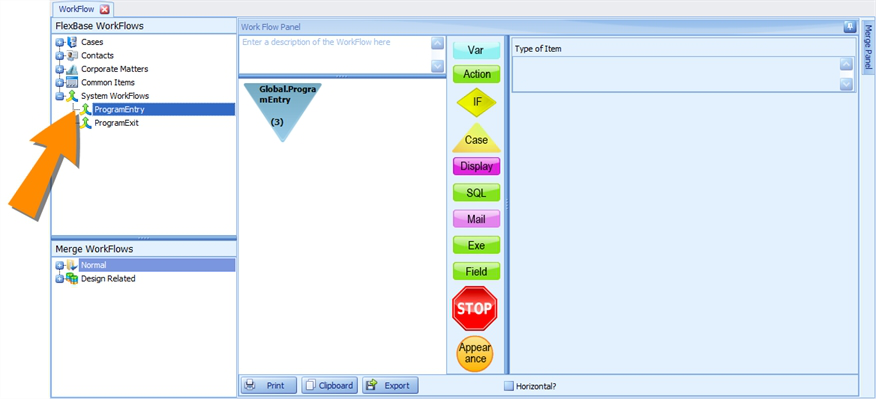
3. Select the WorkFlow you want to edit. You should see the blue triangle starting the workflow on the right in the workflow panel.
4. At this point, you can build the workflow normally. For details about building workflows, see Simple WorkFlow Creation
Common Examples of Program Entry/Exit WorkFlows
You can add a display that pops up for every user logging in; this can be a way to share the announcements of the day.
You can have it write to another table or even to another program to keep records of when your users log in and log out.
Call a stored procedure to do any number of things.
Screen Entry/Screen Exit
Screen Entry WorkFlows fire whenever a user enters a screen within a file, in both edit and browse mode. . Screen Exit WorkFlows are fired whenever a user exits a screen within a file, exits the file or saves/closes the file. You might want to fire screen entry/screen exit workflow in a variety of scenarios:
To pop up a display reminding users to complete the next step
On a tab with financial data, force an automatic calculation of subtotals and totals.
Adding Screen Entry/Exit Workflow from within LawBase
1. From within a LawBase file, open the tab you want to add the workflow to. Right-click over the tab label and select either Screen Entry or Screen Exit:
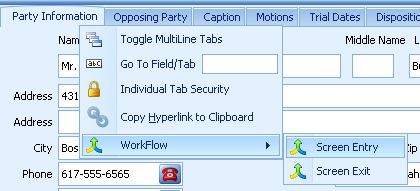
2. A workflow editor window will pop up where you can build the workflow like any other workflow.

Editing Screen Entry/Exit Workflow from LawBase or LBAdmin
To edit your workflow from within LawBase, right-click on the tab label as shown above to open your Workflow editor window. From there, edit the workflow as you would edit any other workflow.
To edit the workflow from within LBAdmin, in the Workflow section, under Merge Workflows, Design Related, your workflow will be listed as ScreenEntry(screen serial) or ScreenExit(screen serial):
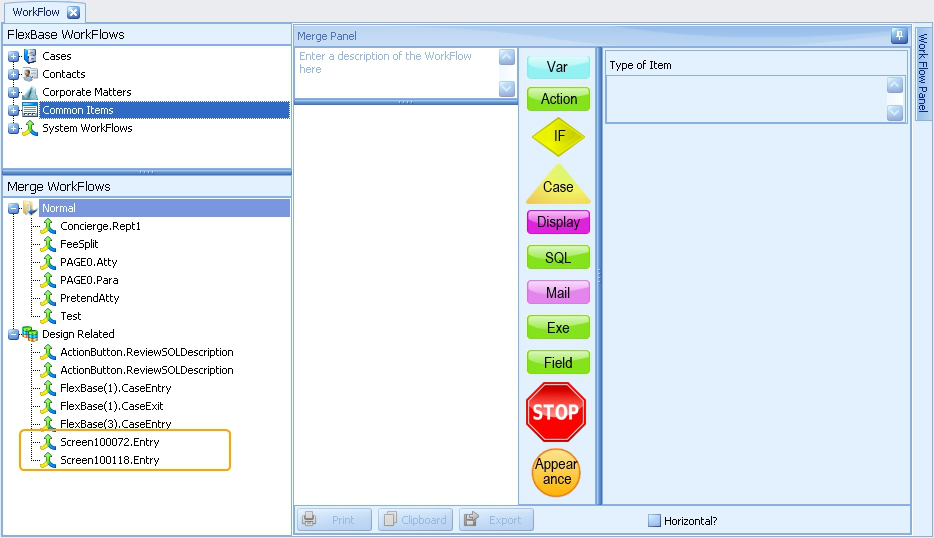
Adding Screen Entry/Exit Workflow in LBDesign
- Launch LBDesign and locate the tab where you want the WorkFlow
- Click into the screen property for WorkFlow Entry; click the lookup button.
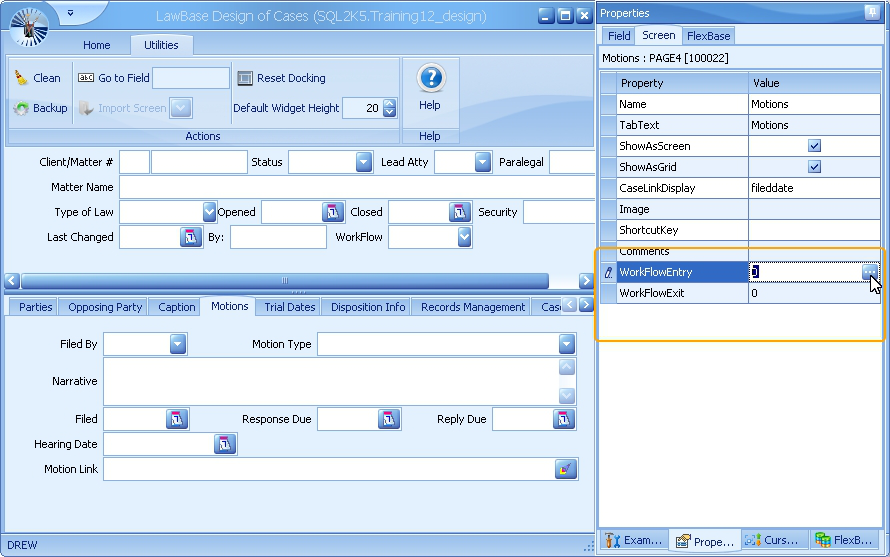
3. Because your active WorkFlows typically run in your production environment, you'll be prompted to Import the WorkFlows into your design database. This ensures that the workflows are synchronized across environments. Select the database you want to import from or choose none for no import.

4. After you select the import option, you'll be taken directly to the new WorkFlow. At this point you can build the workflow like any other. For more information about WorkFlow basics, see Creating a WorkFlow

5. When you have completed building the workflow, click close.
6. Upon exiting design, if you imported workflows in step 3, you'll be prompted to synchronize the new workflows back. It is generally a good idea to do the sync.
7. There is one more step. It is not enough to sync the workflow to production; you also need to run LBSync to synchronize the screens because the trigger for the workflow is a property of the screen and the screen entry workflow won't run without this sync.
Removing a Screen Entry/Exit WorkFlow in LBDesign
To remove a tab entry/exit workflow:
- Select the tab in LBDesign
- Open the Screen Properties
- Overwrite the script number which is filled in with the number 0 (zero) and press enter.
- Make sure to sync the workflows back to production; you should be prompted to do this when you exit LBDesign. Also sync the screens using LBSync.
The WorkFlow Button
While most WorkFlow types are triggered automatically, there will be occasions when the user clicks a button to fire a workflow. Here's an example where a note stored on the screen can also be added to the notes when the user click the button.
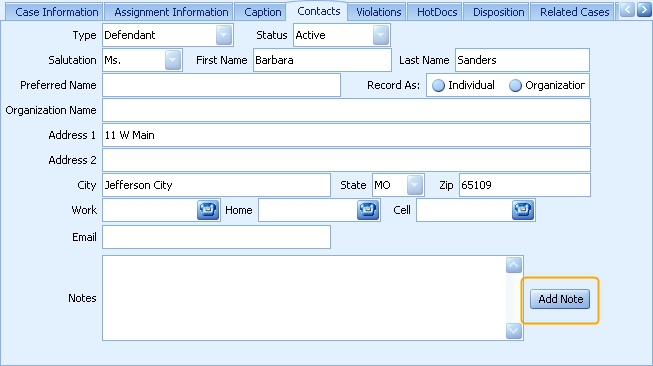
Common examples for using WorkFlow Buttons
To copy a repeatable tab
To calculate financial figures
To translate an address to be processed by Google Maps
To update a series of fields based on newly entered values
and more
Terminology
In previous versions of LawBase, this button was called an Action Button
Creating a WorkFlow on a WorkFlow Button
To create a workflow triggered by a WorkFlow Button, start in LBDesign:
1. Launch LBDesign and make sure the tabwhere you want to add the button is in view.
2. From the Exotic panel of the Examples palette, drag a WorkFlow button onto the tba.
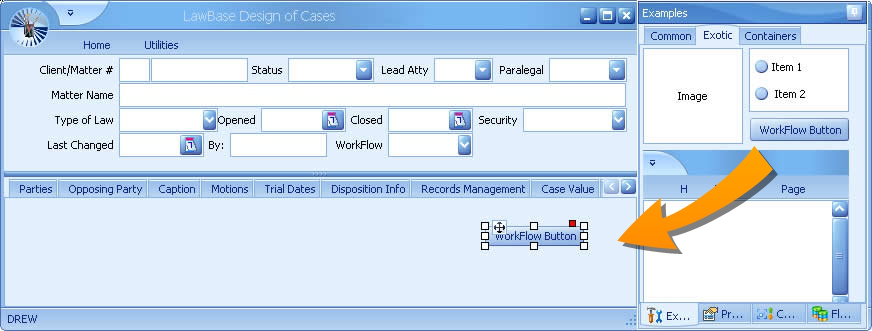
3. Once in position, select the button and expose the properties panel. To edit the WorkFlow, click the lookup button [...] to the right of the WorkFlow property.
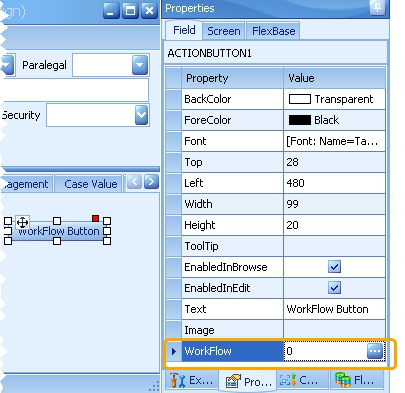
4. You will probably be prompted to import WorkFlows. Select the appropriate database.
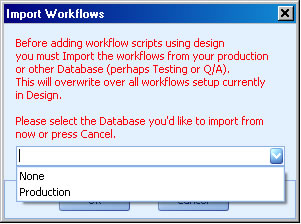
This is because typically, LBDesign uses a different database from your production environment and therefore the WorkFlows may not be in sync. NOTE: If you are designing "live" you won't see this prompt.
5. A WorkFlow Editor will appear and you can build the WorkFlow as described in Simple WorkFlow. Edit the WorkFlow normally and click Close to save it. Exit the WorkFlow property field and you'll see the automatically assigned script number is filled in.
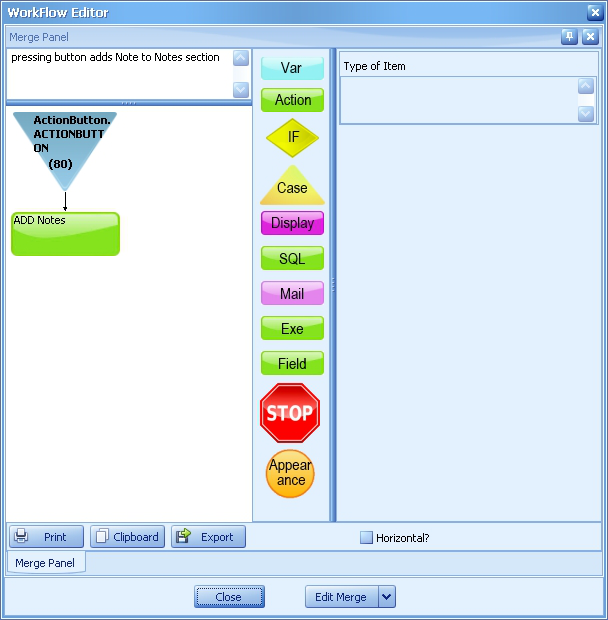
6. You can edit the text which appears on the button from the Text property. Also observe that the script name is filled in here as well.
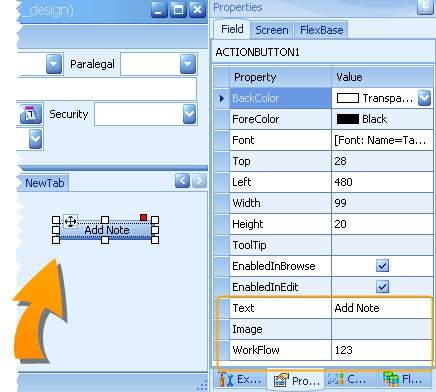
7. When you exit the LBDesign program, you will be prompted to sync your new workflows back to the database you imported them from. Generally you'll want to click yes and sync.
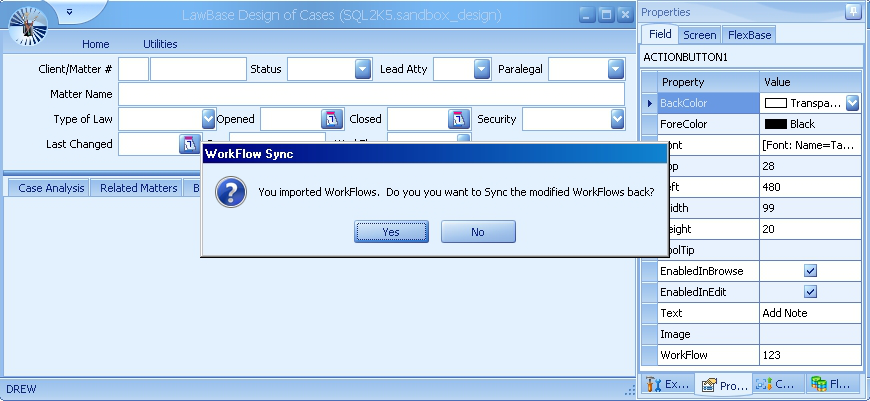
Built in WorkFlow functions
Datemath(date,type,num)
Figure out a new date by adding or subtracting some number of days (months,weeks,years) from another date. You can use d,m,w,y for day month week year and negative #’s for the num Datemath(11/13/2002,d,3) = 11/16/2002 Datemath(:CurDate,m,-2) = 12/20/2003 where today's date is 02/20/2004
Calculate only Business days Example: DateMath(:Curdate, b, 10) This example adds 10 business days. All weekends and LBAdmin defined holidays will be skipped. Holidays are set in LBAdmin under System Setup. For more information about Holidays, see Holidays.
Weekends and Holidays Use this to set how dates calculated by workflows should be handled when they fall on weekends and holidays. Holidays are set in LBAdmin under System Setup. For more information about Holidays, see Holidays. Use p for previous and n for next; dp moves a date to the previous business day,
dn moves it to the next business day. Examples
DateMath(09/19/2013,dp,2) calculates to 09/20/2013 since the calculated date 09/21/2013 falls on a weekend.
DateMath(09/19/2013,dn,2) calculates to 09/23/2013 which is the first business day after the calculated date 09/21/2013
You can use also use previous and next with the operators w,m,and y: DateMath(09/21/2013,wn,1) to calculate to 09/30/2013.
Flexserial
Return the flexbase serial number of the case that the Workflow is acting upon. :flexserial
GetCity / GetState / GetCounty These return the state or city from a zip code.
So something like getstate(80222) or more likely getstate(<<zip>>) will return the state for that zip and getcounty(<<zip>>) will return the county for that zip.
LowerCase(string)
LowerCase(Hello There) = hello there You can also combine functions. For instance say you wanted to take a string (in Var.V1) and make the first letter capitalized and the rest lower case, you could do: UpperCase(substr(<<var.v1>>,1,1))LowerCase (substr(<<var.v1>>,2,1000))
PlainText
Plaintext strips out RTF codes. This can be useful if the text from a memo needs to be used somewhere that rich text can't be handled. plaintext(<<memo>>)
ReplaceChars
ReplaceChars allows you to replace characters in a sequence before using that sequence. This can be helpful when dealing with apostrophes in SQL. ReplaceChars (this is the text, "the","and")
which would result in this is and text
Serial of Item just added (<<var.ActionAddedSerial>>)
It may be useful to know the serial number of a record added by a WorkFlow Action add or change statement. <<var.ActionAddedSerial>> is an automatic variable that gets set when an Action adds (or changes) a record.
StripQuotes(<<var.v1>>)
When using a variable to get information from a field that contains possible math functions (-, +, /) you must surround the variable in quotes so the math function does not occur. User StripQuotes to prevent those quotes from appearing when the variable is displayed.
When contact1.ph1 is a phone number formatted like 555-555-5555, the variable must be in "" to prevent the system from reading dashes as subtraction functions:
<<var.ph1>> = "<<sql(select directph from contact1 where
caseserial in (select SUBSTRING (page0.orgid ,charindex
('^',page0.orgid)+1 ,len(page0.orgid)) from page0 where serial =
:serial)>>"
If you placed that <<var.ph1>> directly into an email template (for example) it would appear like: "555-555-5555"
To prevent the quotes from appearing, place the variable in the email template like: StripQuotes(<<var.ph1>>)
Substr(string,index,length)
Extract length number of characters out a string starting at position index. Substr(abcdef,2,2) = bc Substr(<<LastName>>,<<Var.V1>>,3) = omb where LastName = Homburger and V1 = 2
Strlen(string)
Return how long string is in characters. Useful to see if a field is filled in. Strlen(abcde) = 5 Strlen(<<Var.V1>>) = 4 where V1 = Test
Time Spent (:TimeSpent)
Variable can be used in a workflow that is triggered from within a file to show how long that particular user has had the file open.
:TimeSpentUpperCase(string)
UpperCase(Hello there) = HELLO THERE UpperCase(<<Var.V1>>) = YES where V1 = Yes or yes or YES (Useful in case statements to allow users to enter something with out worrying about the case)
Debugging WorkFlows
Using System Debugging
While in LawBase, navigate to the field where you want to fire/test the workflow. Right-click twice on the login name in the bottom left corner of the screen so that it looks like this:

Make a change to the field that the workflow is on (or enter/exit tab or file) to fire the workflow. The following WorkFlow Debugging window will appear:
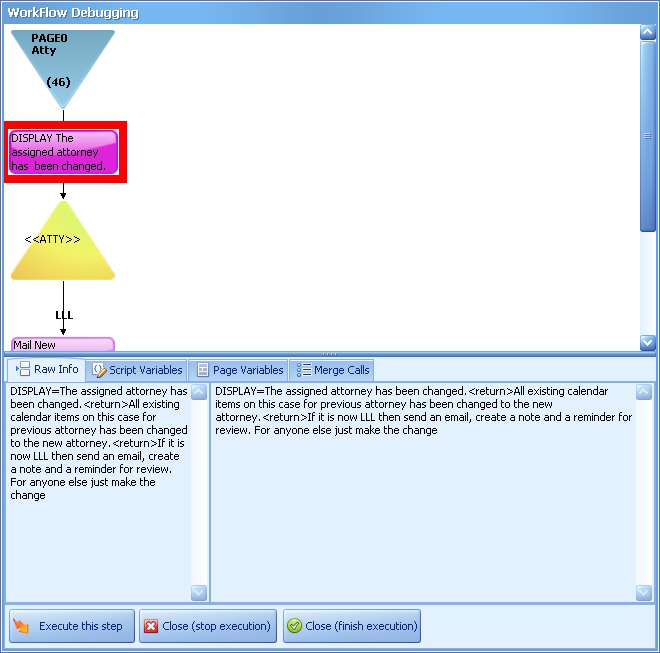
Button/Tab Function/Display
Execute this step
Will execute the current step highlighted and move to the next step in the workflow.
Close (stop execution)
Will close the debug window and stop any subsequent workflow steps from occurring.
Close (finish execution)
Will close the debug window and execute the remaining steps in the workflow.
Raw Info
Displays how the current step highlighted will change information or will be created. The left pane shows what the step will switch, the right pane shows the data specific to the current file.
Script Variables
If your workflow utilizes any VAR widgets, their values will appear for this particular file at the time this workflow step is fired.
Page Variables
Displays a list of variables and their values for the page the workflow is fired from.
Merge Calls
Lists all Merge workflows called by the workflow.
To get out of debug mode, right-click once over the username in the bottom corner again so that it looks like this:

Build Debug into the Workflow
Use variables to turn debug on and off.
1. Create a var in the workflow where you would like debugging to be activated.
2. Name it debuglevel
3. Fill in the formula area with the Debug level. Supported levels are 0, 1 and 2.
Level Description
0 No debugging; turns off debugging 1 Low level; fewer messages 2 High level; more messages.
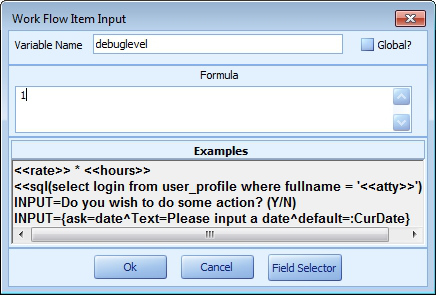
4. Add another variable, also called debuglevel, where you want the debugging to stop. Set the formula value to 0 (zero).
Using WorkFlow to Launch a HotDocs Template
Simple Template
You can launch a HotDocs template from any workflow, but the most common application is using a workflow button.
- 1Once you have built the button (see the section WorkFlow Button for details), add an ACTION component.
- Select Manual Action.
- Fill in the entry area with a command like the following:
HotDocs=path\templatename Examples HOTDOCS=L:\lb12\\hotdocs\<<var.docname>> HOTDOCS=L:\lb12\\hotdocs\<<Intake.rtf>>
Calling a Template with Parameters
Follow the same steps as above, but follow the template name with a notation for the parameters. Syntax:
HotDocs=templatename^Parameters=/stw /nw