LawBase InstantPrint
Document No. 00146205-2 | LawBase version 12.6 or greater
Contents
- Overview
- Template Folder Setup
- Template Editor
- Left Side of Editor
- Right Side of Editor
- A Simple Example
- Defining Data for Templates
- Field Usage
- Display Properties
- Repeat Items
- Template Properties
- Standard Fields
- Reports
- Nested Tables
- Advanced Table Design
- Create from QueryBuilder
- Create from SmartFolder
- Calling from WorkFlow
- Converting HotDocs Templates
- FAQ
Overview
InstantPrint is a function in LawBase, new in version 12.6 or greater, to create documents and reports natively. InstantPrint leverages Word's ability to merge .docx templates with data contained in LawBase. There are three types of InstantPrint templates:
- File based. Used to create output based on a file and the information in that file.
- Report based. Used to create output based on the data contained in multiple files.
- Standard report. Used to create reports based on the common items of a file or for the output of calendar information for a user/group.
Although there are 3 different types of InstantPrint, most of the commands/techniques are the same regardless of the type.
Template Folder Setup
Templates are stored as standard .docx files in the InstantPrint folder designated in the LBAdmin Cosmetic named InstantPrint.Directory. Under this folder are 4 sub-folders. Each sub-folder may have as many sub-folders as you deem useful to segregate your templates. You will need to add the .docx files to the appropriate folders to get started.
- File. All file related templates.
- Reports. All report templates.
- Snippets. A folder for snippets which are portions of templates that may be inserted in other templates. A great way to reuse text or variables of anything that you find yourself doing repeatedly — such as letterhead, address blocks, signatures, etc.
- StandardReports. A folder for all the standard reports regarding common items under a file.
Template Editor
LawBase provides a powerful template editor that allows easy editing and testing of templates directly in LawBase itself. The editor is based on Microsoft Word so we assume familiarity with using Word to create and edit documents. You can edit multiple templates at once which allows for easy access to examples and cut and paste between templates. You can show multiple templates side by side or tabbed.
Note: To be able to edit InstantPrint templates in LawBase, you must either be a LawBase administrator or have AssembleEdit set for InstantPrint Access under your User Profile / Personal Settings tab. On each user profile you can limit which rights they have for InstantPrint using this same drop down.
Left Side of the Editor
The left side of the editor contains the actual text of the template. Most ribbon items do exactly what they do in Word, so we won't describe them here. Under the Mail Merge ribbon group are the LawBase specific items. As with all LawBase forms with ribbons, any ribbon item can be placed on the quick access toolbar by right-clicking on the item.
The Mail Merge items are the following:
- Insert Field From Database. For file based InstantPrint templates, pulls up a blank LawBase file where you can double-click on a field to insert its code in the template.
- Standard Field. A drop down that allows you to insert a field that controls or merges data into the template as needed. The different types of Standard Fields are:
- Repeats. A command to tell the template where to get repeatable data. Repeatable data can come from the file being used or a SQL command.
- Variable. A calculated variable that can be printed in the template or used for other purposes, like used in an action or another calculation.
- Ask Variable. When the template is assembled, ask the user a question and store the result in a named variable to be used later.
- IF/Then. A block that can select which text to display depending on defined conditions.
- Action. Create/Update/Delete items in LawBase. Most often used to create a note and/or calendar item when the template is assembled.
- Document Field. A standard field that relates to the template itself — such as Date Run, Number of pages in the output, or current logged in user.
- Insert Prototype. A drop down of prototypes to speed up template creation. For instance, a prototype of a master/detail report with generic repeat items and nested tables, or an example of side by side columns for one field.
- Show Field Results. When this button is pressed, LawBase will toggle between showing what the document would look like when assembled and the code behind. By toggling this button, you can quickly test the template to make sure the output is as desired.
At the top of the editor there are check boxes that default to unchecked:
- Test Actions? When Show Field Results is pressed, run any actions defined in the template to show how it would look assembled. In normal testing, you do not want to create a note (or whatever the action defines) every time you test the template.
- Test WorkFlow? As with "Test Actions?" you generally do not want to run the Post Assembly WorkFlow every time you test the template.
- Collapse Code? Some codes can become quite long which makes it difficult to see the actual format of how things might be assembled. Toggling this checkbox will shrink all field codes to empty braces
{}to make it easier to visualize the output.
Note: These options are available, as appropriate, when you right-click on the template itself to make it quicker to edit templates.
Right Side of the Editor
The right side of the editor displays tabs that allow you to edit various properties of the template. These are:
- Field Properties. When you select a field in the template, its properties will be displayed here so you can modify their values. This is used to define fields you need and how they are displayed when the template is assembled.
- Repeat Explorer. When you define a repeating data section, this tab will show all the repeats you have defined and the fields that are part of that repeat. Double-clicking the field will insert the code for that field in the template. You may also drag and drop a field from here to insert it on the template.
- Document Properties. Template properties such as Title, Author, Comments, Default Output Type for file created by assembly, and which Typelaws the template should appear on.
- Snippet Selector. When snippets are defined, they will appear here. You can edit the snippets by right-clicking on the snippet or double-click the snippet to insert it into the current template.
- Post Assembly WorkFlow. If you want a WorkFlow to run after the template is assembled, define it here. This can be used to do anything a WorkFlow can do — some examples include emailing the output and printing the output to the default printer.
- Document Map. This is a list of Variables used in the template. You can double-click on an item to take you directly to its location in the template.
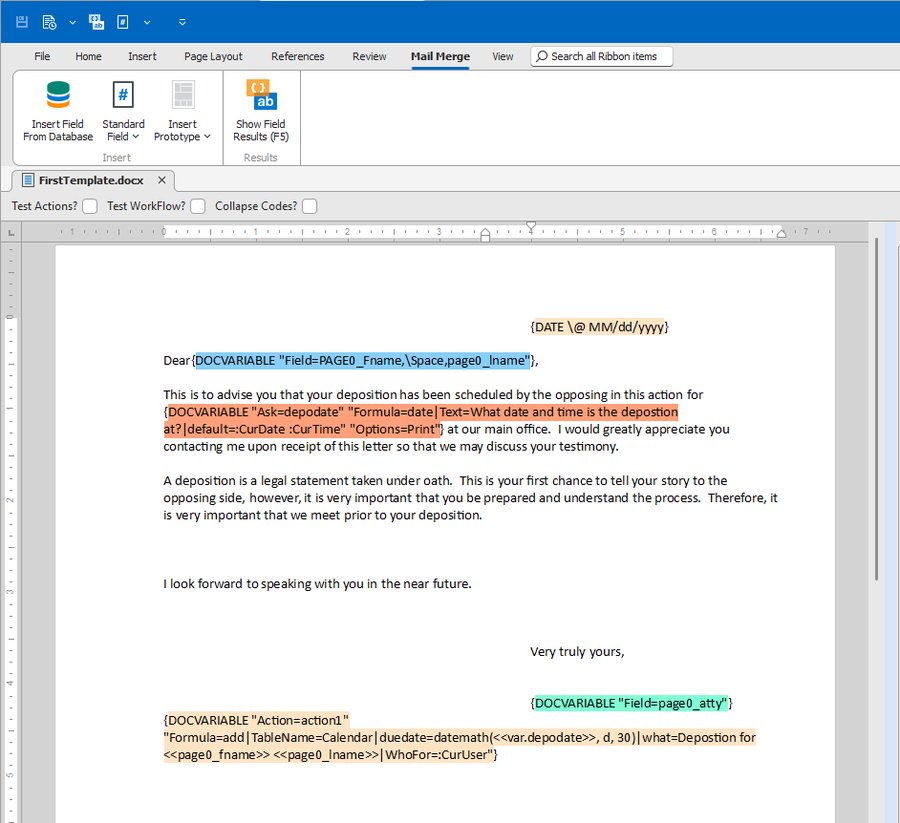
A Simple Example
{DATE "@MM/dd/yyyy"}
Dear {DOCVARIABLE "Field=PAGE0_FirstName,\Space,page0_LastName"},
This is to advise you that your deposition has been scheduled by the opposing in this action for{DOCVARIABLE "Ask=depodate" "Formula=date|Text=What date and time is the deposition at?|default=:CurDate :CurTime" "Options=Print"}at our main office. I would greatly appreciate you contacting me upon receipt of this letter so that we may discuss your testimony.
A deposition is a legal statement taken under oath. This is your first chance to tell your story to the opposing side, however, it is very important that you be prepared and understand the process. Therefore, it is very important that we meet prior to your deposition.
I look forward to speaking with you in the near future.
Very truly yours,
{DOCVARIABLE "Field=page0_atty"}
{DOCVARIABLE "Action=action1""Formula=add|TableName=Calendar|duedate=datemath(<<var.depodate>>:Curdate, d, 30)|what=Deposition for <<page0_FirstName>> <<page0_LastName>>|WhoFor=:CurUser"}
When the above template is assembled it will look something like this:
8/31/2022
Dear John Doe,
This is to advise you that your deposition has been scheduled by the opposing in this action for8/31/2022 11:15 AM at our main office. I would greatly appreciate you contacting me upon receipt ofthis letter so that we may discuss your testimony.
A deposition is a legal statement taken under oath. This is your first chance to tell your story to theopposing side, however, it is very important that you be prepared and understand the process.Therefore, it is very important that we meet prior to your deposition.
I look forward to speaking with you in the near future.
Very truly yours,
Phil Homburger
In addition, a calendar item would be created 30 days after the selected deposition date for whomever assembled the template.
Defining Data for Templates
When you run a template for a file, all the data for the file are available in fields named such as {DOCVARIABLE "Field=Page0_LastName"}. If you use a field from a tab that is not the header such as {DOCVARIABLE "Field=Page1_Address"} it will use the copy of the tab you were viewing before running the template. If you had not visited that tab yet, LawBase will use the first copy of the tab.
Note: Database fields can either be referenced with underbars or periods between the page and field. In this document we use underbars. Page0.LastName will work the same as Page0_LastName. <<var.v1>> is the same as <<var_v1>>.
Field Usage
Inserting data from a field is as simple as using the Insert Field From Database selector. Once you have repeats set up, you can use the Repeat Explorer to insert any available fields from any repeat. You can combine fields from the same source into one field using "slash" definitions. For instance:
{DOCVARIABLE "Field=PAGE0_FirstName,\Space,page0_LastName"}
Which means: use the FirstName, a space, and then the LastName from page0. Available "slash" items are:
\Space\comma\hyphen\n(new line or return)\anytextyoulike(prints anytextyoulike literally)
Note: If you use this technique to create an address block, the output will automatically remove the extra new line created when there is a blank field (e.g. a blank page0_address2).
Display Properties
Regardless of where the data comes from, in Field Properties you can define how the data is displayed. These are types of displays:
- Numeric. Used to format numeric fields such as currency or integers.
- General. Format a string field.
- Date. Format how a date is displayed.
- CaseLink. For CaseLink fields, define which field(s) to show from the linked tab. Use
Lookupto show the standard display orShowFields=comma separated list of fields to show other fields from the linked file. CaseLinks allow for an optionalDisplayFormat=section to define how the output of the result of the lookup should be formatted. - Image. For fields that contain images, text fields that refer to an image file on the file system, or web addresses that are images — display the actual image in the document. Optional parameters define the size and stretching mode of the resulting image in the output document.
Repeat Items
Often you may want to select one or more copies of a repeatable tab, select data that is not directly in a file, combine data in a unique way, or run a report with no associated file. To define this data, use a Repeat Item. Repeat Items either define what table to pull from the current file, or supply a SQL statement to grab any data from the database in any format. A template can have as many Repeat Items as needed.
Examples — Repeating Data from Current File
{DOCVARIABLE "Repeat=p53" "Formula=TableName=Page53"}
Get all copies of page53 from the current file. Data will be available in fields named p53_fieldname.
{DOCVARIABLE "Repeat=p1" "Formula=TableName=Page1|Orderby=LastName desc,FirstName"}
Get all copies of page1, ordered by LastName descending then FirstName. Data placed in fields named p1_fieldname.
{DOCVARIABLE "Repeat=p2" "Formula=TableName=Page2|Filter=doi > 'datemath(:CurDate,d,-7)'|Orderby=defld"}
Get all copies of page2 where the doi field is more recent than seven days ago, ordered by defld.
{DOCVARIABLE "Repeat=p2" "Formula=TableName=Page2|Filter=Top 3"}
Get the first three copies of page2.
Examples — Repeating Data Using SQL
{DOCVARIABLE "Repeat=cal" "Formula=SQL=select * from calendar where caseserial = :serial and status = 'PENDING' order by duedate desc"}
Get all pending calendar items for the current file ordered by duedate descending. Fields named cal_fieldname.
{DOCVARIABLE "Repeat=p0" "Formula=sql=select * from page0 where LastName in ('smith', 'johnson') and FirstName = '<<var_ask1>>' order by LastName,FirstName"}
Get all page0 records with a LastName of 'smith' or 'johnson' and FirstName equal to the answer of an ask question (ask1), ordered by LastName then FirstName.
Using Repeated Data
Once you have set up a Repeat Item you must use a Word table to display the repeated data. This table may have up to three sections:
- Optional Header Row(s) to display column titles.
- Repeatable row(s) which are duplicated for every entry in the repeat.
- Optional Total Row(s) which display totals or other collected information at the bottom.
Example Table
Assume a Repeat Item with the following definition:
{DOCVARIABLE "repeat=sql1" "Formula=SQL=select LastName,FirstName,amt from page0 order by LastName"}
A table definition might look like:
| Last Name | First Name | | {DOCVARIABLE "Field=sql1_LastName"} | {DOCVARIABLE "Field=sql1_FirstName" "Display=! UpperCase"} | | Total: {DOCVARIABLE "VAR=tot" "Options=Print" "Display=# $,0.00" "Formula=sum(<<sql1_amt>>)"} | |
When assembled: one header row with Last Name / First Name titles, repeating rows (one per result) with LastName and FirstName in uppercase, and a final row showing the sum of the Amt field.
Note: All Repeat Items must be shown using a table. If you do not want the resulting borders of the table to show, go into the Table Design ribbon tab and turn off all borders.
Note: When displaying field information from a repeat, the field will be trimmed to remove any leading and trailing spaces. If you need to preserve leading/trailing spaces, add |NoTrim to the end of the formula of the Repeat definition.
Template Properties
Field Properties
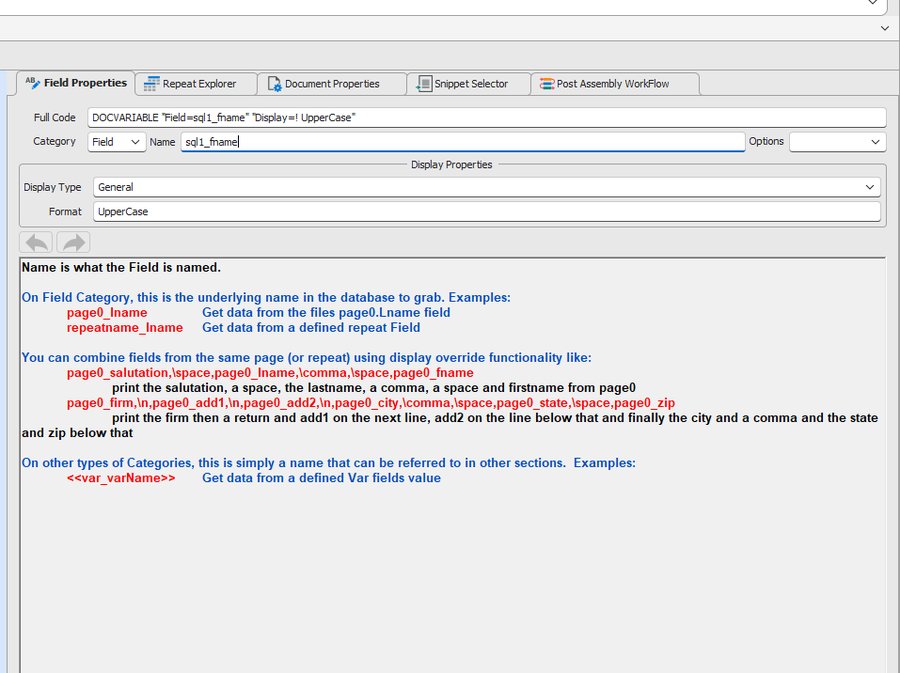
When you select a field in the editor, Field Properties will be populated with a definition of the field so you can modify it.
- Full Code. The actual code placed in the template. Only edit if you're sure of what you're doing.
- Category. What type of field this is.
- Name. The name of the item, or in the case of Fields, the field(s) you'd like to display.
- Options. Certain items allow you to optionally print the item, make the item a hyperlink (as in CaseLinks), or not do math in the case of Variables (such as an input date).
- Display Type. If you wish to format the output of the field, this is the type of display.
- Format. Optional value defining how to display the field.
Repeat Explorer
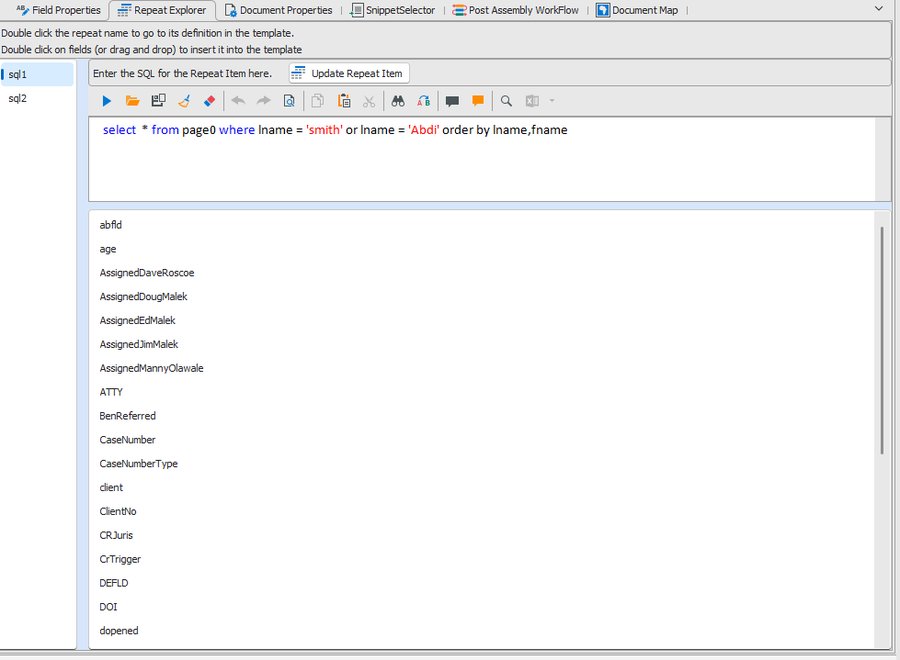
This lists all the Repeat Items the template has defined and lets you select items from any repeat to insert into the template. On the left are all the Repeat Items defined. When you select a repeat, it will show the available fields from that repeat on the right. You can double-click a field to insert it in the template at the current position. You can also drag and drop fields to drop them in the template.
If the Repeat Item is a SQL statement, you can modify the statement directly here and test using the standard LawBase SQL editor. When you are satisfied with your results, press the Update Repeat Item button to apply the change to the template definition.
Document Properties
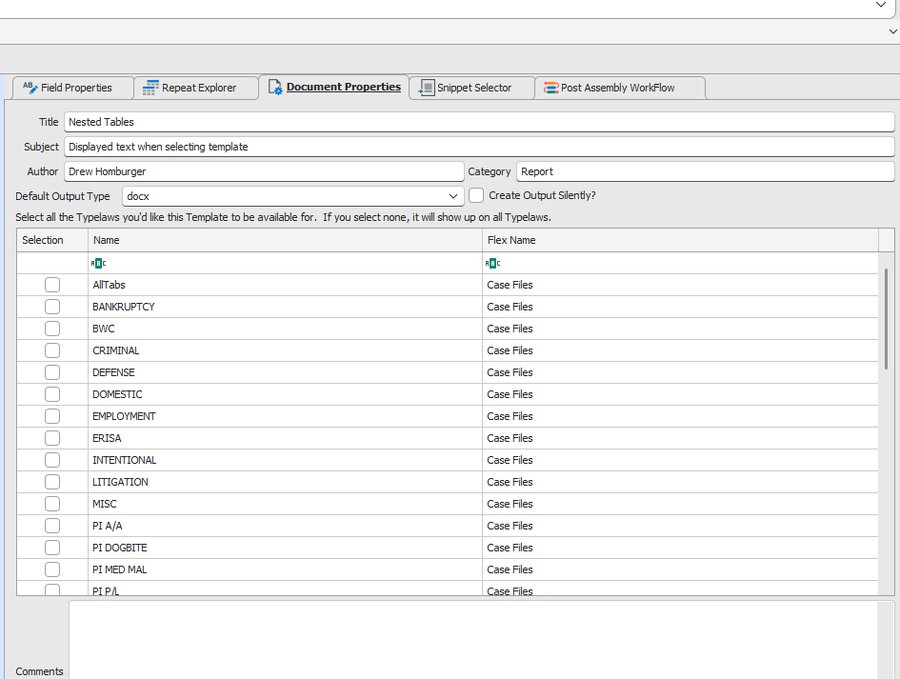
Document Properties are items that describe the Template and how it's used:
- Title. A friendly name for the template.
- Description. The text displayed on the template selector when a user chooses which template to assemble.
- Author. The name of the person who authored the template.
- Category. Any category you'd like to use for this template.
- Default Output Type. When the template is assembled, how the output should be saved:
- Docx – Standard Word file.
- Html – HTML format. Useful for using the output as an email.
- Pdf – Standard PDF format.
- Rtf – Rich Text Format.
- Txt – Plain Text Format.
- Odt – Open Document Format.
- Xlsx – Excel Spreadsheet.
- Create Output Silently? By default, when a user assembles a template, it will launch the output file using the Windows associated program. If checked, it will not launch. Useful if you want to do something special with the output — for instance, email the resulting HTML file, or send the output to a document management indexer.
- Typelaws. A list of Typelaws the template should appear on. If no Typelaws are selected, the template will appear on all files.
- Comments. Simply a place to keep notes/comments you'd like to associate with the template. Useful to describe to other template editors anything you'd like to convey.
Snippet Selector
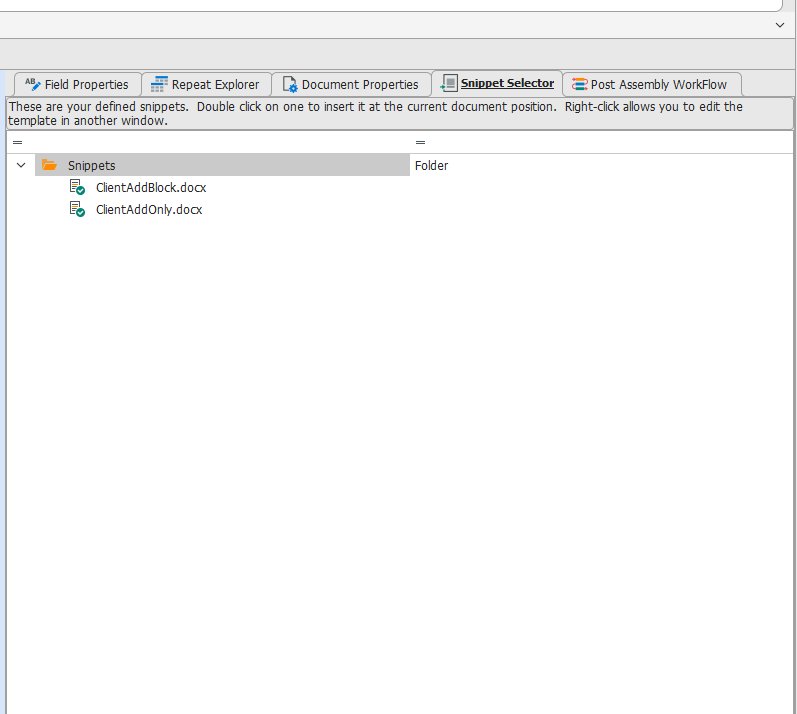
This displays any previously defined snippets. You can double-click a snippet to insert it into the template at the current document position. You can also right-click to directly edit the snippet. By default, snippets are inserted and show the text as they are defined in the snippet itself. If you want to display the text of the snippet using the font shown for the {DOCVARIABLE} of the snippet itself, add the IgnoreFont option after the name of the snippet in Field Properties.
To create a snippet, highlight the portion of text in a template that you'd like to turn into a snippet and right-click. You will see a menu item Create Snippet that will allow you to create a snippet of the selected text. Snippets can include fields or other items such as {ask} variables or actions.
Post Assembly WorkFlow
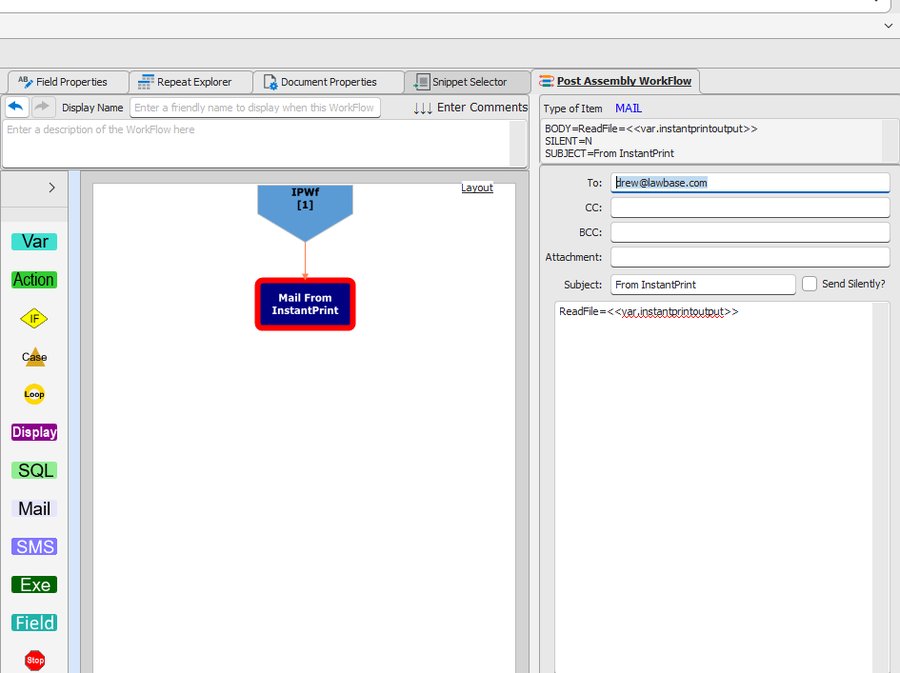
Define any WorkFlow you'd like to run after the template is assembled. Variables and Asks that are defined in the template are sent to the Post Assembly WorkFlow and can be accessed using <<var.varname>> or <<param.varname>> format. In addition, a variable named <<var.InstantPrintOutput>> is created that references the output filename from the assembly. You can use this variable to print, email, index, or do whatever else you need to do after the template is assembled.
Note: If the WorkFlow contains a variable with the exact same name as a variable being sent in from the template, this variable will be used whenever <<var.varname>> is referenced. In this situation, if you need to access the variable that came from the template, you must use <<param.varname>> instead.
To email the assembled output, set the document properties Output Type to html, then in the Post Assembly WorkFlow drop an email component and use:
ReadFile=<<var.InstantPrintOutput>>
As the only line of the memo body. This tells the email to get its body from the HTML file created by assembling the document.
To print the output to the default printer, use an Exe component and place Print in the executable Program and <<var.InstantPrintOutput>> in the parameters.
To attach an InstantPrintOutput to an email, add it as an email Attachment (<<var.InstantPrintOutput>>). The file will be generated as a temporary file name. If you want a defined name, include the OutputFile definition in the manual action. Example:
INSTANTPRINT=L:\LawBase\InstantPrint\File\Welcome Letter.docx^OutputFile=C:\Users\<<LB_UserName>>\AppData\Local\Temp\<<Client>>_Welcome.docx^LaunchAfterAssembly=false
Note: Template WorkFlows are stored in the document itself so that a .docx file contains everything needed. As such, they are not available in LBAdmin's standard WorkFlow editing.
Document Map
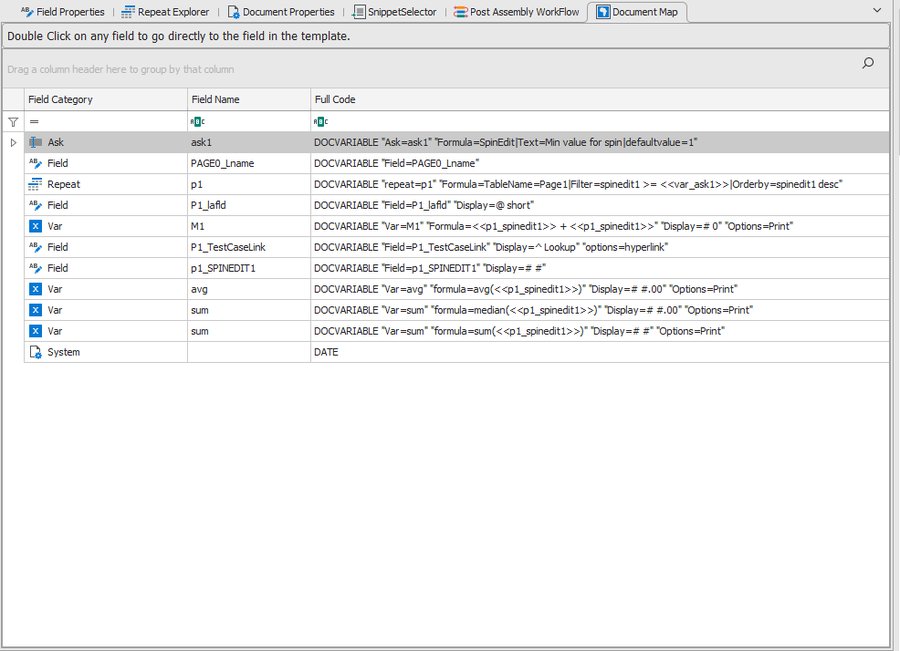
This is a list of all the variables used in the template — a quick way to see everything that is used and lets you search by filtering in any of the columns. Double-click on any item to go directly to its definition in the template; the selected variable will be highlighted in the editor.
Standard Fields
This is a description of the different types of fields and what you can do with them. When you edit a field the Field Properties tab will show several examples. Many more examples are shown in the online help under the Field Properties definition.
Database Fields
Any field that gets its information from a File or a Repeat Item. By itself, it will simply print the value of the field. You can combine fields from one source to create a larger field output. Add IsNull= to provide alternate text when the field is blank. Add MaxLength=# to limit output length.
{DOCVARIABLE "Field=sql1_LastName,\comma,\space,sql1_FirstName" "Display=! UPPERCASE"}Show the LastName, a comma, a space and then the FirstName from the sql1 Repeat Item — all in uppercase.{DOCVARIABLE "Field=sql2_LinkField" "Display=^ Lookup|DisplayFormat=! UpperCase"}CaseLink field — show the straight lookup value in uppercase. Any string, date (@), numeric (#), or image (*) format can be applied viaDisplayFormat=.{DOCVARIABLE "Field=sql2_LinkField" "Display=^ ShowFields=FirstName,\space,LastName"}CaseLink field — from the linked tab, display FirstName, a space, then LastName.{DOCVARIABLE "Field=sql2_Mailer" "Options=Hyperlink"}Email field — show the email address as a clickable hyperlink.{DOCVARIABLE "Field=page53_image1" "Display=* Height=200|Width=200"}Image field — display the image at 200×200 preserving aspect ratio.
Repeats
Define which data to show in a template. Can come from the current file or from a SQL command. Examples:
{DOCVARIABLE "Repeat=p53" "Formula=TableName=Page53|Filter=doi > 'datemath(:CurDate,d,-7)'|orderby=doi desc"}Get all page53's for the current file where doi is in the last seven days, ordered by doi descending. Fields namedp53_fieldname.{DOCVARIABLE "Repeat=sql1" "Formula=sql=select * from page0 order by LastName,FirstName"}Run the SQL statement. Set all field names tosql1_fieldname.
Variables
Variables can do math, combine fields, get SQL results and more. Examples:
{DOCVARIABLE "Var=v1square" "Formula=<<var_v1>> * <<var_v1>>" "Display=# $,#.00" "Options=print"}Multiply variable v1 by itself and print using currency format. Also places the result in<<var_v1square>>for later use.{DOCVARIABLE "VAR=var1" "Formula=sql(select login from user_profile where fulLastName = '<<page0_attyName>>')" "Options=Print"}Run a SQL command to find the login of a user whose full name is in the page0_attyName field.{DOCVARIABLE "Var=v1" "Formula=sum(<<sql1_amt>>)" "Options=Print" "Display=# 0"}Get the sum of sql1_amt (from a Repeat Item) and print as an integer.
Ask Variable
Items that need to be asked when the template is run by a user. They use the exact same {ask} format used in HotDocs and elsewhere. Please refer to LBAdmin help for examples.
IF/Then
Used to control conditional text. IF/Then blocks must contain at least an IF and an ENDIF variable, and optionally an ELSE block. IF blocks contain a test that must evaluate to true or false. You may combine conditions using AND and OR.
{DOCVARIABLE "IF=if1" "Formula=<<page0_serial>> = 124564"} In first section page0.serial = {DOCVARIABLE "Field=PAGE0_serial"} {DOCVARIABLE "IF=If2" "Formula=<<page0_serial>> > 123423423423"} in second section — PROBABLY SHOULDN'T BE SEEN {DOCVARIABLE "Else" "Inner else1"} This Section will be printed. {DOCVARIABLE "Endif" "Inner endif 1"} out of second if part (If2) {DOCVARIABLE "Else" "outer else"} Serial does not equal 124564 {DOCVARIABLE "If=If3" "Formula= 0 > 1 or 3 < 1"} If3inside 0 > 1 — SHOULD NEVER BE SEEN {DOCVARIABLE "EndIf" "inner endif bottom"} between last endifs {DOCVARIABLE "EndIf" "final endif"}
Snippet
Merge in another .docx that can contain anything a normal template can contain. Useful for reusable text/code across multiple documents — edit in one place and the change appears in all templates that contain the snippet.
{DOCVARIABLE "Snippet=SnippetName" "Forumula=SnippetName"}Insert the named snippet, output with the font(s) defined in the snippet.{DOCVARIABLE "Snippet=SnippetName" "Forumula=SnippetName|IgnoreFont"}Insert the named snippet, ignoring the font set in the snippet and using the font defined for the snippet variable instead.
Document Fields
Fields that are singular or refer to the assembled document itself:
DATE– The current date.TIME– The current time.PAGE– The current page number. Useful in headers or footers.NUMPAGES– Total number of pages in the assembled document.TITLE– The title of the template (from Document Properties).CREATEDATE– The date the template was originally created.:CurUser– The LawBase login of the user who assembled the document.:FileName– If run as a File Template, the file name of the file.<<lb_fullName>>– The full name of the user who assembled the document.<<lb_email>>– The email address of the user who assembled the document.<<lb_caluser>>– On Calendar Reports, the name of the Calendar being printed.<<lb_caluser_fullName>>– The full name of the Calendar being printed.
Reports
Reports are created the same way as file based templates. Reports have no associated file so every piece of data must be collected in one or more Repeat Items. Also, Post Assembly WorkFlow on reports runs only once at the end of assembly since there is no associated file. As such, the only data available to the WorkFlow are Variable, Ask Items and <<var.InstantPrintOutput>>.
Nested Tables
Often it is necessary to have nested tables. Some reasons you might want to have nested tables include:
- You want to show a set of files and all the notes for each file.
- You want to show some files and all the contacts which appear on a repeatable tab in the file.
- You want to show different statuses of files and under each status list the case names and sub-totals of some field(s).
To nest tables in InstantPrint, create two tables. In the outer (master) table include at least one repeatable row with data from the master data, making the repeatable row height much larger, then insert another table in the repeatable row where desired. This inserted table contains detail information for the master record.
The master table requires one Repeat Item and the detail table requires a different Repeat Item. In the detail Repeat Item you must include an additional piece of information named ForeignKey to indicate how the detail record relates to the master record.
NOTE: The ForeignKey fields must be included in the select clause of the respective repeat variables.
Example of Nested Tables
{DOCVARIABLE "Repeat=sql1" "Formula=sql=select * from page0 order by LastName, FirstName"} {DOCVARIABLE "Repeat=sql2" "Formula=SQL=select * from page1 order by mailer|ForeignKey=sql2_caseserial=sql1.serial"}
Master table row:{DOCVARIABLE "Field=sql1_LastName,\comma,\space,sql1_FirstName" "Display=! UPPERCASE"}
Detail table row:{DOCVARIABLE "Field=sql2_serial"}{DOCVARIABLE "Field=sql2_Caselink" "Display=^ Lookup"}{DOCVARIABLE "Field=sql2_Mailer"}Subtotal: {DOCVARIABLE "Var=v1" "Formula=sum(<<sql2_serial>>)" "Display=# $,#.00" "Options=Print"}
Footer row:{DOCVARIABLE "Var=v1" "Formula=sum(<<sql1_serial>>)" "Options=Print" "Display=# 0"}
The Master Repeat sql1 gets all fields from page0 ordered by LastName and FirstName. For each file that matches the SQL, it prints the name in all capitals. For each such file, the detail repeat sql2 prints all page1's for that file. The ForeignKey tells InstantPrint to get all page1's where caseserial on page1 equals the master record's serial.
Note: When creating a ForeignKey, always put the detail condition first and the master condition after the =.
Advanced Table Design
Due to the way Word tables work, there are some limitations to work around — primarily the inability to insert page breaks in a table and the requirement that LawBase repeatable rows cannot have spanning rows.
Page Break Per Copy
To print a page break between each row in a repeated table (e.g. one letter per Medical Provider on a repeatable tab), add Options=PageBreak to the Repeat Item definition:
{DOCVARIABLE "Repeat=p15" "Formula=TableName=Page15|Options=PageBreak"}
Spanning Rows
A spanning row is where one column covers (or spans) multiple rows from another column. Because LawBase requires repeatable rows to not have spanning rows, a spanning table must be broken into two separate tables and merged using the <<mergetables>> command between each table you'd like to merge. Example:
Table 1: Hearing For: {DOCVARIABLE "Field=PAGE1_Firstname,\space,\page1_LastName"} Hearing date: {DOCVARIABLE "Field=PAGE1_hearingdt" "Display=@ short"} Hearing location: ...
<<mergetables>>
Table 2:COUNTY ATTORNEY: ... | This is a spanning column that spansPRESENT: ... | multiple rows on the left.
Multiple tables may be merged as needed by placing <<mergetables>> between each table.
Side by Side Columns
If you want SQL repeat results displayed side by side in a table rather than down one column, use the SideBySide=# option in the repeat definition:
{DOCVARIABLE "Repeat=rpt1" "Formula=sql=select defendant from tablename where caseserial=:serial order by defendant|SideBySide=2"}
With SideBySide=2, LawBase creates one row for every two rows in the SQL results — the first result goes into defendant1 and the second into defendant2, and so on. You can use any number (within reason) and select multiple fields. For example, SideBySide=3 selecting fname, lname would yield fields fname1, lname1, fname2, lname2, fname3, lname3 for use in 6 columns.
Note: To use SideBySide, you must select named fields. You cannot use select *.
Create a Report Template from QueryBuilder
To speed up report creation, you can create an InstantPrint template directly from QueryBuilder. Create or run a query that selects the fields you'd like to see in the proper order. On the QueryBuilder Results tab, select Create InstantPrint Template. LawBase will create a template named NewReport#.docx including the query and all selected fields. If you have selected over 10 fields, the report will break each 10 fields into their own separate table. You can then modify the format to your liking. Right-click the template name in the editor to rename it.
Create a Report Template from a SmartFolder
You can also create a template based on a SmartFolder. Only rules-based SmartFolders are supported (the template needs a SQL statement). You must have InstantPrint edit rights and be on a SmartFolder that has results. Right-click on the folder and select Create InstantPrint from Folder. LawBase will create a template named SF_{folderName}_Report.docx in the reports folder. The report will need to be modified to ensure the output is exactly what you require. Right-click the template name in the editor to rename it.
Calling InstantPrint from WorkFlow
WorkFlow has a manual action type of InstantPrint. To use it, create a new action component and insert something like the following in the Manual Action portion:
INSTANTPRINT=TemplateName.docx^OutputFile=.html^LaunchAfterAssembly=false^Parameters=FirstParam=value,SecondParam=value2
The sections of the InstantPrint Manual Action are:
- InstantPrint – The name (full path) of the template to assemble. Use UNC path names if you plan to use this in LBConcierge.
- OutputFile – The output file name. Can be a complete filename or just an extension (
.docx,.html,.pdf,.rtf,.txt). In either case<<var.InstantPrintOutput>>will be set with the output file name for use in subsequent WorkFlow steps. - LaunchAfterAssembly (optional) – Override the template's Create Output Silently? setting. Use
trueorfalseto force display or suppress display of the output to the user. - Parameters (optional) – A comma-separated list of
parametername=parametervaluepairs to send additional information to the template. Parameters are available in the template using<<param_ParameterName>>.
Examples
INSTANTPRINT=L:\LawBase12\InstantPrint\File\FirstTemplate.docx^OutputFile=.html^LaunchAfterAssembly=false
Assembles FirstTemplate.docx. Because LaunchAfterAssembly=false, the output is not shown to the user even if the template doesn't have Create Output Silently? checked.
INSTANTPRINT=L:\LawBase12\InstantPrint\File\EmailTemplate.docx^OutputFile=.docx^Parameters=email=<<email>>,fullname=<<fullname>>
Assembles EmailTemplate.docx. The template will have <<param_email>> and <<param_fullname>> available, containing the email address and fullname fields of the current page.
Converting HotDocs Templates
LawBase can do the bulk of the conversion work. In the InstantPrint editor there are three selections under the File Ribbon:
- Import HotDocs File Template — pulls up the HotDocs library to select one regular template to convert at a time.
- Import HotDocs Report — pulls up the HotDocs library to select one report template to convert at a time.
- Import Directory of Templates — converts multiple templates at once. Place all HotDocs templates and their corresponding
.cmpfiles in one directory, then select that directory. LawBase will attempt to convert all templates in it.
All converted templates are placed in a directory named ConvertedHDTemplates under the InstantPrint directory. Not all HotDocs features can be exactly converted, so you need to modify, test, and finally move each converted template to its proper final folder.
FAQ
Q. How can I have users conditionally select text using snippets?
Use a variable or ask in the snippet definition to conditionally select a snippet:
{DOCVARIABLE "Ask=ask1" "Formula=RadioEdit|Text=Which snippet would you like to use?|RadioItems=SnippetName1,SnippetName2,SnippetName3|Default=SnippetName1"} {DOCVARIABLE "Snippet=snip" "Formula=<<var_ask1>>"}
This will ask the user to select which snippet to use. Only the selected named snippet will be merged into the final output. The variable used in the snippet formula can also be a regular variable calculated by other means.
Q. How can I create a nice-looking email?
Create a template with an HTML output type and Create Output Silently? checked. Then create a Post Assembly WorkFlow with an email component, and set the memo body to:
ReadFile=<<var.InstantPrintOutput>>
This tells the email to get its body from the HTML file created by assembling the document.
Q. In WorkFlows, how can I combine multiple output files into one email using ReadFile?
Produce the first InstantPrint output and save <<var.InstantPrintOutput>> into another variable (e.g. <<var.out1>>). Then produce the second output. In the Email step, use a comma-separated list:
ReadFile=<<var.out1>>, <<var.InstantPrintOutput>>
Q. Is there a way to gracefully handle blank values in a field's display?
Yes. Use the IsNull= option in the display format. The value after IsNull= can contain text or other variables.
{DOCVARIABLE "Field=page0_LastName" "Display=! TitleCase|IsNull=Last Name Not Filled In"} {DOCVARIABLE "Field=page0_doi" "Display=! Short|IsNull=<<page0_otherdate>>"}
Q. How do I limit the length of the output for fields?
Use the optional MaxLength=# option in the display section:
{DOCVARIABLE "Field=page0_LastName" "Display=! TitleCase|MaxLength=10"}
Prints up to the first 10 characters. Note: MaxLength is only available on String and CaseLink displays.
Q. How do I automatically profile the assembled file in Worldox?
In the Post Assembly WorkFlow, create a Manual Action step that begins with DocProfile=Worldox and includes FileName=<<var.InstantPrintOutput>>. Example:
DocProfile=Worldox|ProfileGroup=CaseFiles|Description=Here is a description|Case #=<<page0.serial>>|DocType=HOTDOCS|Author=<<lb_UserName>>|Comments=This goes in the comments|FileName=<<var.InstantPrintOutput>>
Q. Is there any way to send template parameters from a SmartFolder result to tailor a template for the selected result?
Yes. When you right-click and select InstantPrint on a file in the SmartFolder results, all fields gathered by the SQL statement are available in the template using the same <<param_field>> syntax as in WorkFlow parameters.
Q. Can InstantPrint be run from LBConcierge?
Yes. Simply use a WorkFlow step that calls an InstantPrint manual action.
Q. Can I edit InstantPrint Templates in Word?
Yes. However, you will not be able to test results or use any of the built-in features of the LawBase Template Editor. Press Alt+F9 in Word to toggle the display of Field Codes.
Q. Many codes are long and make it difficult to see what the document output will look like. How can I better visualize it?
Directly under the template name in the editor, check the Collapse Codes? checkbox. This shrinks all field codes to simple {} placeholders so you can better visualize the output.
Q. Is there a way to search all defined templates for something I've done before?
Yes. On the File ribbon, use Search All Templates. Type what you're looking for (including partial field codes) and press the search icon. All templates containing that text will be displayed for selection.
Q. How can I rename a template in the editor?
While editing a template, right-click on the template name in the tab header and select the rename option.
Q. How can I tell how many items are in a SQL repeat and which row number a current item is on?
Repeat items contain two system-defined variables — RowCount and RowNum — that you can use just like any other repeat field:
{DOCVARIABLE "Field=sql1_RowCount"} <!-- returns how many rows in the sql1 repeat --> {DOCVARIABLE "Field=sql1_RowNum"} <!-- returns the current row number -->
Q. Can I use variables in an {ask} variable to make the prompt dynamic?
Yes. Variables placed in the {ask} definition will be replaced by their values before being shown to the user. You can also include <return> in the Text portion to insert a line break in the prompt:
{DOCVARIABLE "Ask=ask1" "Formula=calc|Text=Input the amount value here<return><<page0_amt>>|default=<<var_proposedAmt>>"}
Q. How can I merge multiple InstantPrint outputs (or other files) into one document?
Use a WorkFlow manual action of type MergeFiles=. Format:
MergeFiles=OutputFile=OutputFileName.docx^Files=file1,file2,file3,...
- OutputFile – The final combined output file. Can be a complete filename or just an extension.
<<var.MergeFilesOutput>>will be set with the output filename for subsequent WorkFlow steps. - Files – A comma-separated list of files to combine, each appended with a page break in between. Supports
.docx,.html,.rtf,.jpg,.png,.bmp, and.tiffiles. The list can include variables such as<<var.InstantPrintOutput>>.
Q. How do I get the linked name for the TypeLaw or security of a file?
Place the TypeLaw or security field from the header in the template. In the Display Properties section of Field Properties, change the Display Type to General to get the name value. Change to Numeric to get the numeric value instead.
Q. Why are fields from pick_list not working?
The underscore (_) is a delimiter between a table and its field. When referencing any field that has an underscore, you must output it using an alias in SQL. For example:
SELECT pick_description [description] FROM pick_list WHERE pick_name='States'
Q. How do I save the results of an InstantPrint template as an Excel file?
Under Document Properties, set the Default Output Type to xlsx. Due to Excel limitations, only the tables defined in the template will be output — no other text will appear, and Nested Tables are not allowed. If the template has multiple tables, each will be output to a separate worksheet of the master workbook.