LawBase 12
User Manual
Synaptec Software, Inc.
- Getting Help in LawBase 12
- Getting Started With LawBase
- Calendar
- Common Tabs - Notes, History, Calendar
- Conflicts Tab
- Dashboards
- Favorites
- Fields
- FlexBases - Contacts, Cases and More
- HotDocs
- LawBase Hyperlinks
- New Features in LawBase12
- Other Shortcuts Tab
- Parts of the Screen
- Query Builder
- Quick Add
- Reports
- Searches
- Shortcut Keys
- About Synaptec Software
LawBase 12 User Manual
© 2018 Synaptec Software, Inc. | Last Updated: June 1, 2018
Getting Help in LawBase 12
- Getting Started
- New Features in LawBase 12

LawBase 12 User Manual
Last Updated: 6/1/2018 © 2018 Synaptec Software Inc.
Getting Help in LawBase 12

- Getting Started
- New Features in LawBase 12
Searching the WebHelp
The WebHelp provides a table of contents and search tool on the left. You can drill through the table of contents to find the topic you want or search for keywords.
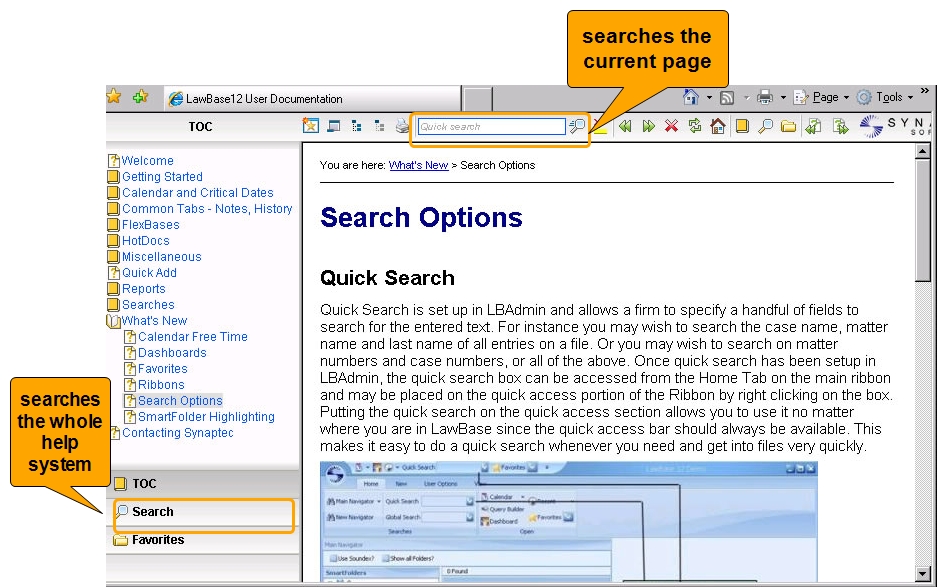
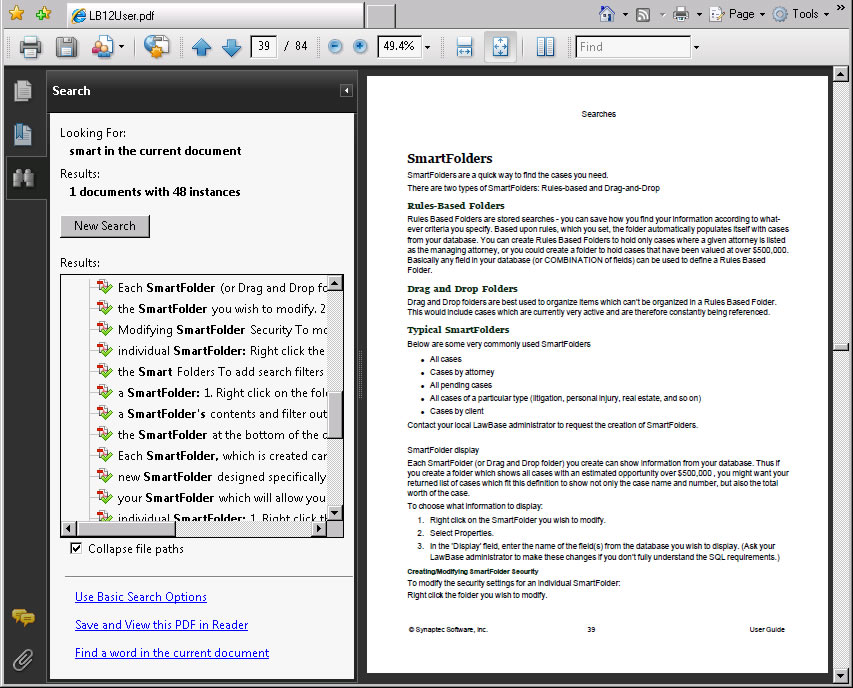
Searching the PDF help
- Press CTRL+SHIFT+F to return all results as shown below.
Opening the Help PDF through the Browser
You may find when you click the link for the PDF version of the help that the file opens in the browser and Adobe Reader menus are not available; this is a setting controlled by your Adobe Reader. To open the pdf outside the browser
- Close the browser window where the help pdf is viewed.
- Launch Adobe Reader from Start > Programs.
- Go to Edit > Preferences. Select Internet under Categories.
- Uncheck Display PDF in Browser.
Getting Started With LawBase
To start LawBase, double-click the shortcut on the desktop.

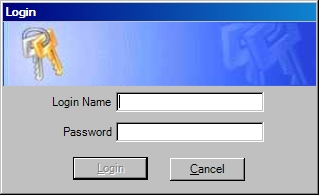
Logging In
Log in with the user name and password assigned by your local administrator. If you forget your password, contact your LawBase administrator, who will be able to reset it for you.
After logging in, the main LawBase window appears.
Calendar
The LawBase calendar is a powerful tool in managing your office's time. In addition to having standard calendaring abilities, such as group scheduling, appointment making, multiple views of your calendar and more, your LawBase calendar is tightly integrated with your case/matter database, and allows to you control all of your docketing and case scheduling from one easy-to-use interface. Accessing the Calendar
To access the calendar, click the Calendar button on the Home Tab:
![]()
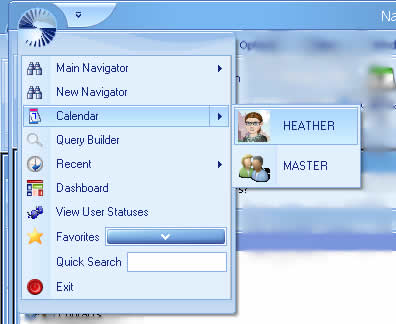
You can also open the calendar from the LawBase Button You can choose from your calendar or any of the groups you are a member of.
Viewing the Calendar
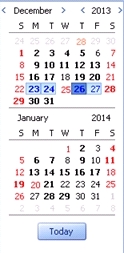
When you open the calendar, you should see something like the image below.
- The current day, week or month is in the middle.
- Ticklers and tasks are listed on the right.
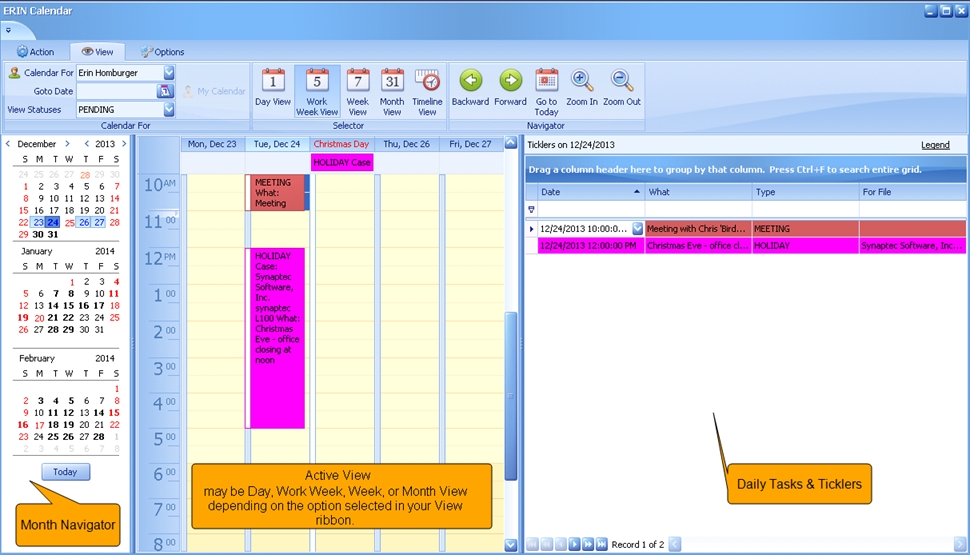
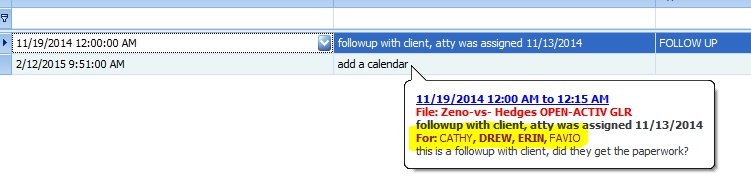
Viewing Entries
To view a calendar entry: Select the item from the Active view or the Ticklers and double-click.
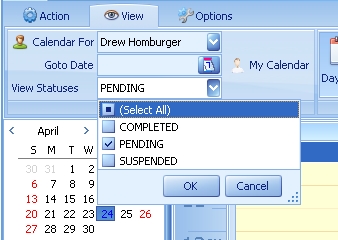
By default, only Calendar items with a PENDING status appear on the Calendar.To see Calendar items with COMPLETED or SUSPENDED statuses, in the Action ribbon select the View Statuses dropdown and check the boxes of the additional statuses you would like to see.
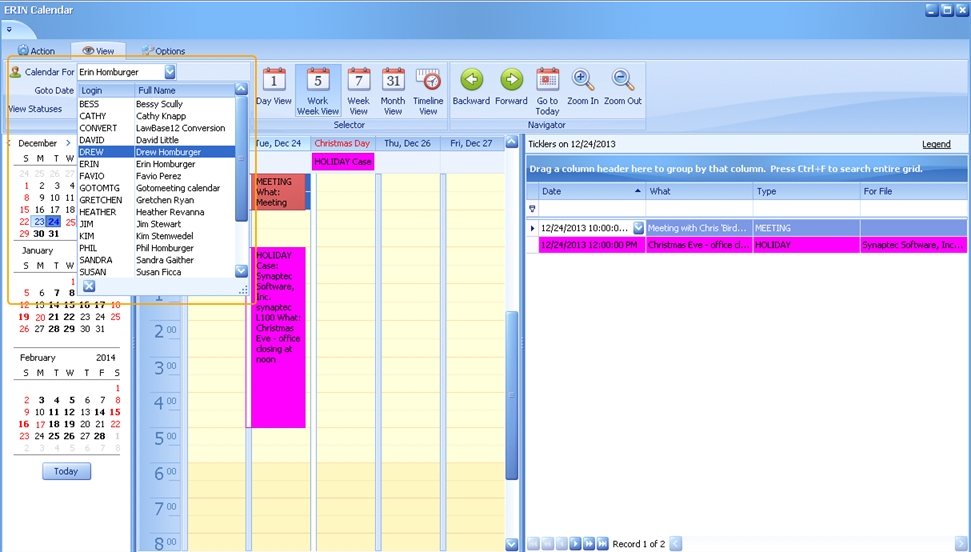
Viewing other Users' Calendars
To view another user's calendar, select a different user or group from the drop-down at the upper left. When you select a group, you'll see the Calendar entries for all the members of that group.
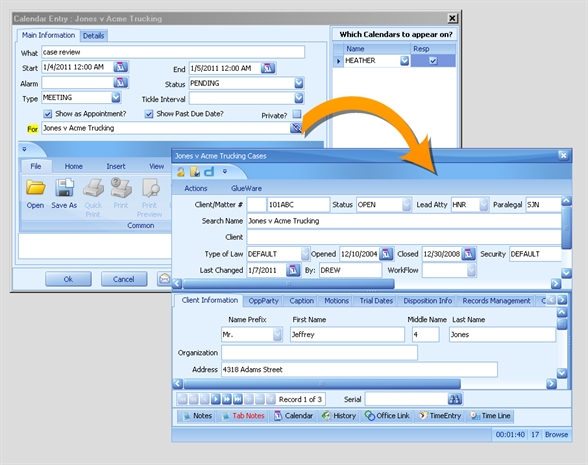
Adding Calendar Entries
To add a calendar entry:
- Open your calendar; from the Home tab of the ribbon click the Calendar button.
![]()
2. From the Action tab within the Calendar, click New

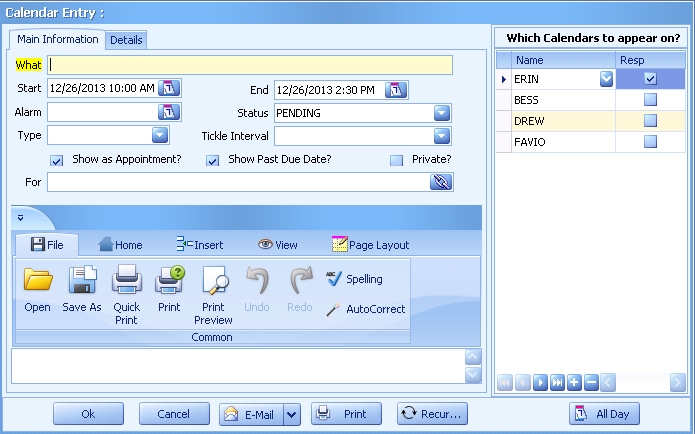
3. A new entry is ready to fill in.
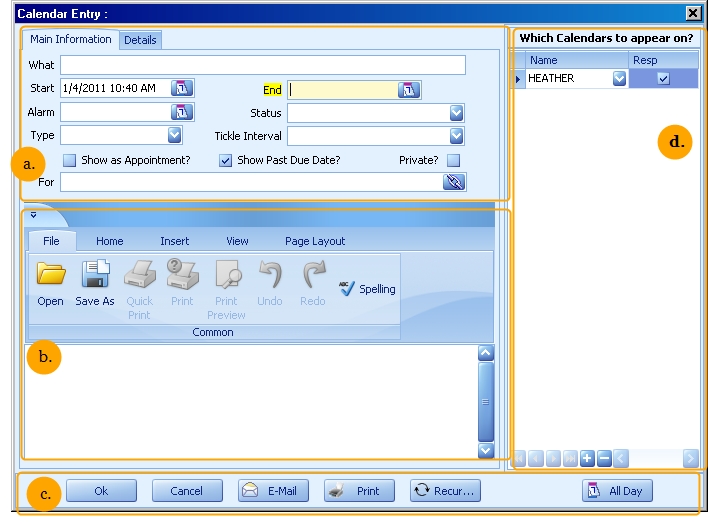
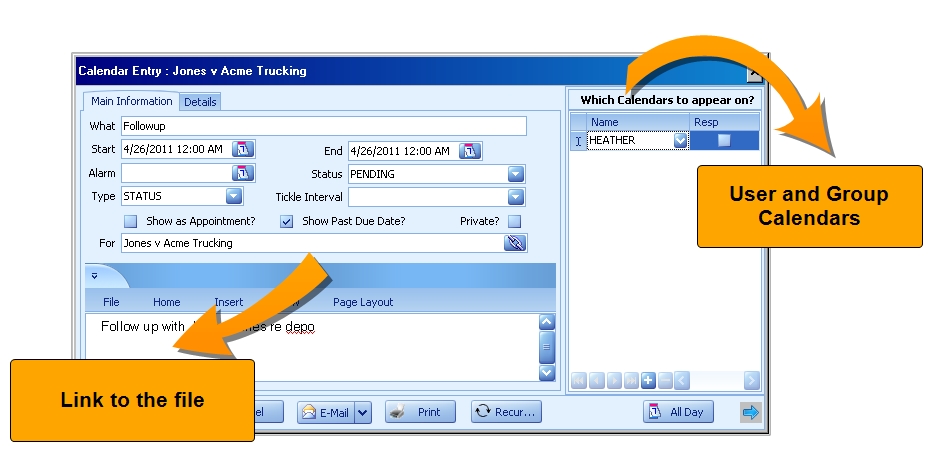
The parts of this screen are described below.
Adding Entries from Calendar Day View
You can add an appointment to your calendar at a specific time by right-clicking over the desired time in your display and selecting Add.
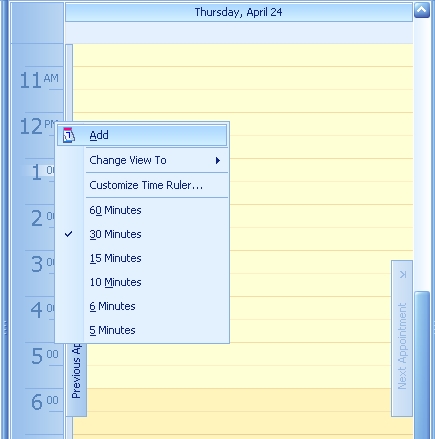
A new Calendar Item box will appear with the start date and time mirroring where you clicked in the display.
You can also highlight a section of your day grid, right click and select Add.
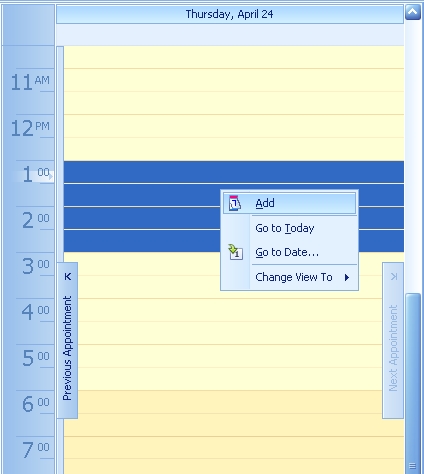
The new Calendar Item box will appear with the date, start and end times that you selected in your highlight:
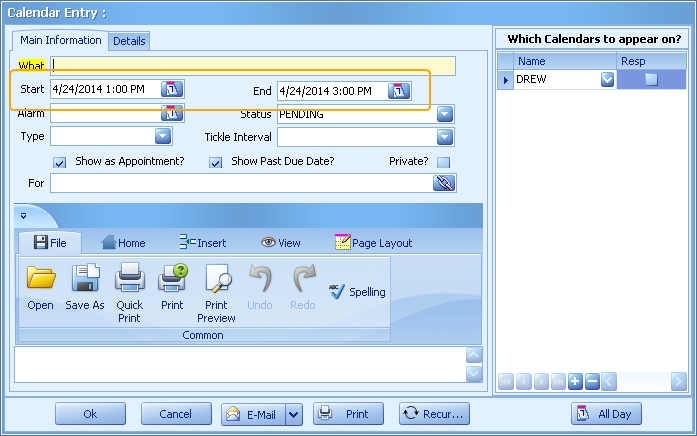
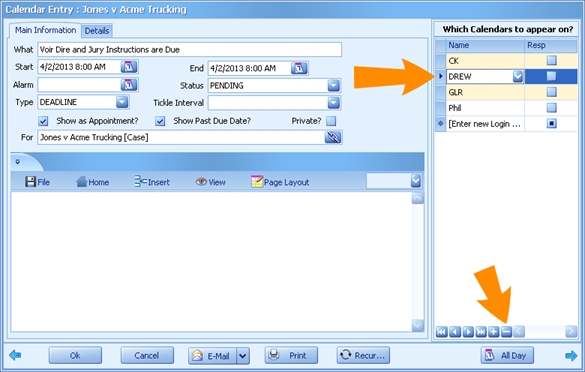
Parts of a Calendar Entry
The table below describes the parts of the calendar labeled with a.. These items are listed alphabetically.
| Alarm | Fill this in to set an alarm for the event. Alarms pop up only once in LawBase. If your LawBase is integrated with Outlook, the alarms will also be created in Outlook. |
| End | An optional field used in conjunction with the Start. When filled in, and when the Show as Appointment box is checked, these fields block out time slots in the LawBase calendar. If a User's Appointment Gradient is set in the User Profile, the End time will default to the gradient set. For questions about Appointment Gradients, contact your LawBase Administrator. |
| For | Identifies the FlexBase file to which a calendar entry is attached (for more information about FlexBases, see FlexBases). When the calendar is created from within a file, the For field is automatically filled with information. Click the link button at the end of the field to open the linked file. To establish a link to a file, start typing the file name into the For field and press enter. Then click to select the correct file. 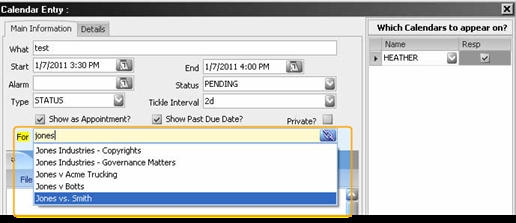 |
| Private | Check this to prevent other users from viewing the contents of the event. They will still be able to see the time reservation but will be blocked from viewing the details. . |
| Show as appointment | When checked, time is blocked on the calendar. When unchecked, the calendar item is a task or to-do with no time booked, just a deadline. |
| Show past due date | Determines whether the calendar entry remains on calendars even after the due date has passed. By default, calendar entries continue to be displayed until they are actively removed (by deleting or completing). |
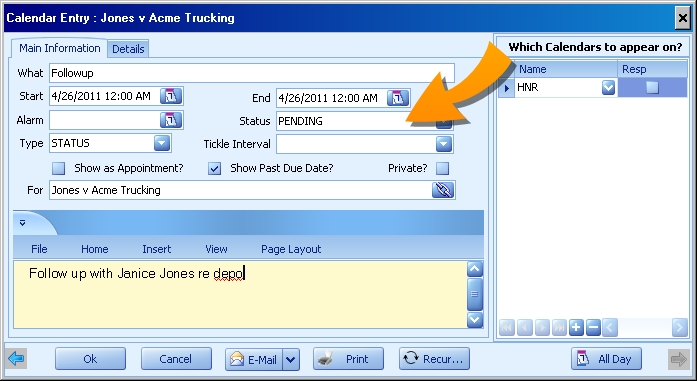
| Start | The date and time the event is scheduled. This field defaults to today's date, but you can change it by typing in a new date or using the calendar control. Just click on the calendar icon at the end of the field. |
| Status | By default this is set to Pending. Only pending items appear on the active calendar and tickler list. Pending - This is the default value. Pending items are active and visible on the LawBase calendar. Suspended - calendar items which must be taken off of the active LawBase calendar on a temporary basis. Only works for entries which have a file linked through the For field. Completed - Normally any entries which are "completed" are removed from the LawBase calendar. Typically, the record of the original event is stored in the History tab. |
| Tickle Interval | The tickle interval determines when an event or deadline is listed on the tickler pane. The value may be set automatically after choosing the type, but you can fill it as you like. Fill in using these abbreviations: d - day b - bi-monthly w - week s - semi-annually m - month y - yearly To indicate multiples, add a number. Examples 2d = 2 days. 5m = 5 months. Combine several together in any order; 2d3w1y can also be entered 3w1y2d. How the Tickle Interval works The tickle interval determines when the event or task appears on your tickler view. When the tickle interval is 2d, this means the event will be listed every day for two days before the actual event date. 3w means it will be listed three weeks before, two weeks before and one week before. Using Upper Case Letters Using upper case D, W, M, B, S, Y will add a tickler in the interval AFTER the Start Date of the entry, as long as the Status of the entry is PENDING. For example, if 5D is used in the Tickle Interval for a calendar entry with a Start Date of 11/17, the user will see a tickler for 5 days after 11/17 (11/18, 11/19, 11/20, 11/21, 11/22), as long as the original entry is not Completed, Cancelled or deleted. Weekend and Holiday Skipping Tickle intervals handle weekends and holidays so you don't miss reminders. For example, if you have a duedate on a Tuesday, with a tickle interval of 3d, the ticklers will show up on the previous Monday, Friday and Thursday, skipping Saturday and Sunday. |
| Type | Identifies the type of the calendar entry created. Each calendar entry must have an entry in the type field, although it is possible to type an entry which is not available from the pull-down list. Each entry on the TYPE drop-down automatically enters a value into the tickle interval field; both the types and the associated tickle intervals are configurable by administrators. This field can be manually edited to change the tickler for any one calendar entry. |
| What | A short description of the calendar entry. Examples: Lunch with Client, Filing Deadline, Pre-trial Conference and so on. |
Calendar Memo
The calendar memo is the area labeled b. (above).
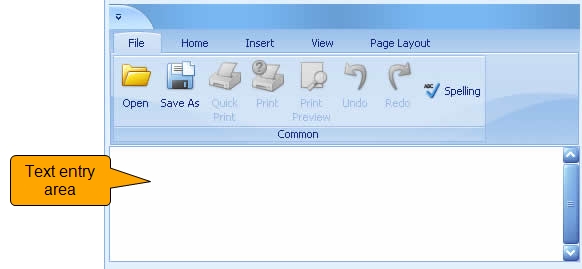
Use the memo to add more information to the calendar entry.
The ribbon at the top provides options for editing, formatting and printing the memo. You can hover the mouse over the buttons for more information about what each button does. The memo is saved in rich text format which can be included in reports and HotDocs.
Calendar Command Buttons
The calendar command buttons are in the area labeled c. (above).
![]()
![]()
Click Ok to close the calendar entry, saving any changes.
![]()
Click Cancel to abandon any edits.
![]()
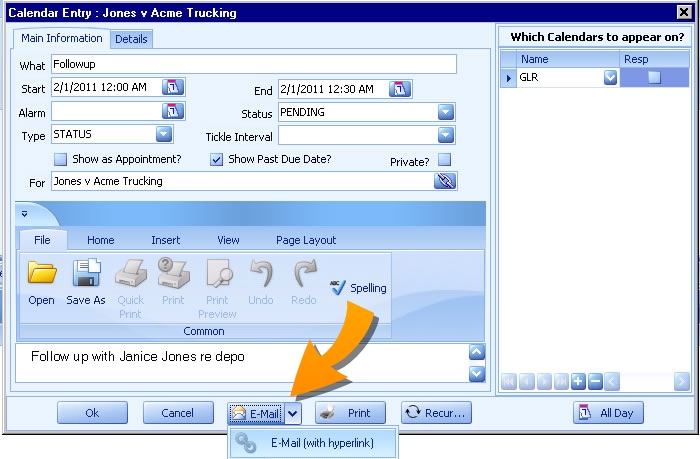
The email button provides three email options.
- Just click the button to launch a mail message with your default mail program. The subject line is automatically filled in with some standard information about the file, typically the file name (the specifics are set by your local administrator). The body of the email message is filled in with the memo text.
- Click the drop-down at the right and you can send a message like the above but it will include a LawBase Hyperlink to the calendar event.
- Right-click to address to message to all the users (including individuals who are members of a listed group) listed in the Which Calendars to Appear on Grid.
![]()
Click the print button to send a screenshot of the calendar to your printer.
![]()
Click Recur to set options for recurrence.

Select the recurrence time period (frequency) that you would like the item calendar item to appear. Then select the date range over which you'd like the calendar item to appear.
For example, in the image above, the calendar item will appear on the Monday of each week from 8/12/2014 to 10/1/2014.
Quarterly and SemiAnnual are the only options that do not permit you to select additional options. If Quarterly is selected, the calendar item will automatically appear every 3, 6, 9 and 12 months from the original item date during the defined period. If SemiAnnual is selected, the calendar will automatically appear every 6 months from the original item date during the defined period.
![]()
The Team button is configured to read from your file data, typically using the values filled into picklist fields, such as staff, attorney, lead, paralegal and so on. When a user clicks Team, it adds all of the defined staff members to the grid on the right (Which Calendars to Appear on).
![]()
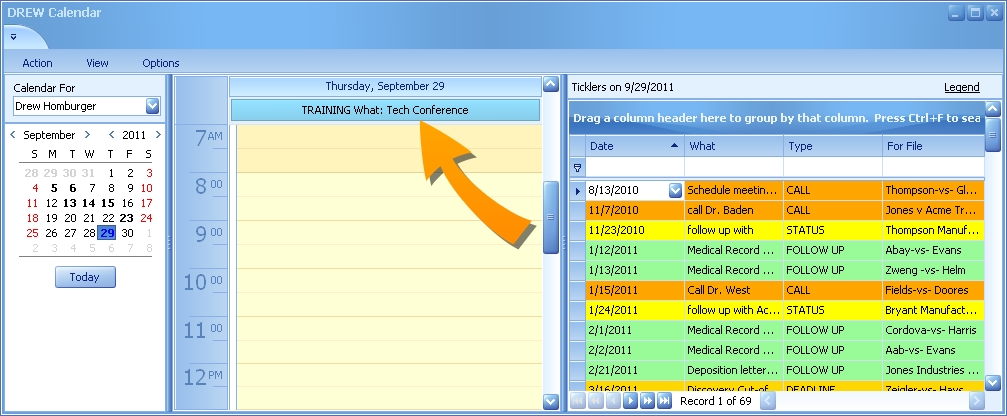
Click the All Day button to schedule an appointment for the whole day; note that this sets the start time at 12:00 AM of the first date and the end time at 12:00 AM on the date just after the last date. So if an all day event is on 9/29/2011, the start at end will be 9/29/2011 12:00 AM and 9/30/2011 12:00 AM, respectively. All Day entries appear in the day view and work week view at the top of the view as shown
below. If you have the LawBase/Outlook integration, All Day entries synchronize to Outlook as All Day entries.
Adding Users to Appointments
On the right-hand side of the calendar entry is an area labeled "Which Calendars to appear on." This is the part of the calendar entry labeled d. (above). By default, when you manually create a calendar entry, your login name is included in the list.
To add another user or group:
- Click the plus at the bottom to add another user/group record. Or if you select the top row and enter a name, a new row for an additional name will be created each time you hit the tab button.
- Select a user or group from the drop-down
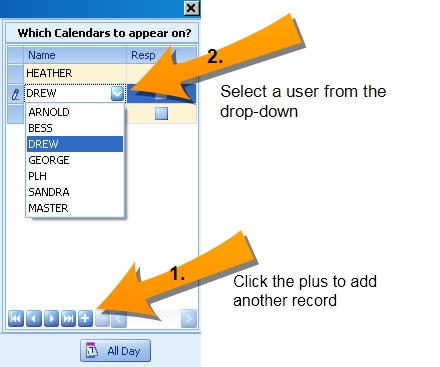
3. Check one or more users as Responsible. This is especially helpful if you have more than 3 people listed and you want to make sure the calendar item is not overlooked.
When you hover over a calendar item, you'll see that all of the users or groups are displayed. Those that are Responsible for the item are displayed in bold type.
Details Tab
The details tab is the second tab in a calendar entry.
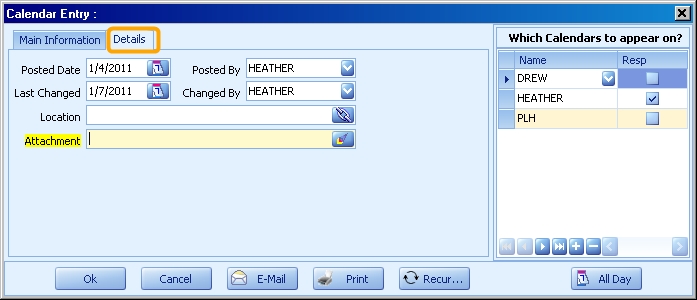
The fields are described here. They are listed alphabetically.
Attachment: Use this field to link to a file on your file server. Example: you could attach a pdf of an agenda for a meeting. NOTE: the attachment does not become part of the database; only the link is saved. Make sure to link to a shared network location others can access.
Changed By: The LawBase login of the user who last edited the calendar entry.
Last Changed: The Date the calendar entry was edited after already having been added.
Location: A caselink.to identify the location of the appointment. Typically this is set up to look at contact/address records.
Posted Date: The date that the calendar entry was entered into the system This field is automatically filled in when the calendar entry is created.
Posted By: The LawBase login of the user who entered the item. This field is automatically filled in when the calendar entry is created.
Completing Appointments and Tasks
LawBase makes a distinction between pending calendar items and those which have been completed. By default, when you create a new appointment or task, the status is PENDING. Pending items show on the tickler view whereas completed items do not.
What Does Completing Mean?
Completing is a shorthand way of saying: move the item from the active calendar to another location. Calendar items can be completed to History, to Notes or they can remain on the calendar but with a status change. Each of these options is described below.
Why Should I Complete Calendar Items?
Tasks and Appointments do not stand alone but are related:
- To the calendar, to track the users and groups assigned
- To the file
Because of this, at any time we can look at a user's calendar and see whatever casework is scheduled and we can look into a file and see all appointments and tasks.
Before and After
Here is a typical calendar item with a status of pending. It was set for 4/26/2011 and if it is not marked complete after that date, then it will remain in the tickler view until it is completed.
Once this has been completed to history, it will look like this. The details of the original event are kept, and there is a record of the date it was posted to history.
How to Complete
- Select the item which you want to complete. You can select it in a user or group calendar, in the tickler view, or in the calendar tab within a file.
- Right-click and select a completion option. Typically you'll have one of the following: Complete to History; Complete to Notes; Complete to Calendar.
Removing Users from and Deleting Calendar Entries
The information below assumes that the user has the proper permissions to delete calendar entries and remove users from entries. You may only have some of these permissions, or you may have none. If you have any questions, please contact your LawBase Administrator.
Removing a User from a Calendar Entry
The simplest way to remove a User from a calendar entry is to open the individual entry, select the name you want to remove from the panel on the right, and hit the - button:
When working within a User's calendar or the Calendar tab within a particular file, you may right click on a particular item and select Delete from the menu:
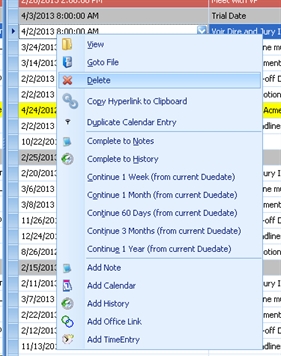
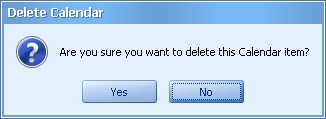
If there is only 1 user on the calendar entry, you will be asked if you're sure you want to delete the item.
If there are multiple users on the calendar entry, you will be given a set of options:
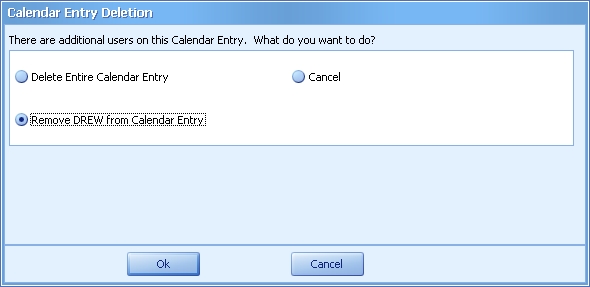
Delete Entire Calendar Entry will delete the entry on ALL USERS calendars. The entry will cease to exist in the system and is not retrievable once it is deleted.
Remove <<USER>> from Calendar Entry will only remove that particular user from the entry. The entry will continue to appear on the calendar of all other users listed in the entry.
Cancel will leave the entry just as it was before Delete was selected.
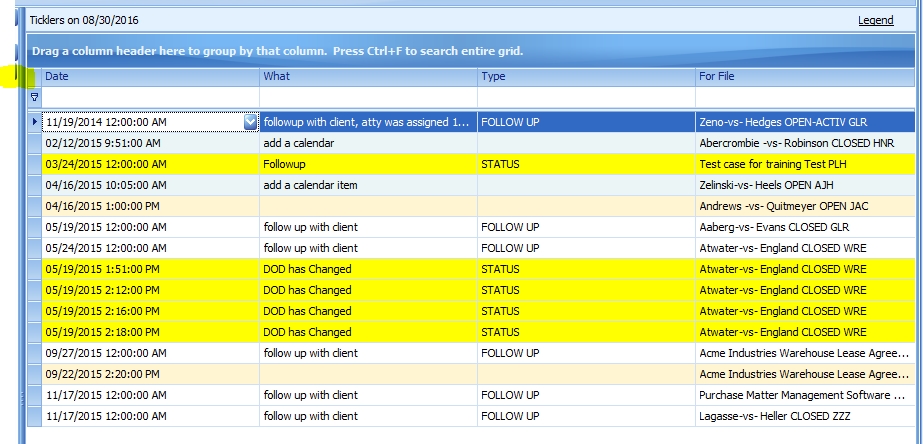
Managing Ticklers
The Tickler pane on the right-hand side of every calendar view is designed to help you keep on top of your most important appointments and tasks. The tickler pane does not display all pending items from your calendar. Here is what it displays:
- Items with a due date today
- Items with a tickle today; you can read more about how ticklers are set in the section Adding Calendar Entries.
- Past due items which are still marked pending.
Continuing Calendar Items
You can push ticklers into the future by resetting the start date (duedate) within the calendar item itself, or an easy way to manage to-do's is to continue them. From the tickler pane, you can right-click on the item you want to move to the future and select how far out you want to move it. The time periods available (1 day, 1 week, 1 month and so on) and configured by your local administrator.
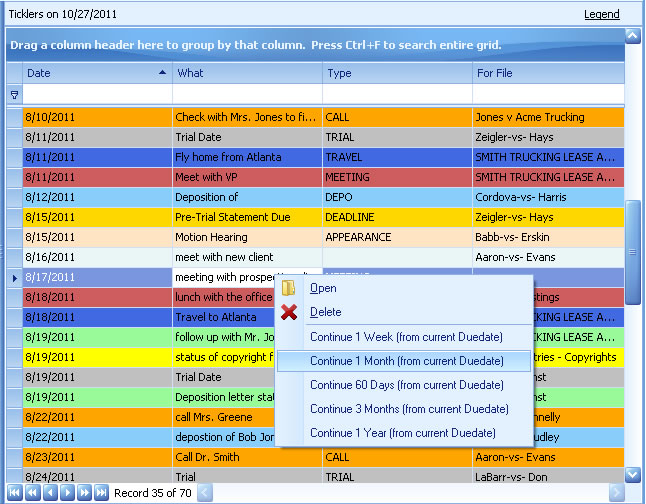
You can also right-click and continue from within user/group calendars and from within the calendar common tab of any file.
Calendar Free Time
You can use LawBase to find the first block of time that users (or resources) are free.
To find free time for a group
- View a group calendar or create an adhoc group
To create an adhoc group, click the group button under the Options ribbon and select the users on the left and click the arrow buttons to move them to the right.
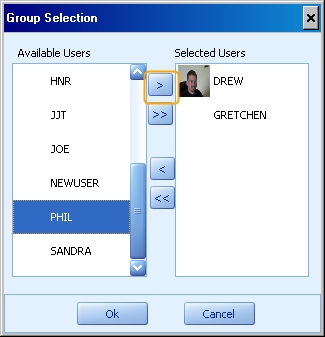
Click OK.
NOTE: You cannot edit an ad hoc group once you have pressed Ok. If you press on the Group button again in the Options ribbon, you will return to your personal calendar. Pressing the Group button again will bring up the screen again to create an ad hoc group.
- Click the Free Time Duration button and select a time needed for meeting.

2. Click the plus sign next to the field and LawBase will find the first block of time that is free for all the users in the group calendar.
In the example below, LawBase finds the first 4-hour and 30-minute block of free time (during the workday) for Drew, Gretchen, and Phil.
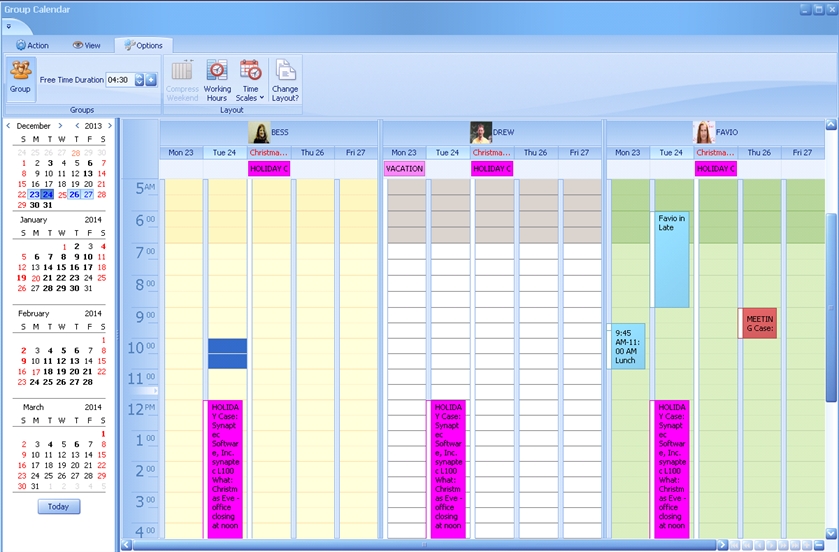
This example was performed on December 24th at 11:40 pm. The system sees that the office is closed this afternoon and on Wednesday for the Christmas holiday. It also sees that Favio has a meeting at 9:00 am on December 26th, so it picks the earliest available time after that, which is 10:00 am.
LawBase found the first time for the 4 hour and thirty minute meeting was on December 26th at 10:00 am. It fills in all the users that were in your group during the search so that you may quickly schedule a meeting then if needed. If you don't need an appointment, you can cancel out of the item.
Standard Calendar Reports
LawBase provides clients with some basic calendar Standard Reports that can be accessed under the Action ribbon, Printer button, Standard:
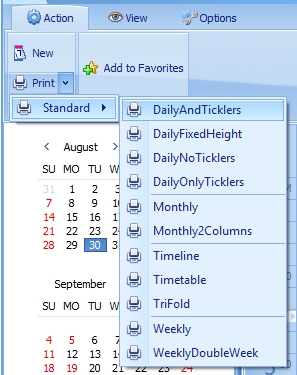
These reports print columns based upon what appears in the User's tickler grid:
Creates a report with the same four columns:
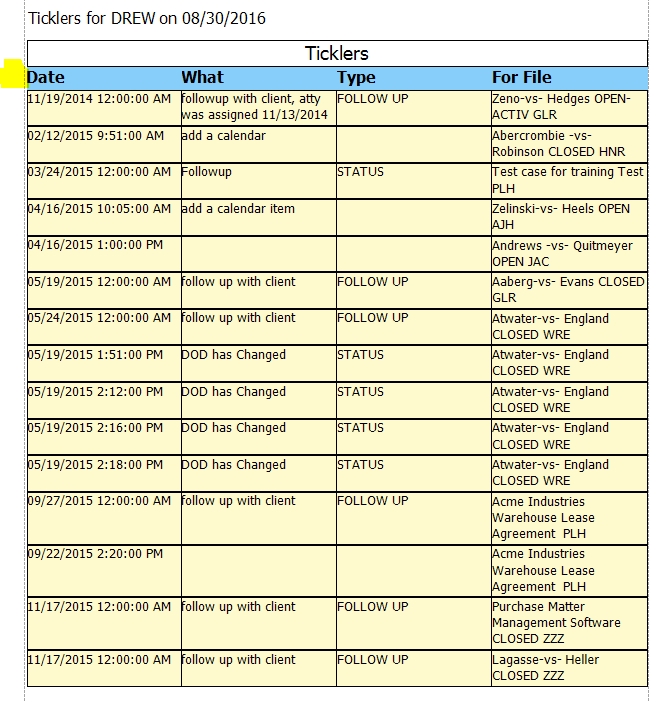
These standard reports are provided as a courtesy and will not be edited or customized by LawBase as a part of support.
Common Tabs - Notes, History, Calendar
This section describes the tabs which are common to every file in LawBase.
Most installations of LawBase include:
- Notes
- Tab Notes
- Calendar
- History
- Office Link
Your organization has the ability to add more common tabs as needed and so you many see additional tabs. Many of the operations, such as creating, deleting, sorting and searching are the same for all the common tabs. For more information about these functions, see Common Operations.
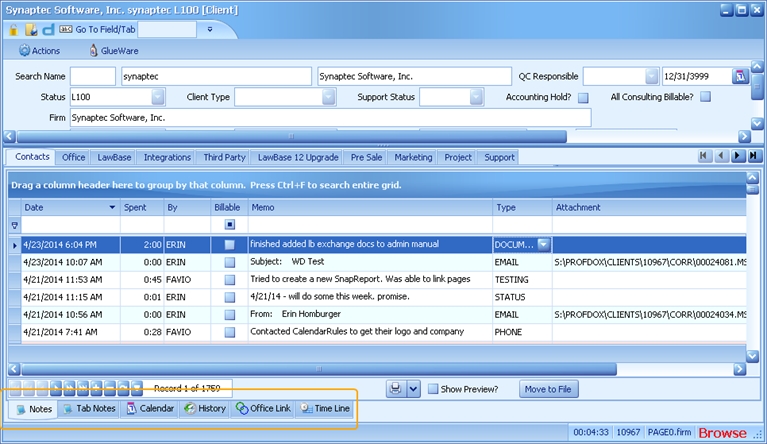
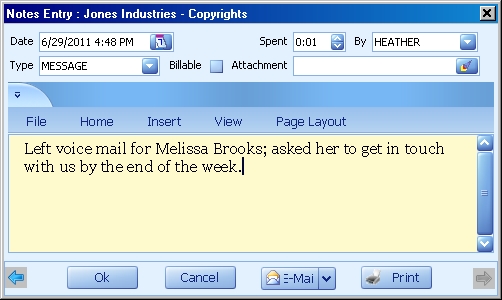
Notes
The Notes tab is a place in every file to keep records of day-to-day activity. Typically LawBase users record events such as phone calls, emails, meeting minutes, and document based contact with clients, witnesses, opposing counsel, courts, etc.
Notes Tab
The Notes tab contains all the Notes entries for a LawBase file, represented by rows and columns. The standard columns are described below. The columns may appear in a different order than shown below, since you are free to drag and drop them into any order you like. Also, your administrator has the ability to add custom columns to this standard set, so you may see additional columns.
![]()
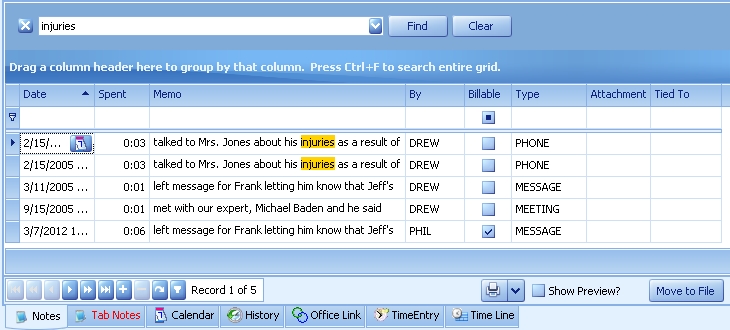
Attachment: Displays the network path for files attached to a note.
Billable: Check this to indicate a billable time entry. Especially handy for capturing in reports of billable notes. Can also be used with integrations with time and billing software.
By: Displays the user login of the person who created the note. Because some notes are generated automatically (through HotDocs or a workflow), this indicates who was logged in at the time the template or workflow was used. Date Displays the date the note was created. Defaults to today's date.
Memo: The memo field is the main text area of the note. The text is stored as rich-text, which supports formatting such as bold, italic, bullets, colors and more.
Spent: The time spent on the activity in the note. This will automatically fill in to indicate how long a user has been viewing a file. This may be in minutes or hours, depending on how you administrator has configured it.
NOTE: The clock begins ticking when a file is opened(viewed) and the time value immediately jumps to the first increment amount. Consequently if your time increment is set to six minutes, a note entry made after a file has been open for three minutes will display six minutes as the Time Spent. Any further notes calculate time spent not from the time the file was opened, but rather from the time the last note was entered. Tied To This is only filled in if a note is also a tab note. For more information, see Tab Notes Type Displays the type of note. Note type is a picklist and the types are generally limited.
Sorting, Searching, and Filtering the Notes Tab
For details about sorting, searching and filtering, see Common Tab Operations.
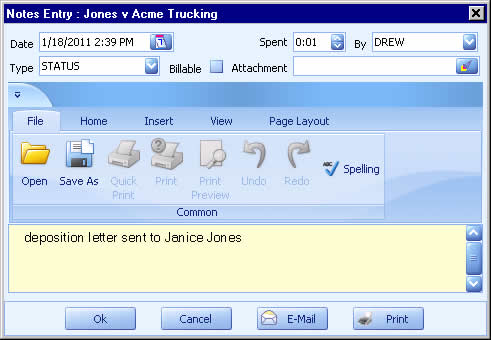
Note Entry
To view a note entry, double-click on the item in the notes tab. To create a new note, click the + at the bottom of the tab. For details about each of the fields seen here, see the Notes Tab section above.
Shortcut Keys
While you are viewing a file, to shift to the Notes tab press F2. To create a note while viewing any tab, press Alt+F2. While viewing the Notes common tab, press F5 to refresh the item list.
Tab Notes
Tab notes provide a way to associate individual notes with different parts of a file. Let's look at an example below. The Records Management tab is selected. While it is selected, we can observe the Tab Notes label is red. This means this tab has a tab note.
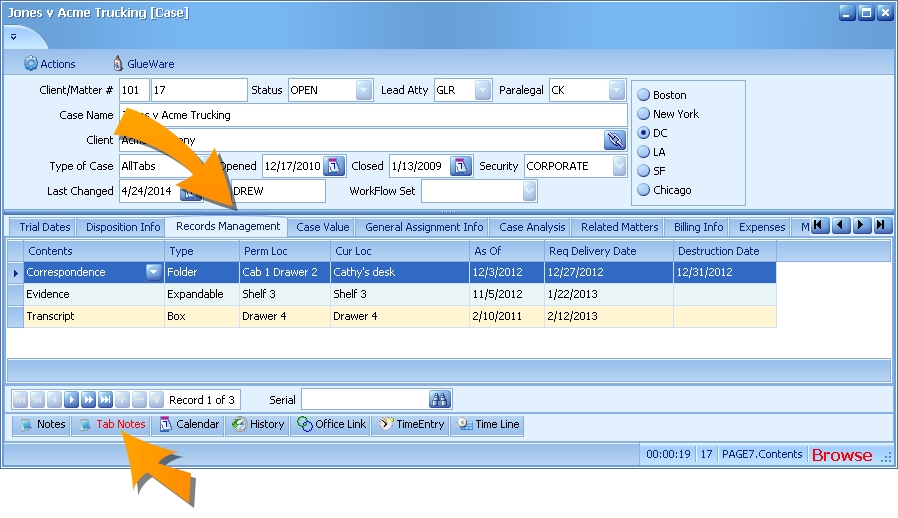
Here we see one note associated with the Correspondence item under Records Management.
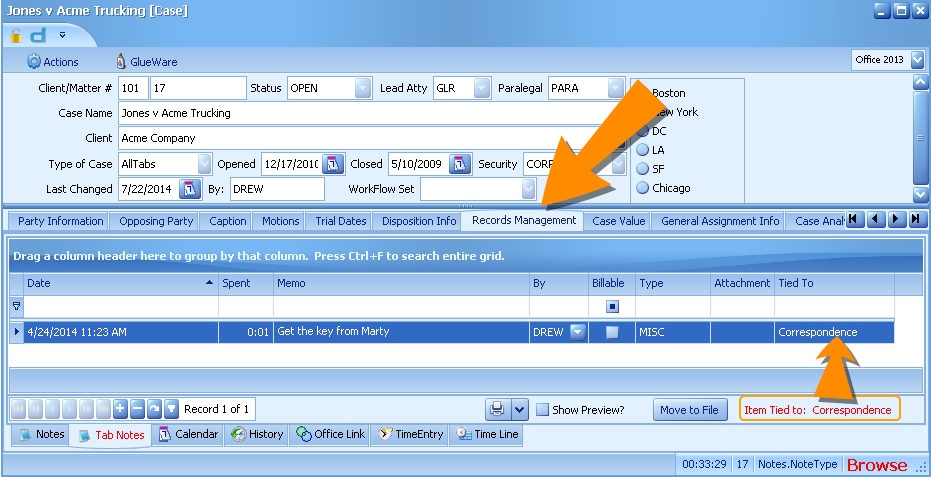
This note will also appear in the notes tab so that users don't have to search multiple tabs to find all the notes. So how is this different from a note? Tab notes are a way to call attention to notes which pertain to a specific tab in a file.
Sorting, Searching, and Filtering Tab Notes
For details about sorting, searching and filtering, see Common Tab Operations.
Adding Tab Notes
To add a note to a custom tab:
- Select the tab where the note should go. If the tab is repeatable, make sure to select the copy you want.
- While viewing the selected custom tab, open the tab notes
- Add a note using the plus button on the navigation bar.
- The tied to column should fill in indicating which copy of the custom tab it is linked to.
You may not see the tab notes indicator turn red until you exit and re-enter the file.
Calendar
Inside every file is a common tab for the calendar. These same items also show in personal and group calendars, depending on who is assigned. What you see here is limited to the calendar items for the open file.
The columns in the calendar grid are described below. You are free to drag and drop the columns as you like, so you may see them in a different order. The items are listed alphabetically.
Attachment Displays the path of a linked file.
Date The date of the appointment or to-do.
Memo The body of the calendar item. The first line appears in this grid.
Status By default this is set to Pending. Only pending items appear on the active calendar and tickler list. Pending - This is the default value. Pending items are active and visible on the LawBase calendar. Suspended - calendar items which must be taken off of the active LawBase calendar on a temporary basis. Only works for entries which have a file linked through the For field. Completed - Normally any entries which are "completed" are removed from both the LawBase calendar and from the calendars tab of the file. Typically, the record of the original event is stored in the History tab.
Type A picklist of types for calendar items. These are set by your local administrator.
What A short description of the calendar entry. Examples: Lunch with Client, Filing Deadline, Pre-trial Conference and so on.
Sorting, Searching, and Filtering the Calendar Tab
For details about sorting, searching and filtering, see Common Tab Operations.
Shortcut Keys
While you are viewing a file, to shift to the Calendar common tab press F9. To create a calendar entry while viewing any tab, press Alt+F. While viewing the Calendar common tab, press F5 to refresh the item list.
Right-Click Menu
You can right click over an entry within a file's Calendar grid view to do various actions to an entry without having to double-click and open the item itself.
Open Item: Another way to open the entry instead of double-clicking on it.
E-Mail: Create an Outlook message that contains the contents of the particular entry without having to open the entry and then press the Email button.
Copy Hyperlink to Clipboard: Copies the hyperlink code for that particular entry to your clipboard so you can paste it into an email or document. Find more information about Hyperlinks here.
Delete Item: Deletes the item you have right clicked over. You will be asked to confirm the deletion before the item is deleted.
Complete to Notes: Removes the entry from Calendar and copies its contents to a Notes entry. Depending on how your Administrator has decided to set up your system, you may not see this option.
Complete to History: Removes the entry from Calendar and copies its contents to a History entry. Depending on how your Administrator has decided to set up your system, you may not see this option.
Continue Options: Selecting one of these options will change the duedate of the entry, moving it forward in time by the amount you select. The calculation will occur from the data that is presently in the duedate, not today's date. Depending on how your Administrator has decided to set up your system, you may see different interval options or no options at all.
Reset Grid Layout to Default: This will revert your Calendar view back to the default. Any customization you have made to the screen (moving columns, changing sort order, grouping by categories) will be reset.
History
The LawBase History function tab provides an area in each file to store completed calendar entries. Rather than delete calendared events when they have passed, the History tab allows you to organize and search these events. Although the History tab was originally designed to serve as a reservoir for completed calendar entries, you can add new entries directly to the History tab. Every organization has its own way of utilizing the History Tab. This help topic is meant only as an overview of some of the features of the History Entry box and may in practice be a very unsuitable description for your office's individual implementation. Please contact your LawBase Administrator for a better understanding of how your office utilizes History entries.
History Tab
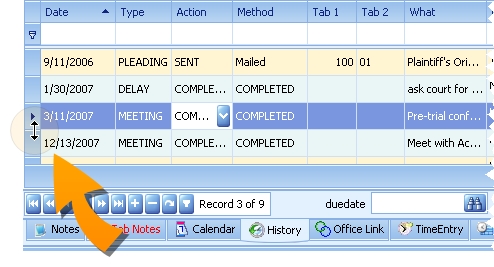
The History tab contains all the History entries for a LawBase file, including entries created by completing calendar entries or by direct entry.

Action: Displays the action which led to the completion of a Calendar Entry. Typically this field holds the Status from completed calendar entries.
Attachment: Displays the network path for files attached to a history item. Date Displays the date the item was entered.
Method: Displays the method by which individual calendar entries were completed. This usually extrapolates on the Action field. Notes The memo area of the history item.
Tab1: By assigning a TAB number to History entries it is possible to create a pleadings index or other artificial event organization.
Tab2: Used in conjunction with TAB1, TAB2 offers an addition
Type: Displays the type of individual History entries. This field is transferred from the same type field in Calendar entries.
What: The subject line of the history item.
Sorting, Searching, and Filtering the History Tab
For details about sorting, searching and filtering, see Common Tab Operations.
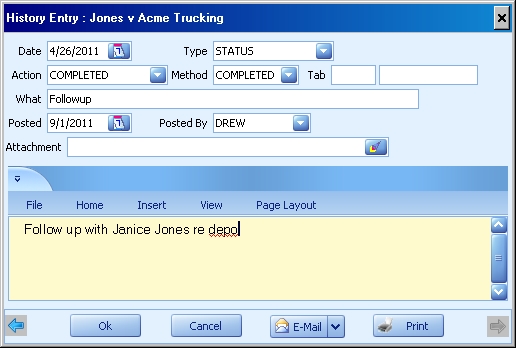
History Entry Box
The History Entry box is used to create new entries to the History Function tab of a particular file. Depending upon the practices of your office, you might only rarely add entries to the History tab in this manner. Most History entries were originally calendar entries that were marked as complete. These completed calendar entries are turned into History entries to remove them from the LawBase calendar and to allow for the use of the additional fields found in the History Entry Box.
ACTION: The event which caused the History entry to be created. Normally the ACTION field is automatically filled with "COMPLETED" when a calendar entry is completed and turned into a History entry. It is possible to be more specific by entering more detailed information to the ACTION field. For instance, if the History entry refers to a deposition, the ACTION field might say "TAKEN" or even "POSITIVE" to describe the outcome of the completed deposition.
DATE: The day on which the event occurred. This field defaults to today's date. If this field is filled by a completed calendar entry it will hold the date the event was originally scheduled to occur, also called the DATE field in calendar entries.
LAUNCH: Identified by the rocket button, the launch field allows you to attach files or documents to your History entry. Any item attached to completed calendar entries also appear in the launch field.
NOTE: A free-text area which allows extensive notes to be added. Notes can be created when calendar entries are completed. POSTED BY The login of the person responsible for creating the entry. POSTED
DATE: The day that the History entry was created. This defaults to today. This field is also filled in with today's date when a calendar entry is completed.
TAB#: Useful in creating pleadings indexes, the TAB fields allow you to ascribe whatever indexing numbers you see fit. If your office utilizes a numbering system for docketed events or for file-related actions, the TAB field would be a good place to store that information. Later on you can sort on this field.
TYPE: Describes the category of the event. On completed calendar entries this contains the value which was originally entered as the calendar entry type.
WHAT: The full description of the event (sentence length.) This is automatically filled by the calendar entry WHAT field when they are completed.
Shortcut Keys
While you are viewing a file, to shift to the History common tab press F8. To create a history entry while viewing any tab, press Alt+F8. While viewing the History common tab, press F5 to refresh the item list.
Office Link
NOTE: This is an optional tab and your system may not include it.
The Office Link Function Tab provides links to any documents or files related to an individual LawBase file. By selecting the network location of word-processing files, spreadsheets, courtroom presentations, and other files, you give immediate access to these files for everyone with security permissions to do so. It is possible to launch any file or document from within LawBase, giving you the ability to speedily review documents related to a file, or change information in an attached file.
Create an Office Link Entry
To create a new entry
- Click the + ; the Office Link Entry Box is displayed.
2. Fill in the fields to identify the document.
File: Click on the rocket button next to the File field to search for the document or file you wish to attach. A Windows-standard search dialogue box appears. Browse to the file on the network and either double-click or single-click and choose Open. This will insert the path and document name in the File field. NOTE: Linked documents are NOT stored in LawBase; the documents remain in their network locations.
Title: The name you give to the document or file. Although you might normally use the actual document name (protect.doc), you also have the ability to give files more appropriate and explanatory names (Letter of Protection.)
Type: The format of the file or document linked, such as Word, WordPerfect, Excel, Lotus Approach etc.. The entries in this drop-down list are determined by your office. Speak with your LawBase Administrator if you believe the list should be modified.
Posted: Automatically filled in with today's date. This marks the date the file was attached in Office Link, not the date the file or document was created.
Posted By: Automatically filled in with the login of the individual responsible for attaching the file or document.
Sorting, Searching, and Filtering the Office Link Tab
For details about sorting, searching and filtering, see Common Tab Operations.
Time Line
The Time Line is a common tab which you may find at the bottom of a file along with your other common tabs. When it is enabled (a choice made by your LawBase Administrator), it appears as the last common tab on the right. The Time Line acts as an aggregator of the Notes, Calendar, and History common tabs and will show you all of the items you choose to see for a certain time period. It is a very valuable tool when you want to get a big picture of file activity.

Parts of the Screen
Choose how you see your data by selecting Day, Work Week, Week or Month from the top of the screen, which will change the main view:
![]()
To change the actual dates being viewed, select the date you want to see from the calendars in the left pane:
To select the type of Common Tab information you would like to display, click on the down arrow next to Included Items - depending on how your LawBase Administrator has configured your system, you will see Notes, Calendar, and/or History. To remove one of these items from your current display, uncheck the box next to the item.
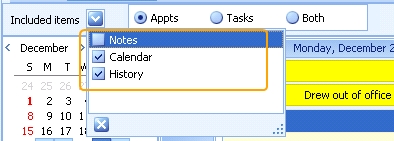
If Calendar items are included in your display, you have the option of viewing Appointments Only, Tasks Only, or Both Appointments and Tasks. Make your selection using the radio button next to the Included Items' picklist.
![]()
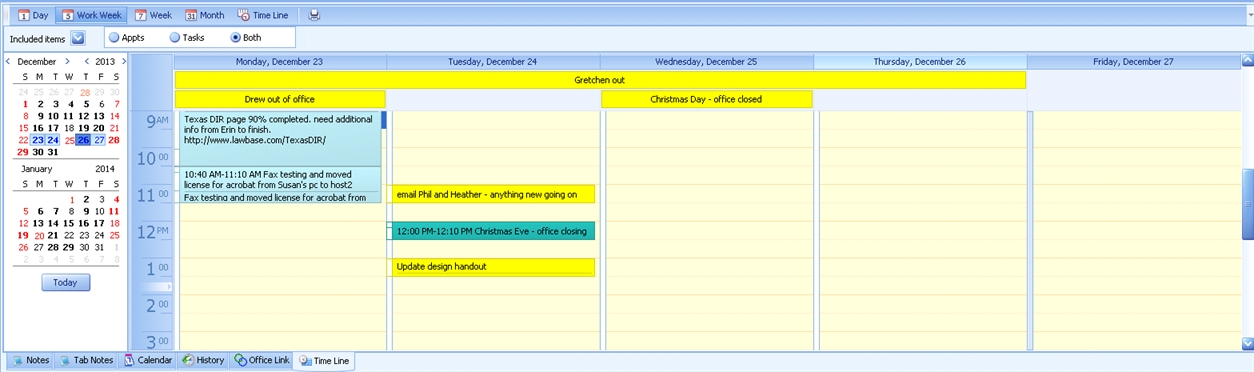
The majority of the screen is your view where you can see the actual items that match the criteria you've selected for the file you're currently in. In the example below, the Work Week view is selected, along with all Notes, Calendar, and History items (Notes=light aqua, Calendar=yellow, History=teal). All types of Calendar entries (Tasks and Appointments) are displayed because Both is selected:
If Notes is unchecked from the Included Items list and Appts is selected instead of Both, the display changes to this:
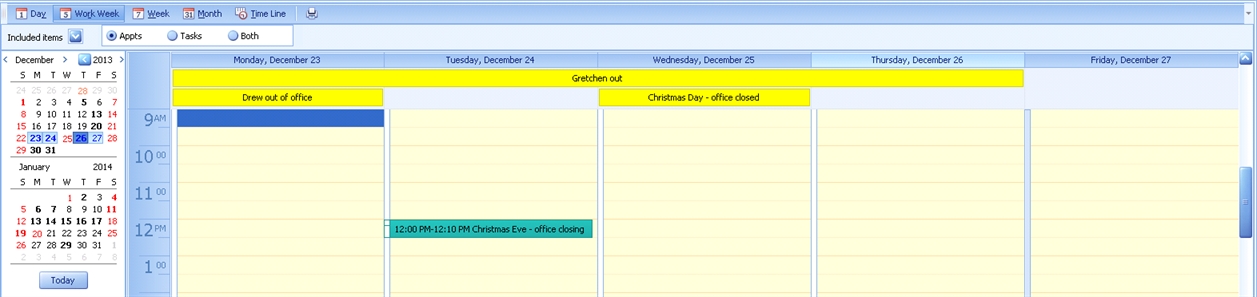
Notice that all of the Notes items (light aqua) are gone, in addition to the two Calendar items on Tuesday that were tasks rather than appointments.
Common Tab Operations
Navigation, Searching and Printing
At the bottom of each common tab you'll find a few more tools
Navigation Bar
![]() Use this bar to create, delete and move within the common tab.
Use this bar to create, delete and move within the common tab.
![]() Adds a new item
Adds a new item
![]() Deletes the selected entry.
Deletes the selected entry.
![]() Moves to the first item in the list
Moves to the first item in the list
![]() Moves to the previous page of records
Moves to the previous page of records
![]() Moves to the previous item in the list
Moves to the previous item in the list
![]() Moves to the next item in the list
Moves to the next item in the list
![]() Moves to the next page of records
Moves to the next page of records
![]() Moves to the last item in the list
Moves to the last item in the list
![]() Refreshes the data; if other users have added/updated/deleted entries since you first viewed this tab, you'll see their changes.
Refreshes the data; if other users have added/updated/deleted entries since you first viewed this tab, you'll see their changes.
![]() Creates a duplicate of the current item.
Creates a duplicate of the current item.
Search box
![]() Sometimes you may only want to see Calendar Items where certain people are listed as the whofor. To filter Calendar Items by whofor, select the checkbox next to the name of the user you'd like to see entries for. Reports Button
Sometimes you may only want to see Calendar Items where certain people are listed as the whofor. To filter Calendar Items by whofor, select the checkbox next to the name of the user you'd like to see entries for. Reports Button
![]() Click the printer button to display available reports. Select an item from the list to generate it.
Click the printer button to display available reports. Select an item from the list to generate it.
Show Preview
![]() When this is checked, you'll see a single entry area to the left of the common tab grid. It will display the contents of the highlighted item.
When this is checked, you'll see a single entry area to the left of the common tab grid. It will display the contents of the highlighted item.
Sorting and Filtering
Searching: To search all fields in the grid, press CTRL+F and a search field will appear above the data. Type in the string you want to search for and click find. Results will be highlighted. To remove the Find box, click the X at the far left.
Single sort: Click on a column header to sort the grid by that column. Click again to reverse the sort.
Multiple item sort: Do a single sort. Then SHIFT-click on the second column header.
Filtering: You can reduce the number of items in the grid view by filtering. In the example below, only items with an action of SENT are displayed. To remove a filter, clear the text.

Adjusting Row Height: At the left of each row is a row control. Hover your mouse over the row header just between two rows. When the mouse pointer changes to a double-headed arrow, click and drag to increase or decrease the row height.
Adding an Item - Note, History, Calendar Item
There are four ways to add a entry to a LawBase file:
Right-click on the Common Tab
- Right-click on the common tab label at the bottom of your file.
- Click on the Add options which appears.
Click the + Inside the Tab
- Click (left-click) on the desired common tab.
- Use the navigation bar inside the tab to add an item. Click the + button.
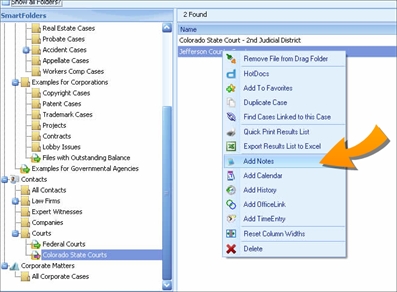
From the Results Pane
This is useful when you have found the file through a search or SmartFolder and don't need to view the file, you just need to add a note or other common item.
- Locate the file in the results pane.
- Right-click on the desired file and select Add Note or Add Calendar
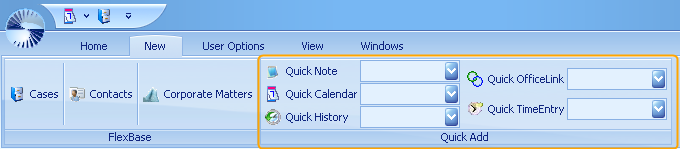
Quick Add
You can also add common items from the New Ribbon.
Moving a Common Item from one File to Another
Sometimes you may find that you accidentally add a Note, Calendar entry, or History item to the wrong file. Whether you've added the item from within the file or by dragging and dropping an email, you can easily move the item to the correct file by using the Move to File button at the bottom of your common tab pane.

Select the item on the grid you'd like to move and click the Move to File button. A dialog box will appear asking you to type in the file you'd like to move the item to - typically you will search by file name or whatever field your administrators determined as your primary search field. Note that wildcard (*) searches do work with this feature.
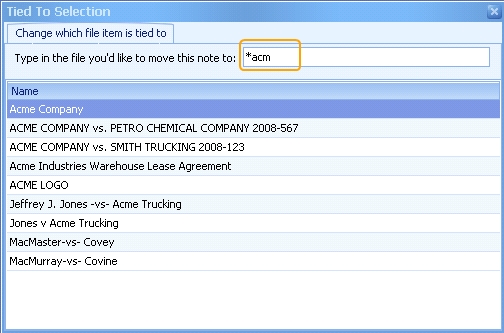
Double-click the file where the item should be moved to. A dialog box will appear asking you to confirm that you want to move the item to the selected file.

Click No to keep the item in the original file. Click Yes to move it to your selected file.
AutoCorrect
Many of us have grown used to software which corrects common typing errors like the following:
teh > the
definately > definitely
SYnaptec > Synaptec (corrects two initial capital letters)
they;ll > they'll (wrong punctuation)
and so on. Autocorrect like this is available within rich-text memo fields in LawBase.
Using AutoCorrect in Common Tabs
Inside a note, calendar entry or other common tab item, you'll find AutoCorrect on the File Tab on the Rich Text ribbon. It's at the end under Spelling.
Click AutoCorrect to expose the AutoCorrect Editor. There are two parts - Personal Entries and System Entries. Autocorrect is handy for adding frequently misspelled words as well as text expansions for abbreviations. For example, you might add lvm which will autocorrect to left voice mail.
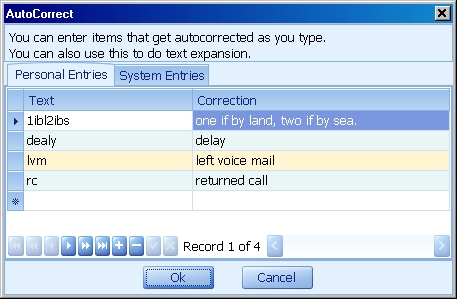
System Entries are global, meaning that they apply to all users. Administrators can edit System Entries while non-administrators have read-only privileges.
Spellchecking
Spellchecking is available in rich-text memo fields. You'll find these rich-text fields in common tabs, such as notes and the calendar. Here is an example from a note:
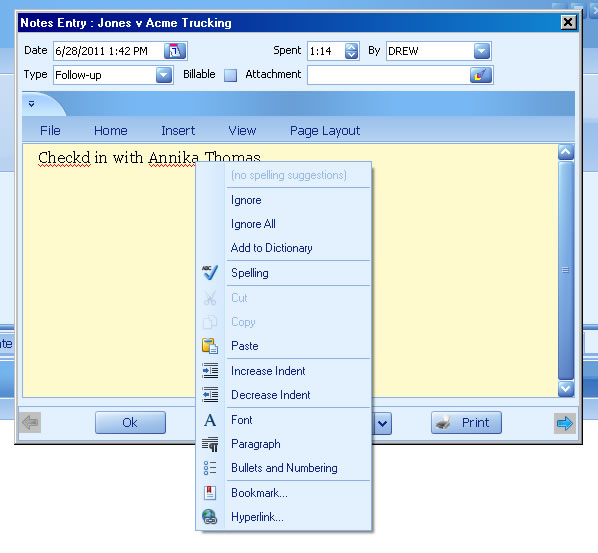
Using the right-click menu you can correct misspellings and add words to the dictionary. In the example above, the name Annika is not recognized. But each user can add the name to their dictionary.
Alternate Method of Spellchecking
You can also spell check from the File Ribbon within the rich-text field. And, as in many Windows applications, the keyboard command for this is F7.
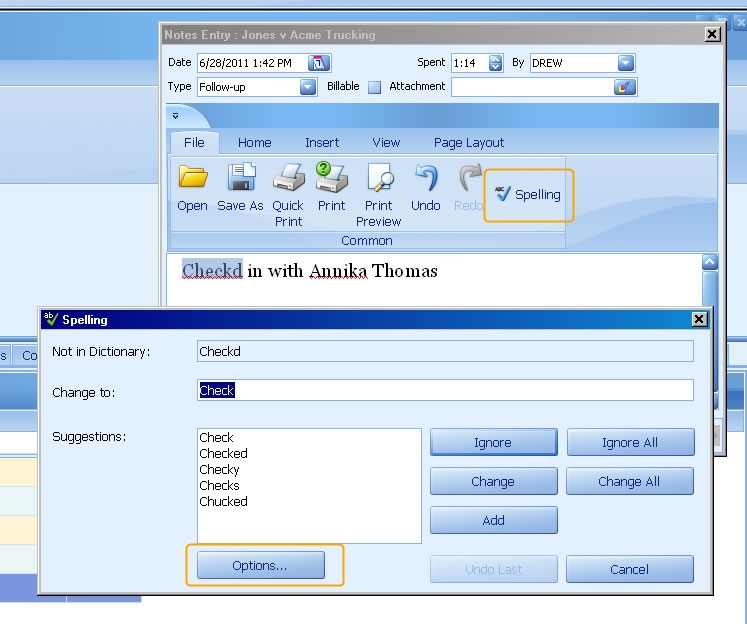
How Spellcheck Works
There is a global dictionary which is active for all users. But each user has a personal dictionary as well. When you right-click on a misspelled word and click Add to Dictionary, the entry is added to your personal dictionary. To edit your dictionary:
- Start inside a rich-text memo field, such as in notes or calendar entries.
- From the File Tab above the memo, click Spelling (or press F7).
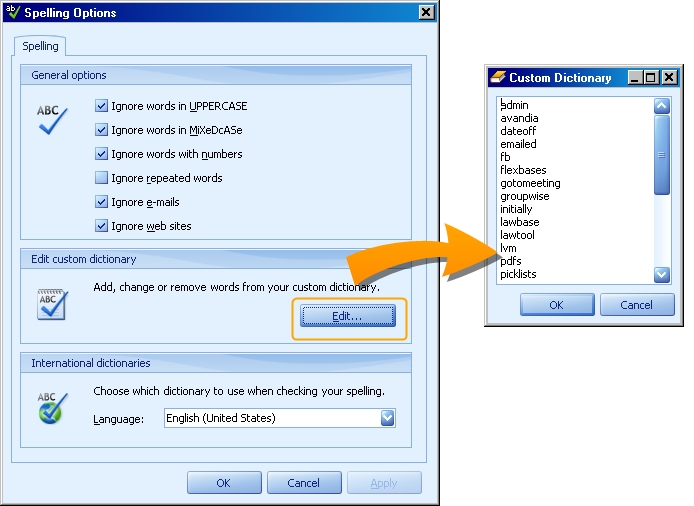
- Click the Options button at the bottom of the dialog.
- Spelling options will appear as below; click Edit to bring up your custom dictionary.
You might want to review the section on Autocorrect as well.
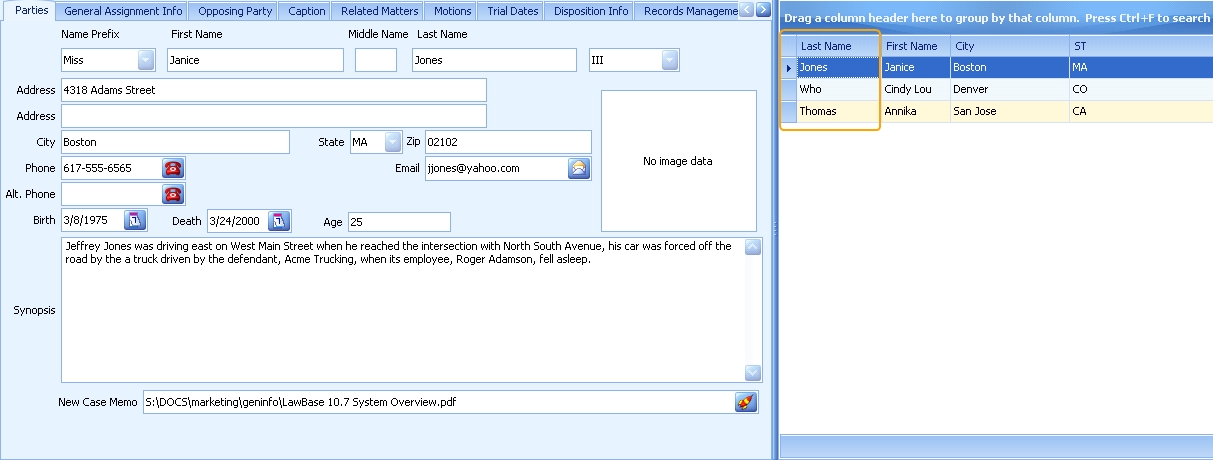
Conflicts Tab
Use the Conflicts Tab to search multiple fields in the LawBase database at once. Type an entry into a search field and press ENTER to execute the search.
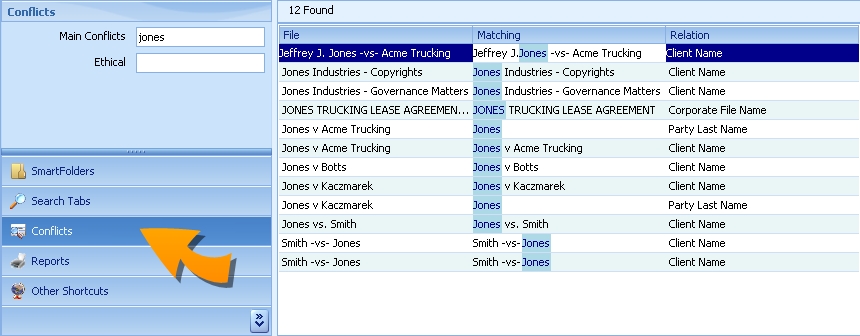
In the example above notice that the string "jones" was located in multiple places throughout the system.The fields that are searched are specific to your organization.
Conflict Search within a File
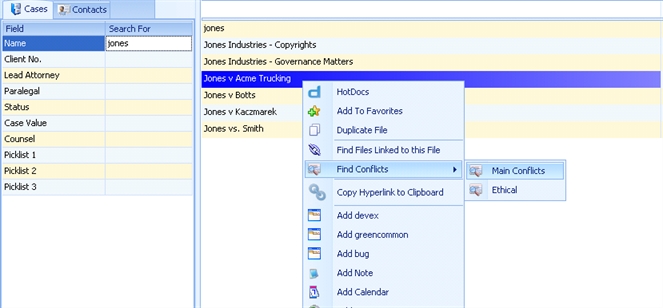
To run a conflicts search for all people within a single file, use the Find Conflicts dropdown menu in the Actions ribbon at the top of the file.
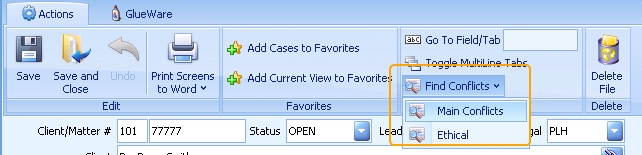
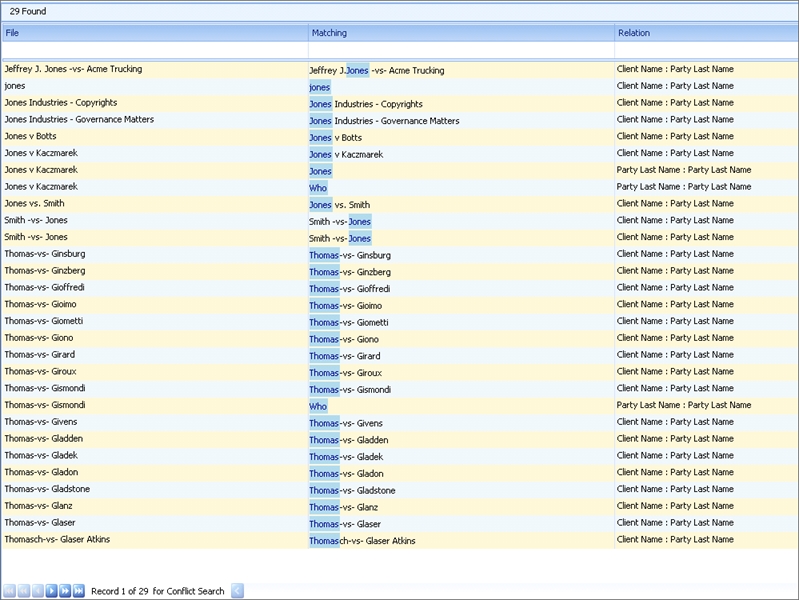
This conflicts search will run all of the appropriate fields against the rest of your files. For example, in this system the Last Name on the Parties tab has been designated as a Main Conflicts search field, which means that when the Main Conflicts search is run from within this file, the system will check for Jones, Who, and Thomas, because those are the Last Name fields with values in the file.
The search results will open automatically in your Main Navigator window, highlighting the conflicting words, listing the file where the conflict occurred, and the field where the conflict exists (especially useful when running the search against multiple fields). Notice that our example search returned results for Jones, Who, AND Thomas.
Note that this same search can be performed without actually opening the file; just right-click by right click on the file listing in the results panel.
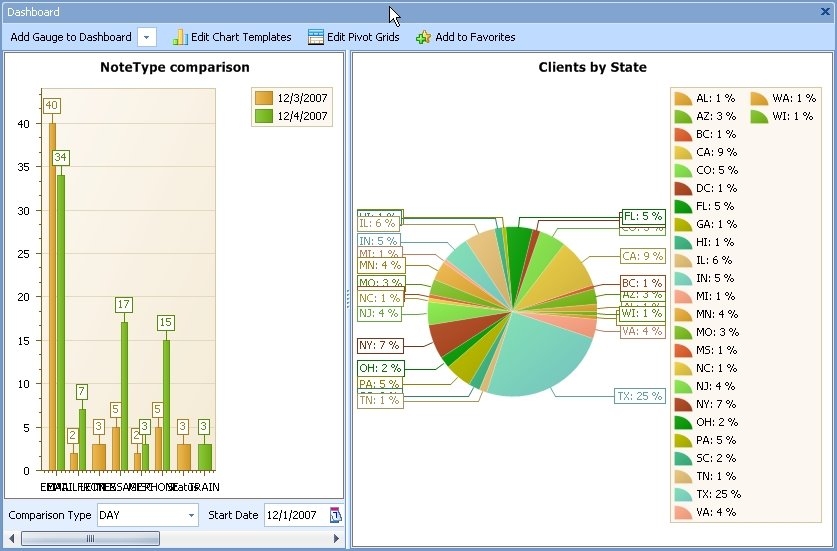
Dashboards
The LawBase Dashboard is a quick way to view a high-level summary of what is happening in LawBase.
- Dashboard gauges can refresh automatically so that what you see is always live and up-to-date.
- You can have up to eight separate gauges on any one dashboard,
- Open as many separate dashboards as you like.
A LawBase dashboard can contain charts and pivot grids. Example:
Viewing Dashboards
From the Home tab of the ribbon:
- Click Dashboard
- Click on the dropdown Add Gauge to Dashboard
- Select the gauge you'd like to see and double-click.
- If you'd like to save this dashboard, you can add it to your favorites. Alternatively, you can close it and add gauges as needed.
Viewing Options
A number of options are available while viewing gauges. Right-click anywhere within the gauge and a context menu appears.

On the fly you can:
Remove From Dashboard: Note: this will not remove a gauge from a saved favorite. To remove a gauge from a favorite, you'll have to re-save the favorite. Chart Type Change the current view to another chart type.
Print: Prints the dashboard. You'll have a chance to preview it before printing.
Restore Default: View Restores the appearance of the gauge to its saved default presentation - displaying the legend and removing any settings to implode/explode.
Show Legend: By default, the legend appears to the right of the gauge. You can toggle it on and off with this.
Explode All: Only applies to pie and donut charts. Click this to expand the pie and add some space between the slices.
Implode All: Only applies to pie and donut charts. Click this to condense the pie and remove space between the slices.
Explode Max: Selection Only applies to pie and donut charts. Click this to call attention to the largest slice(s) of the chart.
Explode Min: Selection Only applies to pie and donut charts. Calls attention to the smallest slice(s).
Favorites
Favorites are a way to bookmark various items within LawBase to make accessing those items faster. For instance, you might make a favorite for a file you use frequently. Or you might find yourself frequently viewing a certain user or group calendar -- this could also be added as a Favorite so that you can quickly return to the calendar without having to select the group of people each time. Each LawBase user has their own Favorites and these are the different types of Favorites you can create:
- SmartFolder - Return to the marked SmartFolder and display its current results.
- FlexBase - Open a particular case file.
- Report - Run a report.
- Calendar - Open a calendar as it was viewed when the Favorite was created.
- Dashboard - Open a Dashboard with all the gauges that were on it when the Favorite was created.
- QueryBuilder - Open the QueryBuilder with all the criteria set up as it was when the Favorite was created.
Creating Favorites
To create a favorite, first view the item you want to bookmark
- Right-click and select Add to favorites.
Or
- Select Add to favorites from the action ribbon
For example: view a LawBase Calendar and select a group of people. From the action ribbon click Add to Favorites. A dialog will appear where you can name the Favorite and organize it in Favorite tree.
Using Favorites
Once Favorites have been setup, you can press on the Favorites button from your main screen. This is located in the Home group of the ribbon and you can also place the Favorite button on the quick access toolbar for easy access. When you press the button, you will be presented with a list of Favorites organized in any folder structure you desire. It will look something like:
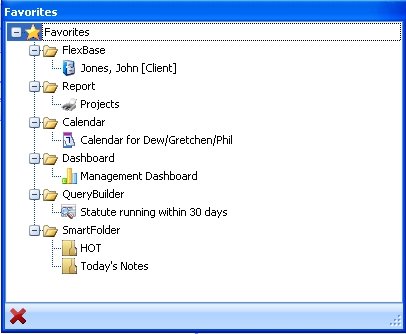
From here double-click on any Favorite item to go directly to that Favorite. You may also organize your folders differently by simply dragging and dropping items where you'd like them to appear in your tree. Right Clicking will allow you to make new folders, rename items, remove items, change the properties on items and organize by type.
NOTE: If you select Organize by Type then your entire folder structure will be removed and LawBase will organize the folders by what each type of Favorite is.
Group Favorites
There may be times you wish to set a single Favorite for several users at once. For instance, you may have a group calendar that all the people in the group should have on their favorites. Or you may have a dashboard that various people in a management group would like to view. If you are an administrator, you may make Favorites show up on other users Favorite lists by assigning the favorite a LawBase Group.
When you assign a group to a Favorite, then it will show up in the list for the members of the group. To make a Group Favorite, right-click on the favorite and select the LawBase group it should appear on from the drop down entry.
Once a Favorite has been made a group favorite, it can be used as usual by anyone in the group. If you wish to remove it from the globals, you may delete the Favorite, or right-click on it again and reassign the group back to [None] or change the group of users it should show up on.
Fields
The most common field types are described here.
Caselink
![]() Use caselinks to link to another tab. Typically this is a link to a contact, but can be to another tab in the same FlexBase or another FlexBase. For more information about FlexBases, see FlexBases. Read more about caselinks here Caselinks
Use caselinks to link to another tab. Typically this is a link to a contact, but can be to another tab in the same FlexBase or another FlexBase. For more information about FlexBases, see FlexBases. Read more about caselinks here Caselinks
Checkbox
![]() This field is a box which can be selected (y) or deselected (n).
This field is a box which can be selected (y) or deselected (n).
Calculator field
![]() This field type only accepts numbers. It also provides a pop up calculator where math functions can be performed. The underlying field in the database is created as a numeric field.
This field type only accepts numbers. It also provides a pop up calculator where math functions can be performed. The underlying field in the database is created as a numeric field.
Date
![]() This field accepts a date in an mm/dd/yyyy format. The field in the underlying database is stored as a date. Double-click on a date field to reveal the date calculator.
This field accepts a date in an mm/dd/yyyy format. The field in the underlying database is stored as a date. Double-click on a date field to reveal the date calculator.
Launch
![]() Use this field type to link a document, image or object. LawBase does not open the linked files; the files are opened by their associated programs. So if a .mpp file is linked but your PC does not have MS project, the file will not open. Furthermore, assuming that your LawBase Administrator has set up the Cosmetic, you may drag and drop Outlook email messages into these fields. The system will automatically create a .msg file in a LawBase folder and that Outlook message will open whenever you press the rocket icon. You may also drag and drop documents from a Windows Explorer window onto a Launch field to populate the path.
Use this field type to link a document, image or object. LawBase does not open the linked files; the files are opened by their associated programs. So if a .mpp file is linked but your PC does not have MS project, the file will not open. Furthermore, assuming that your LawBase Administrator has set up the Cosmetic, you may drag and drop Outlook email messages into these fields. The system will automatically create a .msg file in a LawBase folder and that Outlook message will open whenever you press the rocket icon. You may also drag and drop documents from a Windows Explorer window onto a Launch field to populate the path.
Pick List
![]() This field is a drop down table. Picklists are named and can be used in more than one location in the same LawBase system. For example, you could have a staff table which lists all your staff. And this table could be in multiple tabs as well as in the header. As you type the picklist will display records that meet your criteria. Note - if the picklist is non- validated (where free form entry can also be accomplished), the as you type is case sensitive.
This field is a drop down table. Picklists are named and can be used in more than one location in the same LawBase system. For example, you could have a staff table which lists all your staff. And this table could be in multiple tabs as well as in the header. As you type the picklist will display records that meet your criteria. Note - if the picklist is non- validated (where free form entry can also be accomplished), the as you type is case sensitive.
Active picklist: Looks just like a picklist, but the available selections are sourced from another page or table. Your administrators could, for example, set up a picklist that reads from the user list.
Dependent picklist: The choices depend on another field. For example, you could have two fields, make and model. The models available to select vary depending on the make. So if you choose Honda as the make, Camry will not be a choice in the dependent picklist, but Civic will.
Label
![]() Use this field type to create a standalone label.
Use this field type to create a standalone label.
Mail Field
![]() This field accepts email addresses. Click on the envelope button to launch the email application and create a message addressed to the email in the field
This field accepts email addresses. Click on the envelope button to launch the email application and create a message addressed to the email in the field
Phone field
![]() This field type accepts phone numbers. If your system is configured with a tapi connection, you can click on the phone button to automatically dial the phone with the selected number.
This field type accepts phone numbers. If your system is configured with a tapi connection, you can click on the phone button to automatically dial the phone with the selected number.
Plain text memo
![]() This field type accepts a large amount of text in a single field if the text entered into the field exceeds the space on the screen, a scroll bar will appear.
This field type accepts a large amount of text in a single field if the text entered into the field exceeds the space on the screen, a scroll bar will appear.
Radio Button
 Radio buttons offer multiple choice; select one from the set.
Spin Edit
![]() This field type accepts integers. Use the up and down arrows to increase or decrease the value by 1.
This field type accepts integers. Use the up and down arrows to increase or decrease the value by 1.
Text or Edit Field
![]() This field type accepts numbers or text in any combination.
This field type accepts numbers or text in any combination.
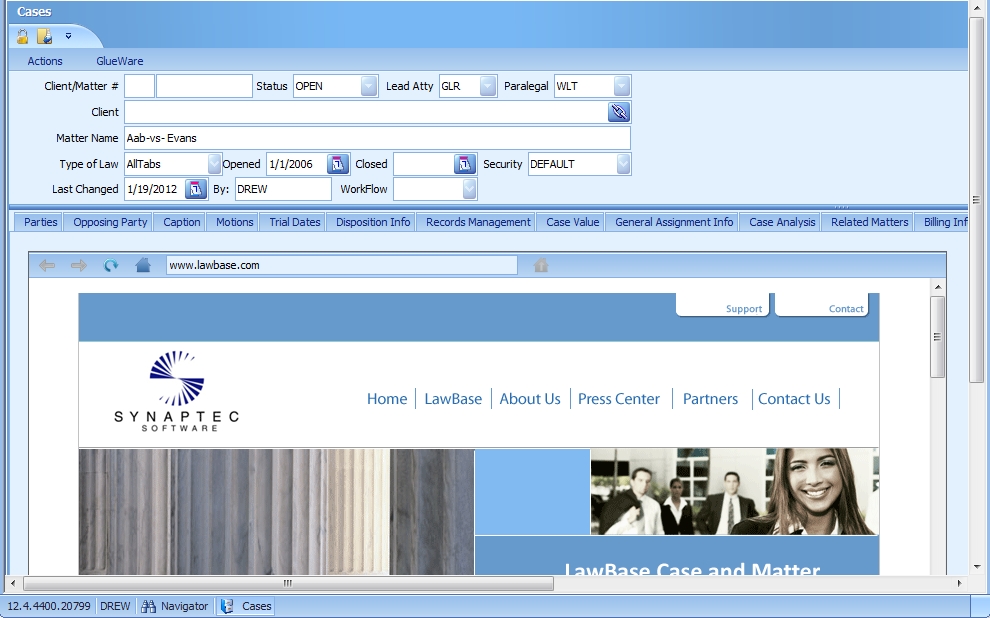
Web Browser: The Web Browser component opens web-based content directly in LawBase. You may find a toolbar at the top of the field where you can change the URL; to save the viewed URL click the button at the right end of the toolbar. If you don't see the toolbar, it means your local administrator has disabled it.
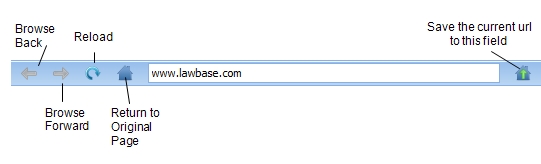
When the toolbar is exposed, you are free to type in other URLs and click on links - you won't change the saved URL unless you click on the button at the right end of the toolbar. Clicking Return to Original Page means you'll go back to the site that is saved in this field. To save a new site, make sure to click the button at the right end of the toolbar. Here's a sample of a web page viewed within LawBase. We expect this will be used most frequently with pages that provide data related to a case, such as government sites, document management sites, sharepoint and so on.
Finding the Name of a Field
There may be times when you need to know the database name or the HotDocs name of a field within your system. There are a couple of ways that you can find this information.
The first is by right-clicking over the field you need to know the name of and selecting 'Show Field Name'. A dialog box will appear:
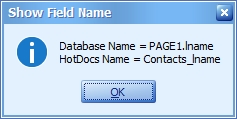
The 'Database Name' gives the page number and field name, which you'll need when writing SQL for smarfolders or queries. The 'HotDocs Name' is the format used to enter that field's data into HotDocs templates (if you do not create HotDocs templates, do not worry about this information).
An even faster way to find the database name of a field is by clicking on the field and then looking in the bottom right corner of your status bar (at the bottom of your case file screen). You'll see the database name of the field between the serial number of the file and the mode you are currently in (Browse or Edit):
![]()
You can copy the field name, serial number or time spent to your clipboard from this status bar by simply right-clicking on the information.
Maneuvering Between Tabs
At the end of your row of tabs are four arrow buttons. These buttons allow you to navigate from tab to tab in order. The button on the far left will take you to the first tab and the button on the far right will take you to the last tab.
![]()
Caselinks/Linking Files
![]()
Much of LawBase's power comes from its ability to freely link files to each other. For example, if you employ the services of the same expert in many of your files, instead of entering the same information about that expert into every file where she is involved, you can link to her Expert Contact record. Once you have linked a contact to an individual file, you can use that linked information in searches, reports and HotDocs output as well.
Filling in a Caselink
- Make sure you are in EDIT mode
- With your cursor in the caselink field, type the first few letters (or more) of the contact/file you are searching for. Press ENTER. A drop-down appears with matching records.
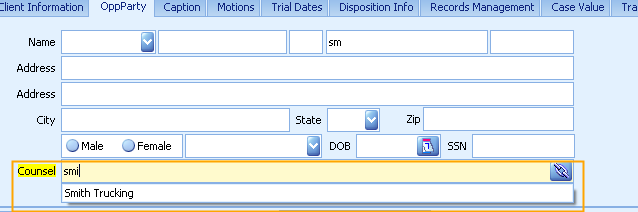
3. Select the contact from the list (either press the down arrow until the correct entry is highlighted and press ENTER, or use your mouse to click on the entry.)
Add a File for the Caselink
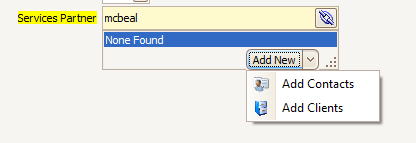
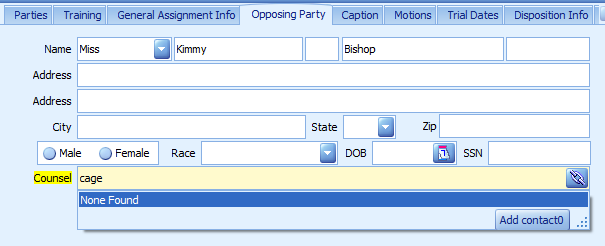
If you cannot find the contact/file that you want to link to, you can add a file from the caselink itself. You'll see a button or dropdown below the caselink field; click the option required and you can create the file you need (provided you have sufficient rights to create new files). The options you see can vary -- what kind of files you can add depend on how the caselink is set up. In the example below, the user can add a full contact record or add individuals to an existing record.
Or you may find a single option for adding a file:
Creating the new file
A window will appear where you create the file you need for the caselink. You'll note, this is a special window; it has a pink Valentine skin to call your attention to the fact that this is a different way to create a file. To save/cancel changes, you must exit this window with its X in the upper right corner.
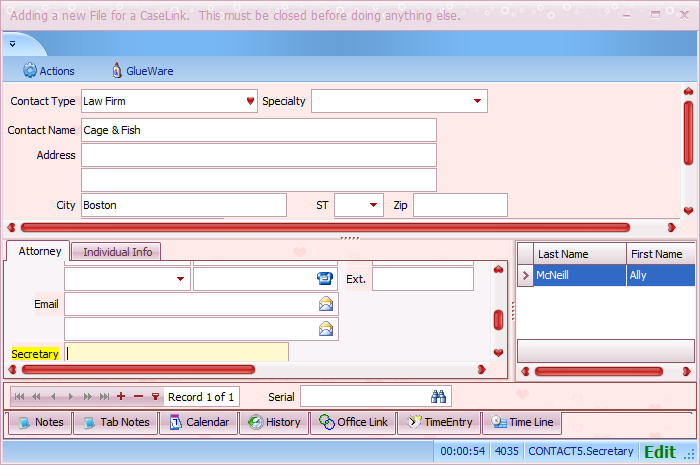
Once you have saved the new file, you can add it to the link where you started.

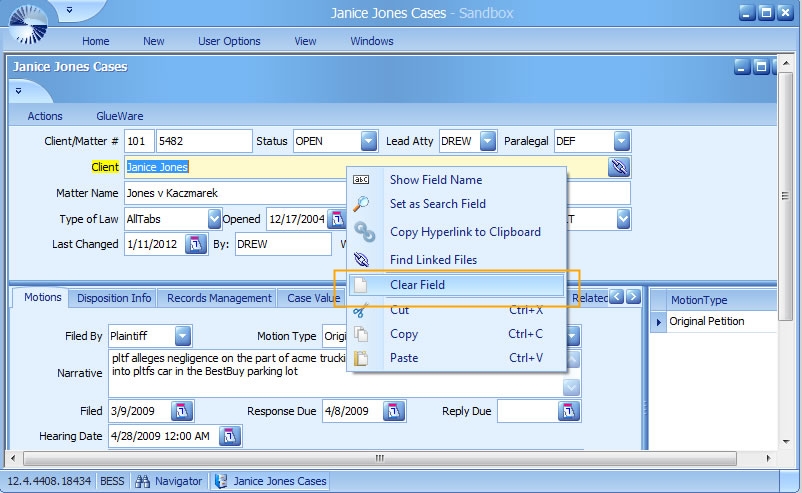
Clearing/Removing Caselinks
Because caselinks are not like other data fields, you can't just select the linked data and delete it. To remove caselink data:
- Make sure you're in Edit Mode (press F3)
2. Right-click on the field and select Clear Field.
Repeatable Screens
Use repeatable screens when you need to enter multiple copies of a tab. In the example below, we're tracking parties; each time there's a new party, the user clicks the + (plus) button at the bottom of the screen to add another record.
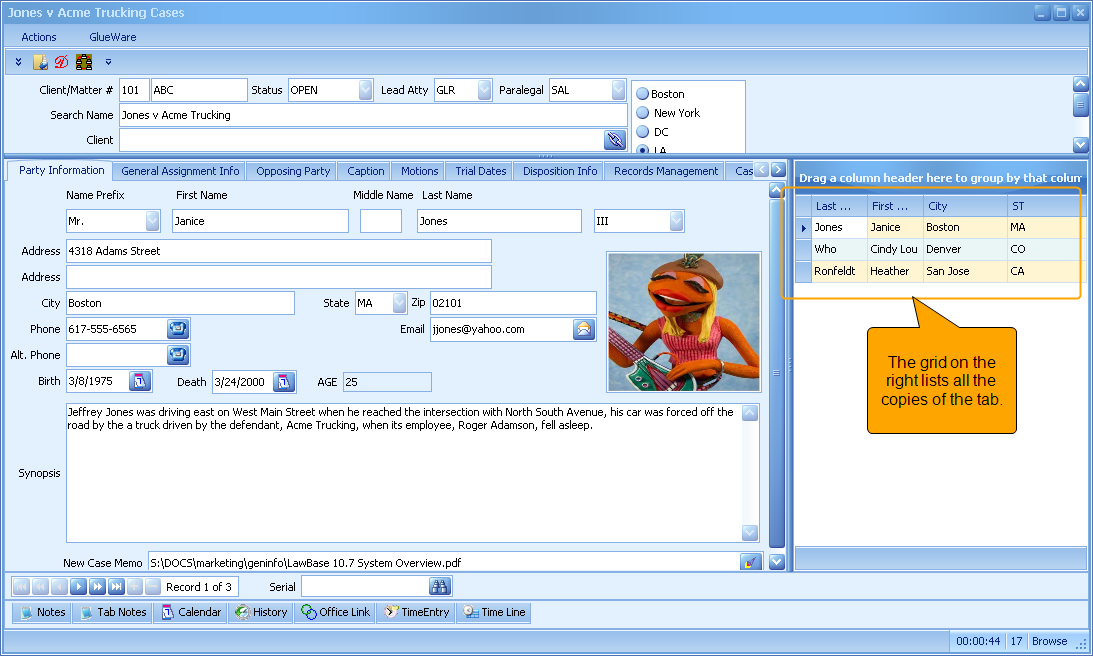
Finding Copies of Tabs
On the right hand side of the tab there is a list of all the copies of the current tab. To change the sort of the list, click on the header of each column. Click on the same header again to organize in reverse alphabetical order (the blue triangle will switch directions). You can also sort the list by two or more of the columns displayed by holding the shift key down and clicking on the header of each column. You will see a number appear, this indicates the order in which the list is being sorted. Your firm has control over the items which are displayed (and can therefore be used as an organizational tool.) Speak to your LawBase administrator to discuss changing these items. <or>
- Locate the navigation bar at the lower left corner of the tab you wish to copy.
![]()
2. If there are multiple copies of that tab you will see the exact number of copies (and which number you are currently editing.)
Creating Copies of Repeatable Tabs
NOTE: Make sure you are in EDIT mode before attempting to copy any tabs.
To create a copy of a tab:
1. Open the file, displaying the record you want to copy.
2. Locate the navigation bar at the lower left corner of the tab you wish to copy
![]()
3. Click the Duplicate Current Item button. .
.
4. This will result in a copy of your tab. When you have multiple copies of a tab, you can scroll through available copies using the navigation bar above the top left corner of the tab or by using the mouse and arrow keys on your keyboard.
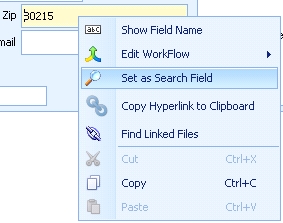
Searching Repeatable Tab Copies
To search all copies of a specific repeatable tab using a specific field (for instance, one that may not appear in the grid on the right), right-click over the field and select Set as Search Field.
The field at the bottom of the screen will change to that field and you can search accordingly.
![]()
If multiple copies match your search criteria, click the search/binoculars button to move to the next record.
FlexBases - Contacts, Cases and More
LawBase was the first case management application to offer a user-defined database, which we call a FlexBase. Until now there have been just two main FlexBases: cases and contacts. Starting with LawBase 12 you can create as many different FlexBases as you need. For example, in a mass torts litigation practice, a firm could also set up a FlexBase to track litigation groups which are made up of various matters. With LawBase you can track complex data such as pictures, sound files, movies and more. And you can create or modify your data structure with our included easy to use LawBase Design program. The following sections walk you through:
- Viewing a file
- Adding a new file
- Copying a file
- Deleting a file
Opening (Viewing) a File
To open an existing file, from the results pane double-click on the name of the file you want to open.
Adding a New File
NOTE: To add a new file to the database, you must first have the proper security access to perform the task. If you are not sure whether you are able to add new file, contact your LawBase administrator.
To create a new file
- Access the New tab on the ribbon at the top of the LawBase screen.
- Buttons for creating files for each of your FlexBases appear. To create a new file, click the files button. To create files for other FlexBases, click the appropriate button.

3. LawBase provides a blank form for you to fill in. Depending on how your specific system is configured, you may have some of the fields filled out automatically (e.g. file number fields, responding attorney.)
Copying Files
It is sometimes necessary to copy an individual file (e.g. when trial groups split or when additional parties are added to the same litigation matter.) You can make a copy of a file and to assign a new name, effectively starting a new file at the same position as its copy.
NOTE: Notes, Calendar Items, History entries and attached files are not copied to the new file.
To copy a file
- Using a search or SmartFolder, locate the file you want to copy.
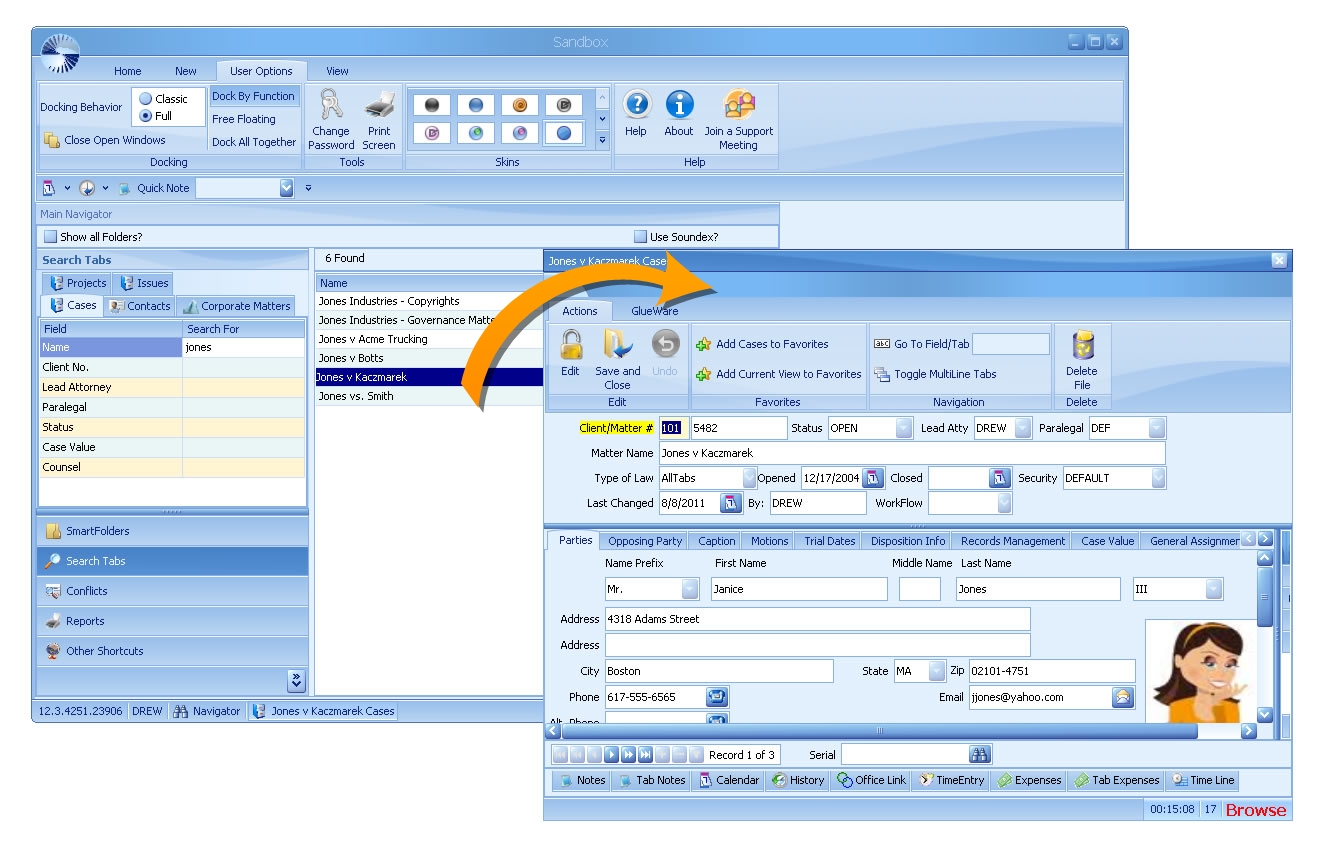
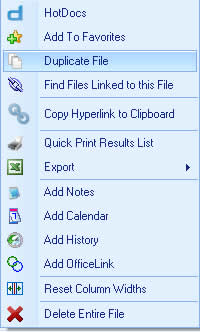
- Right-click on the file and select Duplicate File.
3. A new copy is created. The file will not open but will be listed in the results pane of the original search or SmartFolder. The date opened indicated in the new file will be the same as the original; the date last changed will reflect the date of duplication.
Deleting Files
To delete a file:
- Locate the file in the search results pane.
- Right-click on the file and select Delete. LawBase will ask if you are sure you want to delete the file. If any other files are linked to the case you are trying to delete, LawBase will ask if you are sure you want to delete the file.
- Click YES.
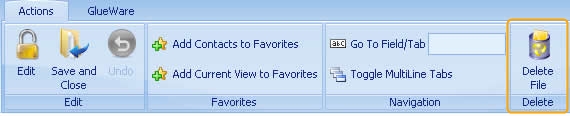
Alternatively, open the file and click the Delete button on the Actions ribbon.
HotDocs
About HotDocs
HotDocs is a document assembly from the company HotDocs Ltd.; HotDocs is integrated with LawBase. The user documentation here describes how to use HotDocs in this integrated environment. Comprehensive user documentation about HotDocs is available from within the HotDocs application.
Running a HotDocs Template from within a File
- Open the file you want to use.
- From the GlueWare tab, click the HotDocs button.
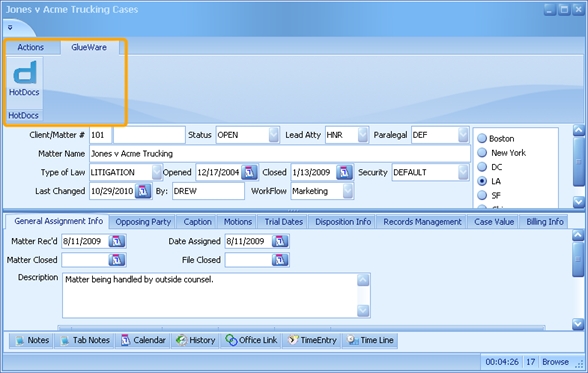
3. HotDocs User appears displaying the templates available.
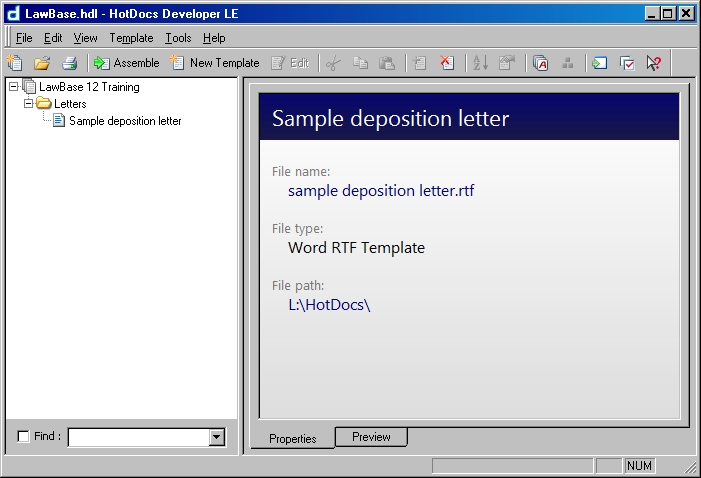
a. Select the template you want to run. Typically templates are specific to your office– if you have any questions about the content of templates, please contact your local support.
b. An interview dialog appears
c. Depending on the template you run, there may be questions to answer. Answer the questions and click finish to send the document to the word processor.
d. The document will have a file name like Document 1 etc. At this point the document is not connected to HotDocs or LawBase and you can edit and/or save it as you would any other document.
Launching HotDocs from the Results Pane
From the Search Tree
- Right-click the file you want to use.
- Click HotDocs.

3. HotDocs User appears displaying the templates available
4. Select the template.
LawBase Hyperlinks
LawBase supports hyperlinks that can be used outside of LawBase to access:
- Files (Cases, Contacts, etc.)
- SmartFolders
- Tabs within Files
- Favorites
- Search and Query Results
Built-in Hyperlink Functionality
There are several places in LawBase where you can right-click on an item and put a hyperlink to that item on your clipboard. Once on your clipboard, it's available for easy pasting into email or another application.
File Hyperlinks
You can get the hyperlink from the results pane as well as from inside a file.
From the results pane, right-click on the file and select Copy Hyperlink to Clipboard.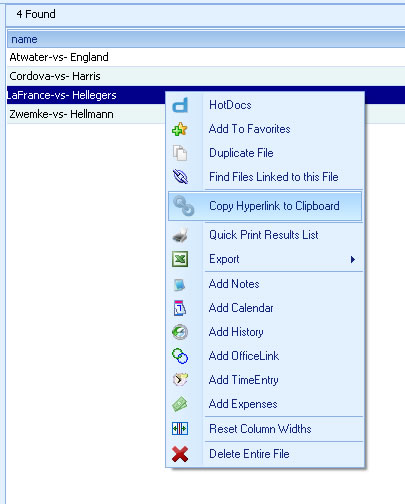
From inside a file, right-click on any field in the header and select Copy Hyperlink to Clipboard
Common Tabs
You can get the hyperlink from the common tab grid as well as from inside a common item.
From the grid
To copy the hyperlink for a common tab item, right-click on that item within the grid and select Copy Hyperlink to Clipboard. Use this to create a link to a specific note, calendar entry or other common tab item.

From within a Common item
Use the drop-down next to the email button to access the link option. This creates an email message with a hyperlink back to this item directly in the new message.
SmartFolder Hyperlinks
To copy a link to a SmartFolder, right-click on the SmartFolder and select Copy Hyperlink to Clipboard.
Tab Hyperlinks
To copy the hyperlink to a tab, right-click on any field in that tab and select Copy Hyperlink to Clipboard
Favorites
Right-Click on a favorite to copy a link to the favorite. Examples: favorite reports, dashboards, group calendars.
Query Builder
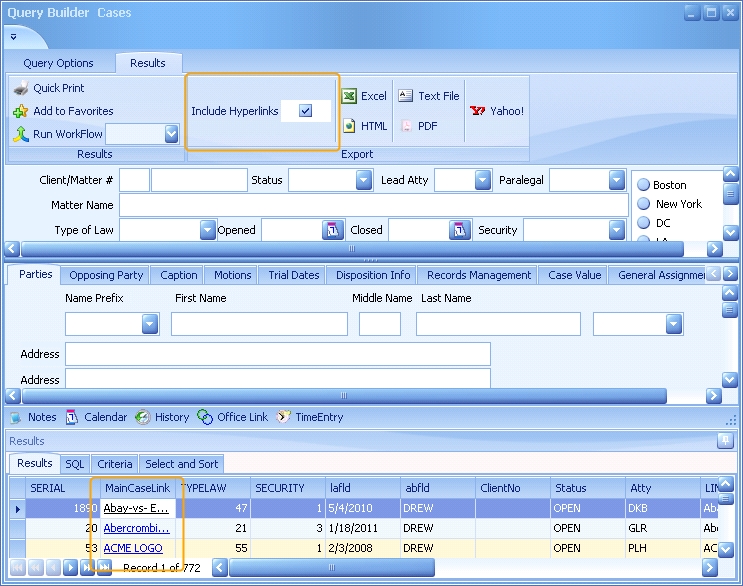
In Query Builder, select the Include Hyperlinks checkbox to add a column to the results with the hyperlink for each file. These links will also be included in any export.
New Features in LawBase12
Here are some of the new features in LawBase12.
Calendar Free Time
Use the calendar to help you find the next available block of time when you can invite people to an event. Details at: Calendar Free Time
SmartFolder Highlighting
SmartFolder results can be color coded to make it easier to find files. Read more in the section on SmartFolders: SmartFolders
Favorites
Save the items you use most often to a handy menu - save files, calendars, queries and more. Read more here: Favorites
Executive Dashboards
Executive Dashboards display personalized data at a glance in an organized visual display, either in graphical chart or pivot table format.Dashboards are useful in gathering business intelligence, giving managers instant access to live data to help them measure efficiencies, and quickly identify and correct negative trends Learn more about dashboards:See "Dashboards" on page 73
Ribbon Interface
Like other contemporary software programs, LawBase 12 uses a ribbon. This combination of icon and text for most commands helps users to perform functions faster by grouping all related icons in a single area of their screen. You can minimize the Ribbon to gain more screen space. Also, you can add the commands you use most often to Quick Access Toolbar. Learn more at The Ribbon
Multiple FlexBases
LawBase was the first case management application to offer a user-defined database, which we call a FlexBase. Until now there have been just two main FlexBases: cases and contacts. Starting with LawBase 12 you can create as many different FlexBases as you need. For example, in a mass torts litigation practice, a firm could also set up a FlexBase to track litigation groups which are made up of various matters. Read more about FlexBases: FlexBases.
Advanced Searches: Global Search, Quick Search and Favorites
LawBase 12 adds three new search options: Global Search allows users to find data located in any field in LawBase with a single search. See "Global Search" on page 182 Quick Search enables client sites to determine the most frequently used search criteria and requires only a single entry to search across those fields. See "Quick Search" on page 181
Favorite searches can be set and maintained, allowing for instant running of the search in a single keystroke. See "Favorites" on page 76
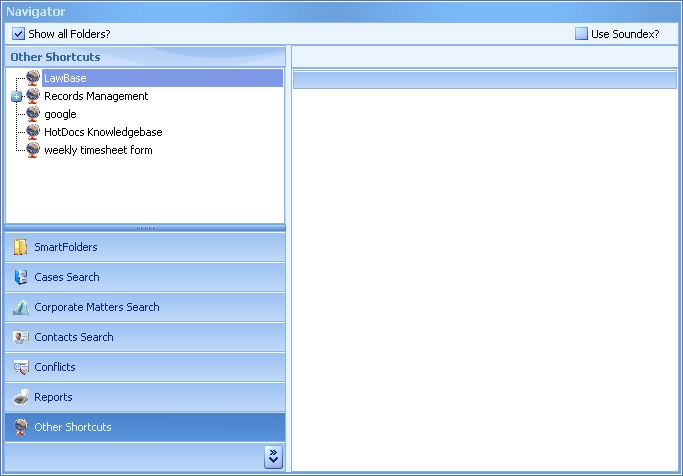
Other Shortcuts Tab
Use the Other Shortcuts tab to bookmark frequently used documents, web sites and programs. This area is shared by all LawBase users and so you may find shortcuts here that pertain to other practice groups as well as to your team. . To access a shortcut just double-click on it.
To add a shortcut:
- Right-click in the other shortcuts tab.
- Select insert.
- Drill out to the desired program or key in a URL.
You can put parameters on items in the Other Shortcuts tree to open external programs. You can use standard LawBase replacement variables in Other Shortcuts (:CurDate, :CurTime, :CurUser, <<LB_USERNAME>>, etc.).
Parts of the Screen
Ribbon/Menu Display Selections
In your main LawBase window, you will see a picklist where you can select various Microsoft versions. This determines how your main ribbons and menus are viewed and mimics the Microsoft Office version that you choose.

Change your ribbon setting to Office 2010:
Main Window
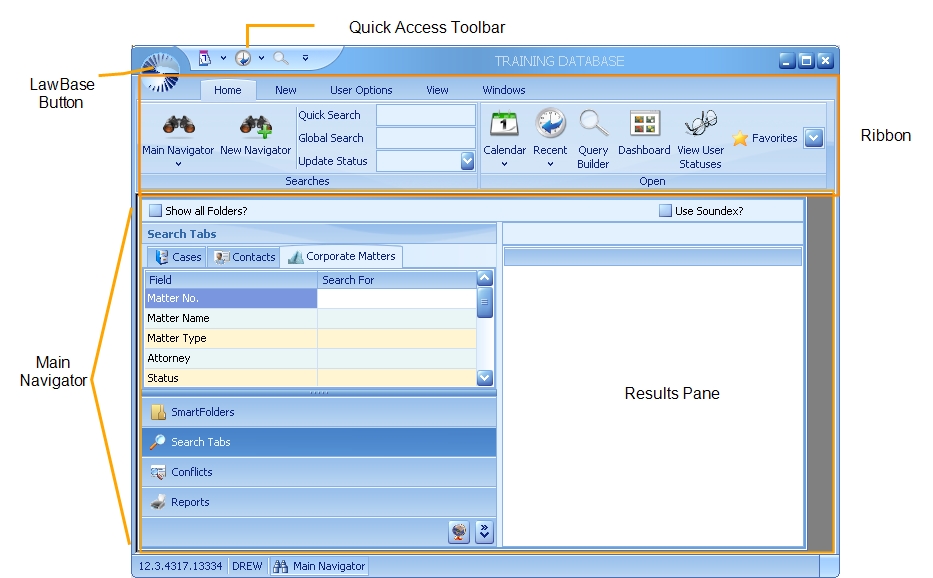
LawBase Button: The LawBase Button provides the most popular commands; these are the same choices as on the Home tab of the ribbon.
Main Navigator: The Main Navigator provides access to the main functions in LawBase: SmartFolders, searches, reports and shortcuts.
Quick Access Toolbar: Use the Quick Access Toolbar to easily access the commands you use the most.
Results Pane: Search and SmartFolder results display here.
Ribbon: The Ribbon is made up tabs, which are like a combination of toolbars and menus.
For more information about these parts of the screen, see The User Interface
Main Navigator
The Main Navigator is where you'll find the most common LawBase functions. The screen is divided into two main areas. The Tabs are on the left and the Results pane is on the right.
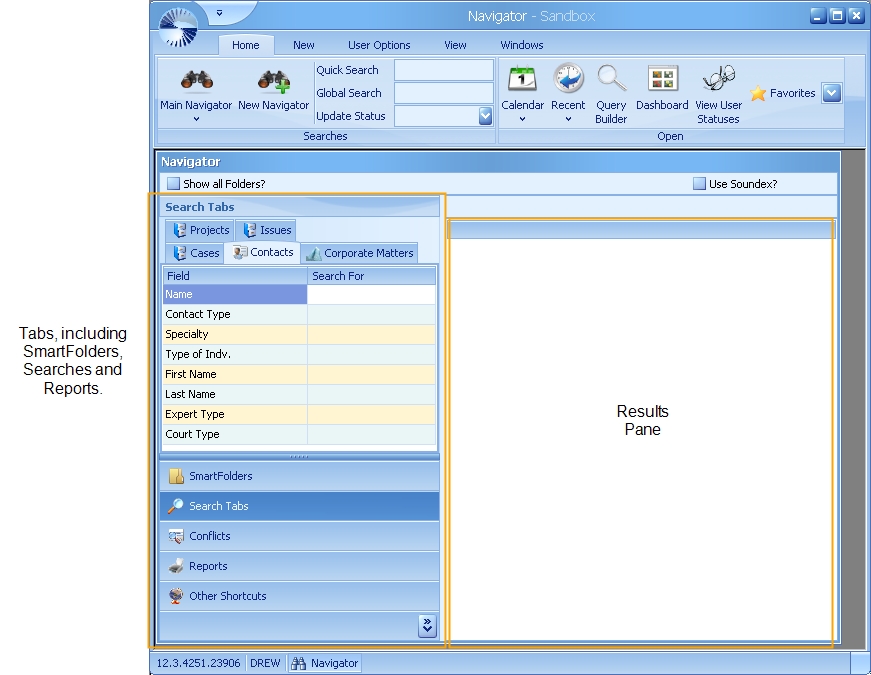
Tabs
SmartFolders: SmartFolders organize the cases and other items you work with most often. For more information about SmartFolders see SmartFolders
Search Tabs:You will see a search for each of the FlexBases your organization uses. For more information about the Search Tabs, see Search Tabs For more information about FlexBases, see FlexBases.
Conflicts Search: Use Conflicts to perform system wide searches. More at Conflict Searches
Reports: Your organization's "canned" reports are here. For more information see Reports
Other Shortcuts: Other Shortcuts is a place to share pointers to frequently used resources outside of LawBase. For more information, see Other Shortcuts
Results Pane
The results of searches and SmartFolders are displayed here. Learn more about the Results Pane here.
Multiple Files Open
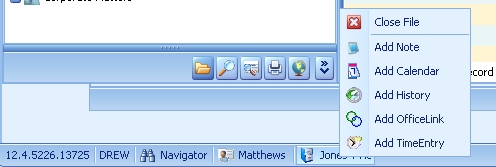
When you have multiple files open and you are in the Main Navigator, the open files will display at the bottom of your screen.
![]()
To view a file, simply click on the name of the file you want to see.
From here you can also right click on a particular file and either close it or add a Common Item to it.
The User Interface
The interface includes the Main LawBase button, the Quick Access Toolbar and Ribbon. These are described below.
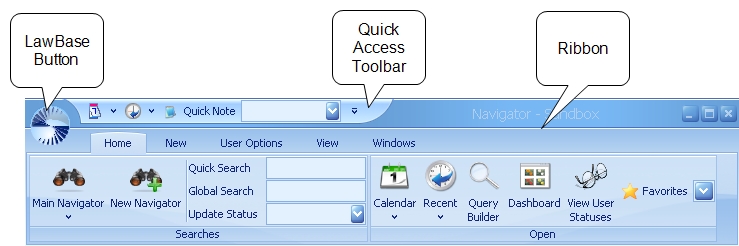
Main LawBase Button
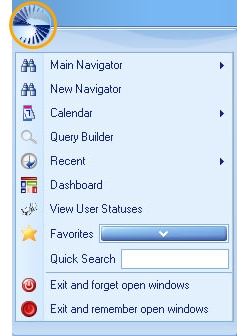
Click the main LawBase Button to display a menu of common commands.
Ribbon
LawBase12 uses a contemporary Ribbon Interface. Commands are grouped into functional areas. For a detailed description of the commands, see more in this section: Ribbon .
Displaying the Ribbon
By default, the ribbon is maximized.
- To minimize the ribbon area, right-click within the ribbon area and select Minimize the Ribbon.
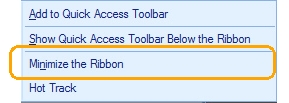
- To display the ribbon, click on the ribbon name (e.g. User Options).
Hot Tracking
By default, to move from tab to tab on a ribbon, you have to click. For example, to move from Home to New you click on the New tab. Hot Tracking makes this a bit faster; when Hot Tracking is on, simply move your mouse over the tab you want to see - no need to click - and the tab appears.
Quick Access Toolbar
![]()
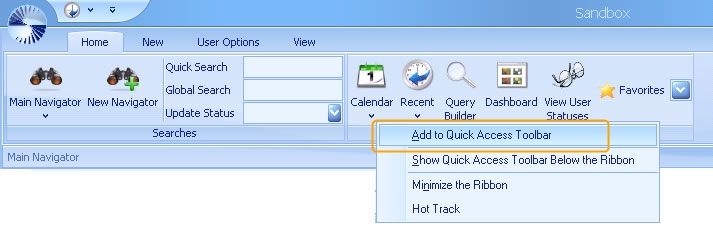
Use the Quick Access Toolbar to keep your most frequently used commands in one place. The Quick Access Toolbar is unique to each user, so you can customize this as you prefer. Commonly added items: Calendar, Quick Note, Reports, Help. Of course you can add whatever you need - the quick access bar is saved with your login.
Adding Items to the Quick Access Toolbar
To add an item to the Quick Access Toolbar, right-click on the item and select Add to Quick Access Toolbar. In the example below we are adding the Calendar.
Removing Items from the Quick Access Toolbar
To remove an item from the toolbar, right-click on the item and select Remove from Quick Access Toolbar.
Moving the Quick Access Toolbar
You can keep the Quick Access toolbar above or below the ribbon. Right-click in the toolbar area and select as you like.
Organizing the Quick Access Toolbar
To move buttons to the left or right, right-click on the item you'd like to move and select Move Earlier (left)or Move Later (right).
Ribbon
The ribbon at the top of the LawBase screen is made up of five tabs.
- Home
- View
- User Options
- View
- Windows (only when using Classic Docking behavior)
Home Tab
The Home tab contains the most common commands. See "Ribbon" on page 112

Item Description
Main Navigator: Select an item from the from the drop-down menu or click to return to the Main Navigator if you have another navigator open.
New Navigator: Opens additional navigator windows. This way, you can have multiple searches and search results available at the same time.
Quick Search: Search the most common fields. These fields are set by your local administrator and so they vary. If you don't see this search, it means the search has not been set up. For more information, see Quick Search
Global Search: Search for a word or phrase anywhere in the database. This is configured by your local administrator and may not be viewable. For more about this, see Global Search
Calendar: Click to open your own calendar, or select a shared calendar from the drop-down menu. Read more at Calendar.
Recent: Open a recently viewed file.
Query Builder: Launches the query builder. Read more about here: Query Builder.
Dashboard: Opens up the Dashboards. See more: Dashboards
View User Statuses: Follow other users to see their status changes. Read more in What's New
Favorites: Display your saved favorites. See more here: Favorites.htm
New Tab

The New tab has buttons for creating new records. Create new files (cases, contacts and so on) as well as notes, calendar entries and other common tab items. Read more about different file types here: FlexBases.
User Options Tab
This tab appears differently when using Classic and Full Docking. See the Full Docking below.
Classic Docking

Docking Behavior: Choose Classic and the screens work as they did in LawBase 10.7 and older style applications. Choose Full to have floating and docked screens. For more information see Docking
Change Password: Users can change their own password here, if enabled by local administrators.
Print Screen: Creates a printable Print Screen view identical to using the Print Screen button on the keyboard.
Skins: Select the look you like for your local LawBase. Money Twins is the default skin. Help Opens the online help. About Displays version information
Join a Support Meeting: This button makes it easy to access an online meeting when working with LawBase support.
Full Docking: When Full Docking is applied, the ribbon displays three more options for window docking. You can read more about these in the section Customizing the User Interface

View Tab

Use the View Tab to change the active screen. Any items you have open will be listed here. Just click the item you want to move, for example, from the Smith file to the Calendar.
Windows Tab
Use the commands in the Windows tab to arrange with windows in LawBase. The Main Navigator will always anchor to the upper left corner of the workspace.
Results Pane
The results pane is where you view SmartFolder and search results. The results pane returns the key identifying information for each file. To open a file, double-click on the entry. The results pane also offers searching and grouping functions.
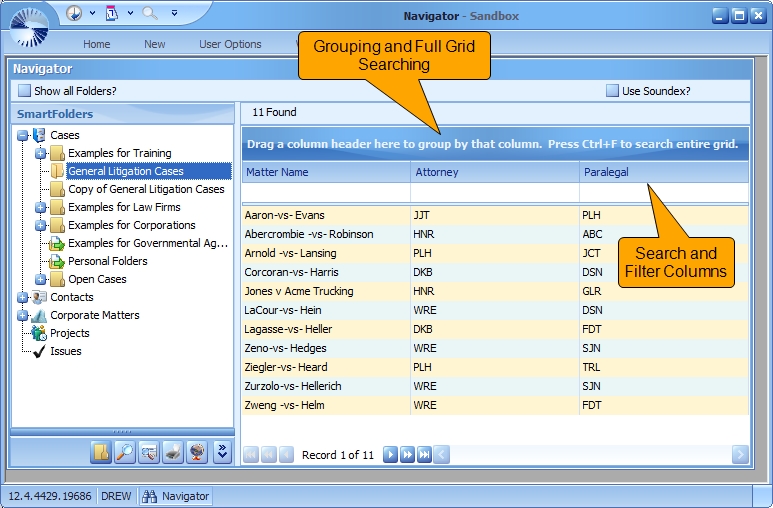
Searching the Grid
To search all columns in the grid, click anywhere in the results and press CTRL+F. A search box like the one shown below will appear. Enter the text you'd like to search and the results will appear. Note that the text is searched anywhere in the columns and you don't need to use wildcards. To hide the search box, click the X at the left.
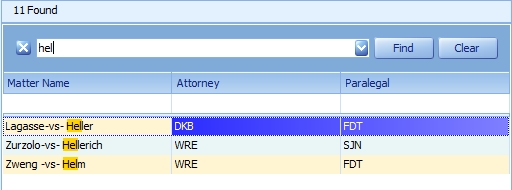
Grouping Results
Here is an example of grouped results; it is the same result set as the above picture, but now the information from the attorney column is used to group the data.

How to Group
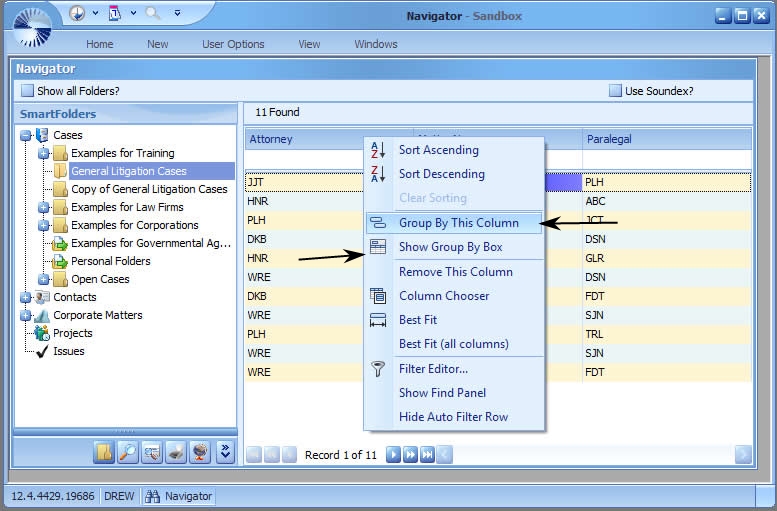
To group by a column:
- Right-click on the column header and select Group By This Column
- You can group by multiple columns as needed.
- Right-click on any column heading and select Show Group By Box. While the Show Group By Box is displayed, you can group by dragging a column header up to the blue bar.
To view the column groupings
- Right-click on any column heading and select Show Group By Box
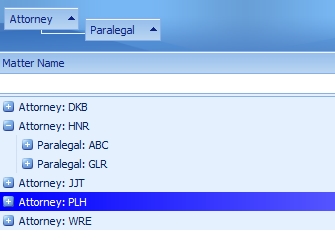
The columns selected appear at the top.
- To remove a column from the grouping, you can drag it down into the results or right-click on the group indicator in the grouping bar and select UnGroup.
Searching by Columns
The auto filter row looks like the picture below. It is an extra row where you can type in text and search.

If the column searching is not visible, right-click on any column heading and select Show Auto Filter Row
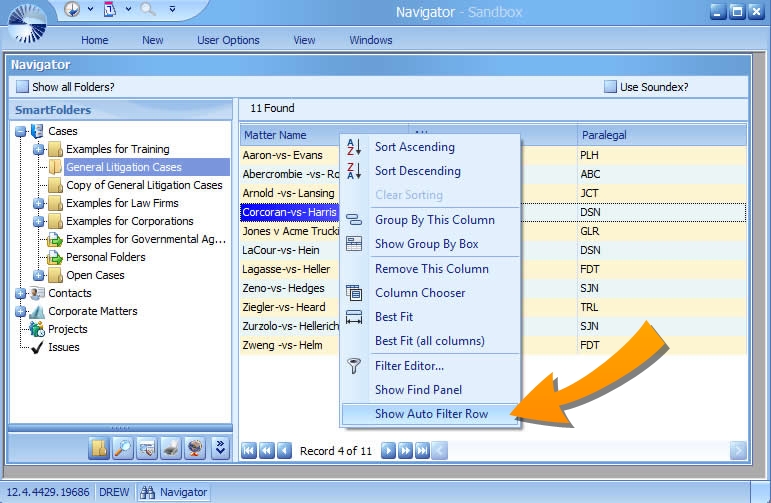
Here's an example of how you might search. Here we typed a in the matter column and got every record that begins with a.

If you want to search for a string in context, you need to use wildcards. Here we search for *he and find ever matter that includes he anywhere in the name. Without the * it would only find he at the beginning.
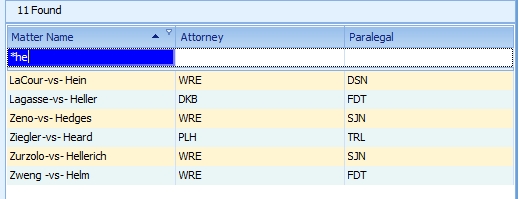
Filtering by Columns
The auto filter row looks like the picture below. It is an extra row where you can type in text and search.

If the column searching is not visible, right-click on any column heading and select Show Auto Filter Row To filter:
- Hover over a column header until you see a small funnel in the upper right corner.
- Click on the funnel and filter options will appear. You can choose from any of the values used in the grid as well as Custom, Blanks and Non blanks.
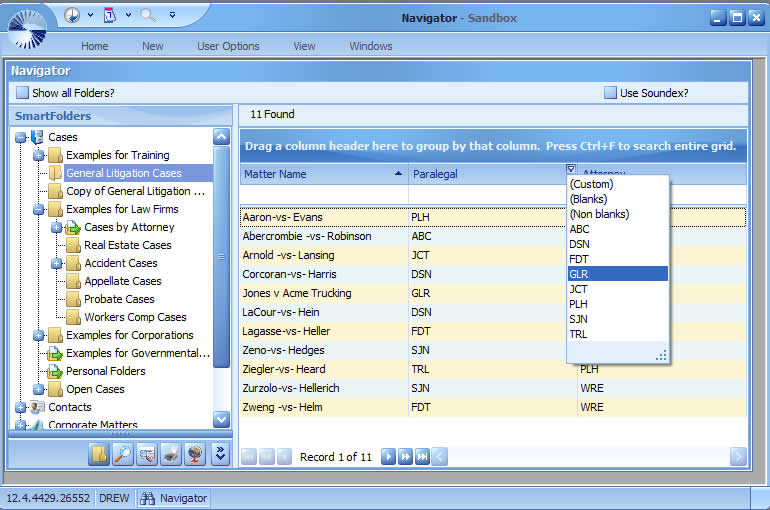
Resetting Column Defaults
If you have rearranged the column order (you can drag and drop to do this) or accidentally removed a column, you can get the defaults back by resetting. To reset: Right-click in the results and select Reset Results to Default.
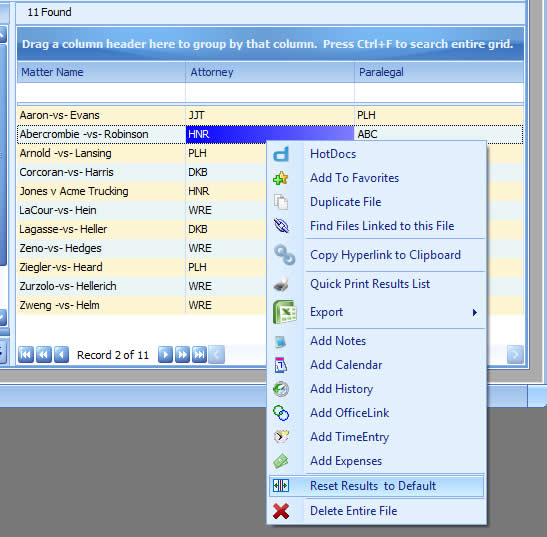
Customizing the LawBase Interface
LawBase12 provides two docking options for organizing your workspace: Classic and Full. Generally, if you are using a laptop or a small monitor, you may prefer the Classic Docking.Users with large monitors and especially those with multiple monitors will benefit from the features provided by Full Docking. These docking styles are described below.
Classic Docking
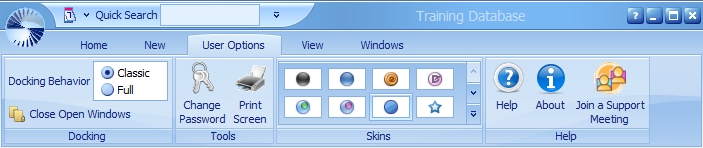
Classic Docking provides window behavior like you found in LawBase 10 and other typical programs designed to run on Windows up through XP. Features include:
- When you maximize the current file it occupies most of the main LawBase screen.
- The Main Window cannot be sized larger than your main monitor.
Below is an example of classic docking. Note that all of the windows of LawBase are contained within the boundaries of the main window and cannot be dragged beyond the borders of the window.
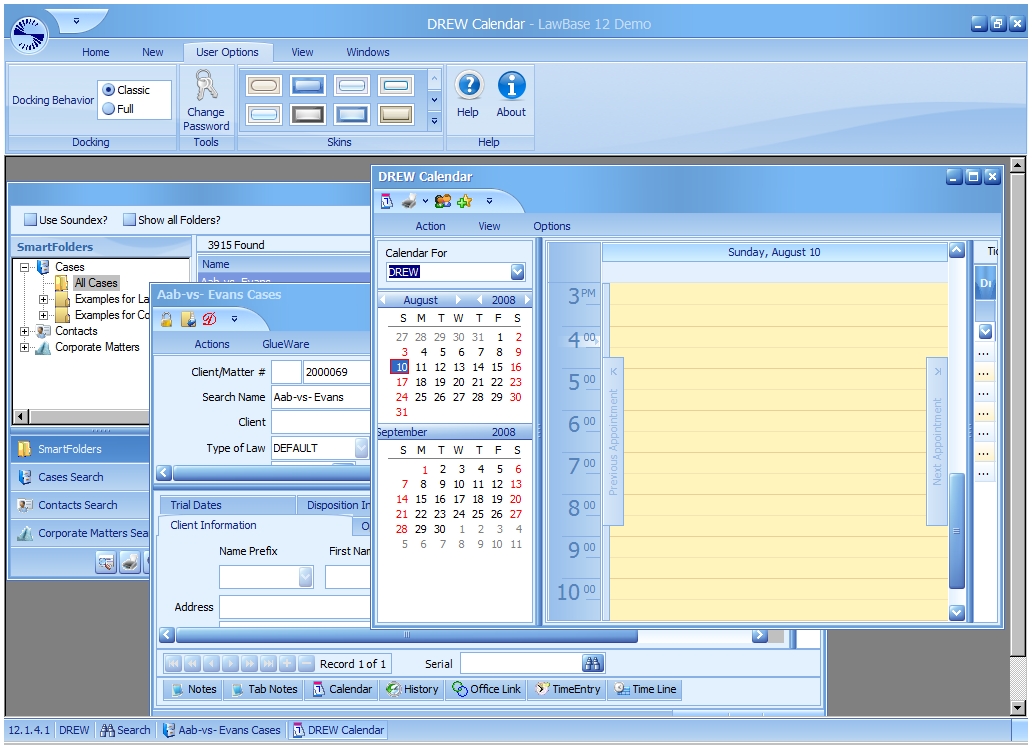
Full Docking

Full Docking behavior is like what you will find in many contemporary programs designed to perform optimally on the Windows 7 platform.
- Any window in LawBase can be sized as large as you like.
- If you have multiple monitors, you can have the main LawBase screen on one monitor and other items such as cases, your calendar and dashboards arranged on the other monitor(s)
Below is an example of Full Docking. Note how you can move windows away from the main navigator.
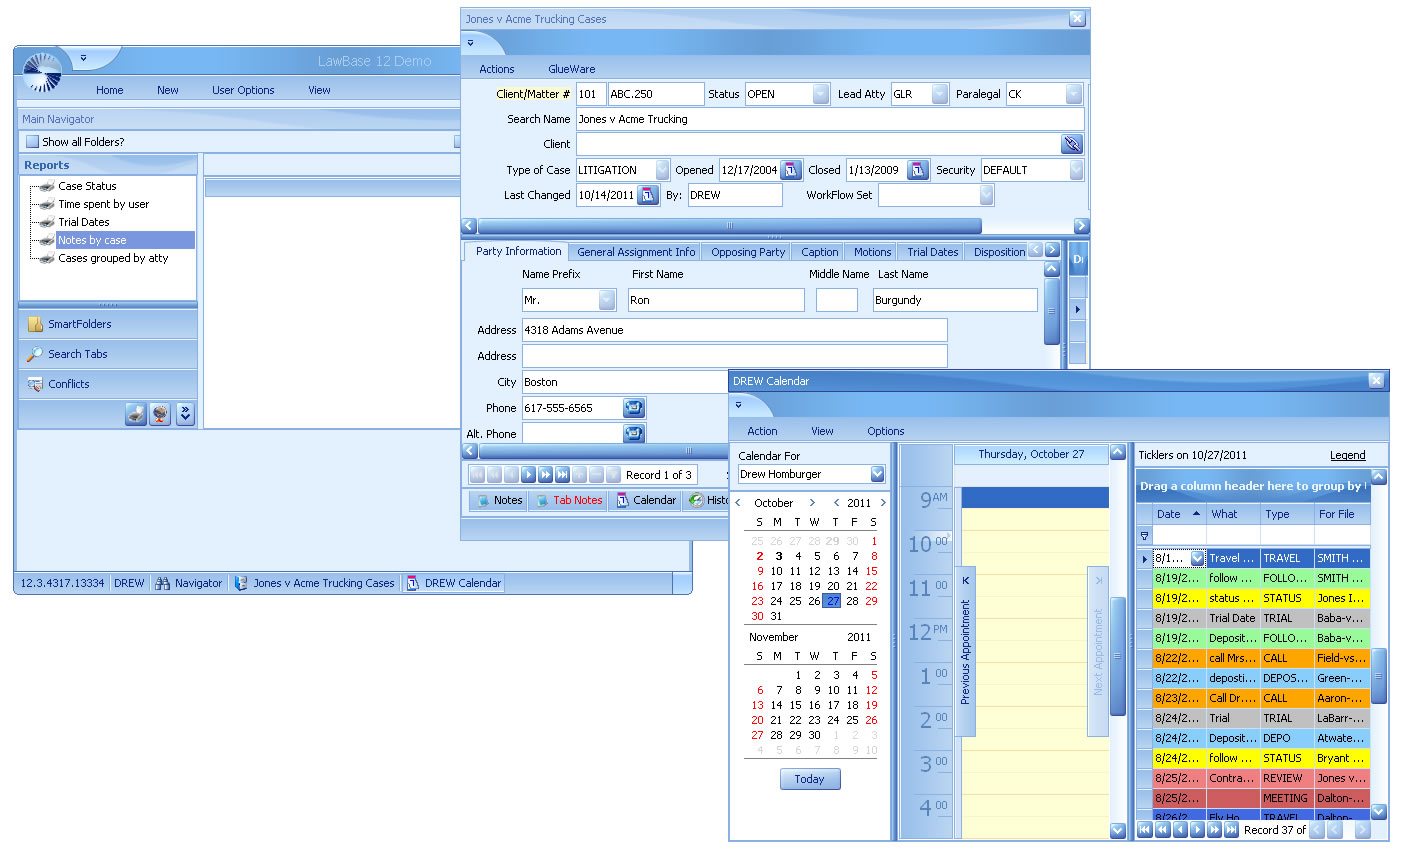
Moving, docking, and floating window panes
Simply because a window pane is attached to the left or right side of the program window by default, this does not mean it has to stay there.
- Moving windows - You can move a window pane wherever you want it by clicking the Drag Pane section (located in the upper-left corner of the window pane) and dragging the window where you want it.
- Floating windows- If you drop the window pane at a random location in the program window, it becomes a floating window. (You can also create a floating window by clicking in the element and selecting Floating.)
- Docking windows - Docking a window means to attach it to an edge of the program window. To do this, move the floating window pane by clicking in the title bar of the window pane, drag it to the edge where you want to dock it, and drop it onto one of the blue arrows or bulls eyes that appear in the interface.
Auto-hiding window panes
In the top-right corner of every window pane, you will see a small button that looks like a pin . If you click this button, the window pane is hidden (or pinned to the edge of the program window). However, you can still see the title of the window pane along the edge of the program window. When you hover the mouse over the title, the window pane temporarily displays again until you move the mouse off the window pane. Click the button again to un-pin the window pane.
Resizing user interface elements
You can easily resize the program window, dialog windows, and floating window panes in LawBase by clicking the edge of the element and dragging the mouse to the desired size.
Window Behavior in Full Docking
When Full Docking is applied, the ribbon displays three additional options for window docking.
Dock by Function
This means that items of the same type will dock together. Examples: Calendars, cases, contacts and navigators are each types. Here is an example; note that items of the same type are grouped and individual items are identified by a tab. The docked groups float in front of the main navigator.
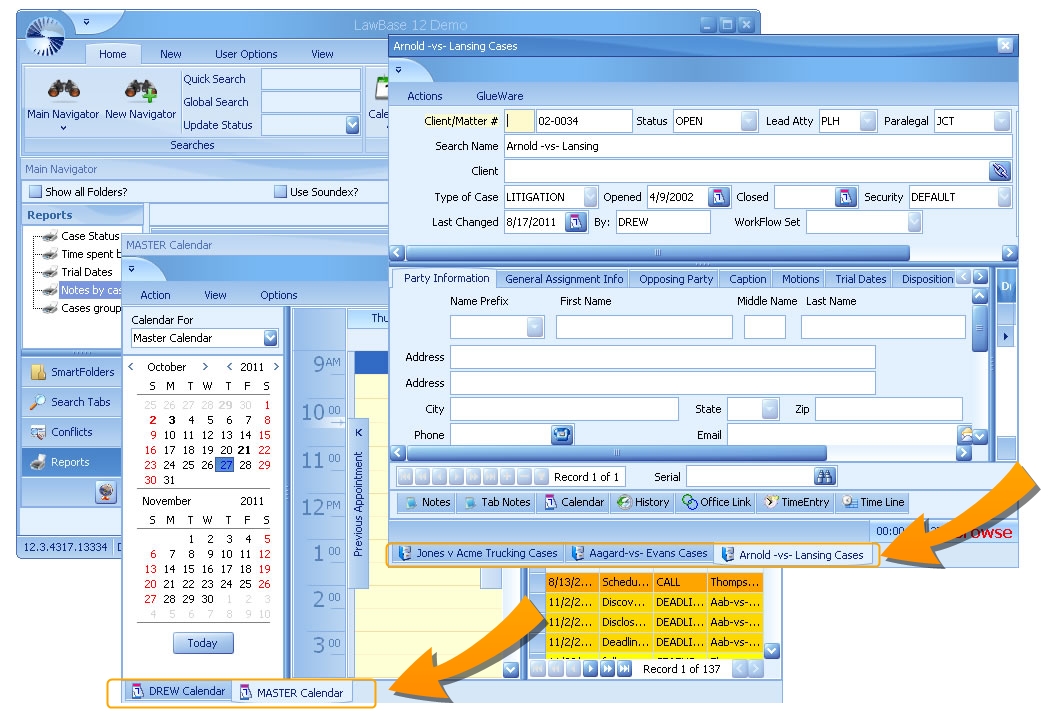
Free Floating
When Free Floating is applied, each new open window floats with no pre-defined docking.
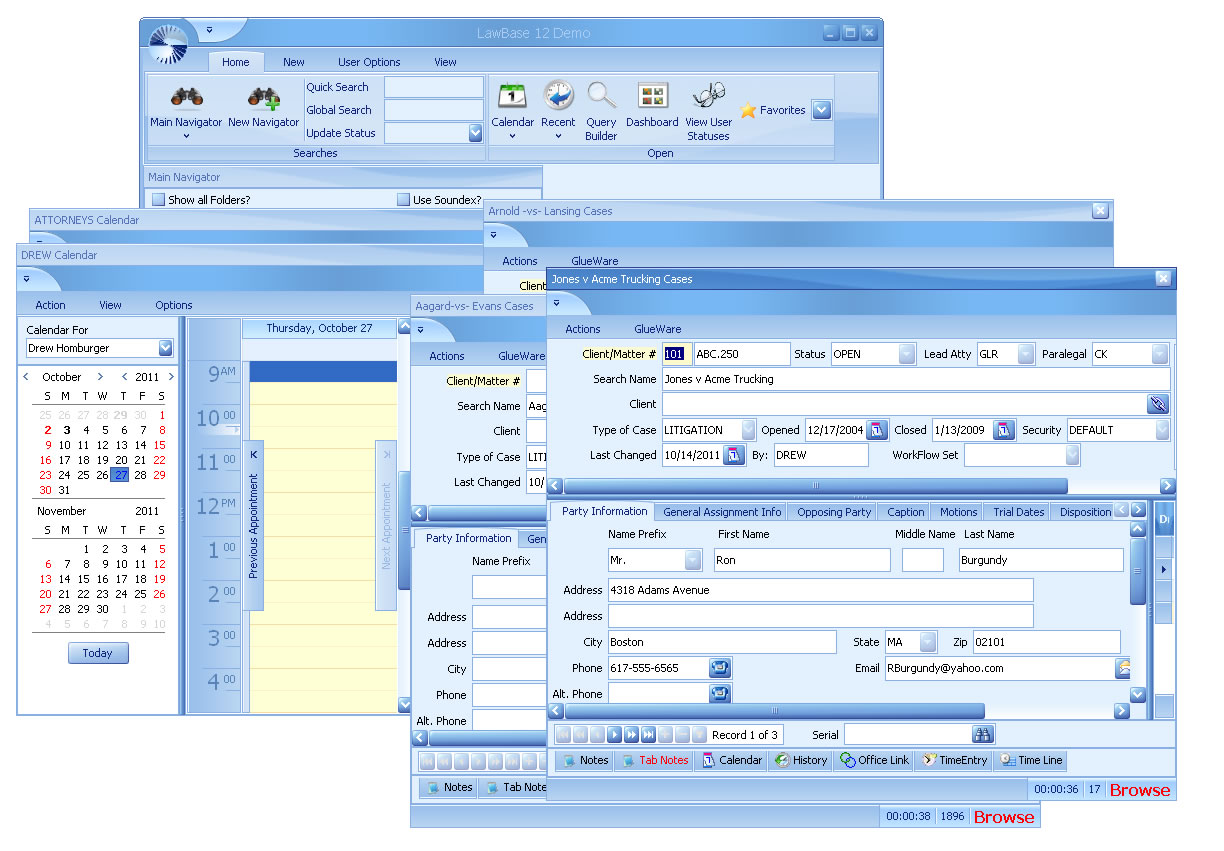
Dock All Together
When Dock All Together is selected all items dock to the Main Navigator. Here's how it looks when a case file is selected.

And now when the Main Navigator is selected
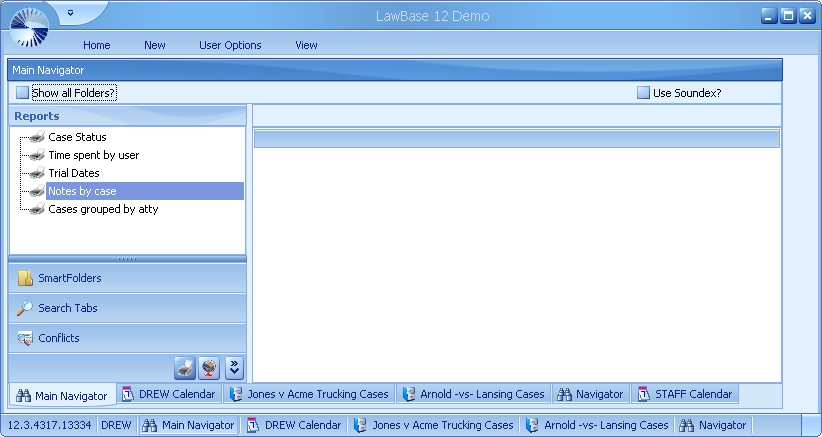
Query Builder
The query builder is a powerful tool that makes it easy to build complex search with multiple criteria. For a walk-through: Query builder step by step For detailed descriptions of the parts of the screen, see Query Options. For a refresher, see Query Builder Quick Tips
Query Builder, Step-by-step
Use the LawBase Query Builder to create SQL statements to find files that match certain criteria.
- Launch the Query Builder from the Home Tab.

2. A blank database screen appears. (Your screen will look different based on your office's design.)
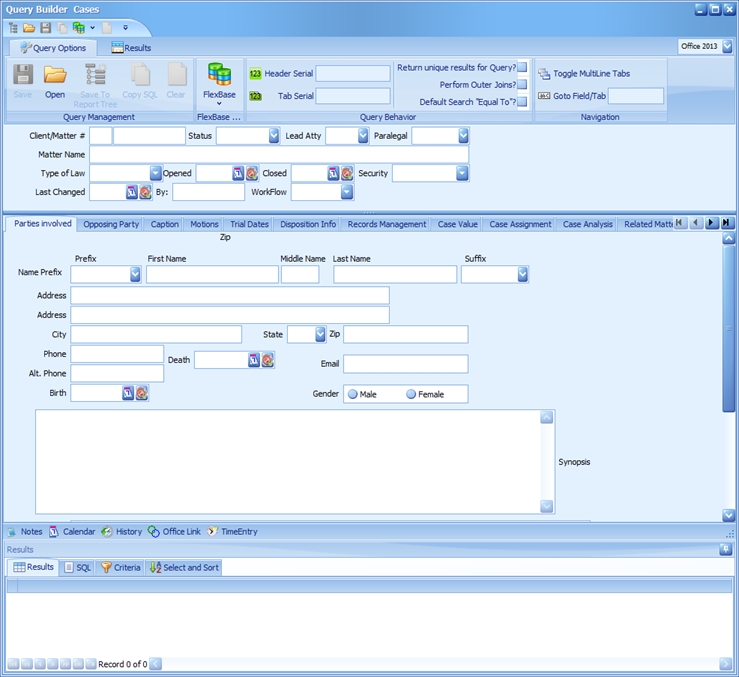
3. Type into a field the value you want to search for and press TAB to exit the field.
For example, to find all the cases where Jones appears anywhere in the Case Name field, type in Jones in the Case Name field, hit the tab button, then select Field Contains from the following list:
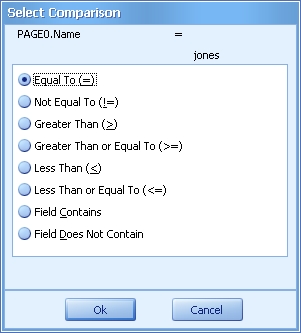
4. The bottom panel of the Query Builder displays the results so far - by default, it displays all columns from the header and any tabs included in the search.
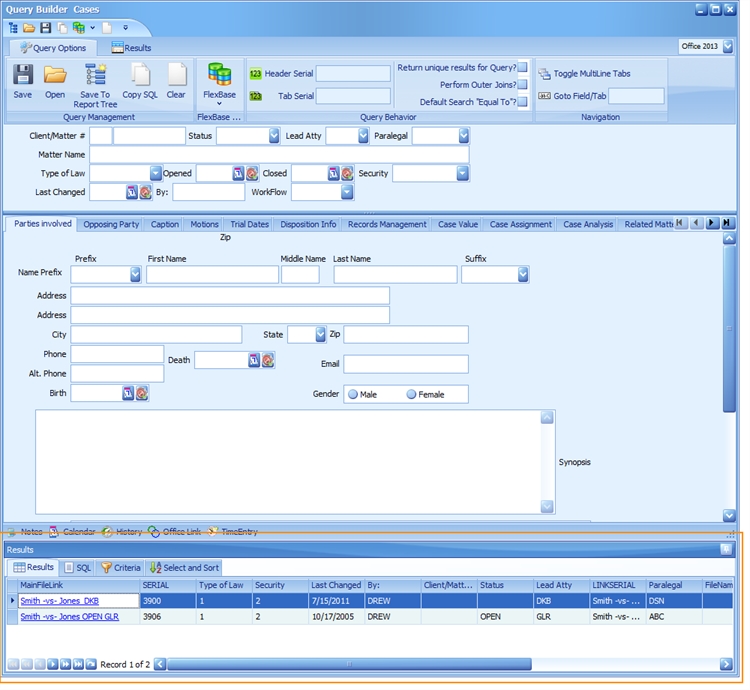
- To narrow the search, enter values into other fields in the FlexBase.
- To search for multiple values in a field, add values in the same field and the Query Builder will search for any of the values entered. LawBase will handle creating the best SQL statement for you including any needed links between tables.
Searching Picklist fields
If your field is a picklist, you may select multiple entries. The QueryBuilder assumes you with to find ANY of the entries and will return results that match each picklist option selected.
Furthermore, long-time LawBase users may notice that, by default, QueryBuilder displays ALL values that exist in a picklist field, whether those options are values in the current iteration of the picklist or not. You can narrow the selection available to ONLY those values in the current iteration of the picklist by checking the Only Include Current? selection at the bottom of the list:
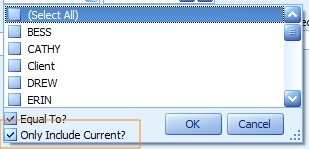
Searching for Null Dates
You may want to search for files where a particular date field is either filled in or not filled it. To do that, press on the button next to the calendar icon on the date field:
![]()
An input screen will pop up asking you to select On this date (=) or Not on this date (!=):
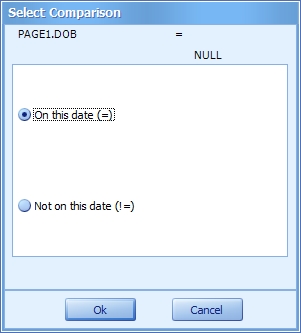
To search for files where the date field is BLANK, select the On this date (=) option.
To search for files where the date field is NOT BLANK select the Not on this date (!=) option.
Wildcards/Like Strings
You may want to find a word, string of words, or part of a word by looking in all of the words within a field, not just what the field begins with. If so, type in your word(s) into the field, tab off, then select either Field Contains to find files with the word(s) in that field or Field Does Not Contain to find all files that do not contain those words.
You can use * wildcards for these purposes as well. Use the * asterisk character to match any number of characters. For example, to find any entries that begin with John, enter John* in a field. This would match John, Johnson and Johnston as they all begin with JOHN. Unlike SmartFolders, you must enter the wildcards at the end of any entry you wish to search if you do not desire exact matches. Because Memo fields use rich text formatting, anytime you search one of these fields, wildcards will be automatically placed at the start and end of the field.
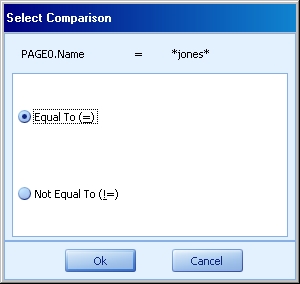
Output fields in Result panel
By default, the Results panel displays all columns from the header and any tabs included in the search. To limit the fields that are returned, drag and drop the fields you want to see on the query results panel (where all the header fields are currently displaying). For example, below the Firm field from the header and the State field from the Office tab were dragged and dropped, resulting in the following:

Sorting results
To sort your results, either for ease of finding information or in preparation for export, within the results pane click on the column header of the field you would like to sort by. For example, below the Firm column header was clicked on, which arranged all the Firm names into descending alphabetical order (for ascending order, click the header twice):
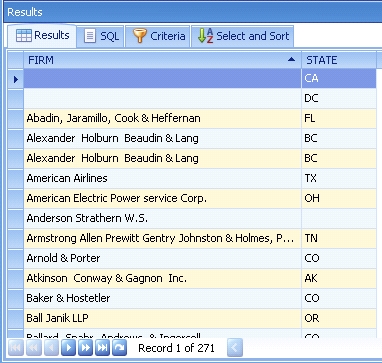
Furthermore, columns can be sorted at the same time. If you wanted to display Firms alphabetically, grouped by state, click on the State column header to get your desired grouping (here, ascending alphabetical order), then press and hold the Shift key while clicking on the Firm column header. The following occurs:
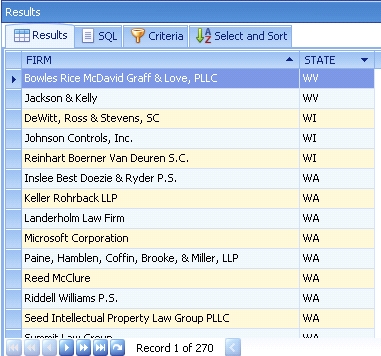
Finally, if you determine that you would like your columns to display in a different order (reading from left to right), simply click on the column header and drag it to the place where you want it to appear. For example, if you wanted to display State information in the left column, you would drag and drop the State column header to the left and release it to the left of the Firm column header. As you do this, you will see two white arrows appear, showing you where the moved column will appear.
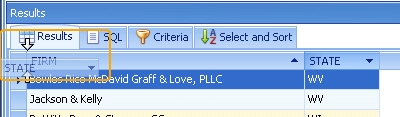
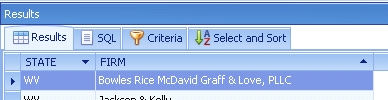
Query Builder Options
This section describes the tabs at the top of the Query Builder and the Results Pane at the bottom.
Query Options

Query Management
Save Save the query for reuse as a .qry file. You can save to any windows directory location.
Open Use this to open and rerun queries that have been saved from the Query Builder.
Save To Report Tree This will save the query as a .qry file to the directory location you choose, then automatically add the path of that .qry file to your Report tree (in the Main Navigator) for ease of access. This is a good option if you run a particular query frequently. This option is only available to Admin Users.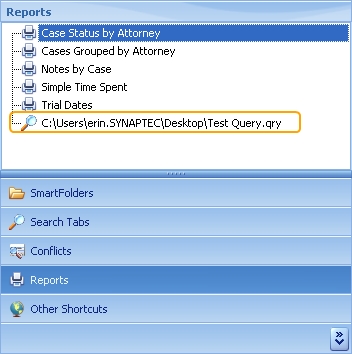
Copy SQL: Copy the SQL to the clipboard to use in other SQL runners or in a report.
Clear: Clears the current search so you can start over. If you don't want to lose the whole query and only need to correct some part of the criteria or sort, use the Criteria and Select and Sort tabs of the results pane. See Query Builder Results Pane below for more information. FlexBa- se Selecti-
FlexBase Selectio: Select the FlexBase you want to search, for example: Cases, Contacts, Projects or otherFlexBase name.
Query Behavior:
Header Serial Use the serial number search to search (and sort) on the serial number for files. Because this field is not normally available on the database screens, we have added a button here.
Tab Serial Use the serial number search to search (and sort) on the serial number for tabs. Because this field is not normally available on the database screens, we have added a button here.
Return unique results: For a single file, you may get multiple results for each tab where results are found. This limits the results to one per file.
Perform Outer Joins: Only needed in some situations. In laymen's terms: don't exclude results when there is only partial data for some tabs. Toggle the SQL to see the change it can make. For a complete explanation, see Outer Joins
Default Search Equal To: When checked, the program assumes the user is looking for the exact values inputted and does not display options of Greater Than, Less Than, etc.
Navigation:
Toggle Multiline Tabs: If the Flexbase has a large number of tabs designed, choosing this option will permit the user to see all Tab Names displayed in multiple lines for easy reading.
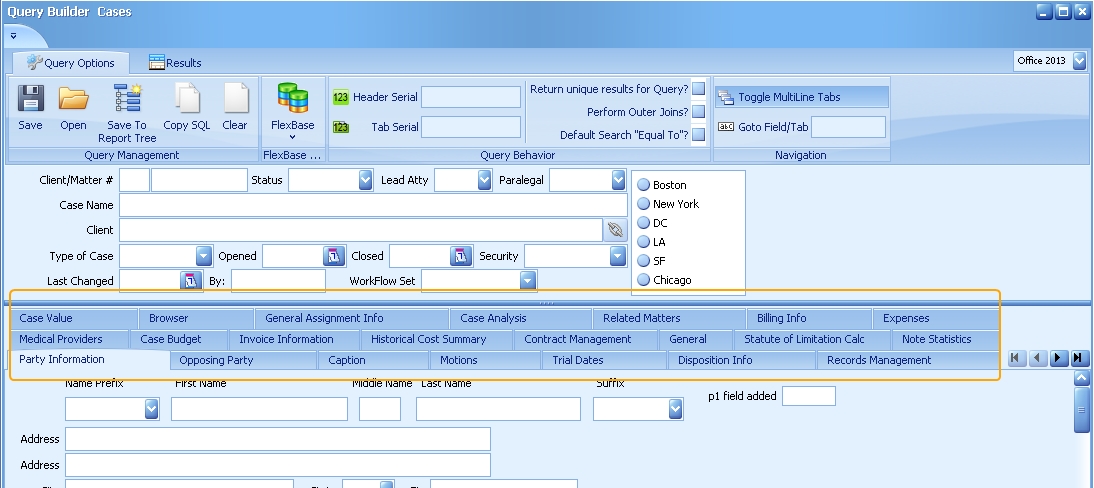
Goto: Jump to a field by field name.
Results

Refresh Results: Refreshes data in Results pane to reflect any recent changes without having to save the query and run it again.
Reset Docking: If a user separates the results panel from the search screen, resetting the docking will put the two screens back together. Helpful if one of the panels is "lost".
Quick Print: Send results to a quick print.
Add to Favorites: Add to favorites for yourself or for a group.
Run WorkFlow: Run a selected workflow against the result set.
Export:
Include Hyperlinks: Check to include LawBase hyperlinks in exported output. Checked by default.
Use Attached Labels for Headers: By default, the column headers in the results panel show the database name of the field, which is not always user-friendly. Selecting this option will change the column headers to display the label that appears on the field.
Excel: Export your results to Microsoft Excel. Choose your version of Excel; you can choose from Excel 2003 or Excel 2007 and higher. The first will export .xls files, the latter xlsx.
HTML: Export your results in html format.
Text File: Export your results as a txt file.
PDF: Export your results as a PDF. RTF Export your results as a RTF file, which is Microsoft Word compatible.
HotDocs: Use resulting file data to produce HotDocs.
Query Builder Results Pane
Results Tab
Displays the selected columns of data. By default, it displays all columns from the header and any tabs included in the search. You can narrow down the search by dragging fields to the results pane.
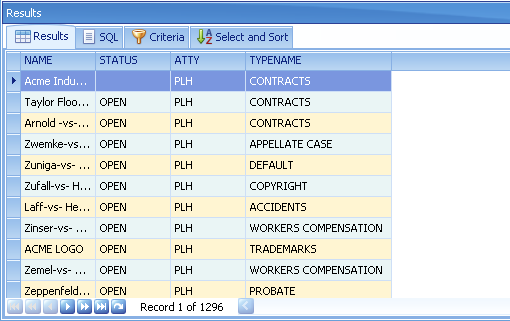
SQL Tab
Displays the SQL that has been created. You can select and copy this for use in other applications but you cannot edit the SQL directly; the SQL here can only be generated by using the Query Builder.
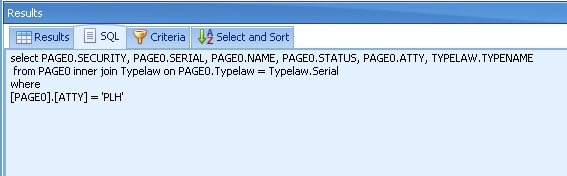
Criteria
View the criteria of the search from this tab. You can edit the Comparison and Search Value and you can delete whole rows, but you cannot add any new items here.
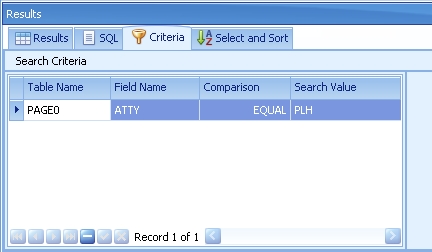
To add more criteria to a search, use the standard Query Builder functionality as described in Query Builder.
Select and Sort
Displays the selections and sorts which are in effect. In the example below we can remove any of the fields on the right. Just select the row on the right and click the - (minus) button. To reverse the sort on the name field, check descending box.
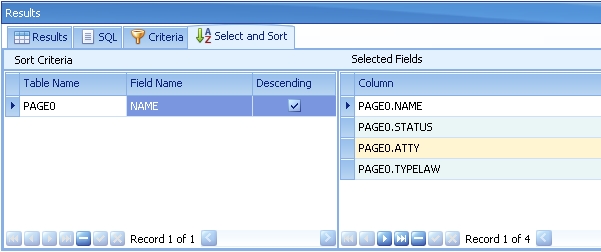
To add new sort parameters use the standard Query Builder functionality as described in Query Builder. You can also change the order of fields seelcted by dragging and dropping the columns in the Results tab. Just grab a column by its header and drop it where you want it to be.
Quick Tips
What do you want to search for? Basically there are three steps:
- Fill in the appropriate field with criteria
- Press ENTER
- Choose the option and press ENTER
Repeat as needed to narrow down the results. Fields
- Edit - enter the string you want to search for. You can add wildcards, e.g. *jacob*, or use the Contains String or Does Not Contain option.
- Date – for a range of dates, enter start and end dates.
ORs – example – city is Denver or city is Washington BLANKS
- Edit fields – search for NULL (tip: you can type NULL and press enter but to save a step, press CTRL+0)
- Date fields - 12/31/1899
Outer Joins
Why might you need a left outer join in LawBase? Suppose you have a database that has records like the following. The first case, Jones v Acme, has three parties entered while the second case has none. The second file, Aagard v Evans doesn’t have a blank record on page1, it has none at all.
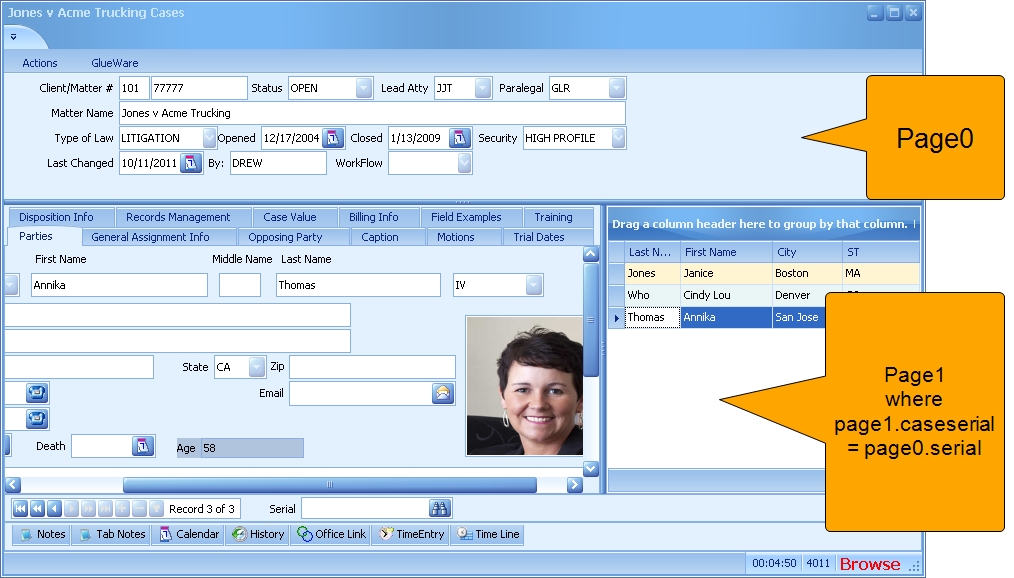
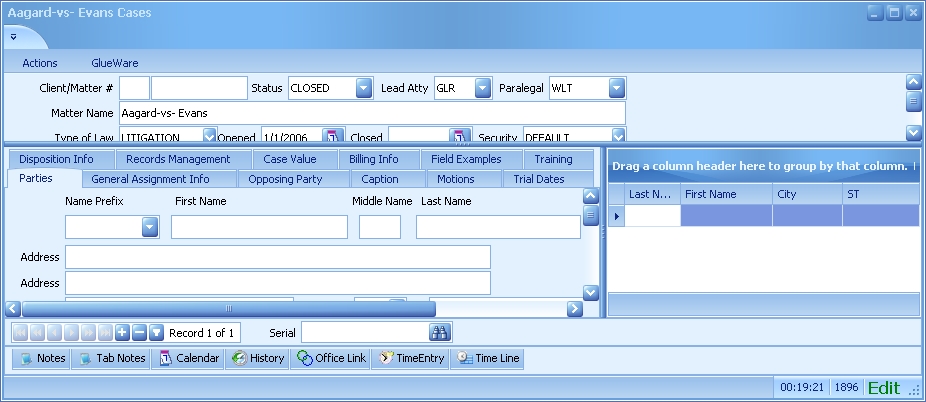
Now say you want to get a list of cases and you want to show the case name and the parties for each case. Using a normal (inner) join, you would not see any cases that do not have any parties filled in yet. So if you did a query such as: Select page0.SearchName, page1.LastName, page1.firstName from page0 inner join page1 on page1.caseserial = page0.serial
you would have results like the following:

The Aagard v Evans file would not appear at all since it has no page1 with any items on in. If you want to get all cases regardless of whether there are values in page1, you need a left outer join. Using a left outer join say: get all the files whether or not they have a page1. It might look like this: Select page0.SearchName, page1.LastName, page1.firstName from page0 left outer join page1 on page1.caseserial = page0.serial
You would get results like the following:
Outer Joins in Query Builder
By default, Query Builder uses inner joins. To use an outer join, check the Perform Outer Joins checkbox on the Query Options tab.

Quick Add
Quick Add is an optional feature. If it is configured, you'll find it on the New tab of the ribbon.

Use the Quick Add to add any of the common tab items without having to first open the related file. For example, to add a Quick Note:
- Begin to type the name of the file in the Quick Note drop down.
In our example we are looking for Jones v Acme. So we type Jones into the Quick Note drop down and items that match appear.
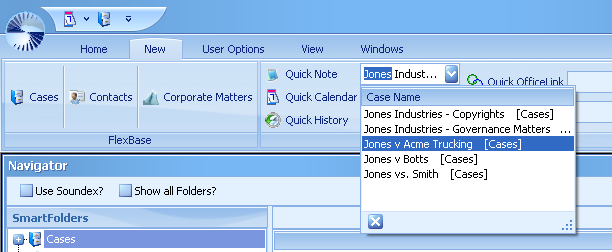
2. Click to select Jones v Acme.
3. A new note entry pops up, ready to edit and already designated for the Jones v Acme case.
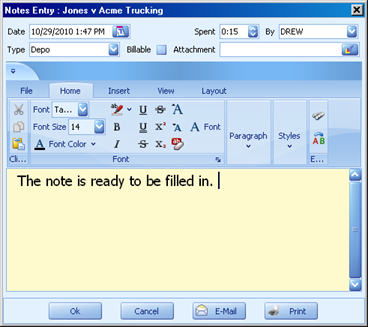
Quick Add from the Quick Access Bar
To add a Quick Add element to your Quick Access Toolbar, right-click on the item you want; for example, right-click on Quick Note.
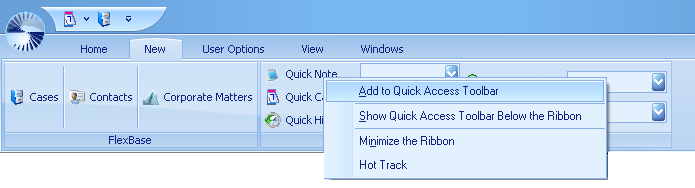
And select Add to Quick Access Toolbar. Quick Note will now be available from the Quick Access Bar.
Reports
LawBase provides three main ways to report data.
- HotDocs Reports
- Quick Prints Results Reports
- Ad Hoc or Query builder reports
You may also find reports linked under the Other Shortcuts tab. This is less common, but possible if your office uses a different third-party report tool.
HotDocs Reports
You'll find HotDocs reports in the reports tab; these are custom reports and have been designed specifically for your organization.

Results Pane Quick Reports
You can save and print the results of searches and SmartFolders. Right-click over the SmartFolder and select Quick Print or Export to get a quick printout or spreadsheet.
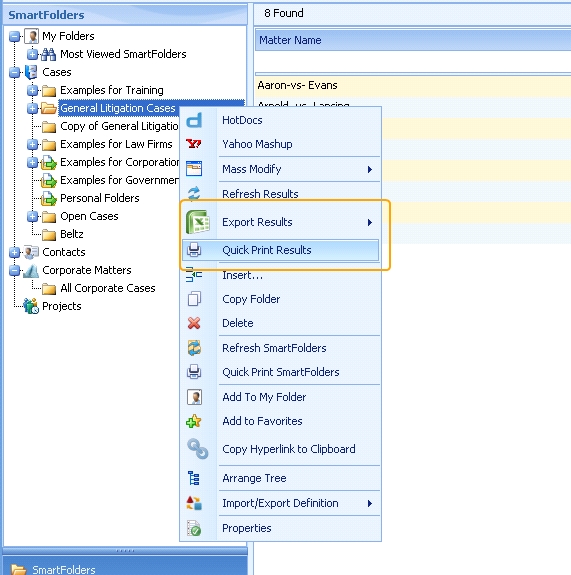
AdHoc reports from the Query Builder
Use the Query Builder to generate reports on the fly. See Query Builder.
Common Tab Reports
Below each common tab grid, to the right of the navigation bar, you'll find a printer button. From here you can access Common Tab Reports.
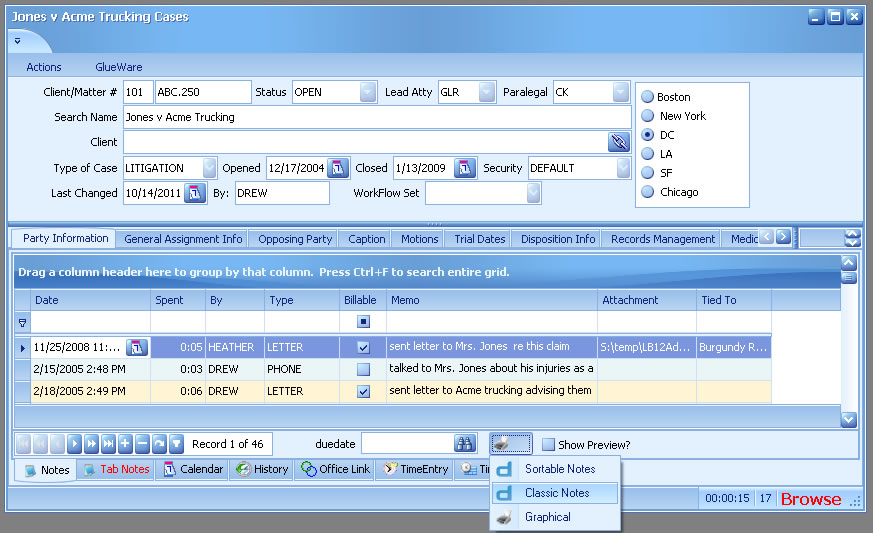
Graphical Reports
You'll find reports marked by the printer icon - these are Graphical Reports. The output looks very much like the LawBase interface. In fact, whatever you are viewing is what will print. For example, if you only want notes by a certain user, you can filter the By column. When you click Graphical to run the report, you'll only see the notes by that user until you remove the filter. The same is true of columns sorting and arrangement of columns - whatever you see in your notes view is what will print. The output is not editable but there are options to save and export the report.
Below is an example for the Notes common tab.
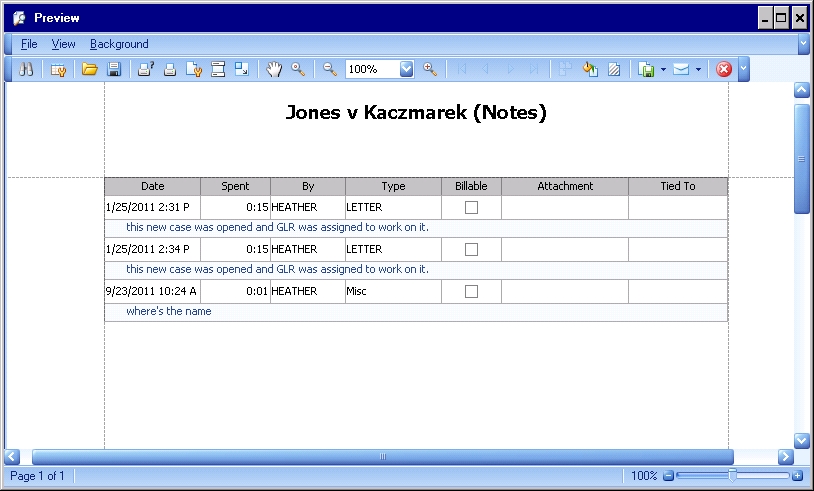
HotDocs Reports
The reports identified by the HotDocs icon are HotDocs reports. When you print one of these, it is assembled with HotDocs and the output is in MS Word or Word Perfect, depending on what your office uses. Your administrators have the ability to add more HotDocs reports to your common tabs, so you may see more than shown above.
Searches
LawBase includes a variety of ways to find the data in your System.
- SmartFolders - predefined, saved searches
- Search Tabs - search by FlexBase, searching by the fields you choose.
- Quick Search -search by the most common fields
- Global Search - search the WHOLE database.
- Conflict Search - search fields defined by your administrator
- Query Builder - this powerful tool helps you build complex searches with layered criteria
SmartFolders
SmartFolders are saved searches; what this means is no one has to manually add files to a folder, the folders find files that match criteria. Here is a sample of the SmartFolders you might see for the contacts FlexBase; experts, law firms, companies, and courts.
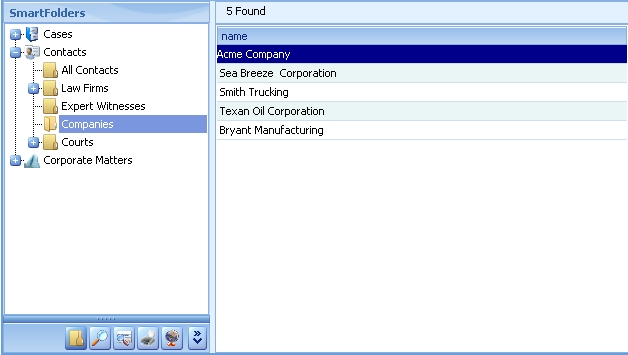
In the cases FlexBase you might have these SmartFolders:
- All cases
- Cases by attorney
- All pending cases
- All cases of a particular type (litigation, personal injury, real estate, and so on)
- Cases by client
The possibilities are endless. Contact your local LawBase administrator to request the creation of SmartFolders.
Using SmartFolders
To view the results for a SmartFolder, click on the folder you want to see. Double-click a single result to open that file. The results can be different from day to day, even from hour to hour. For example, if you have a SmartFolder with all Litigation files and new file is created, that file will be included in the results.
SmartFolder Result Highlighting
A new feature of LawBase12 supports color coding SmartFolder results. This has to be set up by your administrator but if come across a color coded folder, hover over the legend to find out what the colors mean for this folder.
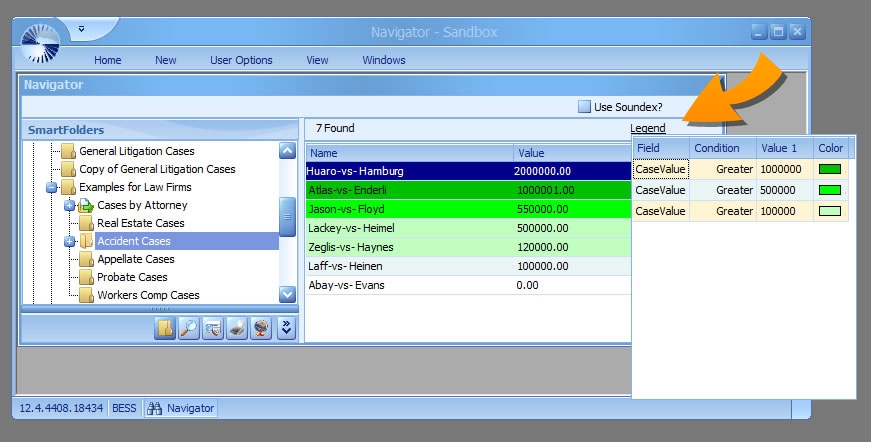
Show All Folders
The Show All Folders checkbox only appears for administrative users. If you are an administrator, when this checkbox is deselected, you will only see the smartfolders for which you have security. Check the box to see all folders, regardless of security.
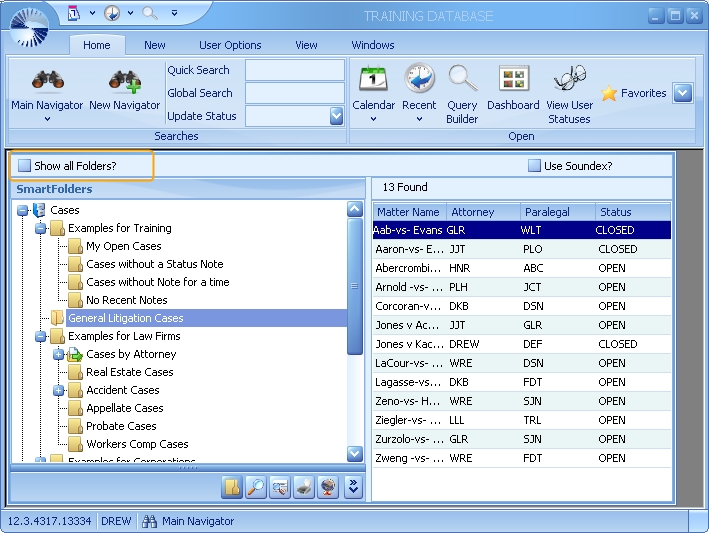
Searching for SmartFolders
Sometimes it can be hard to find a particular SmartFolder, especially if you have a lot of them. To search for a SmartFolder by name, position the cursor at the top of the tree. In this situation we selected Cases. We know we have a Workers Comp folder, so we simply typed worke and it brought us to the first match.

If the search returns a different result than you expect, click to select the next folder after the result and try again. For example, in the folders shown above, there are four visible that are named Example ....Typing Ex would take you the first, then you'd have to click the next folder after it and try the search again to keep searching.
Creating SmartFolders
If your LawBase Administrator has given you permissions to create Smartfolders, when you right click over a SmartFolder you should see the Insert and Properties options:
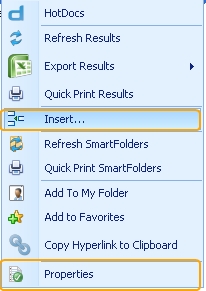
There are two types of SmartFolders: Rule-Based or Drag and Drop.
Rule-Based SmartFolders
A Rule-Based SmartFolder is essentially a saved search that uses SQL logic to find files that fit the rule you have written. If you do not have knowledge of SQL, these kind of SmartFolders will be difficult for you to create. However, you can get some hints from pre-existing SmartFolders by right-clicking on the folder and selecting Properties. A window will open and you can copy and paste the SQL out of that folder to try and create your own.
To create a rule-based SmartFolder:
- Identify where you want to create the folder. To create a folder that is the child of an existing folder, select the folder. Alternatively, select the root of the tree. 2. Right-click and select Insert. 3. A new SmartFolder dialog appears.
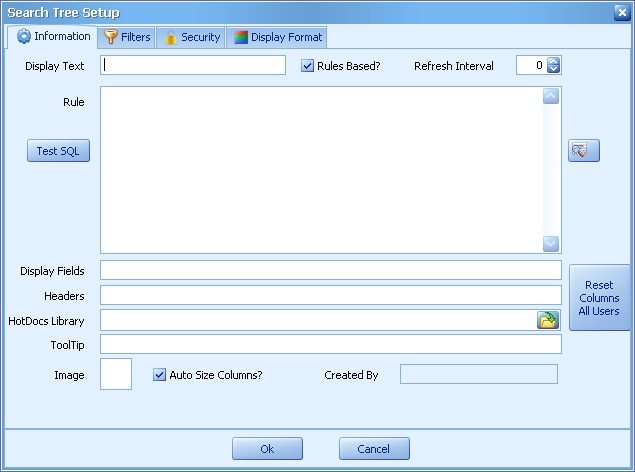
2. Name the folder. Enter the name into the Display Text field.
3. Make sure Rules Based? is checked.
4. Enter an SQL statement into the Rule field. To get help building a select, use the Query Builder button which appears to the right of the Rule field or copy and paste the SQL from a SmartFolder that is similar to the one you want to create.
5. At this point, you have enough to use the SmartFolder. You might like to test the SQL select with the Test SQL button. For information about the other fields, consult the table below.
6. Click OK to save and exit the SmartFolder setup.
7. If you want to edit your SmartFolder, right-click over it and select Properties. If you would like to delete your SmartFolder, right-click over it and select Delete.
Parts of the SmartFolder Information Screen
Auto Size Columns?: Check this if you want the columns to resize according to the width of the SmartFolder Results pane. Uncheck if you would like to utilize the horizontal bar at the bottom of the SmartFolder Results pane (useful if your SmartFolder has a lot of Display Fields).
Display Fields: Enter the specific fields you would like to appear in the results pane. You can skip this and the default display fields for the FlexBase will be used. For more information about Display Fields see FlexBase Set-up.
Display Text: The Name of the folder; this is what is displayed in the tree.
Headers: The friendly labels that appear in the SmartFolder results pane. These are optional; if you don't fill these in, you'll see the field names.
HotDocs Library: Fill this in to use a different library than the standard library when users assemble HotDocs templates from the SmartFolder. If this is not filled in, the standard library is used. NOTE: The HotDocs Library set in the SmartFolder properties will only launch when the HotDocs option is selected after right-clicking on the SmartFolder itself. Right-clicking over a file in the SmartFolder results and selecting the HotDocs option will result in launching the default library (as assigned in LBAdmin).
Image: Right-click to load a custom image to identify the SmartFolder. For best results use 16 x 16 png files. Refresh Interval Sets how frequently the results will auto-refresh. Set a time in minutes.
Reset Columns All Users: When editing the order of columns or grouping in a smartfolder, use this button to clear the savepos for users not currently logged in the system so those users will see the smartfolder as it is designed. When pressed, this message will appear:
Rule: The Rule is the SQL select statement used by the SmartFolder to search.
Rules Based? Check this if the folder should use the rule in the Rule Field. If this is unchecked. the folder is a drag and drop.
Test SQL: Click this to test the syntax of the SQL.
ToolTip: Optional hint language that will appear when you hover over the SmartFolder.
![]() Use the query builder button to build the rule. You can use this button to create a new rule, but you can't edit an existing rule with this button.
Use the query builder button to build the rule. You can use this button to create a new rule, but you can't edit an existing rule with this button.
Changing a Rule-Based Folder to a Drag and Drop Folder
There are two ways to change a Rules Based folder to a Drag and Drop folder:
- On the Search Tree tab, simply drag cases into your Rules Based folder. If you drag a case into the folder which does not conform to the rules which you have set up, LawBase will ask you if you want to make this folder a Drag and Drop folder.
- Answer yes to begin using this folder as a drag and drop folder.
-or-
- Right click on the folder and select Properties... from the popup list.
- On the top of the Search Tree Setup dialogue box, click on the Rules Based? box to remove the check mark.
Drag and Drop SmartFolders
Drag and Drop SmartFolders don't depend on the SQL rules that Rule-Based SmartFolders do. Drag and Drop SmartFolders are best used to organize items that have a common thread that isn't easily discernible with a rule. This would include cases which are currently very active and are therefore constantly being referenced.
To Create a Drag and Drop Folder:
- Identify where you want to create the folder. To create a folder that is the child of an existing folder,
select the folder. Alternatively, select the root of the tree.
- Right-click and select Insert ... .
- A new SmartFolder dialog appears
- Make sure that the "Rules Based?" check box is unchecked.
- Name your new folder by typing its title into the Display Text field.
- Click OK.
No other formatting is necessary, although you may want to set security for this folder, create special search filters, or change what information is displayed.
Adding Files to a Drag and Drop Folder
To add files to a drag and drop folder, locate the file you want to add using a search or another SmartFolder. Drag the file(s) to the drag and drop folder.
Keep in Mind
Exercise caution when altering or destroying Drag and Drop folders. Many times the specific collection of files they reference might be quite tedious to reproduce (you would have to drag every file back into the folder).
Changing a Drag and Drop Folder to a Rule-Based Folder
There are two ways to turn a Drag and Drop folder into a Rules Based folder:
- Right-click on the folder you want to change.
- From the right-click menu, choose Revert to Folder Rules.
-or-
- Right-click on the folder you want to change.
- From the ight-click menu, choose Properties...
- Check the "Rules Based?" checkbox.
- Click OK.
Both methods tell LawBase to use the SQL defined in the Rule area of the Search Tree Setup. If no rules are defined, the folder will not return any results.
SmartFolder Filters
Some SmartFolders may return a large number of results. As a result, you may see the option at the bottom of some SmartFolders to filter the information. This functionality is similar to searching for a piece of information at the top of each column. In the example shown here, typing in the filter robert limited Laura's cases from over 1,300 to a set of five.
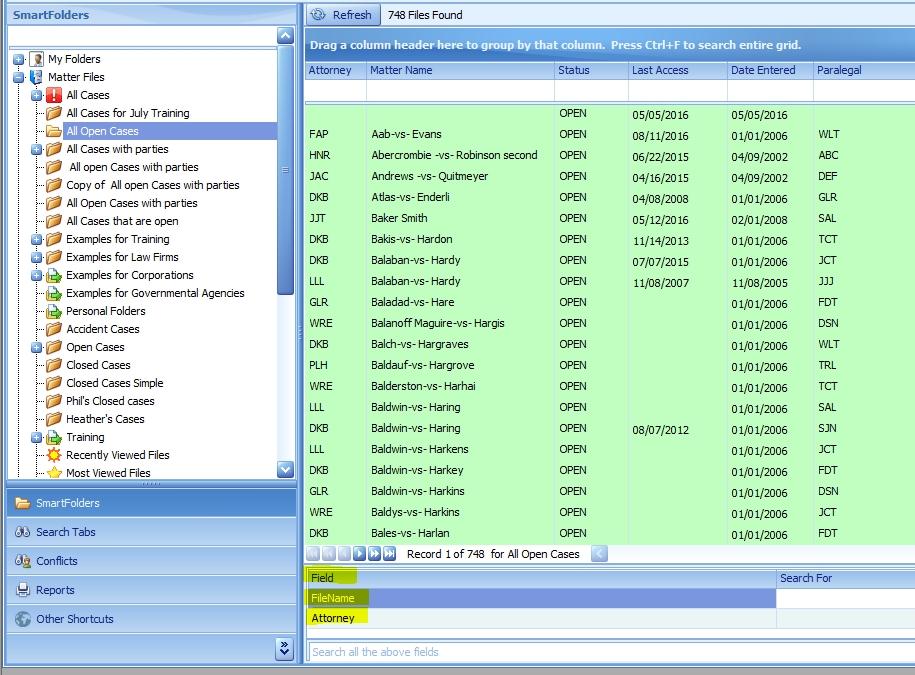
Creating Search Filters on SmartFolders
To add search filters to a SmartFolder:
- Right click on the folder you would like to modify and select Properties.
- Click on the Filters tab.
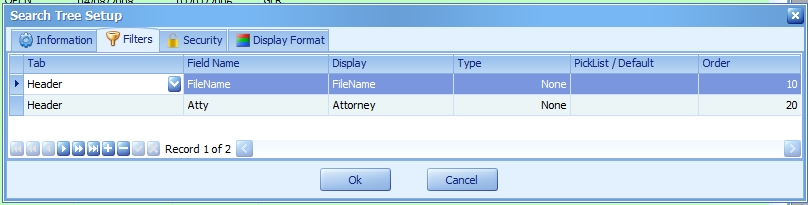
3. Click the plus button at the bottom to add a new filter
4. In the Tab column, select the Tab that holds the information you would like to filter. In the example above we wanted to filter by file name, so we selected the header.
5. In the Field Name column, select the field name.
6. In the Display, enter the label you want your users to see.
7. The Type column is used to distinguish different data types.
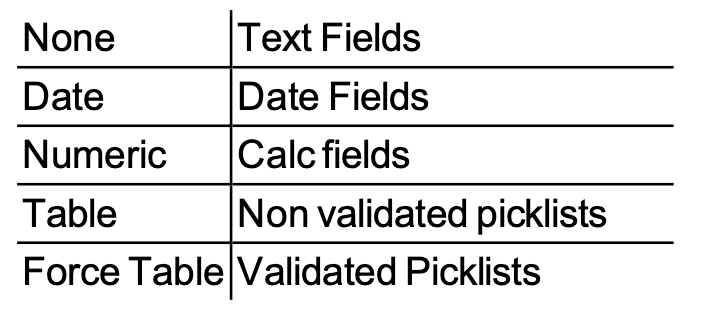
8. The Picklist name is only needed if you are filtering on a picklist field.
9. Set the order from lowest to highest to establish what order the filters appear in .
10 Click OK to save.
Search all the above fields
When you add filters to a SmartFolder, you will notice that an additional field appears stating Search all the above fields. This enables the user to search the fields with defined filters all at once for the same piece of information.
Column Header Filters
If you hover over a column heading in a SmartFolder you'll notice a small filter icon in the top right corner. This option is available on all column types but is especially powerful on date columns, where you can filter based on a specific date, blank date, or range of dates:

Once the filter is applied, you'll see an Edit Filter option at the bottom of the results list to edit the filter even further:
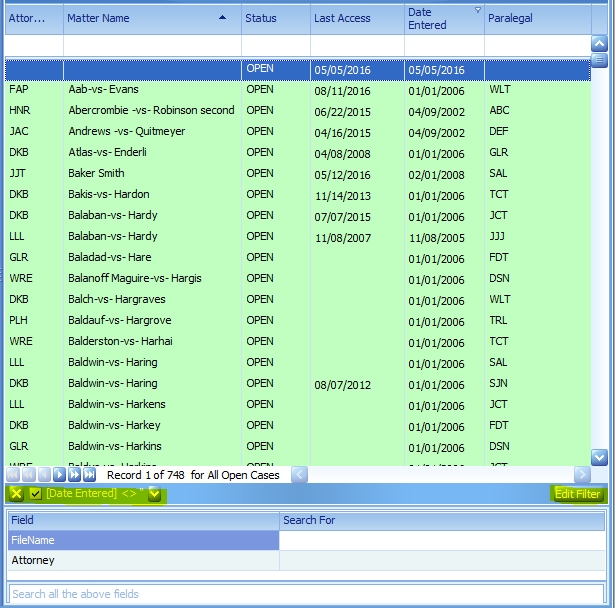
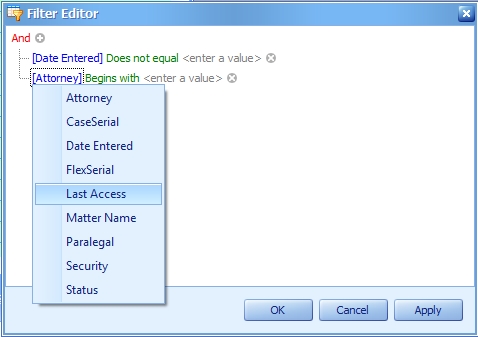
Arranging SmartFolders
You can arrange the FlexBase tree as you like without changing how other LawBase users view their own FlexBase tree.
Arranging FlexBase Groupings
SmartFolders are grouped together by FlexBase and they appear in a default order (by FlexBase Serial) but you can rearrange them. To move a FlexBase Grouping up or down, right-click on the grouping and choose Move Up or Move Down.
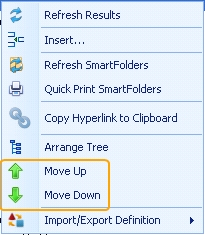
You'll notice that the order within your Search Tabs section will change to reflect the new order of your SmartFolders. If you do not immediately see the change, log out and back into LawBase.
My Folders
At the top of the SmartFolder Tree is a branch called My Folders. This is where you can access
- The folders you use view most often
- Folders you have recently viewed
- Your favorite folders.
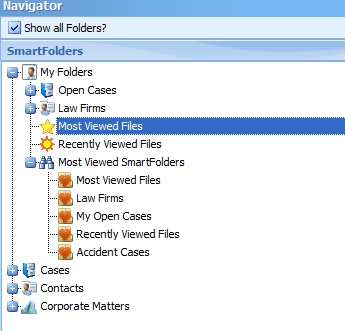
Most Viewed SmartFolders
This folder is updated dynamically; it displays the SmartFolders you view the most often. By default, it shows the 10 folders you view most often, but your administrator may modify the number of results. This branch will appear automatically.
Recently Viewed Files
This returns the same results as the Recent items button on the Home Ribbon. This is a dynamically updated list of the files you have most recently viewed. They can be cases, contacts, or any other kind of FlexBase item. This branch must be initially created by your administrator; once you see it listed under cases or contacts, you can add it to My Folders. To add it to My Folders, right-click and select Add to My Folder.
Most Viewed Files
This returns the files you have viewed most, using historical system data. This list is updated automatically. They can be cases, contacts, or any other kind of FlexBase item. This branch must be initially created by your administrator; once you see it listed under cases or contacts, you can add it to My Folders. To add it to My Folders, right-click and select Add to My Folder.
Favorite SmartFolders
In the screen shot above you can see Open Cases and Law Firms as examples of Favorite SmartFolders. You can add whatever SmartFolders you choose to the My Folders area. Just locate the folder in the tree, right-click and select Add to My Folder. These are your favorites, saved with your user ID, and won't appear on anyone else's SmartFolder tree (unless they add the same ones).
Search Tabs
The Search Tabs are part of the Main Navigator. Use these searches to find files in any FlexBase.
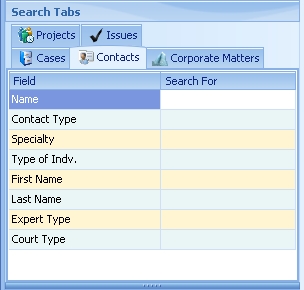
To search for a file:
- Open the search for the FlexBase you want to search.
- Type an entry into the appropriate search field and press enter. You can also narrow the search by entering other criteria into other fields.
- By default, an invisible wildcard is inserted after the last character you type in a search field. So if you enter Brown, you are really searching for Brown*. This search could yield results such as: Brown, Browne and Brownstone. To search for a wildcard at the beginning and end of a word, you'll need to add asterisks to both; e.g. *head*. This search could result in Whitehead or Headley
- If you see a green or pink row in your Search Tabs, this means that the way you search has been determined by your Administrator. Green fields search for EXACT matches only. Therefore typing in Brown will only show you Brown and not Browne. The exact search is especially helpful in Social Security Number, Phone, and File Number fields. Pink fields automatically insert a wildcard at the beginning of the search without you having to type in the *. Therefore typing in Brown would show you Brown and Lowbrown and Highbrown, etc.
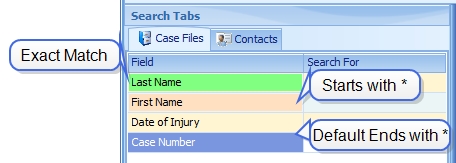
Searching with Or's
You can use or's in your searches as long as the field is not of a type date or caselink field. For example, in a Last Name field you can type: smith or johnson
to find any files with a last name of Smith or Johnson.
Toggling the Tabs
The tabs can be in multiple lines, as shown above, or in one row that you scroll through, as shown below. To toggle from one view to another, right-click on any of the tabs and click Toggle Multiline Tabs.
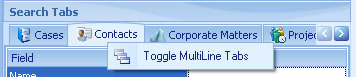
Soundex
You may notice a checkbox labeled Use Soundex at the top right of the main navigator.

When Soundex is enabled, it uses sounds rather than strict spelling to find matches.For example,. when Soundex is enabled, searching for Smith may yield Smythe; Johns may yield Jones; Neil: Knowle, and so on.
Search Tab Set-up
OVERVIEW: Because it is often unwieldy and slow to search for a case only by browsing through folders, it is necessary to give users the ability to pull up cases and contacts by searching according to specific criteria. For instance, it is common to pull up cases according to a case name or number. In order for users to perform this simple search, the search tab on the Search Screen must be properly configured. Both the Cases and Contacts tabs allow users to create their own search fields. To set up these search fields, you must tell LawBase which page and field you want to check when the user types in some information. For instance, if the user is searching for cases based upon the client name, you must indicate in your search field setup where to find the client name field in your database. By doing this you assure that LawBase will always examine only the fields necessary to find matches to your search. To create a search field on the search tab:
- Click on the tab you would like to modify (either CASES or CONTACTS)
- Right-click anywhere in the left-hand pane and choose Properties.
- The "Search Setup" dialog box appears. If you already have some search fields configured, you will find them here.
- Click the "+" to add a new entry.
- In the "Page" column, choose the database page that contains the field you want to search.
- In "Field Name" select which field contains the specific information you want this search to look for.
- In "Display" you should type the title you want to give to this search, e.g. "Client Search" or "Opposing Counsel."
- In “Type”, select what type of field it is. “All Text” (for most fields), “Date”, “Non-Validated Pick List” or “Validated Pick List. If you chose a pick list format, you will need to also give the Pick List name in the next column.
- Click the checkmark to complete this entry.
- Repeat the process to add any additional search fields to this tab.
To organize search fields simply click and drag fields to their desired location.
Search Language
Below are a few things you can do to make your searches more robust.
Wildcards
Typically, by default, when you enter a search string into one of the search tabs, LawBase automatically places an invisible * , also known as a wildcard, at the end of your entry. The wildcard tells LawBase to accept any other letters or numbers in its place. Thus if you type the name John into a search field, LawBase will return anything that is a match for the first four letters, regardless of what other letters follow. Consequently the search for cases or contacts containing John might return John Wilson, John Arigoni, or even Johnsville Phillips. By adding a wildcard at the beginning of your search, you can find information which falls in the middle of a LawBase field. Consequently by adding a * to the beginning of our search for John we will find all instances where the letters J-O-H-N appear, regardless of what precedes them or follows them. This method is especially beneficial when searching large notes fields for specific entries.
Multiple Search Fields
You can also combine multiple Search Fields in your search. By typing the desired criteria into more than one field, you tell LawBase that you wish to find cases that contain matches to BOTH items entered. For example, you may wish to find cases which have John Doe listed as the Plaintiff, and which have an estimated value of over $500,000.00.
Additional Search Characters
A few examples:
Quick Search
Use Quick Search to search for the most commonly used fields in your system. Quick Search is located in the search group of the Home tab as shown below.
Sample Uses
Search for the most commonly searched fields, such as
- Case Name
- Matter Name
- Last Name
When you type anything into the quick search box, LawBase searches and finds any matches. The results are displayed in the Result Panel of the Main Navigator. The search proceeds upon each keystroke, so you can quickly narrow the result list by entering more information. If your local administrators have set it up, you should be able to hover over the field to find out what fields are being search. If the hover does not appear or you have questions about what fields are being searched, please consult with your local LawBase support.
Global Search
Use the Global Search to search every field in every FlexBase that has been designed in LawBase. Depending upon your LawBase design, this may need to search several hundred or even several thousand fields. This means that Global Search may take a while - anywhere from five to twenty minutes is reasonable, and even longer if you have a large database with many records. .

Performing a Global Search
From the LawBase interface:
- Enter the search item in the Global Search box.
2.Determine whether you would like use a wild card search (look for the word anywhere in all fields, within words). If so, check the box. By default, this box is unchecked.
![]()
3. Hit enter and a dialog appears. Select Yes to search common items (this includes notes, calendar and history). Select No to exclude the common items.
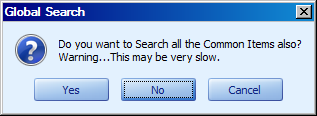
Note that if you search the common items as well, the search will take longer. However doing a search such as this is very thorough and may help in finding any references to any name, or text, anywhere in the normally used database.
The resulting matched files will be presented on the Main Navigator result panel so that you may access any file that matches the search. For example, the following were results from a global search for bank using a wild card search but not searching common items:

Shortcut Keys
The most common areas of LawBase can be accessed with a combination of shortcut keys. The following is a list of available keystrokes.
Search Screen Shortcuts
File Shortcuts (used in Cases, Contacts and other files)
Common Tab Shortcuts (for Notes, Calendars, History, Office Link, etc.)
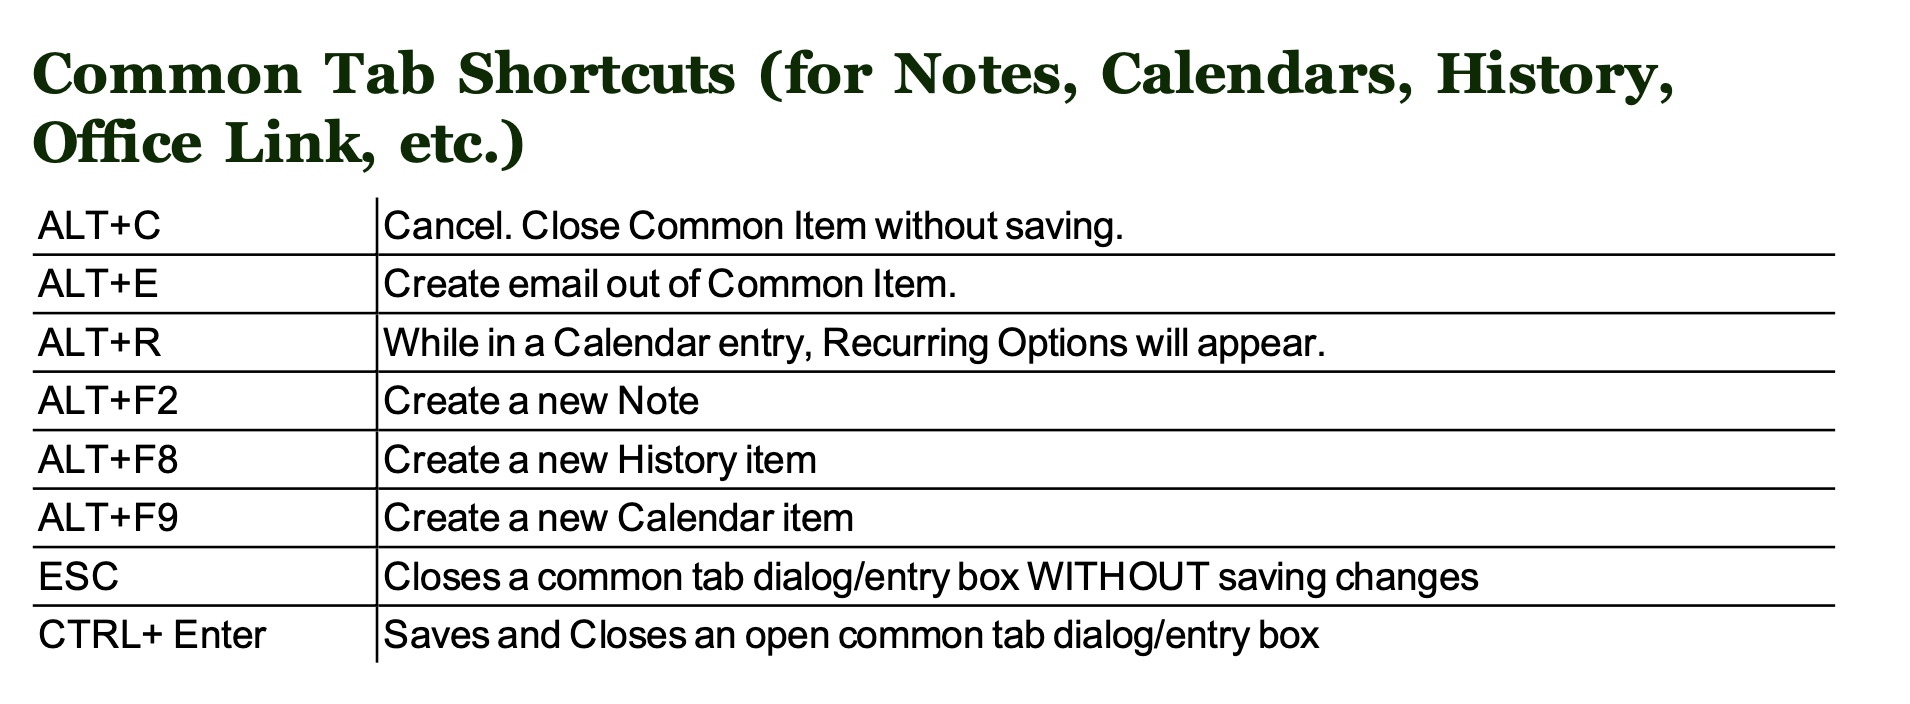
Ribbon Commands
Navigate the ribbon using the built-in ribbon shortcuts. To display the ribbon shortcuts, press ALT. You should see something like this:
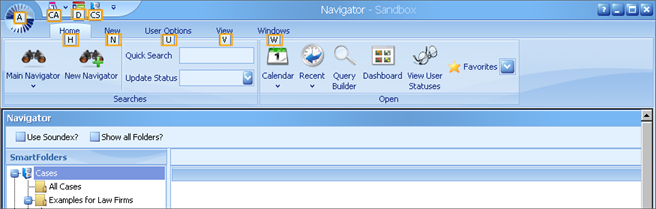
While the ALT options are activated, press the corresponding keys to select buttons. Example
- Press ALT to activate the ALT options.
- Press H to access the Home tab
- Press CA to display the Calendar.
About Synaptec Software
Company Information
LawBase Case Management is the flagship program of Synaptec Software, Inc. It has been serving legal professionals since 1981. We are proud that the first LawBase client is still a client over a quarter century later. We have always had a corporate philosophy to create software that "thinks the way you do." We achieve this by giving you the ability to design your own system and determine what information is important to track for your office.
Contact Information
In order for Synaptec Software to give you the best possible technical support for your LawBase matter management system, please refer to the following guidelines when seeking assistance:
- Only the designated contacts from your office should contact Synaptec to receive support. This is to assure that your firm has at least one person who has a direct and personal relationship with our support staff, and is therefore the most qualified to handle any issues which may arise.
- The preferred method to request technical support is email. This assures that Synaptec always has a clear record of any issues which need attention. (We realize that often speed is an issue, so the telephone is a necessary tool and is always an option.)
- When you call, please be at your computer, and be prepared to provide the following information:
- LawBase version number
- Operating system
- Exact wording of any messages that may appear on your screen
- What you were doing when the problem occurred
- How you tried to solve the problem
Phone: Support: (303) 320-4420 ext. 12, 720-536-3212 Toll Free at 1-800-569-3377 Fax:(303) 320-4860 Email:[email protected] Address: Synaptec Software 4155 E. Jewell Avenue Suite 600 Denver, CO 80222