Configuring an Adobe Sign Integration
Onit integrates directly with Adobe Sign, allowing you to send documents in Onit through signature workflows orchestrated by Adobe Sign.
The configuration of this integration takes a bit of work to set up and you will need to download a REST client of your choice. You will also need to use a template App (provided by Onit) to build out this integration. This tutorial will go over the components and moving pieces of the template App, so that you can customize it to fit your workflow.
Overview of the Integration
Onit’s Adobe Sign integration relies on an Onit Action to create an Adobe Sign workflow. The Action passes a document from Onit to an Adobe Sign’s signature workflow, where one or more signers provide electronic signatures.
After the workflow is started by the Onit Action, Adobe Sign does not make API calls back to Onit. In order for Onit to know the current status of an Adobe Sign workflow an Onit Action must be fired this Action calls Adobe Sign, retrieves a status, and then stores the new status into an Onit Field.
However, when the signature workflow is complete, Adobe Sign will send an email to Onit, triggering an Onit Action that saves the signed document into an Onit Field/Record, changes the Phase of one or more Records, and performs any other tasks that you like.
Once a document has been created and sent out for signature, any signer has the option to decline to sign the document within Adobe Sign. If they choose to decline, Onit will display a message that the document’s signature workflow was cancelled/voided.
Using the Adobe Sign Template App
As mentioned above, it is highly recommended that you use a pre-built App. This app is named Adobe Sign Template and it comes pre-built with all of the required Actions, Conditions, Fields, etc. If necessary you can apply your own customizations on top of the app’s pre-built configuration.
This tutorial assumes that you will be using a copy of the Adobe Sign Template App. If you do not have this App in your Onit environment, talk with your Onit representative.
A Word on Relationships
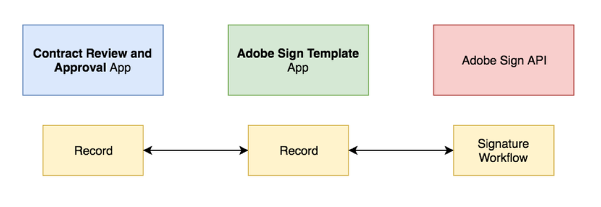
An Onit-to-Adobe Sign integration consists of two apps:
- The Adobe Sign Template App, provided by Onit.
- Your end-user facing App, which contains your business Records. In this tutorial we’ll use an example App named Contract Review and Approval you can use this integration any type of business object (contracts, expense reports, legal matters, etc.).
Once a business Record has been created by a user in the Contract Review and Approval App, a related Adobe Sign Record will automatically be created in the Adobe Sign Template App. In most cases, the Adobe Sign Template App is a stand-alone, non-user-facing App, within which there is one Record per Adobe Sign signature workflow. The business Record in Contract Review and Approval receives updates about the signature workflow from the record in Adobe Sign Template App. Both Apps should be related through a ManyToMany relationship.
Sample Workflow
Below is a step-by-step description of a basic implementation of this integration.
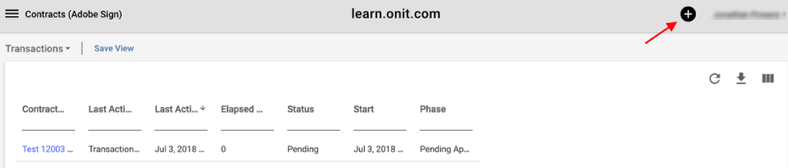
- In the Contract Review and Approval App, a user will create a new record by clicking the “plus” button.
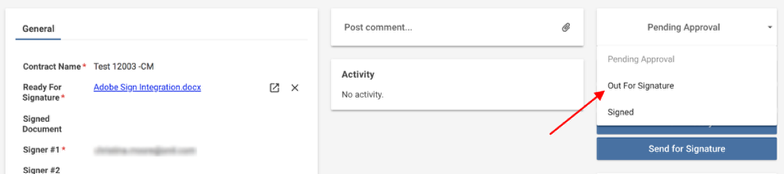
- According to the business requirements in question, the record will advance to a Phase named Out for Signature.
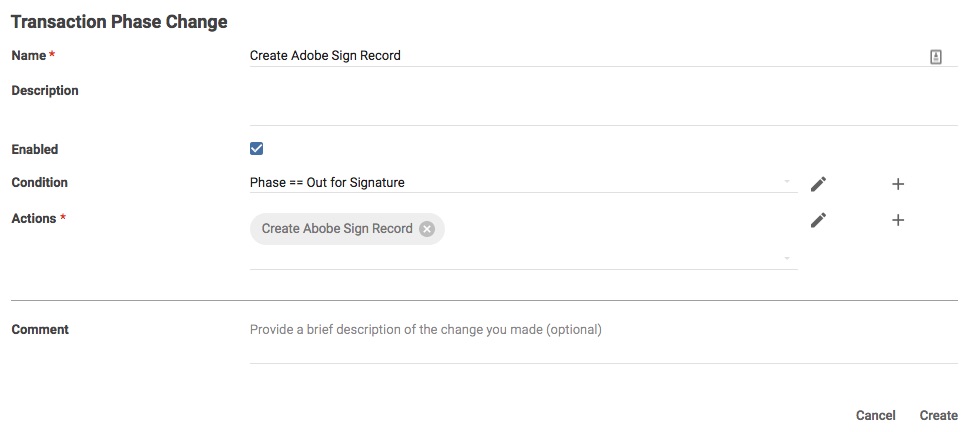
- Upon Phase change, a Transaction Phase Change Business Rule named Create Adobe Sign Record will trigger in the Contract Review and Approval App.
- The business rule will fire a Create Related Transaction Action named Create Adobe Sign Record in the Contract Review and Approval App.
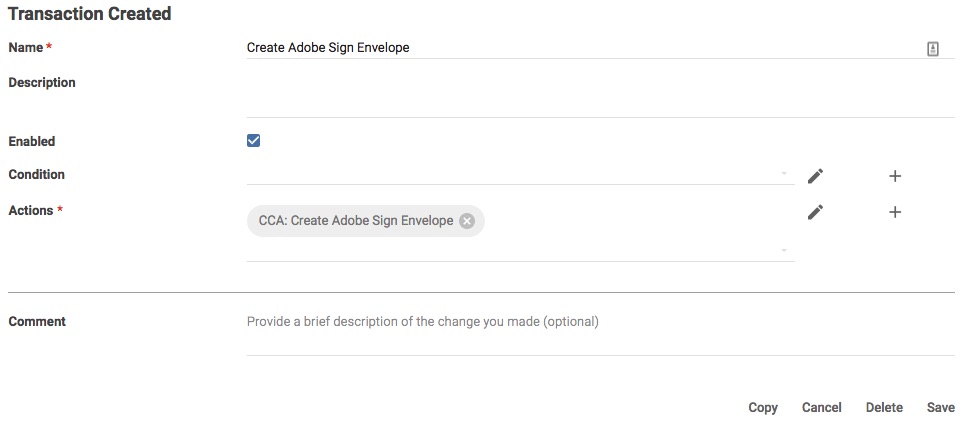
- Upon Record creation, a Transaction Created Business Rule named Create Adobe Sign Envelope will trigger in the Adobe Sign Template App.
- The business rule will fire a Conditional Compound Action (CCA) called Create Adobe Sign Envelope. This CCA will in turn fire:
- An Adobe Sign Agreement Creation Action named Create Adobe Sign Envelope will fire, creating the Adobe Sign workflow.
- The business rule will fire a Conditional Compound Action (CCA) called Create Adobe Sign Envelope. This CCA will in turn fire:
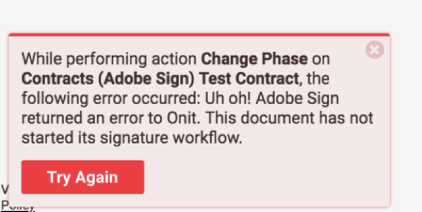
- If Adobe Sign encounters an error while creating a workflow, a Business Rule in Onit named Throw Error: Adobe Sign Error Encountered will be triggered. The Business Rule will fire a Throw Error Action named Adobe Sign Error Encountered. Help text from the Adobe Sign error message will be pushed to the Contract Review and Approval App.
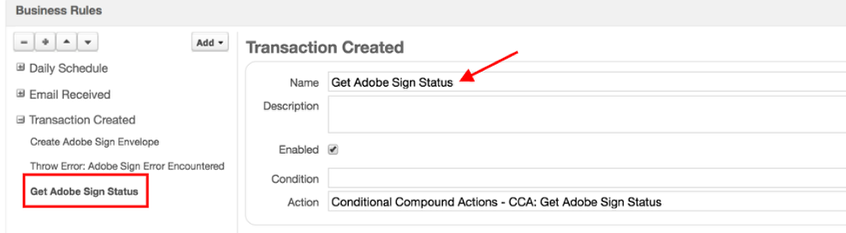
- A Transaction Created Business Rule named Get Adobe Sign Status in the Adobe Sign Template App will be activated to check on the status of the newly created document.
- The business rule will fire a Conditional Compound Action (CCA) named Get Adobe Sign Status. This CCA will in turn fire:
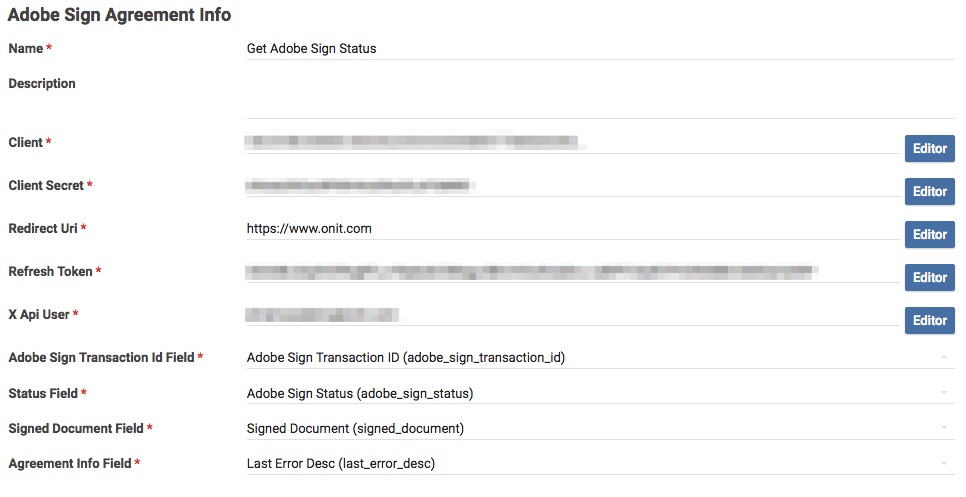
- An Adobe Sign Agreement Info Action named Get Adobe Sign Status.
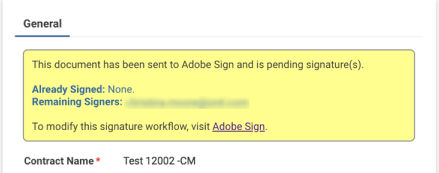
- An Update Related Transaction(s) Action named Update Adobe Sign Help Text on Business Record. This Action pushes text from Adobe Sign updates into a Field on the business Record, then shows end-user helpful display text.
- An Adobe Sign Agreement Info Action named Get Adobe Sign Status.
- The business rule will fire a Conditional Compound Action (CCA) named Get Adobe Sign Status. This CCA will in turn fire:
- Adobe Sign will automatically send emails to each user in the signature workflow, one-by-one. Each user clicks a link in their email to launch an Adobe Sign webpage and electronically sign the document. At this step the participant(s) will also have the option to decline to sign the document. If they do so, the document’s signature flow will be stopped and Onit will be display a message on the Contract Review and Approval Record.
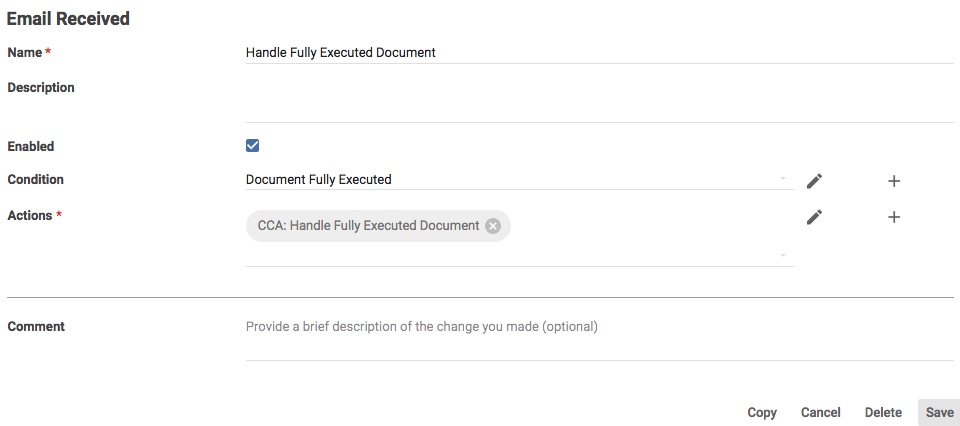
- When the signature workflow is complete, Adobe Sign will email Onit, satisfying the Document Fully Executed Condition in an Email Received Business Rule named Handle Fully Executed Document in the Adobe Sign Template App.
- A Conditional Compound Action (CCA) named Handle Fully Executed Document will orchestrate updating both the Adobe Sign Template Record and the Contract Review and Approval Record via the following Actions:
- An Adobe Sign Agreement Info Action named Get Adobe Sign Status.
- A Copy Document Property to Related Transaction Action named Copy Signed Document to Business Record.
- A Change Phase for Related Transactions(s) Action named Change Phase on Related Record to Signed.
- A Change Phase Action named Change Phase to Signed.
- An Update Related Transaction(s) Action named Update Adobe Sign Help Text on Business Record.
- An Adobe Sign Agreement Info Action named Get Adobe Sign Status.
- A Conditional Compound Action (CCA) named Handle Fully Executed Document will orchestrate updating both the Adobe Sign Template Record and the Contract Review and Approval Record via the following Actions:
Adobe Sign Template App Components
The following is an overview of the major components used in the integration. As an App Builder, you should be aware of each component to both understand how it functions and how you can customize these components around your needs.
Creating Adobe Sign Workflows
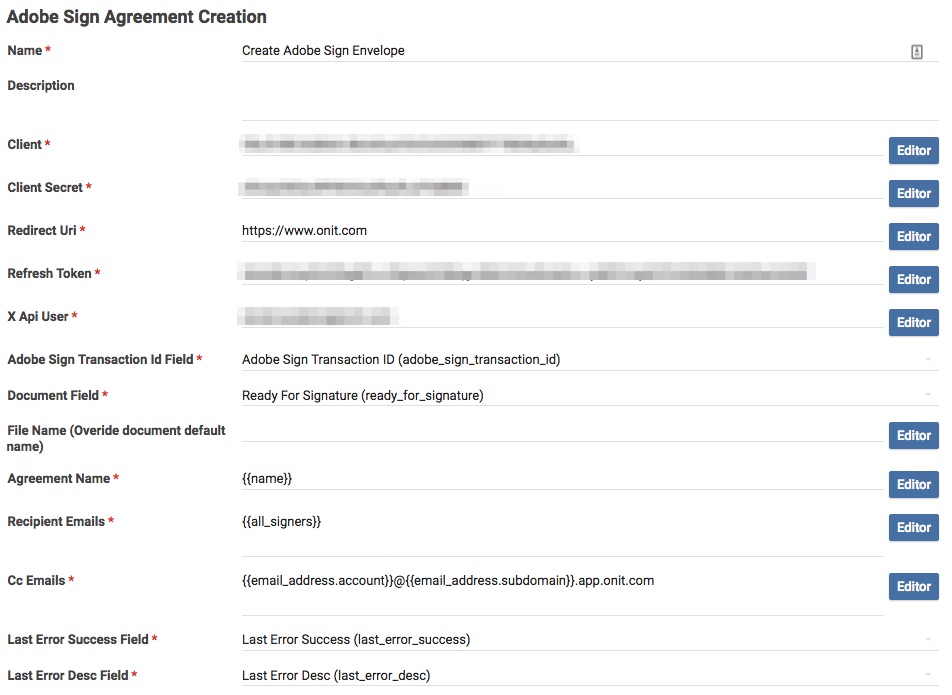
An Adobe Sign Agreement Creation Action named Create Adobe Sign Envelope is responsible for creating an Adobe Sign workflow. You’ll do most of your customization for the integration inside of this Action.

Reacting to Adobe Sign Events
As mentioned above, Adobe Sign does not make any API calls back to Onit. Onit must trigger a CCA named Get Adobe Sign Status. This CCA makes a call to Adobe Sign to retrieve information about the status of the Adobe Sign workflow and then saves the response in the Adobe Sign Template’s adobe_sign_status Field. Additionally, this CCA will fire an Action named Update Adobe Sign Status Help Text on Business Record which will update the help textbox on the end-user-facing App with the workflow’s status.

Responding to Adobe Sign Failures
A Business Rule named Throw Error: Adobe Sign Error Encountered fires when a workflow is created by the Contract Review and Approval App. If the Business Rule’s Condition is satisfied by an Adobe Sign error, it triggers a Throw Error Action named Adobe Sign Error Encountered. This Action displays help text to the end-user and rewinds the Record’s Phase to Pending Approval.
Handling Completed Documents
When a signature workflow completes, the Handle Fully Executed Document CCA will execute. This CCA fires when Adobe Sign emails Onit and triggers the Document Fully Executed Condition. Once this CCA is triggered it will run the following Actions:
- An Adobe Sign Agreement Info Action named Get Adobe Sign Status.
- A Copy Document Property to Related Transaction Action named Copy Signed Document to Business Record.
- A Change Phase for Related Transactions(s) Action named Change Phase on Related Record to Signed.
- A Change Phase Action named Change Phase to Signed.
- An Update Related Transaction(s) Action named Update Adobe Sign Help Text on Business Record.
These actions will handle copying the completed document to the end-user-facing Record and changing the Phase to Signed on both the end-user-facing Record and Adobe Sign Template Record. Finally, these Actions will update the help text on the end-user-facing Record.
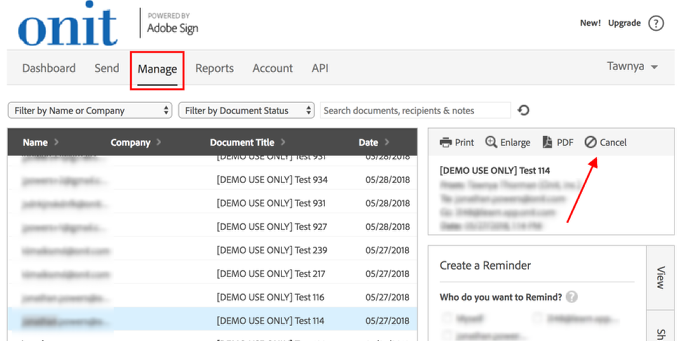
Voiding A Workflow
The integration does not support voiding/canceling a workflow through Onit once it has started. As a result, an Adobe Sign administrator must cancel the workflow from Adobe Sign’s Website, under the Manage tab.
Customization Options
As an App Builder, you can customize the following aspects of the integration:
- Signature workflow: You can specify how many signers should be involved, who those signers should be, and the order in which the signers should provide their signatures. In addition, you can optionally define different signature workflow paths (e.g., if the value for the Onit department Field is Sales, include Signer A, then Signer B, then Signer C; alternatively, if the department Field value is HR, include Signer C and then Signer B).

- Onit Phases and Fields: You have control over which Onit Phases the Onit Records are in at any given time as the signature workflow is being traversed.
- Signature Tabs: You can specify exactly where Adobe Sign's Sign Here icons will appear throughout the file requiring signature. If you do not specify where the signature is located in the document Adobe Sign will place a signature block on the bottom of the document.
Adobe Sign Credentials
To complete this tutorial, you will need the following information:
- Adobe Sign Username/Password: This is the username/password of an Adobe Sign Developer Account.
- Client ID and Secret: You must generate this ID/secret by creating a new Application in Adobe Sign.
- Refresh Token and Access Key: You must generate this refresh token/access key by walking through Adobe’s OAuth workflow (detailed later in this tutorial).
- X API User: This value must begin with email: and then be following by the email address of the Adobe Sign Development account mentioned above (e.g., email:[email protected]).
Let's Get Started
Relate the Template App to the End-User-Facing App
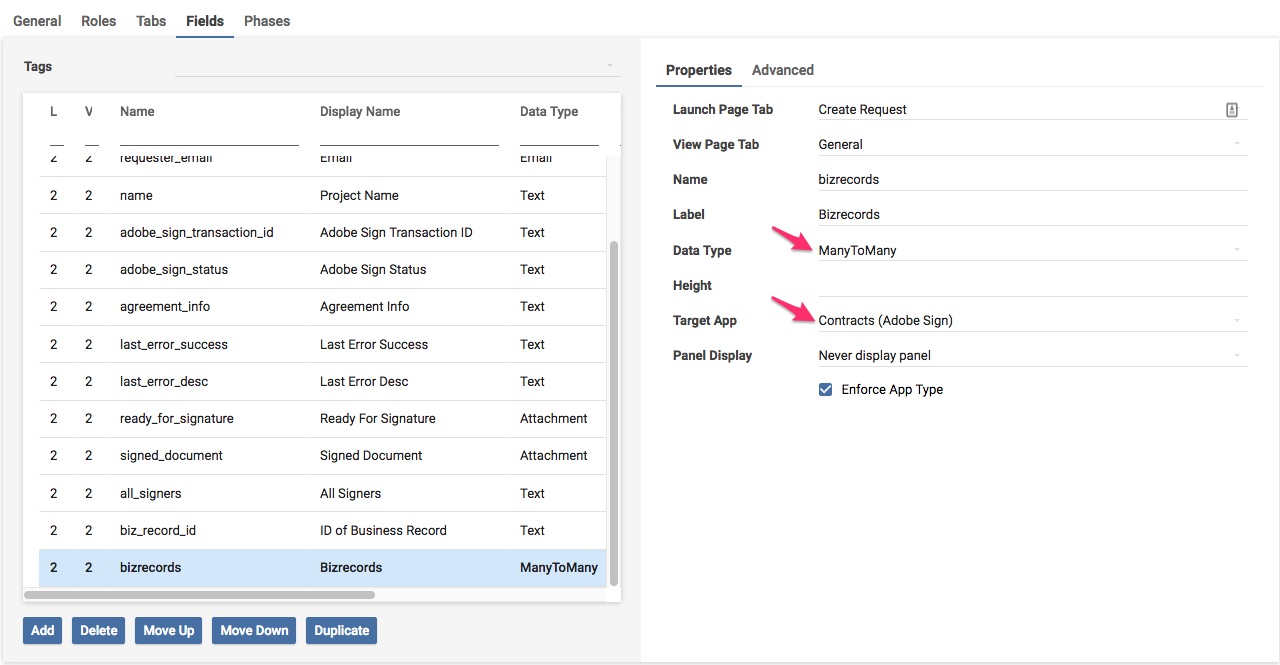
The Adobe Sign Template App contains a ManyToMany Field named BizRecords which is designed to connect it to your end-user-facing App. In the App Builder for the Adobe Sign Template App, change the Target App property to point to your end-user-facing App.
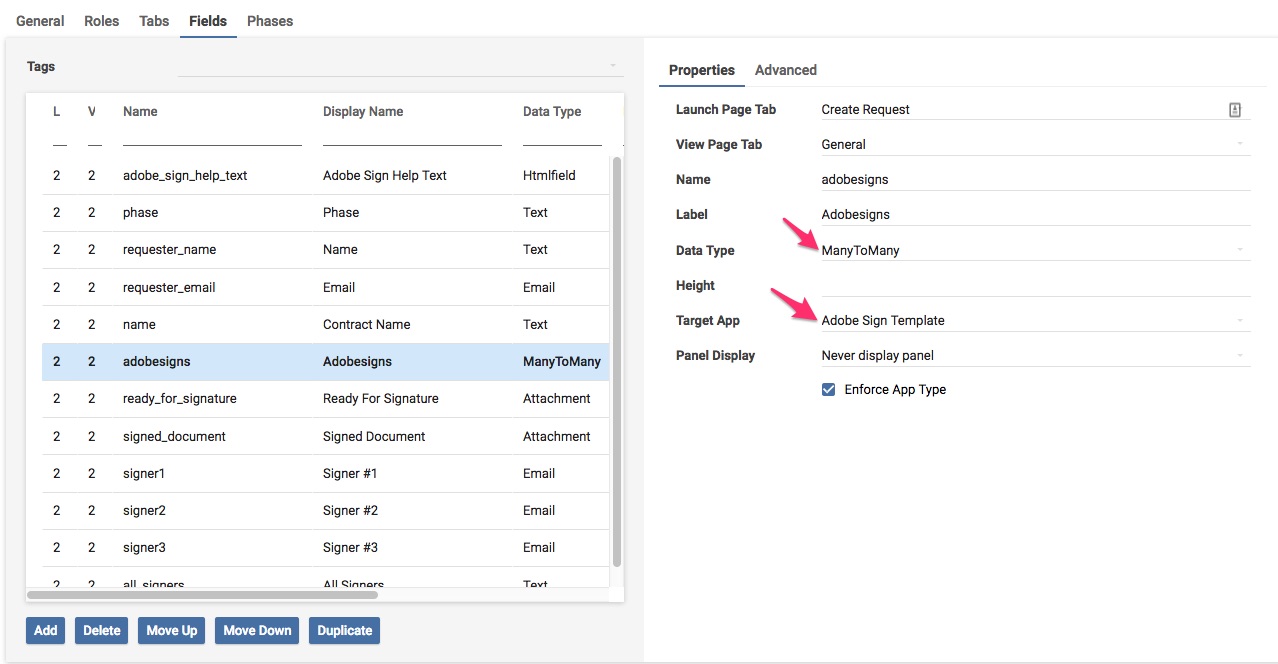
Ensure that your end-user-facing App has a ManyToMany relationship pointing to the Adobe Sign Template App. In the screenshot below this relationship is defined in the adobesigns Field.
Once both of these steps have been completed, you can now relate Records in these two Apps together as siblings. This will be required so that Onit can change Phases and Field values in your end-user-facing-App as events occur in the Adobe Sign Template App.
Configure the Create Adobe Sign Envelope Action
The Adobe Sign integration relies on setting up an oAuth flow with Adobe Sign. An oAuth flow allows applications (like Adobe Sign and Onit) to share information without exchanging passwords. To complete Adobe Sign’s oAuth flow you will need a refresh token. A refresh token allows an application, in this case Onit, to remain authenticated with Adobe Sign so you can keep creating workflows without interruption.
In order to configure Adobe Sign you will need four pieces of information:
- Client ID
- Client Secret
- Refresh Token
- Access Code
- If you have not already done so, create a developer account for Adobe Sign.
- Log into Adobe Sign’s website at this URL: https://secure.[location_value].echosign.com/account/accountSettingsPage#pageId::API_APPLICATIONS
- On the Dashboard, go to the API tab.
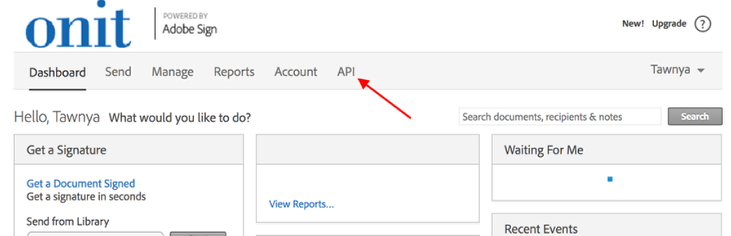
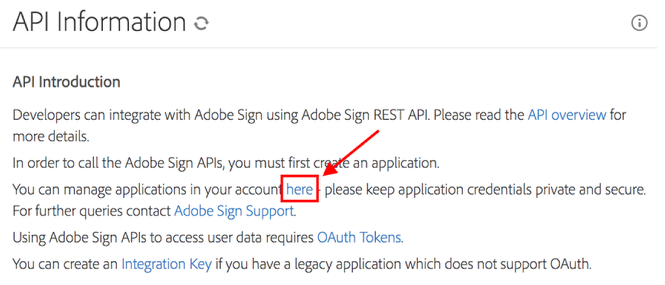
- Click the here link (as shown in the screenshot below).
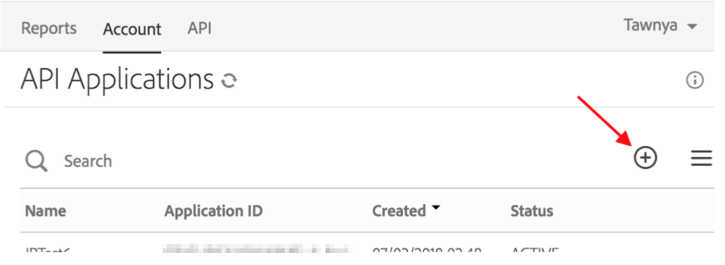
- Create a new Application by clicking the “plus” button.
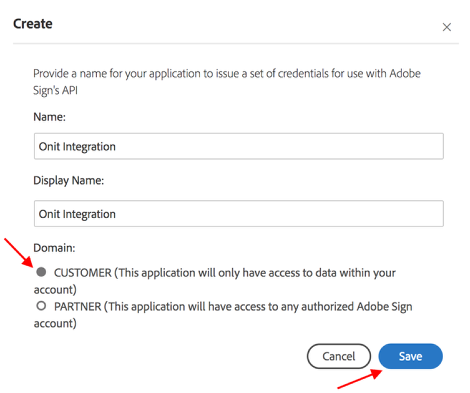
- Name new Application and leave the domain as Customer. Click Save.
- Once the Application is created, click on the Application name and go to configure OAuth for Application.
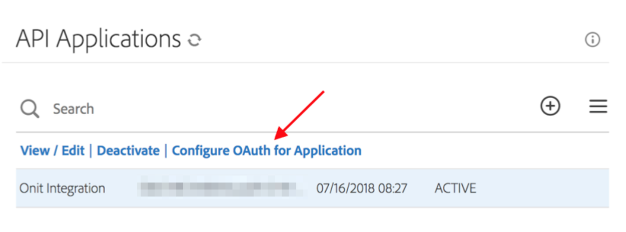
- You will see your Client ID on this page: make a note of this value. Fill in the redirect URI with any URL you want (the client will never interact with this URL). In our case we will use https://www.onit.com.
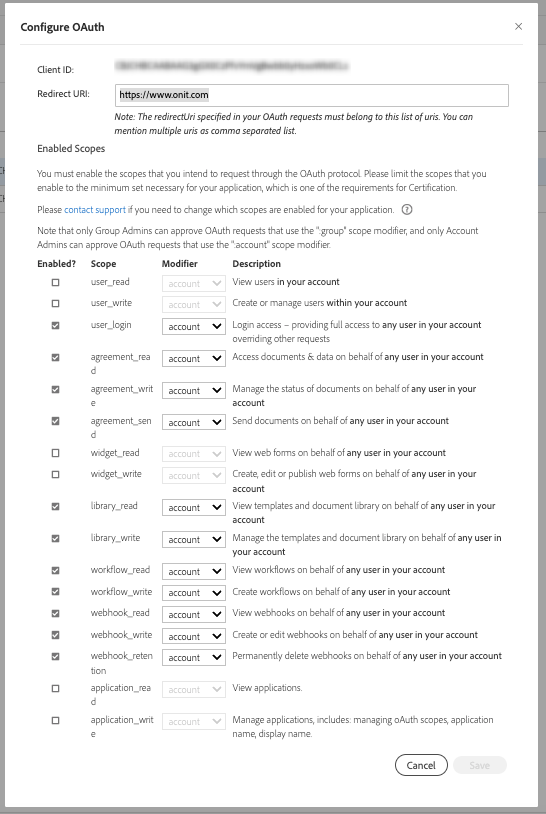
- Check all the boxes except the user_read, user_write, widget_read, and widget_write boxes and leave all the Modifier values set on account. Click Save when you are done.
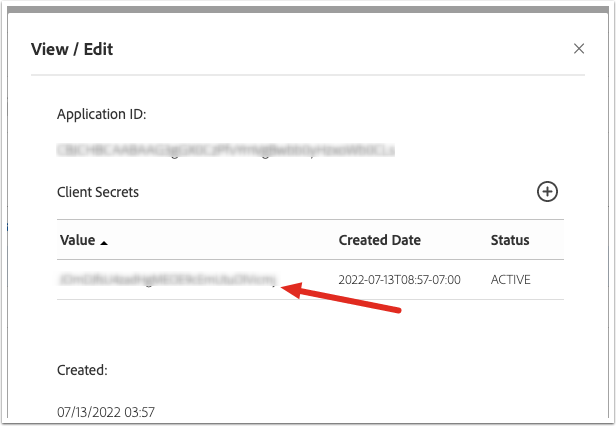
- You will need the Client Secret. To get this, select your application and click "View/Edit". The secret will be visible in the popup window that appears.
- Enter the following URL in your browser:
https://secure.[location_value].echosign.com/public/oauth/v2?redirect_uri=[redirect_uri]&response_type=code&client_id=[client_id]&scope=user_login:account+agreement_read:account+agreement_write:account+agreement_send:account+library_read:account+library_write:account+workflow_read:account+workflow_write:account+webhook_read:account+webhook_write:account+webhook_retention:account- You must replace the
location_valuein the URL with the same value you see in the address bar when logging into Adobe Sign between secure and echosign. (e.g.,na1orna2)
- Replace the
client_idof your Application.
- Replace the
redirect_uriwith your redirect URI.
- Navigate to the above URL. The page will prompt you to sign in and grant access to Onit. Be sure to sign in using the Adobe Sign developer account that you want to integrate with Onit.
- Once you grant Onit access you will be redirected to the redirect URL that you entered earlier. Look in your browser’s URL bar for a parameter called
code. Make note of this values as you’ll need it in an upcoming step below. Below is an example URL:
https://api.echosign.com/oauth/v2/token?code=XXXXXXXX&client_id=XXXXXXXX&client_secret=XXXXXXXXX&redirect_uri=https://www.onit.com&grant_type=authorization_code- Open your REST client (we’ll be using Postman) and prepare to make a POST request.
- In the header next to POST, put the URL you used to connect to Adobe sign before, up through "token". E.g.:
https://api.na2.echosign.com/oauth/token(note that thev2/has been removed here)
- Click on Body. Select this option:
x-www-form-urlencoded.
- Create KEY-VALUE pairs:
- code - [your code]
- client_id - [your client id]
- client_secret - [your client secret]
- redirect_uri - [your redirect URL from before, such as https://www.onit.com]
- grant_type - authorization_code
- make your POST.
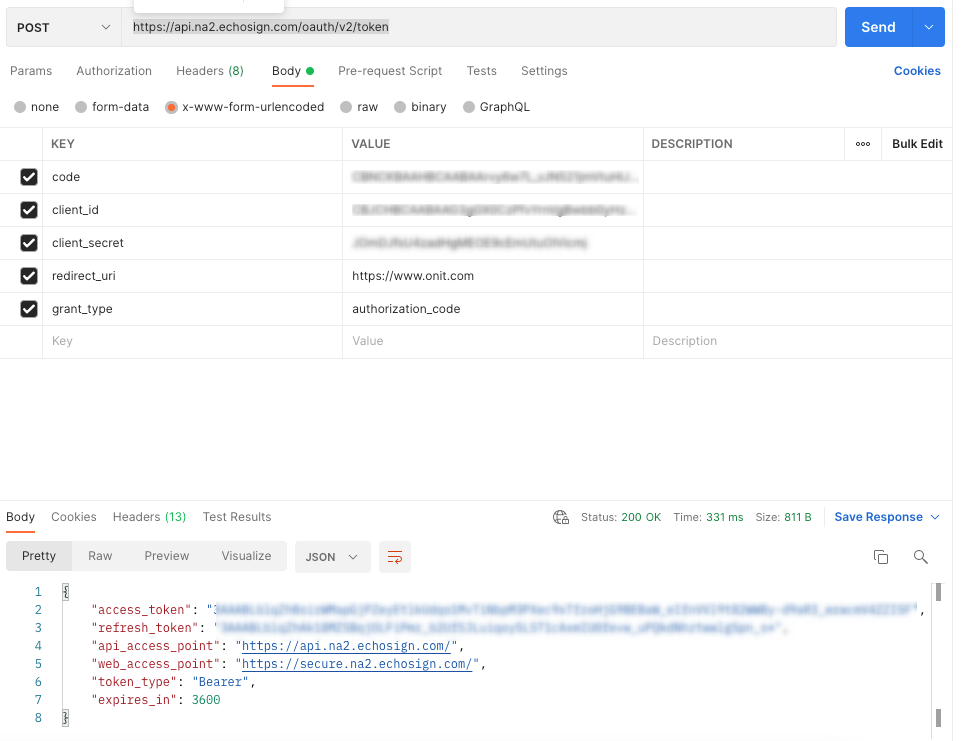
A successful 200 OK response should contain your access token, your refresh token, token type, and the token expiry date. Make a note of these, you will need them shortly. If you get a response of 403 Forbidden or 401 Unauthorized, something went wrong.
If you received a successful response, congratulations! The hard part of the tutorial is over. Now we will be moving back to Onit to configure your Adobe Sign integration.
- Back in Onit, go to the Advanced Designer page of the Adobe Template App and find the Create Adobe Sign Envelope Action.
- Set the following properties with the values that you retrieved via the steps above:
Client ID(from the Adobe Sign website)
Client Secret(from the Adobe Sign website)
Redirect URI(the same one URL you used earlier)
Refresh token(from your POST request)
X API user(the email associated with the Adobe Developer account in the following format: email:[email protected])
- From the Adobe Sign Transaction Id Field property, ensure that the Adobe Sign Transaction ID Field is selected. This will link the two documents together an ensure they have the same transaction ID.
- From the Document Field property, select Ready for Signature. The document stored in the Document Field property will be passed to Adobe Sign for the signature workflow.
- Now we will need to fill in some Liquid so our Adobe Sign documents get to the right people. Enter the following in the Action:
- Agreement Name:
{{name}} - Recipient Emails:
{{all_signers}} - CC Emails:
{{email_address.account}}@{{email_address.subdomain}}.App.onit.com

This Liquid will populate the agreement name, recipient emails, and any cc emails from the end-user-facing related document into the Adobe Sign document.
- Choose Last Error Success from the Last Error Success Field property and Last Error Desc from the Last Error Desc Field property. These Fields will ensure any errors from Adobe Sign are reported correctly to Onit.
- Once all the Fields are correct click OK to save your Action. As the last step you will now need to enter this information again in the Get Adobe Sign Status agreement.
Customizing the Workflow
The out-of-the-box Adobe Sign Template App comes equipped with various Conditional Compound Actions that orchestrate the overall integration. To meet your specific business needs, you can configure the Actions inside of these CCAs to control Phase changes, Field value changes, and many other aspects of your Onit Records.
The Adobe Sign Template App comes with a Daily Schedule Business Rule titled Check Status on All Pending Signature Workflows. This Business Rule, if activated, will run every day at a 3 a.m. to automatically check the status of every open document awaiting signature.
Adobe Sign Signature Tags
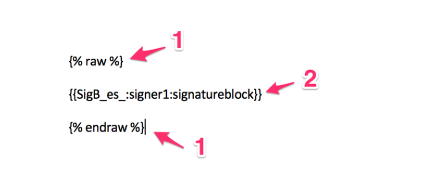
Documents submitted to Adobe Sign that contain Liquid, require using Liquid’s Raw filter to wrap your Adobe Sign tags. The Liquid used in Onit template documents has the same syntax as Adobe Sign’s tags, therefore you must let Liquid know to ignore the Adobe Sign tags in the document. If you do not wrap your Adobe Sign tags in a Liquid Raw filter, Liquid will try to interpret the Adobe Sign tags in your document and you will get errors.
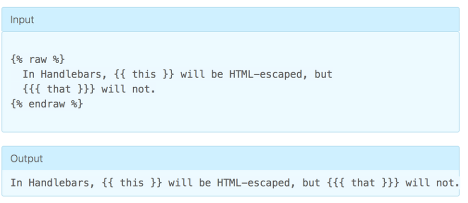
Using the Liquid Raw filter is very easy: you must place {% raw %} and {% endraw %} around your Adobe Sign tags and that’s it. In the example below, the Liquid Raw filter (1) wraps the Adobe Sign tag for signer one’s signature block (2):
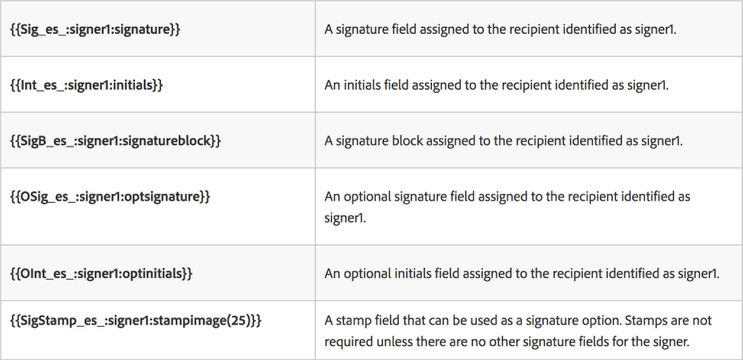
Adobe Sign Text Tags
In order to request signatures in your document you will must use Adobe Sign’s text tags. In addition to signatures you can create checkboxes, radio buttons, an insert images using text tags. Text tags can also be made read-only or required. Below is a list of useful text tags:
Switching to Production
It is highly recommended you test your Adobe Sign integration with an Adobe developer account in a non-production environment. Using an Adobe developer account ensures you will not be charged while testing.
Once you are ready to switch your Adobe Sign integration to production, consider the following things:
- You must exhaustively test to ensure email bounces are treated correctly. Failure to do so may lead to significant problems in production.
- Moving your App to production should consist of changing the developer account values we entered in steps 17 and 22 to be your production Adobe account values.